

Salesforce (SF) keeps playing a leading role among integrated CRM platforms. More and more businesses are taking advantage of it. Those who used Salesforce at least once came across a need to quickly update multiple records. However, its built-in tools do not cover all the scenarios that users may require, and that is why third-party tools started gaining more pace.
There are a variety of desktop or web-based data loaders to use for this purpose. In this guide, we’ll explore different approaches — from Salesforce’s built-in tools like List Views, Reports, and Data Loader to advanced methods such as Apex scripting. We’ll also cover automation with third-party solutions like Skyvia, which allow bulk updates via CSV, filters, and SQL queries.
Table of contents
- Why Mass Update Is Important in Salesforce
- Which Method to Use to Mass Edit Records in Salesforce
- Method 1. Mass Update Using Salesforce List Views
- Method 2. Mass Updating with Salesforce Data Loader
- Method 3. Automating Updates with Salesforce Import Wizard
- Method 4. Mass Update Records with Salesforce Reports
- Method 5. Bulk Updates via Apex
- Method 6. Third-party solutions for Salesforce Mass Updates
- Step-by-step Guide to Salesforce Mass Update with Skyvia
- Best Practices for Automating Mass Updates in Salesforce
- Conclusion
Why Mass Update Is Important in Salesforce
In Salesforce, mass updating records is a daily routine task. You might need to adjust lead statuses, assign new opportunity owners, or make other bulk changes. Here are some common use cases:
- Sales and marketing alignment: keeping lead statuses, campaign responses, and opportunity stages consistent to synchronize sales and marketing efforts.
- Operational efficiency: accelerating routine administrative tasks, such as updating record ownership or changing statuses.
- Data hygiene and compliance: correcting outdated information and standardizing format to maintain data accuracy and regulatory compliance.
- Business process changes: supporting workflows during organizational changes, such as company restructuring or sales territory adjustments.
- Strategic decision-making: updating fields relevant to forecasting, reporting, and analytics to provide leadership roles with actual data.
Now, let’s imagine a marketing team just finished a highly successful campaign, and you need to edit thousands of leads to reflect their new status. Mass updates in Salesforce can save hours of manual work. But they come with certain risks — a single mistake can amplify errors that could take days to correct.
Here are potential challenges that may follow the process:
- Data integrity: unreliable updates can spread errors across many records, leading to inaccurate reports and poor decision-making.
- System performance: bulk record changing can slow down workflows or trigger automation rules, and impact overall productivity.
- Audit trails: when many records are updated at once, it can be hard to trace the author, which complicates compliance and audit processes.
- User permissions: not all users have the same level of access. If permissions are set incorrectly, unauthorized changes could compromise data security.
- Backup: Salesforce doesn’t have built-in undo options for mass updates, so if something goes wrong, it can be challenging to revert the changes. Always back up your data before making bulk updates.
Which Method to Use to Mass Edit Records in Salesforce
Bulk editing records in Salesforce can skyrocket efficiency, but the best strategy will depend on your unique requirements. Salesforce offers built-in tools that are effective for simple use cases, such as List Views, Data Loader, and Import Wizard. But for complex scenarios, third-party solutions and custom automation based on Apex can do the job.
In this guide, we’ll walk you through six different methods – both built-in and external solutions:
- Method 1: Salesforce List Views
- Method 2: Salesforce Data Loader
- Method 3: Salesforce Import Wizard
- Method 4: Salesforce Reports
- Method 5: Apex
- Method 6: Third-Party Solutions
Understanding their strengths and limitations will help you choose the approach that best suits your scale and data management plan.
| Method | Features | Automation Level | Technical Expertise | Best For |
|---|---|---|---|---|
| List Views | – Inline editing – Quick updates without opening records – Limited to certain field types | Manual | Beginner | Quick UI-based updates |
| Data Loader | – Bulk import, update, and export via CSV – Handles large datasets – Requires data formatting and manual file handling | Semi-Automated | Intermediate | Large datasets (up to 150M records) |
| Import Wizard | – Built-in tool – Easy to use but limited to specific objects – Cannot delete records | Manual | Beginner | In-browser bulk edits (up to 50K records) |
| Reports | – Bulk updates from report results – Logs changes – Limited field and data type support | Manual | Beginner | Filtered updates with an audit trail |
| Apex | – Advanced automation – Supports large datasets and complex logic – Requires Salesforce development expertise | Fully Automated | Advanced (coding required) | Advanced automation and bulk updates |
| Third-party Tools | – Advanced data manipulation and automation – More user-friendly and scalable – May require additional costs | Fully Automated | Beginner to Intermediate | High customization, flexibility, and performance |
Method 1. Mass Update Using Salesforce List Views
Changes can be made directly within Salesforce’s List View interface. Built-in features allow for change values in text fields, picklists, and dates for multiple records simultaneously. This capability eliminates the need to open each record individually, saving significant time and improving productivity.
Users can find and select the necessary records in the view and change values by clicking on the relevant field.
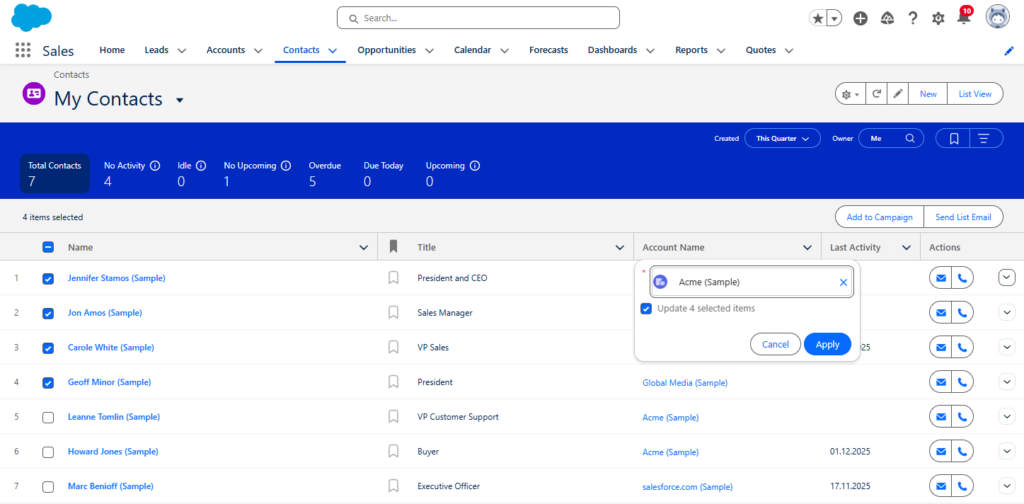
Before saving, SF will allow users to review and confirm changes to ensure data accuracy. This helps prevent data errors and discrepancies, leading to better quality. Additionally, it’s possible to customize list views to display the specific fields they need to edit.
See more on a list view in Salesforce documentation.
Pros
- Quick and easy updates without extra tools
- No need to open individual records
- Built-in filters help target specific records
Cons
- Limited to certain field types
- Cannot update records across multiple objects
Best for
Users who need a simple way to make quick edits directly within Salesforce.
Method 2. Mass Updating with Salesforce Data Loader
SF Data Loader is a client application for bulk data import and export. It is a native solution that works with CSV files and can update records in Salesforce via its user interface, or from the command line.
Data Loader is used when working with large data sets of up to 150 million records with a file size limit of 150 MB. It is free and can perform such operations as Insert, Update, Upsert, Delete, Hard Delete, Export, and Export All.
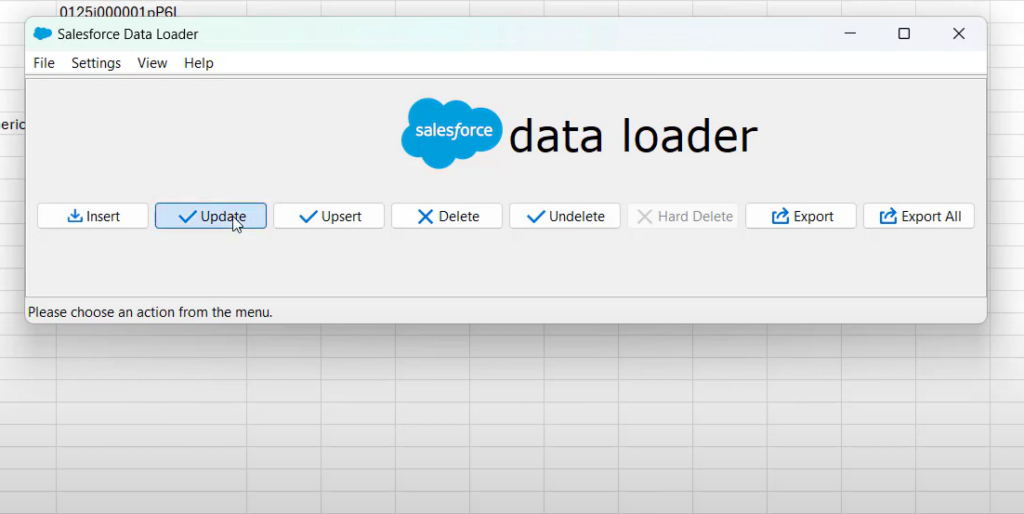
However, it requires data to be formatted before loading into Salesforce, offers static operations with limited flexibility, and can experience bugs and timeouts.
To avoid timeouts, users can lower the default batch size to process fewer records at a time. To mass edit existing objects using the Salesforce API, the 15-character, case-sensitive record ID needs to be converted to an 18-character, case-insensitive version to ensure the correct records are updated. Although Data Loader has limitations, it can be useful for simple, one-off jobs.
Check out these articles for in-depth insights on SF Data Loader:
- 9 Best Free and Paid Salesforce Data Loaders
- Salesforce Data Migration Best Practices
- Choosing the Right Salesforce Data Tool
Pros
- Handles large volumes of data
- Supports various formats (CSV, Excel)
- Allows for advanced field mapping and error handling
- Can perform updates for multiple objects
Cons
- Requires installation and setup
- More complex interface compared to native tools
- Occasional bugs, timeouts, and crashes
Best for
Salesforce admins dealing with large datasets needing a free tool for basic data updates.
Method 3. Automating Updates with Salesforce Import Wizard
The Salesforce Data Import Wizard is a built-in tool to mass update records, allowing you to import up to 50,000 records at once. With it, businesses can bulk edit accounts and contacts, leads, solutions, campaign members, and custom objects.
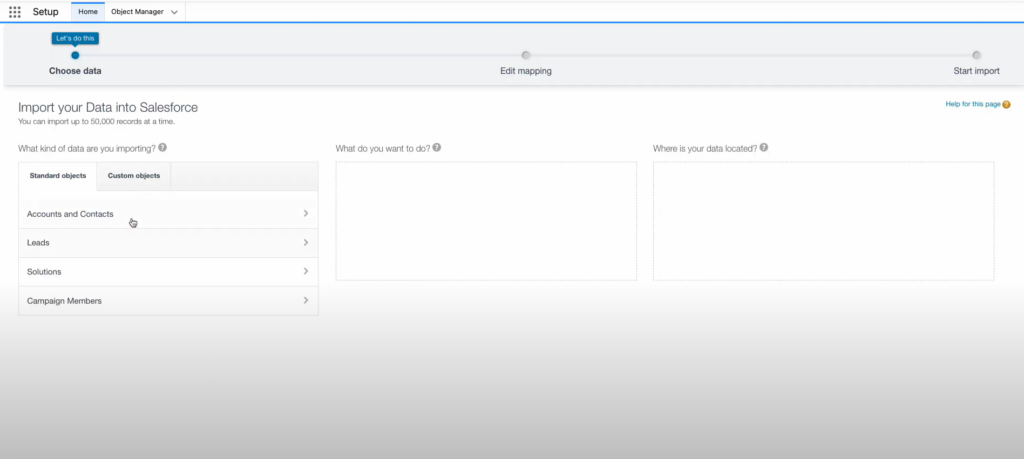
To update existing records, your file must contain a unique identifier to match with existing records. However, this solution does not allow you to import Cases and Opportunities or to delete unwanted records, and users must find alternative solutions.
Pros
- Import up to 50,000 records at one time
- Updates contacts, accounts, and leads
- In-browser tool, no additional installation is required
Cons
- Does not allow importing certain objects like cases and opportunities
- Users are unable to export data
Best for
Users needing to update contacts, accounts, and leads in Salesforce in-browser, without technical expertise.
Method 4. Mass Update Records with Salesforce Reports
This method provides a workaround for making changes when building SF reports. Users can filter records based on various criteria, such as record type, owner, status, or any other field values. Once the report is generated and the records are identified, users can initiate the process directly from the results. The feature supports a limited set of columns and data types.

SF Reports enables users to make changes across multiple records quickly but needs to navigate through individual records. Salesforce logs who made changes, when they occurred, and what changed in each record. This audit trail ensures transparency and accountability in the data management process.
For more details, visit the Salesforce Help Center.
Pros
- Quick updates directly from report results
- Provides an audit trail of changes made
- Can filter records based on criteria like record type, owner, or status
Cons
- Is not automatic; users need to define filters and generate the report
- The feature supports a limited set of columns and data types
- Not ideal for large volumes of data
Best for
Power users needing to update multiple records quickly from Salesforce reports while maintaining an audit trail.
Method 5. Bulk Updates via Apex
SF Apex is a programming language that allows users to build custom functionalities and automate complex business processes within the platform. When it comes to mass updating records, it can adjust to specific business requirements.
Here is a code example to update a contact and its related account using two statements:
try {
    // Query for the contact associated with an account.
    Contact queriedContact = [SELECT Account.Name
                              FROM Contact
                              WHERE FirstName = 'Contact_Name' AND LastName='Contact_LastName'
                              LIMIT 1];

    // Update the contact's email
    queriedContact.Email = 'New_Email';

    // Update the related account industry
    queriedContact.Account.Industry = 'New_AccountIndustry';

    // Make two separate calls
    // 1. This call is to update the contact's email.
    update queriedContact;
    // 2. This call is to update the related account's Industry field.
    update queriedContact.Account;
} catch(Exception e) {
    System.debug('An unexpected error has occurred: ' + e.getMessage());
}
Apex provides users with the flexibility to implement complex logic and manipulate data in ways that may not be achievable with standard functionality alone.
Find more information in the Apex Developer Guide.
Pros
- Supports complex business logic and specific requirements
- Automates bulk updates without manual effort
- Handle large data volumes with optimized batch processing
- Enables integration with other systems via custom code
Cons
- Requires coding knowledge and expertise
- Higher complexity and maintenance overhead
Best for
Organizations requiring highly customized and tailored automation rules to meet specific business requirements.
Method 6. Third-party solutions for Salesforce Mass Updates
Third-party tools for Salesforce offer additional functionality, better performance, and flexibility beyond the built-in features. Examples of these tools include DemandTools, Weflow, and Skyvia, which provide advanced features for data cleansing and pipeline management.
However, it’s important to carefully evaluate the pros and cons of each tool to ensure it meets the organization’s needs and requirements.
Pros
- Extended functionality beyond standard SF features
- User-friendly interfaces for non-technical users
- Enhanced performance, especially for large volumes of data
- Integration capabilities with other systems and applications
- Customization options to tailor the mass update process to specific needs
Cons
- The cost associated with purchasing and maintaining third-party tools
- Reliance on external vendors for support and updates
Best for
Organizations looking for more flexibility, advanced features, and high performance for large data updates.
You can find more information about third-party tools in these blog articles:
- How to import data into Salesforce
- Most Popular Salesforce Reporting Tools
- Salesforce middleware integration tools
- 9 Best ETL Tools for Salesforce
- Salesforce Data Migration Best Practices
Step-by-step Guide to Salesforce Mass Update with Skyvia
In the following sections, we will focus on the Skyvia solution, a cloud-based platform that offers versatile options for mass updating Salesforce records. Users can either upload a CSV file or use filters or SQL to select records directly. Besides, Skyvia provides a Backup solution to keep your data safe.
Mass Update Using CSV
When it comes to the most popular method of updating data in bulk, CSV files take the first place. No wonder it is so widely used for those who have hundreds or thousands of records and need to update records asap.
Below, we explain how to mass edit SF records with Skyvia’s import operation. As an example, we mass update leads in Salesforce. Assume we have leads that have changed the employer company, and we would like to change the company in bulk. We add extra lookup keys to map FirstName and LastName columns for reliability.
- Register a free Skyvia account.
- Create a Salesforce connection by clicking +Create New > Connection.
- Select Salesforce among the connectors.
- Sign in to your Salesforce production, sandbox, or custom environment. The detailed procedure is described in How to Import Data into Salesforce tutorial. Check it out for more details.
- Create a new import in Skyvia by clicking +Create New > Import.

- In the opened window, check whether the source type — CSV upload manually — is selected. Then, select the Salesforce connection as a target.
- When the source and the target have been selected, add a task by clicking the Add new link on the right.
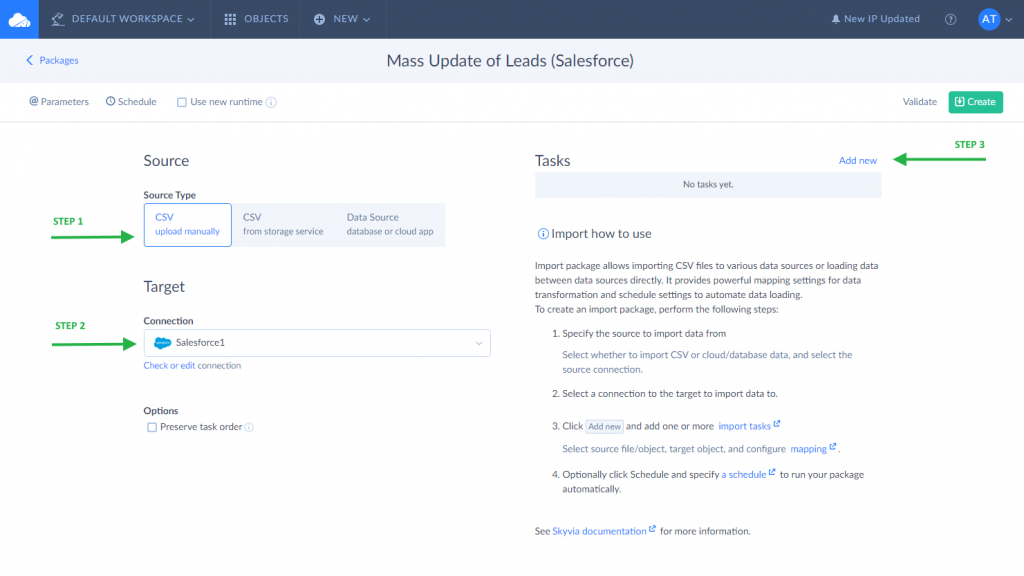
- When the task editor opens, upload the required CSV file. The columns from CSV will be displayed on the right of the task editor. Pay attention to the CSV Separator parameter. It should be selected correctly to display columns as a table (as in the screenshot). When everything looks fine, click Next step to proceed with target settings.
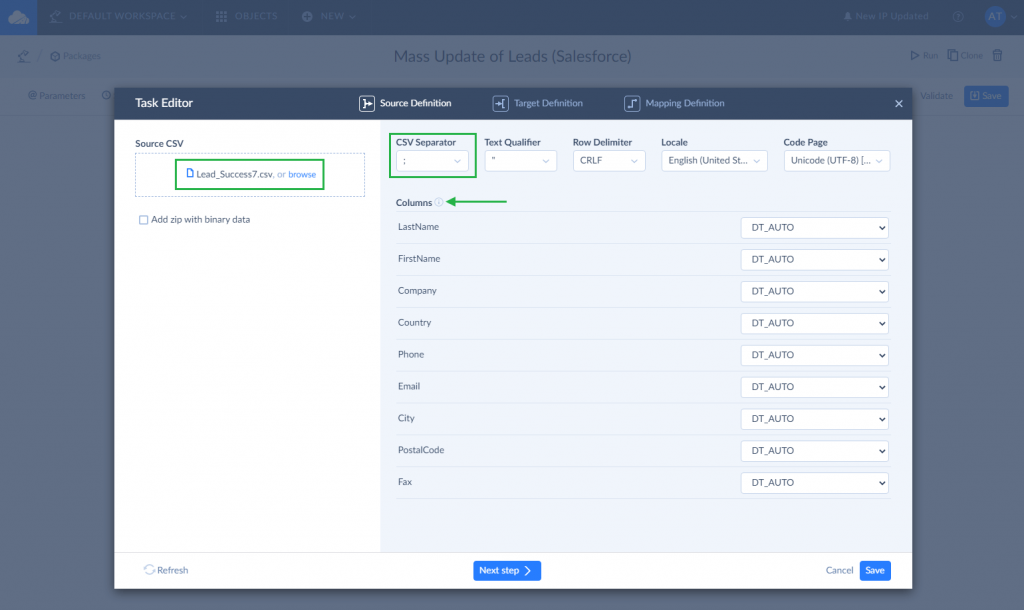
- In the Target drop-down list, select the Lead object. Then, select the Update operation type and go further.
- On the Mapping Definition tab, map the source to target columns. The columns with matching names are mapped automatically. To match columns with different names, use Column or Target Lookup. Skyvia offers several mapping options so you can split data or use complex expressions and lookups. You can find more information on the Skyvia Documentation Portal.
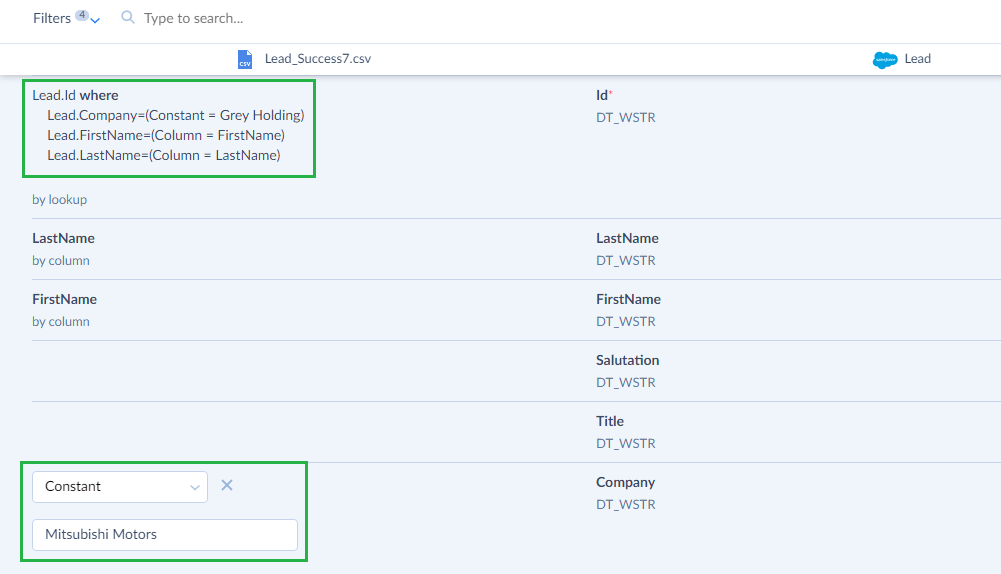
In our CSV file, we don’t have IDs, which is why we select the Target Lookup mapping. Then we select Lead in the Lookup Object drop-down list and Id value in the Result Column list.
Under the Lookup Key Column, in the first dropdown list, we choose Company. In the second dropdown list, we select Constant and enter the company name we want to be replaced in Salesforce.
To add another Lookup Key Column, click +Add Lookup Key. In the first drop-down list, we select FirstName. In the second drop-down list, we keep Column as it is. In the third drop-down list, we select FirstName. We click +Add Lookup Key again and repeat the same action but with LastName. Adding extra lookup keys helps you better find required leads and replace an old employer company with a new one.
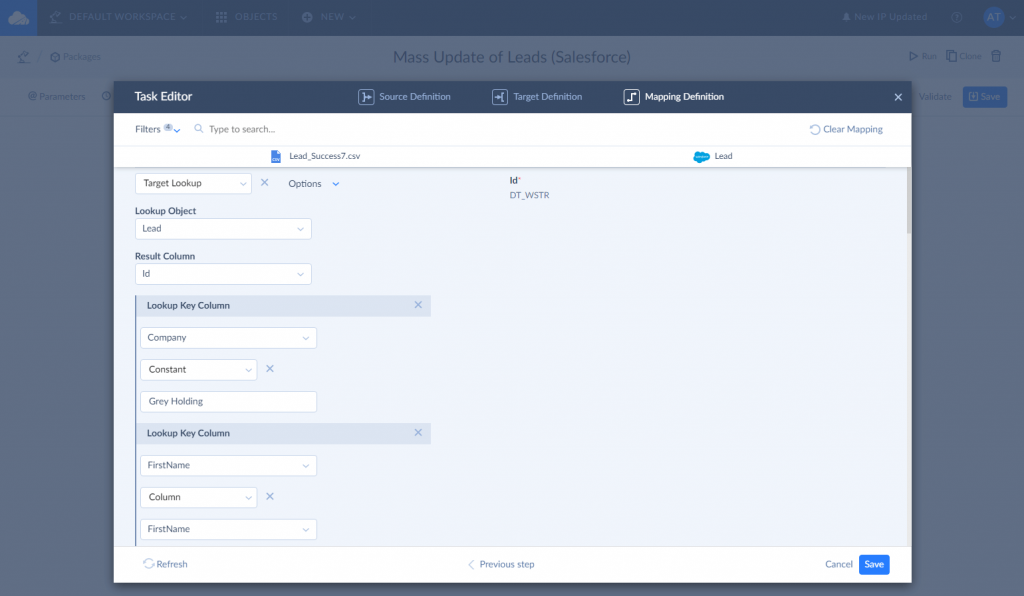
- After finishing with the ID column, we proceed with the Company column. We select Constant and enter the company name, which should be inserted instead of the old one.
- Click Save to complete your task.
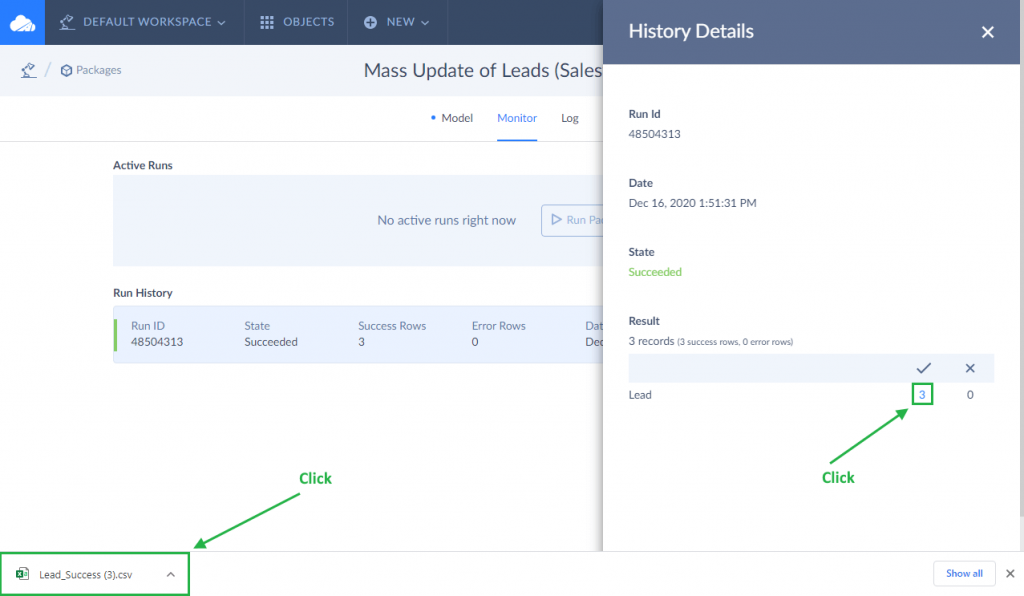
- Create and run import by clicking the corresponding buttons. You can check your job status on the Monitor tab. Uploading a result CSV will help you to check updated records.
As you can see, everything is quite simple and easy to configure. In the same way, you can mass update any Salesforce fields or objects you need to.
Mass Update Using Filters
To update only the needed data set, you can use filters in Skyvia. This is the right solution if the records can be received from SF directly. As an example, we will mass update a contact owner in Salesforce.
- Create a new import in Skyvia as described above.
- When the import editor opens, click Data Source database or cloud app and select the Salesforce connection as a source. Then, select the same connection as a target.
- When both connections are selected, proceed with adding a task. After clicking the Add new link, you are dropped into the task editor window.
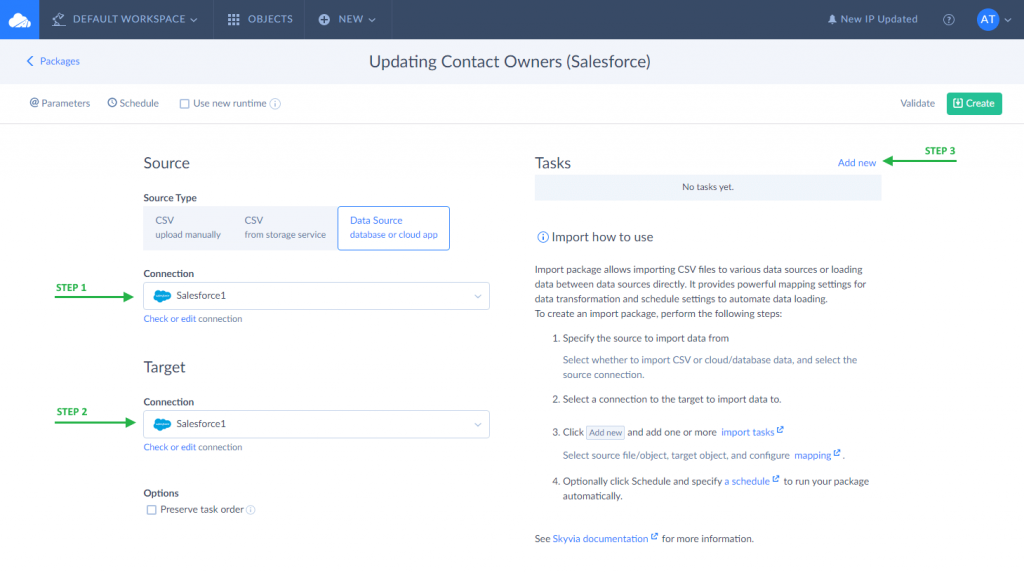
- On the Source Definition tab of the task editor window, select Contact in the Source drop-down list.
- Apply filters to select records for the update. In the Filter section, click the +Condition button on the right and set the condition according to which contacts will be updated. We select Owner with a certain email.
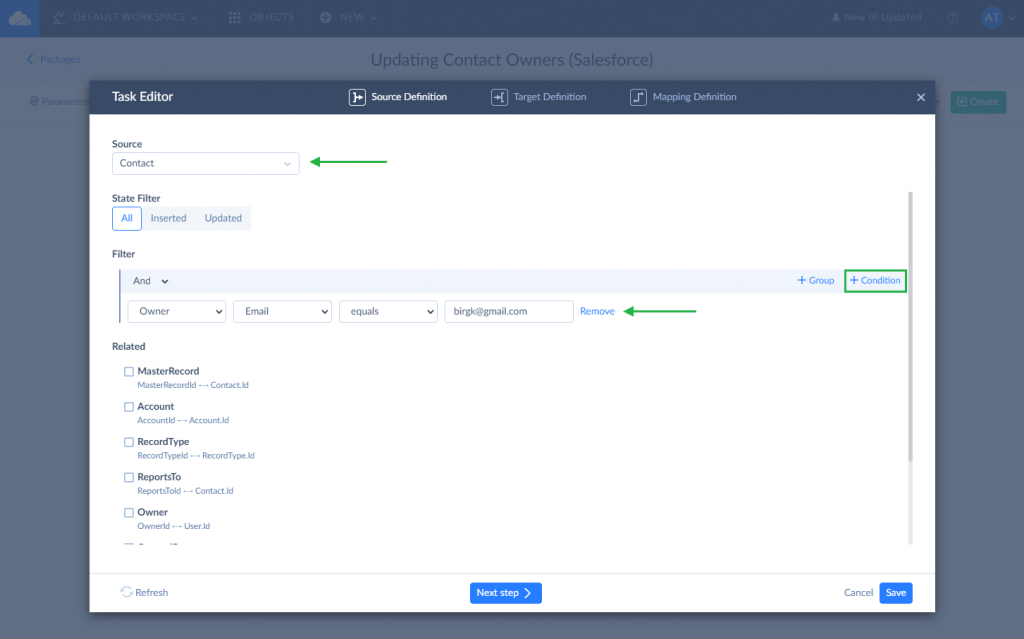
- In Skyvia, you can also add multiple filters, which can be combined into groups. Each group can consist of several filters and/or subgroups united with a logical operator AND or OR. Find out more about it in the Filter Settings topic. When everything is ready on the Source Definition tab, click Next step.
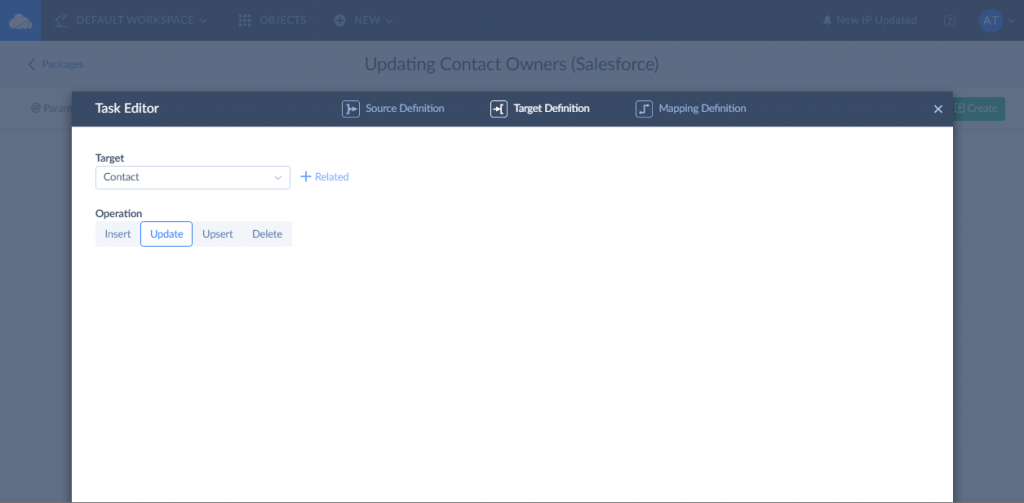
- On the Target Definition tab, select the same Contact object in the Target drop-down list. Then, select Update as an operation type and go further.
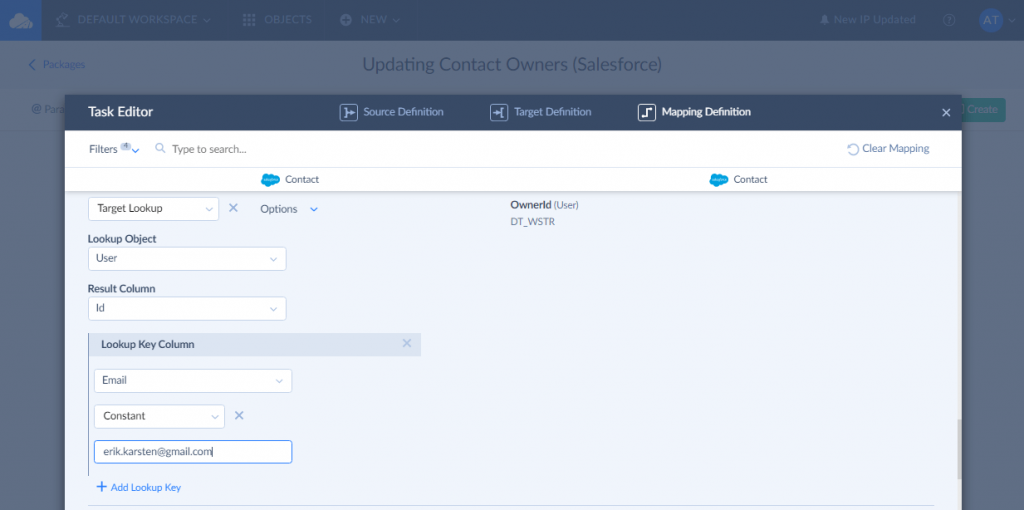
- On the Mapping Definition tab, map source and target columns.
In our case, we only need to map the Id and OwnerId columns. The Id column should be mapped through column mapping — it will be used to search for a record to update, and the OwnerId column should be mapped through target lookup. The Target Lookup mapping allows getting the ID directly from target tables by other fields, identifying rows, such as emails, and names, for example.
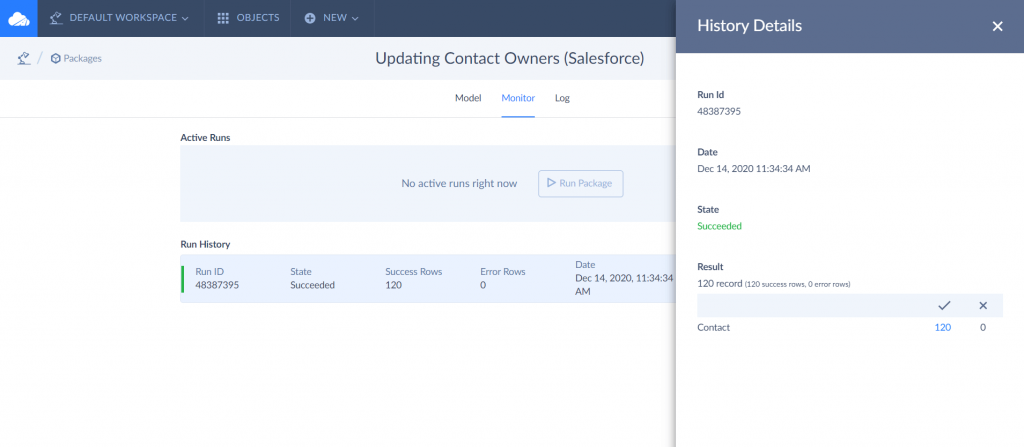
- When it is done, click Save. Then, click Create and run the import. On the Monitor tab, you can check the results by clicking the Run ID line.
Mass Update Using SQL
Another way to edit Salesforce data in bulk is through Skyvia Query using SQL. Skyvia Query lets you preview changes before applying them, so the operation is safe. Skyvia Query can be used by both experienced SQL users and SQL beginners. Except for UPDATE statements, it also supports SQL SELECT, INSERT, and DELETE for cloud sources. You can find more in Skyvia documentation. Below, we describe in simple steps how to mass update Salesforce opportunity owners.
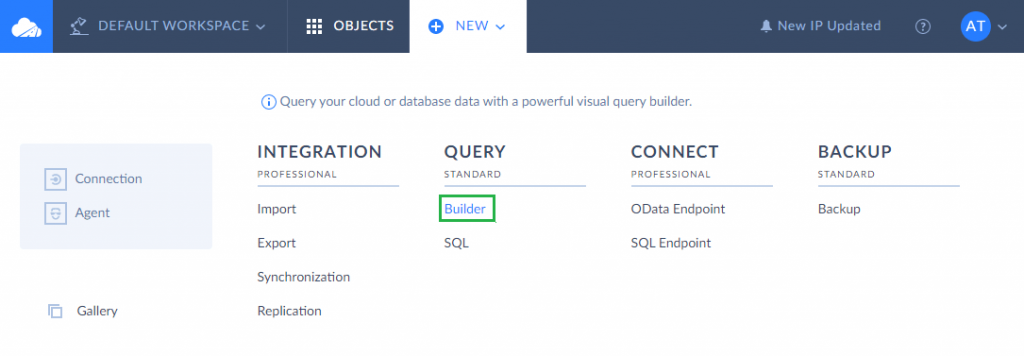
- Create a query in a standard way by clicking +Create NEW and selecting Builder in the Query.
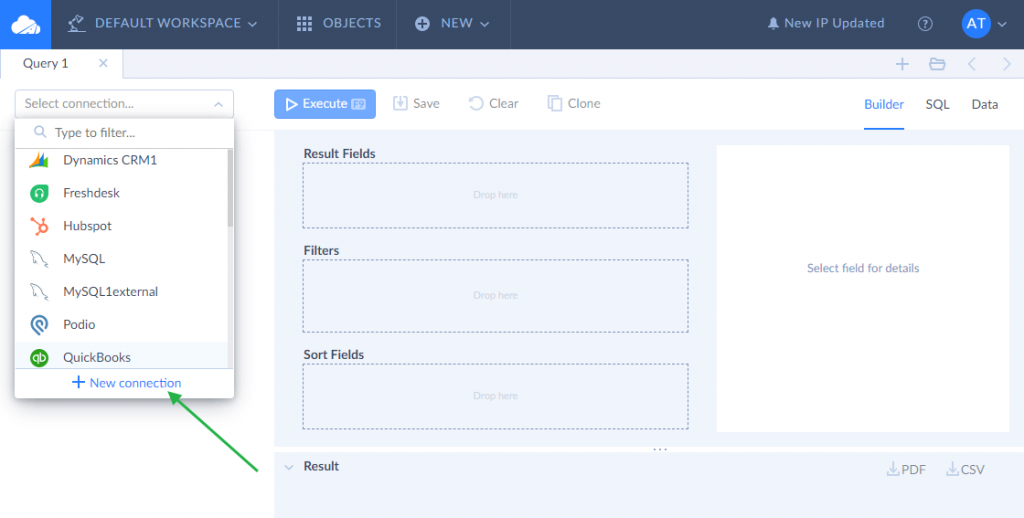
- The query editor opens. To query data, first, you need to create a connection to Salesforce by clicking the +New connection link (in case you have not created it yet) or selecting the already created Salesforce connection from the drop-down list on the left.
- To update an opportunity owner, you need to know the owner ID. If you do not remember it, you can easily extract this ID from the User table, filtering User by email.
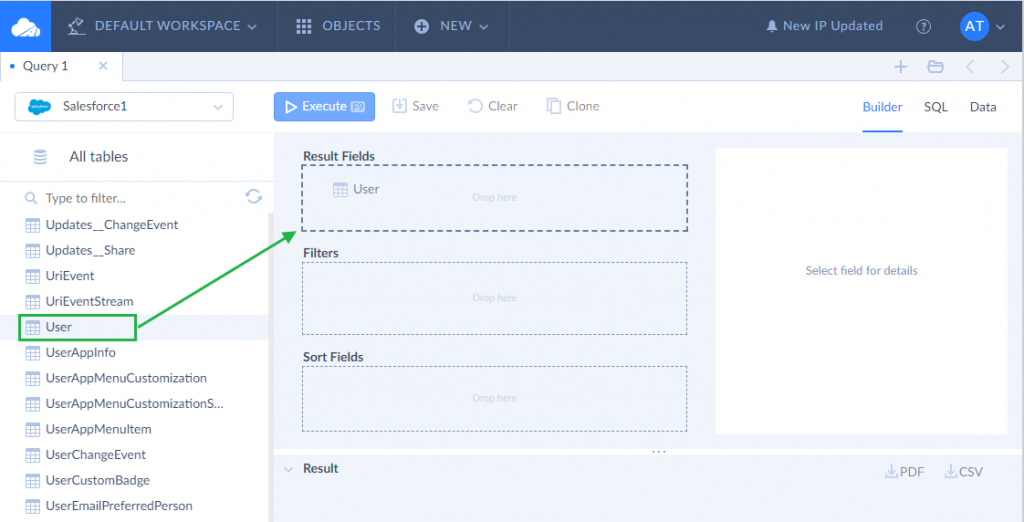
- To query data from a table, simply drag this table from the Salesforce object list to the Result Fields pane. In our example, we drag User to the Result Fields pane.
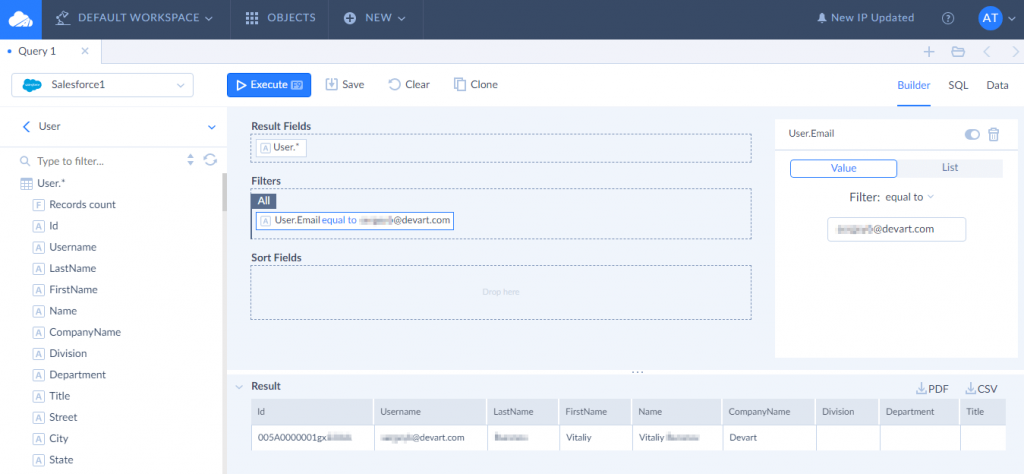
- Next, to filter data by email, we click User and drag the User.Email column to the Filters pane. Then we click User.Email in the Filters pane and configure the filter in the Details pane on the right side of the query.
- Finally, we check our query and click Execute to run it.
- The query result field displays a record with User ID. You need to copy the ID to use it in your second query.
- Now, we need to create another query to edit the OwnerID. To create the second query, click the + button on the query page tab bar. A new query will be created. To switch to the necessary view, click the corresponding button on the right side of the query toolbar — in our case, it is the SQL view button. We enter the UPDATE statement to the code editor:
UPDATE Opportunity

SET OwnerId='005A0000001gx22BBG'

WHERE OwnerId = '005A0000001gx22IAA'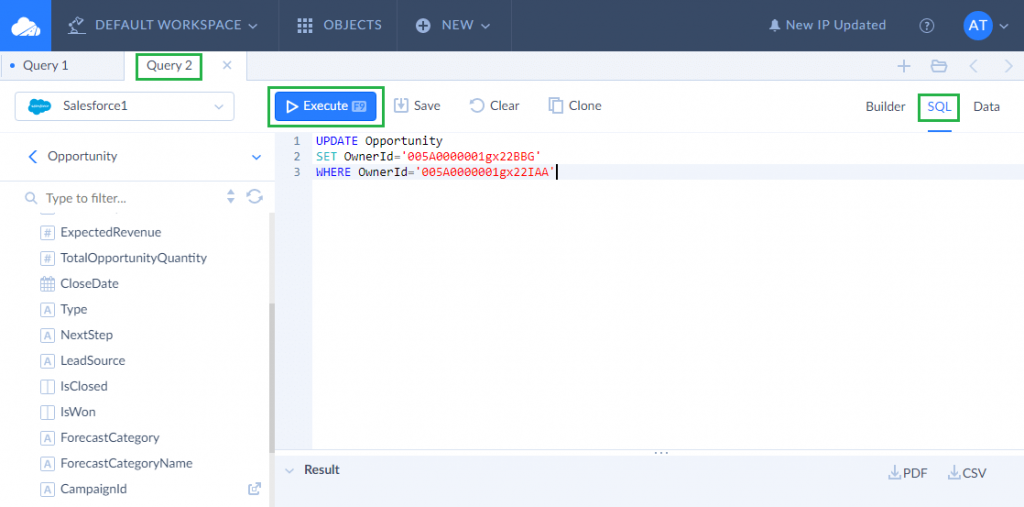
- When you have finished your second query, click Execute to run it and mass update Salesforce opportunities (opportunity owner to be exact).
Best Practices for Automating Mass Updates in Salesforce
The volume of data is constantly increasing, and if businesses continue to rely on outdated manual processes, they risk falling behind their competitors. This makes automation essential for fueling business growth. A solid automation strategy is key to boosting productivity and making smarter decisions.
Two key aspects of automating the process include:
- Scheduled using SF features or third-party tools
- Implementing best practices for setting up automation.
While Salesforce provides built-in tools for mass updates, third-party solutions offer greater flexibility, customization, and advanced features to keep your data accurate with less effort.
Scheduling enables businesses to automatically update information on a daily, weekly, or monthly basis. To schedule updates according to particular criteria or triggers, Salesforce offers built-in functionality like Flow Builder. Alternatively, third-party software like Xapex or Skyvia provides scheduling and more features for complex integration scenarios.
Follow the best practices to ensure efficient update execution:
- Define the objectives and scope of the automation process, including the specific records and fields to be updated.
- Develop a data governance strategy to maintain data quality and integrity throughout the automation process.
- Test the automation workflow in a sandbox environment before deploying it to production to identify any potential issues.
- Back up data before making any changes.
- Monitor the automation process and make adjustments as needed.
- Implement proper error and exception-handling mechanisms to address issues that may arise during the process.
- Document the automation workflow, including the criteria, actions, and scheduling parameters, for better troubleshooting and maintenance.
Conclusion
Keeping your Salesforce records up to date is important for clean data and smooth operations. The right method depends on your needs — whether it’s a minor adjustment, a large-scale update, or a highly customized change.
For simple updates, List Views and the Data Import Wizard do the job. If you’re dealing with thousands of records or unsupported objects, Data Loader is a solid choice. Need full customization? Apex lets you build tailored solutions, but it requires coding skills.
Third-party tools bring more power and flexibility, and Skyvia makes mass updates seamless. With CSV uploads, filter-based updates, and SQL queries, you can update records with control and precision. Plus, you can schedule updates and use Skyvia Query for even more customizable bulk changes — all with expert support ready to help.
FAQ for Mass Update Records in Salesforce

How many records can I edit in Salesforce at once?
Salesforce allows up to 200 records to be edited at once via List View. For larger updates, you can use Data Loader or external tools that support bulk operations.
Can I mass delete data in Salesforce?
Yes, you can mass delete cases, solutions, accounts, contacts, leads, products, and activities using the Mass Delete Wizard. For more complex scenarios, consider Data Loader or third-party tools. Always backup your data, as deleted records may not be recoverable.
How to mass update leads in Salesforce?
Leads can be updated in bulk using List Views for quick edits, SF Data Loader for large datasets, or third-party tools for automation. Filtering by lead status or source will help narrow the records and make updates accurate.
How to change record ownership for multiple Salesforce records?
Use the Mass Transfer tool to reassign owners for leads, accounts, and custom objects. For complex ownership updates across multiple objects, Salesforce Data Loader or third-party tools like Skyvia provide more flexibility.
Can I update multiple contacts at once in Salesforce?
Yes, you can update contacts in bulk using List Views for small changes or Data Loader for large-scale modifications. To modify related data, consider using Apex programming language or automation tools like Skyvia.
How to mass update opportunities in Salesforce?
Opportunities can be updated through List Views for stage or status changes, Data Loader for large updates, or third-party tools for advanced filtering and automation. Ensure updates align with your sales pipeline rules.
