In this article, you will learn about Salesforce to Salesforce integration, its importance, and who can benefit from it. Explore four key methods, including the Standard Connector, REST API, Skyvia, and Salesforce Connect, along with challenges and best practices for seamless data integration. Discover use cases and solutions to optimize data sharing and collaboration between Salesforce orgs.
Table of contents
- What Is Salesforce to Salesforce Integration, and Who May Need It?
- Why is Salesforce to Salesforce Connection Crucial?
- Four Methods for Salesforce to Salesforce Integration
- Challenges Businesses May Face During Salesforce to Salesforce Integration
- Salesforce to Salesforce Data Integration Best Practices
- Salesforce to Salesforce Data Integration: Overview of Use Cases
- Summary
- FAQ
What Is Salesforce to Salesforce Integration, and Who May Need It?
Salesforce to Salesforce integration means connecting two (or more) Salesforce orgs to share data and sync it effortlessly. It’s like building a bridge between different Salesforce systems that allows businesses to sync records like leads, accounts, contacts, and opportunities between systems in real-time.
Not every business will need Salesforce to Salesforce integration, but it’s essential for:
- Firms dealing with external vendors who rely on Salesforce to track orders or manage contracts can benefit from seamless data exchange.
- Companies that have separate Salesforce instances for different business units or regions.
- Businesses in mergers and acquisitions often bring separate Salesforce orgs that need to be unified.
- Companies that work with partners or resellers who also use Salesforce. Integrating data helps with smoother communication and collaboration.
Click here to see the use cases detailed overview.
Why is Salesforce to Salesforce Connection Crucial?
Without integration, different departments, partners, or regions would operate with their own data that doesn’t easily flow between systems and face duplicated efforts, outdated information, and data errors. Salesforce to Salesforce connection creates a unified view of their data across all teams and partners. It’s crucial because it:
- Sharing data between Salesforce orgs can significantly reduce costs, especially when considering the impact of improved efficiency, reduced manual work, and more accurate data.
- Improves collaboration and communication across the organization.
- Provides real-time insights by keeping data up-to-date and accessible.
- Reduces duplication of effort and minimizes manual data entry.
4 Methods for Salesforce to Salesforce Integration
There are several ways to integrate Salesforce org, depending on businesses’ needs, budgets, and data complexity. These methods offer different features and levels of customization. Let’s briefly review them before describing each one in detail.
1. Standard Salesforce to Salesforce Connector
Salesforce’s out-of-the-box solution for connecting two Salesforce orgs allows users to share records like leads, accounts, and opportunities between orgs. The standard connector is easy to set up and works well for basic data sharing.
Best for companies that only need to share a basic subset of data, like Accounts or Contacts, between two Salesforce orgs without frequent updates. Since the Standard Connector has limited customization, it’s also best for companies whose shared data relies on standard Salesforce fields and objects.
Click here for a detailed method overview.
2. REST/SOAP API Integration
Salesforce provides robust REST, BULK, META, and SOAP APIs (including Apex) for custom integration between Salesforce orgs. You can use these APIs to build custom integrations, sync specific data points, automate processes, and create highly tailored workflows.
Apex REST and SOAP APIs: provide real-time integration, allowing data synchronization and logic processing between orgs.
Best for businesses that need data updates to occur almost instantly between Salesforce orgs: large organizations or enterprises with multiple Salesforce instances, enabling a scalable integration approach that supports various departments or regions.
Click here for a detailed method overview.
3. Middleware/Third-Party Integration Tools
Middleware solutions like Skyvia, MuleSoft, Jitterbit, Dell Boomi, and Zapier act as connectors between multiple Salesforce orgs (and other systems). These tools offer pre-built connectors, automation, and data transformation, making it easy to integrate without custom coding.
Best for organizations looking for ease of use and the flexibility to handle complex, customized data tasks across multiple Salesforce environments.
Click here for a detailed method overview.
4. Salesforce Connect with External Objects
This Salesforce Connect allows businesses to access data in another Salesforce org (or even external systems) without moving the data itself. You may create external objects that act like a “window” into another org’s data to view and use the data without importing it.
Best for companies that need real-time access to data across multiple systems without the hassle of moving or duplicating that data into Salesforce. It’s perfect for keeping Salesforce lightweight while still giving users access to important external information.
Click here for a detailed method overview.
Let’s consider the most popular methods in detail.
Salesforce to Salesforce Connector Using the Standard Connector
Salesforce has built its own connector that can be used to make it easy for businesses to connect and share records between multiple Salesforce orgs. Unfortunately, this functionality has not been maintained very well in recent years. As such, you must configure this functionality within the Salesforce Classic UI, as it is not available in Lightning. However, let’s review how this method works.
Key Benefits
- Simple Setup. The Standard Connector allows two Salesforce orgs to connect and share data without extensive configuration, making it accessible for users with minimal technical expertise.
- Scheduled Data Sync. Users can set scheduled data synchronizations, allowing periodic updates between the two Salesforce orgs.
- Basic Field Mapping. Basic field mapping allows users to align standard fields across shared objects in both organizations, although customization options are limited.
- Data Ownership Control. Each Salesforce organization retains control of its own data, and only specified records are shared with the connected organization.
- Manual Maintenance. Users can manually update field mappings and object relationships to adjust to any changes in data requirements.
Configuring Salesforce to Salesforce Integration Using the Standard Connector
As mentioned above, you must ensure you have switched to the Salesforce Classic UI to configure the Standard Connector.
Ultimately, 4 key areas need to be configured when using the Standard Salesforce to Salesforce Connector:
- Turning the Salesforce to Salesforce Connector On
- Creating the Salesforce to Salesforce Connection
- Publishing Relevant Objects and Fields
- Subscribing to Relevant Objects and Fields
To read more about the guidelines and considerations when using the Standard Connector, please feel free to read Salesforce’s official documentation; otherwise, you can read a subset of the key considerations below.
TURNING THE SALESFORCE TO SALESFORCE CONNECTOR ON
- After switching over to the Salesforce Classic User Interface, head over to Setup.
- Search ‘Salesforce to Salesforce’ in Quick Find in Setup.
- Click Salesforce to Salesforce Settings.
- Once you have enabled the feature, you should see a screen like the one below.
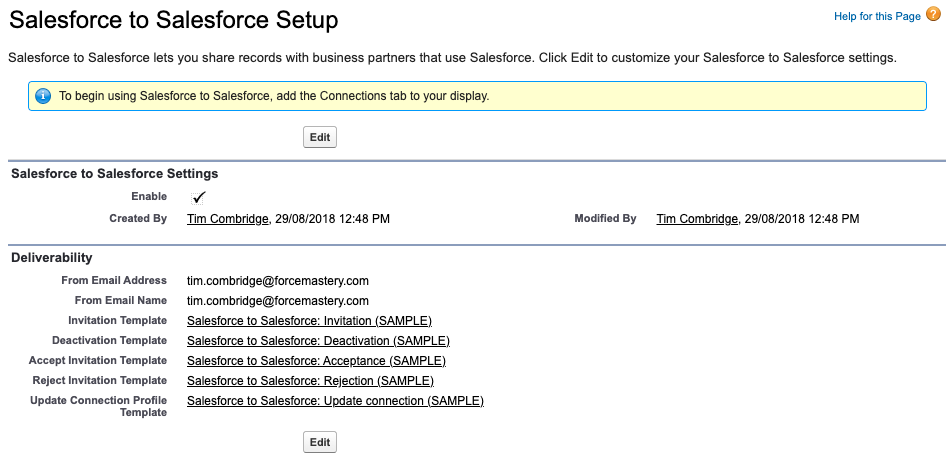
- Once you’ve enabled it in the first org, you must repeat the process in your second org before you can start sharing data between them.
CREATING THE SALESFORCE TO SALESFORCE CONNECTION
Now that both your orgs (we’ll refer to them as Org 1 and Org 2) have had the Salesforce to Salesforce feature enabled, it’s time to build a connection between them. The process here is not what you’d expect – you need to create a Contact record and send them an invite through a new Connection record.
- Create the Contact record with a valid Email Address. This is where you will send the Connection Invite.
- Once you’ve created your Contact record, go to the Connections tab and click New Connection.
- Ensure you’ve set the new Contact record as the Contact, and also set the relevant Connection Owner on your end.
- Then click Save & Send Invite.
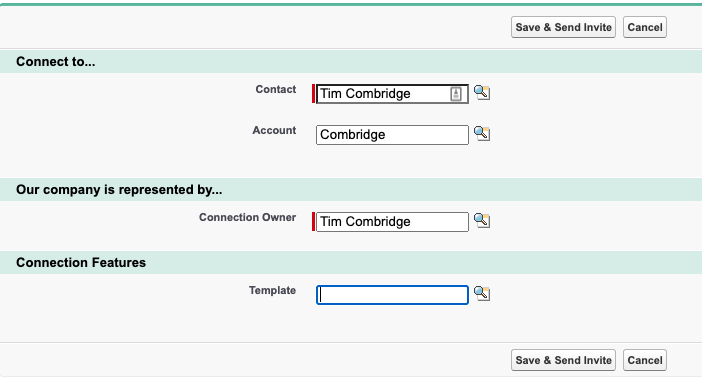
- Receive the email on the other side and set up the Connection record in Org 2.
- Congratulations, you’ve built your Connection between your two Salesforce orgs! The next step is to configure what data should be sent between them.
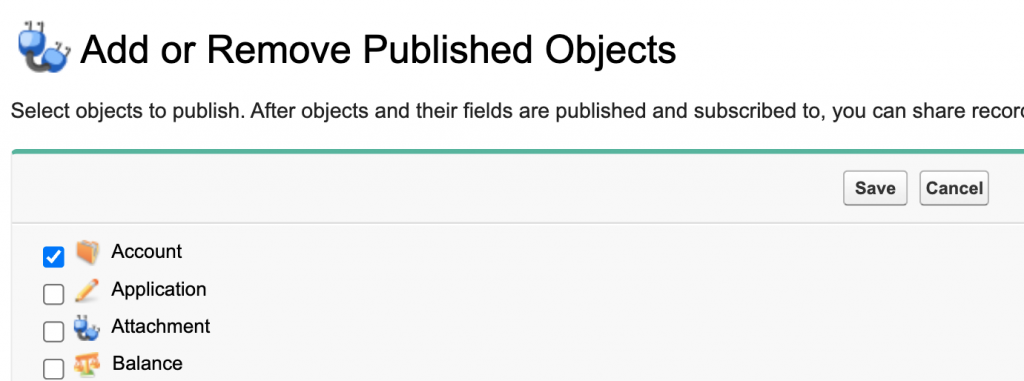
PUBLISHING RELEVANT OBJECTS AND FIELDS
This step must be performed in Org 1 and Org 2.
- Click your new Connection record and navigate to the Published Objects Related List. This is where you’ll be able to select Objects that you want to send to the other org.
- In this example, we will sync the Account records between orgs. To do so, check the Account object on the next page and click Save.
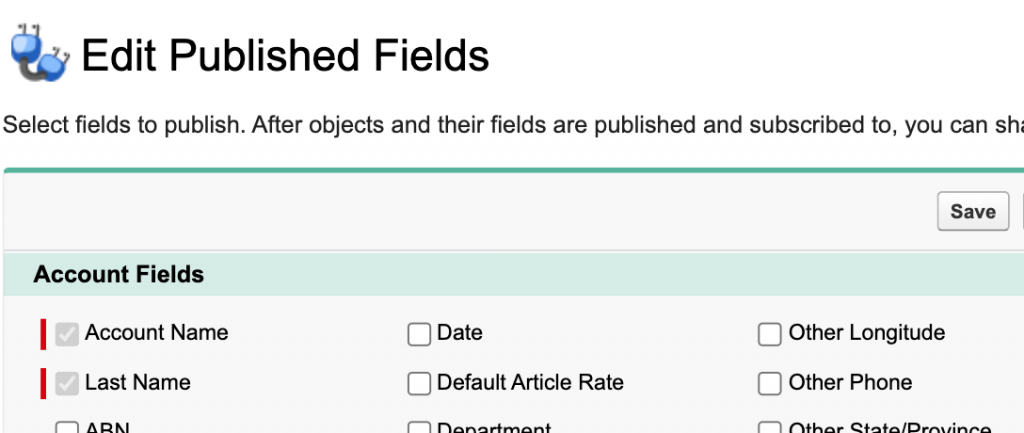
- Now, you need to select the fields that you want to send between orgs. In the Published Objects Related List, click Edit next to the Account row.
Note: the Required Fields (Account Name and Last Name in this case, because I have Person Accounts enabled in this org) are automatically enabled and cannot be undone. You can optionally add other fields to be published to the other org.
- In this case, we will keep things simple, leave the default values selected, and click Save.
- Remember to repeat this in both orgs to ensure a two-way data flow.
SUBSCRIBING TO RELEVANT OBJECTS AND FIELDS
The last thing you need to do is to subscribe to the published fields – once again, this should be done in both orgs.
- Navigate one last time to the Connection record you created in Step 2 and click Subscribe/Unsubscribe on the Subscribed Objects Related List.
- Similar to the above, check the box next to any object you want to subscribe to and click Save (in this case, the Account Object).
- Finally, click Edit next to the Account row and make sure the fields you want to pull in are selected (once again, the required fields should be populated by default).
Salesforce to Salesforce Standard Connector Considerations and Limitations
Salesforce to Salesforce integration using Salesforce’s standard Connector is a convenient way to get started, but like any tool, it has its quirks. Let’s explore some key considerations and limitations users should keep in mind before diving in.
- Ownership-Based Record Sharing. While System Administrators can opt to share all records, most users will only be able to forward/share records that they or their subordinates have ownership over.
- Works Only in Salesforce Classic. The Salesforce to Salesforce connector only works in Salesforce Classic. This is usually not a great sign for a feature, as it’s been quite several years since Salesforce Lightning came out, and many of the features that were never migrated were completely replaced.
- Impact of Hierarchical Sharing. Hierarchical sharing requires careful attention to avoid unintended consequences during synchronization:
- Clicking Stop Sharing in the External Sharing Related List halts record sharing.
- To stop sharing Case Comments or Attachments, you must set them to Private.
- Edited related records may lose sharing connections if the parent record is unshared.
- Only a maximum of 100 Tasks (Open and Closed) can be shared per related record.
- Limited Object Support. The standard Salesforce to Salesforce connector doesn’t support all Salesforce objects. It might be a limitation if you’re working with custom objects or specific types of records (like cases or tasks). Double-check which objects you need to share and ensure the standard connector supports them. If you’re dealing with more complex data models, you might need to explore custom integrations or third-party solutions.
- Asynchronous Updates. Update records are processed asynchronously, so there may sometimes be a small delay in record changes appearing across orgs.
- Asynchronous Updates. The Salesforce to Salesforce connector requires users to configure the data sharing for each record type manually. This means setting up connections, field mappings, and sharing rules for every object you want to integrate. The manual setup is manageable if you’re only sharing a few objects. But if your integration needs involve many different record types, be prepared to automate parts of the process with custom development if the manual workload becomes overwhelming.
Salesforce to Salesforce Integration Using REST API
There are other alternatives to share data between multiple Salesforce orgs if you’re not a fan of the native Salesforce to Salesforce tool. You can use Salesforce’s REST API to build a connection between two orgs (or other sources) and transfer data between them.
Key Benefits
- Customizable Data Flow. REST API offers flexibility to define and control specific data transfer processes, allowing tailored integrations between Salesforce orgs to meet unique business needs.
- Real-Time Data Sync. It enables near-instantaneous data synchronization, ensuring that both Salesforce orgs have up-to-date and consistent information for critical operations.
- Enhanced Control: Granular control over which objects, fields, and records are shared, allowing for secure and selective data exchange.
- Seamless Workflow Automation. REST API integrations can be paired with Salesforce automation tools like Process Builder or Flow to trigger workflows and streamline operations across orgs.
- Scalable for Business Growth. REST API supports dynamic data interactions, making it suitable for evolving business requirements and scalable as data needs increase.
- Multi-System Integration. Beyond Salesforce-to-Salesforce connections, REST API enables integration with external systems, creating a central hub for broader business workflows.
Setting Up Salesforce to Salesforce Integration Using REST API
There are four key steps when setting up a Salesforce to Salesforce connection using REST API:
- Building the REST API Endpoints (Org 1)
- Creating the Connected App (Org 2)
- Configuring the Auth Provider (Org 2)
- Creating Named Credentials (Org 2)
BUILDING THE REST API ENDPOINTS (ORG 1)
You’ll need to build out an Endpoint using an Apex Class before you are able to connect two Salesforce orgs using REST API. Below is an example of how to do so (Mine was called ‘SFtoSFEndpoint’) – build this out in the first org.
@RestResource(urlMapping='/Account/*')
global with sharing class AccountAPI {

    //this section handles deletions through the API
    @HttpDelete
    global static void doDelete() {
        RestRequest req = RestContext.request;
        RestResponse res = RestContext.response;
        String accountId =
req.requestURI.substring(req.requestURI.lastIndexOf('/')+1);
        Account account = [SELECT Id FROM Account WHERE Id = :accountId];
        delete account;
    }

    //this section handles queries through the API
    @HttpGet
    global static Account doGet() {
        RestRequest req = RestContext.request;
        RestResponse res = RestContext.response;
        String accountId =
req.requestURI.substring(req.requestURI.lastIndexOf('/')+1);
        Account result = [SELECT Id, Name, Phone, Website FROM Account WHERE Id = :accountId];
        return result;
    }

    //this section handles inserts through the API
    @HttpPost
    global static String doPost(String name, String phone, String website) {
        Account account = new Account();
        account.Name = name;
        account.phone = phone;
        account.website = website;
        insert account;
        return account.Id;
    }
}
CREATING THE CONNECTED APP (ORG 2)
- Once configured your endpoints, create a Connected App within App Manager (Search ‘App Manager’ in Quick Find in the Setup Menu).
- Click New Connected App.
- Give your Connected App a Name and API Name (I used ‘SalesforceToSalesforce’).
- Set the Contact Email relevant to your contact details.
- Then check the ‘Enabled OAuth Settings’ box, and set a callback URL (Use https://www.login.salesforce.com/services/authcallback as a placeholder until later on in the process).
- Select your relevant OAuth scopes (in this case, I’ve enabled full, API, and refresh_token/offline_access).
- Leave the rest how it is, and click Save.
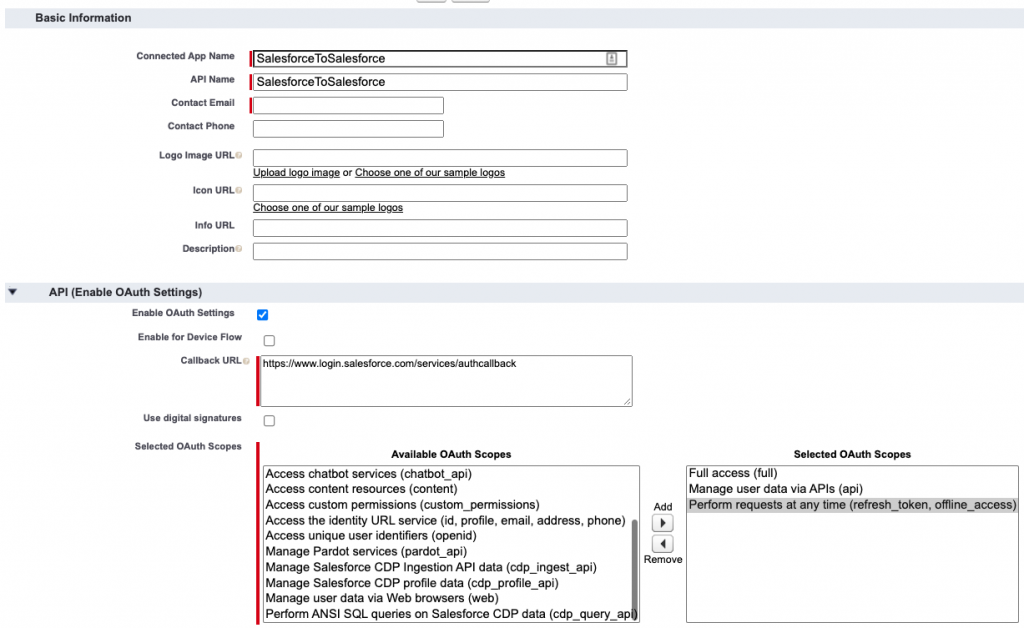
- Once you’ve saved your Connected App, copy your Consumer Key and Consumer Secret – you will need these later (remember to keep your Secret a secret!).
CONFIGURING THE AUTH PROVIDER (ORG 2)
- Now, from your other org, you need to create a new Auth Provider (Search ‘Auth. Provider’ in Quick Find in Setup). Click New to create a new Auth Provider, and select Salesforce as the Provider Type.
- This will display the full form for you to populate. The key fields you need to populate are as follows:
- Provider Type = Salesforce
- Name = I used ‘SalesforceToSalesforce’ in this example
- URL Suffix = for example, ‘Salesforce-to-Salesforce’ in this example
- Consumer Key = Paste your key from the last step
- Authorize Endpoint URL = Leave blank, Salesforce will automatically set this
- Token Endpoint URL = Leave blank, Salesforce will automatically set this
- Then click Save.
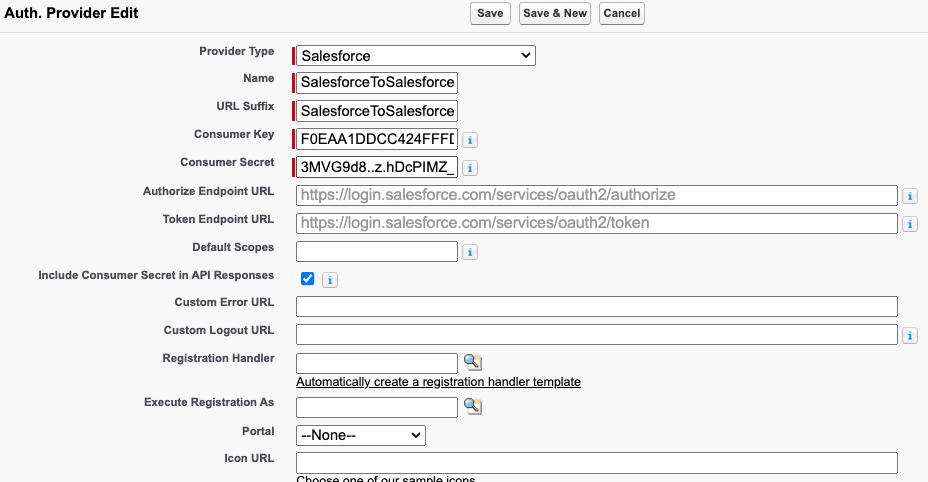
- At this point, you will have a new Callback URL generated at the bottom of the page in the ‘Salesforce Configuration’ section. Copy this Callback URL and update your Callback URL value in the Connected App you created in the above step.

- Here you can check your connection between the two orgs and test that it is working as expected so far.
- Use the ‘Test-Only Initialization URL’ to make sure that everything is working as expected.
- If you don’t see a login screen when you navigate to the Test-Only URL, you should double-check that your Callback URL was updated in the Connected App and you have waited 2–10 minutes for the changes to take effect.
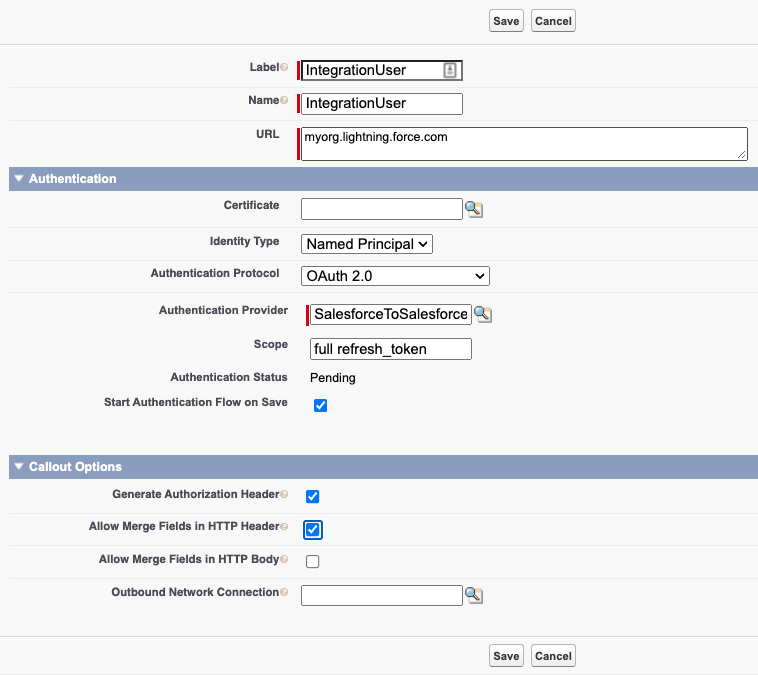
CREATING NAMED CREDENTIALS (ORG 2)
Finally, you need to create a Named Credential so that the org that is making the callouts can connect to the org with the Connected App with ease.
- To do this, search for ‘Named Credentials’ in Quick Find in Setup and click New.
- The key values you need to populate are as follows:
- Give your Named Credentials a Label and Name (I used ‘IntegrationUser’)
- URL: Set your URL according to your own Salesforce org (The same one you used in the Connected App)
- Identity Type: Named Principal
- Authentication Protocol: OAuth 2.0
- Authentication Provider: Set this to the Auth. Provider you configured in the previous step
- Scope: ‘full refresh_token’ (remember, additional scope items must be separated by a space and you can only use the same scopes that you set in the Auth Provider)
- Allow Merge Fields in HTTP Header: TRUE
- Leave everything else the way it is by default, and click Save.
TESTING YOUR CONNECTED APP (ORG 2)
Finally, you can create a new Apex Class in your Org 2 and make sure that everything is working as expected. Here’s a sample Apex Class, and a few lines of anonymous Apex, that you can use to make sure everything is functioning as expected.
Class
public with sharing class AccountWebService {

    public static Http http = new Http();
    public static HTTPResponse response;
    public static HttpRequest request;

public class NewAccountRequestWrapper {
    public String name {get; set;}
    public String phone {get; set;}
}

//test querying an Account record
public static void getAccount(Id accId) {
    request = new HttpRequest();
    request.setMethod('GET');

request.setEndpoint('callout:SalesforceAccount/services/apexrest/Account/' + accId);
    response = http.send(request);
    System.debug(response.getBody());
}

//test creating an Account record
public static void addAccount(NewAccountRequestWrapper newAccount) {
    request = new HttpRequest();
    request.setMethod('POST');

request.setEndpoint('callout:SalesforceAccount/services/apexrest/Account');
    request.setHeader('Content-Type',
'application/json;charset=UTF-8');
    request.setBody(JSON.serialize(newAccount));
    response = http.send(request);
    System.debug(response.getBody());
}

//test deleting an Account recoord
public static void deleteAccount(Id accId) {
    request = new HttpRequest();
    request.setMethod('DELETE');

request.setEndpoint('callout:SalesforceAccount/services/apexrest/Account/' + accId);
    response = http.send(request);
    System.debug(response.getBody());
    }
}
Class
//Add a new Account
AccountWebService.NewAccountRequestWrapper newAccount = new AccountWebService.NewAccountRequestWrapper();
newAccount.name = 'Test Account';
newAccount.phone = '61412345678';
AccountWebService.addAccount(newAccount);

//get Account details based on Id
AccountWebService.getAccount('61412345678');

//delete Account based on Id
AccountWebService.deleteAccount('61412345678');
Salesforce to Salesforce Integration Using REST API: Considerations and Limitations
Integrating Salesforce orgs using the REST API gives businesses much flexibility. However, it also comes with its own set of considerations and limitations. Let’s break them down.
- Flexibility for Custom Integrations. The REST API allows for highly customizable integrations. Users can define specific endpoints, set custom workflows, and integrate unique business logic tailored to their needs. However, setting up custom REST API integrations requires significant development skills and time to design and implement properly.
- Real-Time Data Syncing. REST API allows real-time data synchronization between Salesforce orgs, meaning data can be shared and updated immediately. At the same time, real-time syncing can pressure system performance, especially when dealing with large volumes of data. Rate limits imposed by Salesforce may restrict how often you can make API calls.
- Rate Limits. Salesforce sets API call limits based on your edition (e.g., 15,000 API calls per day in Enterprise Edition). If your integration requires frequent or large data transfers, hitting these rate limits can result in sync delays or failures. You may need to optimize your API calls or purchase additional API capacity.
- Requires Authentication and Security Setup. REST API integrations require secure authentication methods, such as OAuth 2.0, to ensure that data transfers between Salesforce orgs are protected and that only authorized users and systems can access sensitive data. Setting up authentication and managing security tokens can be tricky. You’ll need to refresh tokens regularly and ensure the security protocols are robust to avoid unauthorized access or failed integrations.
- Scalability. While REST API is scalable, and you can add more functionality, connect additional Salesforce orgs, or integrate external systems as needed, performance may decline when dealing with large data sets or complex queries. Additionally, optimizing API calls for efficiency is crucial to maintain system performance.
- Error Handling and Monitoring. Unlike some plug-and-play tools, API-based integrations don’t come with built-in monitoring and error resolution. So, users need to set up custom monitoring tools or integrate with third-party monitoring services to track API health and resolve errors.
- Data Transformation. REST API allows custom transformations or data enrichment before sending it to the destination org. Custom data transformations add to the complexity of the integration. You’ll need to define clear rules for how data is transformed and ensure both Salesforce orgs can handle the updated data formats without issues.
- One-Way or Bi-Directional Integration. REST API can be used for one-way and bi-directional integration, allowing data to flow both ways for continuous updates. However, bi-directional syncing increases complexity and requires careful handling of potential conflicts, such as overwriting data or duplicate records, to ensure data consistency across orgs.
- Maintenance and Updates. REST API integrations allow users to control maintenance and updates without relying on external tools. However, regular maintenance and updates on the integration may require ongoing developer support., especially when Salesforce releases new features or API changes.
Salesforce to Salesforce Integration Using Skyvia
Using third-party tools, like Skyvia, MuleSoft, Zapier, or Boomi, for Salesforce-to-Salesforce integration provides a more agile and reliable integration framework. These tools manage complex data mappings, transformations, and workflows with minimal custom code, enabling faster setup, simplified maintenance, and reduced development costs.
Let’s consider such an integration on the Skyvia example. It’s no-code, provides a user-friendly interface, and supports 200+ connectors and offers flexibility and control suited for more sophisticated data integration needs.
Configuring a Salesforce to Salesforce Connection Using Skyvia
To create a Salesforce to Salesforce connection with Skyvia, you must first authorize and correctly set up an integration with one Salesforce org.
CREATE A CONNECTION FOR EACH SALESFORCE ORG
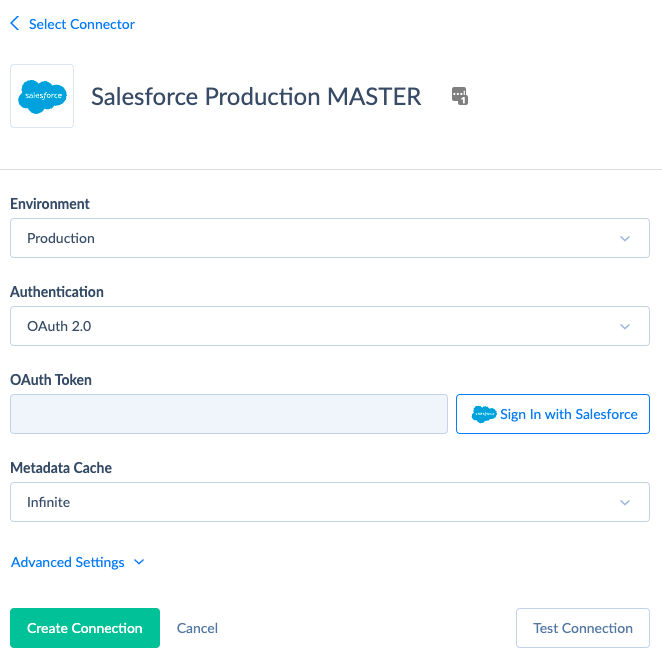
- Navigate to Skyvia and click + Create New, then Connection.
- Find the Salesforce Connector from the list, and configure your org details.
- Make sure to use OAuth 2.0 and click Sign In with Salesforce.
- Name the Connection accordingly (in this example below,‘Salesforce Production MASTER’). We are going to sync its data to another Salesforce org.
- Repeat this for the other Salesforce org (and in the future, you can also connect to any other org you’d like, which may or may not be a Salesforce org. Skyvia has many connectors for different apps and features for synching data between multiple sources).
CREATE AN IMPORT SCENARIO TO SYNCHRONIZE DATA ONE-WAY
Once you have created a Connection for each org you want to sync, you need to create an Import scenario between them.
- Click + Create New at the top of the Skyvia app, and then click Import.
- You’ll see a page where you can specify source and target settings. Under Source, click Data Source database or cloud app. Then select the two Salesforce Org Connections that you created in Step 1.
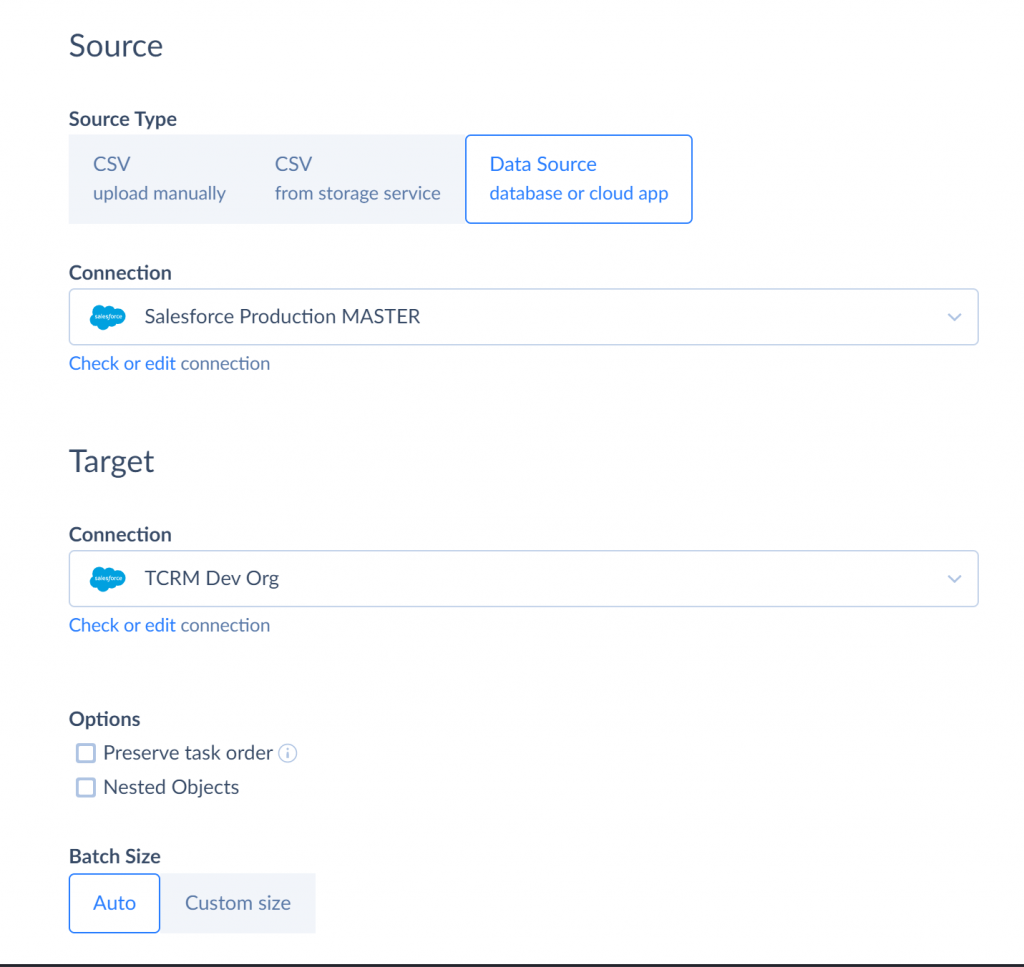
- Once you’ve selected the two orgs to synchronize data between, you need to create a Task. Click the Add New button on the right-hand side of the page to do so.
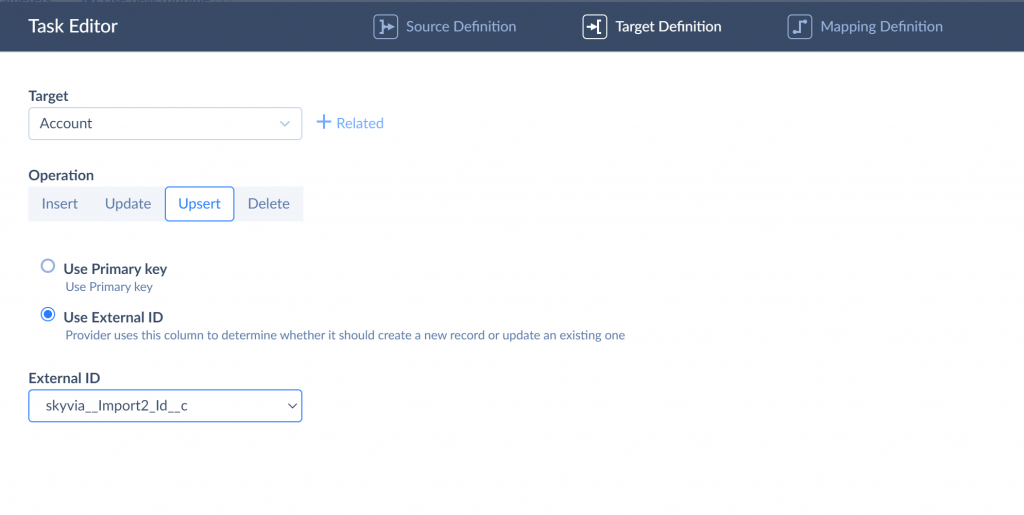
- Select the Account object and then click Next Step.
- On the next page, select the Account object as a target. We also select the UPSERT operation in order to avoid creating duplicates. We will use the native Salesforce External Id method for this operation and select the corresponding External Id field.
- On the next page, you’ve to configure mapping ( how the fields from each side should align). This will be different for everyone, but for our example, you need to ensure the Name columns are aligned, as per the screenshot below. You must also map the selected external ID field to the corresponding field.
Note: Skyvia automatically maps columns with the same name.
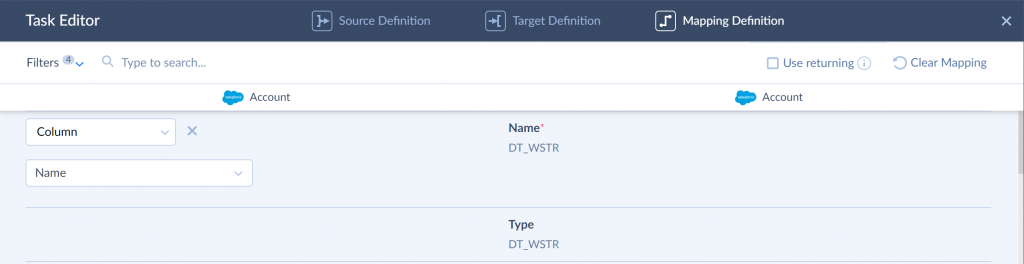
- This means that Skyvia is going to sync the fields mapped on this step (Account records and specifically, the Account Name field on the Account records).
- After saving a task, validate your Job by clicking the Validate button.
- Once validated, click Save to save your Job. You can also click Run Now to perform the first sync manually.
SET UP AUTOMATIC SYNCHRONIZATION
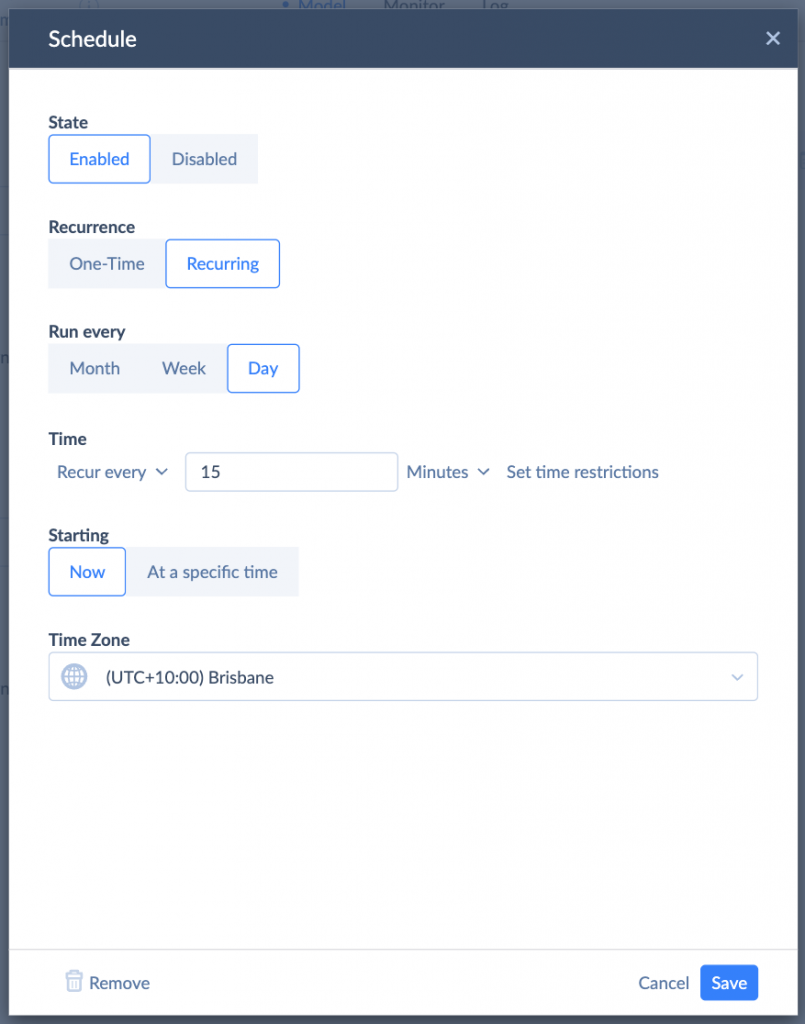
You need to create a schedule for the Import Package to allow your Synchronization to occur automatically in the background. This can be found at the top-left of the Import page you created in Step 2.
- Depending on the complexity of your Import Package, your business rules, and your business requirements, you must configure the Schedule yourself. That being said, it’s not overly complicated. As you can see in the screenshot below, the schedule is set up to run every 15 minutes, starting now. Configure this page according to your own needs.
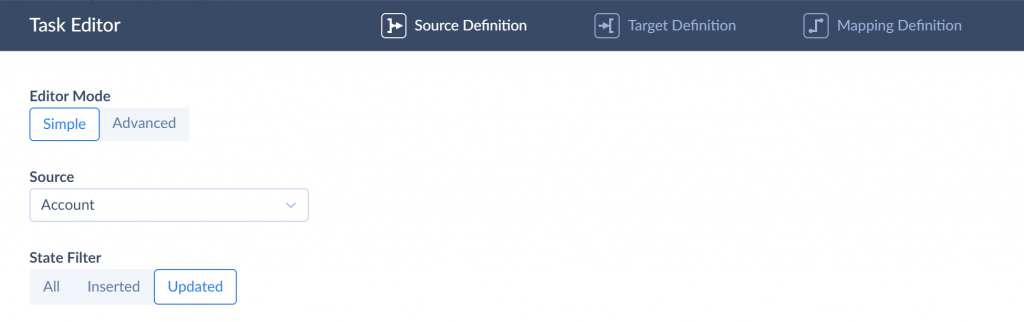
- If you don’t want to load all the records each time but sync only new and changed records, edit the job, edit its task(s), and select the Updated button on the source definition page of the editor.
Considerations and Limitations When Integrating Salesforce to Salesforce Using Skyvia
- User-Friendly, No-Code Interface. Skyvia is designed with ease of use in mind, offering a wizard-based setup that allows non-technical users to configure data integrations without writing code.
- Flexible Scheduling and Automation. Users can schedule data syncs frequency, allowing automated, hands-free data transfers between Salesforce orgs. Such an approach is ideal for businesses needing regular data updates.
- Powerful Mapping Options. Standard or direct mapping means that fields in the source are directly mapped to fields in the target with no transformations. Data transformation mapping includes transforming data from one format or value to another as it moves to the target. Skyvia supports both Salesforce standard and custom objects, enabling companies to sync basic and custom Salesforce data fields seamlessly.
- Support for Complex Data Workflows. With Skyvia’s visual designer, users can configure multi-step workflows with conditional logic, allowing advanced data
- Real-Time Connectivity. Skyvia Connect simplifies integrating external data into Salesforce by providing OData endpoints that Salesforce Connect can use, enabling seamless and real-time access to external data within the Salesforce environment.
- Affordable, Scalable Pricing. Skyvia’s pricing model offers various subscription plans, including a free tier, making it accessible for small businesses while scalable for larger organizations needing higher volumes and advanced features.
- Error Handling and Logging. While Skyvia provides error logs, interpreting and resolving errors, especially in complex integrations, can be challenging and may require additional expertise.
- API Limitations. Skyvia relies on Salesforce’s API limits, meaning high-frequency data syncs or large data volumes could potentially exceed Salesforce’s quotas, impacting performance and accessibility.
Salesforce to Salesforce Integration Using Salesforce Connect
Salesforce Connect allows Salesforce to integrate with external data sources, including other Salesforce orgs, without needing to store the data inside Salesforce. Instead of importing the data, Salesforce Connect allows the creation of external objects, which act as virtual representations of the data stored in another system. So, users can view, update, and use the data in real-time within Salesforce, but the data remains in the original system.
Key Benefits
- Real-time data access. You can work with data from other Salesforce orgs or external systems in real time.
- No data duplication. Since the data is accessed remotely, storing or duplicating it in multiple systems is unnecessary.
- Supports multiple data sources. Besides Salesforce orgs, it can connect to other external systems like databases or ERP systems.
Performing Salesforce integration using Salesforce Connect
- Launch the Org and go to Setup > Integrations > External Data Source > New External Data Source.
- In the New External Data Source Screen, enter the appropriate data as shown below.
- Enter an External Data Source name.
- Select Salesforce Connect type: Cross Org.

- Select “Connect To: Production URL“ (for Developer edition & Production orgs).
- Enter URL: https://login.salesforce.com.
- Set up Search and Writable External Objects.
- Choose Identify Type > Per User.
- Select Authentication Protocol>Password Authentication.
- Add the Administration Username of the target Org Integration Use.
- Enter < Password >/ < Security Token >.
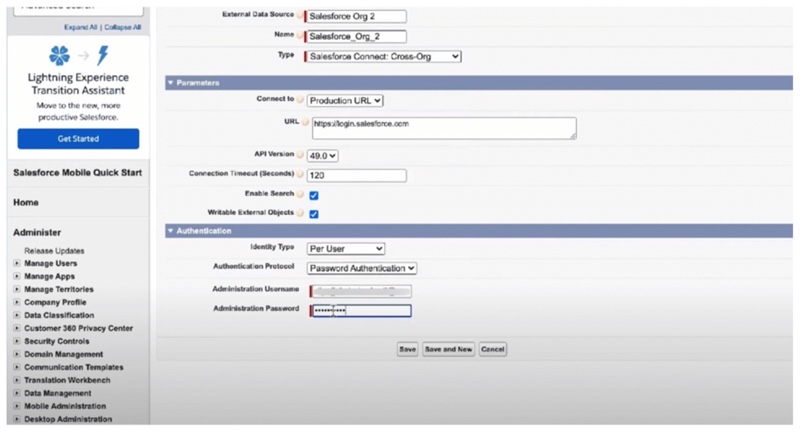
- Click “Save”.
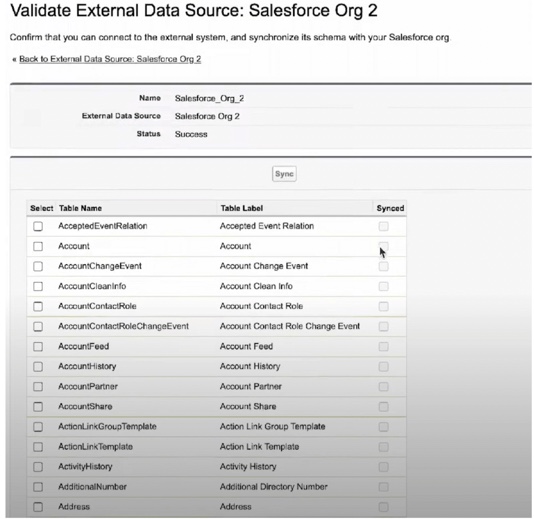
- Open the just created External Data Source and click “Validate and Sync”
- Choose appropriate objects, like “Account,” and click “Sync”.
- To access the external object, create the External Object tab.
Salesforce Connect Considerations and Limitations
- Compatibility. Salesforce Connect is available for Classic and Lightning Experience users, offering flexibility for different Salesforce environments.
- Availability and Cost. Salesforce Connect is an add-on feature at an extra cost in Enterprise, Performance, and Unlimited Editions.
- Real-Time Data Access. Allows users to access and interact with external data in real-time without storing or duplicating it within Salesforce. This approach makes it ideal for syncing with third-party solutions and other Salesforce environments.
- Data Fetching Not Required. There’s no need to import external data into Salesforce to read, write, view, or report on it. External objects allow interaction with remote data as if it were native to Salesforce.
- Search Capabilities. It offers real-time search for external data and supports free text search, record viewing, and list views for external objects.
- Cost of Integration. Each Salesforce Connect integration costs approximately $4,800 monthly, depending on the number of data sources connected.
- Limit on External Objects. You can establish up to 100 external objects per organization (can be extended to 200 upon request).
- Query Limitations. A maximum of 4 joins are allowed per query across external objects and other object types, limiting complex queries.
- OAuth Token Limit. OAuth tokens issued by external systems can have up to 4,000 characters, which may limit specific integrations that require longer token lengths.
- Paging Limit. The upper limit for page size for server-driven paging is 2,000 rows, affecting how large datasets are handled during queries.
Challenges Businesses May Face During Salesforce to Salesforce Integration
Like any big project, integrating Salesforce systems can come with its own set of challenges. Let’s walk through some common hurdles businesses might face and how to tackle them.
Data Mapping Confusion
Imagine moving into a new house. You’ve got boxes of stuff (data) from the old place (Salesforce org), but things don’t always fit perfectly in the new rooms. During integration, mapping data fields between the two orgs can get tricky. Sometimes, fields in one Salesforce instance don’t have a clear match in the other, leading to misaligned or missing data.
Solution
Plan out data mapping in advance. Work with the teams to make sure fields are standardized, and if needed, create custom fields that will allow for smoother mapping between the systems.
Data Duplicates
One of the biggest challenges in Salesforce to Salesforce integration is dealing with duplicate records. If two orgs are working with the same customer or lead, you might end up with multiple versions of the same record, cluttering your database and causing confusion.
Solution
Before diving into the integration, run a data deduplication process. You can also set up rules during the integration to prevent duplicates from being created by merging similar records automatically.
Permission and Security Issues
Security is always a big deal, especially when sharing sensitive customer data between systems. Different Salesforce orgs might have different permission settings, leading to access issues when sharing data.
Solution
Ensure both orgs have aligned security and permission settings. If certain records or fields shouldn’t be shared, set up sharing rules or field-level security to protect sensitive information.
Integration Complexity
Depending on your Salesforce orgs’ complexity, the integration can feel like trying to solve a giant puzzle. Multiple objects, custom fields, and different processes add up and can become overwhelming.
Solution
Begin by integrating a few key objects like accounts or leads, and expand the integration once you’ve ironed out any initial challenges. A phased approach helps you avoid major headaches.
Data Syncing Delays
In an ideal world, data would sync instantly between Salesforce orgs, but sometimes, there can be delays. If one team makes changes in real-time while another works on outdated data, it can lead to miscommunication and missed opportunities.
Solution
Set clear expectations with your teams about how often data will sync. Real-time syncing might only be necessary for some data types, depending on the integration setup. Schedule periodic syncs for things that don’t require immediate updates to keep everything running smoothly.
Managing Multiple Stakeholders
If you’re working with multiple departments, regions, or even partner companies, getting everyone aligned on handling the integration can be challenging. Stakeholders may have different goals or requirements, which can complicate the process.
Solution
Bring everyone to the table early and ensure they’re all on the same page about what the integration will look like and what they can expect. Regular check-ins throughout the process will help avoid any surprises later on.
Salesforce to Salesforce Data Integration Best Practices
It’s important to plan out your Salesforce to Salesforce integration before connecting the orgs together. Here are a few key things you need to take into account.
1. Define Object and Record Scope
Make sure to make a definitive plan as to the exact scope of the integration. If only a subset of data is being synced between Salesforce orgs, or only a single team’s data will be impacted, this must be communicated and planned for accordingly.
Similarly, larger Salesforce-to-Salesforce integrations can take a lot of time and effort – especially when cleansing larger data sets or merging data from multiple origins and ensuring no duplicate records are created. Keeping a Salesforce-to-Salesforce integration project within a set budget is important, and this budget should be defined from the outset.
2. Tidy Your Data
Plan for where your data is going, not where it’s coming from – clean it before setting up a sync to your other Salesforce environment. Ensuring your data is clean and tidy and the data models of your two orgs are aligned before it is synced means your Salesforce data integrity remains intact across both orgs and your users can still gain value from your data.
3. Create Integration Plan
There’s no point setting up a Salesforce-to-Salesforce integration and spending time and effort preparing for it and setting it up if it’s going to fall apart shortly after kickoff. It’s critical to create an integration plan to ensure that the data is validated and sync errors are resolved so as to continue providing value to your business users.
The integration plan should detail how data should be organized and structured in both orgs going forward. These include things like which data should be kept in which environment, how data should be validated before being stored in either org, who is responsible for data validation, etc. These things should all form part of the integration plan.
4. Create Contingency Plan
There’s a high chance you will run into some kind of roadblock while setting up your Salesforce-to-Salesforce integration. This will likely be due to data not being organized properly, data not being formatted correctly, or a Validation Rule being hit inside one of your Salesforce orgs. Salesforce’s Best Practice is to record the error that you receive. This way, you can continue your original integration plan as much as possible and tidy up any leftover data at the end rather than getting stuck at a single point.
5. Test the Integration in a Sandbox
Don’t risk breaking anything important in your live Salesforce environment. Always test the integration in a sandbox first. This approach allows for catching any issues before they affect real data. Sync a small sample of records and check for errors. Once you’ve confirmed everything works as expected, you can confidently roll it out to your production environment.
6. Set Up Monitoring and Alerts
Once the integration is up and running, you don’t want to set and forget it. Use Salesforce’s built-in monitoring tools to track syncs and identify errors in real-time. Set up alerts to notify your team if any sync failures or issues occur. This way, you can fix problems before they become larger headaches for the users.
7. Plan for Ongoing Maintenance
Salesforce isn’t static, and neither should your integration be. Over time, your data needs may change, or new processes may be added. Ensure you have a maintenance plan for updating the integration as needed. Regularly review the integration’s performance and adjust as your business grows or changes.
8. Communicate With Stakeholders
A successful integration relies on more than technical know-how; it requires good communication. Keep all stakeholders (from managers to users) in the loop about the scope, timeline, and potential disruptions during the integration process.
The video below shows the best practices of the Salesforce to Salesforce connection.
Salesforce to Salesforce Data Integration: Overview of Use Cases
When discussing Salesforce-to-Salesforce data integration, we’re diving into connecting different Salesforce orgs to share data seamlessly. Whether it’s merging data from multiple regions, syncing sales records between partner businesses, or keeping track of customer interactions across different departments, there are plenty of real-life scenarios where Salesforce-to-Salesforce integration comes in handy.
- Connecting Multiple Salesforce Orgs for Better Collaboration. Imagine a large company with different business units using its own Salesforce org. One division manages product development, while another focuses on customer service. To create a seamless flow of information between these teams, Salesforce-to-Salesforce integration allows syncing relevant data (like customer details, cases, or product updates) across orgs. This way, everyone can access the latest information, and teams can collaborate more effectively without manually exchanging data.
- Partner Collaboration for Joint Sales Efforts. Many businesses work with external partners or resellers who also use Salesforce. Instead of manually sending reports or data files back and forth, Salesforce-to-Salesforce integration allows for real-time sharing of leads, opportunities, and accounts. This setup helps partners keep track of shared sales efforts, ensuring that both parties are working with up-to-date data. For instance, if a reseller identifies a promising lead, they can instantly sync the information with your Salesforce instance so your sales team can follow up quickly.
- Mergers and Acquisitions. When companies merge or acquire other businesses, it’s common to find each entity running its own Salesforce instance. Merging all that data into a single Salesforce org can be a headache without the right tools. With Salesforce-to-Salesforce integration, companies can integrate and migrate data incrementally, syncing contacts, opportunities, and cases between the two orgs while ensuring data accuracy. This use case is precious during transitions when both entities need to maintain business continuity.
- Regional Salesforce Orgs Sync. Large organizations operating in multiple regions often have separate Salesforce orgs for each area. For example, a company might have different Salesforce instances in the U.S., Europe, and Asia. Data from each regional org can be synced into a central org to get a holistic view of global sales and operations. This way, leadership can monitor performance across all regions while the individual teams keep their local data in sync with the global system.
- Vendor or Supplier Management. If a company relies on external vendors or suppliers who also use Salesforce, integrating their systems can make managing orders, contracts, and communications a breeze. For instance, whenever an organization updates product availability or order status, its vendor’s Salesforce org is automatically updated with the latest information. This approach reduces miscommunication, ensuring all the partners have accurate data.
Summary
When your business has a requirement to connect two Salesforce orgs together for any reason, you need to carefully consider exactly why it is required, what data is required to be synced between them, the frequency in which it needs to be synced, and carefully craft a plan (and contingency plan) so that you’re not met with any nasty surprises while setting up the connection.
If you decide to use Skyvia Data Integration to connect your Salesforce orgs, just keep in mind that you’ll receive a convenient and easy-to-use solution for an honest price that saves you time and resources.
To learn more about Skyvia Data Integration, click here.
FAQ for Salesforce to Salesforce Integration

Can I control which data is shared between Salesforce orgs?
Yes, Salesforce to Salesforce integration gives you complete control over what data you want to share. You can choose to share specific records or only certain fields within records. Permissions, rules, and filters help ensure that only relevant information is shared between orgs, keeping sensitive data private while sharing useful information with your partner or other departments.
What are the most common use cases for Salesforce to Salesforce integration?
Salesforce to Salesforce integration is commonly used for:
1. Partner collaboration. Sharing leads or opportunities with external partners.
2. Mergers and acquisitions. Combining data from two separate companies or business units.
3. Regional teams. Syncing data across different Salesforce orgs for teams in various regions.
4. Vendor or supplier management. Syncing data with* vendors or suppliers using Salesforce.
Do I need technical expertise to set up Salesforce to Salesforce integration?
Setting up basic Salesforce to Salesforce integration can be done with minimal technical expertise, mainly if you use the native Salesforce features. However, for more complex integrations (e.g., involving multiple orgs or advanced data synchronization), some technical knowledge or support from Salesforce admins or developers may be required. Using third-party integration tools, such as Skyvia, can simplify the process further.
Can Salesforce to Salesforce integration handle real-time data updates?
Yes, Salesforce to Salesforce integration supports real-time data sharing. Once the integration is set up, updates made in one org are automatically reflected in the other. This approach ensures that both teams are working with the most current data, improving collaboration and decision-making across departments or businesses.