Data has become a staple for many modern businesses. We collect more insights and have become more data-driven in critical decisions. And there’s an ever-growing trend to process them faster. You can do it with Extract, Load, and Transform (ELT) or use Extract, Transform, and Load (ETL). This article will focus on Batch ETL and its close cousin, Streaming ETL.
ETL batch processing is a more traditional but solid approach. Meanwhile, stream processing is the newer kid on the block. Find out what you really need in this in-depth comparison.
Table of contents
- What is ETL (Extract, Transform, Load)?
- Batch ETL Processing: How it Works
- Streaming ETL Processing: How it Works
- Batch Processing vs. Streaming Processing: Key Differences
- Use Cases of Batch ETL
- Use Cases of Streaming ETL
- When to Choose Batch ETL vs. Streaming ETL?
- Examples of ETL Batch Processing Using Skyvia
- Conclusion
Let’s dive in.
What is ETL (Extract, Transform, Load)?
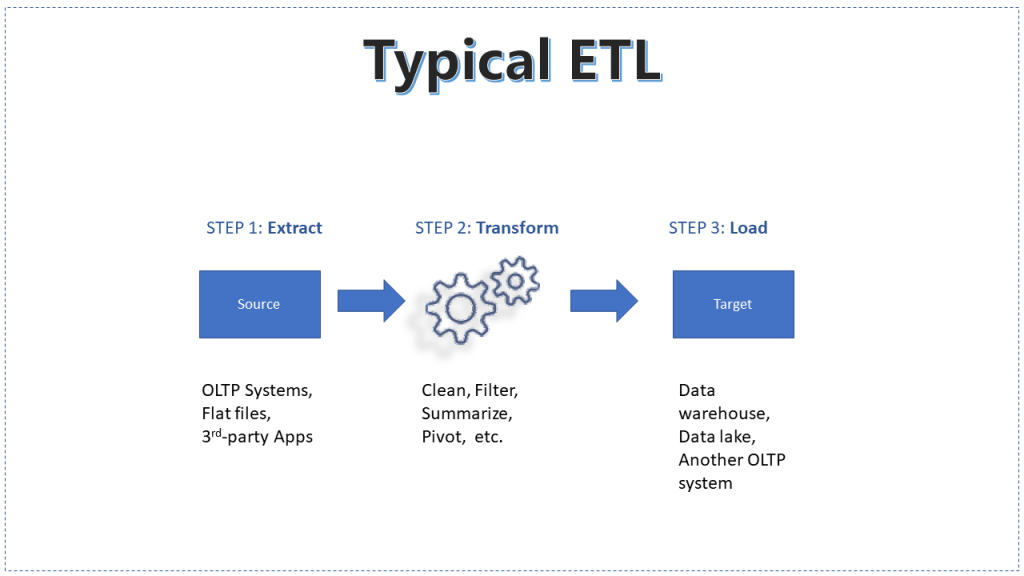
Global insights creation has grown to more than 180 zettabytes in 2025. And that’s a lot. Since the 1970s, ETL has been a data pipeline that processes all this info in three simple steps.
- Extract the information from various sources. It can be flat files like CSV or Excel. Or from relational databases like Oracle or SQL Server. And it can also be third-party sources like Salesforce or HubSpot.
- Transform it by cleaning, filtering, summarizing, and more.
- Load it to the appropriate target.
Here are some specific examples of typical ETL processes today:
- Processing of monthly sales data into a data warehouse.
- Gathering daily fingerprint scans with date and time from a biometrics machine. This approach is helpful for employee time and attendance.
- Combining client profiles for two merging companies.
ETL can also be batch or streaming. This method is perfect for information that needs to be processed immediately.
The following section describes further how a batch ETL works.
Batch ETL Processing: How it Works
The batch ETL definition is simple. It refers to data processing in batches that cover a time period.
The following steps describe batch ETL processing:
- Volumes of data are extracted and processed from the source.
- Extraction is possible via a query language like SQL or a bulk or batch API for SaaS like Salesforce.
- Extraction covers a batch window or a time range.
- Processing is triggered manually or scheduled.
Let’s review two ETL batch processing examples that happen through a stream of time.
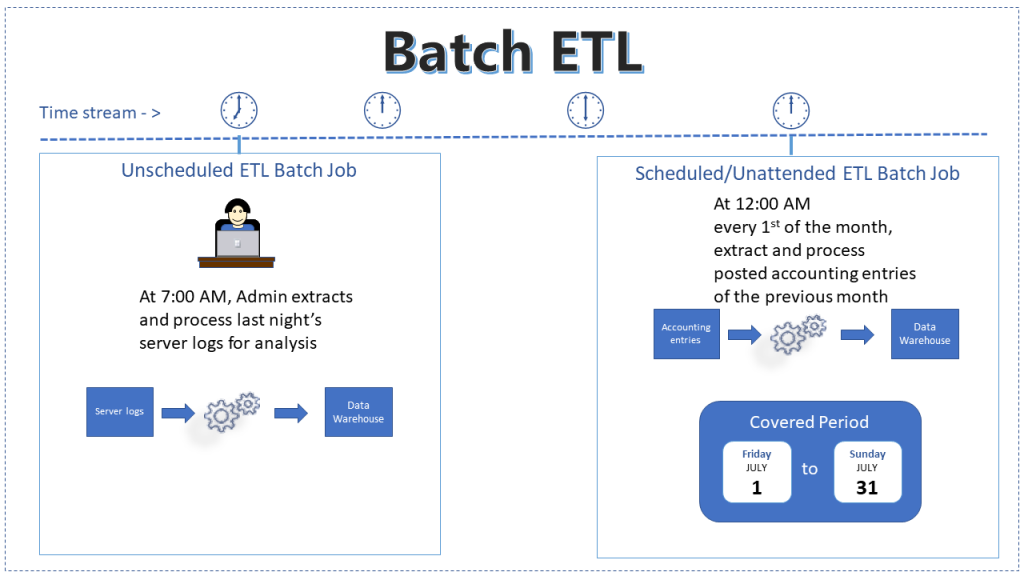
The first one goes like this:
- The administrator ran the batch process manually.
- He extracted server logs like CPU utilization, disk space, RAM usage, and more.
- Coverage is within a batch window; logs from last night. It could be from 7:00 PM to 11:59 PM.
Meanwhile, the ETL scheduler triggered another batch process at the start of the next day. And here’s how it worked:
- The process was automated to run every first of the month at the appropriate time or as needed.
- Extracted data covers posted accounting entries from July 1 to July 31 of the current year.
Note: You can perform these sorts of ETL batch processes using modern ETL tools.
But batch ETL can be challenging, as you will see later. First, let’s describe what streaming ETL is.
Streaming ETL Processing: How it Works
Streaming ETL is a data pipeline that starts when a record is available in the source. It’s sometimes called real-time ETL or stream processing. However, it’s not literally real-time because it takes a fraction of a second to extract, transform, and load the whole thing.
The following steps describe streaming ETL processing:
- Data is continuously extracted from the source as soon as it is generated. Here, sources include IoT devices, transactional databases, event logs, and APIs. And data is ingested in real-time instead of being collected in batches.
- Streaming ingestion is performed using event-driven architectures. Technologies like Apache Kafka, AWS Kinesis, or Google Pub/Sub handle high-velocity data streams in this step. Data flows into a processing pipeline without waiting for accumulation.
- Data transformation occurs in real-time. Operations like filtering, aggregation, and enrichment happen as the data flows through the pipeline. Transformations are applied immediately to ensure up-to-date insights.
- Processed data is continuously loaded into a target system. Here, storage options include data warehouses (Snowflake, BigQuery), databases, or cloud storage (AWS S3, Google Cloud Storage).
Note: Some streaming ETL workflows trigger real-time actions instead of storing data (e.g., fraud detection alerts).
Real-world examples of streaming ETL include:
- Credit card fraud detection. When you swipe the credit card, a transaction is sent to a fraud detection system for analysis. Then, a deny or approve status is returned depending on several factors.
- Location tracking. Imagine you’ve ordered something on Amazon and want to track it to the destination. GPS devices send real-time location information to monitor truck movements on a map.
- Real-time patient monitoring. Medical equipment and devices monitor patients’ vital signs to respond to emergencies quickly. This technology is widely used in intensive care units (ICUs), emergency rooms, remote patient monitoring systems, and wearable health devices to ensure continuous health tracking and timely medical intervention.
Streaming ETL processes’ architecture may also involve a stream processing platform.
For example:
- In a streaming ETL process, a data source, like an IoT device, transactional database, or application, continuously generates real-time data.
- This data is then sent to a stream processing platform like Apache Kafka, a central hub for collecting and managing the incoming data streams. From there, users can ingest the data, apply transformations, and perform real-time analytics.
Finally, the processed data can be stored in a target system, such as a data warehouse, a database, or a cloud storage solution, making it available for further analysis, reporting, or machine learning applications.
Batch Processing vs. Streaming Processing: Key Differences
Batch and streaming processing serve different purposes in data workflows, each catering to distinct data management and analytics needs.
In this section, we’ll explore the key differences between these two processing methods to help users determine the best fit for the data strategy.
1. The Approach to Processing the Information
Batch operates by collecting and processing insights in large, scheduled batches. It is suitable for scenarios where data is accumulated over time and does not require immediate action, such as financial reconciliations or business intelligence reporting.
Streaming processing, in contrast, handles data as it arrives, enabling real-time analysis and action. It is widely used in applications where instant info and responses are critical, such as fraud detection, live monitoring systems, and recommendation engines. This approach is ideal for financial services, healthcare, logistics, and media platforms that require real-time decision-making.
2. Latency
The batch has inherently high latency due to its scheduled execution. The time lag between data generation and processing can range from minutes to hours, depending on the batch frequency. This makes it well-suited for industries like finance, retail, and manufacturing, where periodic data updates are sufficient.
Streaming processing minimizes latency by continuously processing incoming data, often within milliseconds or seconds. Such a method is ideal for time-sensitive applications where immediate decision-making is required. It is widely used in cybersecurity, telecommunications, and real-time analytics, where rapid response is critical.
3. Data Volume and Velocity
The batch handles large volumes of accumulated information at once. So, it’s efficient for historical data analysis, reporting, and periodic updates.
Streaming processing excels at managing high-velocity streams, ensuring data is processed as generated. It is particularly beneficial for use cases like IoT sensor data analysis, social media feeds, and stock market transactions.
4. Scalability
Batch systems can scale but often require careful resource allocation to handle large datasets effectively. Scaling is typically achieved by adding more computational power or optimizing batch scheduling.
Streaming processing offers superior scalability by dynamically adjusting to fluctuating data loads. It is often implemented using distributed systems that support horizontal scaling, ensuring continuous and efficient insights handling.
5. Complexity
Implementing a batch is simpler, following a predefined workflow with predictable data sets and structured processing steps. So it’s easier to debug and manage the process.
Streaming processing is more complex due to its real-time nature. It requires advanced info-handling techniques, including event-driven architectures, windowing strategies, and stateful processing to ensure accurate and timely insights.
6. Infrastructure Requirements
Typically, batch operates on DWHs and requires less computational power, as processing occurs periodically.
Streaming processing also leverages cloud solutions like data lakes, real-time ingestion frameworks, and distributed computing, similar to batch processing.
However, maintaining continuous data streams at scale generally incurs higher costs due to the need for low-latency processing and high-speed storage. Such infrastructure is typically necessary for enterprises dealing with massive real-time data volumes, such as financial services, large-scale IoT deployments, and high-frequency trading platforms.
7. Error Handling
In batches, errors are detected and corrected after processing the entire one. While this allows for thorough validation, it also means errors can delay subsequent processes.
Streaming processing necessitates immediate error detection and correction to maintain data integrity. It incorporates real-time monitoring and automated recovery mechanisms to prevent inaccurate data from affecting decision-making.
8. Flexibility
The batch is relatively rigid, requiring significant adjustments to accommodate information formats, sources, or processing logic changes.
Streaming is highly adaptable, allowing for dynamic data transformations and integrations. It can quickly adjust to evolving business needs and real-time analytical requirements.
The table below briefly compares the most common criteria for using both methods.
| Criterion | Batch ETL | Streaming ETL |
|---|---|---|
| Processing Approach | Processes data in scheduled batches. | Processes data continuously in real-time. |
| Latency | High. | Low. |
| Data Handling | Large volumes of accumulated data. | High-velocity, continuous data streams. |
| Scalability | Limited. | Highly scalable, adjusts dynamically. |
| Complexity | Simpler, predefined workflows. | More complex, real-time processing challenges. |
| Infrastructure Needs | Traditional DWHs, less demanding. | Advanced, real-time computing infrastructure. |
| Error Handling | Detects and corrects errors post-processing. | Immediate error detection and correction. |
| Flexibility | Less adaptable to changes. | Highly adaptable to dynamic data needs. |
Use Cases of Batch ETL
Let’s walk through the most common scenarios where batch ETL is optimal.
Data Warehousing and Business Intelligence
Organizations use batch ETL to aggregate, transform, and load large datasets into data warehouses for reporting and analytics. Common services that support batch ETL include AWS Glue, Azure Data Factory, and Skyvia, which offer automated scheduling, transformation capabilities, and seamless integration with cloud storage and databases.
This method supports business intelligence by providing cleaned and structured data for dashboards, historical data analysis, and trend forecasting.
Financial and Accounting Reporting
Companies process financial transactions and records in batches to generate periodic reports, such as monthly balance sheets, quarterly earnings reports, and tax compliance filings. Batch ETL ensures data accuracy and consistency by aggregating large volumes of transactional data before analysis.
Customer Data Integration
Batch ETL helps merge customer data from multiple sources, ensuring accurate and consistent customer profiles for marketing analysis, as well as customer segmentation strategies. This approach enables businesses to refine targeting efforts and improve customer experience based on historical insights.
ETL for Compliance and Audit
Healthcare, finance, and other industries rely on batch ETL to process and store large volumes of data for regulatory compliance, audits, and historical record-keeping. By automating compliance data processing, organizations can meet legal obligations, pass audits efficiently,
Payroll Processing and HR Analytics
Payroll systems use batch ETL to calculate salaries, deductions, and employee benefits based on collected data, ensuring accurate and timely payroll processing. HR teams also leverage batch ETL to analyze workforce trends, monitor employee performance, and optimize talent management strategies.
Supply Chain Management
Businesses process orders, inventory data, and sales records in batches to optimize supply chain operations, demand forecasting, and pricing strategies. Batch ETL helps businesses identify stock shortages, predict future demand, and streamline logistics planning to minimize disruptions.
Data Migration and System Upgrades
Organizations use batch ETL for bulk data transfers when migrating databases, upgrading systems, or consolidating legacy data into new platforms without disrupting daily operations. ensures that historical data is accurately preserved while enabling organizations to transition smoothly to modern cloud or hybrid infrastructures.
Use Cases of Streaming ETL
The use cases below illustrate the transformative power of streaming ETL in enabling immediate decision-making and enhancing operational efficiency.
Real-Time Fraud Detection
Banks and financial institutions use streaming ETL to detect fraudulent transactions as they occur, minimizing financial losses and security risks. By analyzing transaction patterns in real time, suspicious activity can be flagged instantly, preventing fraud before it happens.
IoT and Sensor Data Processing
Manufacturing, healthcare, transportation industry, etc., rely on real-time data ingestion from IoT devices to monitor equipment performance, track health metrics, and optimize logistics. This approach ensures predictive maintenance, reduces downtime, and enhances overall efficiency.
Cybersecurity and Threat Detection
Security systems use streaming ETL to analyze network traffic and detect potential cyber threats, responding to anomalies in real-time to prevent breaches. Automated threat detection allows businesses to react instantly to unauthorized access or unusual activity, improving security.
Personalized Recommendations
Streaming ETL enables e-commerce and entertainment platforms to deliver personalized content recommendations by analyzing user interactions in real-time. method helps businesses increase engagement and conversions by showing the right products, movies, or music at the right moment.
Stock Market and Financial Trading
High-frequency trading systems depend on real-time info processing to execute trades based on live market conditions and trends. Even a fraction of a second can make a difference in financial gains or losses, making streaming ETL essential for fast decision-making.
Log and Event Monitoring
IT teams use streaming ETL to monitor system logs, detect failures, and automate alerts to ensure operational stability. This ability helps businesses proactively address technical issues before they impact users or cause downtime.
Smart City and Traffic Management
Governments and urban planners use real-time insights from traffic sensors to optimize road management and reduce congestion. By adjusting traffic signals and rerouting vehicles based on live data, cities can improve traffic flow and reduce delays.
When to Choose Batch ETL vs. Streaming ETL?
So, how to choose between batch ETL and streaming ETL? The answer depends on:
- Company’s information needs.
- Business priorities.
- Infrastructure capabilities.
If the organization works with large datasets on a set schedule and doesn’t require immediate insights, batch ETL is a practical and cost-effective solution. It simplifies data management and is convenient for structured reporting, compliance, and periodic analysis.
But streaming ETL is the better choice if your business demands:
- Real-time analytics.
- Fast decision-making.
- Continuous data updates.
This approach is crucial in the finance, cybersecurity, and IoT industries, where real-time insights can significantly impact.
The table below outlines key selection criteria to help people determine the most suitable ETL approach.
| Selection Criteria | Choose Batch ETL when | Choose Streaming ETL when |
|---|---|---|
| Data Processing Schedule | Data can be processed at scheduled intervals. | Immediate processing is required. |
| Data Type Consistency | Data formats and sources remain consistent. | Data is diverse and evolves frequently. |
| Latency Requirements | Some delay in data processing is acceptable. | Real-time data processing is critical. |
| Budget Constraints | A company has a limited budget for infrastructure and computing. | An organization can invest in real-time infrastructure and expertise. |
| Complexity Tolerance | Users prefer a simpler, predefined workflow. | Users can manage advanced real-time processing challenges. |
| Business Goals | The focus is on structured, periodic reporting and compliance. | The strategy requires quick insights and adaptive decision-making. |
Examples of ETL Batch Processing Using Skyvia
Performing batch ETL in Skyvia is simple and efficient, offering multiple options depending on each user’s needs. Skyvia provides several solutions to the ETL process. Let’s look at samples of how it solves appropriate cases of ETL Batch Processing.
- Data Replication. This ELT solution is designed to copy data between cloud applications and relational databases. This approach is perfect for data analytics use cases.
- Data Import. Facilitates ETL between two data sources, allowing for seamless data movement in either direction and vast abilities of mapping and transformations. This method also supports reverse ETL, where a data warehouse acts as the source and a cloud app is the target. It’s useful when copies of large data sets need to be kept up-to-date in the database or DWH.
- Data Flow. Defines how data moves from source to destination, undergoing extraction, transformation, and loading (ETL). It includes:
- Source Connection. Extracting data from databases, cloud storage, or APIs.
- Data Transformation. Cleaning, filtering, aggregating, or enriching data before loading.
- Destination Mapping. Storing transformed data in a data warehouse, database, or another system. Enables complex ETL workflows, allowing the integration of multiple data sources and conditional transformations.
- Control Flow. While Data Flow handles the movement of data, Control Flow manages the execution sequence, dependencies, and conditions within the ETL pipeline. This allows for:
- Task Scheduling and Automation. Ensuring ETL jobs run at the right time.
- Error Handling and Retry Logic. Managing failures and ensuring data consistency.
- Conditional Workflows. Running specific tasks based on predefined rules.
- ETL Data Pipeline Designer: A Visual Approach to Data Workflow helps users build, manage, and orchestrate their ETL processes without coding. These tools offer drag-and-drop interfaces to define Data Flow pipelines, meaning mapping and transforming data from source to destination, and Control Flow orchestration, meaning automating dependencies and job execution.
How to Build an ETL Pipeline with Batch Processing: Step-by-Step Guide from Skyvia
When integrating data between systems, there are two primary approaches: data replication and data flow. Each serves a different purpose, depending on how frequently data updates are needed and whether transformations are required before loading.
- Data Replication copies data from one system to another without modifications to ensure a consistent backup, supports reporting needs, and allows easy access to historical info. It’s best for users who need a straightforward, scheduled sync to maintain data consistency across systems.
- Data Flow moves and transforms data in real-time or near real-time, enabling enrichment, filtering, and automation of workflows. This approach is ideal for users who require immediate data updates, complex transformations, and automated business processes.
Let’s take a closer look at how each works. A great example is extracting data from Salesforce and loading it into the Azure SQL Database. Let’s review two examples of how to do it.
Data Replication
As discussed earlier, batch ETL is widely used for data warehousing and business intelligence, enabling businesses to aggregate and transform large datasets efficiently. One of the everyday use cases is data replication, where data is regularly extracted from a source system and loaded into a target database for analysis.
The first step is to go to the Skyvia sign-up and create the two connections needed for our batch ETL examples.
Creating the Salesforce Connection
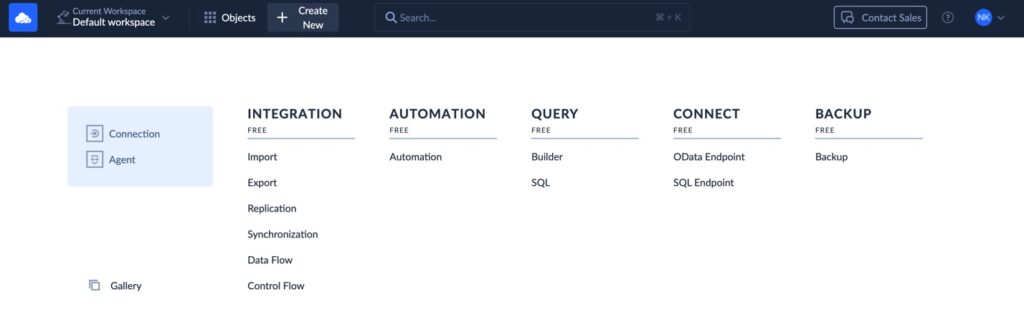
- In Skyvia, click + Create NEW > Connection.
- Type Salesforce in the Select Connector box.
- Click the Salesforce icon.

Note: You need a valid Salesforce account, or this step won’t work. So, check the configuration below.
- Name your connection.
- Select the production environment.
- Select OAuth 2.0.
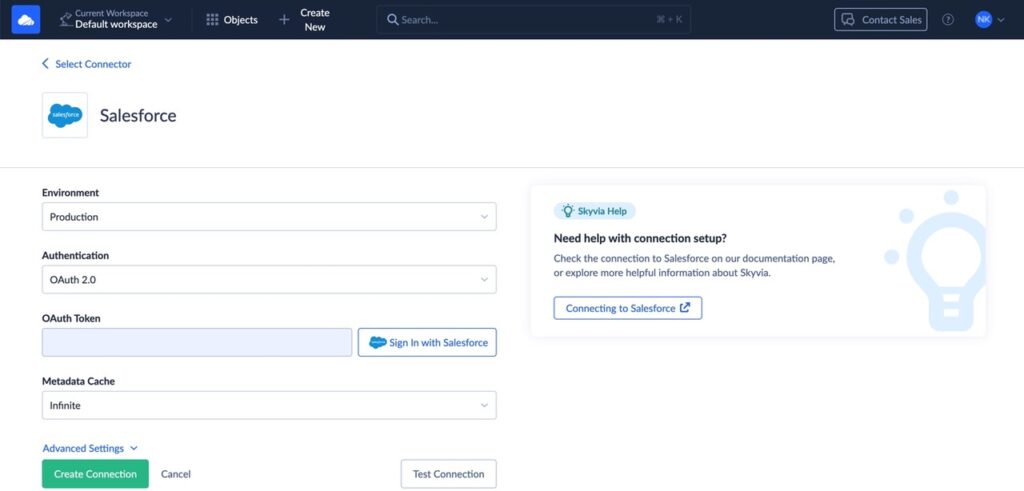
- You’ll get a security key (OAuth token) after signing in.
- Then, click Test Connection.
- Click Create Connection. When it’s done, click Save Connection to finalize the settings.
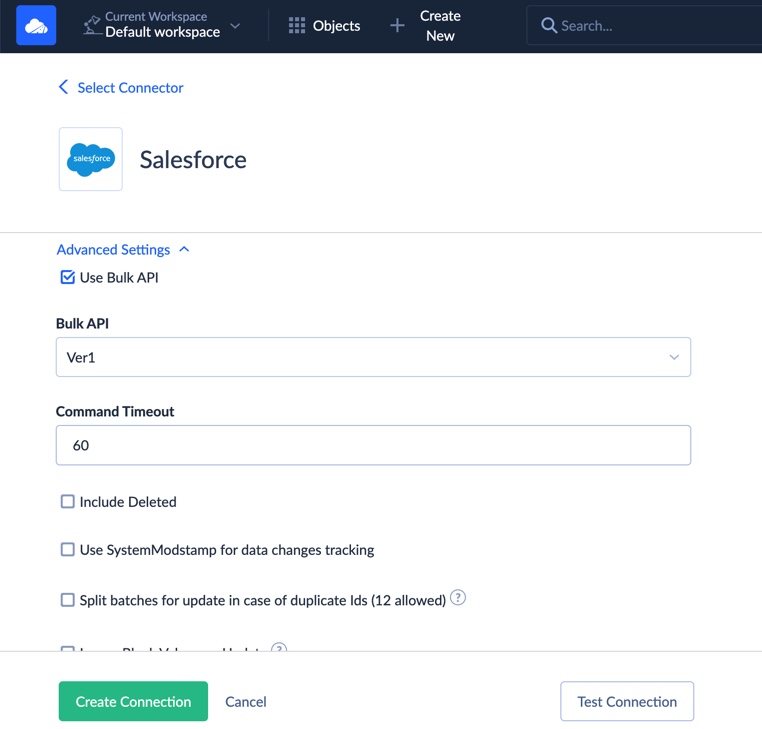
Note: Don’t uncheck the Use Bulk API checkbox in Advanced Settings. This will use batch API calls. That will let you avoid reaching your API request limits and allocations.
Then, you’re ready to use this connection in a Skyvia package.
Creating the Azure SQL Database Connection
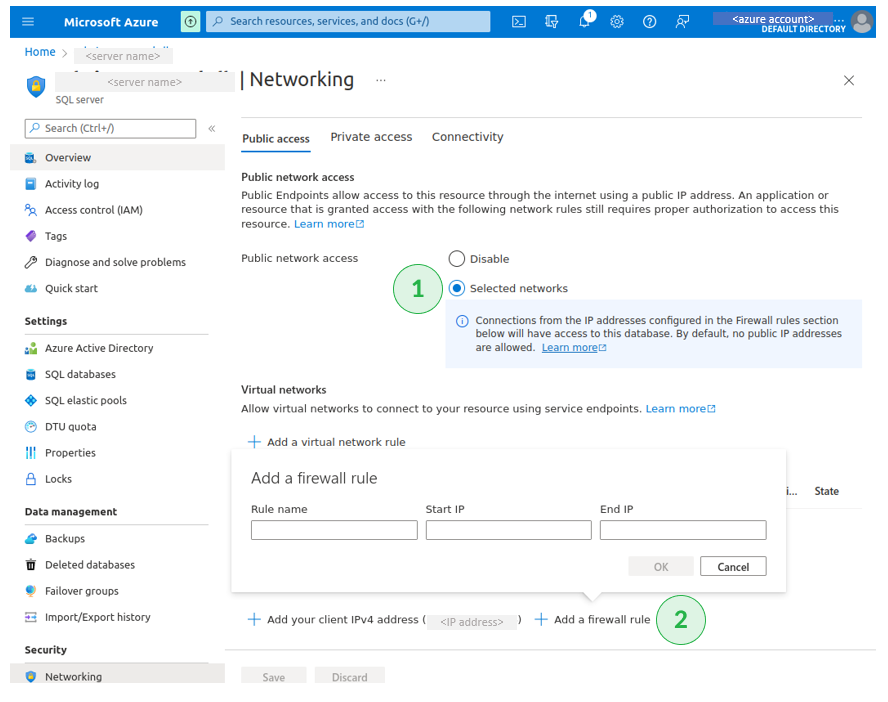
After you’re registered in Skyvia on the previous steps, let’s create the Azure account to make this connection work. Note: In this step, a fully managed PaaS database and a table where the Salesforce records will be loaded must be created and ready to work. You also need to whitelist Skyvia’s IP addresses in Azure. One way to do it is by enabling public network access with firewall rules. See below.
Create a new Azure SQL Server Connection
- Click + Create NEW > Connection.
- Type SQL Server in the Select Connector box.
- Click the SQL Server icon.

Configure the Azure SQL Server Connection
- In the Azure SQL database, click Connection Strings. You’re going to need the server’s name, User ID, and database name, as it’s shown here.
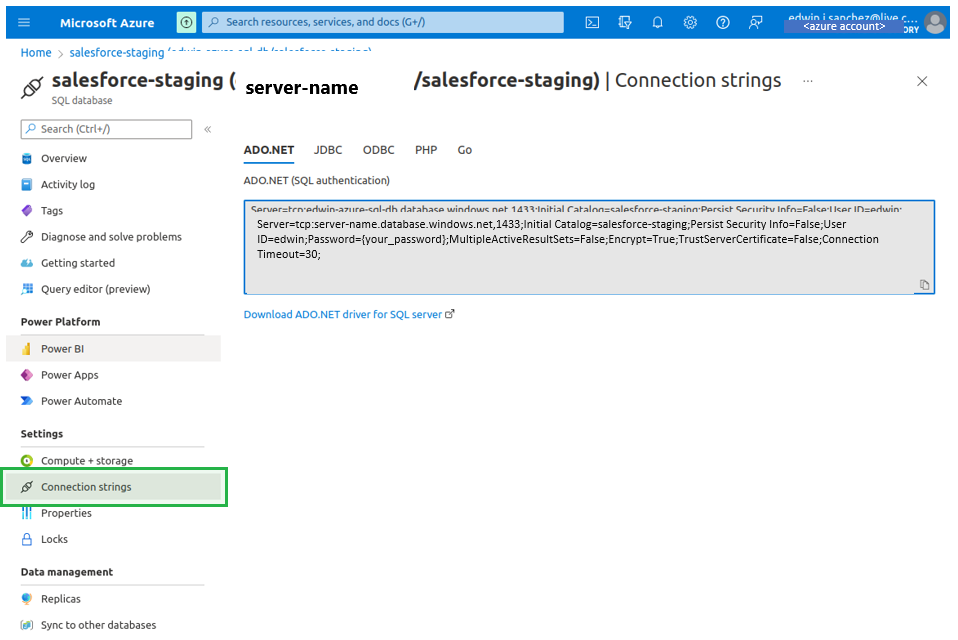
- Then, go to Skyvia and set the appropriate parameters (see the screen below).
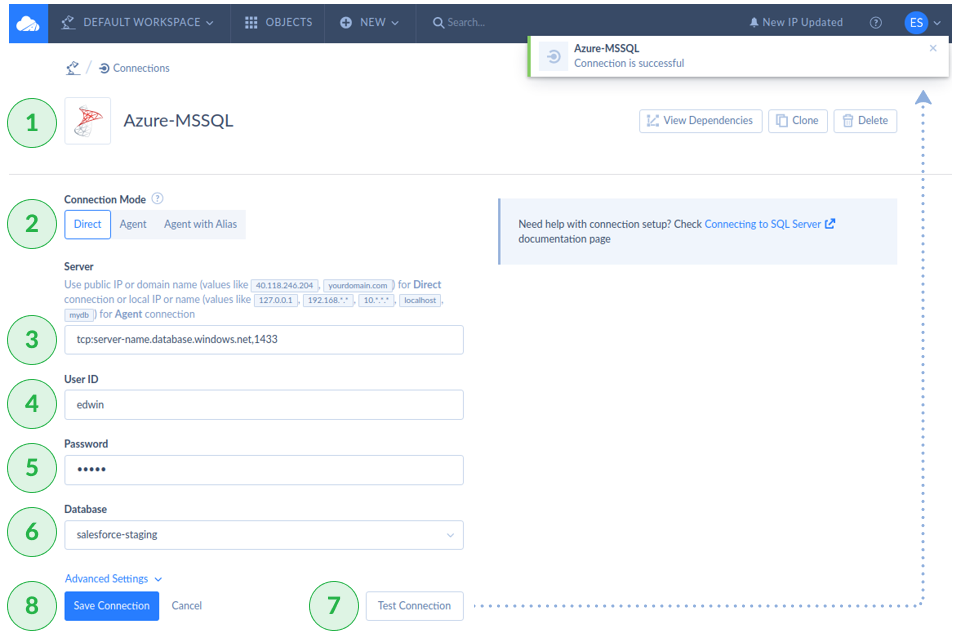
- Test Connection will succeed if you use the correct credentials.
- Then, click Create Connection to save the parameters.
Batch ETL Example 1: Replicating Salesforce to Azure SQL Database
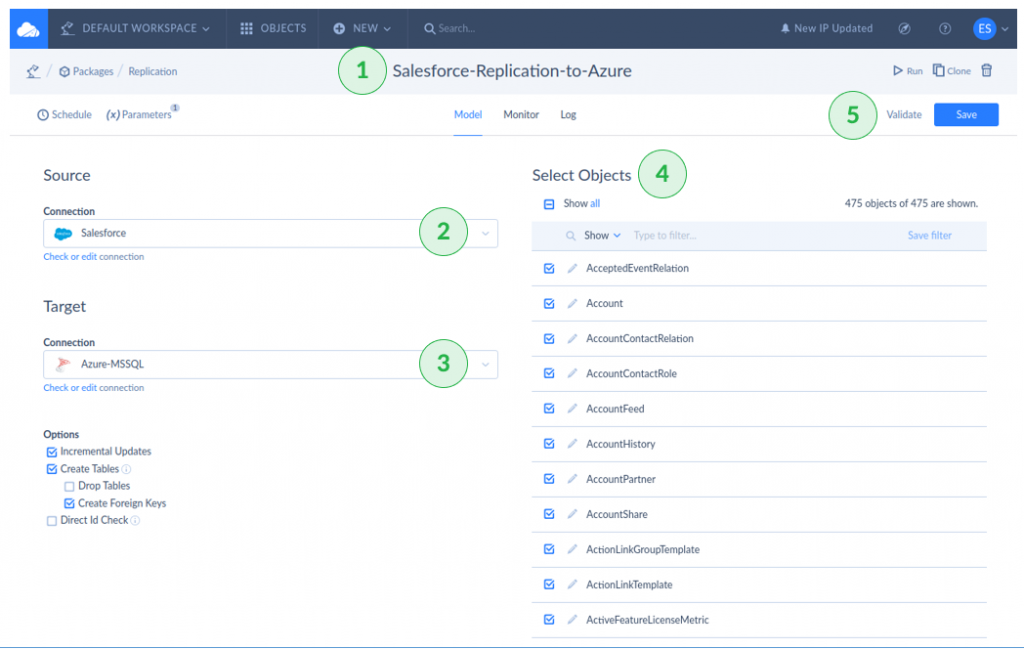
It’s time to build our easy example: a Skyvia Replication Integration. The following shows Salesforce to Azure SQL Server database replication.
- Name your replication package.
- Specify “Salesforce” as the Source.
- Specify “Azure-MSSQL” as the Target.
- Select the Salesforce objects you want to replicate.
- Validate and save your package.
- Then, test it by clicking Run in the top-right corner of the page. Use external tools like SQL Server Management Studio to check the replicated data.
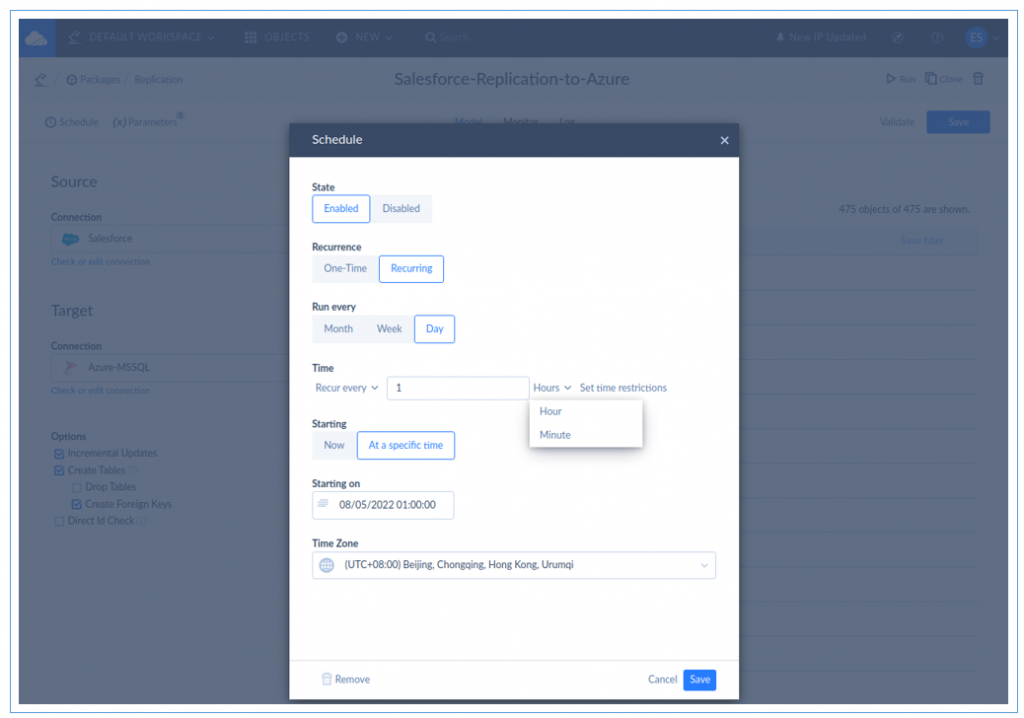
- Then, you can schedule this package to run at a set time. It can be a one-time or recurring schedule. It’s all up to you. See below.
Batch ETL Example 2: Using Skyvia Data Flow to Load Salesforce Data to Azure SQL Database
Our next example is a more flexible ETL solution using a Control Flow and Data Flow.
We are going to use a simple example so this solution is easier to understand. Then, you can use this knowledge to do complex Control Flows.
To do this, we will extract the Contacts from Salesforce. Then, add a new column as a transformation. Finally, store the results in Azure SQL.
We will use the dummy Contacts data created when you register to Salesforce.

So, we expect seven names with initials present in Azure after the package runs.
Anyway, here are the steps:
Creating a Control Flow
- Click + Create NEW > Control Flow.
- Name your Control Flow (in the screenshot below, the name is Salesforce-Contacts-to-Azure).
- Drag and drop an Action Component between Start and Stop.
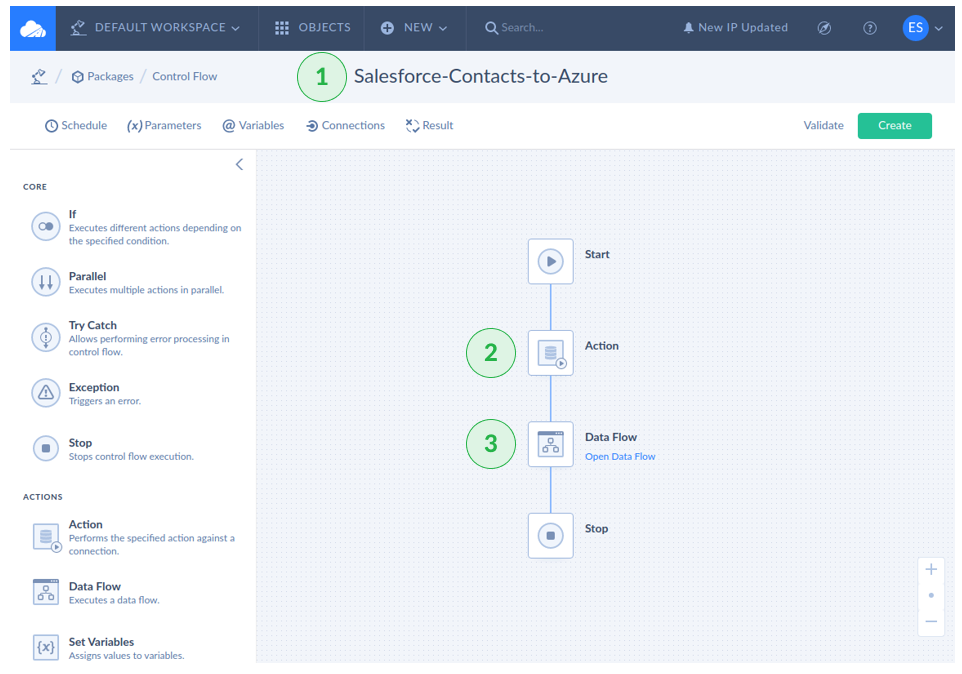
- Drag and drop a Data Flow between Action and Stop.
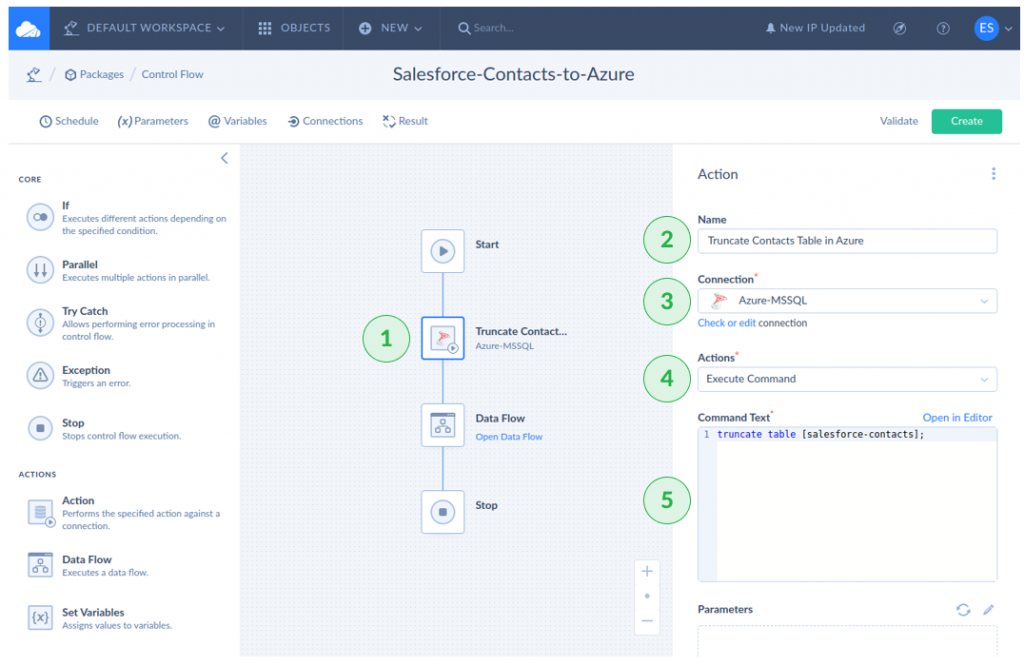
Configuring the Action Component
For simplicity, we will use a full-load ETL to avoid duplicates. You can also do an incremental load in Skyvia, but we won’t explain it here. So, the first action will remove all the records in the target table.
- Click the Action icon.
- Name the Action.
- Select the Azure-MSSQL connection.
- Select Execute Command for the Action.
- Specify the Command Text.
Configuring the Data Flow
- Click the Data Flow component to start.
- Click Open Data Flow. Then, a new page will appear with a blank Data Flow.
- Drag and drop a Source.
- Drag and drop an Extend transformation.
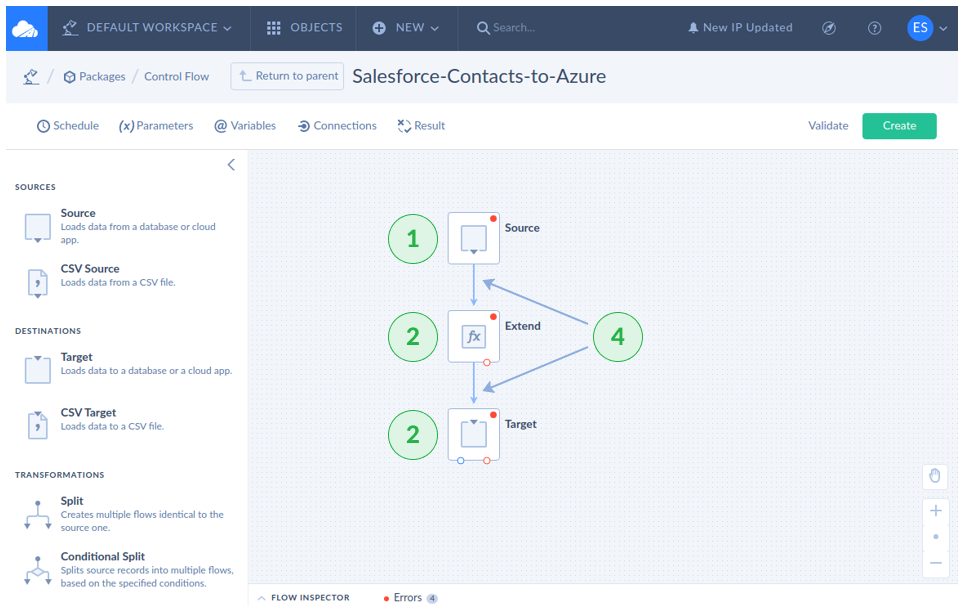
- Drag and drop a Target.
- Connect the arrows to each component.
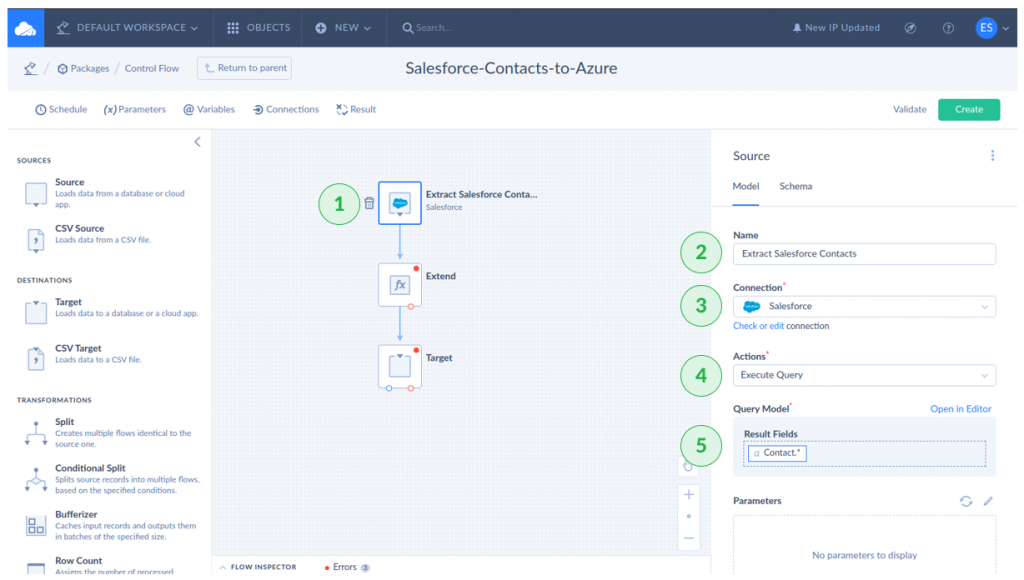
Configuring the Source
- Then, click the Source icon and name it
- Select the Salesforce connection.
- Select Execute Query for the Action.
- Click Open in Editor. Find the Contacts table and click it.
- Drag the Contacts* to the Result Fields box, then click Apply.
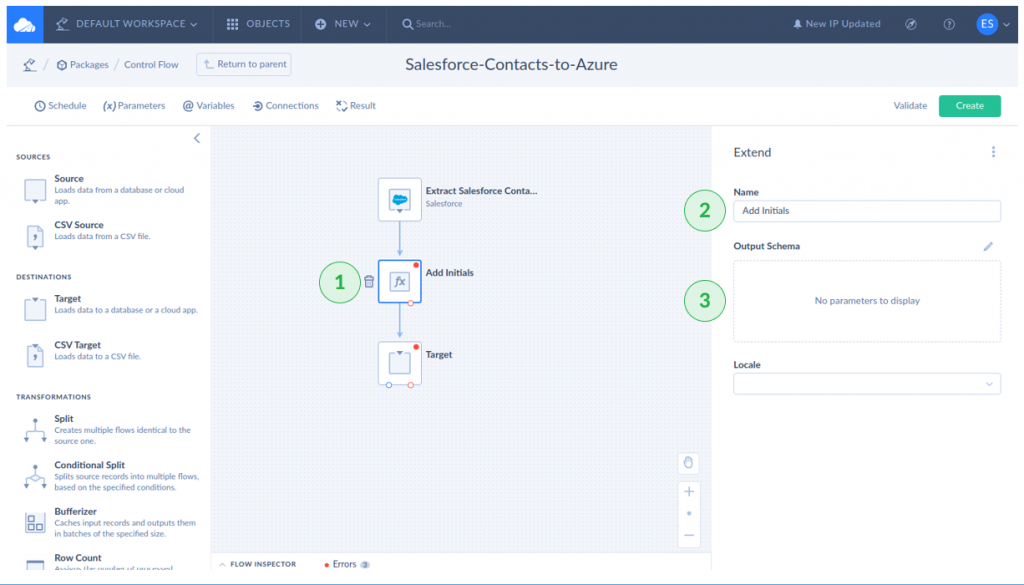
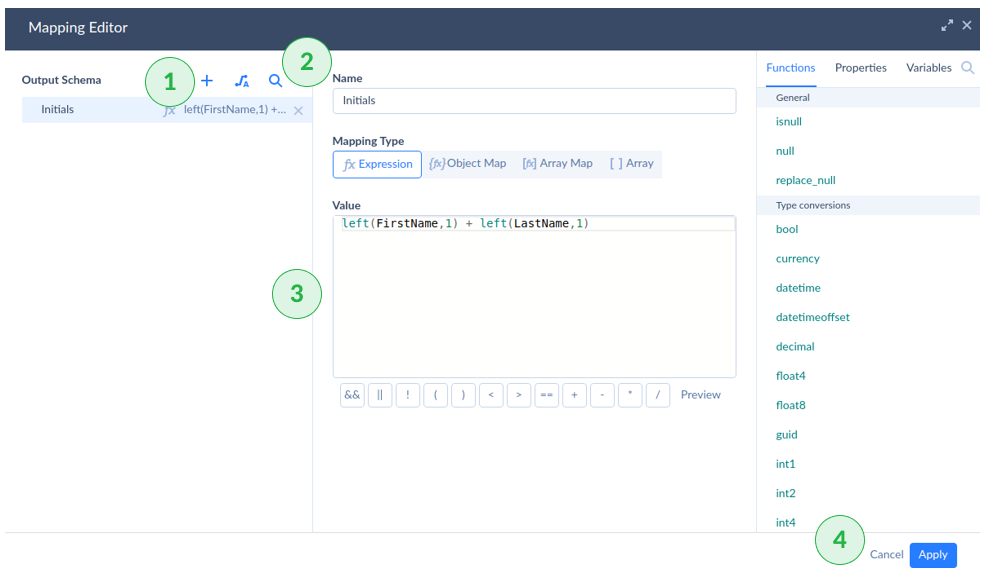
Configuring the Extend transformation
- Click the Extend transformation icon.
- Name the Extend transformation.
- Click the pencil icon in Output Schema.
Specifying the expression for the new column
- Click + to add a new column.
- Name the new column.
- Enter the expression to extract name initials using the left function.
- Click Apply.
Configuring the Azure Target
- Click the Target icon.
- Name the Target.
- Select the Azure-MSSQL connection.
- Select Insert for the Action.
- Click dbo.[salesforce-contacts] or the name of your table in Azure.
- Click the pencil icon in Parameters. A pop-up window will appear.
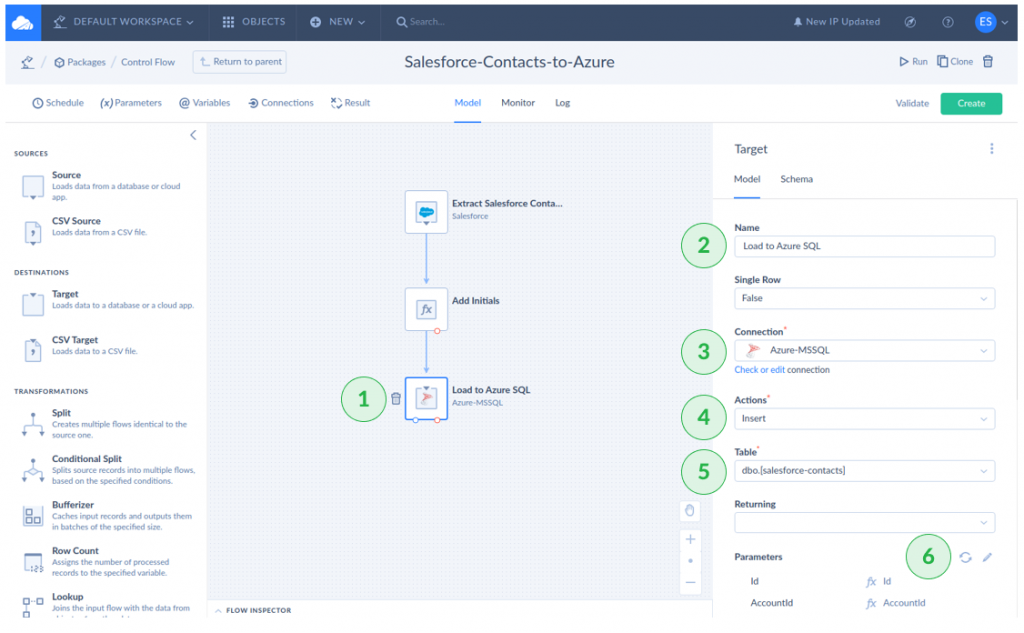
- Click the Auto Mapping icon, then click Apply.
- Click Create in the upper right corner to save the work.
- Then, click Run. The result of the batch ETL is shown below. Compare it to the Salesforce screenshot earlier.

This simple Control Flow can include more data flows that handle other Salesforce tables. You can make a parallel execution or run it in succession.
You can also make a schedule to run based on the appropriate needs. The configuration is the same as the one for the replication package earlier.
Conclusion
If you work with large data volumes that don’t require real-time updates, batch ETL processing is a good choice. While it provides simplicity and efficiency, selecting the right tool can make a bit of magic. If you’re planning a batch ETL project, Skyvia offers a user-friendly, flexible solution that meets a variety of ETL needs, like data migration, integration, or synchronization. The platform simplifies all these processes. So, you may focus on insights rather than infrastructure. Why not try it and see how such a system can streamline the data workflows?
FAQ to ETL Batch Processing

When should I use Batch ETL instead of Streaming ETL?
Batch ETL is ideal when:
– Data freshness is not critical (e.g., daily reports, historical analysis).
– Processing large data volumes efficiently is a priority.
– The data sources don’t generate updates frequently.
– Cost optimization is a key concern since batch jobs are often cheaper.
What are the best use cases for Streaming ETL?
Streaming ETL is best for:
– Real-time analytics (e.g., fraud detection, stock market analysis).
– Event-driven applications (e.g., IoT, monitoring logs).
– Continuous data ingestion from sources like Kafka or IoT devices.
– Low-latency use cases where instant processing is required.
What are the main challenges of Streaming ETL compared to Batch ETL?
Streaming ETL comes with challenges such as:
– Higher complexity in implementation and maintenance.
– Increased infrastructure costs due to always-on processing.
– Handling late-arriving or out-of-order data.
– Ensuring exact-once processing and consistency.
How do costs compare between Batch ETL and Streaming ETL?
Batch ETL is typically more cost-efficient since it runs periodically, optimizing resource usage. On the other hand, Streaming ETL requires constant resource allocation, which can lead to higher operational costs depending on volume and latency requirements.