Power BI struggles with what every BI tool struggles with – data that arrives broken, information with holes, processes requiring too much human babysitting. Proper ETL workflows turn that disorder into transparent insights people can trust when making decisions. That’s the entire point of ETL in Power BI.
In this article, we’ll explain what ETL is in Power BI, why it is not an ETL tool, and how to perform extract, transform, and load tasks using the built-in Power BI tools. We’ll also define the main ETL challenges for Power BI and how dedicated ETL tools may help.
Table of contents
- What is Power BI?
- What is ETL?
- Why do you need ETL in Power BI?
- Is Power BI an ETL tool?
- How to perform ETL in Power BI
- ETL Challenges in Power BI
- Skyvia ETL Tool for Power BI
- Conclusion
What is Power BI?
Power BI is a collection of software services, apps, and connectors that combine to turn unrelated data sources into coherent, visually immersive, and interactive insights. – Microsoft Docs.
It’s a diverse business intelligence platform designed by Microsoft to help organizations analyze and visualize raw data so that lightbulbs near the data analysts’ team turn into strategic decisions. That is possible through the following features:
- Interactive visualizations.
- Advanced analytics.
- Real-time dashboards.
- Data transformation.
Microsoft Fabric, the cloud-based Power BI Service, and the desktop edition of Power BI are all available.
What is ETL?
ETL means Extract, Transform, Load: an assembly line where information gets pulled from sources, cleaned up or restructured, and stored in one place, whether that’s a data warehouse (DWH), data lake, or any system designed to handle the unified output.
Review the ETL process diagram below.
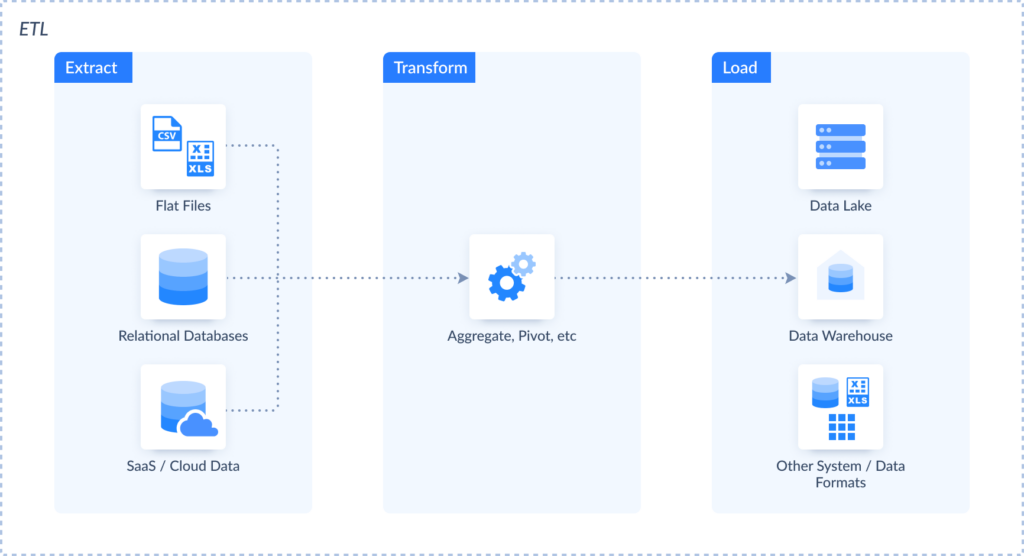
From Skyvia to Informatica to Talend, ETL-dedicated tools are designed to do the extract-transform-load dance at scale. They support a mix of inputs and outputs, and can shape streams of data mid-flight, so you’re not just moving information, you’re improving it.
Why do you need ETL in Power BI?
ETL processes inside Power BI environments produce datasets worth analyzing rather than datasets that exist. Transformation cleans up inconsistencies, fixes accuracy issues, standardizes formats, and then loads everything into Power BI, where visualization can happen without the constant worry that the underlying data is nonsense.
Take ETL standardization formats and scrubbing inconsistencies – businesses get cleaner reports, which produce smarter decisions. Skip ETL and you’re stuck wrestling mismatched formats and manual prep work that sabotages analytics before it starts.
Is Power BI an ETL tool?
It may seem that standalone Power BI can also be called an ETL tool. However, that’s not quite so. Power BI is primarily a business intelligence platform that includes some ETL capabilities. It is designed to help users with analysis, reporting, and visualization. It allows you to create interactive reports and build dashboards that reflect your current reality – the truth and nothing but the truth. Power BI includes Power Query and Power BI dataflow, which can solve some ETL-like tasks.
How to perform ETL in Power BI
You can use several tools in Power BI that may help you with ETL. We will cover all the possible options in this article, so in the end, you will have an approach that works for you. Let’s start.
Using Power Query for ETL
Let’s implement ETL in Power BI using Power Query. It is the built-in data preparation engine that involves the following capabilities we’ve already touched briefly a bit earlier:
- Extract: the ability to connect to different sources and retrieve data from them.
- Transform: its visual editor enables various transformations such as sorting, grouping, column splitting, and more.
- Load involves ingesting the data from the previous stage to a separate destination, which can be a database or DWH. In this case, the data remains within Power BI or is loaded into an Azure Data Lake.
Best for
- Analysts shaping data directly in Power BI Desktop.
When transformations are simple to moderate and stay within a local report.
STEP 1: Connect to the Data Source
To see this in action, let’s use Power Query ETL for an SQL Server data warehouse in Power BI.
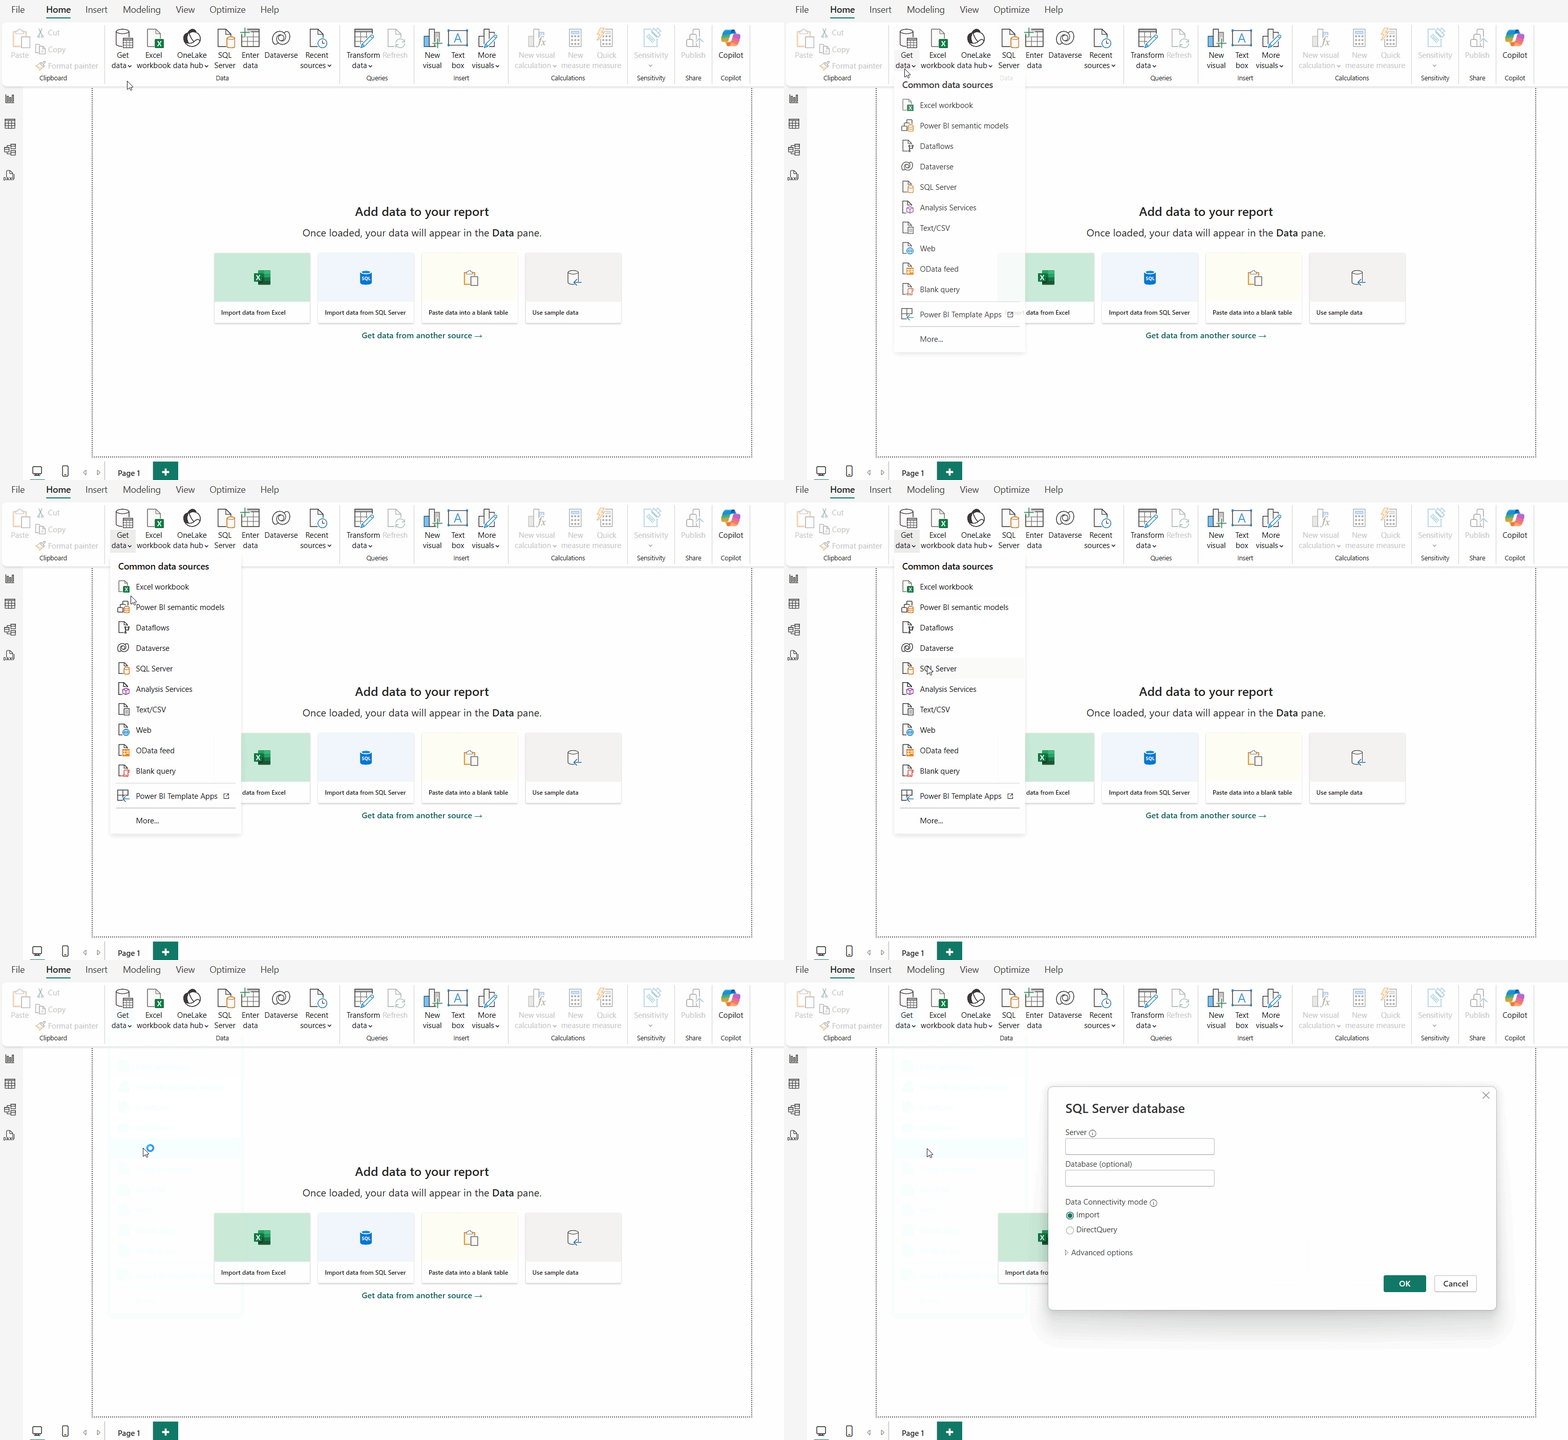
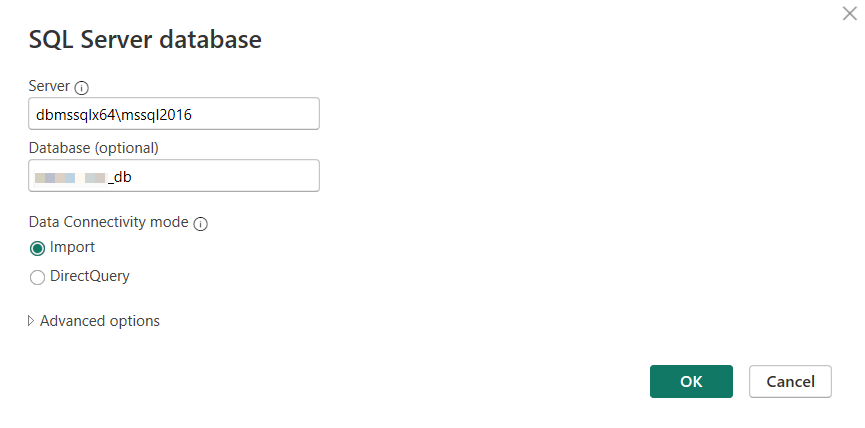
Specify the connection settings for the source. You may need to provide a user ID and password when you click OK.
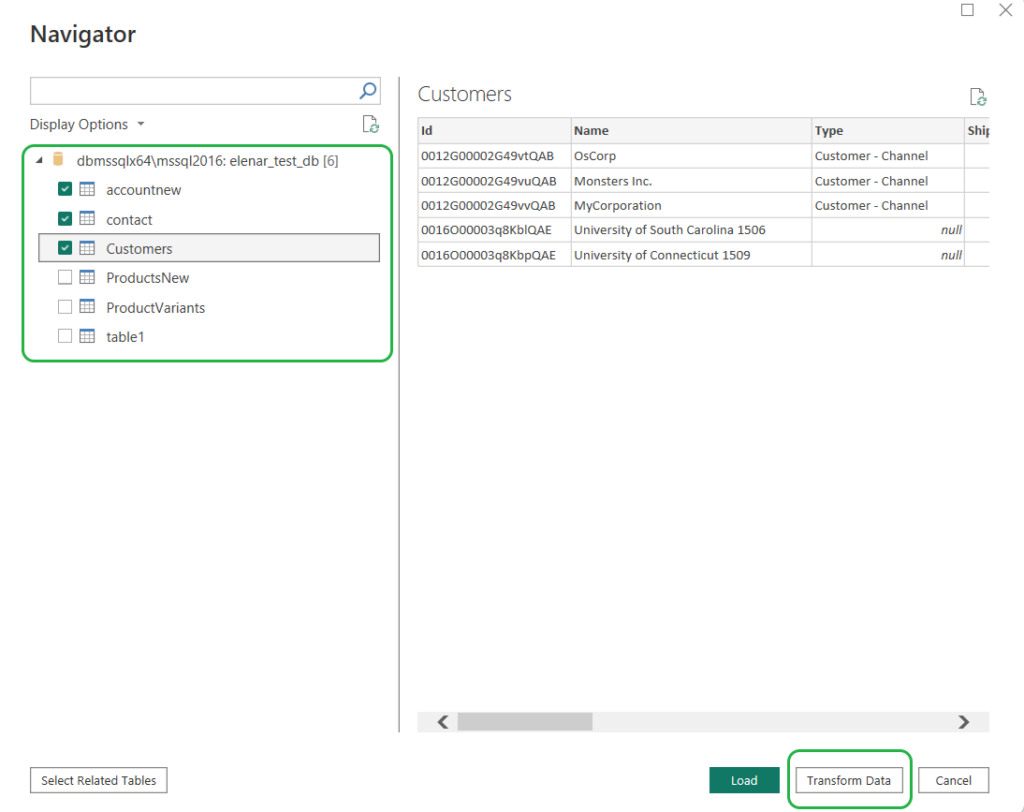
STEP 2: Select Data
Select the tables you want to include in the report and click Transform Data to start the next step.
STEP 3: Transform Data
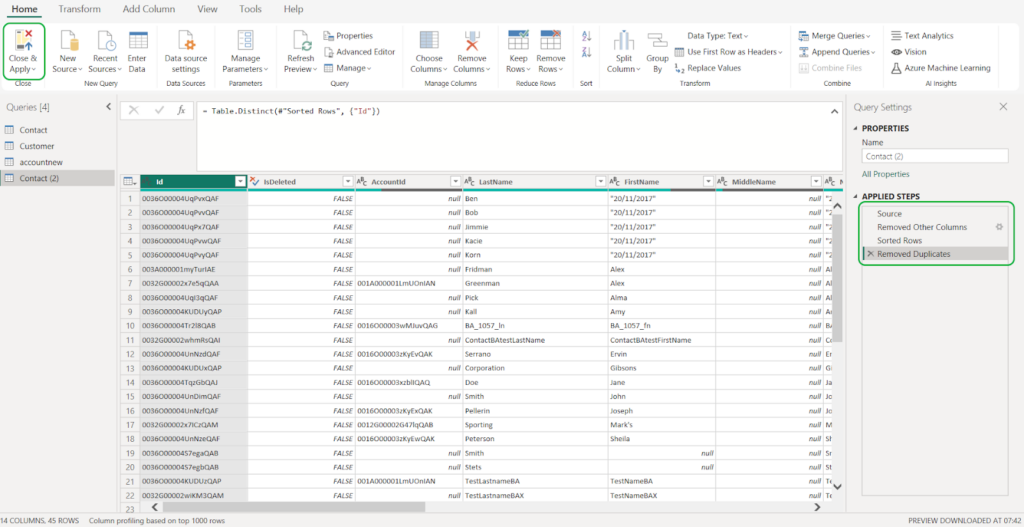
Power BI offers various transformations, from simple sorting or grouping to running Python scripts. Below, we demonstrate several simple actions. Let’s try to clean up the source for the report. We select the specific columns, sort the data, and split them into one of the columns:
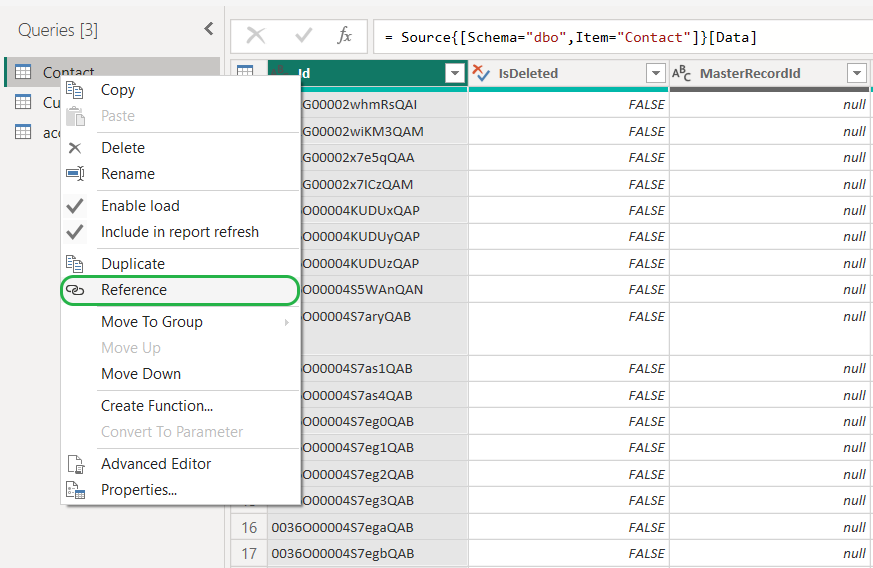
- Create a new query by referencing an existing table. Right-click the table from which you want to create a new query and select Reference. Another query with *(2) suffix will appear.
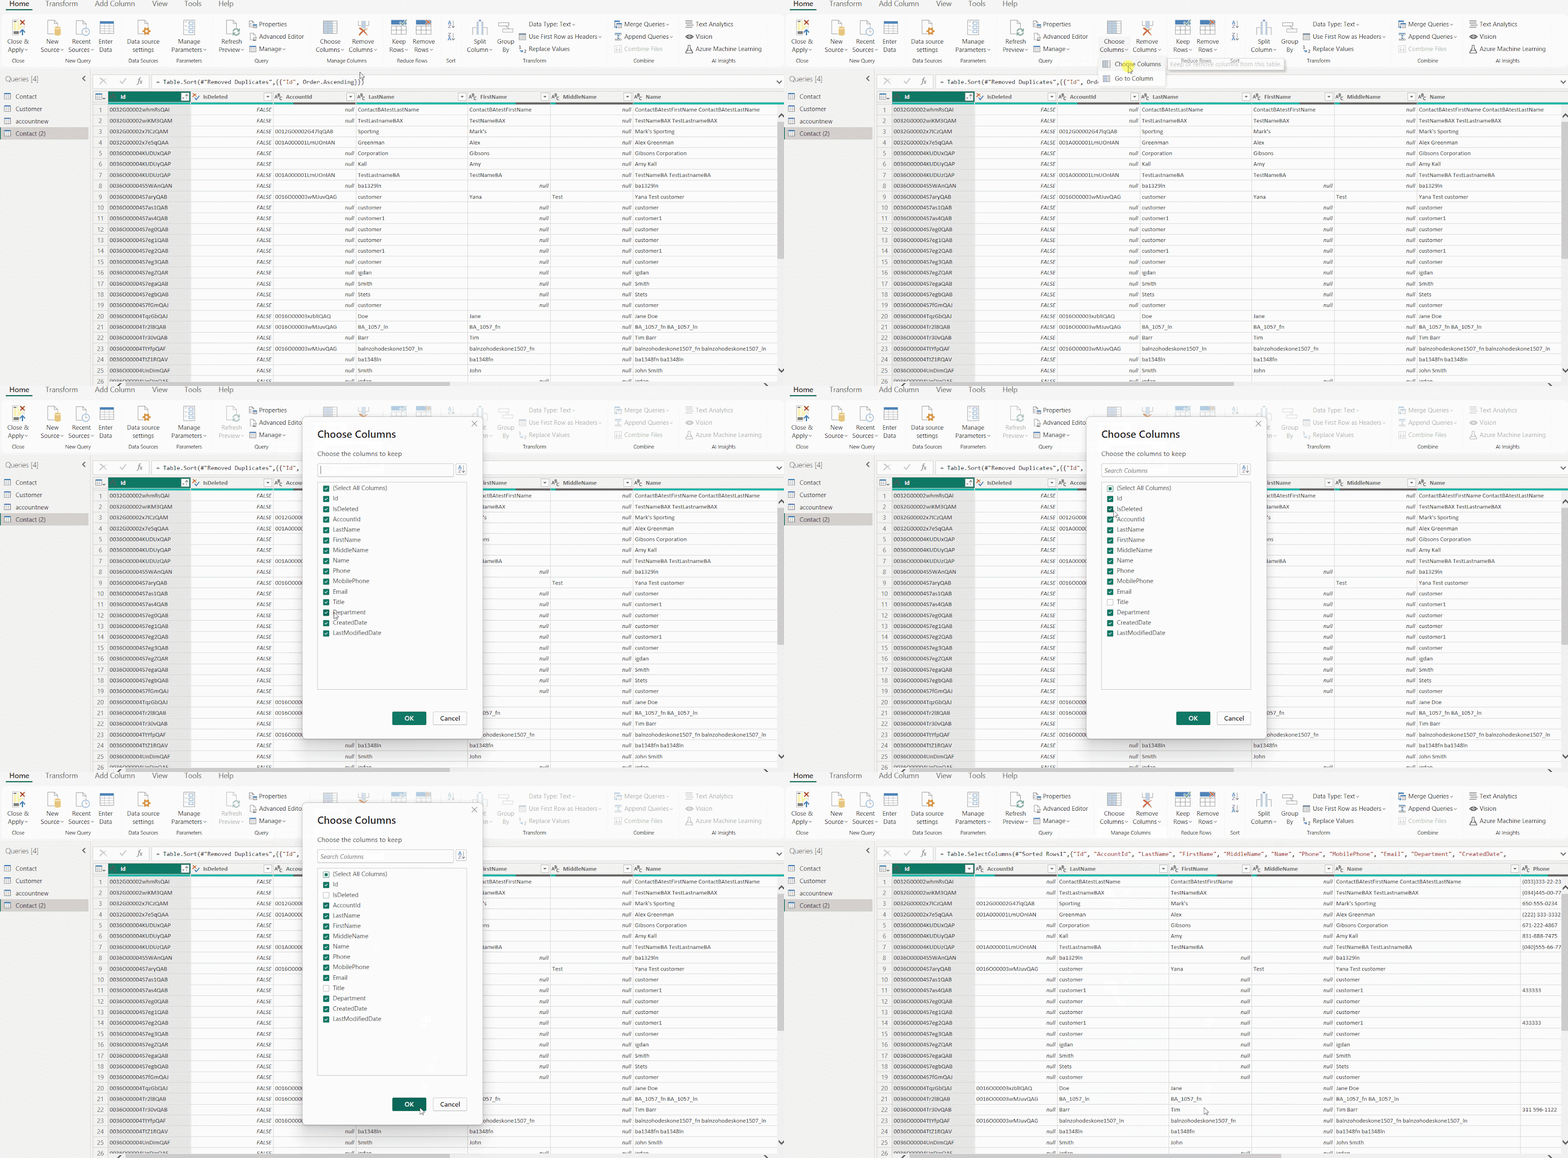
- Click Choose Columns and select Choose Columns again to include/exclude the necessary data in the report.
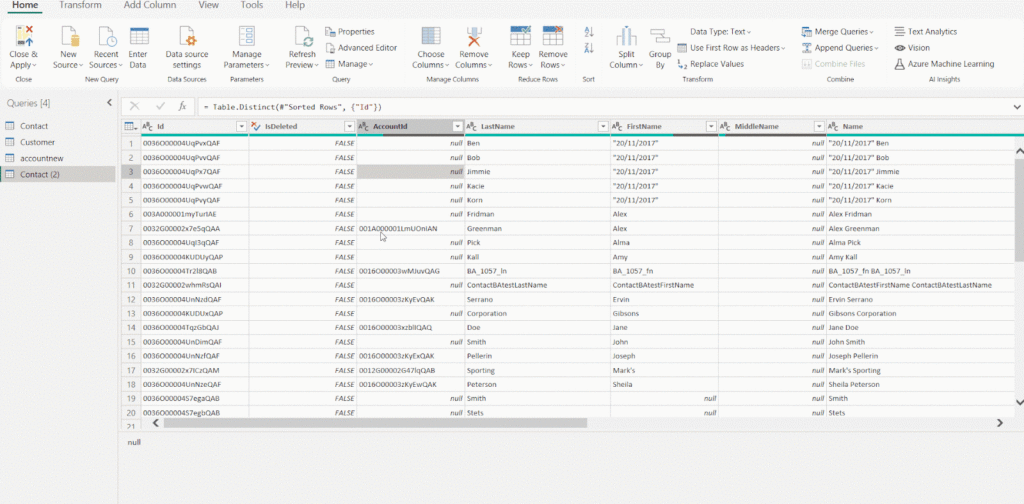
- Select the column by which you will sort the data and click the sorting button.
- Let’s remove duplicate records. Click Remove Rows and select Remove Duplicates.
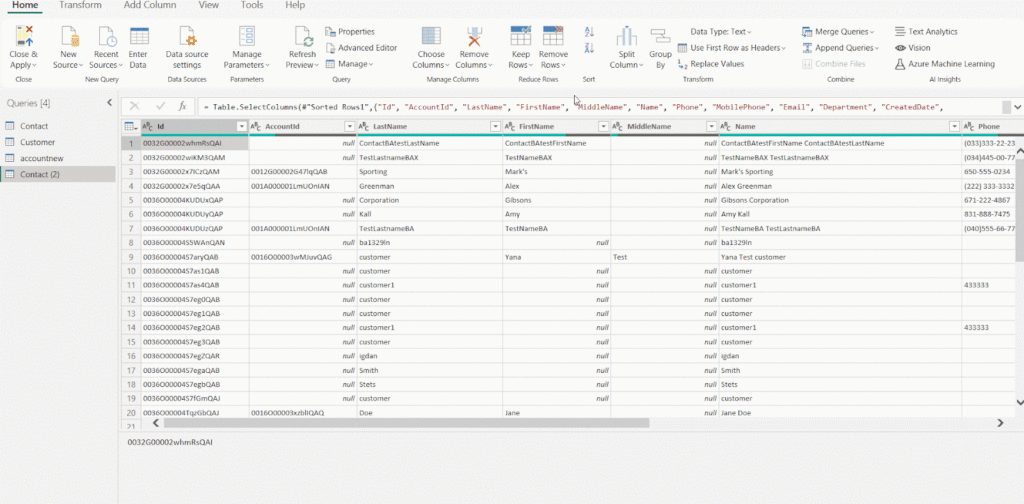
All the performed transformations appear in the right pane under Applied Steps. You can select any of them to modify a step.
Using Power Query M Formula Language for ETL
Power Query provides a visual editor that works well for straightforward tasks, but advanced transformations often require going deeper. Everything happening in that friendly interface gets coded in M, Power Query’s formula language, working behind the curtain. The M code representing all those actions from above looks like this:
let
    Source = Contact,
    #"Removed Other Columns" = Table.SelectColumns(Source,{"Id", "IsDeleted", "AccountId", "LastName", "FirstName", "MiddleName", "Name", "Phone", "MobilePhone", "Email", "Title", "Department", "CreatedDate", "LastModifiedDate"}),
    #"Sorted Rows" = Table.Sort(#"Removed Other Columns",{{"Name", Order.Ascending}}),
    #"Removed Duplicates" = Table.Distinct(#"Sorted Rows", {"Id"})
in
    #"Removed Duplicates"
If you want to do advanced transformations using the Power Query engine, you can use the Advanced Editor to access the query script and modify it as you wish.
When finished, click Close & Apply. As a result, your data will be imported to Power BI Desktop.
Using Power BI Dataflows for ETL
Dataflow is another tool that can perform ETL-like tasks. Power BI Dataflows are collections of entities or tables created and managed in workspaces in the Power BI service. That is much like a table in your database. You can use dataflow output in other Microsoft products and services.
Best for
- Teams that want reusable, self-service ETL powered in the cloud.
- Great for prepping shared datasets once and using them across many reports.
When you use Power Query, all the transformations you perform remain within the product where you use it. Dataflows don’t limit you to Power BI or Excel. You can store the dataflows output in other storage options, such as Dataverse or Azure Data Lake Storage Gen 2.
Note: Dataflows are available for users with a Pro license and a Premium Per User (PPU) license.
Creating Dataflows In Power BI Service
This method is suitable for users of the standalone Power BI Service, which is now a component of Microsoft Fabric.
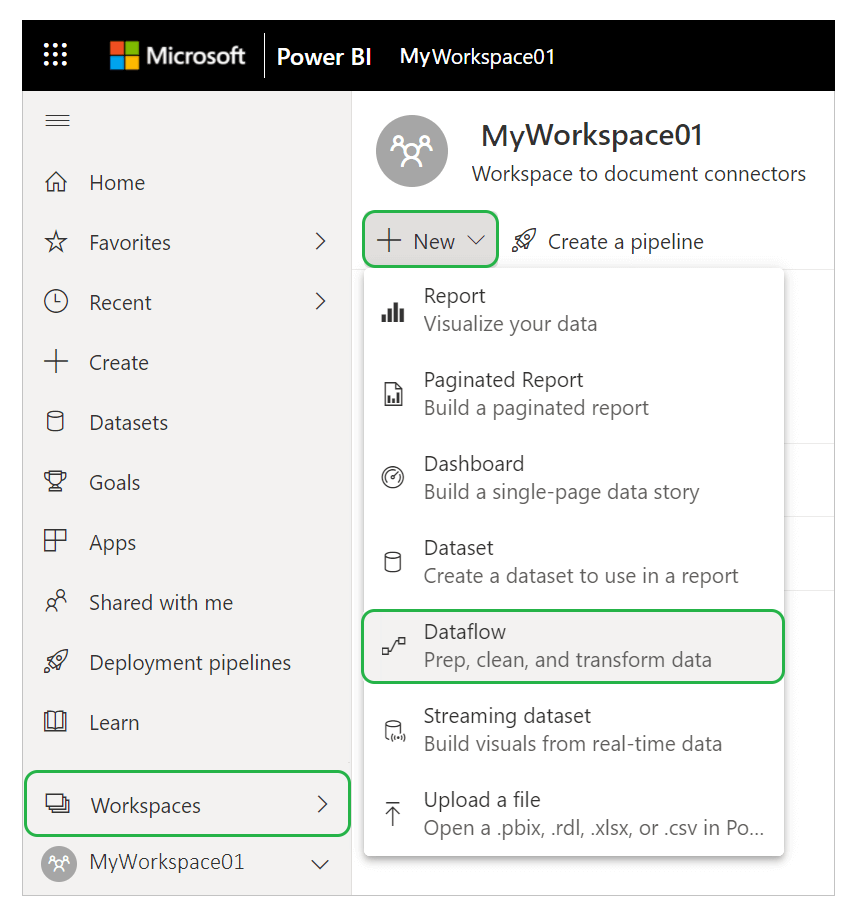
Creating Dataflows is similar to the one we did with Power BI Desktop because of ETL Power Query. But first, log on to your Power BI Service. Open your workspace and click New. Then, select Dataflow.
There are five options for creating a Dataflow:
- New data source.
- Linked tables.
- Computed tables.
- Import/Export.
- CDM folder.
Let’s look at each of them in detail.
Create Dataflows Using New Data Source
This method allows you to connect to a source and select the needed tables.
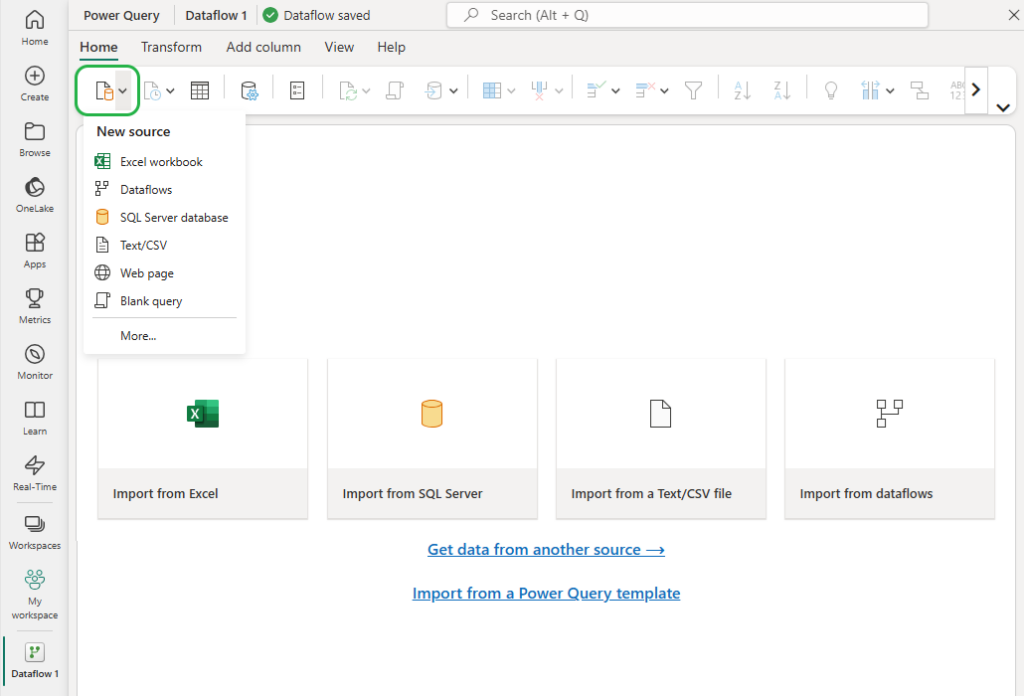
- Click Get Data and select the source.
- Connect to the source.
- Select objects to extract.
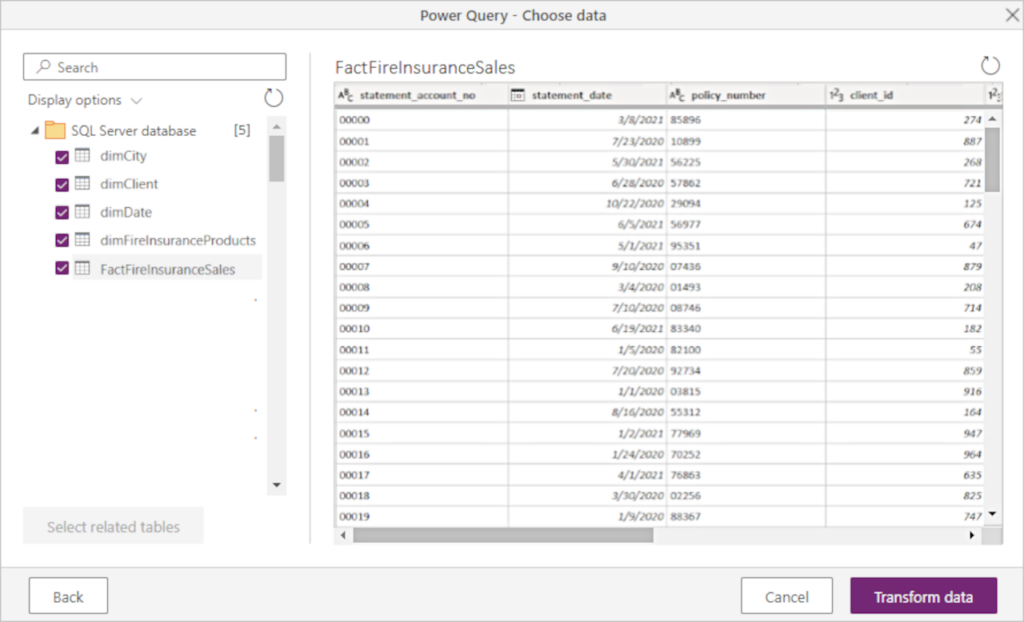
- Once you checkmark all the needed tables, click Transform data. Perform the necessary transformations.
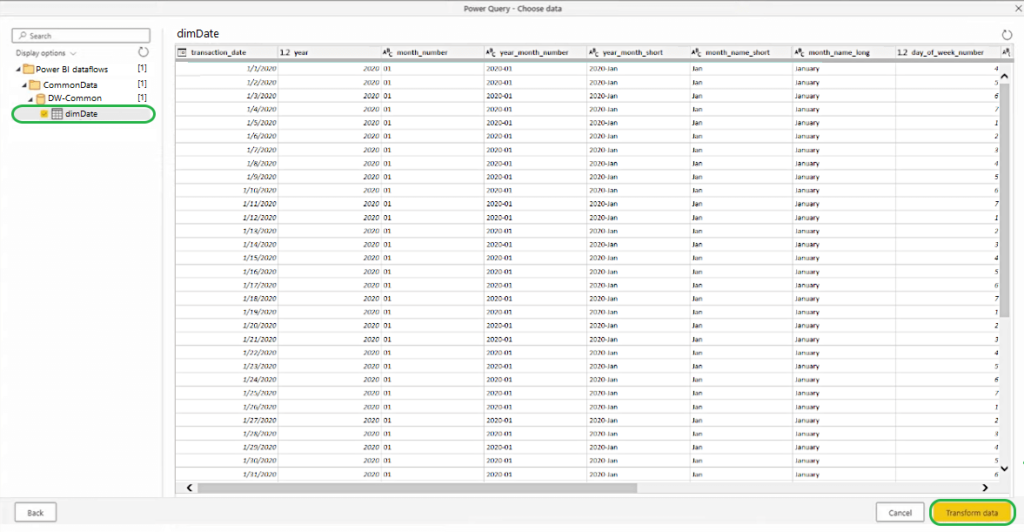
Create Dataflows Using Linked Tables
The second method implies creating a link to an existing table to reuse the existing table in different Dataflows. Select the needed table in a tree hierarchy of dataflows and tables, and click Transform data.
Create Dataflows Using Computed Tables
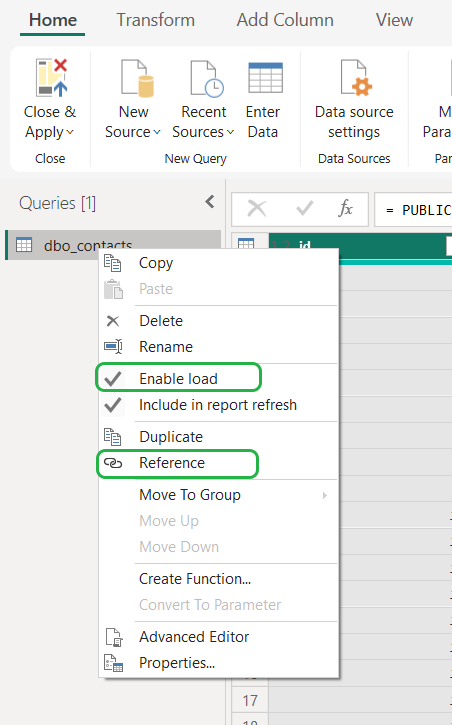
The third method implies referencing a table and performing in-storage calculations. These calculations don’t involve an external source. The result is a new table, known as a computed table.
- To edit a linked table, right-click the table and select Enable load.
- Then, rename the resulting computed table and make any necessary transformations.
Create Dataflows Using Import/Export
This method allows you to export an existing Dataflow to a JSON file.
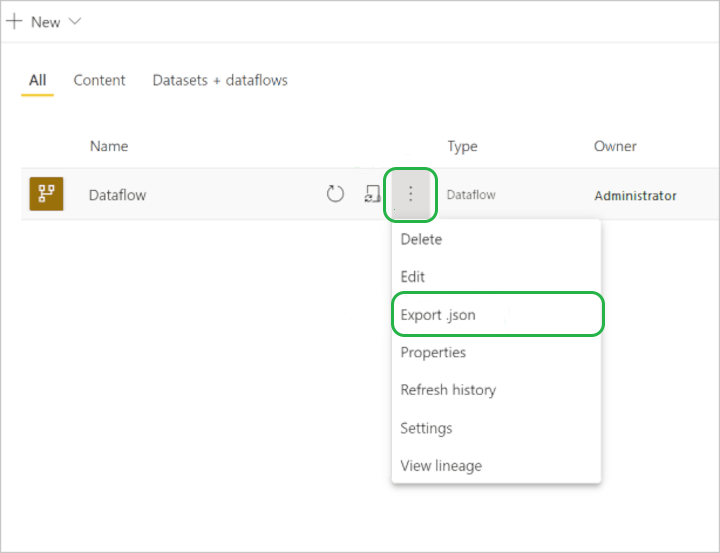
To import the model we just exported, go to another workspace and create a new Dataflow. And then choose the Import model. Then, browse for the JSON file you exported and click OK.
Create Dataflows Using CDM Folder
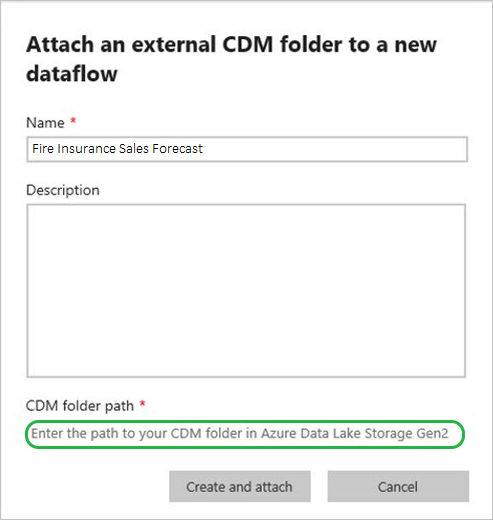
Use this approach to connect with tables that another application created in CDM format. Point it to the complete path where the CDM file lives in Azure Data Lake Storage Gen 2.
Important: You need read permissions for that folder, or this goes nowhere.
To create a new Dataflow, click Create and attach.
Power BI Dataflows Next Steps
You can use the Dataflows you created in Power BI Desktop.
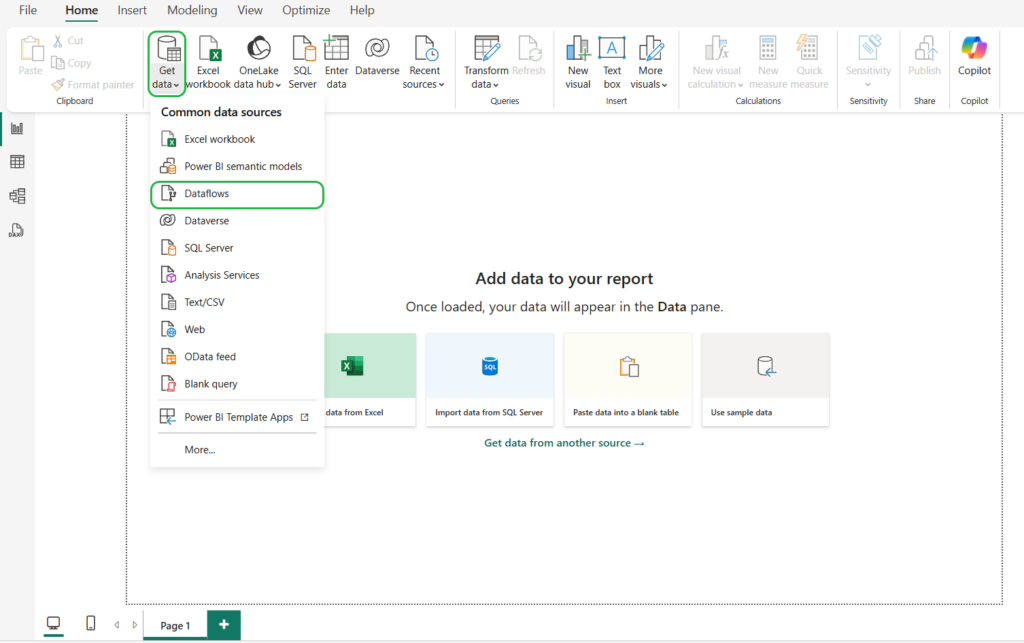
To select dataflows, you must sign in to the Power BI Service and choose the tables you need in your report.
There’s so much more about Dataflows as an ETL tool in Power BI than we can discuss in this article. For additional information, click on these helpful links:
- Benefits of using Power BI Dataflows and their use cases.
- Configuring Incremental Refresh for faster loading.
- Limitations and considerations in using Power BI Dataflows.
- Power BI ETL best practices using Dataflows.
Enterprise-Grade ETL in Microsoft Fabric: Dataflow Gen2 + Pipelines
Microsoft Fabric is an all-in-one analytics platform that includes business intelligence, real-time analytics, data science, and data migration. Microsoft Fabric allows people in various roles and teams to work together in a single environment by combining multiple Azure data workloads with Power BI.
Dataflow Gen2 in Microsoft Fabric
Ideal for reusable, low-code transformations built right into the Fabric workspace. Dataflow Gen2 lets business and data teams structure and enrich data at scale inside a lakehouse architecture, all while staying deeply integrated with Power BI and other Fabric-native tools.
Best for
- Preparing shared datasets for multiple reports.
- Integrating structured data into a lakehouse.
- Drag-and-drop transformations in a governed cloud environment.
Follow these steps to construct a Microsoft Fabric dataflow.
- Create a new dataflow in your workspace first. Navigate to your workspace, choose Dataflow Gen2, and click New Item.
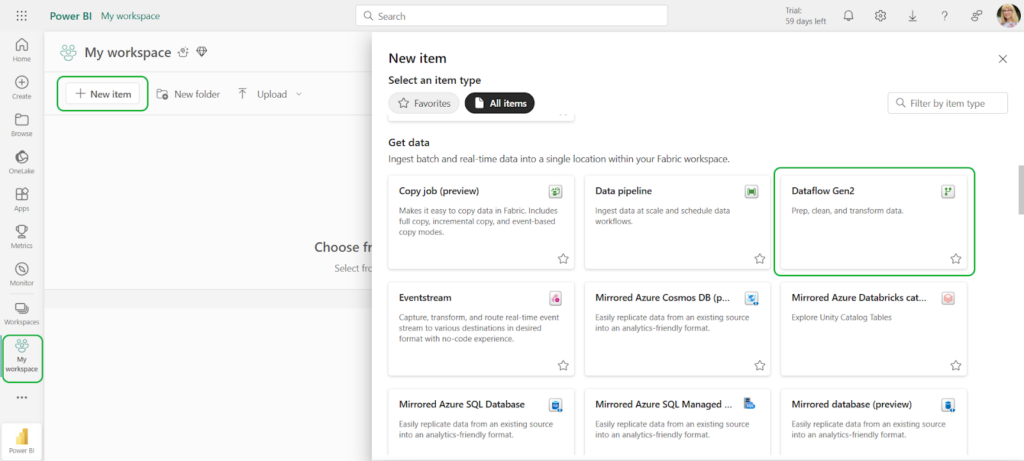
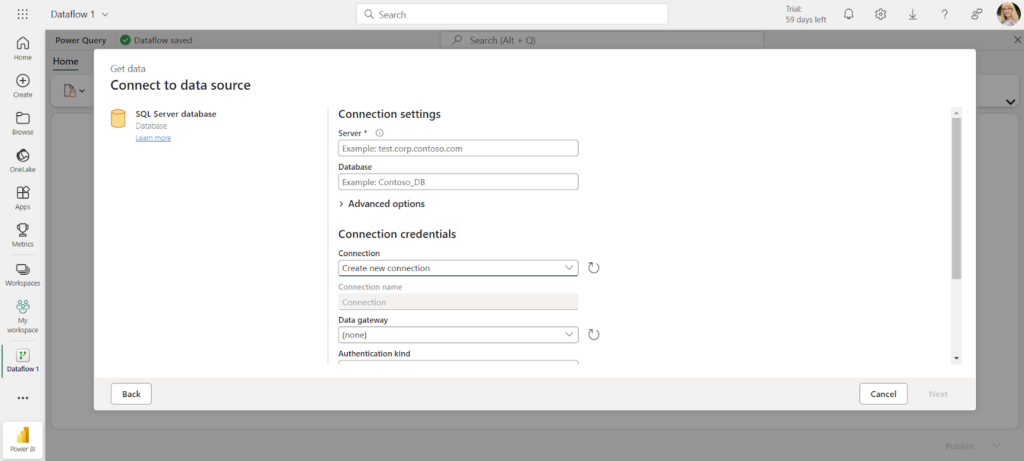
- Click Get data or use the ribbon’s New source option to choose a source. For our example, we choose SQL Server.
- Specify the connection settings.
Note: Before you connect, check that your database isn’t hiding behind a private network. It needs to be reachable online.
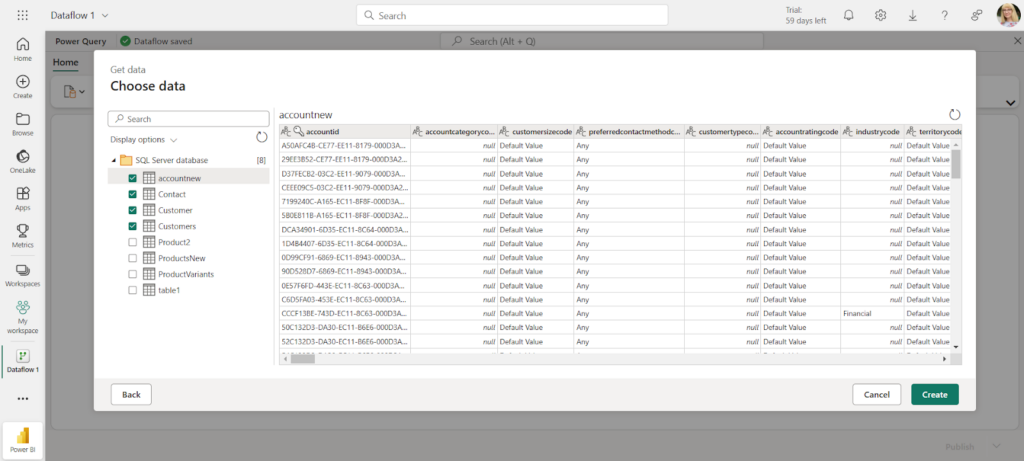
- Select the tables to include in the dataflow and click Create.
- After transforming the data into the required format using the dataflow editor, publish it.
Microsoft Fabric Data Pipelines for ETL
While Gen2 Dataflows handle transformation, Pipelines handle orchestration. Pipelines let you build full ETL/ELT workflows across different sources and destinations. You can schedule tasks, chain actions, and load data directly into Fabric Data Warehouses — often using T-SQL and cloud-scale compute.
Best for
- Orchestrating multi-step ETL/ELT at enterprise scale.
- Applying transformations across cloud sources.
- Loading data into Fabric Data Warehouse or other targets.
- Scheduling and automating ingestion.
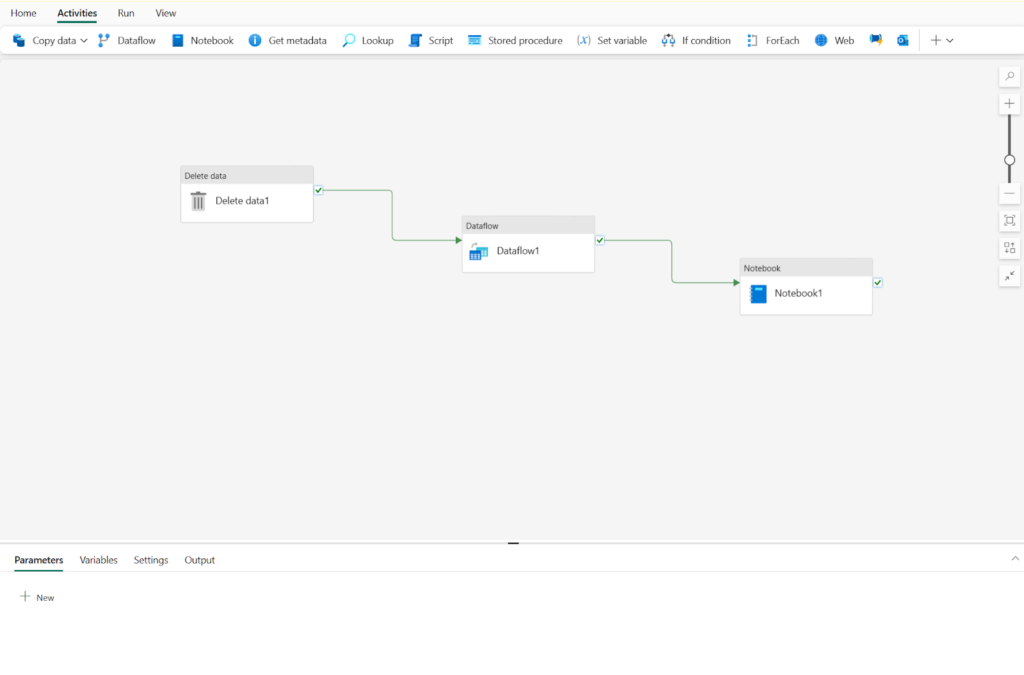
Note: Although pipelines greatly improve the Power BI ETL experience, they are exclusively intended for business intelligence. They cannot be used as a standalone automation or data integration solution. The same issues that affect other Power BI ETL tools also affect pipelines.
ETL Challenges in Power BI
The business intelligence tools offer ETL-like capabilities but don’t fully cover the entire ETL process. Businesses may face several challenges:
- Automation: Though Microsoft Fabric supports a complete ETL cycle, it is tied to analytics and reporting and doesn’t function as a standalone automation process.
- Scope: Self-service and lightweight data preparation are the goals of Power BI ETL solutions. Large-scale, enterprise-level ETL procedures are not appropriate for it.
- Sources and Destinations: Only a few locations are supported by Microsoft. Data can be loaded into standalone Power BI services from a variety of sources, but Power BI or an Azure Data Lake is the only destination.
- Performance: Poorly optimized queries in Power Query can lead to poor performance and excessive memory usage. Import connection mode can speed things up, but it increases dataset size, while DirectQuery connection can suffer from slow query execution, especially with complex joins and aggregations. For more details, refer to the Microsoft optimization guide.
- Complex Transformations: Power BI and Fabric tools are great for basic transformations, but when dealing with complex, multi-step ETL processes, advanced data manipulation, and execution logic, they fall short, and dedicated ETL tools are required. Writing complex M-codes for these scenarios requires special technical skills and involves manual intervention.
You are free to overcome these challenges by trying query optimization, proper data modeling, and efficient use of storage modes techniques. However, for the best ETL experience, a dedicated ETL tool like Skyvia or others is a game-changer.
Numerous data-related problems, including data migration, bulk loading, intricate pipelines, etc., can be resolved using ETL-specific technologies. Databases, data warehouses, storage services, and a variety of cloud applications are typically supported. These applications might all be used as ETL sources and targets. ETL tools replace BI tools when handling intricate multi-step ETL operations, sophisticated data processing, and execution logic.
Let’s look at a simple example in Skyvia.
Skyvia ETL Tool for Power BI
Skyvia is a cloud data platform designed for contemporary pipelines, including data warehousing, workflow automation, ETL, ELT, and reverse ETL. Because Skyvia allows you to transfer data from more than 200+ sources, such as databases, cloud apps, and APIs, into a data warehouse where Power BI can analyze it without requiring you to write a single line of code, it is relevant for users of Power BI.
We’ll demonstrate how to extract, transform, and load data from Salesforce into a data warehouse so that it can be used for Power BI reporting in the example that follows.
We’re going with Skyvia Replication for this. It doesn’t just move rows; it brings the whole table blueprint along for the ride, then keeps your warehouse (Snowflake, BigQuery, Azure SQL, etc.) synced with the source, no babysitting required.
STEP 1: Connect to the Source
- Log in to Skyvia or create an account.
- Go to +Create New->Connection and select the source from the list.
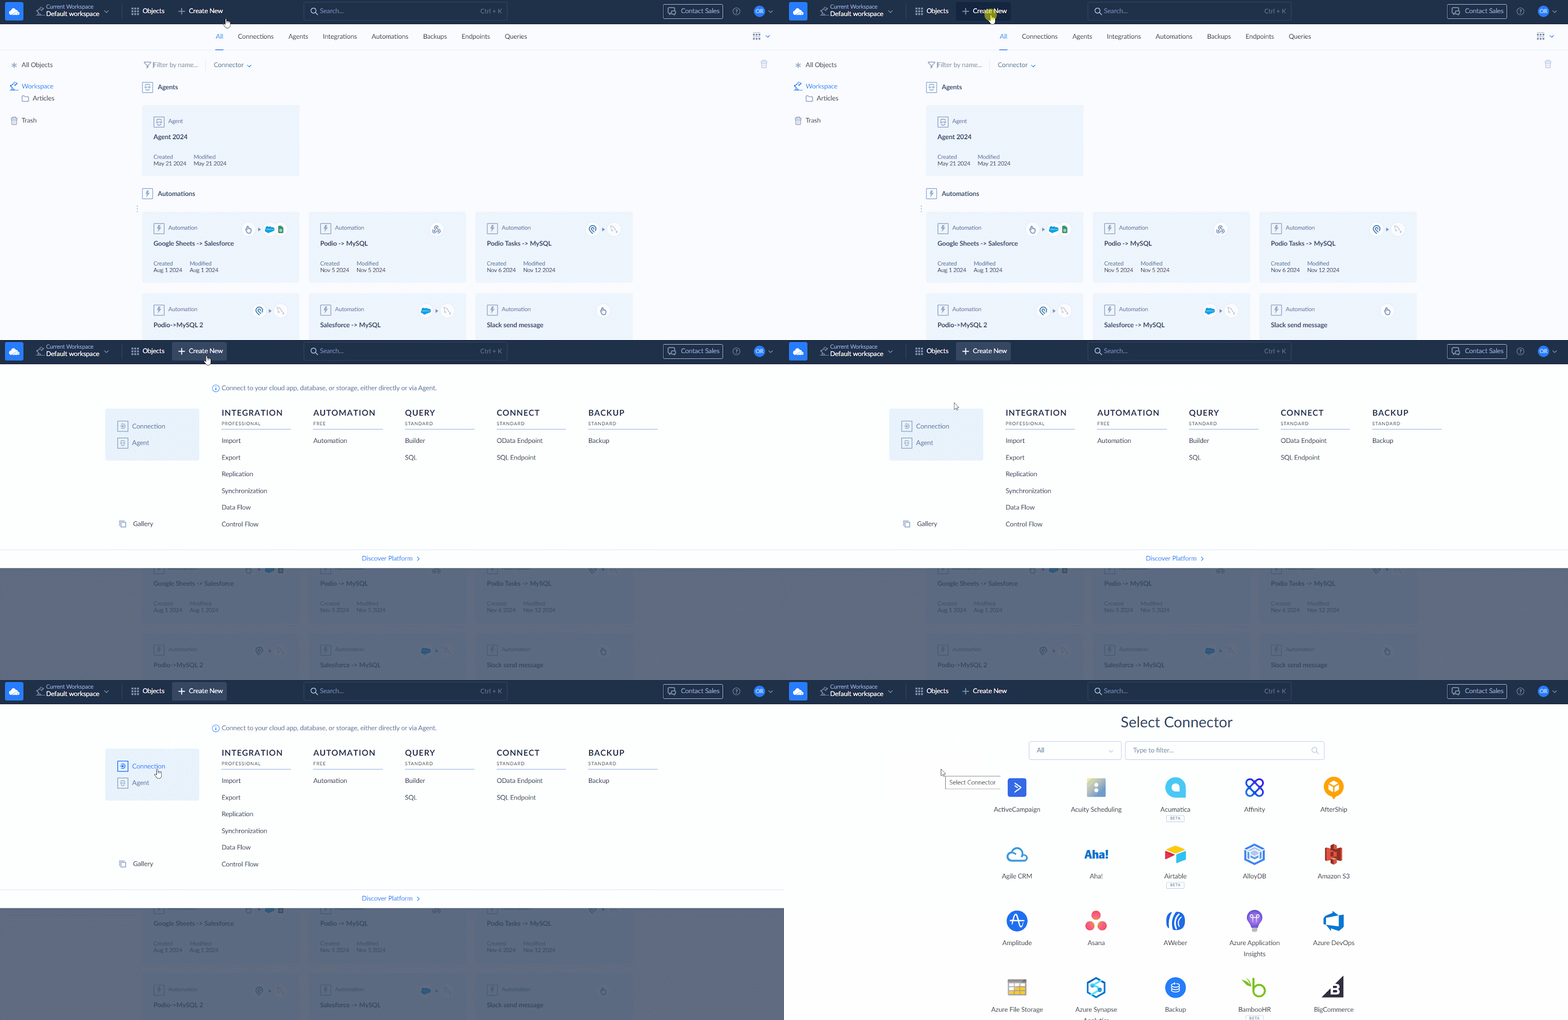
- Specify your credentials.
STEP 2: Load Cloud Data to Data Warehouse
- Go to +Create New->Replication in the top menu.
- Select the app of your choice as a source.
- Select a preferred data warehouse as a destination. Skyvia supports Amazon RedShift, Google BigQuery, Azure Synapse Analytics, Snowflake, and other popular data warehouse platforms.
- Select the objects for replication.
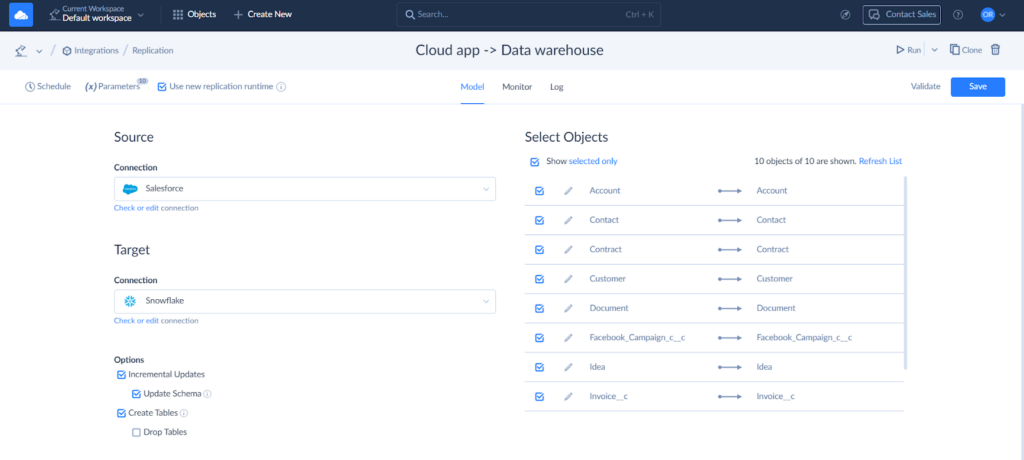
- Configure objects for replication on the right. Click Edit to open the task editor for an object. Here, you can select specific fields to replicate, set the target table name, and specify replication settings.
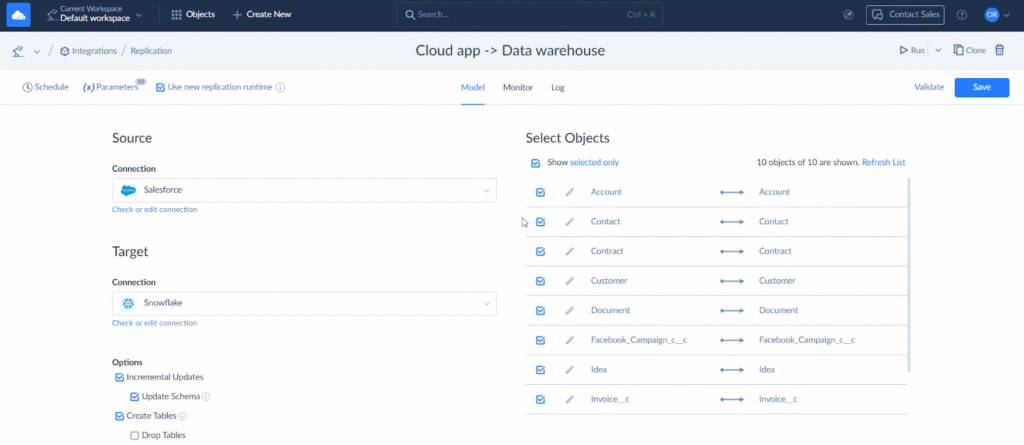
Skyvia also allows you to address compliance requirements with hashing. Select specific object fields to hash, ensuring the secure transfer of sensitive data.
- Set filters, if needed, and save the task. Name the replication and save it. You can run the replication manually or schedule it.
STEP 3: Load Data into Power BI
Power BI offers native integration with central data warehouses. You can transfer the recently uploaded information from the data warehouse (in this example, Snowflake) to Power BI.
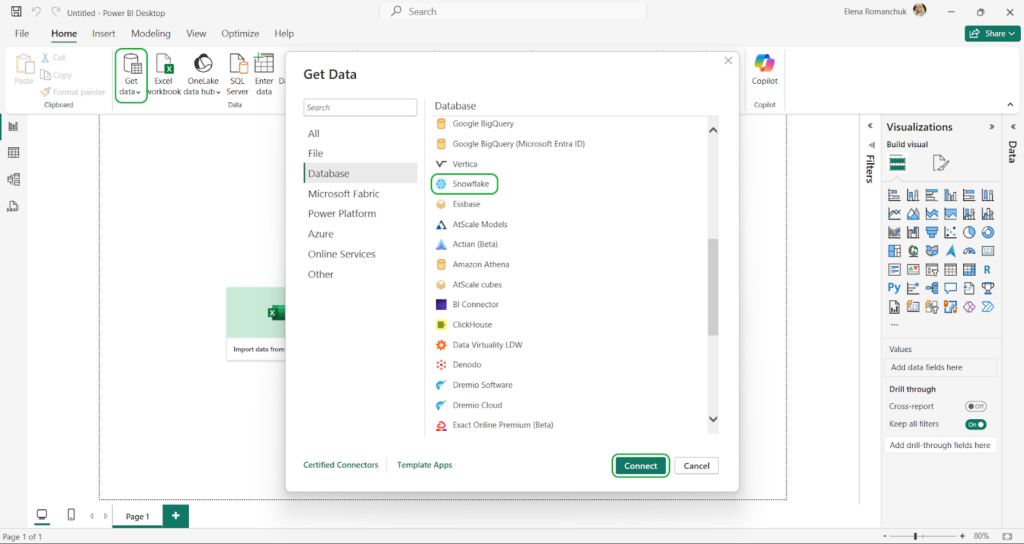
- In Power BI, select Get Data and type Snowflake in the search bar.
- Select Snowflake on the list and click Connect.
- Enter your Snowflake credentials.
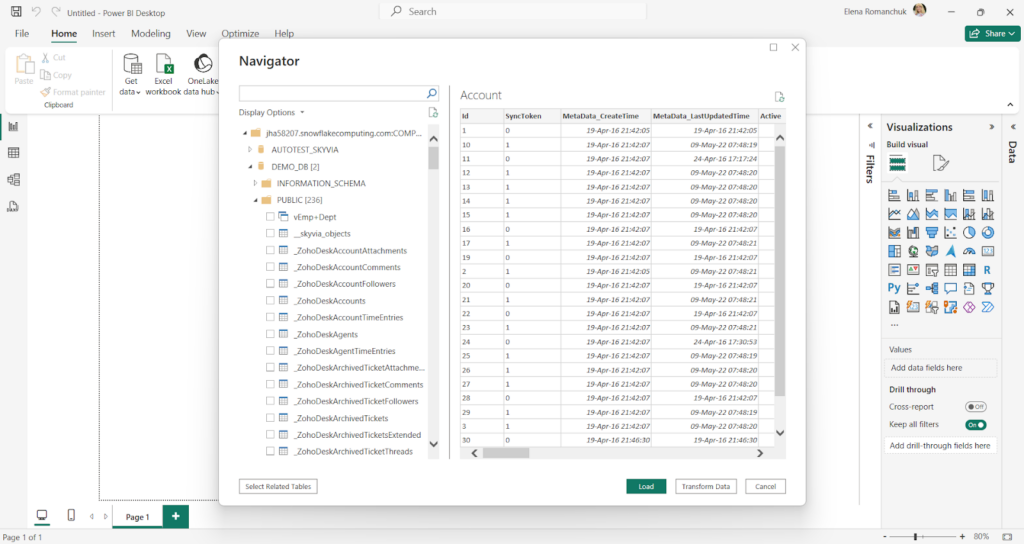
- Once the connection is established, the Navigator window with available objects on the server appears. Select the needed source objects and click Load to pull them into Power BI Desktop.
As we’ve just observed, Skyvia perfectly carries out data warehousing scenarios with ELT.
Skyvia ETL, ELT, Reverse ETL Features
The example above is just one way you can use Skyvia for ETL, but it includes other features that also support ELT and Reverse ETL patterns, making it easy to move, transform, and sync data across platforms.
Here’s a quick look at the most relevant features:
- Import is ideal for both ETL and Reverse ETL. Use it to load data to or from cloud apps, databases, or warehouses.
- Data Flow and Control Flow allow building multi-step pipelines with complex transformations, branching, and orchestration across multiple sources.
- Connect allows you to publish OData or SQL endpoints in minutes to expose cloud data in real time. That enables live Power BI access via OData or ODBC, without building custom APIs.
- Automation helps automate workflows by performing actions based on events.
Note: Skyvia’s Data Integration product also offers the ability to export data to CSV files and to synchronize data between systems.
Skyvia vs. Other ETL Tools
No doubt, Skyvia is a robust ETL solution, and it works with different data integration scenarios. However, it’s not unique in its market genre. There are many similar solutions by competitors. Let’s have a look at other popular data integration solutions and see how they are different from or like our platform. The best way to start is by providing a comparison table with several critical parameters.
| Skyvia | Informatica | Stitch | Hevo | |
|---|---|---|---|---|
| Focus | ETL, ELT, Reverse ETL, data sync, workflow automation | ETL | ETL, ELT | ETL, Reverse ETL, ELT |
| Skill level | No-code and visual wizard | No-code, low-code | No-code, low-code | No-code, low-code |
| Sources | 200+ | 100+ | 140+ | 150+ |
| The ability for customers to add other sources | With REST API | With the Connector Toolkit Developer | With Singer, Import API, or Incoming Webhooks | With REST API |
| G2 customer satisfaction rate | 4.8/5 | 4.4/5 | 4.5/5 | 4.3/5 |
| Compliance with safety certificates | HIPAA, GDPR, PCI DSS.ISO 27001, and SOC 2 (by Azure) | SOC 1, SOC 2, SOC 3, HIPAA / HITECH, GDPR, Privacy Shield | SOC 2 Type II, HIPAA BAA, ISO/IEC 27001, GDPR, and CCPAR | SOC 2, HIPAA, GDPR, CCPA |
| Pricing | Volume- and feature-based.Has a free plan. | Consumption-based. | Volume- and feature-based.Has a 14-day trial. | Consumption-based pricing based on Hevo events.Full-feature 14-day free trial.Has a free plan. |
Compared to its major competitors, Skyvia supports a significant number of data integration scenarios and sources. It also has the highest rankings for usability on the G2 review platform.
In terms of skill level requirements, all tools are very similar, as each of them offers no-code and low-code interfaces. Each service also strongly complies with modern security protocols and certificates.
As for pricing, both offer a free plan with limited monthly data volume and features, which allows a test drive to find your one and only solution. Pricing plans for all tools rely on a consumption-based model that considers data size and feature set.
Conclusion
Now you know how to perform ETL using Power BI tools and the challenges you may face as a result. Together with that, solutions like Skyvia solve these problems, enabling a seamless, code-free way to integrate, transform, and load data from various sources to Power BI. They provide businesses with robust ETL, ELT, and Reverse ETL solutions.
You’ve seen how Power BI handles ETL and where it starts to struggle. Tools like Skyvia fill in those gaps by offering a code-free, unified way to pull, clean, and load data from hundreds of sources into Power BI. It’s ETL, ELT, and Reverse ETL without plumbing headaches.

F.A.Q. for Power BI ETL
Why do I need ETL if I’m already using Power BI?
Because garbage data produces garbage dashboards. ETL cleans, reshapes, and standardizes everything before it hits Power BI, so your reports show truth instead of confusion.
What’s the easiest way to do ETL in Power BI?
Power Query handles smaller jobs nicely. It connects to sources, cleans up mess, and loads data straight into Power BI Desktop. All through clicks, no coding required.
What are the limits of using Power BI for ETL?
You’re trapped in Power BI’s ecosystem mostly. Limited output destinations, sluggish performance when data volumes climb, and manual M coding when logic gets complicated. Works fine until scale becomes an issue.
Can Power BI handle real-time or multi-source ETL?
Sort of. Fabric pipelines and Gen2 Dataflows help patch gaps, but true multi-source, real-time pipelines usually need external ETL platforms pulling strings.
When should I use a dedicated ETL tool like Skyvia?
When data arrives messy from a dozen sources, refuses to fit neat rows, or demands serious automation, scheduling, and governance.

