Disconnected systems are one of the biggest hidden costs in businesses. When sales, marketing, and product data live in separate tools, teams spend hours stitching together reports, chasing metrics, and working from incomplete information. It slows everything down and makes real-time decision-making nearly impossible.
That’s where Salesforce to Redshift integration comes in. You can sync customer data directly into a data warehouse to eliminate silos, reduce manual work, and give every team access to consistent, up-to-date analytics. It’s a smarter, faster way to turn data into decisions — without waiting for reports or relying on guesswork. In this article, we will learn how to connect Salesforce to Redshift using different methods.
Table of contents
- Key Features of Salesforce
- Key Features of AWS Redshift
- Why Do You Need to Connect Salesforce to Redshift?
- Salesforce and Redshift Integration Options
- Method 1: Native Integration
- Method 2: Third-Party Integration Tools
- Method 3: Integration Using APIs
- Conclusion
Key Features of Salesforce
Salesforce is the most popular cloud CRM on the market. It has already become the standard for customer relationship management and holds a significant 21.7% of the market share. The key benefits of Salesforce include:
- Improved Customer Relationship Management: Track the interactions, preferences, and purchase history of customers, which will lead to better customer service.
- Increased Sales Productivity: Many business processes can be automated. Your reps can focus on more important tasks instead.
- Always Available: Accessible from anywhere with an internet connection, on many different devices.
- Scalability: Can be scaled to meet the needs of the business.
- Customizable: Highly customizable and can be tailored to many specific requirements.
Besides customer relationship management, Salesforce offers a united platform with a number of additional tools for marketing (Salesforce Marketing Cloud), data analysis (Salesforce Wave Analytics), customer service, and many more. Functionality can also be extended with customer or third-party applications.
Key Features of AWS Redshift
Amazon Redshift is a part of the Amazon Web Services (AWS) platform. It is a cloud-based data warehouse designed for large-scale data analytics and business intelligence. Key benefits include:
- Massively Parallel Processing (MPP): Splits data processing tasks and runs them simultaneously on multiple processors, providing exceptional performance for complex analytical queries over huge volumes of data.
- Data Warehousing: Allows storing and processing data on a petabyte scale.
- Cost-Effective: Redshift offers relatively cheap data storage per gigabyte compared to Salesforce.
Why Do You Need to Connect Salesforce to Redshift?
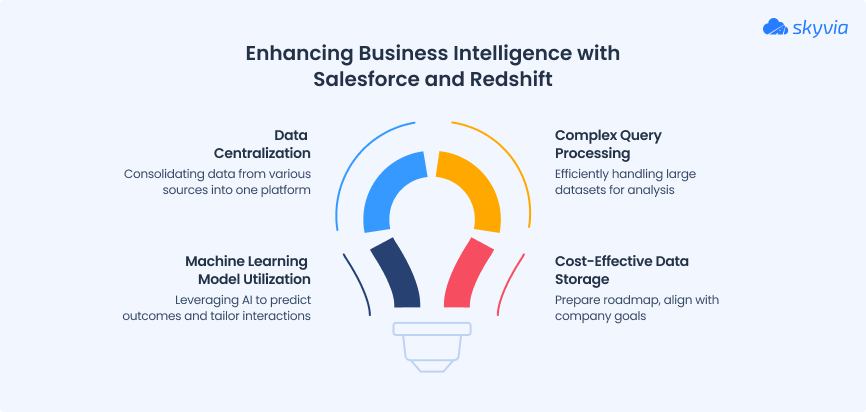
Salesforce holds critical data about leads, sales, customer interactions, and support tickets. But what about financial data, marketing performance, website traffic, and product usage? That information often lives in other systems. With Salesforce to Redshift integration, business can get all their data in one place to see the full customer journey and make decisions faster.
- Salesforce offers reporting, but it’s not designed for complex data analysis at scale. Large datasets can slow down reports, and certain insights (like trend forecasting or AI-powered recommendations) require advanced data crunching.
- Redshift can help you run complex queries on millions of records in seconds. Your business will be able to unlock the power of machine learning models to predict sales and risks, as well as to tailor customer interactions.
Storing large amounts of data in Salesforce can get expensive. Instead of paying high storage costs, businesses can move rarely used but legally required records to Amazon Redshift to save some money.
Benefits & Use Cases
- Marketing Analytics: Track campaign performance, customer segmentation, and lead scoring.
- Sales Analytics: Analyze sales pipelines, forecast revenue, and identify top-performing reps.
- Customer Service Analytics: Monitor customer satisfaction and identify service bottlenecks.
- Business Intelligence: Create comprehensive dashboards and reports for executives.
Salesforce and Redshift Integration Options
There are several options to connect Salesforce to Redshift. Below is a quick overview of each method:
| Method | Best For | Skill Level | Customizability |
|---|---|---|---|
| Native Tools | Budget-conscious, occasional use | Medium | Low |
| Third-Party Tools | Easy, hands-off automation | Low | High |
| Salesforce API | Dev teams needing full control | High | High |
Method 1: Native Integration
Salesforce offers several native ways and tools for connecting Salesforce to Redshift:
- MuleSoft AnyPoint Platform. This is a Salesforce-owned solution for automatic data solution that allows Salesforce and Redshift integration, as well as with other apps and systems. It comes with an additional cost, depending on data sources and use cases, and there is no well-defined pricing published; you need to contact them for a quote.
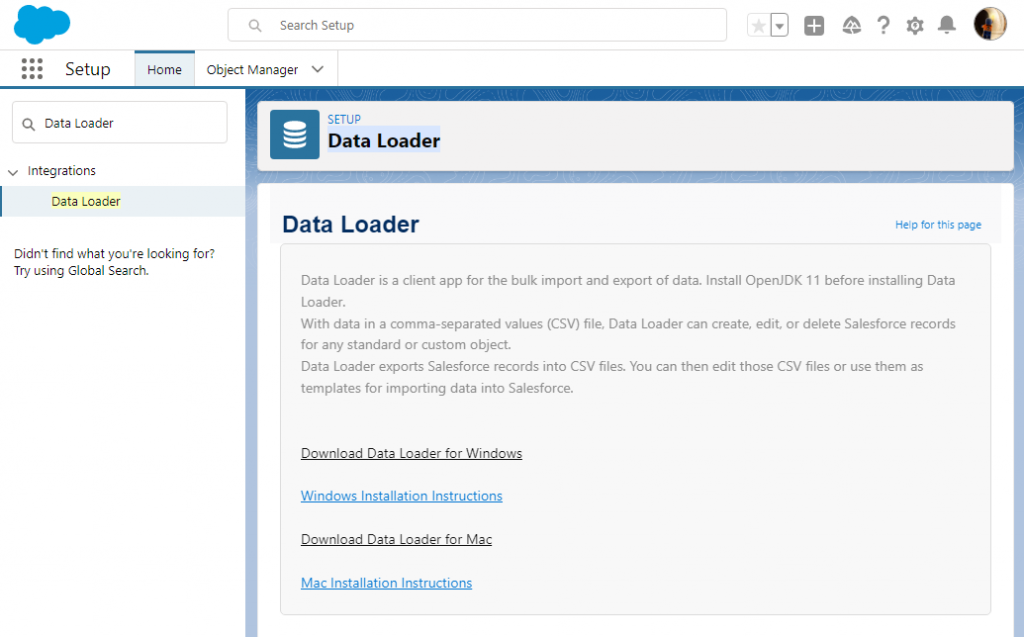
- CSV Export and Import. A manual but cost-free alternative. You can use Data Loader or Salesforce Data Export wizard to get CSV files of your objects that will be manually imported to Redshift. This method is available for Salesforce Enterprise, Performance, Unlimited, or Developer editions.
In this article, we will take a closer look at the second method.
Best For
Ideal for organizations on tight budgets that need occasional data transfer and can manage manual processes.
Option 1: Exporting Data via Salesforce Data Loader
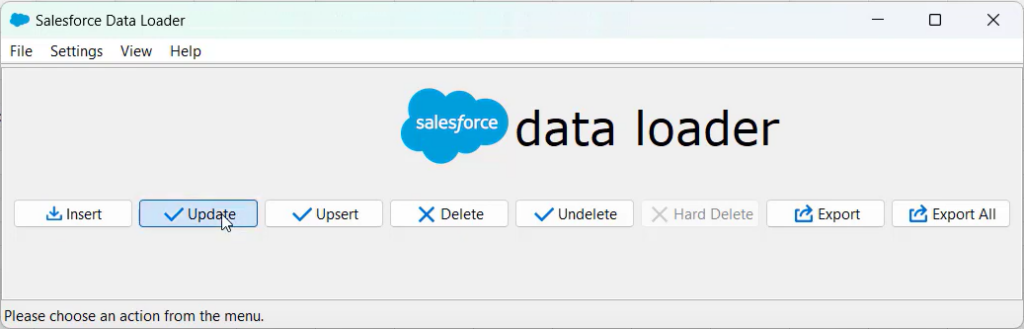
Salesforce Data Loader is a client application for bulk import and export, available in the Enterprise, Performance, and Unlimited editions. It is a downloadable tool that supports up to 5 million records at a time.
Before we start, download Data Loader and install it on your computer. Make sure that you have installed JRE and JDK: you can’t run Data Loader without them!
Then, perform the following steps:
Step 1
In the Data Loader window, click Export.
Step 2
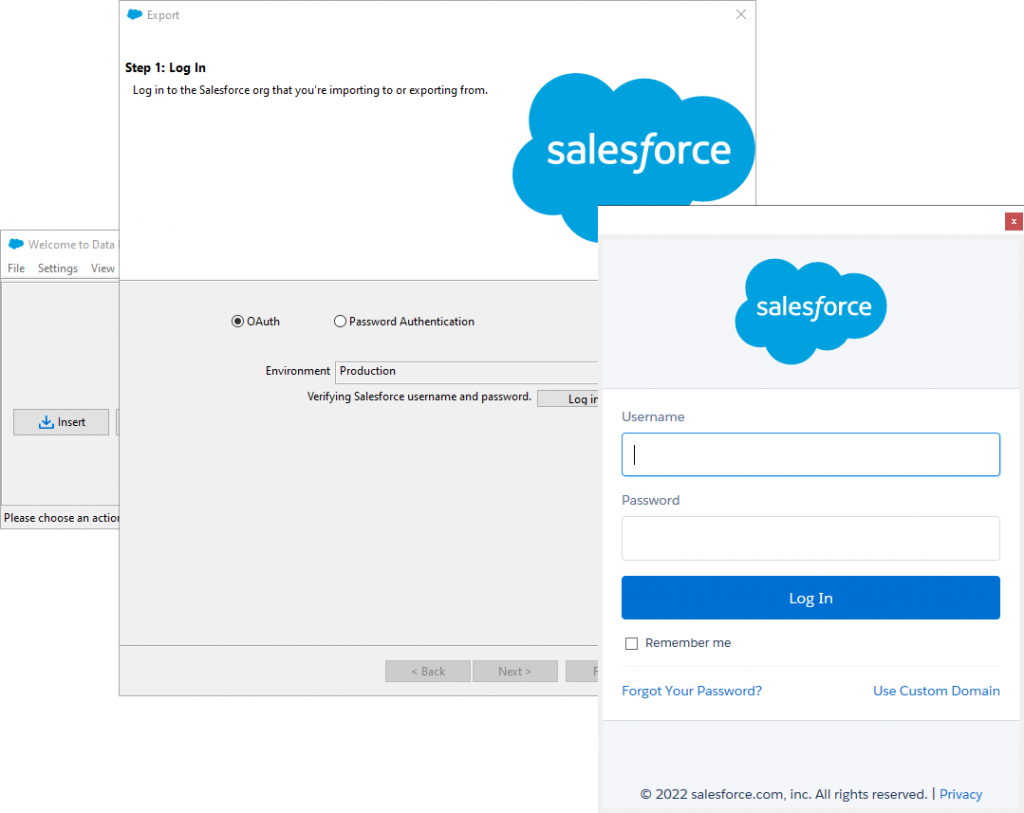
A wizard will open, prompting you to sign in. Choose your environment from the drop-down menu and click Log In. Follow the authentication instructions on the screen to proceed.
Step 3
Select a Salesforce object to export data from and specify the CSV file name. Click Next. Data Loader allows you to export both predefined and custom objects. You can also change the location where the result file will be saved by clicking Browse.

Step 4
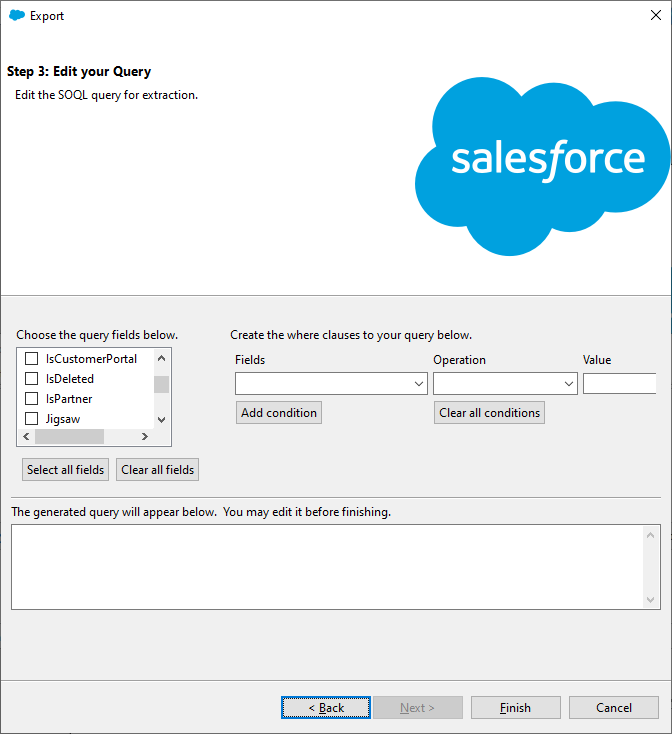
On the next wizard page, you can configure a SOQL query to use for exporting data. We only need to select the fields that we want to export, but if you want to filter data, you can also configure WHERE clauses. For our purposes, we can just click Select all fields, and then click Finish.
Step 5
Finally, click Yes to start the process. The data will be exported to the specified file.
Let’s go over one more option to export data before we bring it into Redshift.
Option 2: Exporting Data via Data Export Wizard
To export data to CSV using the Salesforce Export Data feature, perform the following steps:
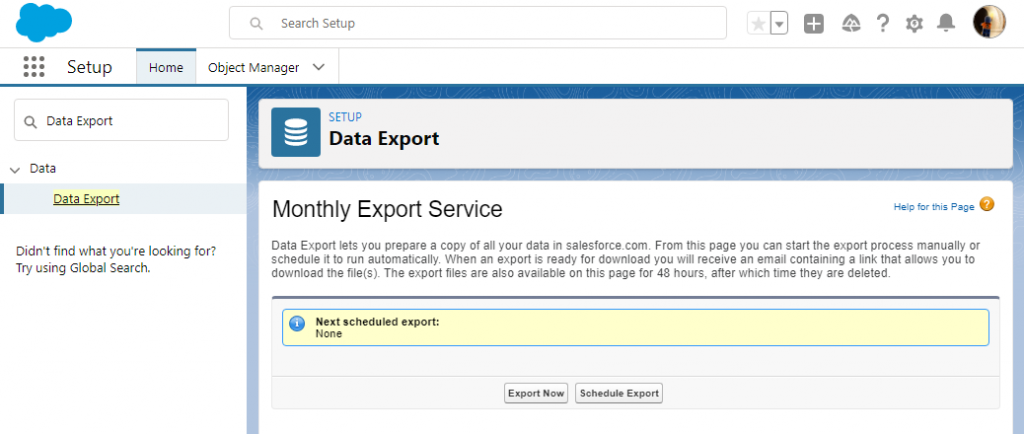
Step 1
Open the Salesforce Setup by clicking the Quick Setup gear icon in the upper-right corner.
Step 2
Type “Data Export” in the Quick Find box and, under Data, click Data Export. On the next screen, select Export Now.
Step 3
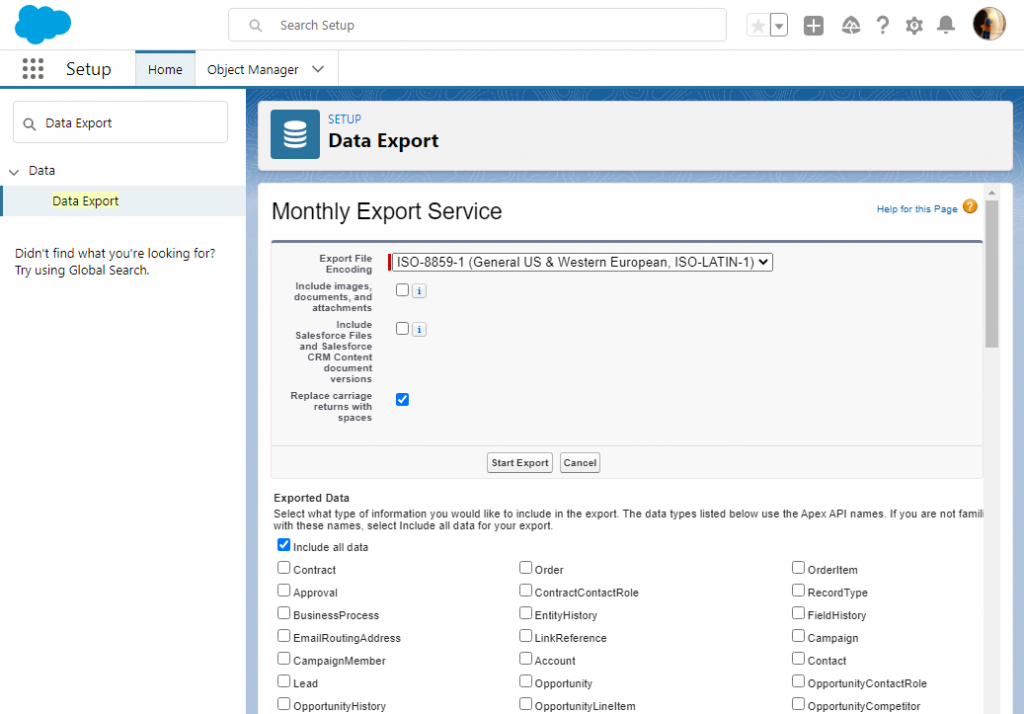
Select Salesforce objects to export and click Start Export. You can export both predefined and custom objects.
The data export will start, and after some time, you will receive an email with the link to the exported data:
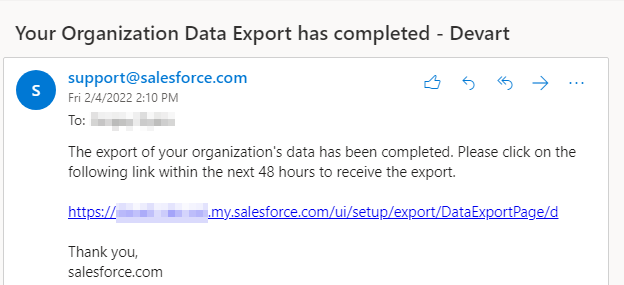
Step 4
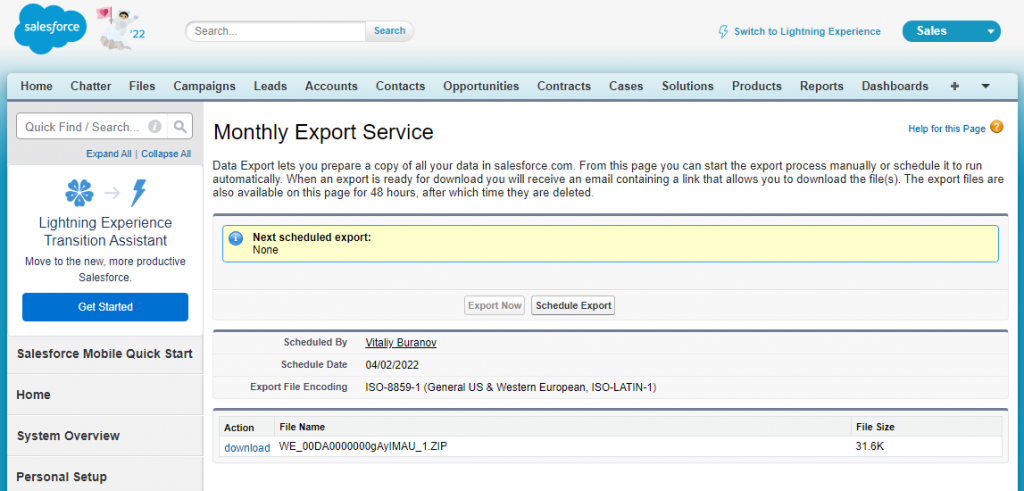
Click this link to open the page where you can download the export results:
We are now ready to move to the importing process.
Importing Data to Redshift
If you haven’t prepared the tables for the data in Redshift, you need to create them first.
Step 1
To create a table in Redshift for Salesforce Accounts, use the statement below:
CREATE TABLE "Account" (
    "Id" VARCHAR(18) NOT NULL,
    "IsDeleted" BOOLEAN NOT NULL,
    "MasterRecordId" VARCHAR(18),
    "Name" VARCHAR(255) NOT NULL,
    "Type" VARCHAR(255),
    "ParentId" VARCHAR(18),
    "BillingStreet" VARCHAR(255),
    "BillingCity" VARCHAR(40),
    "BillingState" VARCHAR(80),
    "BillingPostalCode" VARCHAR(20),
    "BillingCountry" VARCHAR(80),
    "BillingLatitude" DOUBLE PRECISION,
    "BillingLongitude" DOUBLE PRECISION,
    "BillingGeocodeAccuracy" VARCHAR(255),
    "BillingAddress" TEXT,
    "ShippingStreet" VARCHAR(255),
    "ShippingCity" VARCHAR(40),
    "ShippingState" VARCHAR(80),
    "ShippingPostalCode" VARCHAR(20),
    "ShippingCountry" VARCHAR(80),
    "ShippingLatitude" DOUBLE PRECISION,
    "ShippingLongitude" DOUBLE PRECISION,
    "ShippingGeocodeAccuracy" VARCHAR(255),
    "ShippingAddress" TEXT,
    "Phone" VARCHAR(40),
    "Fax" VARCHAR(40),
    "AccountNumber" VARCHAR(40),
    "Website" VARCHAR(255),
    "PhotoUrl" VARCHAR(255),
    "Sic" VARCHAR(20),
    "Industry" VARCHAR(255),
    "AnnualRevenue" DOUBLE PRECISION,
    "NumberOfEmployees" INTEGER,
    "Ownership" VARCHAR(255),
    "TickerSymbol" VARCHAR(20),
    "Description" TEXT,
    "Rating" VARCHAR(255),
    "Site" VARCHAR(80),
    "OwnerId" VARCHAR(18) NOT NULL,
    "CreatedDate" TIMESTAMP NOT NULL,
    "CreatedById" VARCHAR(18) NOT NULL,
    "LastModifiedDate" TIMESTAMP NOT NULL,
    "LastModifiedById" VARCHAR(18) NOT NULL,
    "SystemModstamp" TIMESTAMP NOT NULL,
    "LastActivityDate" DATE,
    "LastViewedDate" TIMESTAMP,
    "LastReferencedDate" TIMESTAMP,
    "Jigsaw" VARCHAR(20),
    "JigsawCompanyId" VARCHAR(20),
    "AccountSource" VARCHAR(255),
    "SicDesc" VARCHAR(80),
    CONSTRAINT "PK_Account" PRIMARY KEY ("Id")
);
Note: your Account object might contain custom fields that are not included in this statement.
Step 2
After creating the necessary tables, you need to upload the CSV files to an Amazon S3 bucket. This is the easiest way of importing CSV files to Amazon Redshift manually. To learn how to upload files to the bucket, refer to the Amazon S3 documentation.
Step 3
The uploaded CSV files can be imported into the Redshift table with the COPY command. The COPY command has the following syntax:
COPY table_name [ column_list ] FROM data_source CREDENTIALS access_credentials [options]For example:
copy Account
from 's3://awssampledbuswest2/tickit/Account.csv'
iam_role 'arn:aws:iam::<aws-account-id>:role/<role-name>'
CSV
INGOREHEADER 1;
If the columns in the CSV file and the table are the same, we can omit the column list. Note that Data Loader exports CSV files with columns sorted alphabetically, so we may need to specify the column list for it.
copy Account(AccountNumber, AccountSource, AnnualRevenue, BillingAddress, BillingCity, BillingCountry, BillingGeocodeAccuracy, BillingLatitude, BillingLongitude, BillingPostalCode, BillingState, BillingStreet, ChannelProgramLevelName, ChannelProgramName, CreatedById, CreatedDate, Id, Industry, IsCustomerPortal, IsDeleted, IsPartner, Jigsaw, JigsawCompanyId, LastActivityDate, LastModifiedById, LastModifiedDate, LastReferencedDate, LastViewedDate, MasterRecordId, Name, NumberOfEmployees, OwnerId, Ownership, ParentId, Phone, PhotoUrl, Rating, ShippingAddress, ShippingCity, ShippingCountry, ShippingGeocodeAccuracy, ShippingLatitude, ShippingLongitude, ShippingPostalCode, ShippingState, ShippingStreet, Sic, SicDesc, Site, SystemModstamp)
from 's3://awssampledbuswest2/tickit/Account.csv'
iam_role 'arn:aws:iam::<aws-account-id>:role/<role-name>'
CSV
INGOREHEADER 1;
These examples use an AWS Identity and Access Management (IAM) role to access the specified bucket. This is the recommended way to access it. You can also use authentication via your access key ID and secret access key, like in the example of the credentials clause below, but this is not recommended.
credentials 'aws_access_key_id=<your-access-key-id>;aws_secret_access_key=<your-secret-access-key>'We need to add the CSV and IGNOREHEADER options because we are importing a comma-separated file with one header row.
After the import, you can remove the CSV files from the Amazon S3 bucket or even remove the bucket itself to reduce the costs of storing your file in Amazon S3 storage.
Pros
This method has the following advantages:
- Flexibility: You have direct control over the entire process and can manually edit the file structure and the appearance of your final table in Redshift.
- Familiarity: Native Salesforce tools look familiar, and the learning curve to use them might be lower compared to other solutions.
This solution will work great if you need to transfer records from Salesforce to Redshift once in a while and you don’t need a perfect pipeline.
Cons
This method has some limitations that you should keep in mind:
- Error-Prone: Transforming data during manual transfer can be labor-intensive, and it only gets worse with large or complex datasets. There’s a higher risk of errors during manual transformation. Detecting these errors might require restarting the entire process.
- Limited Export Amount: Salesforce Data Export and Data Loader are not available in all plans, and even in the most expensive plans, Data Export Wizard only allows up to one export per week. Other solutions usually offer better conditions.
- Monitoring: You are responsible for monitoring the replication process to ensure successful execution. This can become an issue as your business grows.
Let’s consider a better way of building a Salesforce-to-Redshift data pipeline, this time using third-party solutions.
Method 2: Third-Party Integration Tools
There are a number of third-party tools that can be used for Salesforce and Redshift integration. For this method, we will review Skyvia.
Businesses often choose integration tools as their go-to method: this approach is simple, doesn’t require heavy development, and offers reliable automation. It allows teams to get up and running quickly, reduce manual effort, and keep data in sync.
Using Skyvia, you can easily transfer your records into the cloud data warehouse, and it can be set up in less than 15 minutes! Skyvia also has a free plan to try out the platform and see if it works for you.
After configuring replication, you can schedule it: the platform will automatically import updated Salesforce records into Redshift. Only modified data will be loaded, saving you time and money.
Best For
Best suited for businesses that want a hassle‑free, continuously automated solution with minimal effort.
Creating Connections
Let’s describe how to configure replication in Skyvia. First, you need to register a Skyvia account. Then, create connections to your data sources – Salesforce and Redshift.
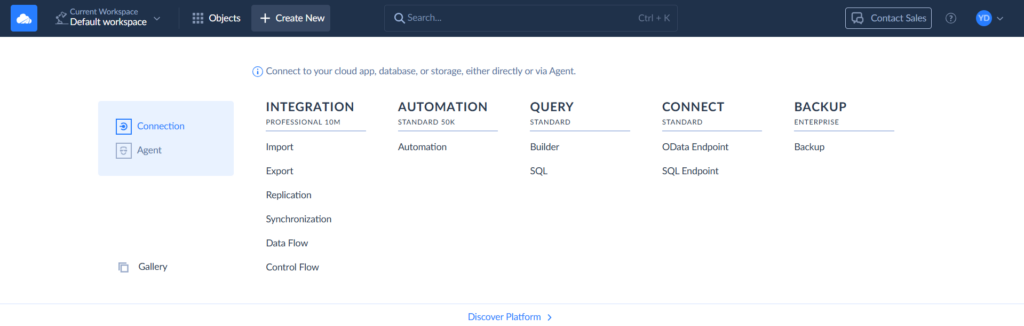
Step 1
To create a connection, select + Create New > Connection on the left. Then select the respective connector. Besides Redshift and Salesforce, Skyvia supports a large number of connectors.
Step 2
Signing via OAuth is the fastest way, and it is selected by default. To create a connection to Salesforce, click Sign In with Salesforce. Then you can enter the connection name and save the connection.

Alternatively, you can select the Username & Password authentication method. You will need to specify your username, password, and security token.
Step 3
To create a connection to Redshift, click + Create New > Connection and find Redshift. Fill in the fields required for this connection: Server, Port, User ID, Password, Database and Schema.
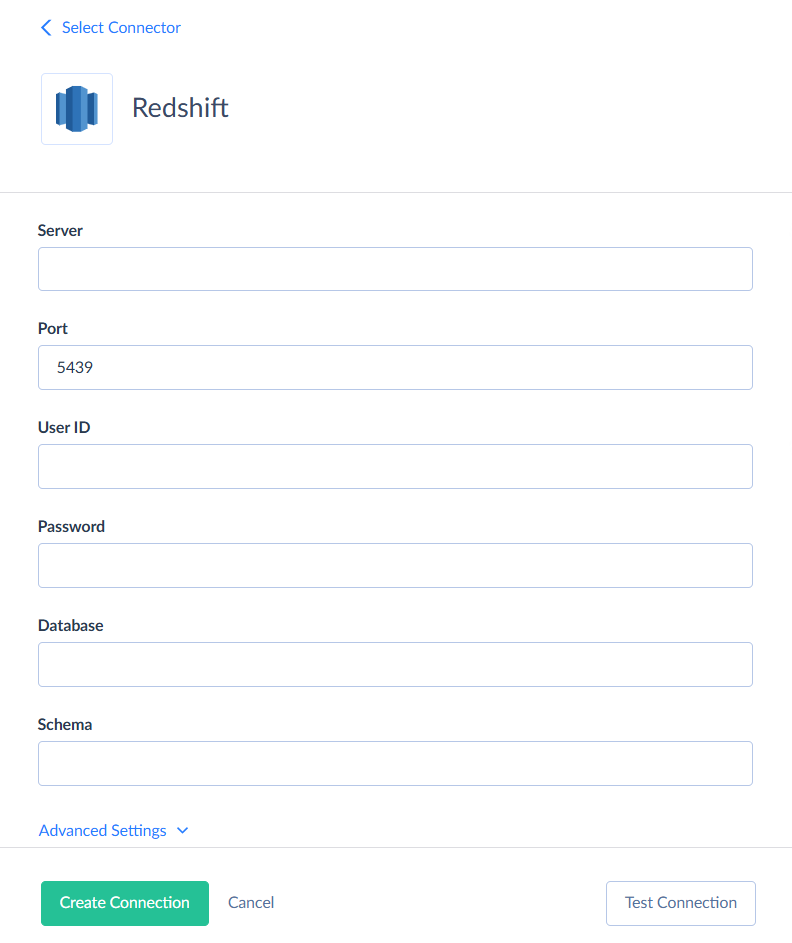
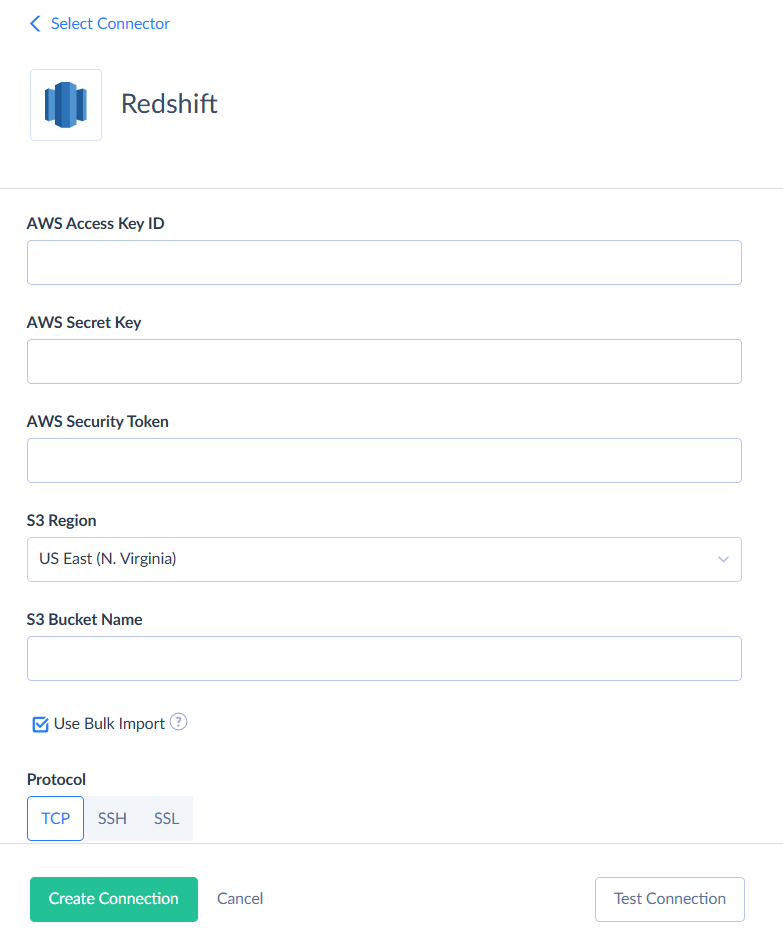
Don’t forget to also click Advanced Settings and enter the parameters for Amazon S3 storage.
After you’re done, click Create Connection.
Creating Replication Packages
Now, let’s move forward with building a Salesforce to Redshift replication pipeline.
Step 1
Select + Create New and then, under Integration, select Replication.
Step 2
Choose Salesforce as Source and Redshift as Target connection.
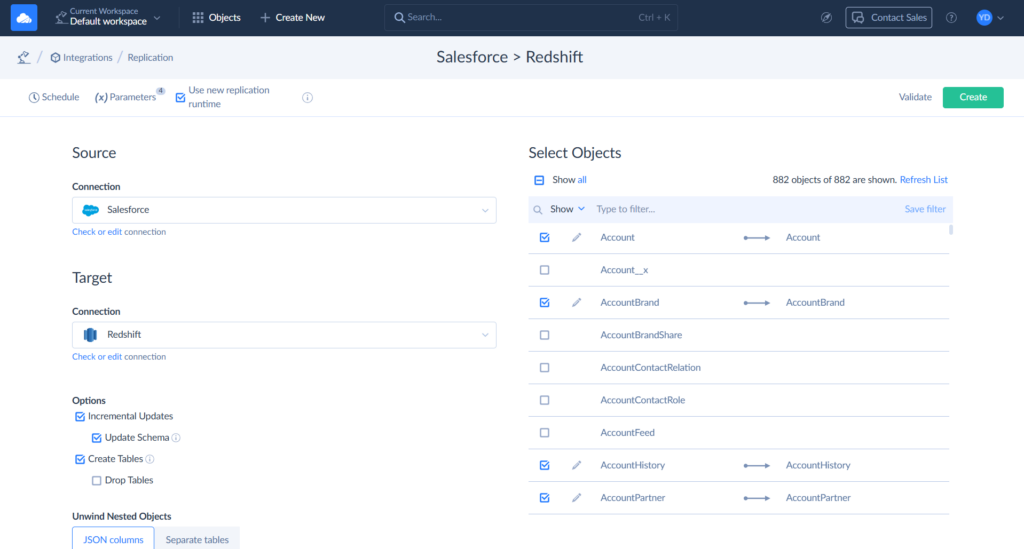
Step 3
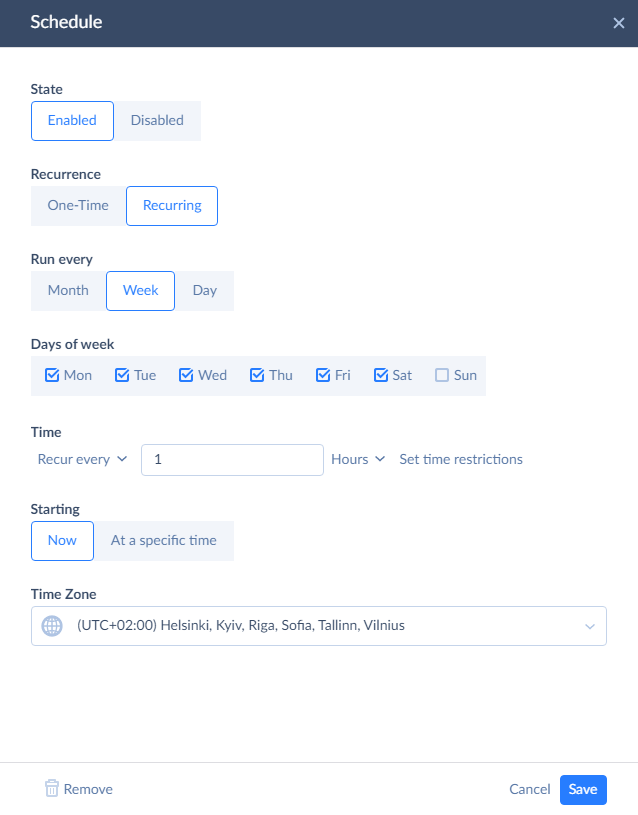
After selecting connections, all we need to do is to select the Salesforce objects to replicate. Then, you can also click Schedule and set automatic replication.
After this, Salesforce to Redshift replication will export data automatically, and it will keep data in Redshift up-to-date without any user interaction. It can be used for any Salesforce edition.
As you can see, automating Salesforce and Redshift integration with Skyvia is very simple and requires just a few minutes. However, it’s often necessary not just to load data from Salesforce to Redshift, but also to get it back. For example, it can be important when performing Salesforce data archiving when you load legacy Salesforce data to Amazon Redshift to save on Salesforce storage costs but still want to be able to access them from time to time from Salesforce. Let’s see how Skyvia can help you integrate Amazon Redshift to Salesforce.
Real-time connectivity: Salesforce to Redshift
To allow your sales reps to make weighted decisions on processed information, you might need to load data back from Redshift to Salesforce. You can use Skyvia Import or Data Flow for these purposes: these ETL tools can extract data from a data source, transform them if necessary, and load them to the target.
However, in the case of Salesforce data archiving, loading data back to Salesforce is not always suitable. We will consider a different scenario – connecting Redshift to Salesforce as an external data source via Salesforce Connect. Salesforce Connect comes at an additional cost and is available only in Enterprise, Performance, and Unlimited editions. In the developer edition, it is available for free.
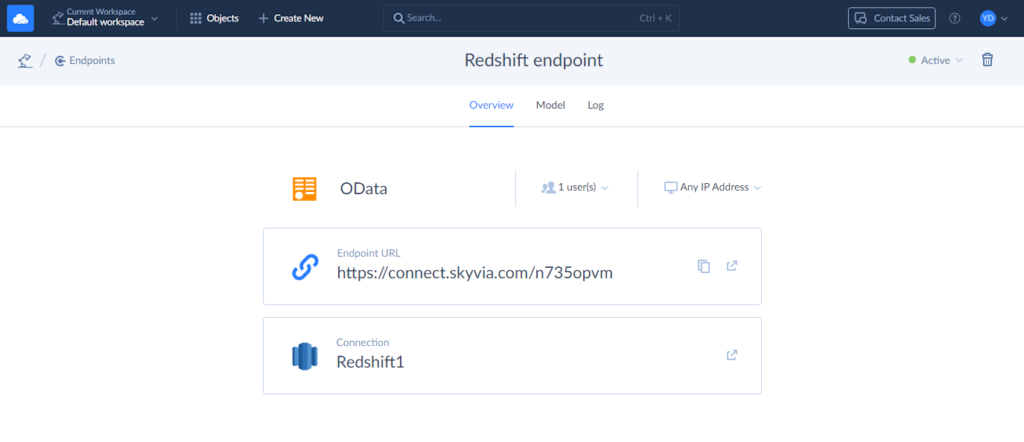
You can use Skyvia Connect to view Redshift data in Salesforce without moving it. Skyvia Connect turns your Redshift data into a special web link called an OData endpoint. Then, Salesforce uses that link to access the data. This way, you can work with your Redshift data inside Salesforce as if it were already part of it — even though the data stays in Redshift.
Suppose we have loaded legacy accounts and contacts to Redshift. Let’s see how we can link them back via Salesforce Connect and Skyvia Connect.
Creating OData Endpoint in Skyvia Connect
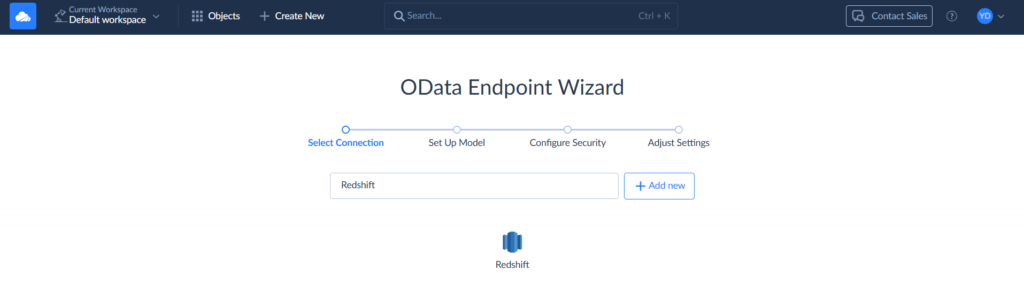
Step 1
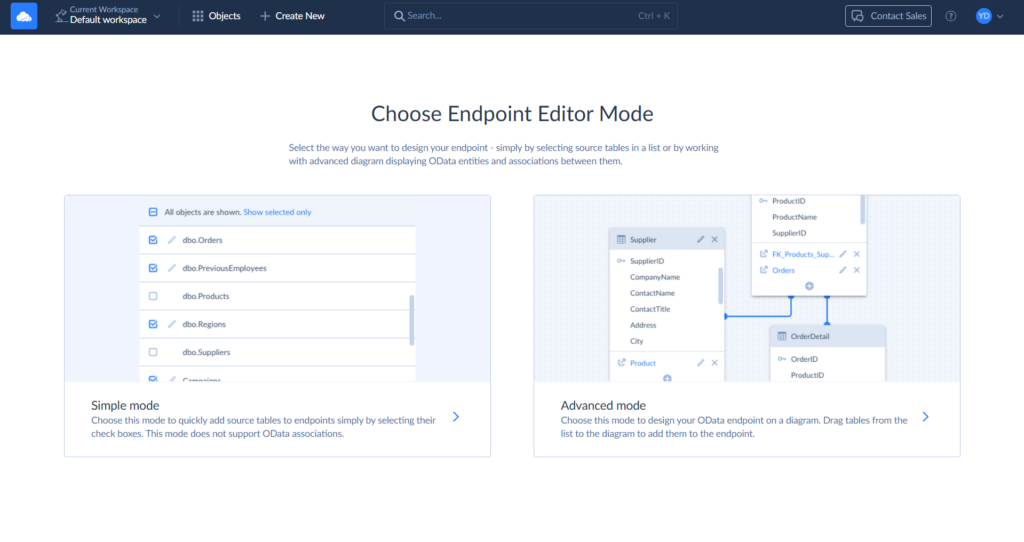
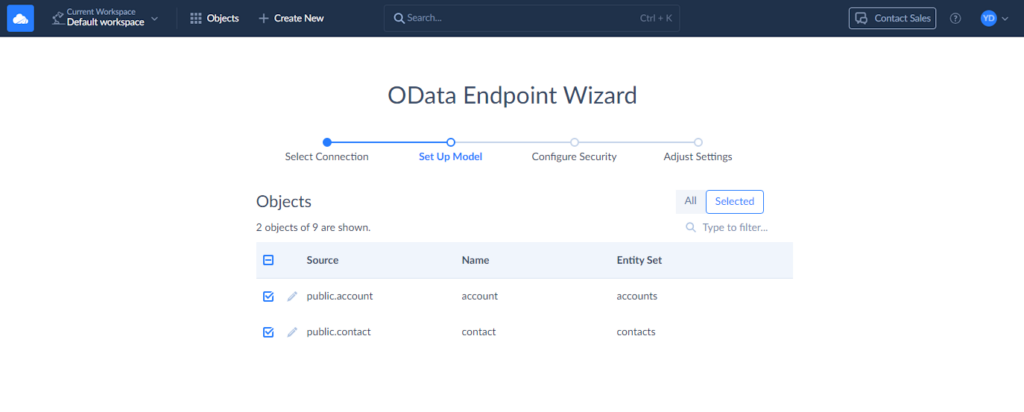
Click + Create New and then, under Connect, select OData Endpoint. Click Simple mode.
Step 2
Select your Redshift connection.
Step 3
Select the tables with data you would like to access in Salesforce. In our case, we select the account and contact tables.
Step 4
Let’s change the generated entity names and add the ‘legacy_’ prefix to them. We are doing it in order for Salesforce external objects to have different, easily distinguishable names. To do it, click the pencil icon near the table name.
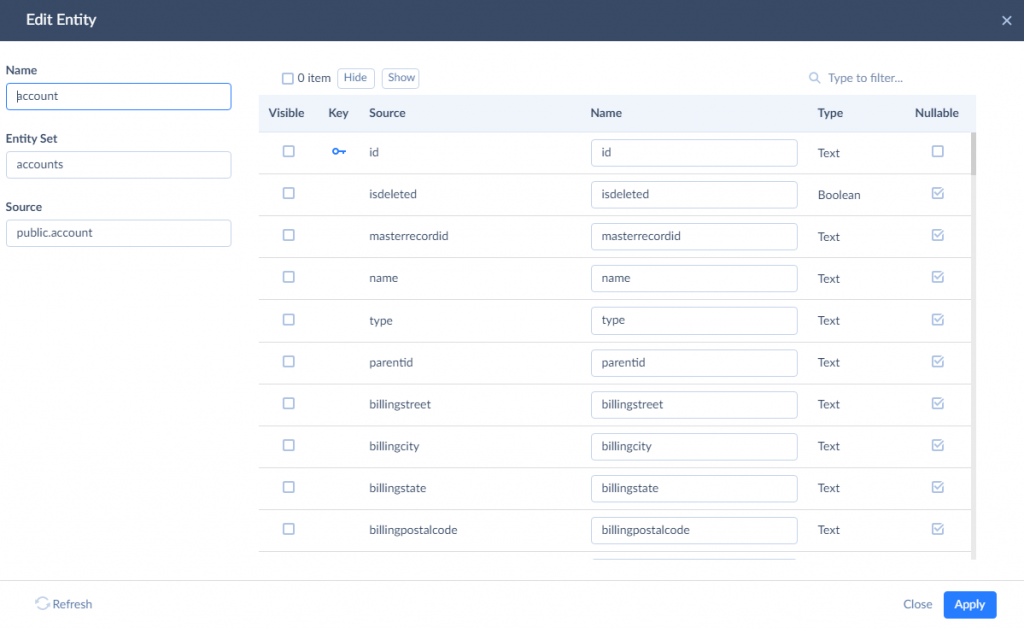
In this window, you can edit the result name of entity and entity set, and the names of entity properties. You can also hide certain properties to remove access to them. Here, we need to add the ‘legacy_’ prefix to the values of the Name and Entity Set boxes. We need to do it for both the account and contact tables. After this, click Next step.
Step 5
Now, we need to configure security settings. You can add an authentication method to protect your data.
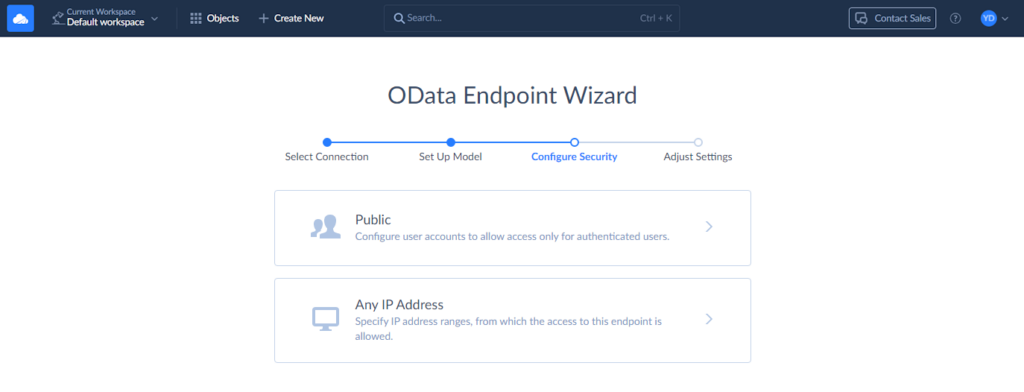
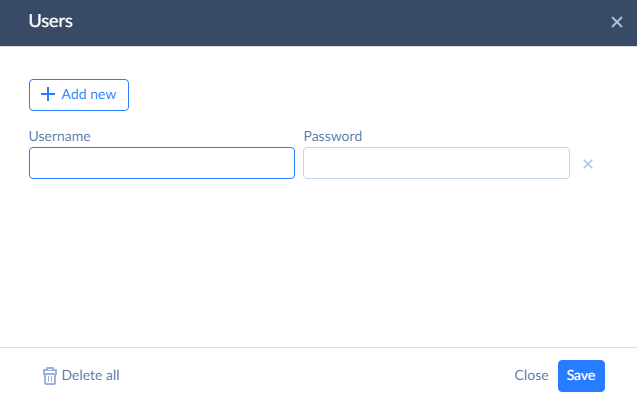
To add authentication, click Public and then + Add new. Come up with a username and a password.
In a similar way, you can add IP Address ranges to allow access only from these ranges. After you finish configuring endpoint security, click Next step.
Step 6
Finally, specify the endpoint name and configure the remaining settings. You can allow editing of your archived records by selecting the Read/Write endpoint mode. That’s all, you can now confirm your settings by clicking Save endpoint.
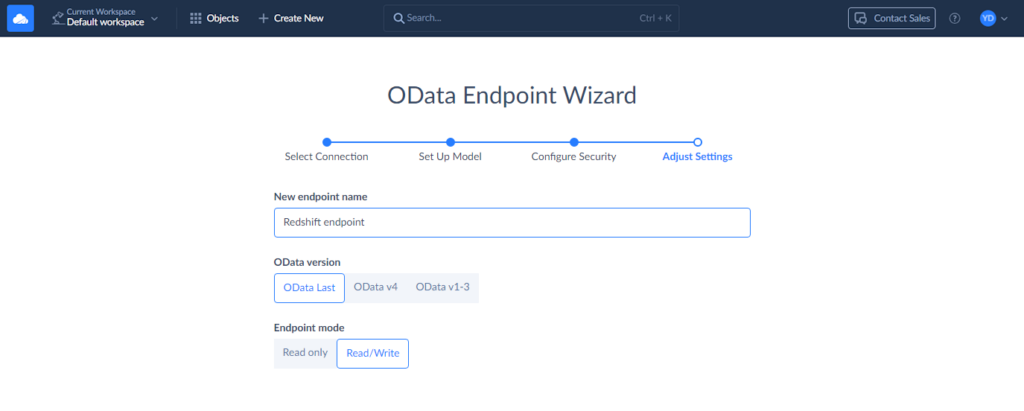
Copy the Endpoint URL. We will need it in the next steps.
Creating External Data Sources in Salesforce
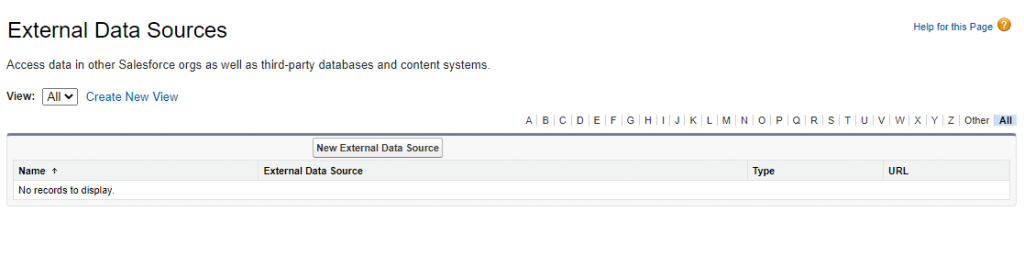
To create an external data source in Salesforce, we need to perform the following steps:
Step 1
In the Salesforce Setup, type “External” in the Quick Find box and, under Develop, click External Data Sources.
Step 2
Click New External Data Source.
Step 3
Make sure to perform the steps below:
- Enter values for External Data Source (a user-friendly name) and Name (unique external data source identifier) fields.
- In the Type list, select Salesforce Connect: OData 4.0
- Paste the endpoint URL into the URL field.
- If you want to allow changes in archived data, check the Writable External Objects.

Optionally, configure other settings, like High Data Volume, depending on your data.
Step 4
Next, you need to set up authentication. If you didn’t create any login credentials for the Skyvia endpoint, you can skip this step.
If you did set up a username and password for the endpoint, you’ll need to enter those:
- Choose Named Principal as the Identity Type.
- Set the Authentication Protocol to Password Authentication.
- Then, type in the Username and Password you created for the endpoint.
Then, click Save.
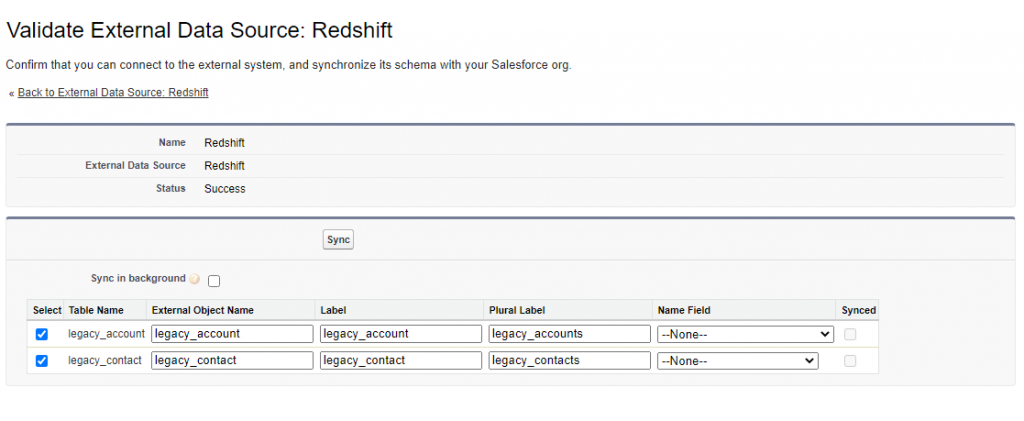
Step 5
On the opened page, select the tables you want to access and click Sync. This will create the necessary external objects automatically.
Creating Tabs for External Objects
Although external objects are now available in Salesforce, they are not directly visible to users through the interface. We need to create tabs to make these objects accessible from Salesforce.
Step 1
In the Salesforce Setup, type “Tabs” in the Quick Find box and click Tabs.
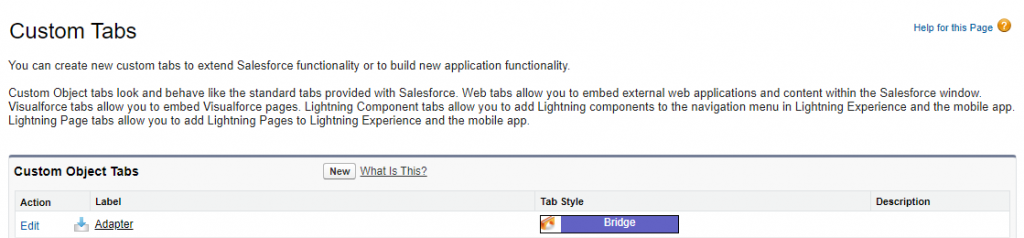
Step 2
Click New. Select the required Object, then set the Tab Style and Description.
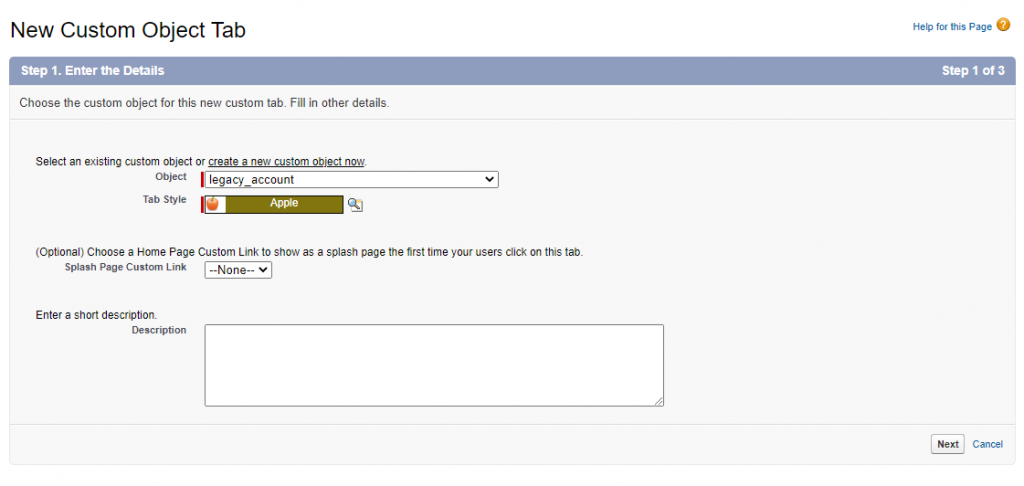
Click Next.
Step 3
On the next screen, specify the tab visibility settings and click Next. Configure the tab availability for custom apps and click Save.
Pros
This method has the following advantages:
- Minimal Effort: The platform offers a highly intuitive, no-code interface that enables a Salesforce to Redshift replication in under 15 minutes, even for non-technical users.
- Automated Syncs: Data can be configured to sync between the platforms automatically to keep the information backed up.
- Scalability: Besides Redshift, Skyvia supports over 200 connectors, making it easy to expand integrations as business needs evolve.
- Bi-directional Flow: Using Skyvia Connect, you can access your Redshift data straight from Salesforce.
This solution will work great if you’re looking for a hands-off, scalable integration that keeps Salesforce and Redshift data in sync with minimal setup and ongoing maintenance.
Cons
This method has some cons that you should keep in mind:
- Additional Costs: Some features, like Salesforce Connect, are not available in all plans. This may add some additional fees.
Method 3: Integration Using APIs
We’ve already explored both manual and automatic ways of integrating Salesforce with Redshift. However, there’s still one method for bringing different tools together, the very traditional one but still popular – APIs, and Salesforce offers a large number of them. Here are the most popular and widely used APIs provided by Salesforce:
- REST API
- SOAP API
- Bulk API
Such a variety provides a space for developers to customize the integration of Salesforce data into other apps to the desired level.
Best For
Perfect for teams with big development resources looking for a highly customizable, automated integration workflow.
Prepare Your Salesforce Data for Amazon Redshift
To move data from Salesforce to Amazon Redshift, you first need to plan how that data will be stored in Redshift. Since Redshift is a database, you’ll need to create tables with the right columns and data types to match the structure of your Salesforce data.
One important thing to know: Redshift can’t take data straight from Salesforce. Instead, the data has to go through a “middle stop” — like Amazon S3 or another service that Redshift works with. After that, extra tools are used to move the data from that middle stop into Redshift. Here are some services that can act as a middle stop:
Before we start, you will need to do a few things:
- Obtain a Salesforce security token. You will need it to connect the platforms.
- Define a custom platform event. Define the exact data that will be streamed out of Salesforce.
- Create a connected app. This will allow AWS to communicate with your Salesforce.
- Create an EventBridge account or log into an existing one. It catches events from Salesforce (via the platform event) and knows where to send them.
- Enable Amazon S3 bucket for EventBridge. S3 is where your records will land before loading into Redshift.
Load Data from Salesforce to Amazon Redshift
Here, you will find detailed instructions on the process, including minor preparatory and intermediary procedures.
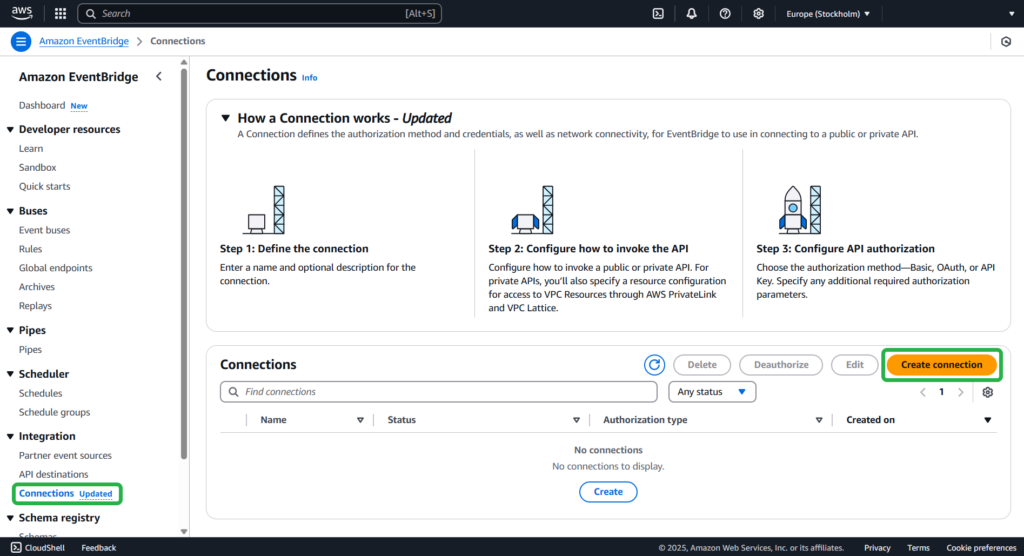
Establish Connection to Salesforce API
Step 1
Open the Amazon EventBridge console. Under Integration, select Connections -> Create connection.
Step 2
Perform the following steps:
- Provide the name and description of the connection.
- Select Use partner template and choose Salesforce for Partner Destinations.
- In the Authorization endpoint field, type https://MyDomainName.my.salesforce.com/services/oauth2/token with your domain name instead of a placeholder.
NOTE: The URL will be different in case you are using Sandbox with or without enhanced domains.
Step 3
Select POST from the HTTP method drop-down list. Enter the client ID and client secret associated with your Salesforce-connected app.
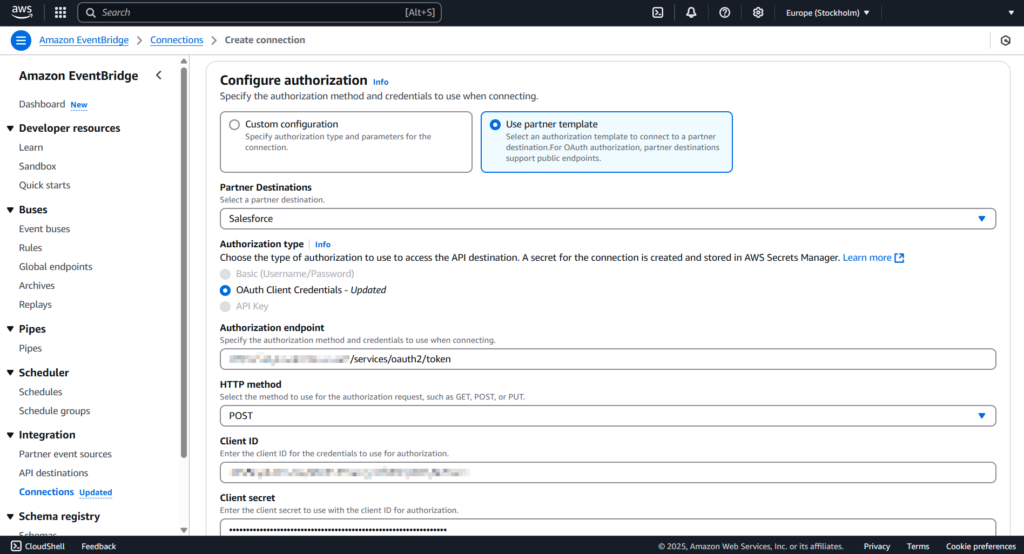
After you’re done, click Create.
Create API Destination
Step 1
Open the Amazon EventBridge console. Go to API destinations -> Create API destination.
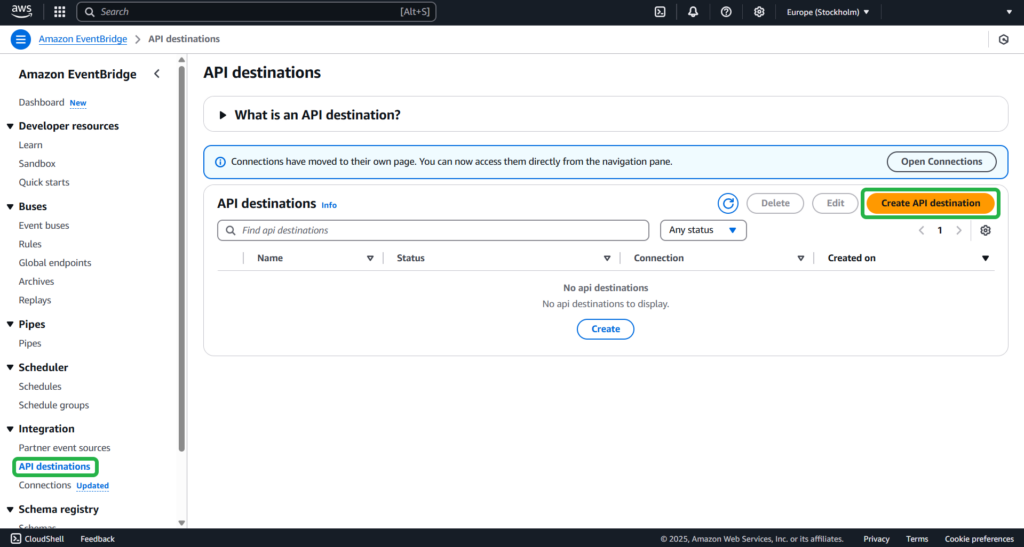
Step 2
Provide the name and description of the API destination.
In the API destination endpoint field, paste the following link: https://MyDomainName.my.salesforce.com/services/data/v54.0/sobjects/MyEvent__e, where “Myevent__e” is the platform event where you want to send information.
Step 3
Select POST from the HTTP method drop-down list.
In the Invocation rate limit field, type 300. Select the Use an existing connection option and specify the Salesforce connection created in the previous step.
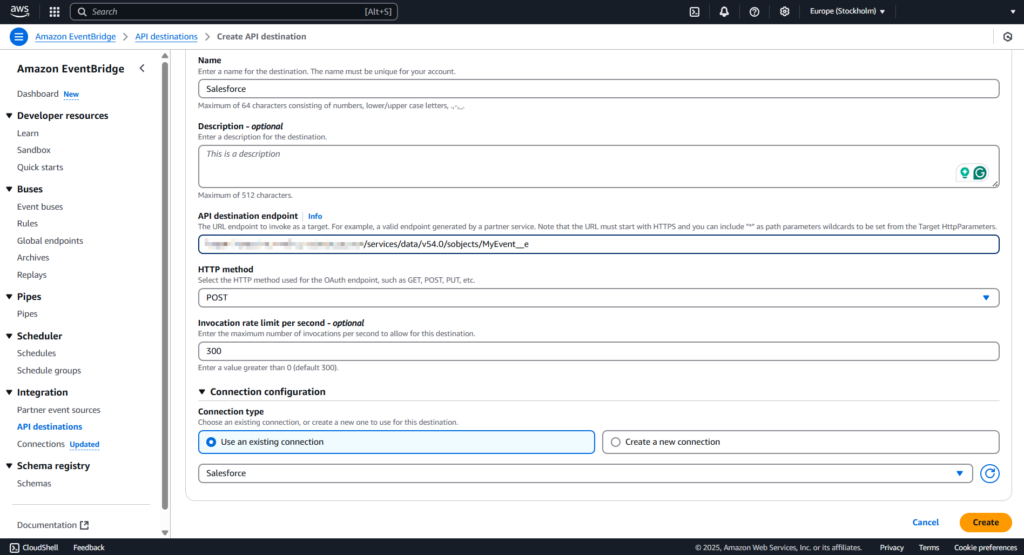
Click Create.
Create a Rule
This step is necessary to organize the sending of events to Salesforce once an Amazon S3 object is created.
Step 1
Open the Amazon EventBridge console. Go to Rules -> Create rule.

Step 2
Provide the name and description of the rule.
Set Default for the Event bus option and select Rule with an event pattern in the Rule type field.
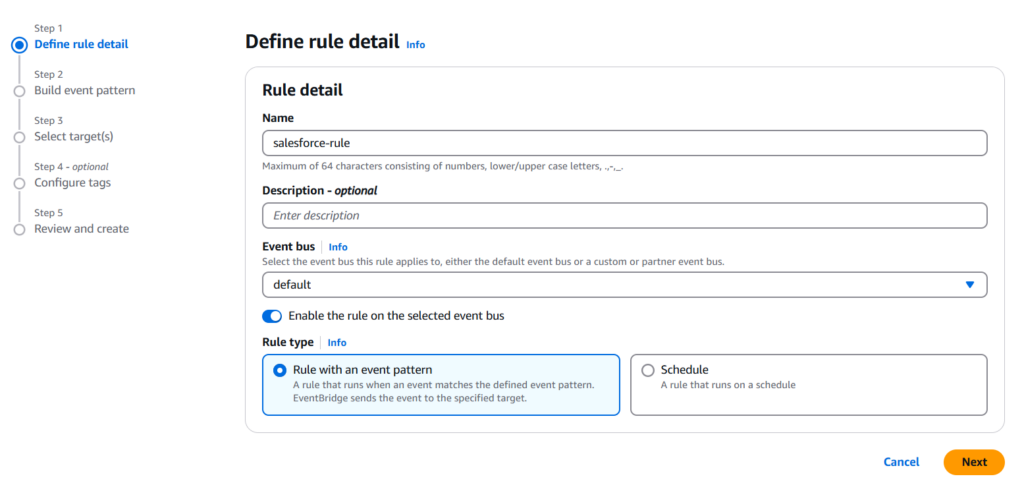
Click Next.
Step 3
Select Other in the Event source field.
In the Event pattern field, insert this code:
{
“source”: [“aws.s3”]
}.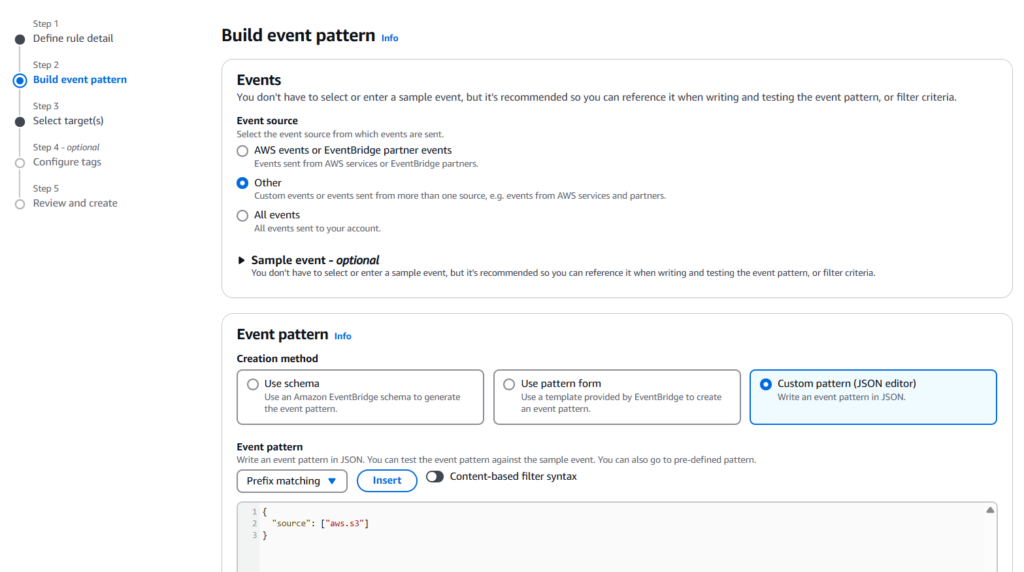
Click Next.
Step 4
Choose EventBridge API destination in the Target types and specify the existing API destination for Salesforce created in the previous step.In the Execution role, select Create a new role for this specific resource.
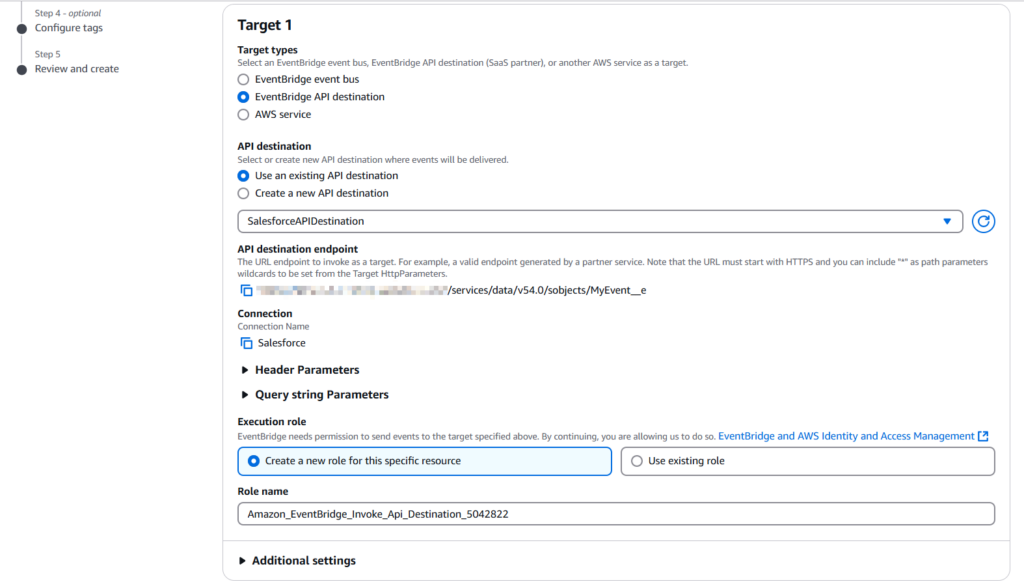
Click Next.
Step 5
Review your settings and click Create rule.
To test your rule, create an Amazon S3 object by uploading a file to an EventBridge-enabled bucket. The information about the created object will be sent to the Salesforce platform event.
Load Data From S3 to Redshift
At this point, you already have set up a flow that can respond to new objects in S3 storage – now it’s time to move it to Redshift.
There’s no one-size-fits-all approach here. You get to choose the level of complexity and automation that fits your use case. For that, please check the official documentation for transferring data from Amazon S3 to Amazon Redshift.
As you see, the process of Salesforce to Redshift integration with APIs isn’t that simple. This method is definitely more sophisticated than manual and automated data transfer with third-party tools. However, integration with APIs has its benefits – it offers a high degree of customization, which isn’t available with other approaches.
Pros
This method has the following advantages:
- High Customization: APIs allow precise process tailoring to business workflow.
- Real-time Sync: EventBridge can be set up to trigger data transfers in real-time when specific actions happen.
- Security: You can enforce authentication, authorization, and data-handling protocols.
Cons
This method has some disadvantages:
- Complex Setup: Configuring Salesforce, S3, EventBridge, and Redshift requires a deep understanding of all these systems.
- Harder to Maintain: Unlike third-party tools, APIs require manual updates and can break with version changes.
Conclusion
In this guide, you learned how to integrate Salesforce and Redshift. You also discovered how to manually load data from Salesforce to Redshift by using the Salesforce Data Loader Export wizard.
Connecting Salesforce to Redshift will maximize the value of your business data. This integration can help eliminate silos, enable real-time analytics, and make smarter, faster decisions. For the most efficient integration, choose a solution that offers automation, ease of use, and scalability, skipping the need for complex coding or maintenance. A cloud-based, no-code platform like Skyvia handles the heavy lifting — let your team focus on what matters.
FAQ to Salesforce to Redshift

Can I automate the data transfer process between Salesforce and AWS Redshift?
Yes, using ETL tools like Skyvia or APIs, you can automate the regular syncing of data between Salesforce and Redshift.
What are the benefits of using an ETL tool for this connection?
ETL tools simplify integration and reduce manual effort. You can easily schedule and transform your data transfer process, and error-handling features will warn you in case something goes wrong.
How can I ensure the security of my data during the transfer process?
For API or native integrations, use encrypted connections (HTTPS, IAM roles), secure access credentials, and limit access via authentication and IP whitelisting. For third-party integrations, see the provider’s security features.
What are some common challenges in connecting Salesforce to AWS Redshift?
You can run into data format mismatches, API limitations, handling large datasets, and maintaining sync accuracy over time. Third-party integration can take care of that even before the problem occurs.