

Imagine that the Salesforce data is like a treasure chest, but it’s locked up. All those leads, opportunities, and customer interactions are gold, but you can’t dig into them properly while they’re stuck in Salesforce.
The real magic happens when that treasure moves into a powerhouse like Amazon Redshift. Suddenly, you can run complex queries, spot trends, and make decisions that actually move the business forward instead of just guessing.
This guide is your map. We’ll walk through three ways to get Salesforce data into Redshift: manual exports, custom API scripts, and no-code tools.
We’ll break down the costs, address the headaches associated with large datasets, and discuss how to troubleshoot like a pro. By the end, you’ll know which path fits your team’s budget, tech skills, and security needs.
Table of contents
- Why Do You Need to Connect Salesforce to Redshift?
- Choosing Your Method: A 360-Degree Comparison
- Method 1: The Manual Way (Native CSV Export)
- Method 2: The Developer Way (Custom API Integration)
- Method 3: The Smart Way (No-Code Automation with Skyvia)
- Critical Integration Challenges & Solutions
- Conclusion
Why Do You Need to Connect Salesforce to Redshift?
You’ve got Salesforce full of rich customer data, but trying to slice it for insights feels like juggling hot potatoes. Moving that data into Redshift changes the game entirely. Here’s why.
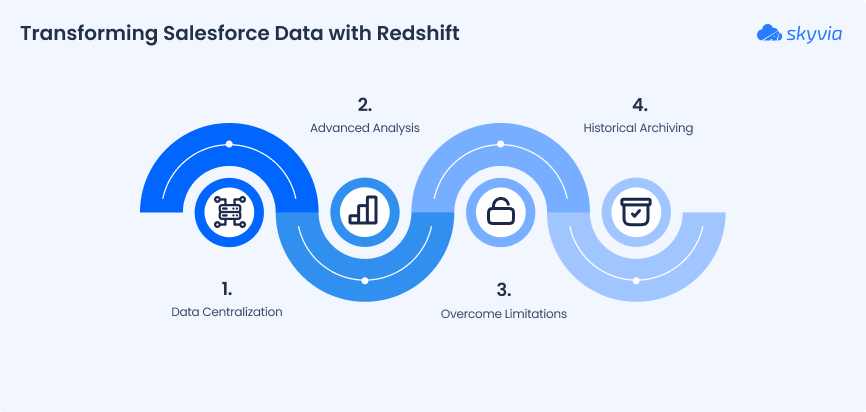
1. Unlock Advanced BI and Machine Learning
With Redshift as the playground, you can feed data into BI tools or machine learning models without slowing down Salesforce. That means smarter forecasts, better churn predictions, and dashboards that actually tell a story instead of just spitting numbers.
2. Create a 360-Degree Customer View (Single Source of Truth)
No more guessing if the sales, support, or marketing teams are looking at the same information. Redshift centralizes everything, stitching together interactions from Salesforce with other systems. Think of it as finally having one clean notebook instead of ten half-filled, messy ones.
3. Overcome Salesforce Reporting and Storage Limitations
Salesforce is powerful, but large datasets and complex queries can grind your org to a halt. Redshift handles massive amounts of data effortlessly, letting you run heavy analytics without breaking a sweat or the Salesforce org.
4. Archive Historical Data for Compliance and Trend Analysis
Need to track long-term trends or meet regulatory requirements? By moving older records to Redshift, you free up Salesforce for daily operations while keeping a reliable, query-ready archive. It’s like moving seasonal inventory to storage. You still know exactly where everything is when you need it.

Choosing Your Method: A 360-Degree Comparison
When it comes to connecting Salesforce to Redshift, the right method really depends on what you need.
- Are you looking for a simple, one-time data dump?
- Do you need a custom solution with full control?
- Are you aiming for speed, reliability, and ease of use?
Each approach has its strengths, but understanding the trade-offs is key. Let’s break it down and see how each method stacks up based on features like cost, setup time, and maintenance.
| Feature | Method 1: Manual (CSV) | Method 2: Custom API | Method 3: No-Code Tool (Skyvia) |
|---|---|---|---|
| Best For | One-time transfers, small data. | Unique requirements, dev teams. | Speed, reliability, automation. |
| Total Cost | Low tool cost, High labor cost. | Very High (Dev + Maintenance). | Predictable subscription (Low TCO). |
| Setup Time | Hours (per export). | Weeks to Months. | Minutes. |
| Maintenance | High (fully manual). | High (API changes, errors). | Low (fully managed). |
| Large Datasets | Poor (Prone to failure). | Good (Requires expert coding). | Excellent (Built for scale). |
| Security | Fair (User-managed). | Good (Requires expert setup). | Excellent (Compliance built-in). |
| Real-Time Sync | No. | Possible (Complex setup). | Near real-time (Scheduled). |
Method 1: The Manual Way (Native CSV Export)
Salesforce offers several native ways and tools for connecting Salesforce to Redshift:
- MuleSoft AnyPoint Platform. This is a Salesforce-owned solution for automatic data solution that allows Salesforce and Redshift integration, as well as with other apps and systems. It comes with an additional cost, depending on data sources and use cases, and there is no well-defined pricing published; you need to contact them for a quote.
- CSV Export and Import. A manual but cost-free alternative. You can use Data Loader or the Salesforce Data Export wizard to get CSV files of the objects that will be manually imported to Redshift. This method is available for Salesforce Enterprise, Performance, Unlimited, or Developer editions.
Best For
Ideal for organizations on tight budgets that need occasional data transfer and can manage manual processes.
Option 1: Exporting Data via Salesforce Data Loader
Salesforce Data Loader is a client application for bulk import and export, available in the Enterprise, Performance, and Unlimited editions. It is a downloadable tool that supports up to 5 million records at a time.
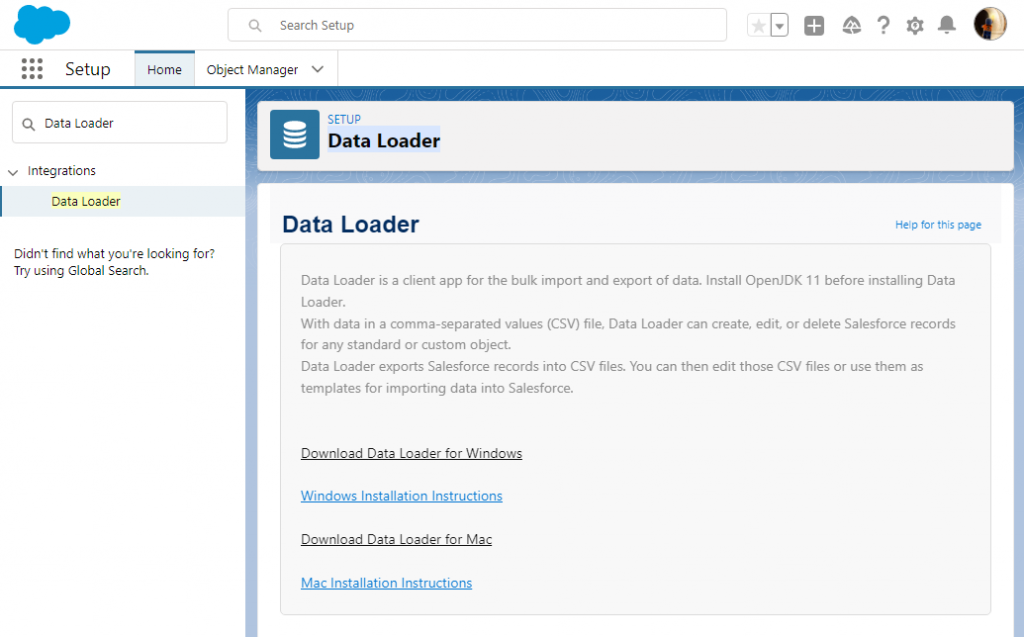
Before we start, download Data Loader and install it on your computer. Make sure that you have installed JRE and JDK: you can’t run Data Loader without them!
Then, do the following:
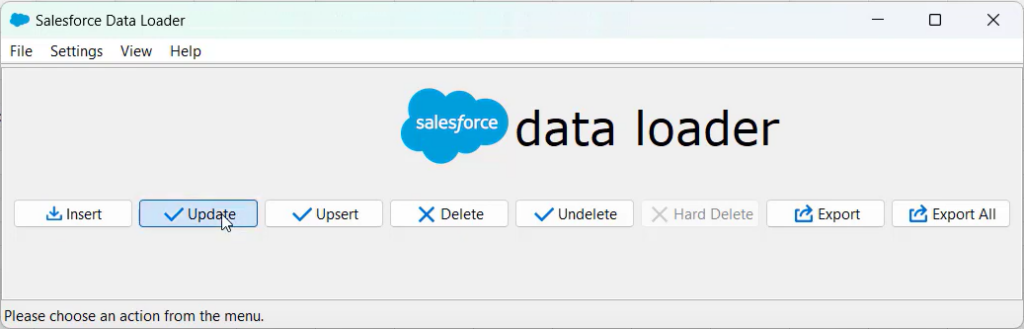
Step 1
In the Data Loader window, click Export.
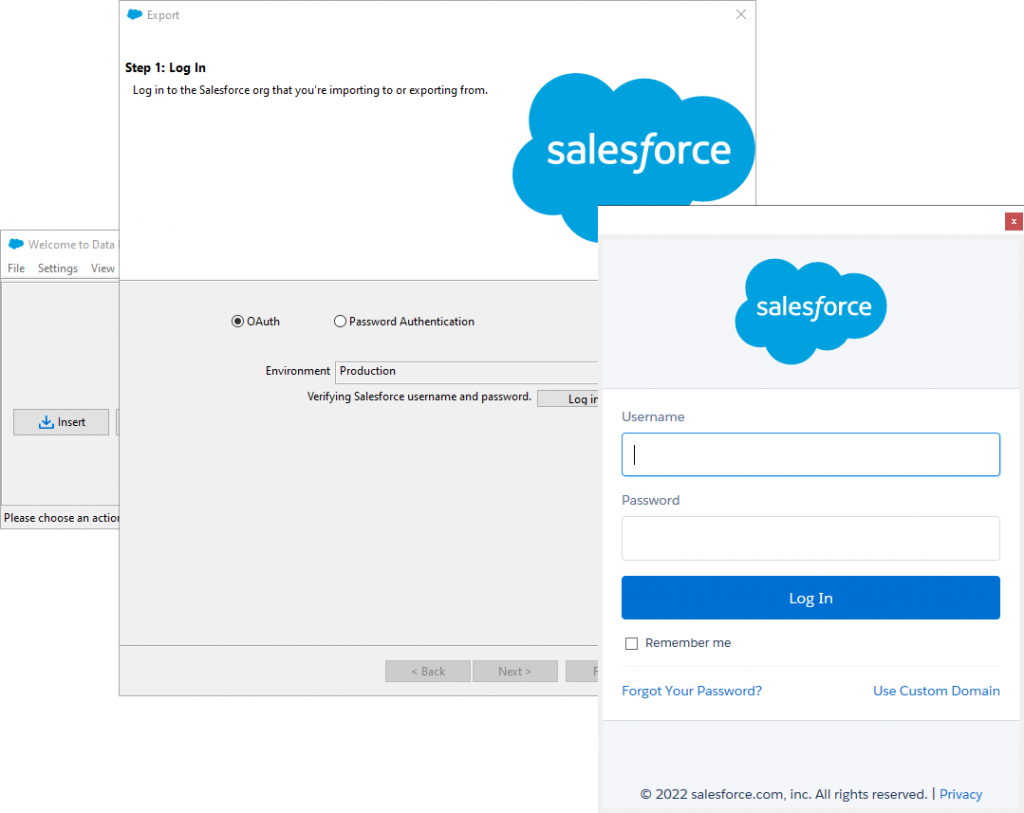
Step 2
A wizard will open, prompting you to sign in. Choose your environment from the drop-down menu and click Log In. Follow the authentication instructions on the screen to proceed.
Step 3
Select a Salesforce object to export data from and specify the CSV file name. Click Next. Data Loader allows users to export both predefined and custom objects. You can also change the location where the result file will be saved by clicking Browse.

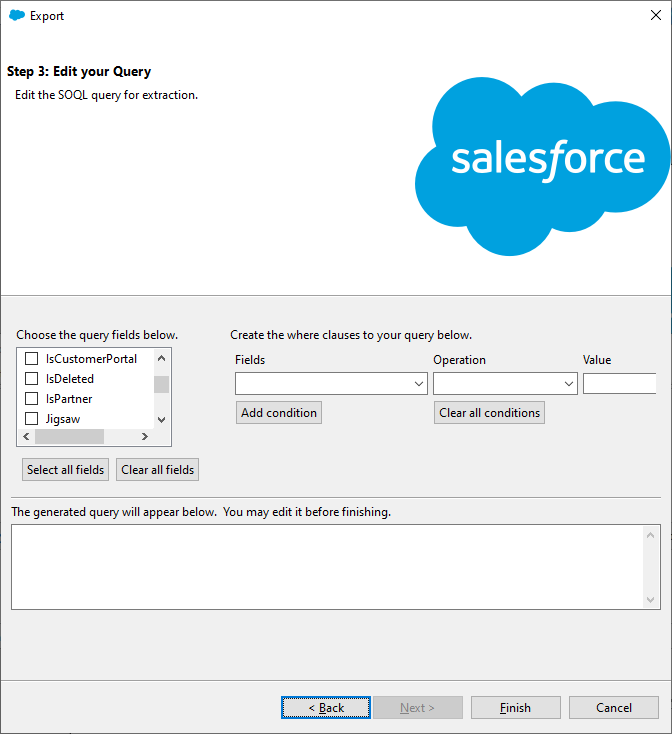
Step 4
On the next wizard page, you can configure a SOQL query to use for exporting data. We only need to select the fields that we want to export, but if you want to filter data, you can also configure WHERE clauses. For our purposes, we can just click Select all fields, and then click Finish.
Step 5
Finally, click Yes to start the process. The data will be exported to the specified file.
Let’s go over one more option to export data before we bring it into Redshift.
Option 2: Exporting Data via Data Export Wizard
To export data to CSV using the Salesforce Export Data feature, perform the following steps:
Step 1
Open the Salesforce Setup by clicking the Quick Setup gear icon in the upper-right corner.
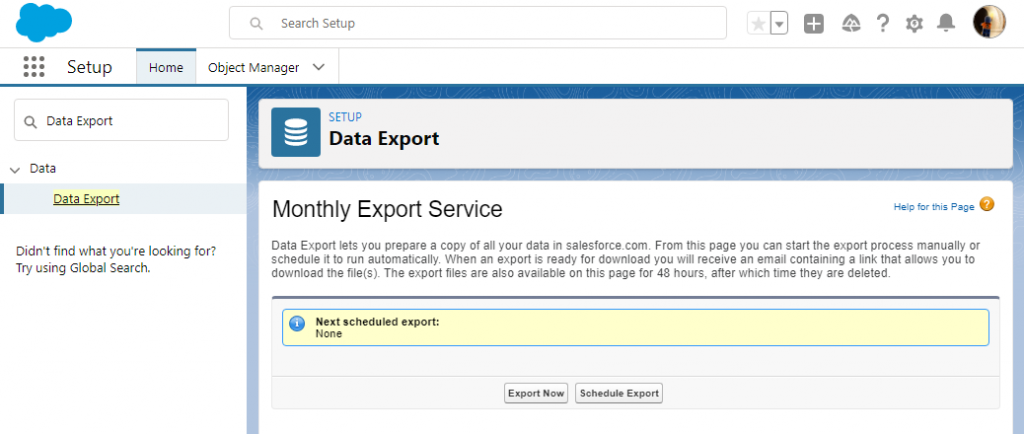
Step 2
Type “Data Export” in the Quick Find box and, under Data, click Data Export. On the next screen, select Export Now.
Step 3
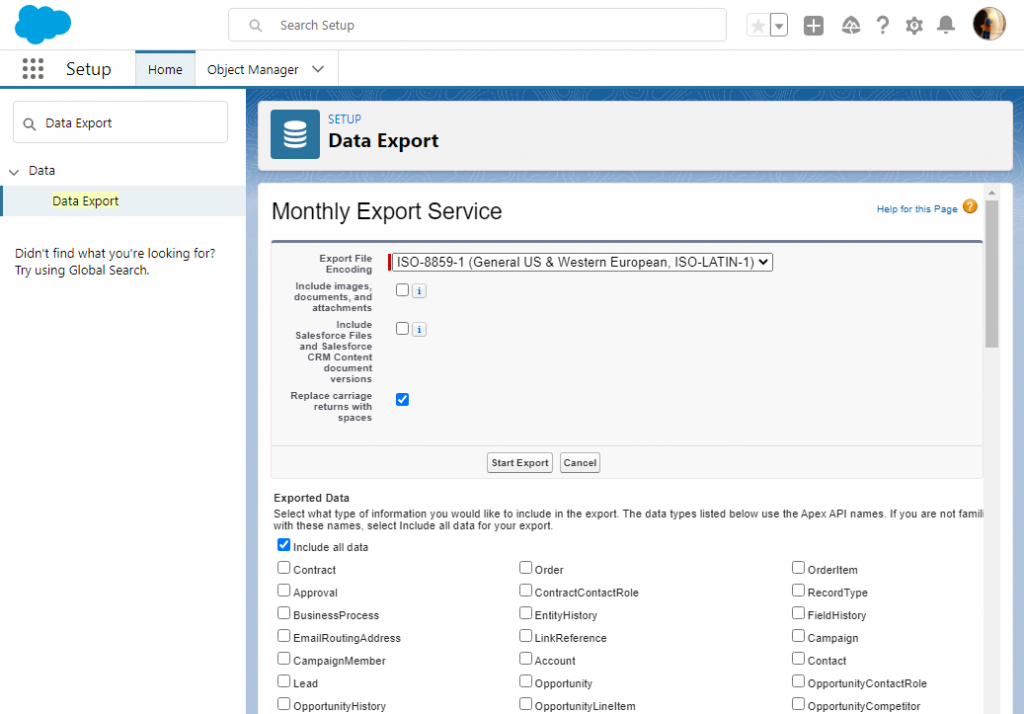
Select Salesforce objects to export and click Start Export. You can export both predefined and custom objects.
The data export will start, and after some time, you will receive an email with the link to the exported data:
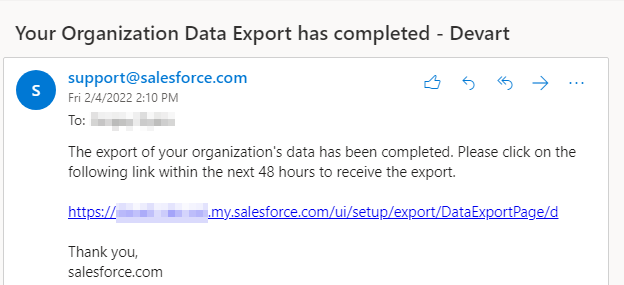
Step 4
Click this link to open the page where you can download the export results:
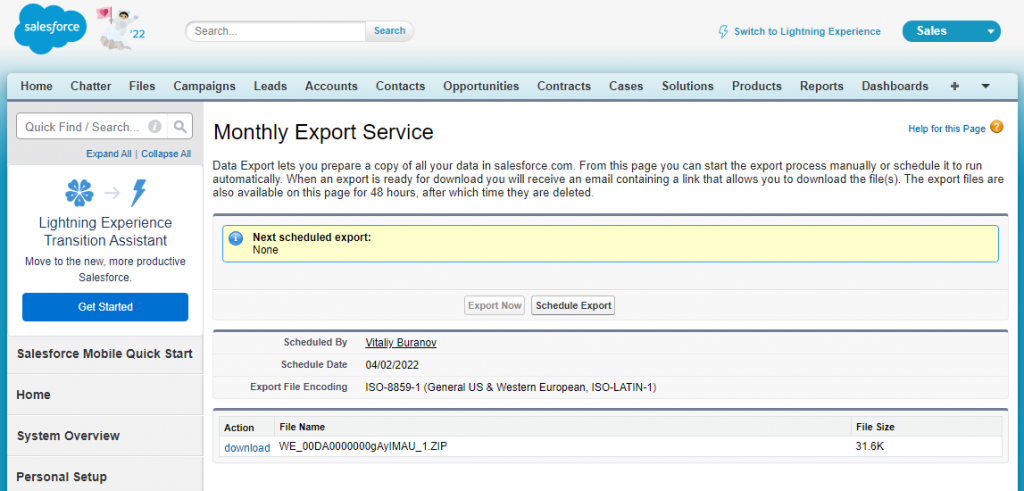
We are now ready to move to the importing process.
Importing Data to Redshift
If you haven’t prepared the tables for the data in Redshift, you need to create them first.
Step 1
To create a table in Redshift for Salesforce Accounts, use the statement below:
CREATE TABLE "Account" (
    "Id" VARCHAR(18) NOT NULL,
    "IsDeleted" BOOLEAN NOT NULL,
    "MasterRecordId" VARCHAR(18),
    "Name" VARCHAR(255) NOT NULL,
    "Type" VARCHAR(255),
    "ParentId" VARCHAR(18),
    "BillingStreet" VARCHAR(255),
    "BillingCity" VARCHAR(40),
    "BillingState" VARCHAR(80),
    "BillingPostalCode" VARCHAR(20),
    "BillingCountry" VARCHAR(80),
    "BillingLatitude" DOUBLE PRECISION,
    "BillingLongitude" DOUBLE PRECISION,
    "BillingGeocodeAccuracy" VARCHAR(255),
    "BillingAddress" TEXT,
    "ShippingStreet" VARCHAR(255),
    "ShippingCity" VARCHAR(40),
    "ShippingState" VARCHAR(80),
    "ShippingPostalCode" VARCHAR(20),
    "ShippingCountry" VARCHAR(80),
    "ShippingLatitude" DOUBLE PRECISION,
    "ShippingLongitude" DOUBLE PRECISION,
    "ShippingGeocodeAccuracy" VARCHAR(255),
    "ShippingAddress" TEXT,
    "Phone" VARCHAR(40),
    "Fax" VARCHAR(40),
    "AccountNumber" VARCHAR(40),
    "Website" VARCHAR(255),
    "PhotoUrl" VARCHAR(255),
    "Sic" VARCHAR(20),
    "Industry" VARCHAR(255),
    "AnnualRevenue" DOUBLE PRECISION,
    "NumberOfEmployees" INTEGER,
    "Ownership" VARCHAR(255),
    "TickerSymbol" VARCHAR(20),
    "Description" TEXT,
    "Rating" VARCHAR(255),
    "Site" VARCHAR(80),
    "OwnerId" VARCHAR(18) NOT NULL,
    "CreatedDate" TIMESTAMP NOT NULL,
    "CreatedById" VARCHAR(18) NOT NULL,
    "LastModifiedDate" TIMESTAMP NOT NULL,
    "LastModifiedById" VARCHAR(18) NOT NULL,
    "SystemModstamp" TIMESTAMP NOT NULL,
    "LastActivityDate" DATE,
    "LastViewedDate" TIMESTAMP,
    "LastReferencedDate" TIMESTAMP,
    "Jigsaw" VARCHAR(20),
    "JigsawCompanyId" VARCHAR(20),
    "AccountSource" VARCHAR(255),
    "SicDesc" VARCHAR(80),
    CONSTRAINT "PK_Account" PRIMARY KEY ("Id")
);
Note: Your Account object might contain custom fields that are not included in this statement.
Step 2
After creating the necessary tables, you need to upload the CSV files to an Amazon S3 bucket. This is the easiest way of importing CSV files to Amazon Redshift manually. To learn how to upload files to the bucket, refer to the Amazon S3 documentation.
Step 3
The uploaded CSV files can be imported into the Redshift table with the COPY command. The COPY command has the following syntax:
COPY table_name [ column_list ] FROM data_source CREDENTIALS access_credentials [options]For example:
copy Account
from 's3://awssampledbuswest2/tickit/Account.csv'
iam_role 'arn:aws:iam::<aws-account-id>:role/<role-name>'
CSV
INGOREHEADER 1;
If the columns in the CSV file and the table are the same, we can omit the column list. Note that Data Loader exports CSV files with columns sorted alphabetically, so we may need to specify the column list for it.
copy Account(AccountNumber, AccountSource, AnnualRevenue, BillingAddress, BillingCity, BillingCountry, BillingGeocodeAccuracy, BillingLatitude, BillingLongitude, BillingPostalCode, BillingState, BillingStreet, ChannelProgramLevelName, ChannelProgramName, CreatedById, CreatedDate, Id, Industry, IsCustomerPortal, IsDeleted, IsPartner, Jigsaw, JigsawCompanyId, LastActivityDate, LastModifiedById, LastModifiedDate, LastReferencedDate, LastViewedDate, MasterRecordId, Name, NumberOfEmployees, OwnerId, Ownership, ParentId, Phone, PhotoUrl, Rating, ShippingAddress, ShippingCity, ShippingCountry, ShippingGeocodeAccuracy, ShippingLatitude, ShippingLongitude, ShippingPostalCode, ShippingState, ShippingStreet, Sic, SicDesc, Site, SystemModstamp)
from 's3://awssampledbuswest2/tickit/Account.csv'
iam_role 'arn:aws:iam::<aws-account-id>:role/<role-name>'
CSV
INGOREHEADER 1;
These examples use an AWS Identity and Access Management (IAM) role to access the specified bucket. This is the recommended way to access it. You can also use authentication via your access key ID and secret access key, like in the example of the credentials clause below, but this is not recommended.
credentials 'aws_access_key_id=<your-access-key-id>;aws_secret_access_key=<your-secret-access-key>'We need to add the CSV and IGNOREHEADER options because we are importing a comma-separated file with one header row.
After the import, you can remove the CSV files from the Amazon S3 bucket or even remove the bucket itself to reduce the costs of storing your file in Amazon S3 storage.
Deep Dive
Let’s take a closer look at some of the real-world implications of going the manual export route. It might seem like the “easy” option, but there are hidden costs and challenges that you’ll want to consider.
Cost Analysis
Sure, the Salesforce export tools are free, but free isn’t always really free. Think about it this way:
- Manual labor costs add up quickly, especially if you need frequent exports. Time spent selecting data, exporting it, and handling errors is time that could’ve been spent on actual business tasks.
- Error correction is another hidden cost. CSV exports can easily fail or get corrupted, leaving you with more hours spent fixing issues.
- Then there’s the opportunity cost. Every time you wait for an export to run, or deal with mistakes, you lose valuable time that could’ve been spent making data-driven decisions.
Security Considerations
Here’s where manual exports can get tricky:
- Managing IAM roles. In Salesforce, you need to ensure only the right people have access to the data. If someone with the wrong permissions exports sensitive info, you’re in a tricky situation.
- Securing S3 buckets. When you upload CSVs to Amazon S3 for Redshift imports, you need to lock down the S3 bucket permissions. Otherwise, the data could be exposed to people who shouldn’t have access.
- Data on local machines. While handling CSVs on your computer, they’re vulnerable to data theft or loss. If your laptop is stolen or not encrypted, you risk exposing sensitive customer data.
Limitations
Let’s face it: this manual method doesn’t scale well. Here’s why:
- Not scalable. As your dataset grows, exporting data manually gets more complex and time-consuming. You’ll quickly hit Salesforce’s export limits, leading to slower processes and more headaches.
- Error-prone. Manual data handling always comes with a risk of human error. Whether it’s mis-mapped fields or forgotten records, the chances of mistakes increase over time.
- No automation. Every export requires manual intervention. No automation means more time spent copying files instead of analyzing data.
- Weekly export limits. Salesforce places limits on how often you can export data. So, if you need updated data multiple times a week, you’re going to run into bottlenecks.
Method 2: The Developer Way (Custom API Integration)
The next set of approaches for bringing different tools together is very traditional but still popular. APIs, and Salesforce offers a large number of them.
Here are the most widely used APIs provided by Salesforce:
- REST API
- SOAP API
- Bulk API
Such a variety provides a space for developers to customize the integration of Salesforce data into other apps to the desired level.
Best For
Perfect for teams with big development resources looking for a highly customizable, automated integration workflow.
Prepare Your Salesforce Data for Amazon Redshift
To move data from Salesforce to Amazon Redshift, you first need to plan how that data will be stored there. Since Redshift is a database, you’ll need to create tables with the correct columns and data types to match the structure of the Salesforce data.
Note: Redshift can’t take data straight from Salesforce. Instead, the data has to go through a “middle stop” like Amazon S3 or another service that Redshift works with.
After that, extra tools are used to move the data from that middle stop into Redshift. Here are some services that can act as a middle stop:
- Amazon S3
- DynamoDB
- Kinesis Firehose
Before we start, you’ll need to:
- Obtain a Salesforce security token. You’ll need this step to connect the platforms.
- Define a custom platform event. Define the exact data that’ll be streamed out of Salesforce.
- Create a connected app. This step will allow AWS to communicate with your Salesforce.
- Create an EventBridge account or log into an existing one. It catches events from Salesforce (via the platform event) and knows where to send them.
- Enable the Amazon S3 bucket for EventBridge. S3 is where your records will land before loading into Redshift.
Load Data from Salesforce to Amazon Redshift
Here, you will find detailed instructions on the process, including minor preparatory and intermediary procedures.
Establish Connection to Salesforce API
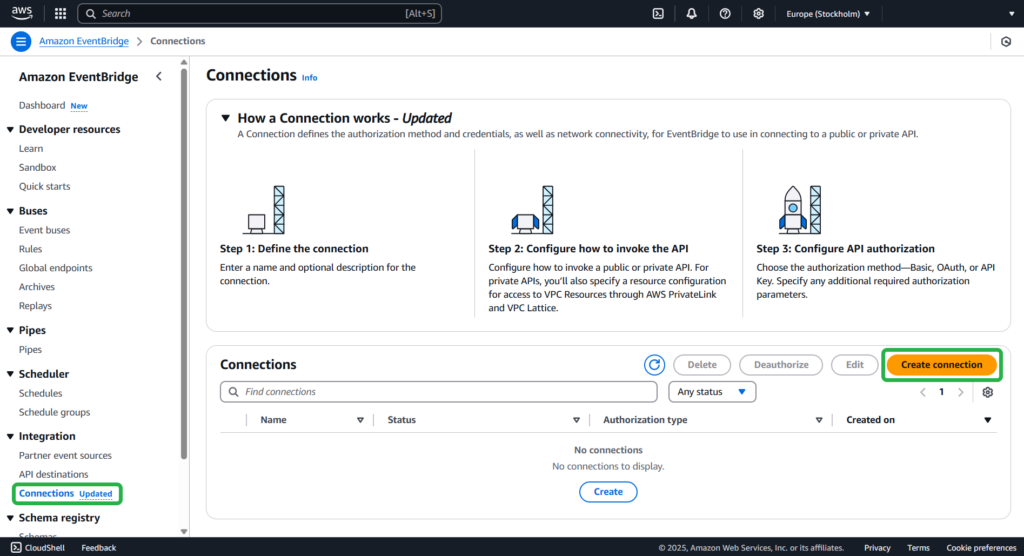
Step 1
Open the Amazon EventBridge console. Under Integration, select Connections -> Create connection.
Step 2
Perform the following steps:
- Provide the name and description of the connection.
- Select Use partner template and choose Salesforce for Partner Destinations.
- In the Authorization endpoint field, type https://MyDomainName.my.salesforce.com/services/oauth2/token with your domain name instead of a placeholder.
Note: The URL will be different in case you are using Sandbox with or without enhanced domains.
Step 3
Select POST from the HTTP method drop-down list. Enter the client ID and client secret associated with your Salesforce-connected app.
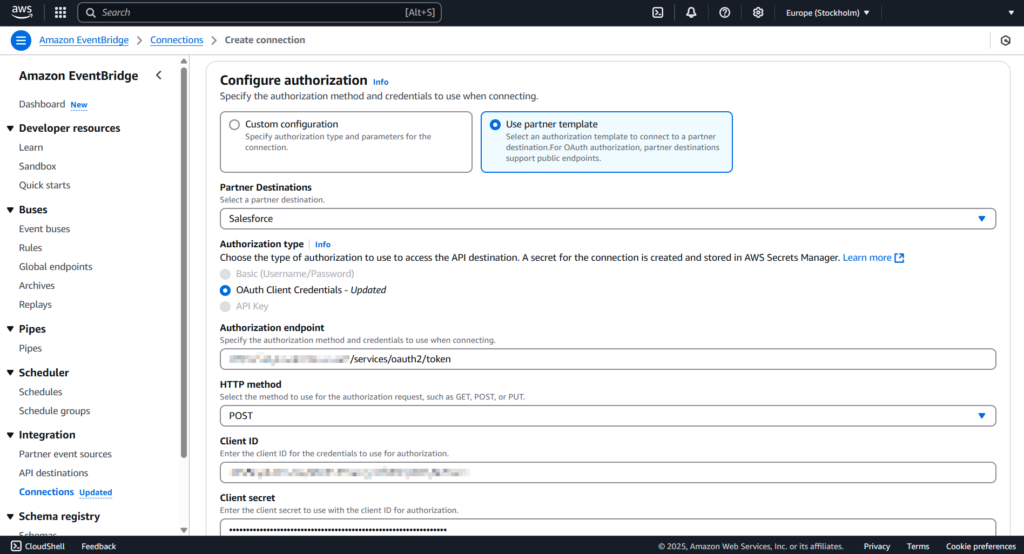
After you’re done, click Create.
Create API Destination
Step 1
Open the Amazon EventBridge console. Go to API destinations -> Create API destination.
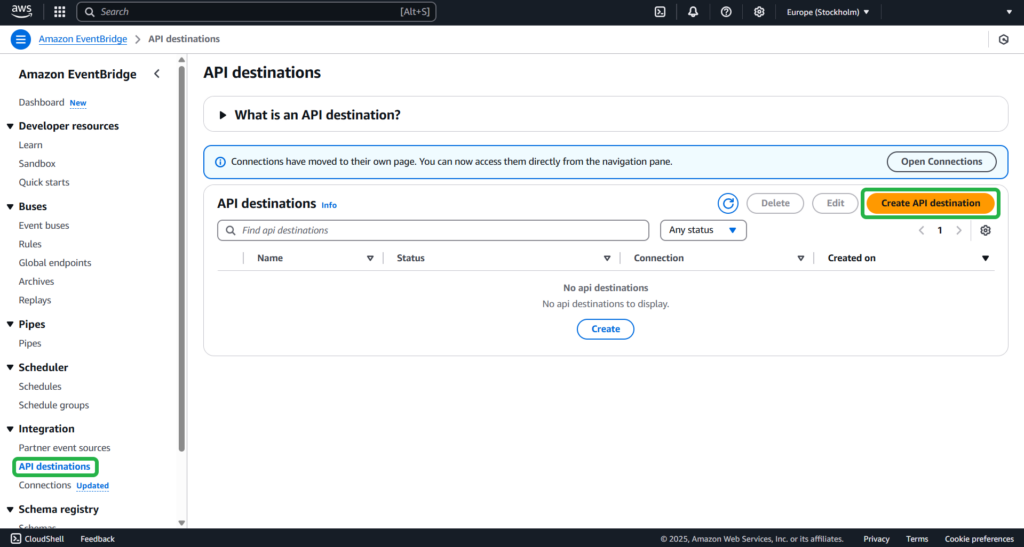
Step 2
Provide the name and description of the API destination.
In the API destination endpoint field, paste the following link: https://MyDomainName.my.salesforce.com/services/data/v54.0/sobjects/MyEvent__e, where “Myevent__e” is the platform event where you want to send information.
Step 3
Select POST from the HTTP method drop-down list.
In the Invocation rate limit field, type 300. Select the Use an existing connection option and specify the Salesforce connection created in the previous step.
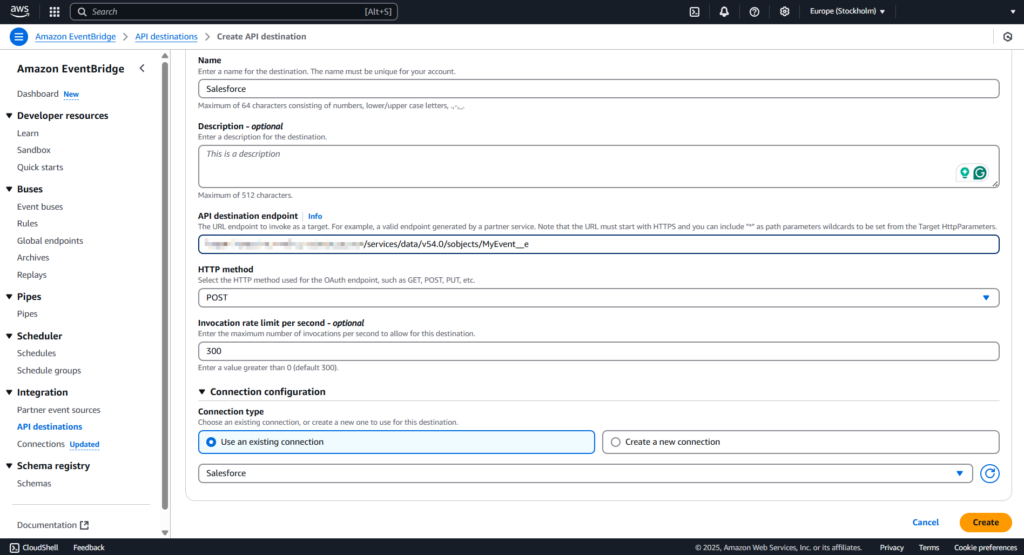
Click Create.
Create a Rule
This step is necessary to organize the sending of events to Salesforce once an Amazon S3 object is created.
Step 1
Open the Amazon EventBridge console. Go to Rules -> Create rule.

Step 2
Provide the name and description of the rule.
Set Default for the Event bus option and select Rule with an event pattern in the Rule type field.
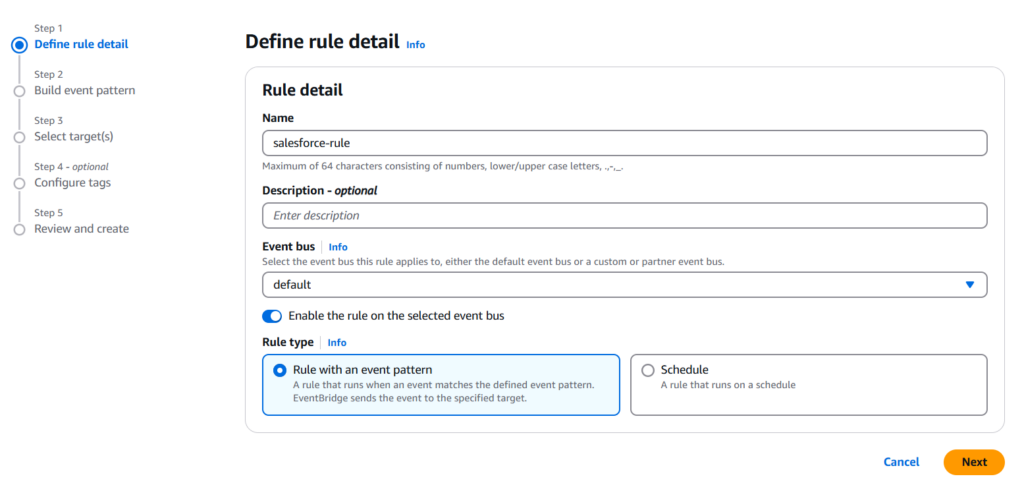
Click Next.
Step 3
Select Other in the Event source field.
In the Event pattern field, insert this code:
{
“source”: [“aws.s3”]
}.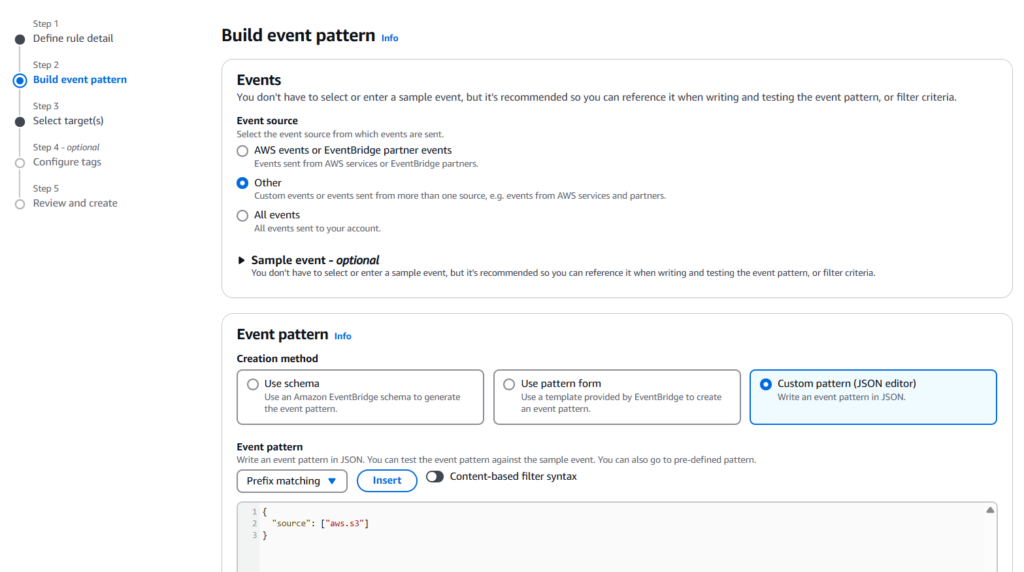
Click Next.
Step 4
Choose EventBridge API destination in the Target types and specify the existing API destination for Salesforce created in the previous step.In the Execution role, select Create a new role for this specific resource.
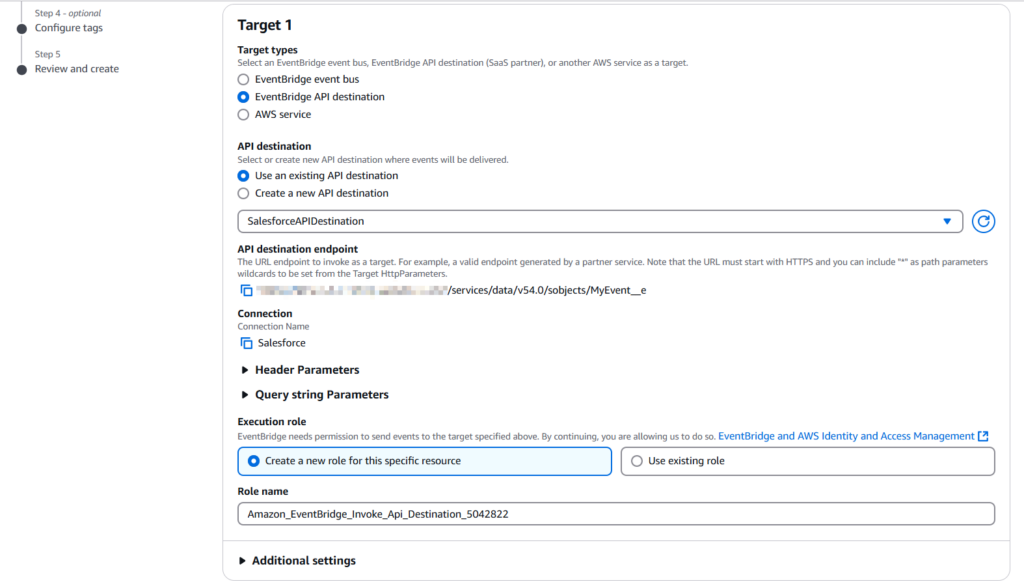
Click Next.
Step 5
Review your settings and click Create rule.
To test your rule, create an Amazon S3 object by uploading a file to an EventBridge-enabled bucket. The information about the created object will be sent to the Salesforce platform event.
Load Data From S3 to Redshift
At this point, you already have set up a flow that can respond to new objects in S3 storage – now it’s time to move it to Redshift.
There’s no one-size-fits-all approach here. You get to choose the level of complexity and automation that fits your use case. For that, please check the official documentation for transferring data from Amazon S3 to Amazon Redshift.
Deep Dive
The developer route is powerful, but it’s like building your own rollercoaster. The users get complete control, but it comes with costs, complexities, and safety checks.
This method is like having a fully customized sports car: insanely fast and tailored to your needs, but it requires an expert driver and constant maintenance.
Cost Analysis
Hiring developers sounds fun until you see the real numbers:
- Salaries. Experienced engineers aren’t cheap, especially if they’re full-time and dedicated to the integration.
- Infrastructure. Running scripts isn’t free. Think AWS Lambda, EC2 instances, or other compute services needed for data pipelines.
- Ongoing maintenance. APIs change, bugs appear, and scripts break. Every tweak costs hours of debugging, testing, and redeploying. The true “free” solution is never really free. It’s an investment in time, skills, and money.
Handling Large Datasets
Big data isn’t just a buzzword here; it’s a real challenge:
- Bulk API 2.0 is your friend. Pulling millions of records one by one? Nightmare. Bulk API lets you handle massive datasets efficiently.
- Pagination. Always handle it. APIs often return data in chunks, and missing this step can leave holes in your dataset.
- API limits. Salesforce enforces strict call limits. Hit them, and your integration grinds to a halt. Planning your call frequency and batch size is essential.
Security Considerations
When you roll your own API solution, security is on you:
- OAuth 2.0. Properly implementing secure authorization is non-negotiable. Bad token handling can expose your Salesforce instance.
- Encrypting data. Data in motion (TLS) and data at rest (S3 encryption) must be handled carefully to prevent leaks.
- Credential management. Hard-coding passwords or tokens? Big no-no. Use secure vaults or environment variables to keep keys safe.
Method 3: The Smart Way (No-Code Automation with Skyvia)
There are a number of third-party tools that can be used for Salesforce and Redshift integration. For this method, we will review Skyvia.
Businesses often choose integration tools as their go-to method.
This approach:
- Is simple.
- Doesn’t require heavy development.
- Offers reliable automation.
It allows teams to get up and running quickly, reduce manual effort, and keep data in sync. Using Skyvia, you can easily transfer your records into the cloud data warehouse, and it can be set up in less than 15 minutes! Skyvia also has a free plan to try out the platform and see if it works for you.
After configuring replication, you can schedule it: the platform will automatically import updated Salesforce records into Redshift. Only modified data will be loaded, saving you time and money.
Best For
Best suited for businesses that want a hassle‑free, continuously automated solution with minimal effort.
Creating Connections
Let’s describe how to configure replication in Skyvia. First, you need to register a Skyvia account. Then, create connections to your data sources, Salesforce and Redshift.
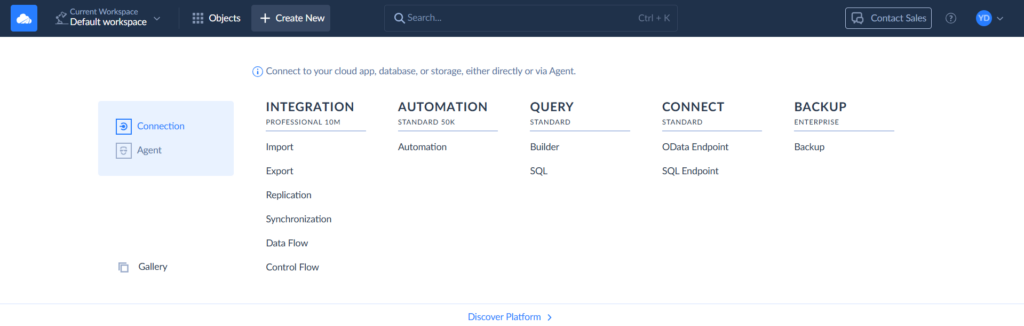
Step 1
To create a connection, select + Create New > Connection on the left. Then select the respective connector. Besides Redshift and Salesforce, Skyvia supports 200+ connectors.
Step 2
Signing via OAuth is the fastest way, and it is selected by default. To create a connection to Salesforce, click Sign In with Salesforce. Then you can enter the connection name and save the connection.

Alternatively, you can select the Username & Password authentication method. You will need to specify your username, password, and security token.
Step 3
To create a connection to Redshift, click + Create New > Connection and find Redshift. Fill in the fields required for this connection: Server, Port, User ID, Password, Database and Schema.
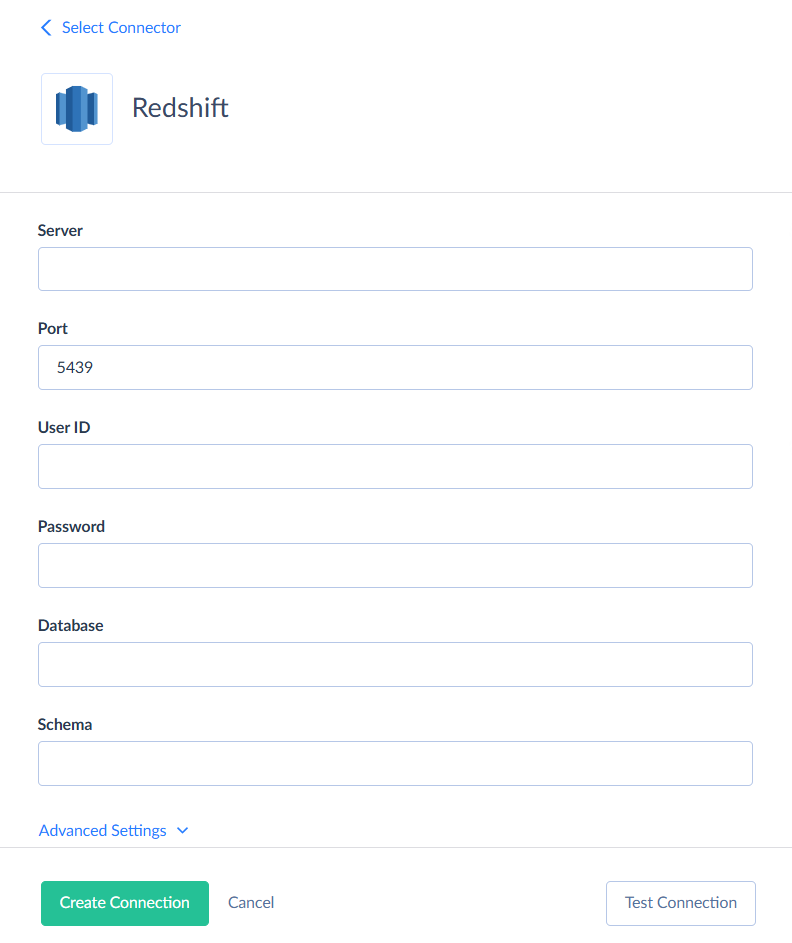
Don’t forget to also click Advanced Settings and enter the parameters for Amazon S3 storage.
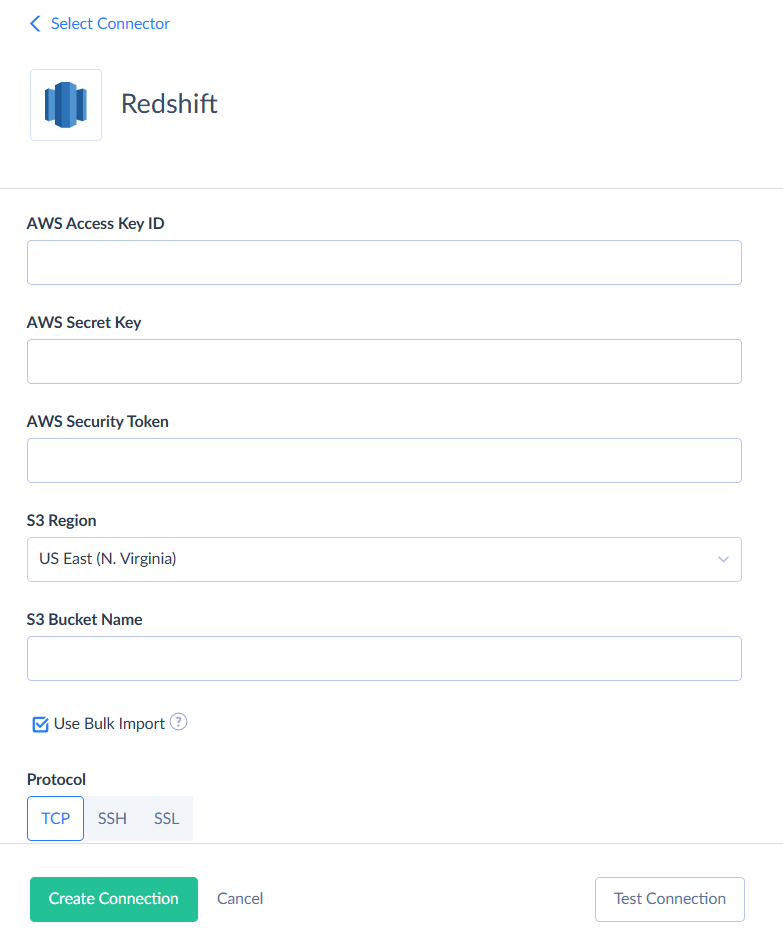
After you’re done, click Create Connection.
Creating Replication Packages
Now, let’s move forward with building a Salesforce to Redshift replication pipeline.
Step 1
Select + Create New and then, under Integration, select Replication.
Step 2
Choose Salesforce as Source and Redshift as Target connection.
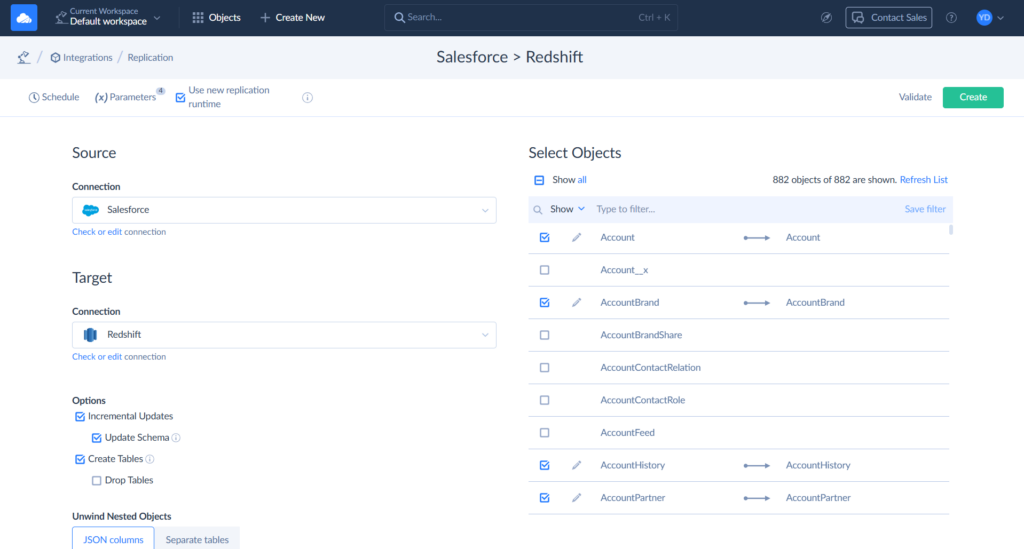
Step 3
After selecting connections, all we need to do is to select the Salesforce objects to replicate. Then, you can also click Schedule and set automatic replication.
After this, Salesforce to Redshift replication will export data automatically, and it will keep data in Redshift up-to-date without any user interaction. It can be used for any Salesforce edition.
As you can see, automating Salesforce and Redshift integration with Skyvia is very simple and requires just a few minutes. However, it’s often necessary not just to load data from Salesforce to Redshift, but also to get it back. For example, it can be important when performing Salesforce data archiving when you load legacy Salesforce data to Amazon Redshift to save on Salesforce storage costs but still want to be able to access them from time to time from Salesforce.
Let’s see how Skyvia can help you integrate Amazon Redshift to Salesforce.

Real-time connectivity: Salesforce to Redshift
To allow your sales reps to make weighted decisions on processed information, you might need to load data back from Redshift to Salesforce. You can use Skyvia Import or Data Flow for these purposes: these ETL tools can extract data from a data source, transform them if necessary, and load them to the target.
However, in the case of Salesforce data archiving, loading data back to Salesforce is not always suitable. We will consider a different scenario – connecting Redshift to Salesforce as an external data source via Salesforce Connect. Salesforce Connect comes at an additional cost and is available only in Enterprise, Performance, and Unlimited editions. In the developer edition, it is available for free.
You can use Skyvia Connect to view Redshift data in Salesforce without moving it. Skyvia Connect turns your Redshift data into a special web link called an OData endpoint. Then, Salesforce uses that link to access the data. This way, you can work with your Redshift data inside Salesforce as if it were already part of it — even though the data stays in Redshift.
Suppose we have loaded legacy accounts and contacts to Redshift. Let’s see how we can link them back via Salesforce Connect and Skyvia Connect.
Creating OData Endpoint in Skyvia Connect
Step 1
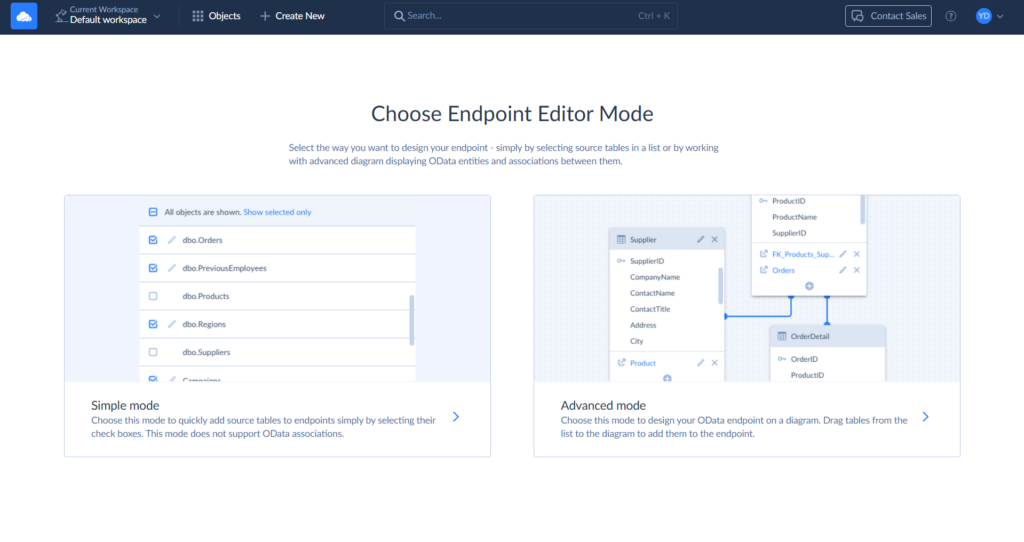
Click + Create New and then, under Connect, select OData Endpoint. Click Simple mode.
Step 2
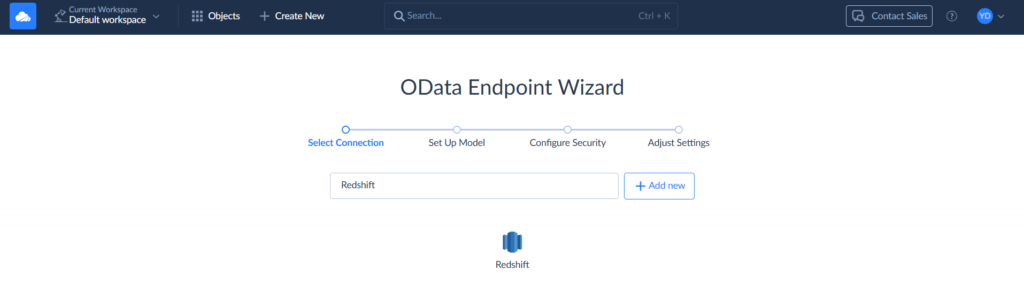
Select your Redshift connection.
Step 3
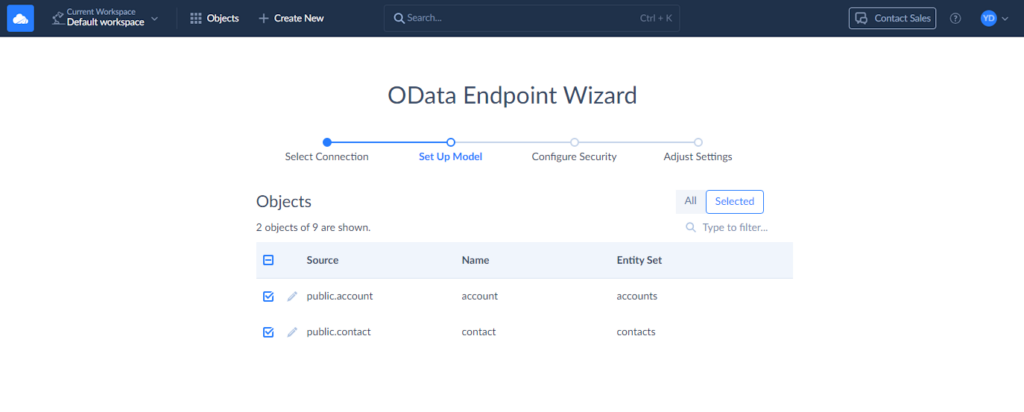
Select the tables with data you would like to access in Salesforce. In our case, we select the account and contact tables.
Step 4
Let’s change the generated entity names and add the ‘legacy_’ prefix to them. We are doing it in order for Salesforce external objects to have different, easily distinguishable names. To do it, click the pencil icon near the table name.
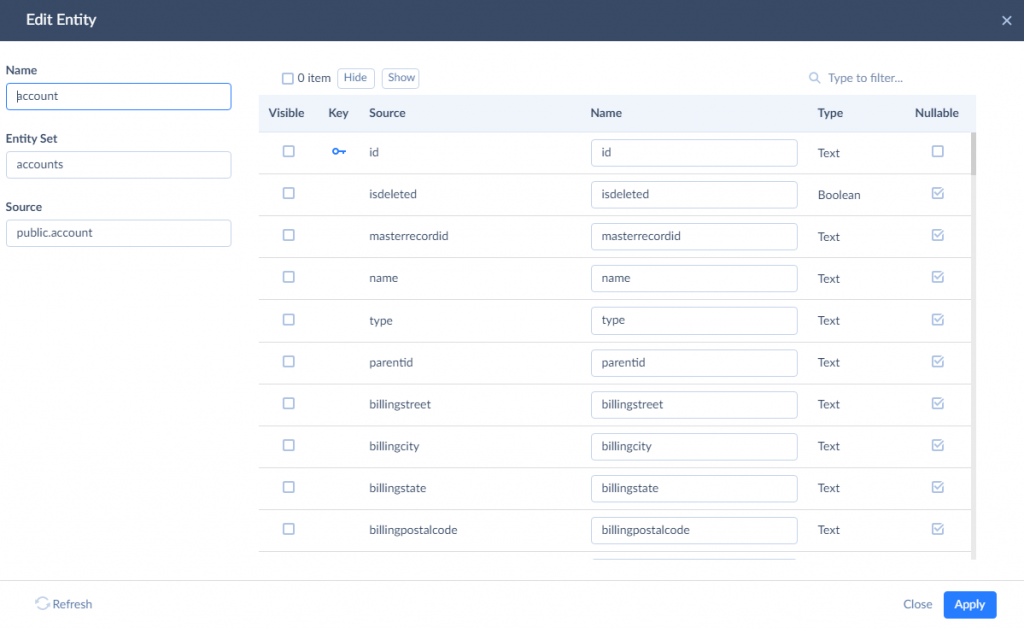
In this window, you can edit the result name of entity and entity set, and the names of entity properties. You can also hide certain properties to remove access to them. Here, we need to add the ‘legacy_’ prefix to the values of the Name and Entity Set boxes. We need to do it for both the account and contact tables. After this, click Next step.
Step 5
Now, we need to configure security settings. You can add an authentication method to protect your data.
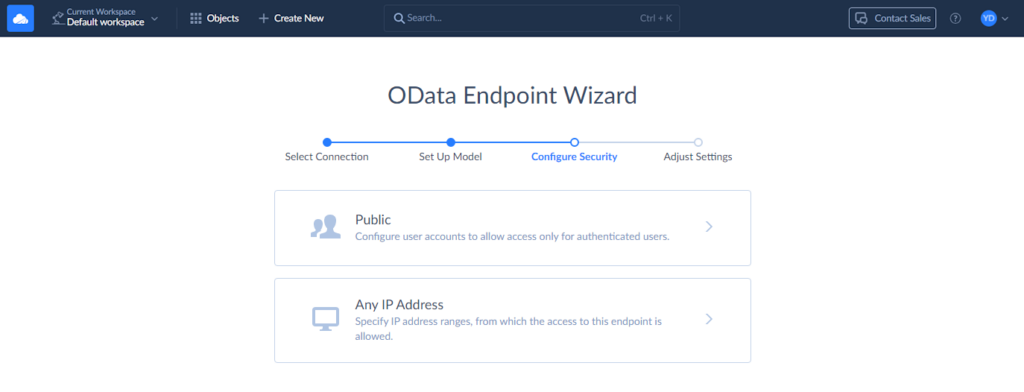
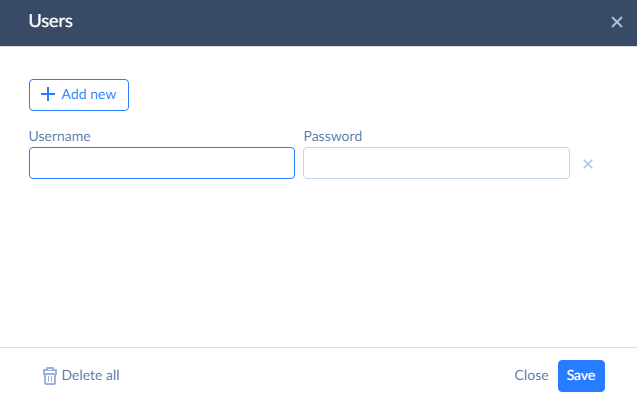
To add authentication, click Public and then + Add new. Come up with a username and a password.
In a similar way, you can add IP Address ranges to allow access only from these ranges. After you finish configuring endpoint security, click Next step.
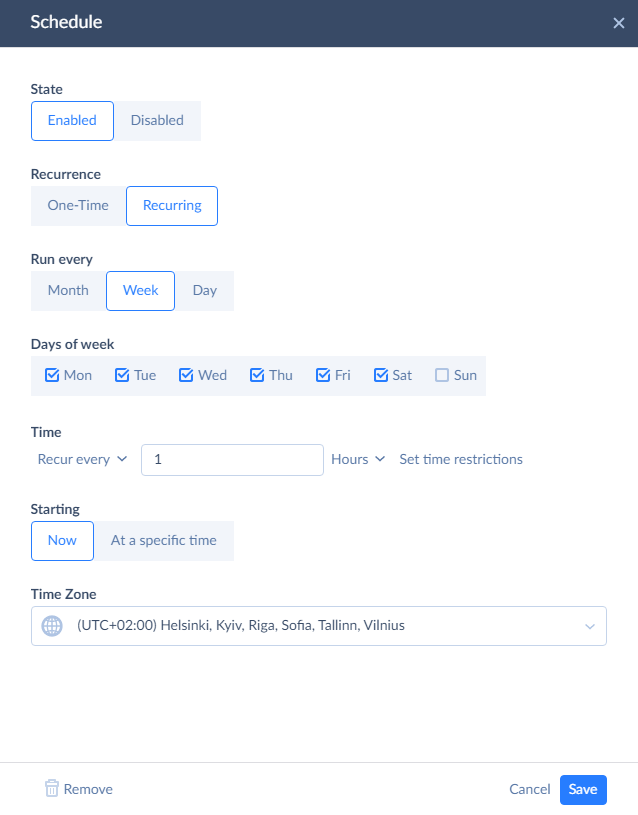
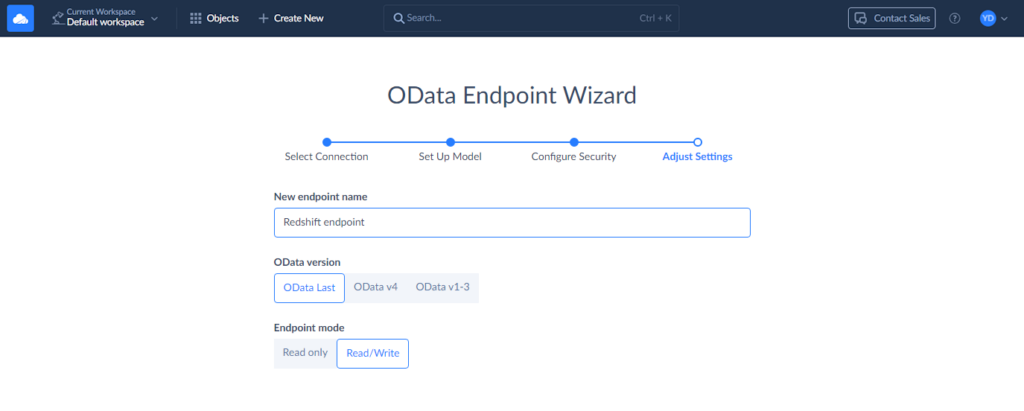
Step 6
Finally, specify the endpoint name and configure the remaining settings. You can allow editing of your archived records by selecting the Read/Write endpoint mode. That’s all, you can now confirm your settings by clicking Save endpoint.
Copy the Endpoint URL. We will need it in the next steps.
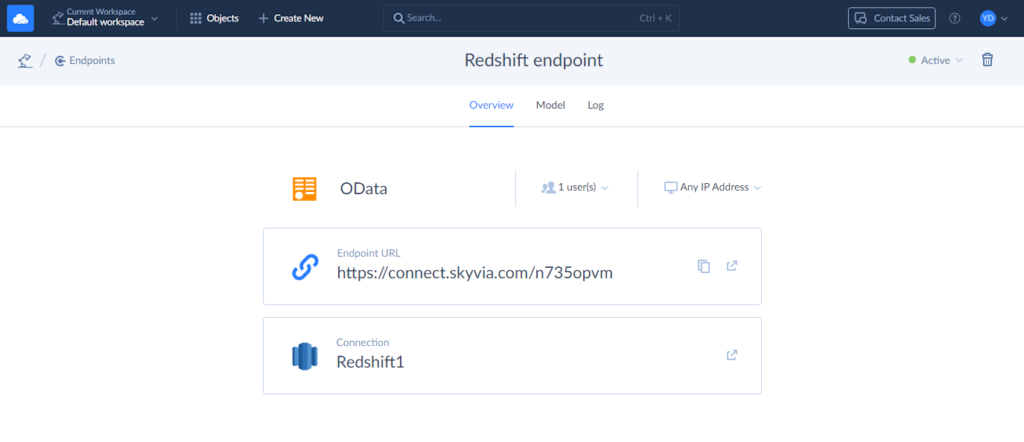
Creating External Data Sources in Salesforce
To create an external data source in Salesforce, we need to perform the following steps:
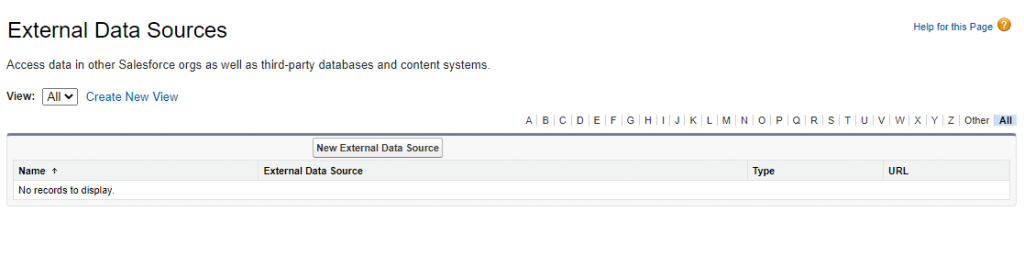
Step 1
In the Salesforce Setup, type “External” in the Quick Find box and, under Develop, click External Data Sources.
Step 2
Click New External Data Source.
Step 3
Make sure to perform the steps below:
- Enter values for External Data Source (a user-friendly name) and Name (unique external data source identifier) fields.
- In the Type list, select Salesforce Connect: OData 4.0
- Paste the endpoint URL into the URL field.
- If you want to allow changes in archived data, check the Writable External Objects.

Optionally, configure other settings, like High Data Volume, depending on your data.
Step 4
Next, you need to set up authentication. If you didn’t create any login credentials for the Skyvia endpoint, you can skip this step.
If you did set up a username and password for the endpoint, you’ll need to enter those:
- Choose Named Principal as the Identity Type.
- Set the Authentication Protocol to Password Authentication.
- Then, type in the Username and Password you created for the endpoint.
Then, click Save.
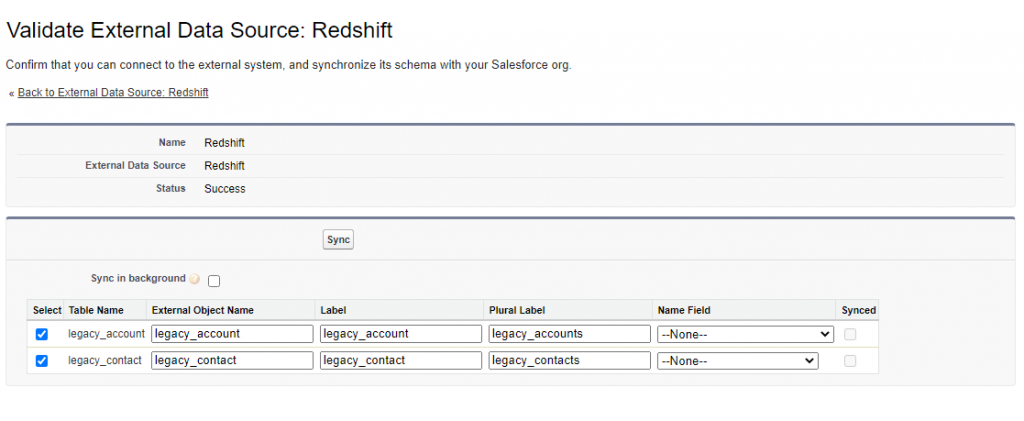
Step 5
On the opened page, select the tables you want to access and click Sync. This will create the necessary external objects automatically.
Creating Tabs for External Objects
Although external objects are now available in Salesforce, they are not directly visible to users through the interface. We need to create tabs to make these objects accessible from Salesforce.
Step 1
In the Salesforce Setup, type “Tabs” in the Quick Find box and click Tabs.
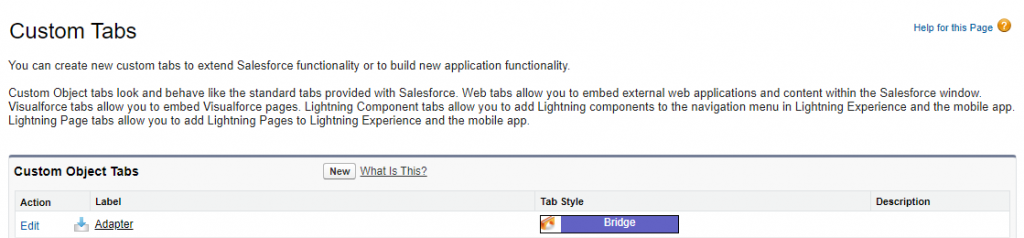
Step 2
Click New. Select the required Object, then set the Tab Style and Description.
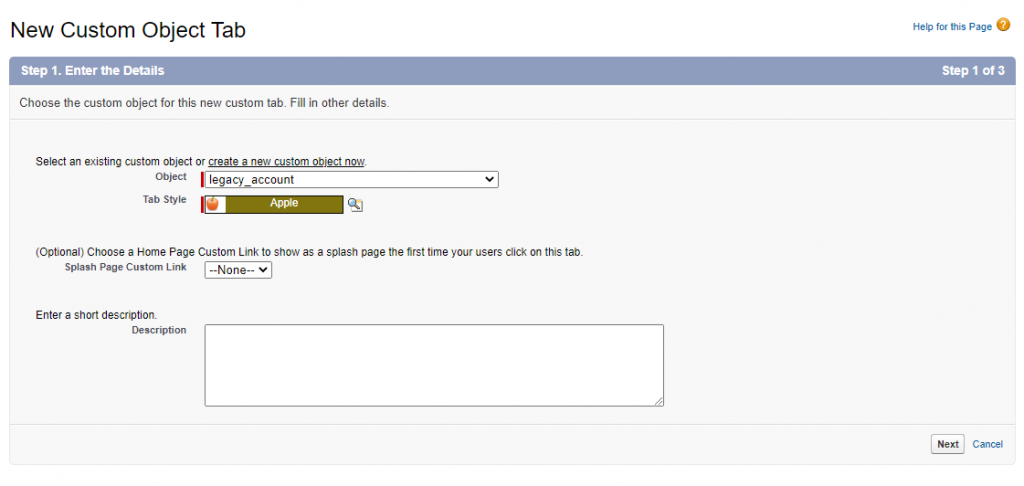
Click Next.
Step 3
On the next screen, specify the tab visibility settings and click Next. Configure the tab availability for custom apps and click Save.
Deep Dive
Alright, digging into Salesforce to Redshift can feel like assembling IKEA furniture without the manual. But with a tool like Skyvia, it’s more like sliding the pieces into place.
They just click. You save time, reduce stress, and avoid the “oops, where does this cable go?” moments.
Let’s break down the real advantages, costs, handling huge datasets, and keeping your data safe.
By the end, you’ll see why no-code integrations aren’t just convenient and smart.
Cost Analysis
With Skyvia, there’s no guessing game. Predictable SaaS pricing beats the rollercoaster of developer salaries, infrastructure, and debugging hours. You know what you pay upfront, and the ROI of automation is immediate. Less time wrestling with scripts, more time analyzing data and making decisions.
Handling Large Datasets
Got millions of records? No problem. Skyvia handles the heavy lifting for you:
- Batching. It splits huge datasets into manageable chunks.
- Incremental loads (CDC). Only new or changed records are synced, so you’re not constantly reprocessing everything.
- Scaling. Whether it’s thousands or millions of records, Skyvia adjusts automatically, keeping your integration fast and reliable.
Security & Compliance
No-code doesn’t mean no protection. Skyvia comes equipped with the essentials:
- OAuth & encryption. Data is secure both in transit and at rest.
- Compliance-ready. SOC 2, GDPR, and other standards are baked in, giving peace of mind for both you and the customers.
Critical Integration Challenges & Solutions
Integrating Salesforce with Redshift isn’t always smooth sailing. Think of it like trying to fit a square peg into a round hole while juggling data. Even with the right tools, you’ll face hurdles.
- Keeping data fresh.
- Moving huge datasets without breaking anything.
- Dealing with inevitable errors.
The good news? Each challenge has a proven way to tackle it, and with the right setup, you can stay ahead of the headaches before they snowball. Let’s break down the most common pitfalls and how to navigate them.
Challenge 1: Real-Time Data Syncing
Real-time sounds amazing, right? But it’s not always what you need. There’s streaming (sub-second updates), micro-batching (every few minutes), and scheduled syncs (hourly, daily). For most analytics, you don’t need lightning-fast updates. Micro-batches often hit the sweet spot.
Skyvia makes it simple. You can schedule data syncs as often as you need, and your Redshift warehouse stays fresh without the headache of managing streaming pipelines.
Challenge 2: Migrating Large Datasets
Moving mountains of Salesforce data can feel like hauling every brick of the apartment across town. The trick? Start with an initial full load, then switch to incremental updates using Change Data Capture (CDC). That way, you’re not re-copying everything every day.
And don’t forget data validation. Ensure all rows made it over correctly, sums match, and nothing got lost in translation. A reliable tool like Skyvia can automate these checks so you’re not staring at endless spreadsheets.
Challenge 3: Troubleshooting Common Errors
Even with the best planning, things go sideways.
- Manual Errors. CSV formatting mistakes, mismatched data types in CREATE TABLE. Classic pain points.
- API Errors. Hit a “API Limit Exceeded” wall, OAuth token expires mid-sync, or null values creep in where they shouldn’t.
- Tool-Based Errors. Connection failures due to firewall settings or IP whitelisting, wrong object permissions. These can stall your entire pipeline.
Conclusion
Alright, let’s wrap this up. We’ve walked through three ways to get your Salesforce data into Redshift:
- Manual CSV exports. Quick and cheap on paper, but labor-intensive, error-prone, and not built for scale.
- Custom API integrations. Powerful and flexible, perfect for complex transformations, but costly and heavy on ongoing maintenance.
- No-code tools like Skyvia. Reliable, scalable, and simple, letting you automate data flows without writing a single line of code.
Decision Framework:
- One-time, non-critical transfers? Go manual.
- Complex, highly custom setups? Call the dev team.
- Most businesses aiming for efficiency, automation, and reliability? Skyvia is your sweet spot.
Start your free Skyvia trial and connect Salesforce to Redshift today.

