Summary
- Salesforce and QuickBooks serve different business purposes and have distinct data structures, creating challenges for data exchange between sales and accounting teams.
- Salesforce QuickBooks integration enables automated data exchange, reducing manual data entry and improving accuracy and efficiency.
- There are four primary methods for Salesforce QuickBooks integration: third-party tools, custom integration, middleware platforms, and manual import/export.
- Benefits of integration include improved accuracy, efficiency, collaboration, customization, scalability, and a unified source of truth for business data.
- Choosing the right integration method depends on business needs, costs, complexity, and the size of the organization.
CRM and accounting services are designed for different purposes and solve various business tasks. Such software flagships as Salesforce for sales and QuickBooks for accounting have completely different data structures but are often used by different teams in the same business.
These differences create additional difficulties for data exchange between sales and accounting teams. Salesforce QuickBooks integration is a way to establish a smooth handshake between these systems. It helps to build a solid bridge for data exchange and collaboration between sales and accounting teams.
In this article you will learn what is QuickBooks and Salesforce integration, what benefits it brings to businesses, and how to set up the integration.
There are four available methods of Salesforce QuickBooks integration: third-party tools, middleware platforms, custom integration, and manual export/import. We will explore all of them, compare their features, and show you several examples of real data integration scenarios.
Table of contents
- What is Salesforce QuickBooks Integration?
- Benefits of Salesforce QuickBooks Integration
- Methods of Salesforce QuickBooks Integration
- Method 1: Using Third-Party Integration Tools
- Method 2: Custom Integration Development
- Method 3: Middleware Platforms
- Method 4: Manual CSV Import/Export
- Best Practices for Salesforce QuickBooks Integration
- Conclusion
What is Salesforce QuickBooks Integration?
Accounting, sales, and other teams use Salesforce and QuickBooks to automate business processes and resolve day-to-day business tasks. Salesforce is the cloud CRM platform for sales, marketing, analytics, and reporting. Its solutions cover the most critical business needs in one place. QuickBooks is an accounting platform for managing and controlling finance-related processes. It helps to monitor company cash flow, control profit and expenses, manage analytics and reporting, and assist with critical financial decision-making. Integration is a process of connecting Salesforce and QuickBooks to establish a smooth exchange of this data between sales and accounting teams.
Integrating these two platforms eliminates manual data entry by automating processes. For example, you can transfer Salesforce opportunities, accounts, or contacts to QuickBooks for billing and invoicing. Or load QuickBooks invoices, payments, or customer records back into Salesforce for sales and customer management.
Benefits of Salesforce QuickBooks Integration
Salesforce QuickBooks integration helps companies handle various data-related tasks. Here is the list of benefits from the integration of these two services.
Accuracy
Having two separate systems operating requires constant manual reconciliation and updates. Manual operations may cause errors such as duplications, mismatched information, or data discrepancies. Salesforce and Quickbooks sync helps to avoid human errors by automating routine processes and eliminating manual data entry. The integration provides consistent data exchange across both platforms and eliminates manual operations with data.
Efficiency
Integration can perform such routine tasks as generating invoices, updating payment statuses, or syncing account balances. It saves time and resources. Integration allows employees to focus on high-value activities. It helps to avoid unwanted delays in processes, improving process efficiency.
Collaboration
Data integration ensures better communication and transparency of data exchange between Salesforce and QuickBooks. For example, sales teams gain direct access to financial data, such as outstanding balances or payment history, from within Salesforce. Accounting teams can process sales in near real-time mode.
Customization
Integration enables setting up complex logical data flows across platforms. Businesses can tailor integration to their specific needs. For example, a company may load only specific data matching some conditions or execute different integration tasks in a particular order.
Scalability
Integration grows with your business, handling increasing data volumes and more complex workflows without requiring manual updates.
Single Source of Truth
Unified data from Salesforce and QuickBooks provides comprehensive insights into customer behavior and financial performance. Companies can provide personalized and informed service by having all customer interactions and financial data in one place. Integration also enables centralized reporting and analytics, providing comprehensive information.
Methods of Salesforce QuickBooks Integration
There are several methods of Salesforce QuickBooks integration. Choosing the right integration method takes work. To make a reasonable decision, you have to define the business needs, evaluate costs for integration, and analyze the existing integration methods and tools. We compared the existing integration methods by complexity, cost, scalability, and business size.
| Method | Ease-of-use | Cost | Scalability | Business size |
|---|---|---|---|---|
| Third-Party Services | High | Moderate | High | SMBs, Enterprises |
| Custom API Integrations | Low | High | High | Enterprise |
| Middleware Platforms | Moderate | High | High | Enterprise |
| Manual Import/Export | High | Low | Low | Small businesses |
We will describe each method in detail below.
Method 1: Using Third-Party Integration Tools
Third-party tools are one of the most popular methods for integrating QuickBooks and Salesforce. Most of them require no coding and provide wizard-based interfaces. QuickBooks App Store and Salesforce Appexchange are marketplaces that may become starting points for exploring existing data integration tools. Below, we describe five tools for Salesforce QuickBooks integration.
Best for: Small to medium businesses whose use cases are not covered by built-in data integration tools.
Top 5 Third-Party Tools for Salesforce QuickBooks Integration
There is a variety of third-party tools that help to sync QuickBooks and Salesforce. We chose the top 5 solutions and explored their features, advantages, and disadvantages.
Skyvia (Import)
Skyvia is a no-code, versatile, cloud-based integration platform that connects Salesforce and QuickBooks Online or Desktop through a no-code approach. It can solve a range of data-related tasks and supports various cloud apps and databases. Skyvia Import is a wizard-based ETL tool that provides one-way data loading from a data source to a cloud app or database, applying data transformations using mapping capabilities.
Best suited for: SMBs to enterprise businesses that need an affordable, no-code platform for Salesforce, QuickBooks, and other app integrations. Skyvia supports both QuickBooks Online and Desktop versions and offers powerful data transformation capabilities.
Features
- No-code integration for Salesforce and QuickBooks Online and Desktop.
- Wizard-based and designer-based tools.
- Real-time and scheduled integration options.
Pros
- Easy to use, requires minimum technical expertise.
- Flexible scheduling options provide near real-time integration.
- Multi-purpose tool for different data integration scenarios.
- Supports both QuickBooks Online and Desktop and other 200+ cloud apps and databases.
- Advanced transformation features.
Cons
- Advanced scenarios and customizations may require basic SQL knowledge to build complex queries and expressions or write custom SQL commands.
Pricing
Free for basic tasks. Paid plans start at $19/month for small data volumes, with scaling based on features and usage.
DBSync
DBSync is a cloud-based solution for Salesforce and QuickBooks integration. It supports both QuickBooks environments: Online and Desktop. With DBSync, you can sync data like customer information, invoices, and payments.
Best suited for: Mid-sized to enterprise businesses looking for integration solutions offering advanced integration capabilities such as bi-directional sync and advanced customization features.
Features
- Pre-built integration templates.
- Real-time and scheduled data sync.
- Bidirectional integration.
- QuickBooks Online and Desktop compliance.
Pros
- Flexible and customizable integration templates.
- QuickBooks Desktop support.
- Real-time updates.
Cons
- The steep learning curve for non-technical users.
- Essential limitations on the free plan.
- Customized integration requires setup and maintenance effort.
- Advanced features like real-time integration are available for the Enterprise plan.
Pricing
Price varies depending on the complexity of workflows, available features, and data volume. The free plan is available, with limits of up to 10000 records and three integrated objects.
Breadwinner
Breadwinner is a native Salesforce tool designed to integrate Salesforce with financial services, such as QuickBooks Online and others.
Best suited for: Small to medium-sized businesses working in QuickBooks Online are looking for real-time financial data sync to operate simple and direct accounting workflows without additional complexity.
Features
- Real-time sync of financial data such as invoices, payments, and customer data.
- Support for multi-currency and multi-entity setups.
- Automatic invoice generation and updates based on Salesforce actions.
Pros
- Easy to install and use with minimal configuration.
- Fully embedded in Salesforce.
- Real-time sync.
Cons
- QuickBooks Desktop is not supported.
- Limited customization opportunities.
- A limited number of integrated objects.
Pricing
Pricing is based on user count and additional features. The service offers a free trial.
Zapier
Zapier is a no-code integration and automation solution that connects Salesforce and QuickBooks.
Best suited for: For small businesses setting up basic integration workflows or trigger-based automations between Salesforce, Quickbooks, and other apps.
Features
- Automates specific data-related tasks like creating invoices in QuickBooks from Salesforce opportunities.
- Pre-built workflows for common integration use cases.
- Connects with thousands of other apps alongside Salesforce and QuickBooks.
Pros
- Affordable and accessible for small businesses.
- User-friendly interface with drag-and-drop workflow designer.
- Pre-built templates gallery.
Cons
- Limited opportunities for enterprise businesses.
Pricing
Zapier offers a free plan for basic workflows. Paid plans start at $19.99/month.
Workato
Workato is a cloud solution for data integration and business process automation.
Best suited for: Medium to large enterprises planning to integrate multiple systems and handle enterprise-grade processes using advanced automation features and scalability for complex workflows.
Features
- Pre-built templates called recipes.
- Advanced data transformation features.
- Multiple supported connectors.
Pros
- Scalability and customization.
- Automation capabilities.
- QuickBooks Online and Desktop environments support.
Cons
- Steep learning curve.
- Expensive for small businesses.
Pricing
Starts at $10,000/year, depending on usage and features.
To summarize, we prepared a table comparing all the mentioned tools using different criteria.
| Tool | Supported Versions | Customization | Cost | Ease of Use | Best Suited For |
|---|---|---|---|---|---|
| Skyvia | QuickBooks Online & Desktop | High | Free plan and paid plans vary by product and start from $79/month | High | Small to enterprise businesses |
| DBSync | QuickBooks Online & Desktop | High | Contact sales to get the pricing | Moderate | Mid-sized to enterprise businesses |
| Breadwinner | QuickBooks Online | Moderate | Contact sales to get the pricing | High | Small to medium-sized businesses |
| Zapier | QuickBooks Online | Low to moderate | Free plan and paid plans vary by feature and start from $19.99+/month | High | Small businesses |
| Workato | QuickBooks Online & Desktop | High | Contact sales to get the pricing | Moderate | Enterprises with complex workflows |
Pros and Cons of Using Third-Party Integration Tools
Pros
- Ease-of-use. Most third-party tools offer wizard-based interfaces and ready templates to build integrations with a few clicks.
- Cost efficiency. Third-party tools are less expensive compared with middleware platforms and custom integrations.
- Compatibility. Most third-party tools support both online and desktop versions of QuickBooks. They also support other services and applications, allowing you to integrate multiple sources.
Cons
- Limited customization capabilities. Advanced customizations for unique or highly specific integrations by third-party tools require more resources, costs, and time.
- Performance dependency. Integration performance depends on third-party tool architecture and infrastructure. You have no impact on unexpected delays or downtimes.
Step-by-Step Guide: Integrating Salesforce with QuickBooks Using Skyvia
Skyvia is a no-code cloud data integration platform that solves various data-related tasks, such as one-way and bi-directional data sync, ETL, ELT, Reverse ETL, and others. Skyvia supports 200+ data sources, including Salesforce and QuickBooks.
Skyvia offers several solutions for QuickBooks Salesforce integration: Import is a wizard-based ETL tool for one-way data loading from a data source to a cloud app or database. Synchronization is designed for bi-directional integration. Skyvia offers more advanced integration scenarios for more complicated data pipelines using Data Flow or Control Flow. These tools allow you to create complex flows with data splits, conditions, and other data manipulation opportunities. Automation provides the trigger-action solution that monitors a specific event or condition in the chosen data source.
We will describe the simple bi-directional Salesforce QuickBooks integration use case using Import. We will insert new records into QuickBooks Customers from Salesforce Contacts data and vice versa.
To set up the integration, you need an active Skyvia account. Sign up with Skyvia for free if you don’t have it.
To connect Salesforce and QuickBooks, perform the following steps:
- Create connections to both tools.
- Create the Import integration to sync data.
- Launch the Import.
- Check integration results.
STEP 1: Create Connections to Salesforce and QuickBooks.
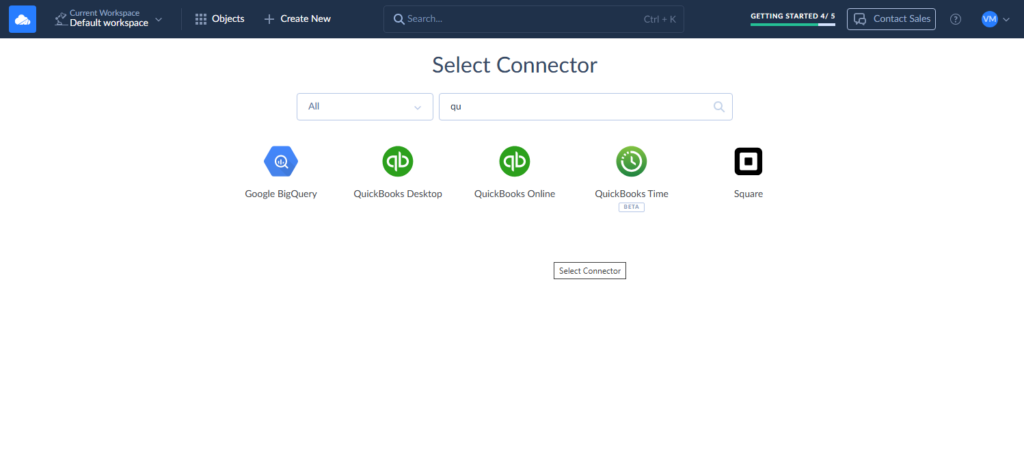
1. Click +Create New –> Connection in the top menu and search for QuickBooks in the connectors’ list.
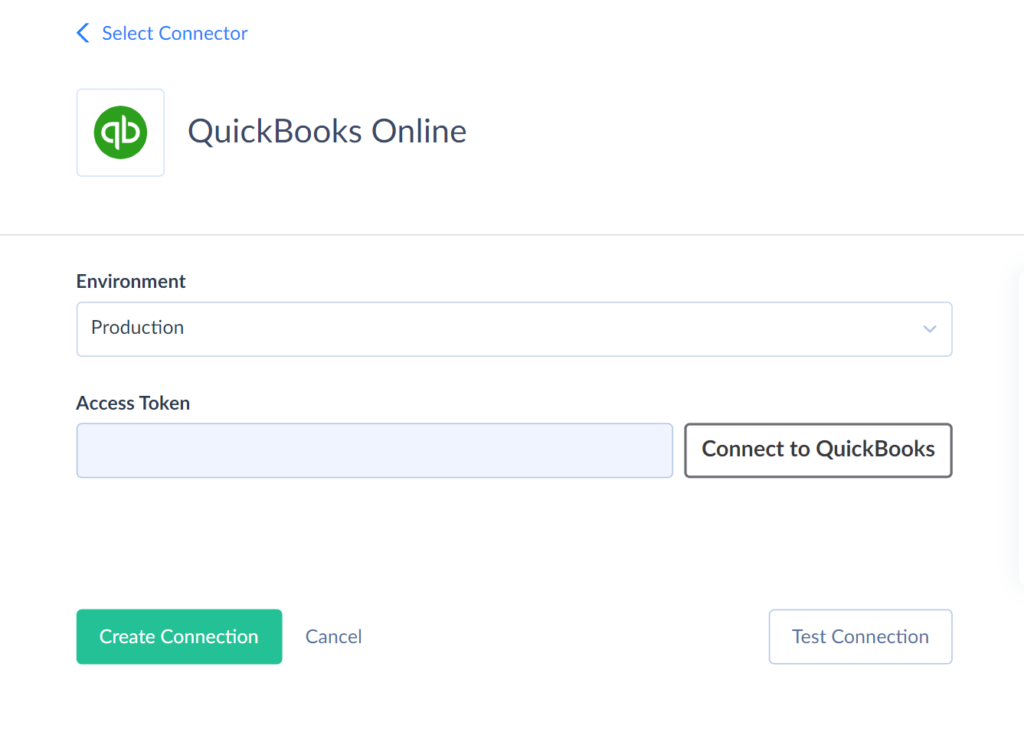
2. On the Connection Editor page, name the connection and select the environment. Click Connect to QuickBooks, enter your QuickBooks credentials, and click the Sign In button. Select a QuickBooks company, wait until the token is generated, and click Create Connection.
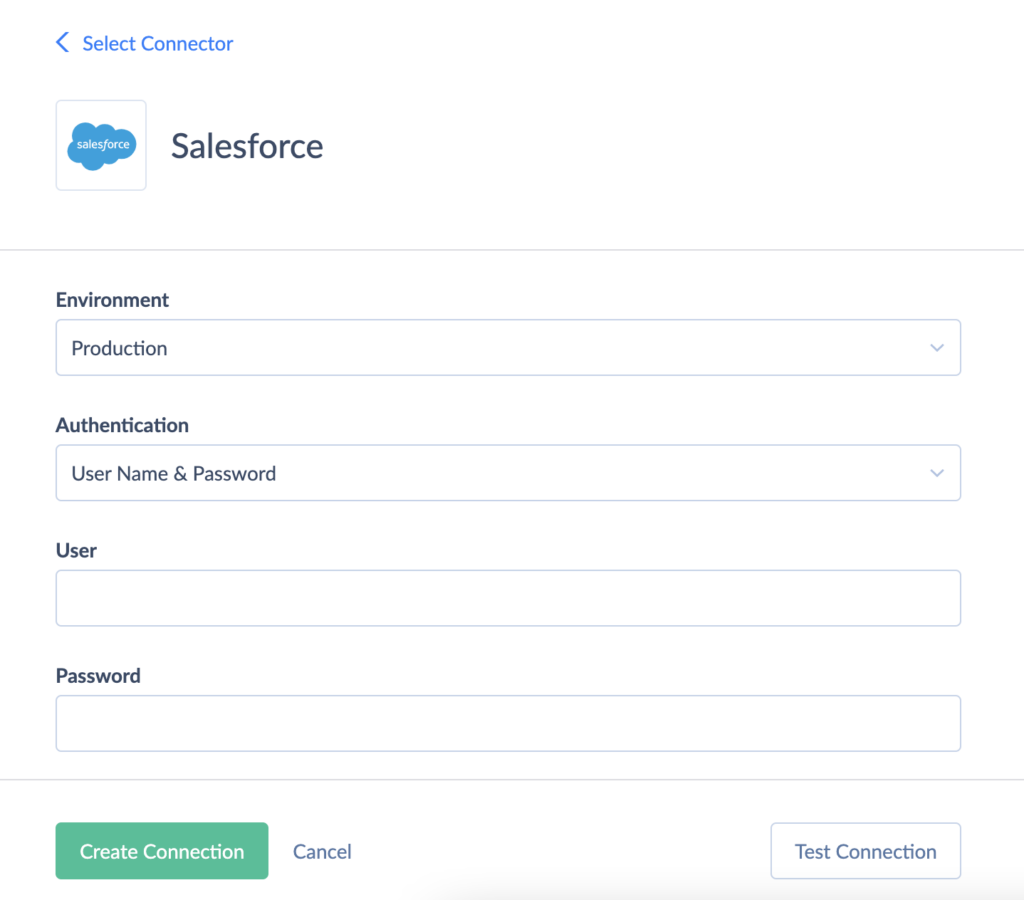
- Click + Create New -> Connection, and select Salesforce. Select the Salesforce environment and authentication type. Click Sign In with Salesforce, enter your Salesforce credentials, and click Log In. Optionally specify the advanced settings.
STEP 2: Create the Import integration.
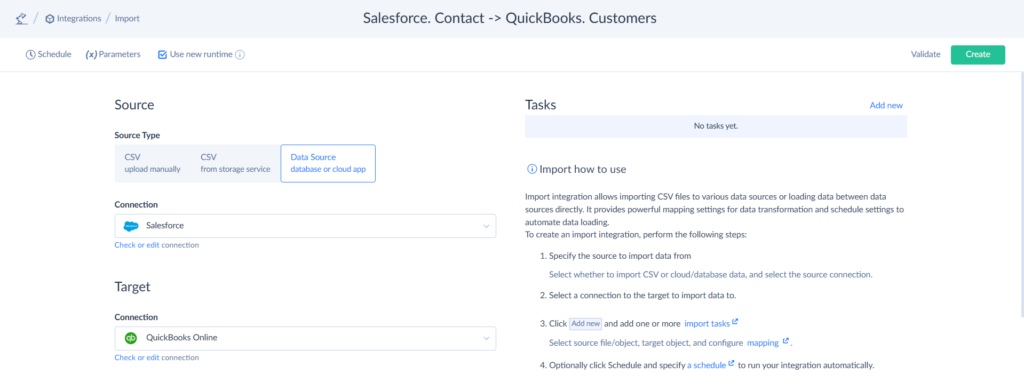
- Click + Create New and select Import in the top menu. Select the Source type. Set your Salesforce connection as a Source and QuickBooks connection as a Target.
- Click Add task on the right to create the Import task. On the Source definition tab, select the Simple task editor mode. Select the Contact object and specify the filters if necessary. You can use Advanced mode to run custom queries or commands. Find more details in the Import task creation manual.
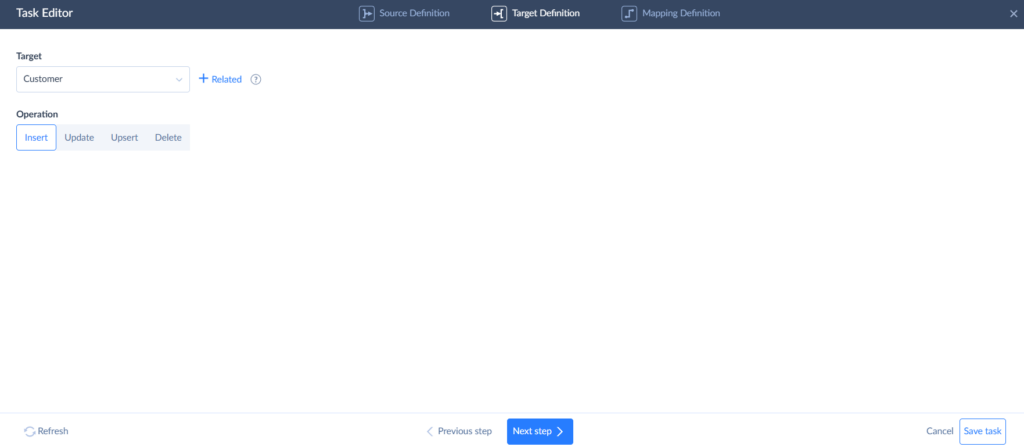
- On the Target Definition tab, select the Customers object as a target and choose the action you need to perform against the target table. Set up the mapping. Skyvia offers different mapping types. You can map column to column directly. Or transform data with other available mapping types.
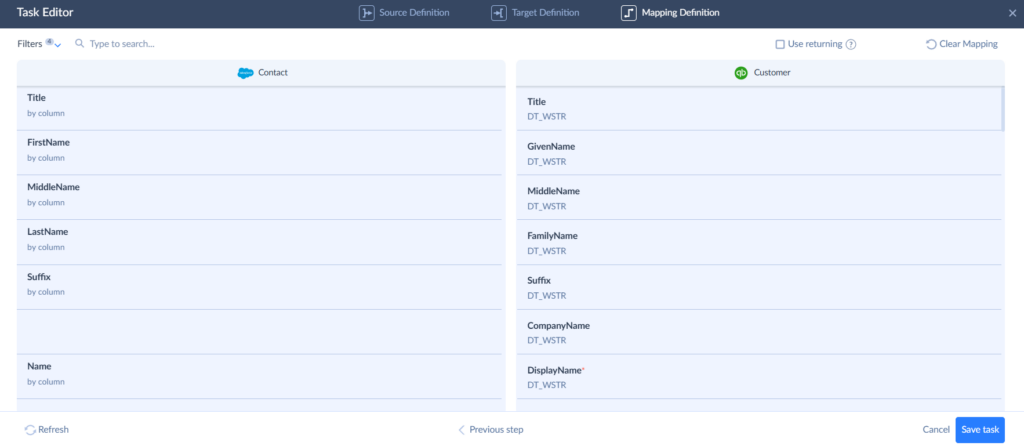
- After the mapping is completed, save the task and the integration.
STEP 3: Launch the integration
- Schedule the integration to run automatically. You can set the schedule to work weekly or daily at a specific time or interval.
STEP 4: Check Integration Results
- After the run, you can check the result in the integration run history on the Monitor and Log tabs.

- If needed, click on the specific run to check the results and view the per-record log.
To perform the import oppositely from QuickBooks Customer to Salesforce, you can create another import according to the above steps. In this case, select QuickBooks as a Source and Salesforce as a Target, add the Import task, map the needed fields, and run the integration.
We recommend avoiding overlapping the schedules if both integrations process the same objects.
That’s all. We have performed a bi-directional integration of Salesforce Contact and QuickBooks Customer.
Method 2: Custom Integration Development
If you have programming skills and technical knowledge, you can create a custom app for integration between Salesforce and QuickBooks via API. This method is best suited for businesses with complex integration needs or custom workflows.
There are two approaches to implementing a custom integration between Salesforce and QuickBooks: REST API integration and webhooks. With REST API, you can create an app that sends API requests to Salesforce and QuickBooks APIs and processes their responses. With Webhooks, Salesforce or QuickBooks will automatically notify your app about the changes in data.
Let’s look at both of these options in more detail.
Best for
Enterprises with complex use cases, and who is ready to invest in full data integration implementation.
Integrate Salesforce and QuickBooks using REST API
To implement this method, use the REST API to access QuickBooks Online and Salesforce data.
Connecting to QuickBooks Online Accounting API
The QuickBooks Online Accounting API allows integration for any app supporting REST API with QuickBooks and Salesforce in both directions in real-time.
To set up integration with QuickBooks using REST API, perform the following steps:
- Create a developer account in QuickBooks. Sandbox company will be created automatically in this case.
- Create An App and define scopes. Scopes help you to manage access to your accounting data.
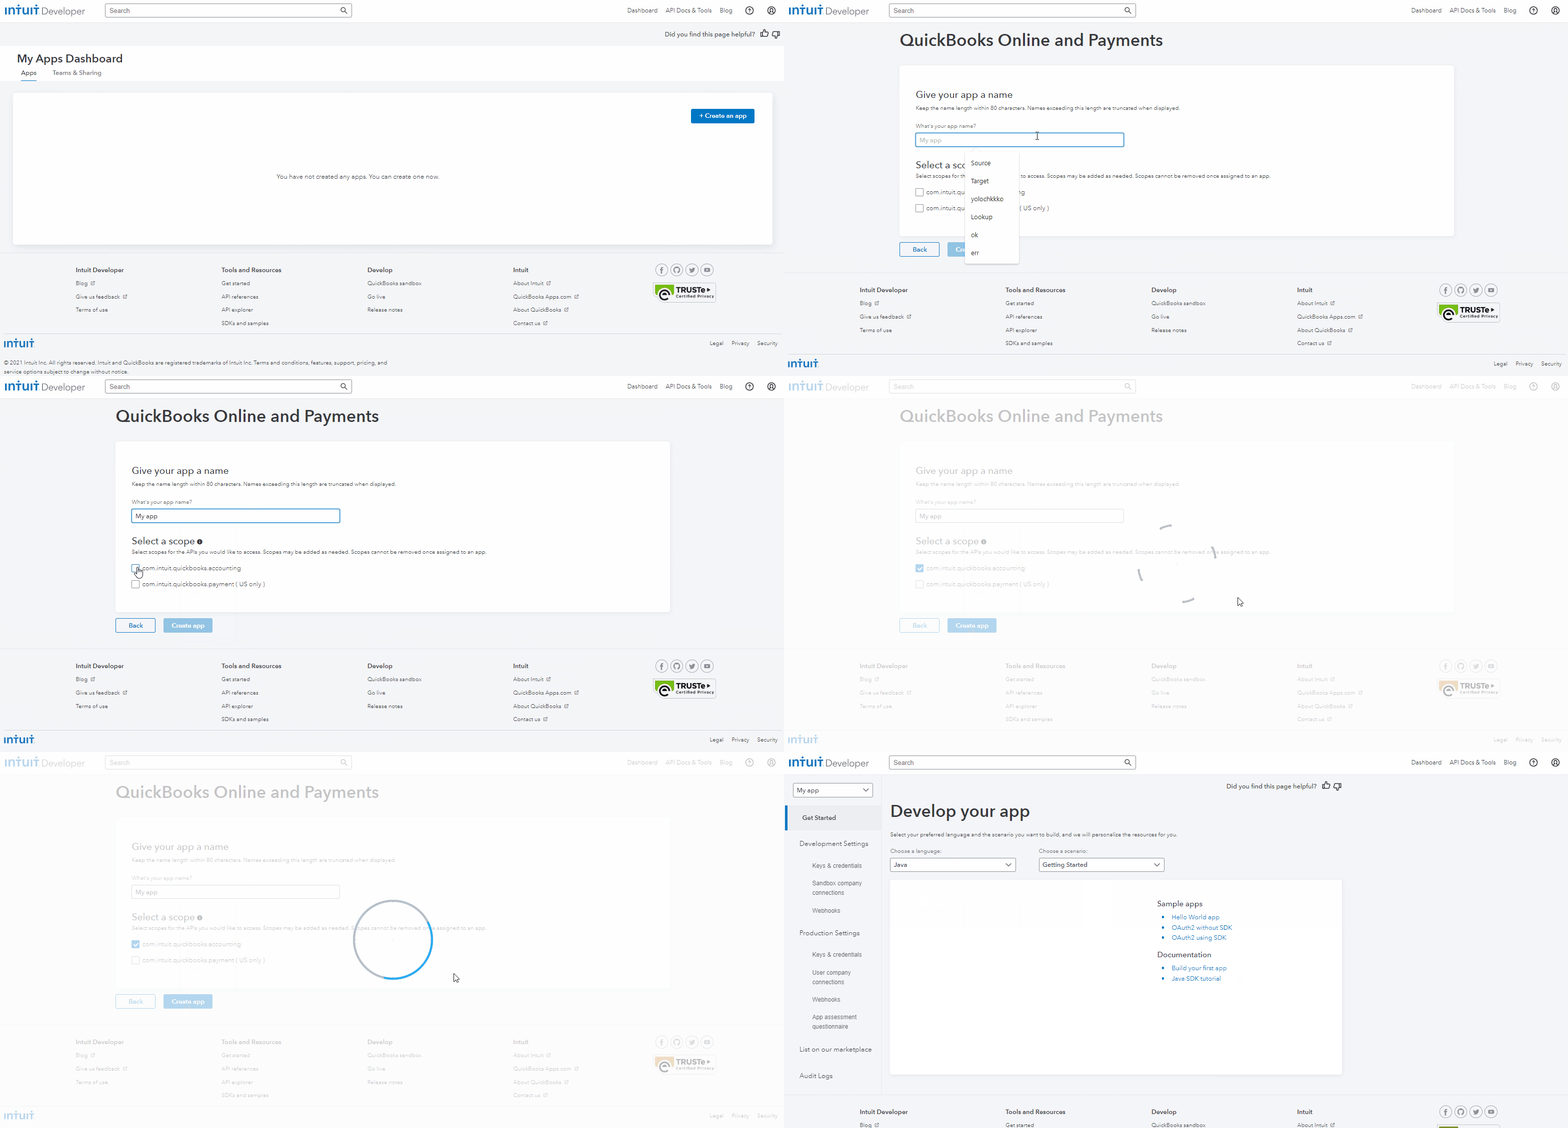
- When the app is created, it gets unique credentials: Client ID and Client Secret.
- The app needs to obtain an access token to exchange data with QuickBooks Online. If the user grants permission, the QuickBooks OAuth 2.0 server sends an authorization code back to your app. This code is exchanged for access tokens. These tokens are tied to users’ now authorized QuickBooks Online company.
- Before performing any transaction via API, you have to create the common basic predefined entities in QuickBooks, such as accounts, tax codes, and customers.
Now, you can perform API calls to QuickBooks and make integration actions as per the API Reference. You can refer to commonly used use cases documented by QuickBooks.
Connecting to Salesforce REST API
Salesforce offers several web interface options to access its data, and REST API is one of them. To access your Salesforce data using REST API, you need a Salesforce org with API access and the API Enabled user permission within that org.
To connect to Salesforce data via API, you should do the following:
- Sign up with the Developer edition. Developer edition provides you with the Salesforce org for development and testing. If you already have a sandbox or development org, you can use it for Salesforce REST API integration.
- Confirm that you have API Enabled as permission for your user profile by following the instructions in User Permissions in Salesforce Help. For Developer Edition, this permission is assigned by default.
- Create a Connected App. Sign in to Salesforce, click Setup –> App Manager –> New connected App, and insert the basic information about your app according to the instructions. Then, you have to enable OAuth Settings for API Integration.
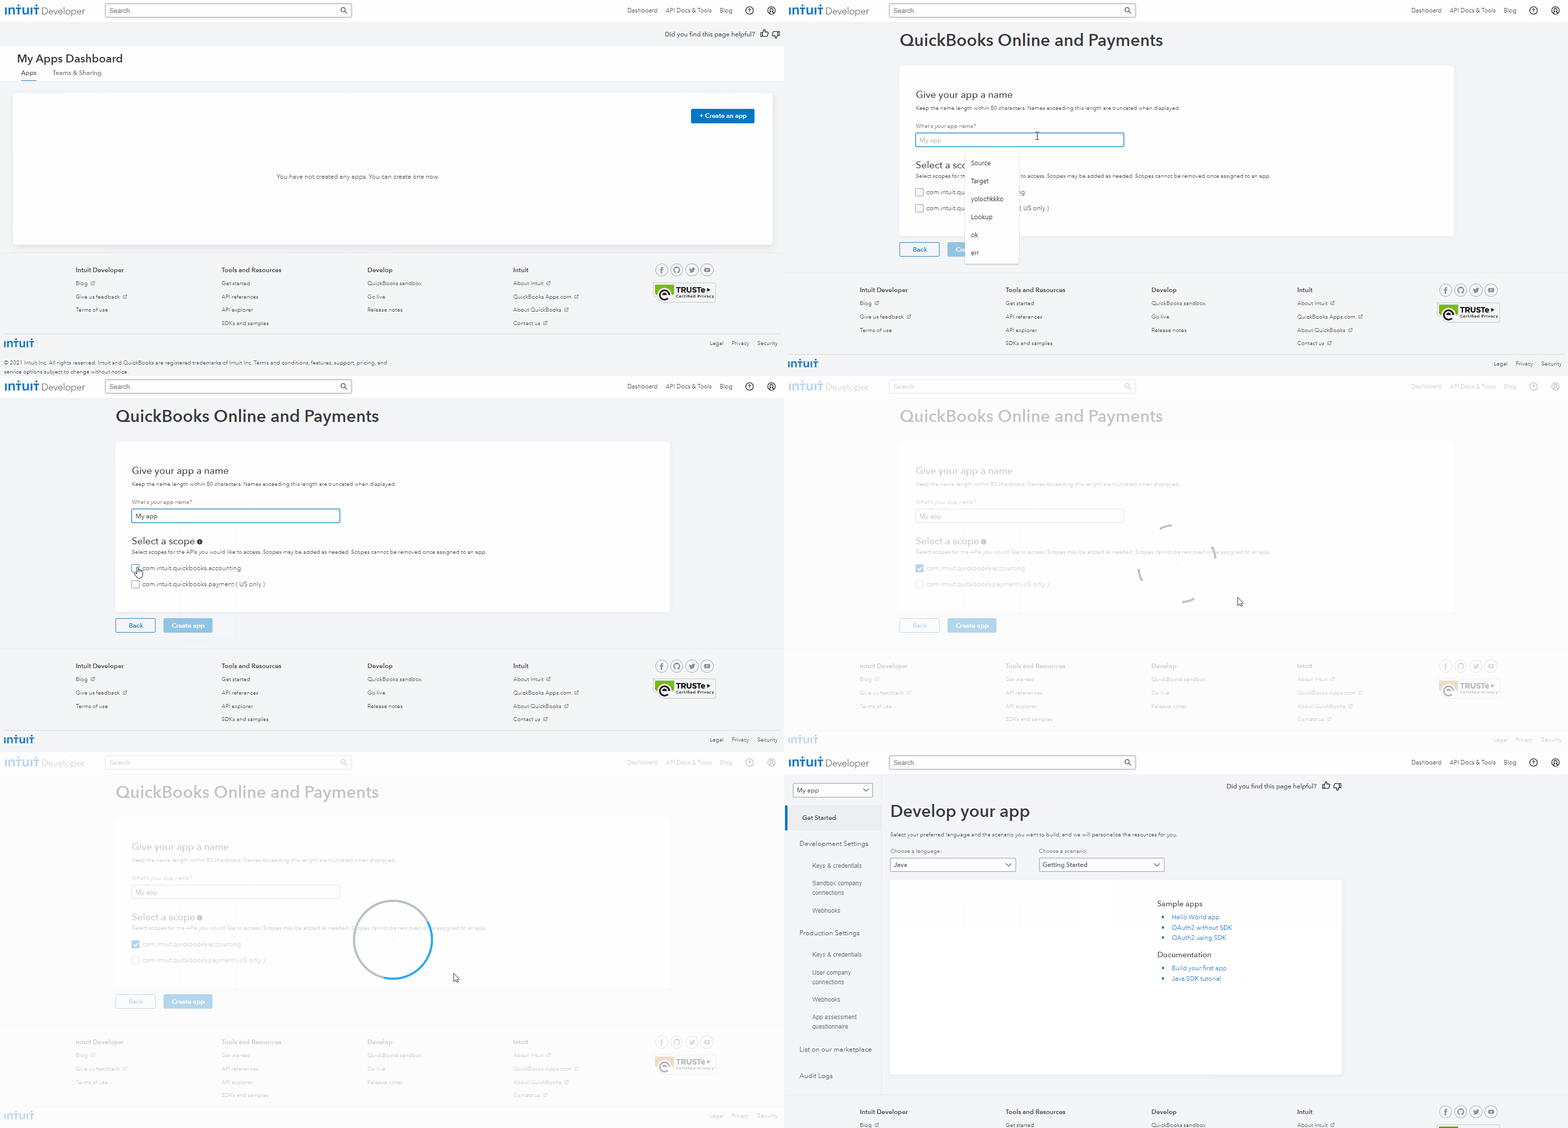
- Get a Consumer Key and a Consumer Secret.
In the Salesforce Setup menu, enter App Manager in the Quick Find box, and then select App Manager. Click the dropdown menu for the connected app that you created and select View. Copy the Consumer Key and Consumer Secret values and save them for later use in this quick start. - Set up authorization. Send a request to the Salesforce OAuth endpoint following the recommendations.
Now, you can perform API calls to Salesforce and make integration actions per the API Reference. You can refer to a commonly used example documented by Salesforce.
Integrate Salesforce with QuickBooks using Webhooks and Triggers
This approach enables the implementation of real-time, one-direction integration using webhooks. Webhook is a feature that works the following way: when something in the data has changed, webhook sends a notification about these changes.
To implement a webhook, you have to configure the entity and the event to notify you about it and establish a URL on the receiving end to accept the data.
To use webhooks in QuickBooks, you need to configure an endpoint QuickBooks servers can call whenever the notifications are triggered. You have to configure webhooks separately for sandbox and production environments.

The details on how to use webhooks in QuickBooks are available in QuickBooks documentation.
Salesforce also supports the tracking and notifying process for entities’ changes. Salesforce has a built-in tool called Apex Triggers. Apex triggers enable you to perform custom actions before or after changes to Salesforce records, such as insertions, updates, or deletions. You can learn more about Salesforce triggers in Salesforce developer docs.
Pros and Cons of Custom Integration Development
Pros
- Flexibility. You can access any available object and perform any possible data-related operation.
- You fully manage your integration and decide what web service to use and how to set the integration up.
- You can develop your own integration app to meet your specific requirements.
- Real-time integration is supported using webhooks.
Cons
- You need a developer account in QuickBooks and Developer Edition in Salesforce to use this method.
- Requires programming skills.
- It is complicated and requires a lot of time and resources for development and testing.
- Requires constant maintenance.
Method 3: Middleware Platforms
Middleware platforms represent another method of Salesforce QuickBooks integration. They can handle complex integrations for enterprise-size businesses. Middleware platforms enable the integration of various services and applying complex workflows. They provide extensive customization options, cross-service logic, and advanced transformations. In contrast to third-party tools, middleware platforms are usually more expensive and complicated. Let’s look at the top five middleware tools.
Best for: Enterprises with complex use cases, which need the outsource assistance for data integration implementation.
Top 5 Middleware Solutions for Salesforce QuickBooks Integration
MuleSoft
MuleSoft is an enterprise-grade middleware platform owned by Salesforce, offering robust integration capabilities for connecting applications, data, and devices. It enables seamless data flow between Salesforce and QuickBooks, with extensive customization options.
Best suited for: Large enterprises with complex integration needs and resources for handling complex workflows.
Features
- API designer.
- Real-time integrations and advanced analytics.
- Prebuilt templates.
Pros
- Complex use cases support.
- Multiple apps support.
- Salesforce native support.
- Advanced analytics and monitoring.
Cons
- Expensive for small and mid-sized businesses..
- Technical knowledge is required.
- Steep learning curve.
Pricing
Pricing varies depending on available features.
Skyvia Data Flow
Skyvia Data Flow is a no-code, cloud-based data pipeline designer for data integration and synchronization. It helps to build custom flows and apply advanced transformations to integrate Salesforce, QuickBooks, and other 200+ supported data sources.
Best suited for: Both SMBs and enterprises looking for easy to use data sync and process automation solutions for various apps and services.
Features
- Pre-built connectors for Salesforce and QuickBooks (Online & Desktop).
- Intuitive, no-code design.
- Real-time and batch synchronization options.
- Data backup and transformation capabilities.
Pros
- Affordable and easy to set up.
- Supports both QuickBooks Online and Desktop.
- Suitable for small businesses with straightforward needs.
Cons
- Limited scalability for large enterprises.
- Less suitable for highly complex workflows.
Pricing
Free for basic use; paid plans start at $159/month.
Boomi
Boomi is a cloud platform from Dell that helps to connect various services. It offers low-code tools for different data integration use cases, including QuickBooks Salesforce sync.
Best suited for: Mid-sized and large businesses implementing complex integrations and data management.
Features
- Pre-built connectors and user-friendly interface.
- AI-guided integrations.
- Real-time integration and batch data processing support.
Pros
- Low-code tools.
- Flexible pricing for businesses of various sizes.
- Strong community and support network.
Cons
- May require additional investment for advanced customizations.
- Steep learning curve for complex workflows.
Pricing
Pricing varies depending on available features.
Jitterbit
Jitterbit is an integration platform that focuses on simplifying connectivity between Salesforce, QuickBooks, and other applications. Its intuitive tools allow users to build custom integrations quickly.
Best suited for: Large businesses looking for data integration of multiple services.
Features
- Pre-built templates for Salesforce-QuickBooks workflows.
- Low-code design for integration creation.
- Real-time and batch data sync options.
- API manager for creating custom APIs.
Pros
- Pre-built templates.
- Flexible options for data integration and API management.
- Strong customer support and documentation.
Cons
- It may require technical knowledge.
- Expensive for small businesses.
Pricing
Pricing varies depending on available features.
SnapLogic
SnapLogic is an intelligent platform offering AI-driven solutions to connect Salesforce, QuickBooks, and other services. It specializes in automating data flow across cloud and on-premise applications.
Best suited for: Businesses looking for complex data integration and automation solutions.
Features
- AI-powered automation capabilities.
- Real-time integration.
- On-premise and cloud connectivity.
- User-friendly interface.
Pros
- AI-driven recommendations simplify integration processes.
- Scalability.
Cons
- Expensive for small businesses.
- Steep learning curve.
Pricing
Pricing varies depending on available features.
Pros and Cons of Using Middleware Platforms
Pros
- Advanced сustomization. Middleware platforms offer customization capabilities for unique or highly specific integrations.
- Scalability. Middleware platforms are designed to handle large data volumes without compromising performance.
- Middleware solutions enable complex integration workflows and advanced process automation.
Cons
- Costs. Middleware platforms are more expensive compared with third-party tools and manual integration via built-in tools.
- Complexity. Integration setup requires significant technical expertise or the involvement of an expert.
- Maintenance. Middleware platforms require continuous maintenance and regular monitoring.
Step-by-Step Guide: Integrating Salesforce with QuickBooks Using Skyvia Data Flow
With Skyvia Data Flow, you can implement complex scenarios using advanced transformations. We will show you how to create QuickBooks customers from Salesforce contacts and accounts.
To start building a data flow, you need to have an active Skyvia account and valid connections to the data sources.
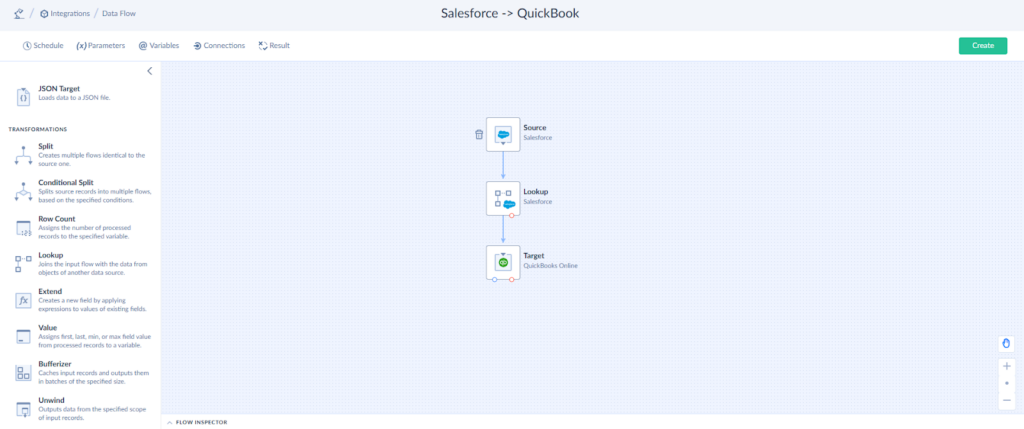
To build a custom integration scenario, perform the following steps.
- Create a new Data Flow.
- Add the components.
- Run the integration.
Let’s explore each step in detail below.
STEP 1: Create a new Data Flow.

STEP 2: Add the components.
- Drag the Source component to the diagram and select the connection.
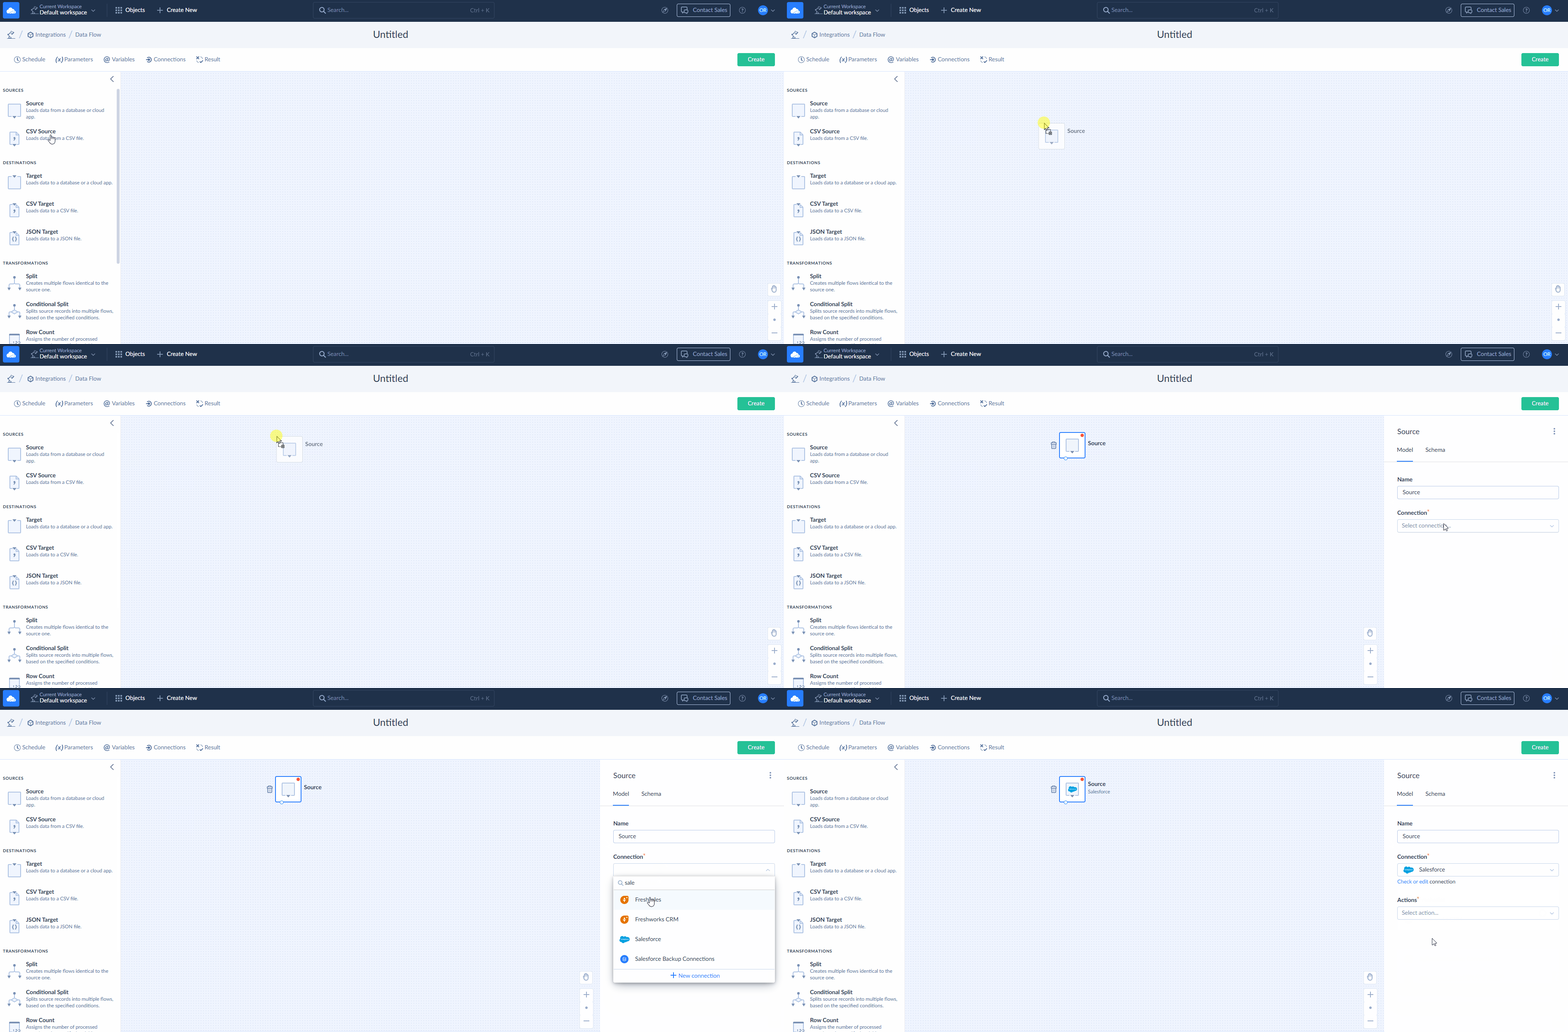
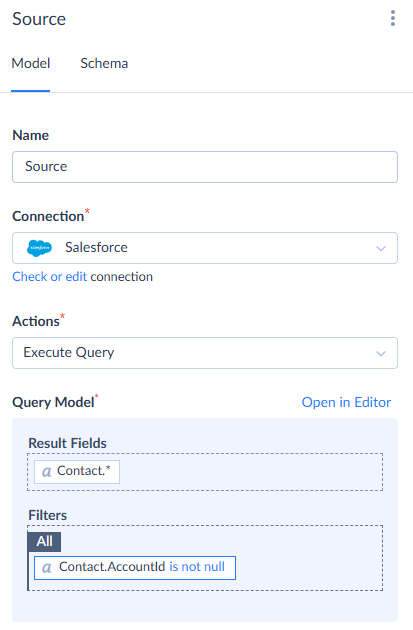
- Select the desired action. Data Flow allows you to build queries in a visual editor, write custom commands, and even run Salesforce reports. We selected the Execute Query action.
- Select the Contact object or its specific fields to query. Set filters if needed.
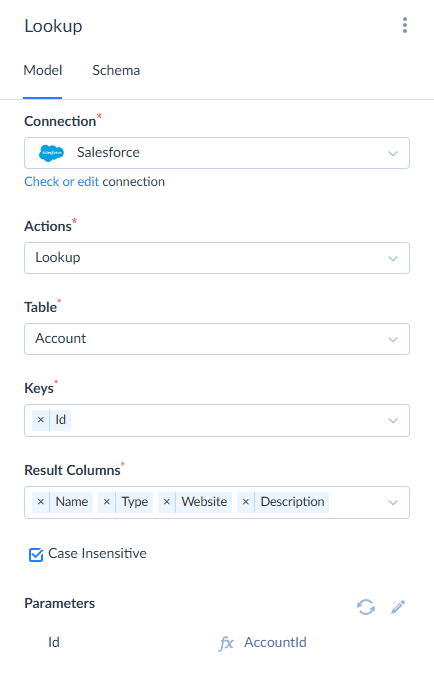
- Add the Lookup component to the diagram and connect. It will help you to fetch the company name and website from the Account object. Select connection, command, object, lookup key, and result fields. Map the lookup key. In our case, we map Account.Id to Contact.AccountId.
- Add the Target component to the diagram.
- Select the connection, action, and object. Complete the mapping in the Parameters section.
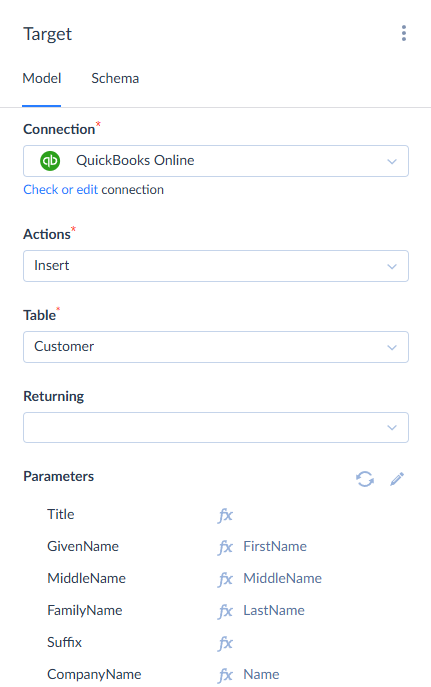
STEP 3: Run the integration by schedule or do it manually.
- Schedule the integration to run automatically or run it manually. You can set the schedule to work weekly or daily at a specific time or by a particular interval.
We showed you a simple example of Salesforce QuickBook sync using Skyvia Data Flow. Visual Data Flow designer and various components allow you to tailor any integration according to your business needs. With Data Flow, you can integrate various data sources in a single integration, load data in any direction, and apply advanced data transformations.
Method 4: Manual CSV Import/Export
There is one more method to sync Salesforce and QuickBooks. It involves exporting data to a CSV file from one side and importing this CSV file to another side. You can export Salesforce data to CSV and then import CSV to QuickBooks or vice versa using such tools as Skyvia Export and Import or Salesforce Data Loader and QuickBooks’ built-in import/export.
Best for: Small businesses to implement sporadic simple data integration use-cases like bulk data import, not involving third-party tools or outsource expertise.
Step-by-Step Guide: Export Data from QuickBooks
To export QuickBooks Online data manually, perform the following steps:
- Go to QuickBooks, click the gear icon, and select Export data in the TOOLS section.
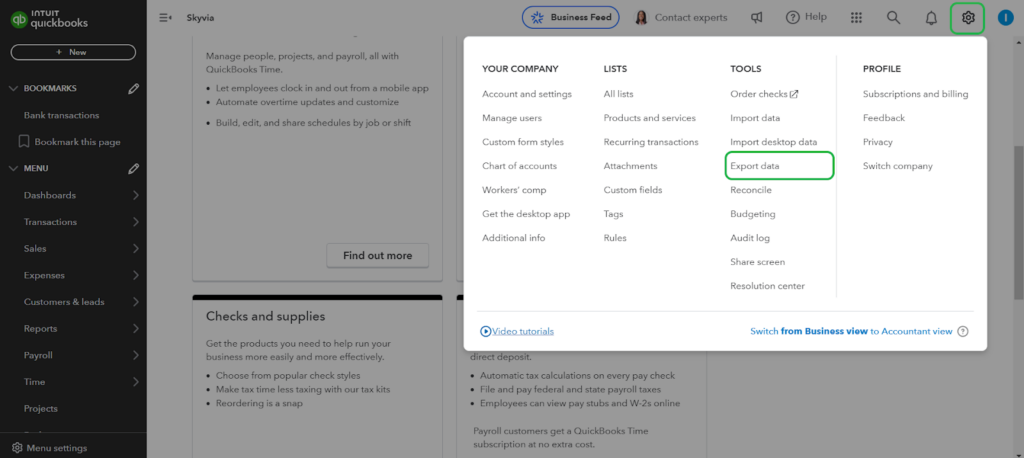
- Choose the object type to export: Reports or Lists. Enable the object toggle to include an object in the export.
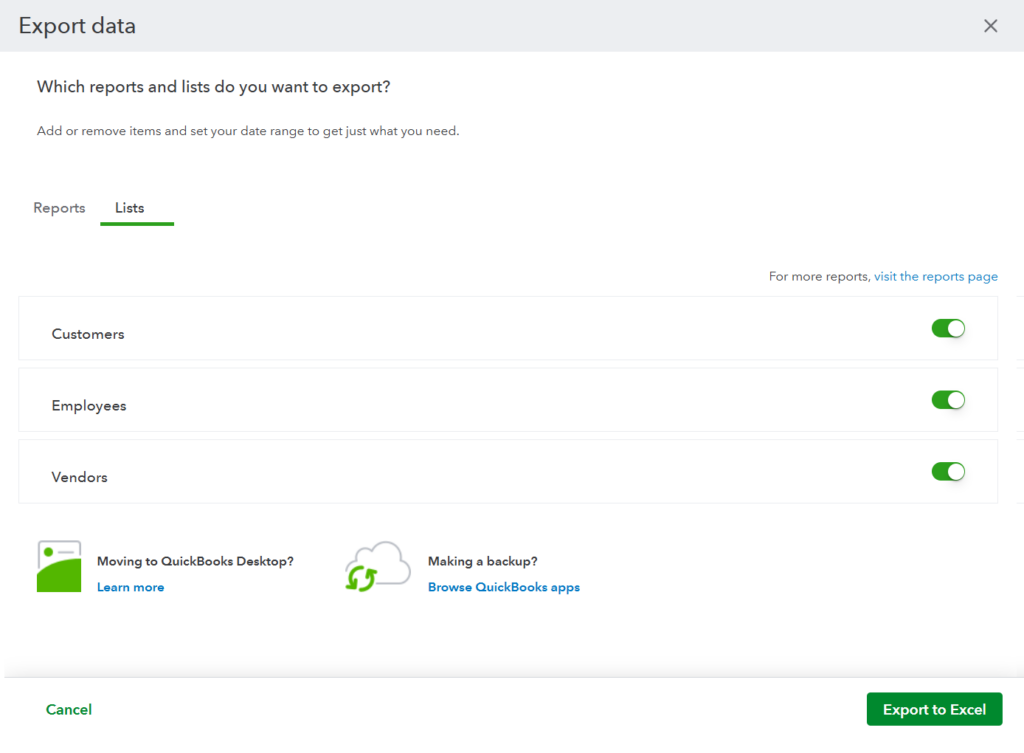
- Click Export to Excel to retrieve QuickBooks data to the local file.
As a result, you get a Zip file with a separate CSV file for each object. You can use these files as sources for import to Salesforce.
Step-by-Step Guide: Import CSV into Salesforce
The easiest way to import CSV files to Salesforce is to use the built-in Salesforce tool Data Import Wizard. To do that, perform the following actions:
- In Salesforce, click the gear icon and select Setup.
- In the Quick Find box, type Data Import and select Data Import Wizard.
- Scroll down and click Launch Wizard.
- Select the target object and choose what to do with your data.
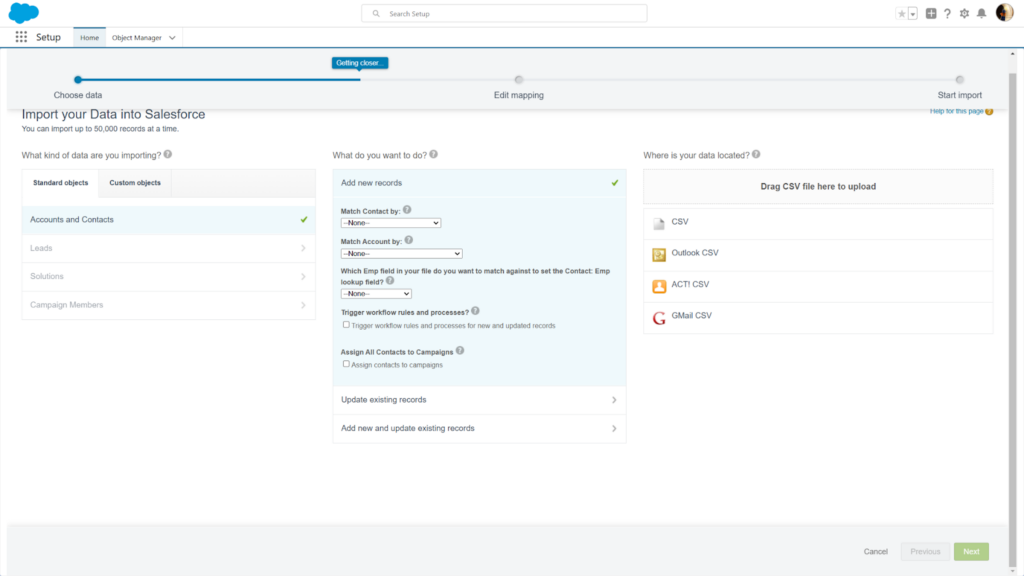
- Define the field mapping and start the import.
As a result, you get your CSV file content imported into Salesforce.
Pros and Cons of Using Manual CSV Import and Export
Pros
- Free or low-cost
- Easy to use.
- Great for ad hoc data transfers without requiring a fixed integration setup.
Cons
- This method is time-consuming. It requires repeated manual activities.
- High risk of human errors.
- No automatic updates.
- Scalability Issues: Unsuitable for large data volumes or frequent integration needs.
Best Practices for Salesforce QuickBooks Integration
You are now aware of all the methods of Salesforce QuickBooks integration. You can proceed to the next steps. Before you start implementing your scenario, let’s look at several hints to help you build integration successfully.
Pay Attention to Planning
Think of the objectives of your integration. Think of the use case logic. Plan what objects you will integrate, what data you will exchange, what actions you will perform, and what result you expect. Evaluate risks. Analyze what resources the integration takes and what risks it produces.
Choose the Method
Choose the integration method based on the information above. Choose the approach that is the best for your requirements and technical environment.
Evaluate Changes
Think about how QuickBooks and Salesforce business processes will change after the integration is implemented. Evaluate the processes’ compatibility.
Ensure Compatibility
Ensure your Salesforce and QuickBooks subscriptions and versions are compatible with the planned integration. QuickBooks offers both Online and Desktop versions, each with distinct integration capabilities.
Evaluate ROI
Evaluate the potential ROI of the integration by analyzing costs, time savings, error reduction, and improved data accuracy.
All these points will help you prepare to implement data integration in your company.
Conclusion
Integration between Salesforce and QuickBooks is a great solution to reduce the amount of manual routine operations and mitigate the risks of human mistakes.
There are several methods to integrate Salesforce and QuickBooks. You have to carefully analyze your business needs, workflows, architecture, and other specifics to decide what method is perfect for your organization. We compared the top 5 of the most popular tools among the third-party solutions and the top 5 middleware platforms. Each tool has specific features and particular pros and cons. We explored each method of Salesforce QuickBooks sync in detail and learned how to build Salesforce QuickBooks integrations using different approaches including Skyvia solutions. It offers versatile no-code tools for businesses of all sizes. It can handle simple integration scenarios and complex workflows of large volumes of data with advanced transformations.
You can find more details about Skyvia data integration opportunities here. You can register in Skyvia for free and start building your Salesforce and QuickBooks integration right now.
FAQ for Salesforce and QuickBooks
What about Salesforce QuickBooks integration security?
Most third-party tools and middleware solutions comply with industry standards such as GDPR, CCPA, or others. Some of them use multifactor authentication encryption. You must ensure data security if you use manual CSV integration or custom API development.
Can I customize the integration to meet my business needs?
It depends on the selected integration method. The Custom API development method offers the best customization opportunities. The integration using the manual CSV Import/ Export is the least customizable. Third-party tools and middleware platforms offer various customization solutions such as mapping, custom workflows, and others.
Is coding or technical expertise required for the integration?
It depends on the chosen integration method. The easiest manual CSV Import/Export doesn’t require special skills. Most third-party tools are also no-code. They offer visual editors and wizards and provide pre-built integration templates. Custom API integration requires programming skills or developers’ assistance, especially when implementing complex logic.
Can this integration handle large volumes of data?
It depends on the solution capacity, architecture, and subscription. Middleware solutions and some third-party tools, such as Skyvia, enable managing large datasets. They provide bulk operations, batch processing, and other performance optimization features.
Which method is best for my business size?
Simple one-time integrations in small businesses or startups can be handled by manual CSV Import/ Export tools. Third-party tools are the most suitable for small and medium-sized businesses because they are easy to use and cost-effective. Middleware platforms are the best choice for enterprises that operate large data volumes and have complex customization requirements.


