

Imagine Salesforce as a high-performance car. It looks sleek and powerful, but without your customer and business data which are fuel, it’s going nowhere. And data loading is the fuel system, delivering the vital inputs that keep the engine humming.
But loading that fuel manually? That’s like pouring gasoline with a teaspoon. You need the right tools. That’s where Data Loaders come in. Yet, there are differences among them. While the built-in Data Import Wizard handles basic tasks, more powerful loaders are built for speed, automation, and precision that turbocharge your CRM.
Let’s look at what makes data loaders necessary.
- Enrichment. They can combine CRM information with other business systems. For instance, a company uses Salesforce, Shopify, HubSpot, and SAP Logistics. In such a case, data loaders help build a single source of truth.
- Migration. This is a one-time process of fueling a new or enhanced Salesforce environment with existing data. For example, loaders can transfer customer records or sales histories when transitioning from legacy systems.
- Backups. Businesses can regularly extract and store copies of SF data, such as lead records or transaction logs, to recover it in case of accidental deletions or system failures.
This guide provides step-by-step instructions and detailed comparisons to help Salesforce administrators, developers, and business analysts navigate the landscape of available data loaders. We will explore the most popular tools, including Salesforce Data Loader, Skyvia, Dataloader.io, Data Import Wizard, and Workbench.
Table of Contents
- Salesforce Data Loader
- Skyvia
- Dataloader.io
- Data Import Wizard
- Workbench
- Use Cases for Salesforce Data Loading
- Comparing Salesforce Data Loaders & Choosing the Right One
- Common Errors & Troubleshooting
- Conclusion: Choosing the Right Data Loader for Your Needs
Salesforce Data Loader
Salesforce Data Loader is a go-to tool to move large amounts of data in and out of the CRM system. It’s a native desktop application that you install directly on your computer. You can use it at no extra cost, and it will be automatically updated with each new release.
Best For
- Data teams in marketing, sales, or operations where bulk operations is part of the daily grind.
- Salesforce admins who need a free and powerful tool for large-scale imports, updates, or exports.
- Advanced users who want more control and flexibility than the basic Data Import Wizard provides.
- Command-line enthusiasts who want to automate tasks via scripts (Windows users only).
Key Features
- It performs import and export records by executing insert, update, upsert, and delete operations.
- Handles large volumes: processes as many as 5 million records per batch.
- Works with a wide variety of standard and custom objects.
- Supports field mapping.
- Performs updates across multiple objects in one run.
- Detailed logs help you identify and fix issues.
Cons
- Learning curve: it’s not the most beginner-friendly tool.
- Scheduling limitations: no native scheduling in the user interface. If you want automated jobs, you’ll need the CLI (Windows only).
- Formatting matters: your data needs to be properly formatted before loading.
- Performance hiccups: expect occasional timeouts, bugs, or crashes – lowering the batch size can help.
Importing Data to Salesforce
Let’s break it down with real-life examples. We’ll walk through how to use Salesforce Data Loader for importing new records, exporting information for analysis, and automating routine tasks – so you can see how to apply it in your day-to-day operations.
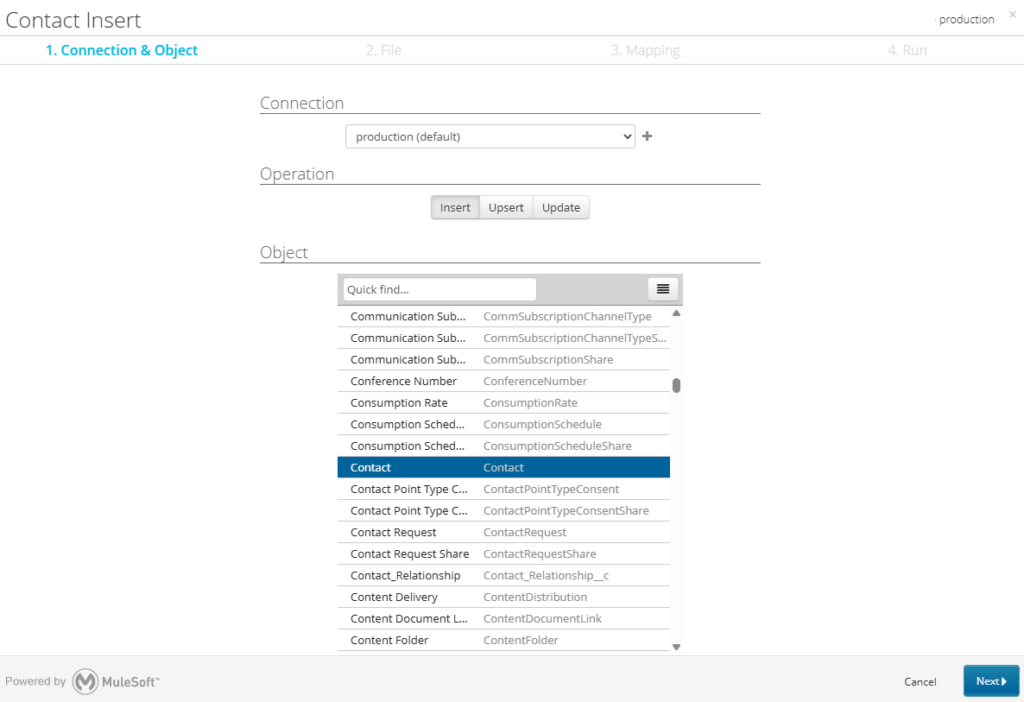
First, we will show an example of importing data into Salesforce. We will import Contacts from a CSV file.
Step-by-Step Guide
Step 1
Install Data Loader on your computer. You may need to install Zulu JDK first. To get the details, follow the official Documentation.
Step 2
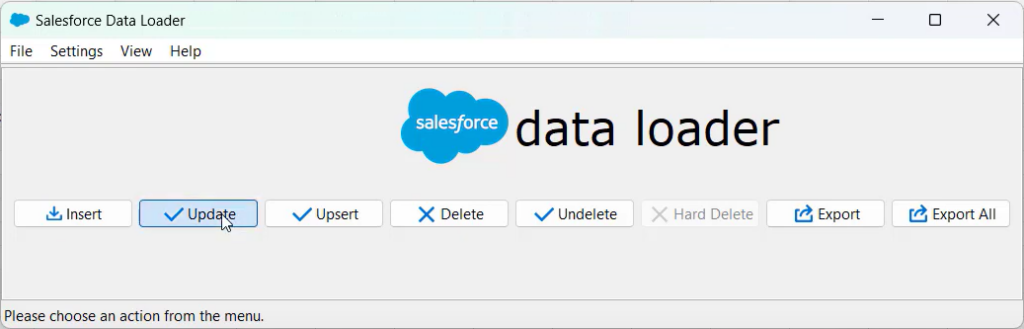
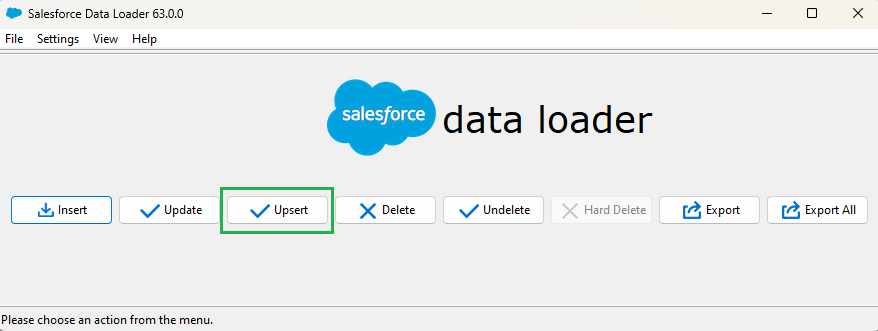
- Open Salesforce Data Loader.
- As we already have contacts in Salesforce, we choose Upsert.
- Log in to your Salesforce account.
- Select an object to insert the data. In our case, it’s Contact.
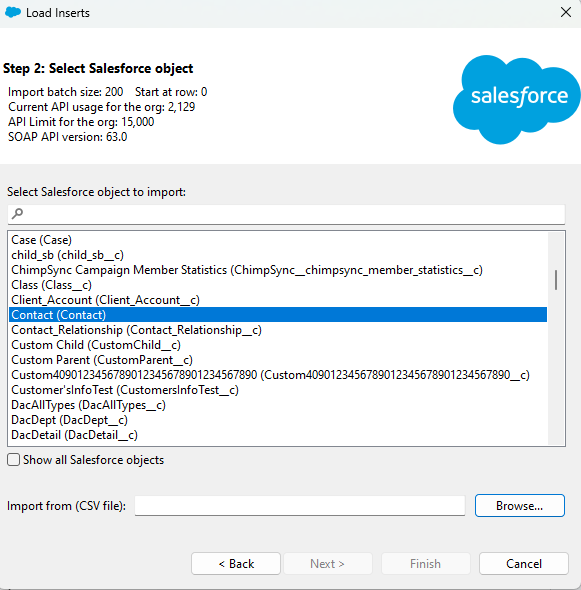
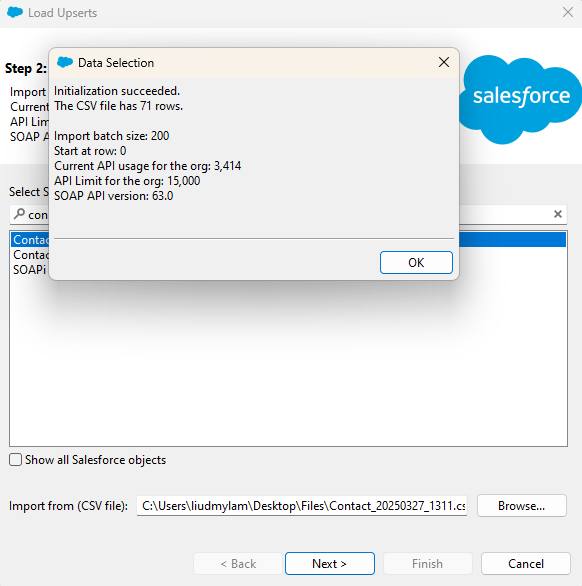
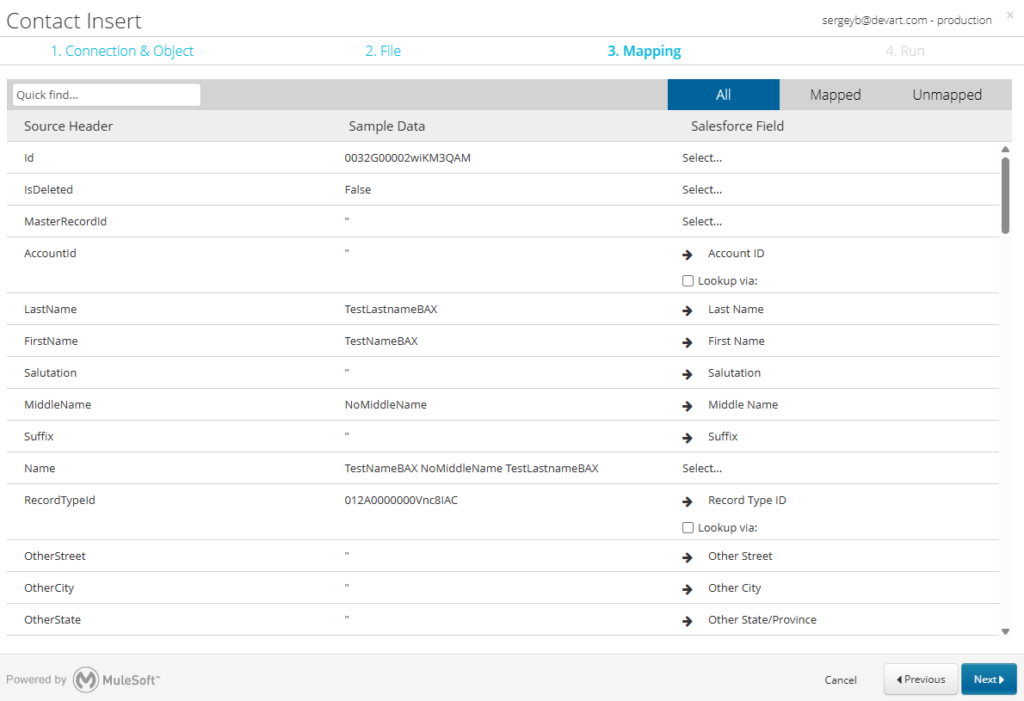
- Upload a CSV file and click Next. The Data Loader will show the preliminary information.
- Next, select the field with unique identifiers to match contacts.
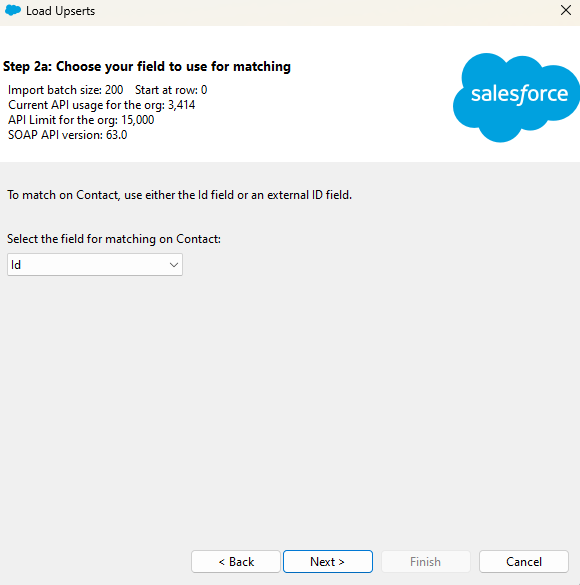
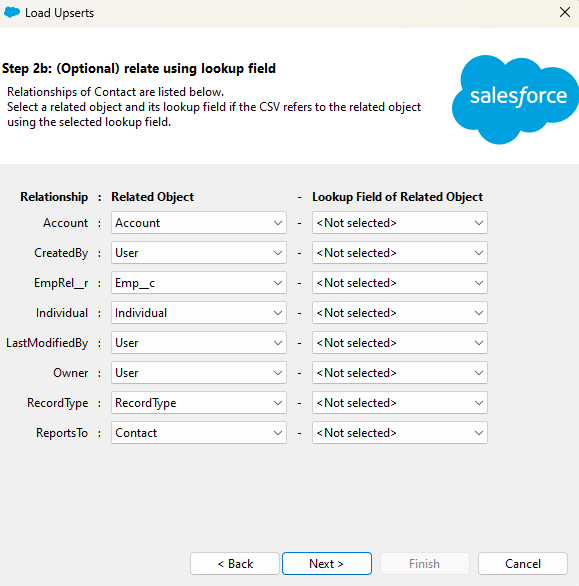
- Check matches to related objects and mapping.
- Start the process.
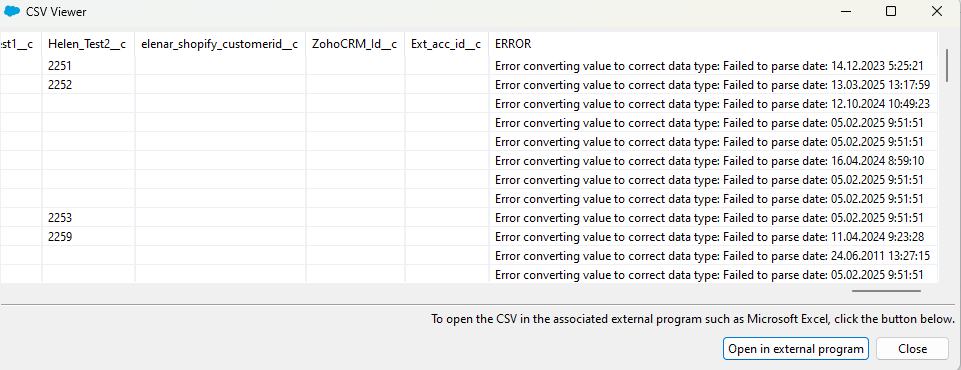
- When it’s done, you can check the list of errors and download it to a CSV file.
Best Practices
- Ensure CSV headers match Salesforce fields.
- If records already exist, use the Upsert command to prevent duplicates.
- Review error logs after processing for any issues.
- When importing large datasets, adjust the batch size (default 200 records per batch) to balance speed and Salesforce API limits.
- Test complex imports in a Sandbox environment first.

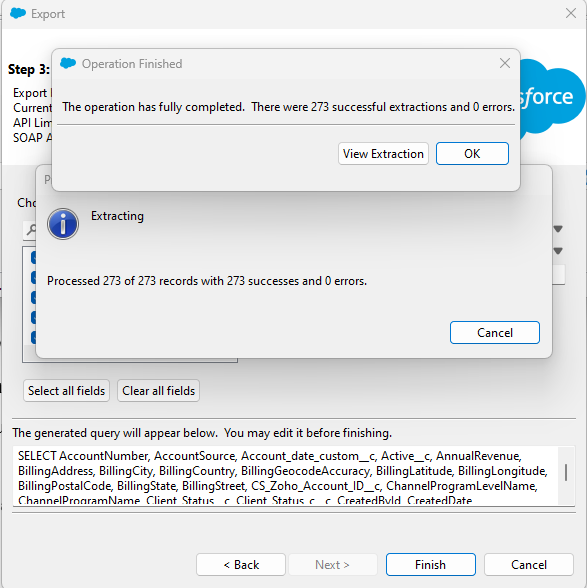
Exporting Data from Salesforce
Regularly exporting data from Salesforce helps maintain business continuity and access to historical records. In this example, we’ll show how to export an account list for reliable reporting, audits, and long-term retention.
Step-by-Step Guide
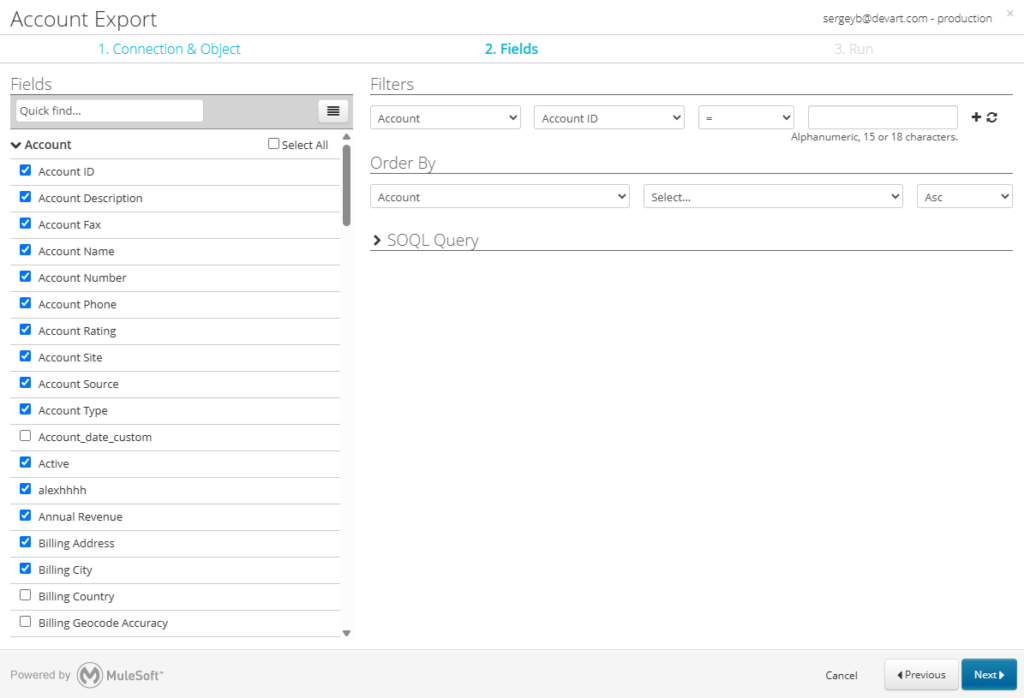
Open Salesforce Data Loader.
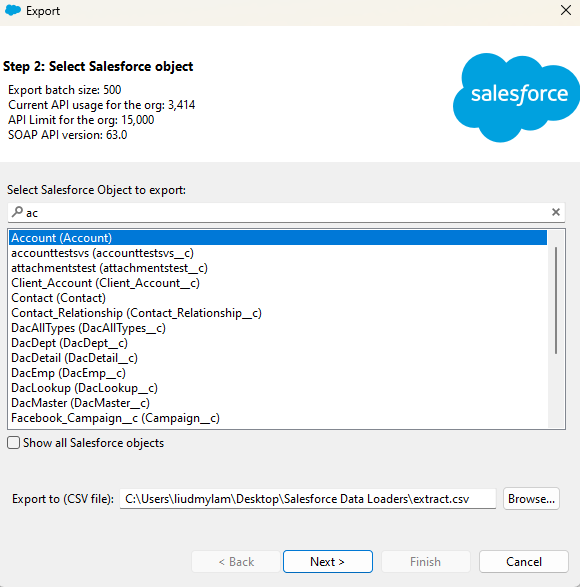
- Click Export.
- Select the Account object and the folder to save the file.
- Select fields to export and optionally use SOQL queries to filter records.
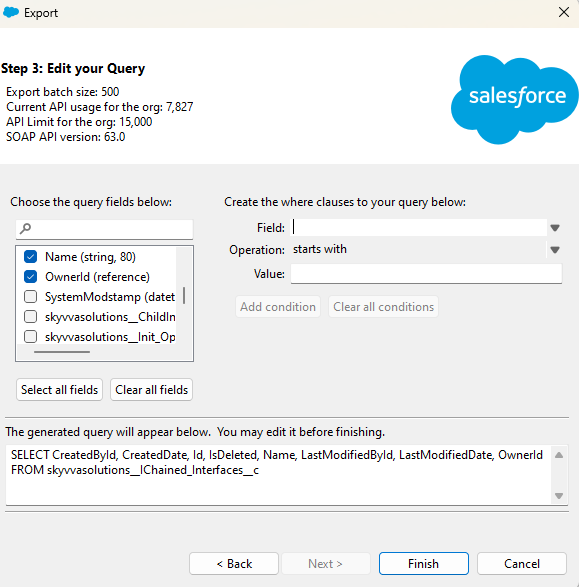
- Proceed to finish the process. When it’s ready, click View Extraction to see the resulting CSV file and download it.
Best Practices
- Use SOQL filters to export relevant data only. This will help to reduce processing time and file size.
Automating Salesforce Data Loader
To automate tasks in Salesforce Data Loader, you must use a command-line interface (CLI). CLI automation is ideal for large-scale, repetitive tasks without manual intervention, but requires more technical setup and configuration.
Step-by-Step Guide
- Generate the encryption key.
- Encrypt the Password for your Salesforce username.
- Set up the field mapping file.
- Create a process-conf.xml file with import configuration settings.
- Run import.
For a detailed, step-by-step guide on using the Salesforce Data Loader CLI, refer to the official documentation.
Best Practices
- To start working with CLI, familiarize yourself with importing and exporting data through the user interface – this helps you better understand CLI functionality. You can also explore sample configuration files located in the samples\conf directory (e.g., C:\Users\{userName}\dataloader\version\samples\).
- Use CLI to automate operations during off-peak hours, optimizing resource usage.
Skyvia
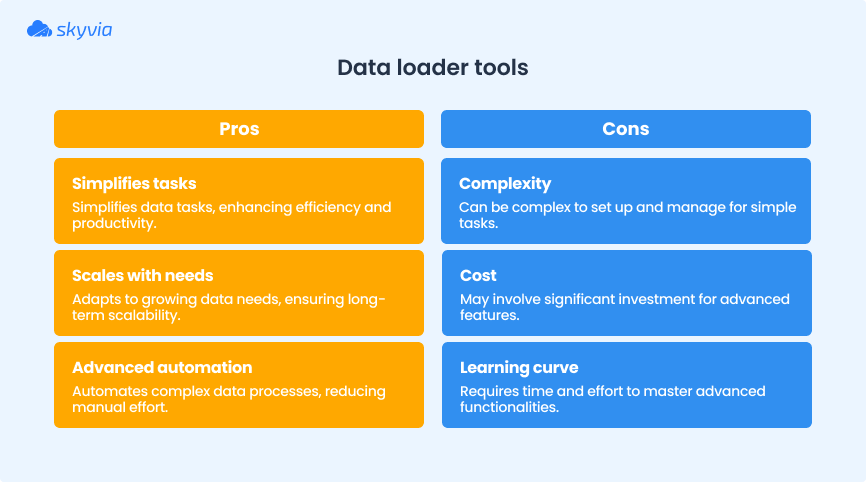
Skyvia is a cloud-based integration and automation platform that allows users to import, export, sync, and delete Salesforce data without installation. With support for 200+ connectors, including databases, cloud storages, and popular SaaS applications, Skyvia simplifies complex data tasks. Its intuitive no-code interface makes it accessible to both technical and non-technical users.
Best For
- Businesses looking to load Salesforce data without technical complexity, especially those with minimal IT support.
- Teams requiring a user-friendly solution for scheduled automatic, high-volume imports and updates into CRM.
- Companies needing an all-in-one platform for syncing Salesforce data with other systems.
Key Features
- 200+ connectors that allow for direct Salesforce integration with other cloud apps, databases, data warehouses, or data storage.
- Scheduled import/export of any Salesforce objects, replication, and bidirectional data sync.
- Cloud-based, no installation required.
- Advanced mapping for data transformations.
- Backup and automation.
- A freemium tier or unlimited connections on paid plans.
Cons
- The free plan has usage limits.

Importing Data to Salesforce
Loading Salesforce data doesn’t have to involve complex scripts or manual steps. In this section, we’ll discover how to automate and simplify common tasks like importing new records, exporting for reporting, and bulk-deleting using Skyvia.
Let’s begin by showing you how to import external CSV files into Salesforce, using the example of importing a contact list.
Step-by-Step Guide
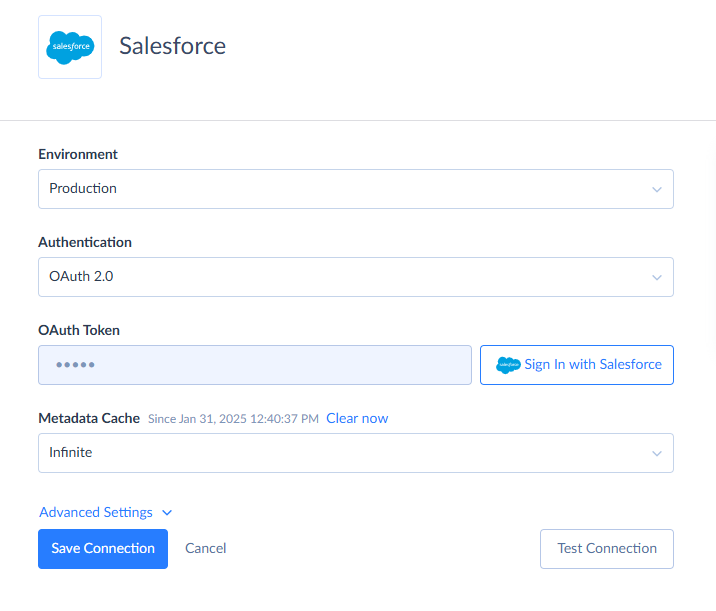
Step 1. Create a connection to Salesforce
- Log in to Skyvia and click Create new > Connection.
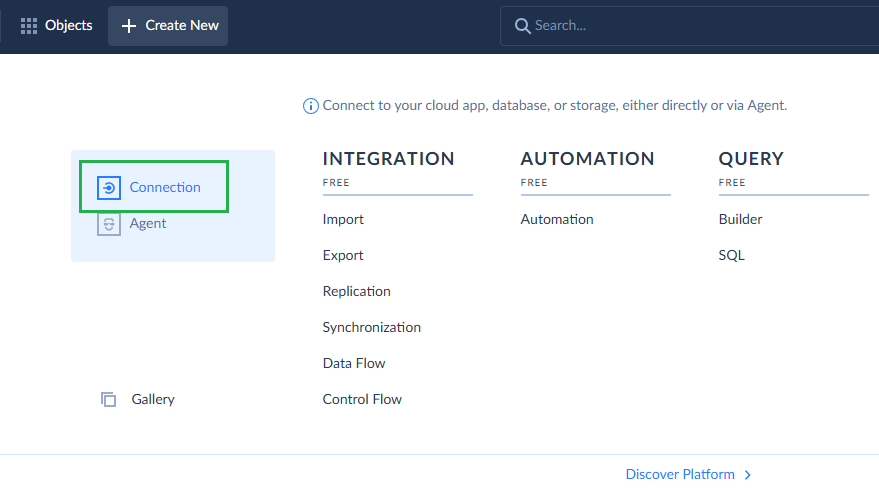
- Find Salesforce in the list.
- Click Sign in with Salesforce and enter your credentials.
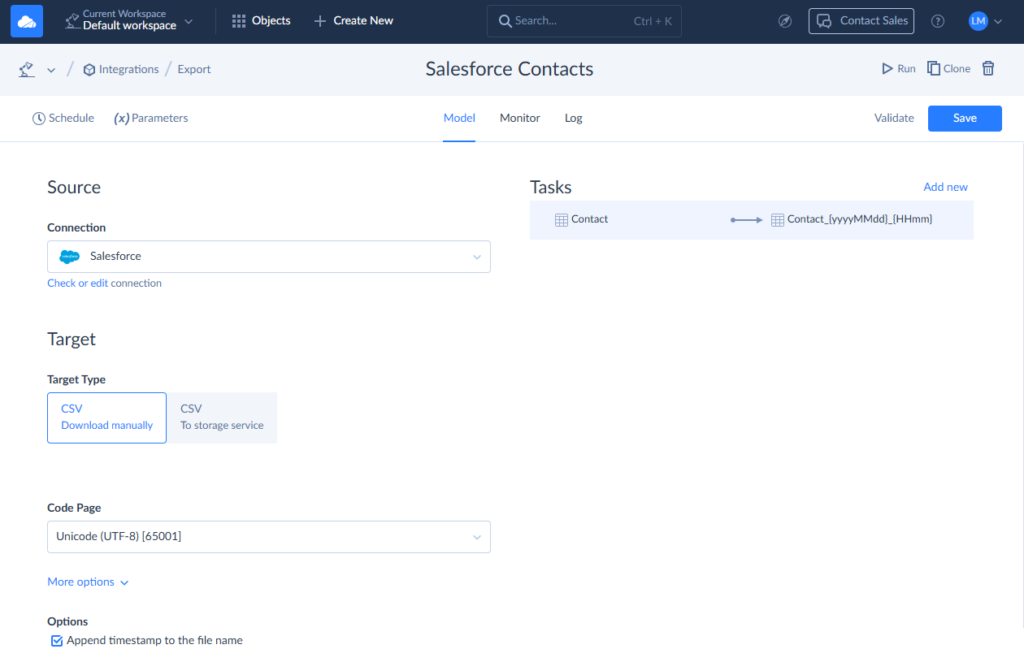
Step 2. Create Import task.
- Click Create New > Import.

- Select your Data Source – CSV upload manually.
- Select the Salesforce connection as a target.
- Click Add New.
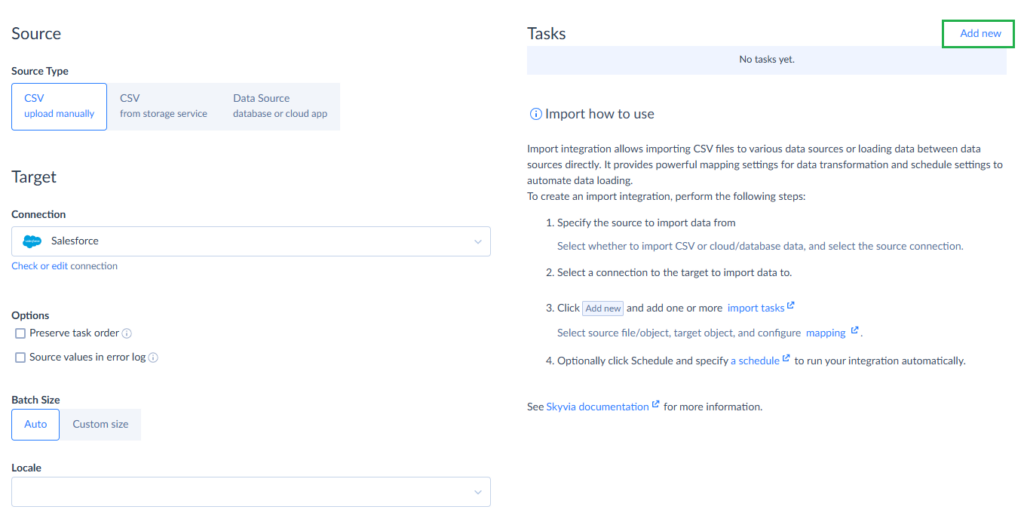
- Drop your CSV file to the Source area and check the CSV separator.
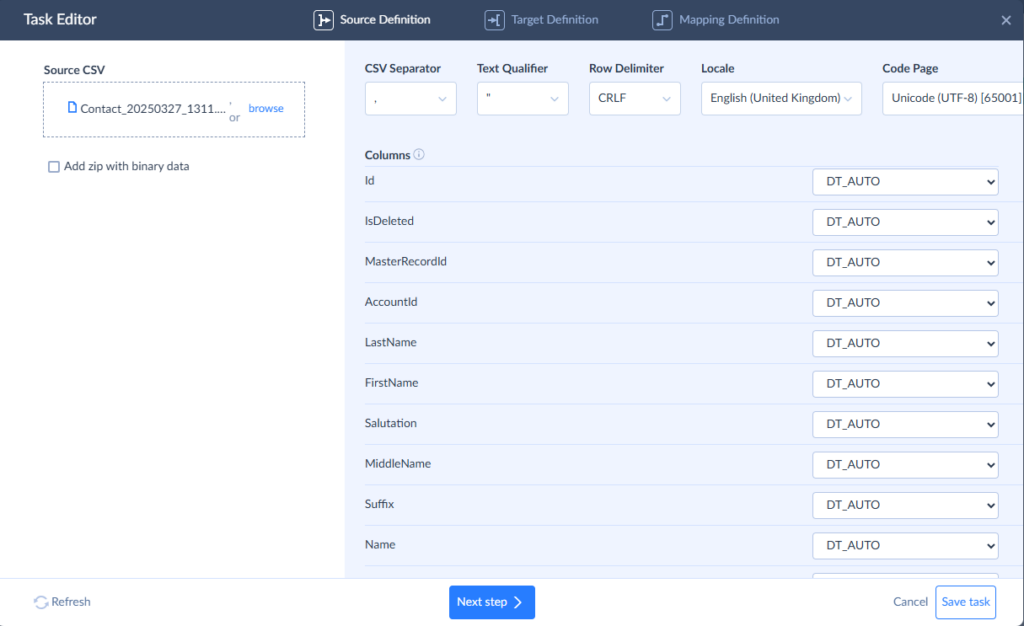
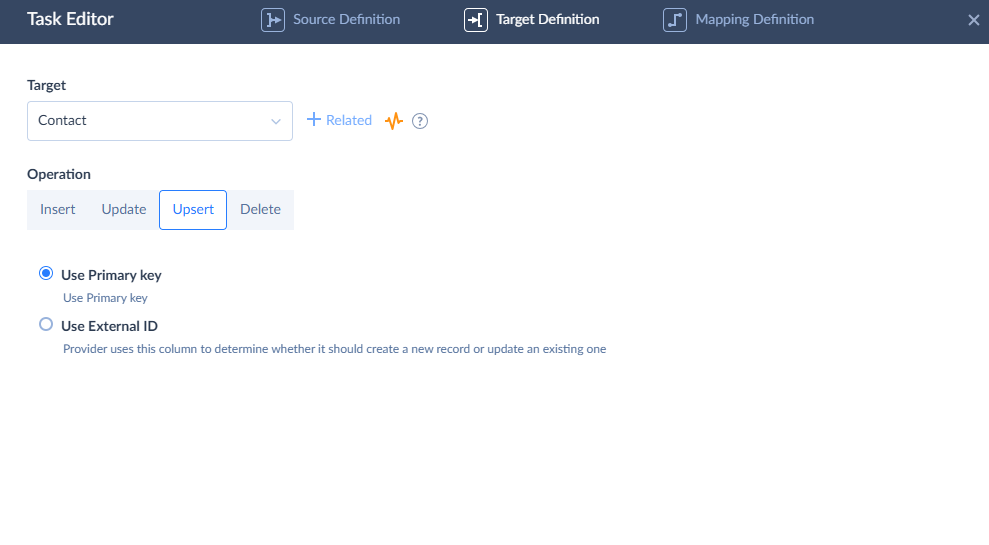
- Next, select the Contact object and choose the Upsert operation. This updates only the changed records, avoiding duplicates.
- Map the required fields between your CSV and Salesforce. The fields with matching names will be mapped automatically. You can map directly to the column, set the constant value, or use expressions and target lookup.
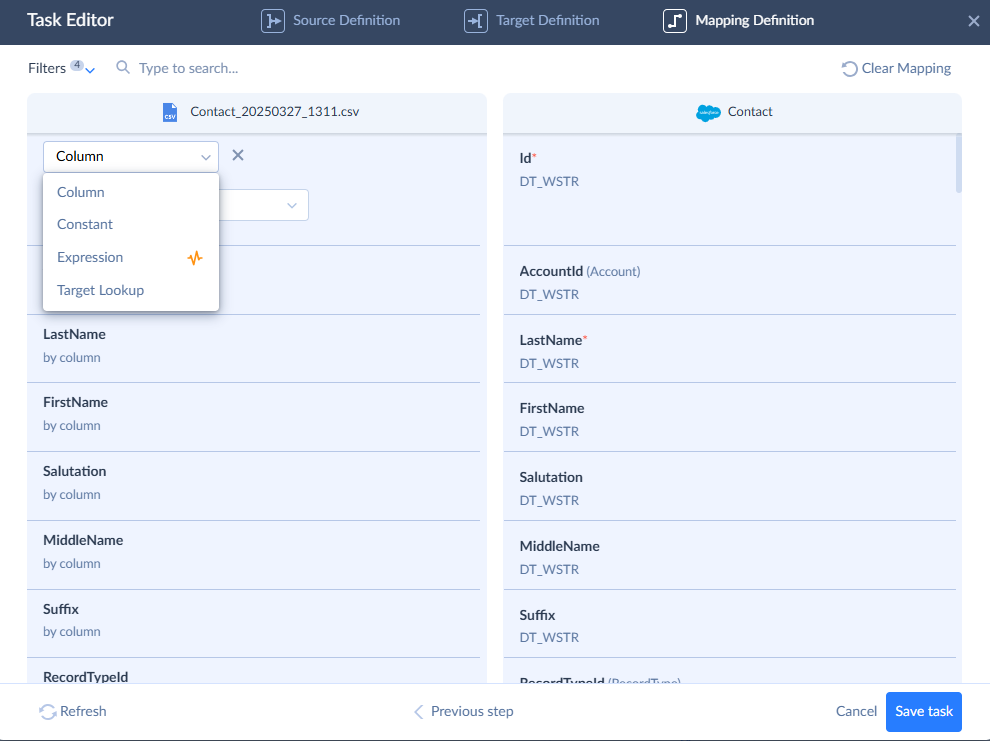
- Save the task.
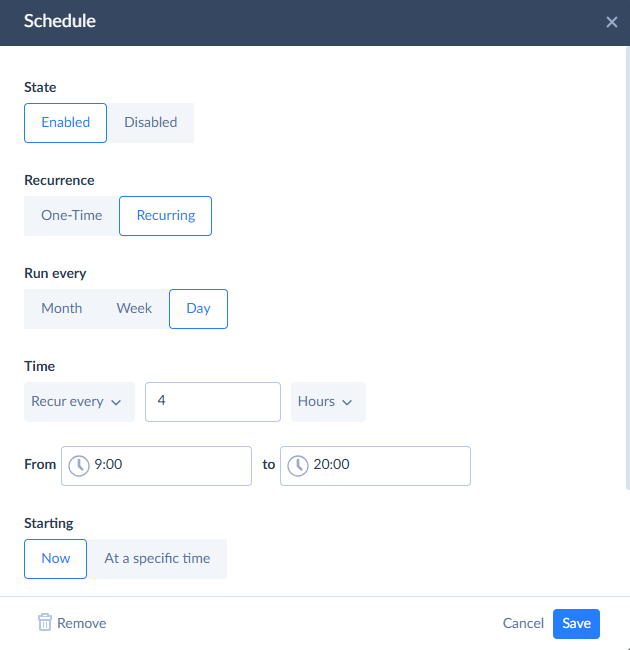
- Click Run to execute immediately, or Schedule for recurring imports.
Best Practices
- Validate data quality before import.
- Schedule regular imports to automate updates.
- Verify how fields are mapped to maintain data integrity.
Exporting Data from Salesforce
Let’s show the example of exporting SF data into CSV files. Similarly, Skyvia can export records to external sources such as SQL databases or cloud storages.
Step-by-Step Guide:
Step 1. Create a connection to Salesforce
- Log in to Skyvia and click Create new > Connection.
- Find Salesforce in the list and set up a connection as we showed above.
Step 2. Create Export task
- Click Create New > Export.

- Select the Salesforce connection as a source.
- Select the Target type – CSV upload manually.
- Click Add New.
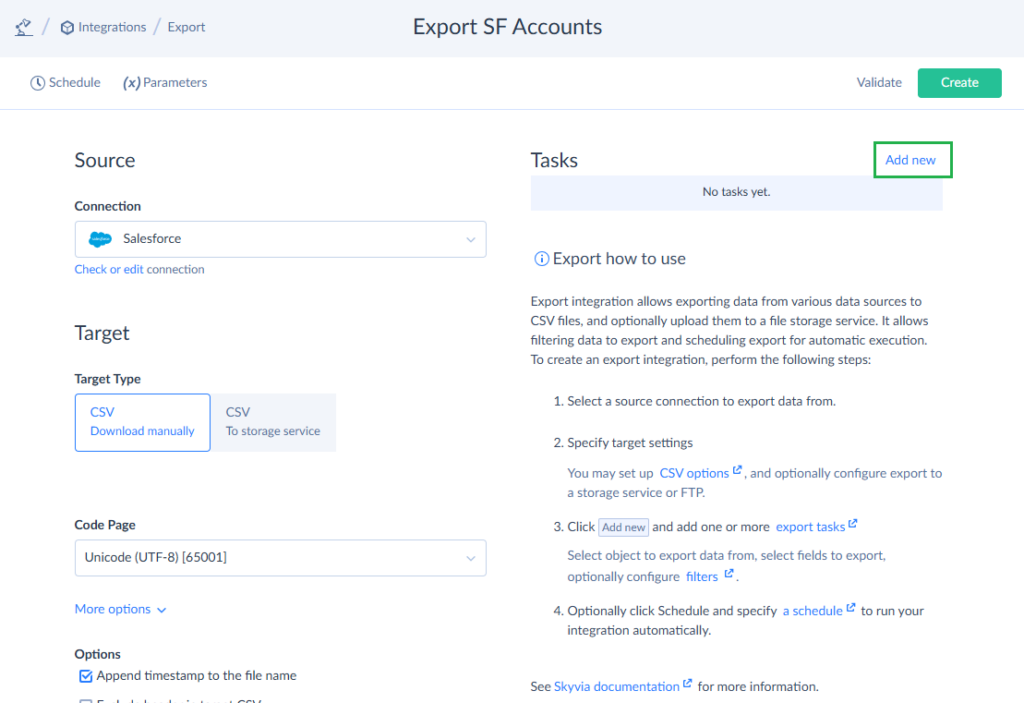
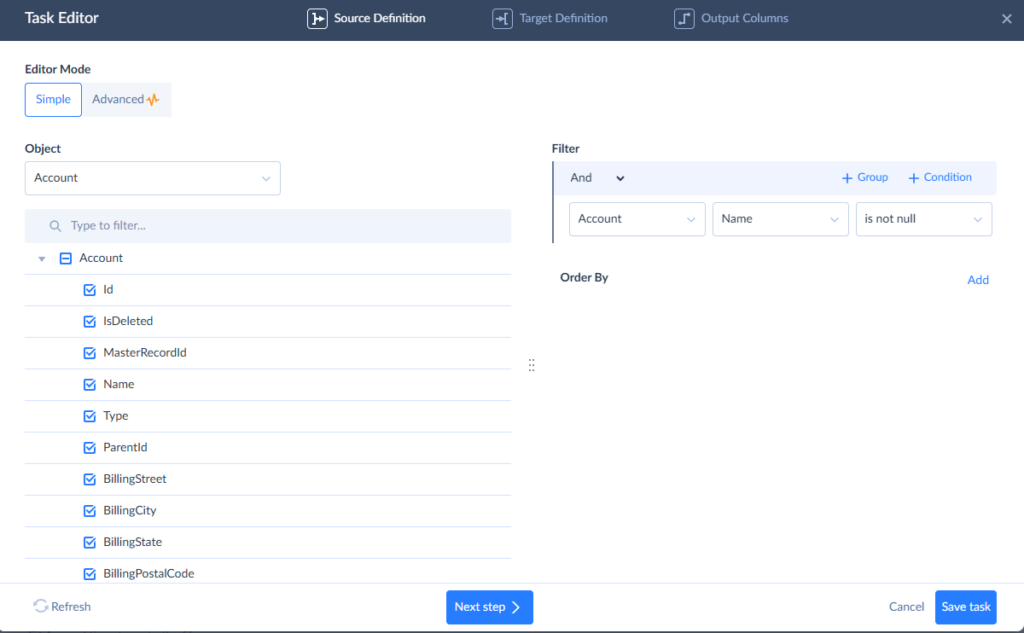
- Choose the Account object, select columns to export, and apply filters if needed.
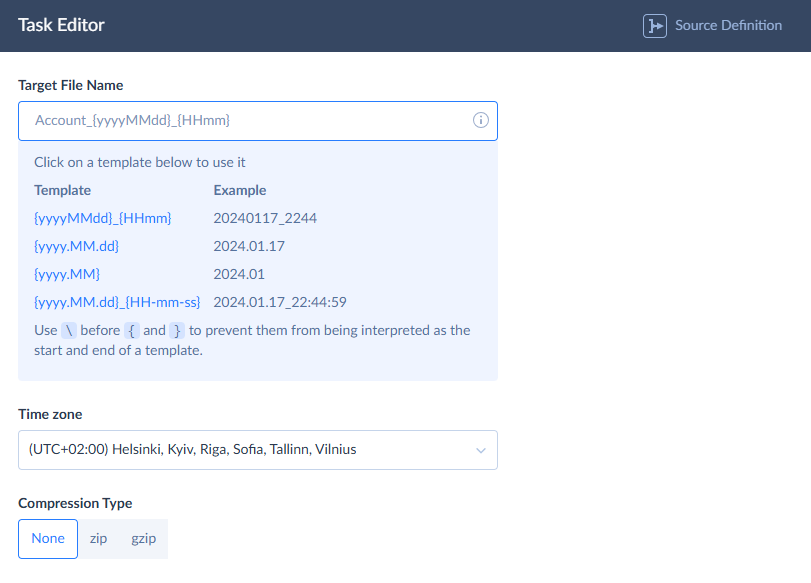
- If you want to automate the uploads, select the template for the file name.
- Run immediately or Schedule automatic exports.
Best Practices
- Automate exports for regular backups.
- Apply filters to export only necessary records.
Mass Deleting Salesforce Data
Here you’ll learn how to mass delete Salesforce records safely with Skyvia. We will cover a case of deleting a lead list with a CSV file.
Step-by-Step Guide
Step 1. Create a connection to Salesforce
- Log in to Skyvia and click Create new > Connection
- Find Salesforce in the list and set up a connection as described above.
Step 2. Create an Import task
- Prepare a CSV file with the leads you want to delete. The file should contain the record’s unique identifiers.
- Click Create New > Import.
- Select your Data Source – CSV upload manually.
- Select the Salesforce connection as a target.
- Click Add New.
- Drop your CSV file into the Source area and check the CSV separator.
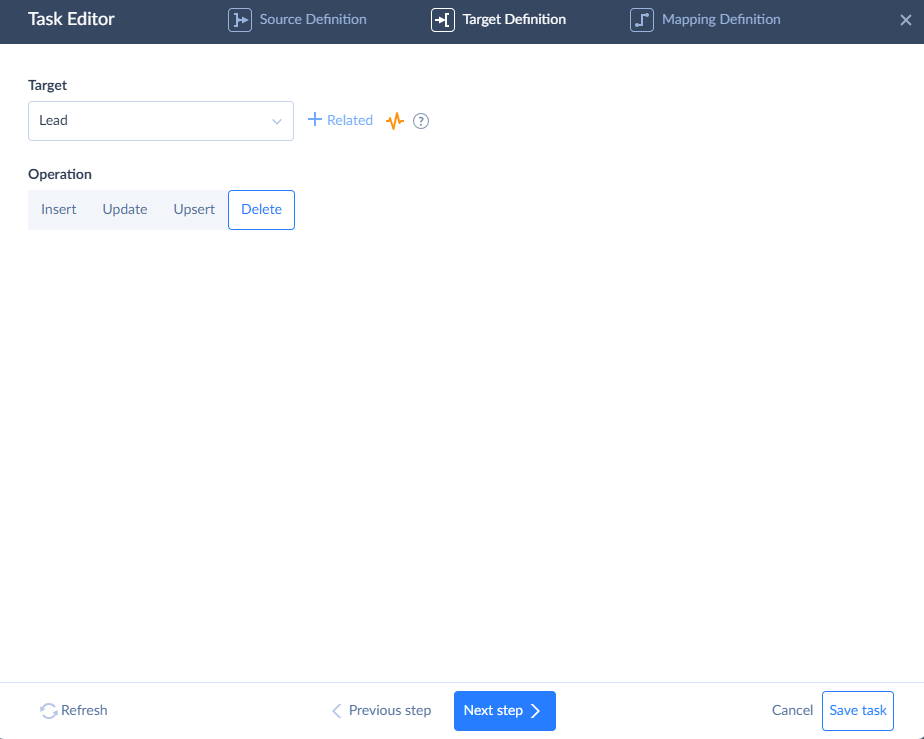
- Next, select the Lead object and the Delete operation.
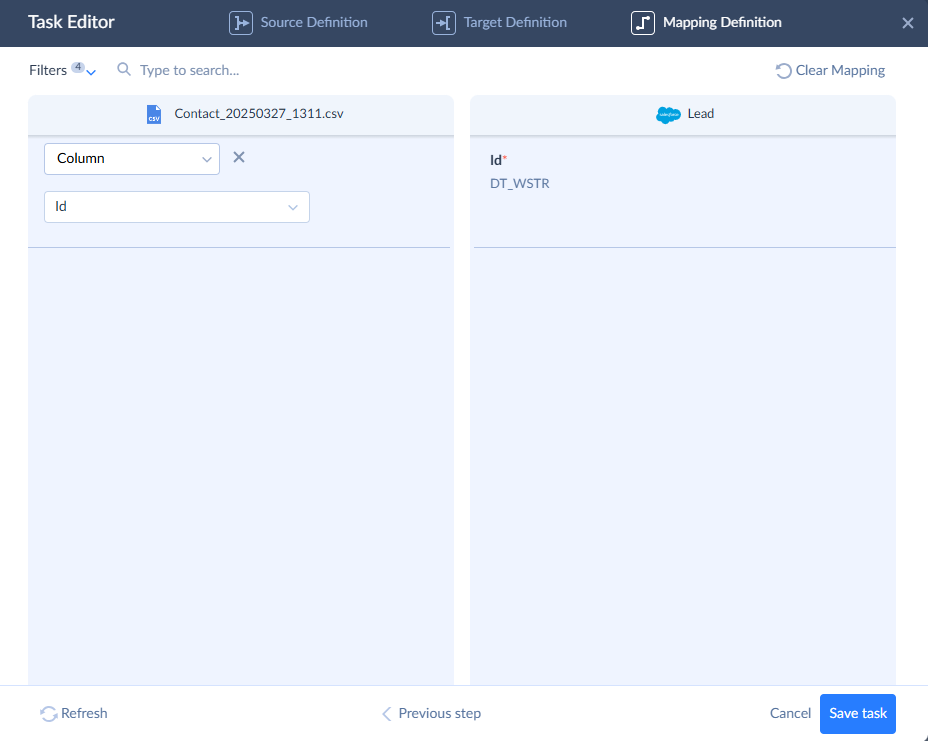
- Map the ID column from your file to the corresponding field in Salesforce.
- Save the task.
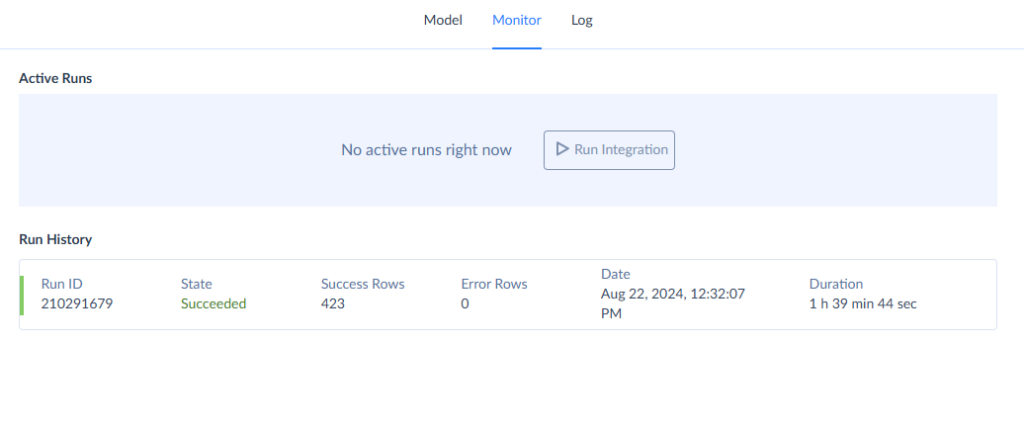
- Click Run to start the deletion.
- Check the results on the Monitor and Log tabs.
Best Practices
- Always backup your information before deleting it.
- To get a .CSV file with record IDs, you can export it with Skyvia using filters or complex queries, as described above. Carefully review the .CSV file to avoid accidental deletions.
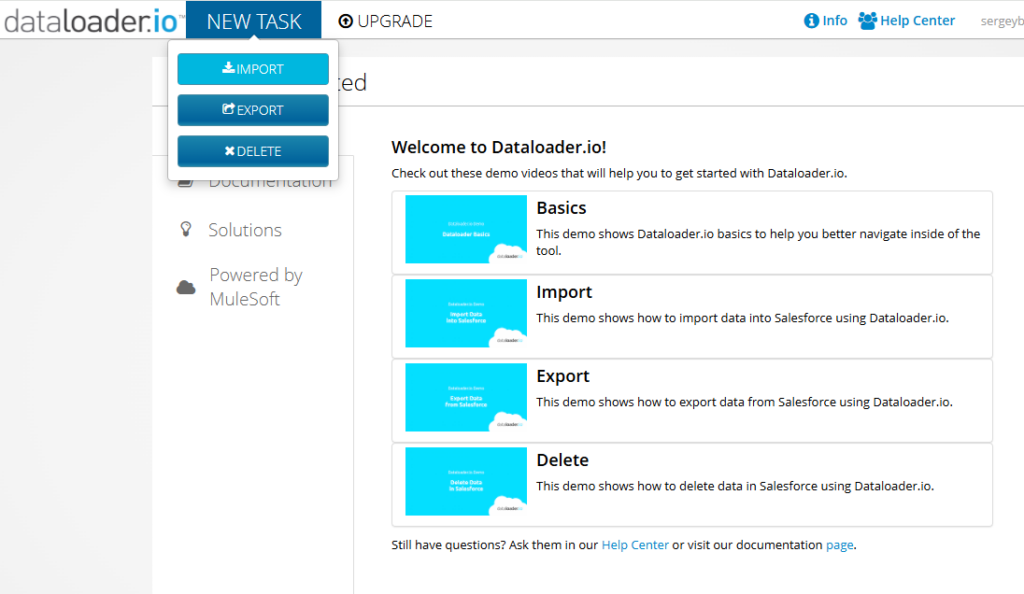
Dataloader.io
Dataloader.io is a cloud tool developed by MuleSoft for importing, exporting, and deleting data. It offers a simple web interface that allows users to map fields, schedule jobs, and automate data tasks without installing software. It also supports OAuth authentication and direct integrations with cloud storage services.
Best For
- Small businesses needing to perform quick bulk operations.
- Users who need a no-install solution.
- Teams looking for simple scheduled automation.
Key Features
- Web-based; no installation required.
- Supports Import, Export, and Delete operations with basic field mapping.
- Scheduled automation capabilities.
- Direct cloud storage integrations (Dropbox, Box).
- Secure OAuth authentication – users can log in with their Salesforce credentials.
Cons
- Limited features in the free plan.
- No advanced transformations or complex data processing.
- No additional cloud integrations except Salesforce.
Importing Data to Salesforce
In this guide, we’ll walk you through two essential use cases with Dataloader.io: importing from a CSV file into Salesforce (using the Contacts object as an example) and exporting data, such as account records, for backup or business intelligence tasks. These scenarios reflect common needs like syncing leads from marketing campaigns or generating external reports for stakeholders.
Let’s start by importing a contact list.
Step-by-Step Guide
- Log in to Dataloader.io and start a new Import Task.
- Select the operation type and the object you want to import data into.
- Upload your CSV file.
- Map fields between your CSV and Salesforce object.
- Review your task summary and select either the Bulk API or Batch API based on your needs.
- Finally, click Save to keep your task for later or schedule it, or Save and Run to execute it immediately.
Best Practices
- Verify and clean the CSV before importing.
- Choose the right API mode – use Bulk API for large datasets and Batch API for lower-volume tasks.
- Perform a dry run to verify that all mappings are correct and data formats align.
Exporting Data from Salesforce
Let’s see how to export records from Salesforce to a CSV file using Dataloader.io. We’ll use the Accounts object as an example.
Step-by-Step Guide
- Log in to Dataloader.io and start a new Export Task.
- Select the Account object, check the columns to export, and apply filters if needed.
- Select the cloud connection to save the file, if needed.
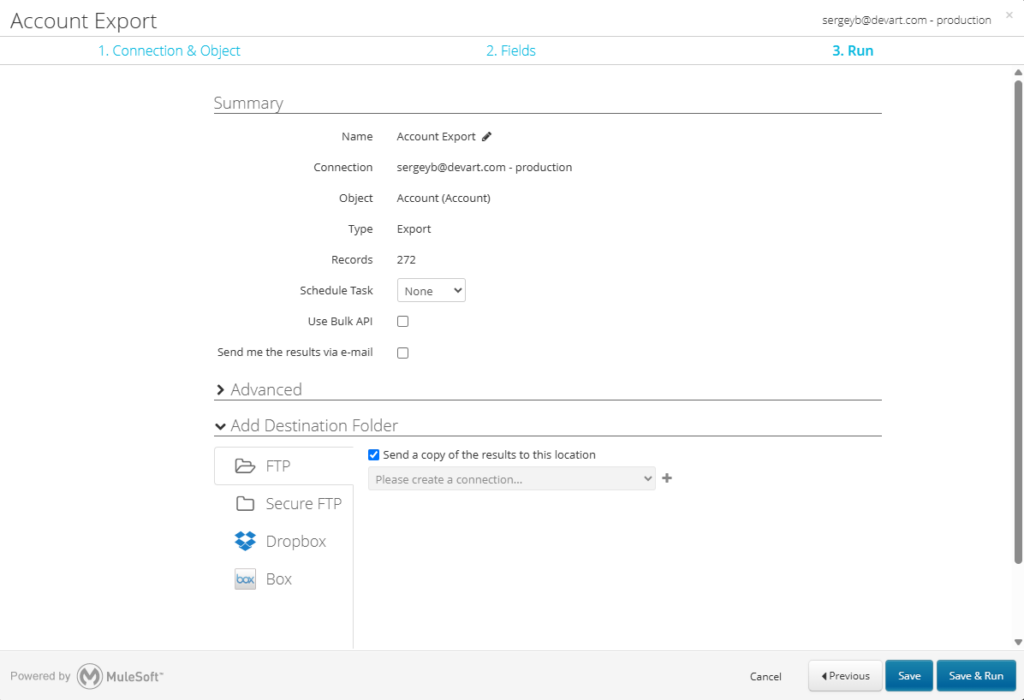
- Click Save to keep your task for later or schedule it, or Save and Run to execute it immediately.
Best Practices
- Automate exports to ensure regular data backups.
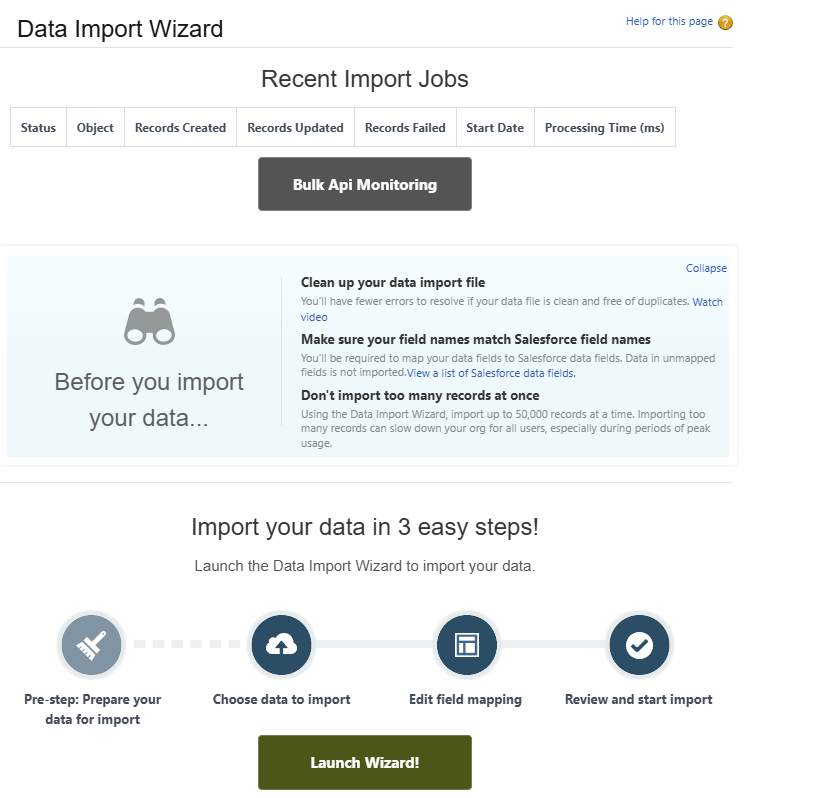
Data Import Wizard
The Data Import Wizard is a built-in tool that provides a user-friendly approach for importing certain information directly within Salesforce. It is primarily suited for importing standard objects like Leads, Accounts, Contacts and selected custom objects. It provides a guided, step-by-step process for uploading CSV files and mapping fields and supports uploads of up to 50,000 records per import.
Best For
- Users who need a simple and guided import process with no additional software.
- SF admins handling occasional bulk imports.
- Small to mid-sized businesses with moderate data import needs.
Key Features
- Built directly into Salesforce.
- Supports standard objects and select custom objects.
- Simple, guided field-mapping process and duplicate detection.
- No installation or setup required.
- Handles up to 50,000 records per import.
Cons
- Limited to 50,000 records per import.
- No scheduling and automation options.
- Lacks advanced transformation and ETL capabilities.
Importing Data to Salesforce
Let’s see how to import accounts and contacts using the Data Import Wizard.
Step-by-Step Guide
- Login to Salesforce and type Data Import Wizard in a search bar.
- Click Launch Wizard.
- Choose Accounts and Contacts object and the way to match the fields.
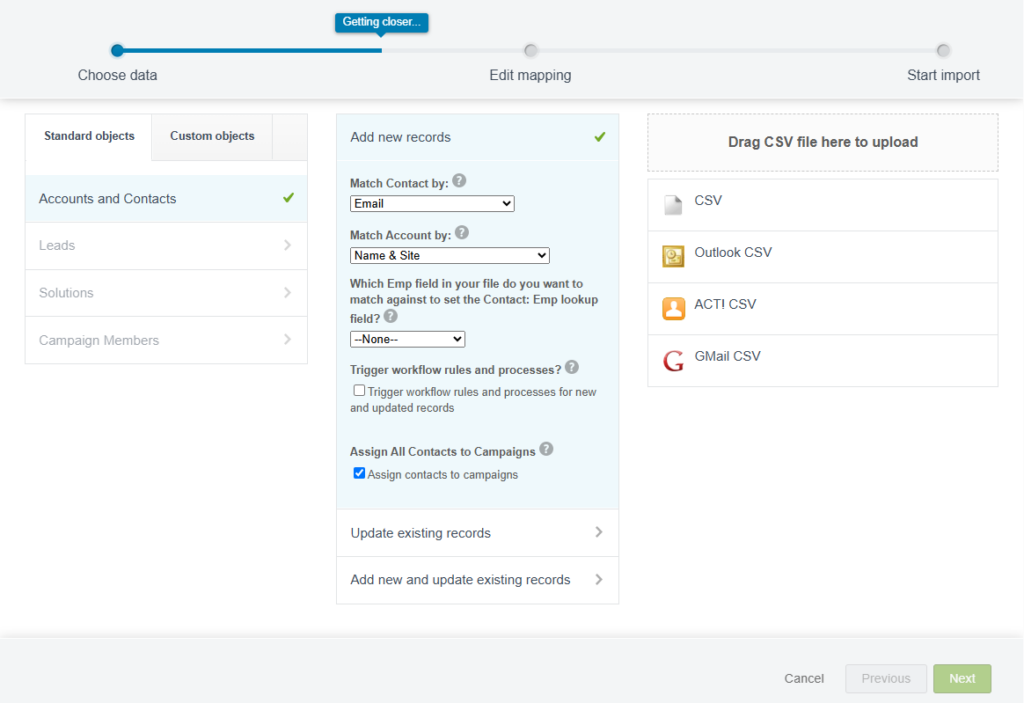
- Upload your CSV file and select a value separator.
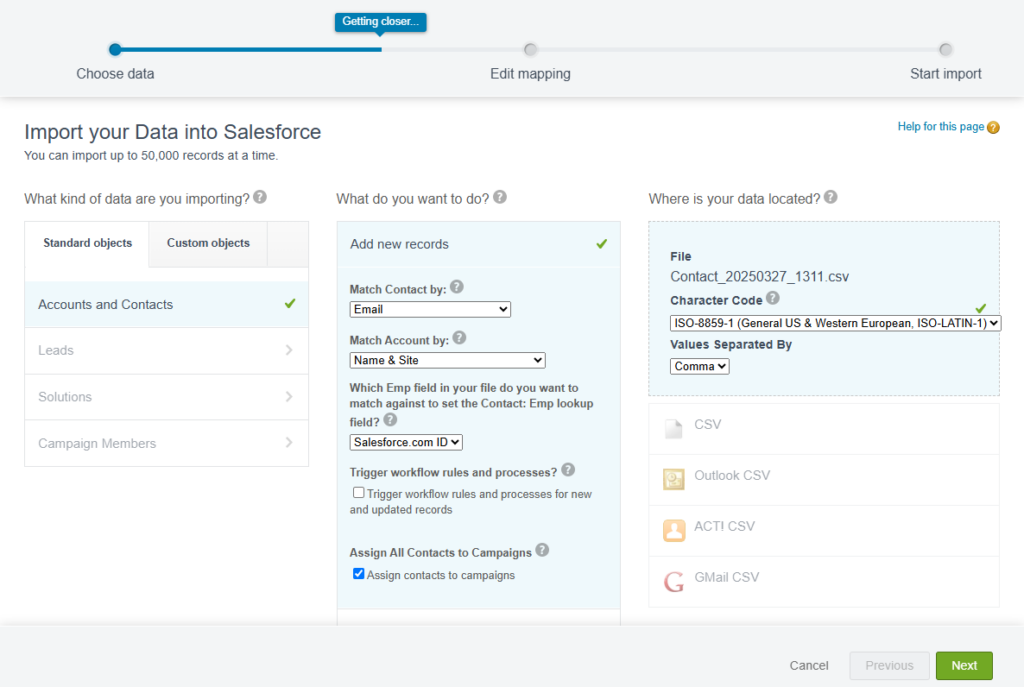
- The wizard will auto-map fields between your CSV file and Salesforce. Review the mappings and make adjustments if necessary.
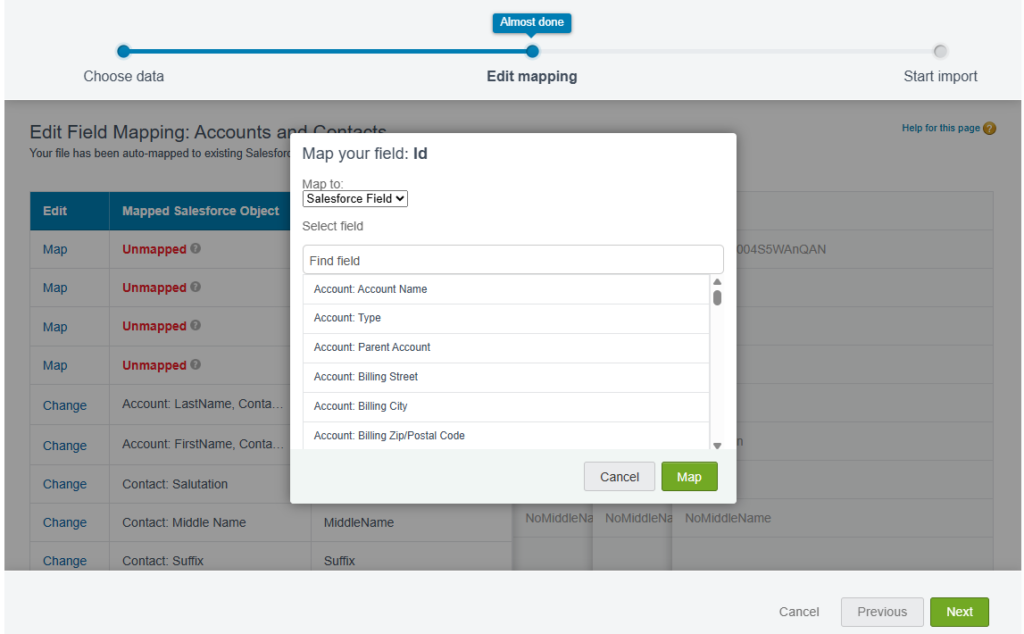
- Once field mapping is complete, review the summary. If everything looks good, click Next, then Start Import to begin the process.
Once the import is complete, check the status to ensure all records were imported successfully. The system will display any errors or skipped records so you can address any issues.
Best Practices
- Follow the recommendations to prepare the data.
- Don’t run several import jobs simultaneously, even if they are in different browser windows.
Workbench
Workbench is a web-based tool used by Salesforce developers and administrators for advanced data operations. Workbench gives a flexible way to to manage data, troubleshooting, and testing processes. It connects to Salesforce using REST and SOAP APIs and can run complex SOQL queries, perform bulk operations (insert, update, upsert, delete), execute Apex code and manage metadata.
Best For
- Developers and admins who need API-level access to SF data.
- Users comfortable with SOQL queries and bulk operations.
Key Features
- Web-based tool for API access and data management.
- Supports Bulk API operations: Insert, Update, Upsert, Delete, and Export.
- Advanced SOQL and SOSL query execution.
- Metadata API access for managing objects and fields.
- Free to use.
Cons
- No user-friendly interface compared to other tools like Skyvia.
- Workbench has not been officially tested or documented.
- Requires familiarity with Salesforce APIs and SOQL.
Exporting Salesforce Data via SOQL Queries
In this section, we will show how to use Workbench to perform an export from Salesforce using SOQL queries.
Step-by-Step Guide
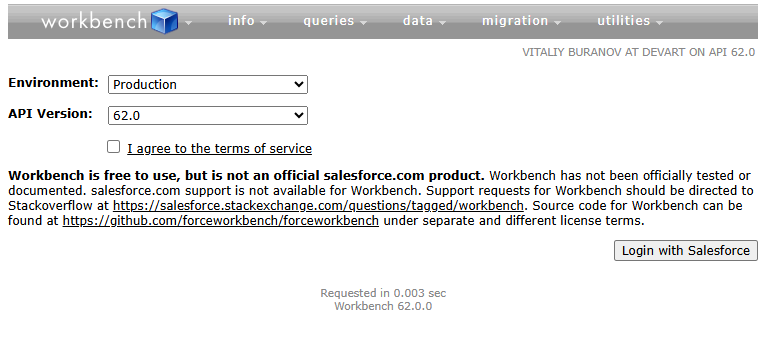
- Log in to Workbench.
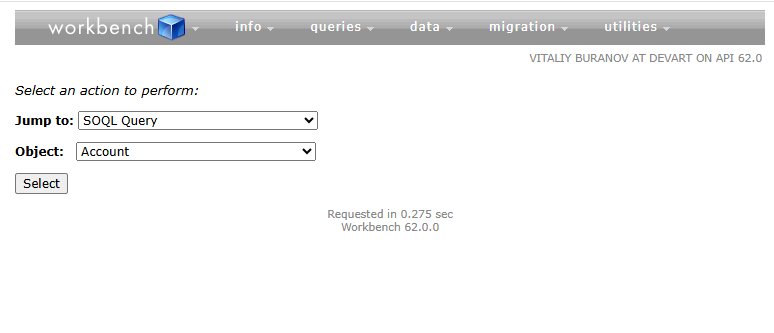
- Navigate to Jump to > SOQL Query and select the object to export data.
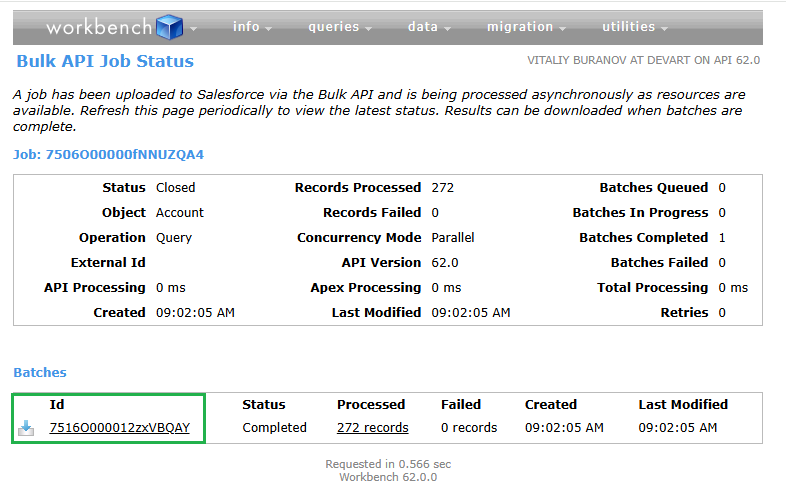
- Write and execute your custom query (e.g., SELECT Name FROM Account). Sort and filter records, if needed.
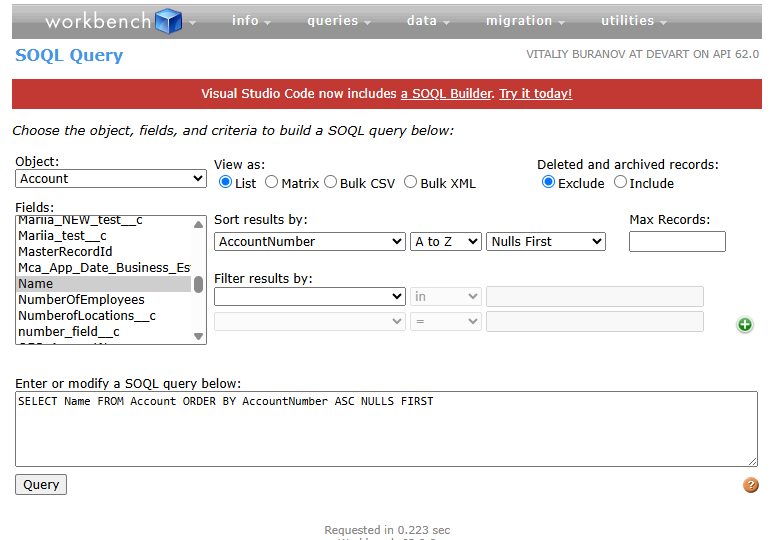
- Select Bulk CSV and click Query.
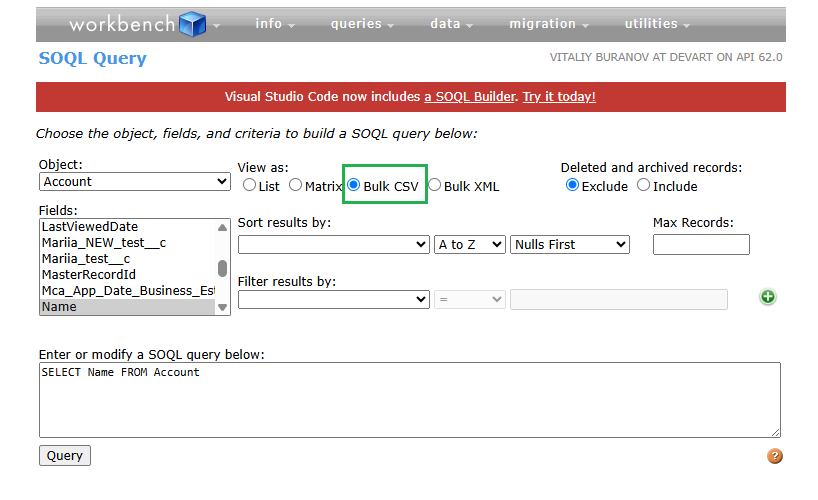
- Download results as a CSV file by clicking on its name.
Best Practices
- Troubleshoot issues with Debug Logs feature.
- Use Metadata API to create, update, or delete custom objects and fields.
- Use the Apex Execute feature to run Apex scripts for automating tasks and processes.
Bulk Insert Salesforce Data
Now let’s show how to use Workbench to import a contact list to Salesforce.
Step-by-Step Guide
- Log in to Workbench.
- Select the Insert action and a Salesforce object.
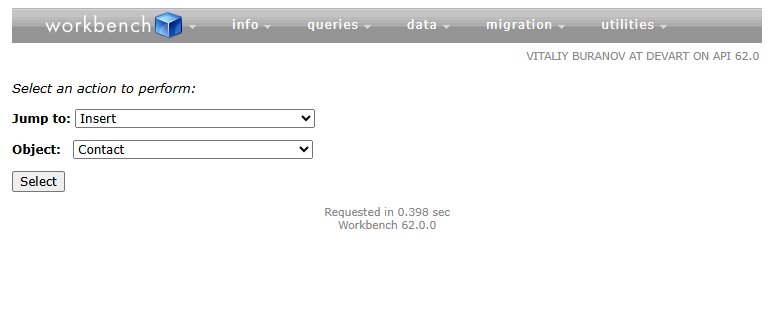
- Select a correctly formatted CSV file.
- Map fields, verify mappings, and click Confirm Insert.
Best Practices:
- Always preview field mappings carefully.
- Consider using Bulk API mode for large-volume operations.
Use Cases for Salesforce Data Loading
Knowing what a tool does is only half the story, but seeing how it transforms raw data into business intelligence is where the magic happens. After exploring the ins and outs of Salesforce data loaders, let’s walk through real-world scenarios where they move the needle for teams and organizations.
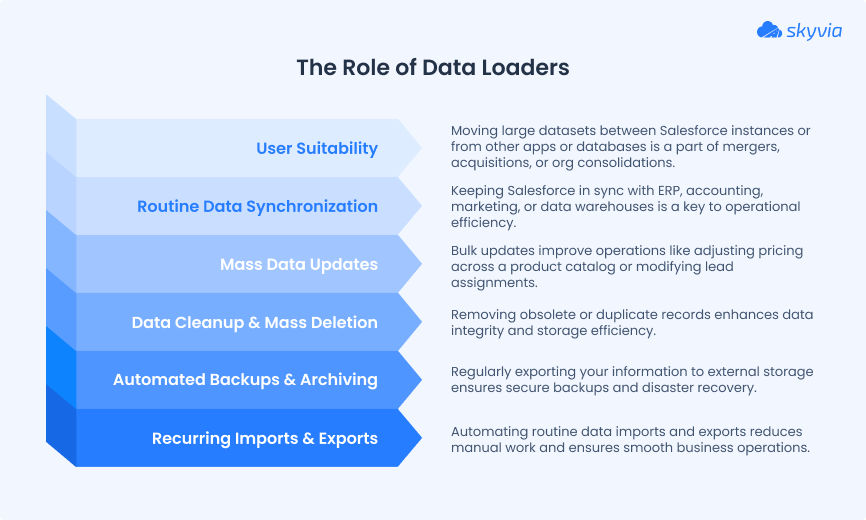
1. Data Migration
Moving large datasets between Salesforce instances or from other apps or databases is a part of mergers, acquisitions, or org consolidations.
- Cirrus Insight used Skyvia for a Salesforce to Salesforce migration to consolidate operations into a single organization while preserving customer data.
- A4 International migrated client data from an external SQL Server-based system (Streamics) into Salesforce, providing a smooth transition.
2. Routine Data Synchronization
Keeping Salesforce in sync with ERP, accounting, marketing, or data warehouses is a key to operational efficiency.
- A real estate company established a two-way sync between Salesforce, MS SQL, and Mailchimp, ensuring up-to-date records across all platforms.
- A4 International set up hourly syncs between Streamics (SQL Server) and Salesforce, giving the sales team real-time insights.
3. Mass Data Updates
Bulk updates improve operations like adjusting pricing across a product catalog or modifying lead assignments.
- Cirrus Insight automated data transfers from Stripe to Salesforce, to ensure always-updated customer and subscription records.
4. Data Cleanup & Mass Deletion
Removing obsolete or duplicate records enhances data integrity and storage efficiency.
5. Automated Backups & Archiving
Regularly exporting your information to external storage ensures secure backups and disaster recovery.
- Dale Carnegie, a global leadership training company, used Skyvia to replace Salesforce’s internal backup system as their business expanded.
6. Recurring Imports & Exports
Automating routine data imports, such as daily lead uploads, and exports, like nightly report generation, reduces manual work and keeps the business running smoothly.
- GOintegro integrated MySQL with Salesforce with Skyvia to improve internal processes.
Comparing Salesforce Data Loaders & Choosing the Right One
| Criteria | Salesforce Data Loader | Skyvia | Dataloader.io | Data Import Wizard | Workbench |
|---|---|---|---|---|---|
| Installation | Desktop App | Cloud-Based | Web-Based | Built-in | Web-Based |
| Pricing | Free | Free & Paid Plans (per account) | Free & Paid Plans (per user) | Free | Free |
| Max Number of Records | 5 Million | 10,000/month (Free), Unlimited (Paid) | 10,000/month (Free), Unlimited (Paid) | 50,000 per import | Limited by API |
| Bulk Processing | ✅ Yes | ✅ Yes | ✅ Yes | ❌ Limited | ✅ Yes |
| Automation | ✅ CLI Scripts | ✅ Built-in Scheduler | ✅ Scheduled Jobs | ❌ No | ✅ Via Apex |
| Connectors (Beyond CSV) | ❌ No | ✅ 200+ (Cloud Apps, File Storages, Databases, etc.) | ✅ Cloud Storage | ❌ No | ✅ SOQL Query |
| Number of Salesforce Connections | 1 | ✅ Unlimited | 1 (Basic & Pro), 10 (Enterprise) | 1 | 1 |
| Error Handling | Logs | Automatic Handling & Logs | UI-Based Reports | Basic Errors | Manual Review |
| Best For | Admins & Devs handling bulk data | Both non-tech & tech users needing integrations | Small businesses & web-based imports | Basic imports for business users | Devs & Admins using SOQL & APIs |
Common Errors & Troubleshooting
Data loading is like a moving day: organized chaos is still chaos. Even the best tools can stumble into a lost field or hit a locked door. Here are the usual suspects for failed data loadings and the smart fix ideas:
- Invalid Field Mappings – check field names in your CSV so they match Salesforce.
- Duplicate Records – use deduplication rules or an Upsert operation to avoid clones.
- API Limits Exceeded – check your API usage and consider batch processing.
- Permission Errors – verify user permissions and object access in Salesforce.
- Bulk API Failures – if Bulk API jobs fail, try switching to Batch API for better control.
Conclusion: Choosing the Right Data Loader for Your Needs
As businesses grow, so do their data challenges. The right data loader not only simplifies current tasks but also scales with your needs, working in the long run. We compared the most popular tools – each of them has its strengths, from the simplicity of the Data Import Wizard to the advanced automation of Skyvia. To choose the best data loader, assess your data complexity, volume, integration needs, and automation requirements.
- Salesforce Data Loader – best for performing bulk data operations and CLI-based automation.
- Skyvia – ideal for integrations, automated data tasks, and multi-user environments.
- Dataloader.io – suitable for web-based simple imports and exports.
- Data Import Wizard – quick, occasional data uploads directly within Salesforce.
- Workbench – preferred for developers and advanced admins needing powerful SOQL queries and bulk API operations.

F.A.Q. for Salesforce Data Loaders

What are the main advantages of using tools like Salesforce Data Loader or Skyvia compared to the built-in Data Import Wizard?
Salesforce Data Loader and Skyvia handle much larger data volumes (up to 5 million records), support more operations (update, upsert, delete, export), offer advanced mapping, and can automate or schedule recurring tasks-features not available in the basic Data Import Wizard.
Can I use these tools for complex operations like mass updates or deletions, and are there specific tool recommendations for these actions?
Yes, both Salesforce Data Loader and Skyvia support complex operations like mass updates and deletions. They allow you to select records by ID or criteria and perform bulk changes efficiently.
What are the crucial data preparation steps I should take before using any Salesforce data loader to ensure a smooth process?
Prepare a clean, well-formatted CSV file, ensure accurate field mapping to Salesforce objects, check for duplicates or data errors, and verify that required fields (like IDs for updates/deletes) are included.
Which of the mentioned data loaders offer automation or scheduling features for recurring data tasks?
Salesforce Data Loader offers scheduling via its command-line interface, while Skyvia provides user-friendly, cloud-based scheduling for automated imports and exports without requiring coding or server setup.
How do tools like Workbench differ from others like Salesforce Data Loader or Skyvia, and when should I consider using it?
Workbench is a web-based tool focused on SOQL/SOSL queries, metadata exploration, and ad hoc data management. It’s ideal for developers or admins needing to run queries, explore metadata, or perform one-time data tasks, while Data Loader and Skyvia are better for bulk, recurring, or automated data operations.
