

Manually updating Salesforce with CSV files is like trying to feed a high-speed engine with a spoon. It’s slow, clunky, and way too easy to mess up. Miss a field mapping, drop a required value, or upload the wrong format, and suddenly, your CRM is a mess of duplicate leads or missing contacts.
However, most teams live and breathe CSVs. Whether you’re uploading leads from a trade show, syncing product lists, or bringing in records from legacy systems, getting that data into Salesforce is non-negotiable.
The good news? You’ve got options.
This guide walks you through three of the easiest ways to import CSV data into Salesforce. From built-in tools to more automated, no-code options like Skyvia. We’ll break down what works best for one-time uploads, scheduled syncs, large files, and non-technical users so you can pick the right fit without wasting time or pulling your hair out.
Ready to make CSV imports simple (and actually reliable)? Let’s go.
Table of Contents
- Why Bother Importing CSVs to Salesforce?
- Prepping Your CSV File: The Foundation for a Smooth Import
- Methods for Import Data from CSV into Salesforce
- Method 1: Salesforce Data Import Wizard
- Method 2: Salesforce Data Loader
- Method 3: Third-Party Tools
- Common Challenges When Importing CSVs to Salesforce and How to Solve Them
- Conclusion
Why Bother Importing CSVs to Salesforce?
Manually creating records one by one in Salesforce is a full-time job no one wants. Importing CSVs is the fastest way to get bulk data into Salesforce without frying your brain or your budget.
Here’s why teams rely on CSV imports every day:
- Bulk record creation and updates. Just got back from a trade show with 2,000 new leads? Launching a product catalog with 500 SKUs? CSV imports let you drop all that data into Salesforce in one go instead of copy-pasting your life away.
- Data migration from other systems. Moving off a legacy CRM or pulling customer data from spreadsheets? Importing a CSV is often the smoothest path to bring that historical data into your Salesforce org without starting from scratch.
- Enriching what you already have. Want to add new fields to existing contact or account records? CSV imports make it easy to update and enhance data without causing any issues, as long as you map the fields correctly.
- Keeping data clean and consistent. With scheduled or regular imports, you can sync updates from other systems (like ERPs, spreadsheets, or email lists) and ensure your Salesforce database stays current and consistent.
In short, CSV imports are the glue between your data chaos and a usable CRM. Now, let’s explore the easiest ways to actually get it done right.
Prepping Your CSV File: The Foundation for a Smooth Import
Most import failures don’t happen during the import. They occur before you hit upload. If your CSV isn’t clean and structured right, Salesforce will throw errors faster than you can say “field mismatch.”
Before diving into any tool, take a few minutes to prepare your CSV file. Here’s what matters:
- Correct format. Ensure it’s saved as a .csv (comma-separated values) file. No fancy Excel formulas or tabs. Just plain, clean data.
- Clean it up. Remove duplicates, fix typos, and standardize elements like date formats and phone numbers. Sloppy inputs mean a messy CRM.
- Required fields. Check which Salesforce fields are mandatory for your object (e.g., Lead, Contact, Account). Your CSV needs matching columns, or it’ll break during import.
- Headers matter. Include a header row with column names. They don’t have to be an exact match to Salesforce field names, but they should be mappable. Something like Email instead of customer contact.
- Match data types. If a Salesforce field expects a number, don’t feed it text. If it’s a picklist, make sure the value exists in Salesforce. Otherwise, you’re in for some ugly errors.
- File size and record limits. Standard Salesforce imports cap at 50,000 records or 10MB per file (depending on the tool). For larger loads, you’ll want to batch or use an integration tool.
- Special characters and encoding. Save your CSV file in UTF-8 to avoid garbled names, accents, or symbols, especially when working with international data.
Tip: Not sure what your fields should look like? Export a few sample records from Salesforce first. That’ll show a clean template to follow and way fewer surprises on import day.

Methods for Import Data from CSV into Salesforce
You’ve got the CSV prepped and ready. Now, the big question: What’s the best way to get it into Salesforce without a migraine?
There’s no one-size-fits-all answer. The right import method depends on:
- How often you perform this task.
- The amount of data you’re working with.
- How hands-on you want (or don’t want) to be.
Some tools are built into Salesforce. Others offer more automation, flexibility, or scalability.
Here’s a quick rundown of the most popular options.
| Method | Best For | Ease of Use | Automation | Pros | Cons |
|---|---|---|---|---|---|
| Data Import Wizard | New users, basic imports. | Very beginner-friendly. Point, click, upload. | Manual only. | Built-in, simple UI, no setup. | Limited to standard objects and smaller datasets. |
| Data Loader | Power users, larger data volumes. | Command-line optional, UI is dated. | (via CLI or schedule). | Handles big files, more object support. | Requires install, steeper learning curve. |
| Third-Party Tools | Growing teams, recurring imports, advanced use cases. | Varies: some are no-code (e.g., Skyvia), others (like Talend, Apache NiFi, or Hevo) need setup/scripting. | Full automation supported. | Flexible, can integrate multiple sources, scheduling, transformations. | Some tools have a learning curve or require paid plans. |
If you’re just doing a quick one-off import, Salesforce’s built-in tools will get the job done.
However, data integration platforms like Skyvia give a serious upgrade without requiring coding. If you:
- Manage growing data flows.
- Perform regular imports.
- Want to connect Salesforce with other platforms long-term.
Next, let’s break down how each method works so you can choose the one that best fits your team.
Method 1: Salesforce Data Import Wizard
Best for
The Salesforce Data Import Wizard is your go-to if you’re just starting out with Salesforce or if you’re only working with basic data imports like
- Contacts.
- Leads.
- Accounts.
It’s perfect for smaller batches of data, occasional imports, or for teams who aren’t super tech-savvy but still need to get things done.
Step-by-Step Guide
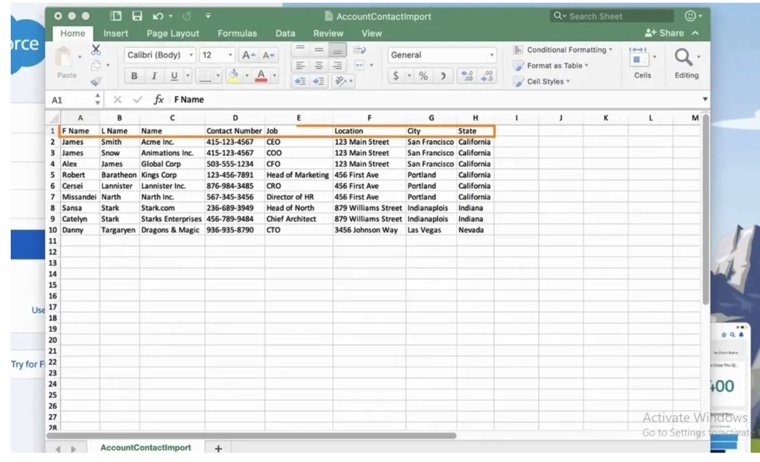
- Ensure your CSV file is clean and ready to go. The columns should match Salesforce field names or be easily mappable.
- From your Salesforce dashboard, navigate to Setup and search for Data Import Wizard. Click Launch Wizard to open the tool.

- Select the Salesforce objects you want to import data for. Select the Standard Objects option for Leads, Contacts, or Accounts. Click Custom Objects for another data type.
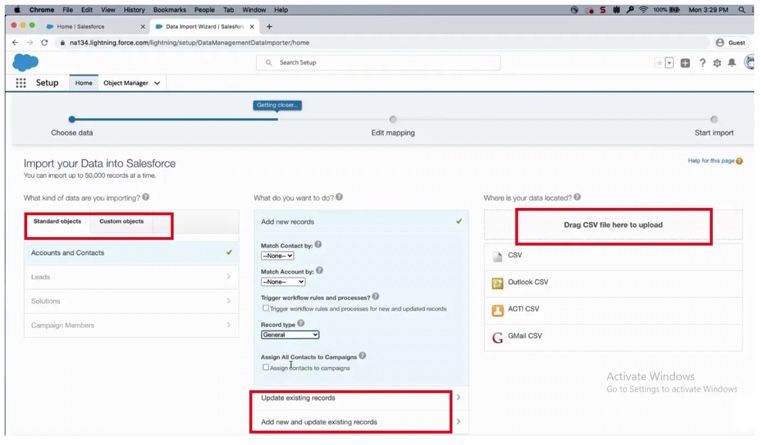
Note: On this step, you can add new and update existing records at the same time and specify matching criteria (like name, which is case-sensitive for custom objects) if needed. The wizard will automatically detect the structure and guide you through the process.
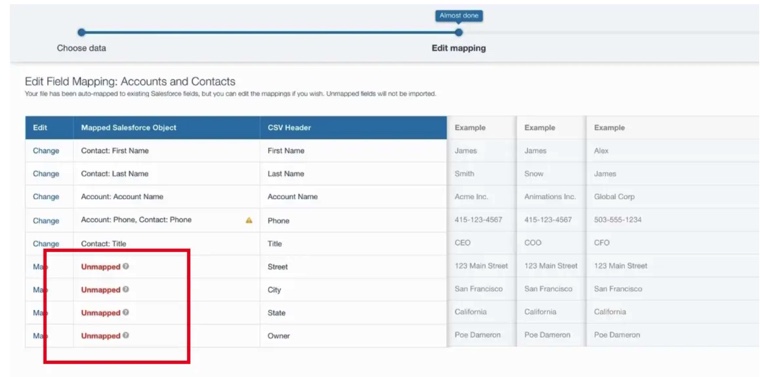
- Ensure each column in your CSV maps correctly to a Salesforce field. You can manually adjust up to 10 mismatches here.
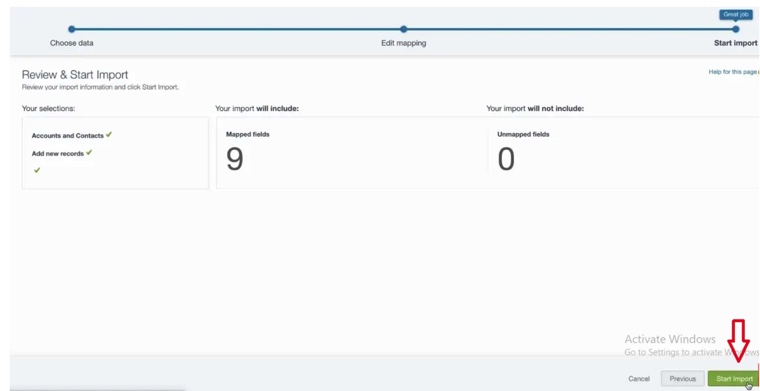
- Once everything looks good, hit Start Import and let the wizard process your file. You’ll get a detailed report on errors or successes once it’s done.
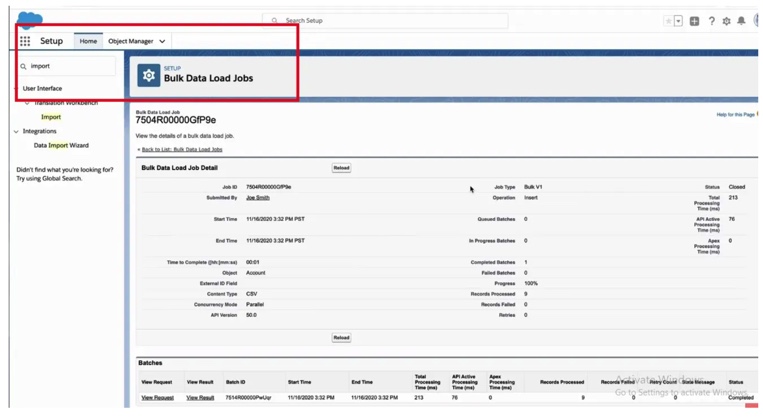
- When the import is running, you can track its status in the following three ways:
- Recent Import Jobs chart on the Data Import Wizard homepage.
- Bulk Data Load Jobs section of the Setup menu (this option isn’t available in the Professional Edition).
- Updates tab (perfect for non-admin users to monitor import progress).
Pros
- Easy to use. The Data Import Wizard is user-friendly. It’s perfect for those who like not complicated tools or coding.
- Built-in. No need for third-party software. It’s already integrated into Salesforce, so you don’t have to worry about external apps or extra costs.
- Quick setup. Setting up an import is fast and intuitive. A great choice for occasional, one-time imports.
- Basic field mapping. Even if you’re not familiar with Salesforce’s internal structure, the field mapping process is simple and guided.
Cons
- No automation. It’s a one-and-done deal. There’s no way to schedule recurring imports or automate the process with this tool.
- Limited error handling. While you do get a report after the import, it’s not as detailed or flexible as some other tools. Troubleshooting can be more manual and time-consuming for large imports.
- File size limits. It’s not built to handle massive files. If you’re working with tens of thousands of records or large files, this method might be slow or even fail.
Method 2: Salesforce Data Loader
Best for
If your import job involves larger datasets or requires more customization than the Data Import Wizard can handle, the Salesforce Data Loader is the tool to turn to. It’s a powerful, feature-packed option that gives users full control over their data import process. Whether you’re dealing with millions of records or need to work with custom objects, Data Loader steps up to the challenge.
Step-by-Step Guide
- Download the Salesforce Data Loader from the Salesforce website and install it on your computer. Click here for more details.
- Launch the Data Loader and log in with your Salesforce credentials. You’ll need to connect the tool to your Salesforce instance to get started.
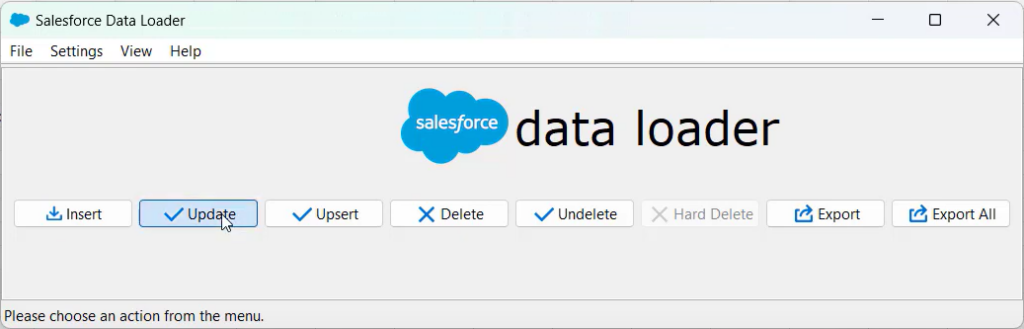
- Select the operation that fits your use case (in this example, inserting contacts).
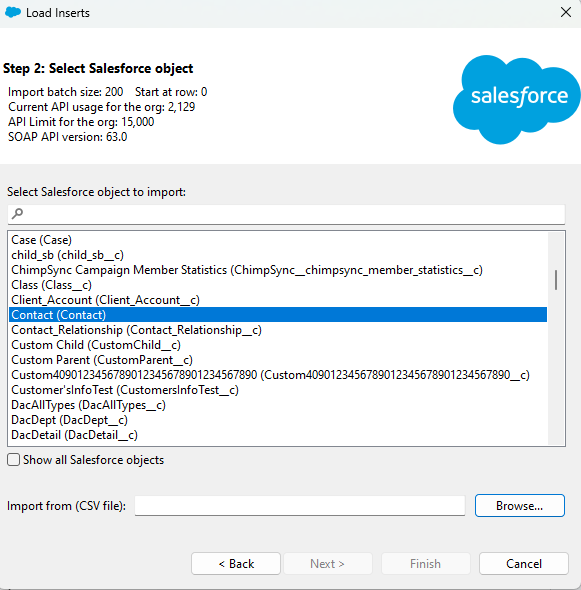
- Choose the CSV file you want to import and map the fields in the CSV to the corresponding Salesforce fields.
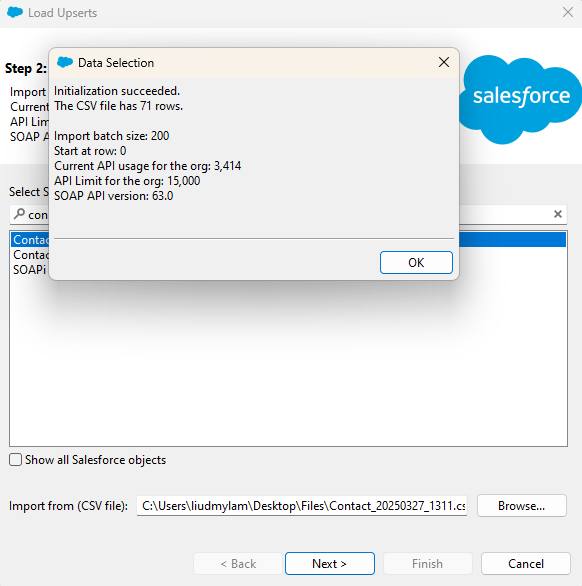
- Once the field mapping is set, hit Next, and the tool will begin processing the data. You’ll be able to monitor the progress and view detailed logs as the import runs.
- After the import is completed, you’ll get a report showing how many records were successfully processed and any errors or warnings to fix issues.
Pros
- Handles large datasets. Unlike the Data Import Wizard, the Data Loader can easily handle millions of records and is more suited for bulk data operations.
- Custom object support. Need to import or update custom objects? Data Loader has you covered.
- Advanced features. Offers more control, like upserting data (insert or update based on matching records) or deleting records.
- Flexible automation. You can schedule imports or run them via the command line, making it easier for recurring tasks.
Cons
- Steeper learning curve. It’s complex enough. New users might find it overwhelming at first.
- Requires installation. The Data Loader isn’t built into Salesforce. You’ll need to download and install it.
- Limited to desktop use. It’s a desktop application, so it’s not as cloud-friendly as other methods and doesn’t work directly from the browser.
- No built-in user interface for error handling. Users must dig into logs to determine where things went wrong.

Method 3: Third-Party Tools
Best for
When a company is scaling up and needs a more automated solution for regularly importing, syncing or transforming data, third-party tools like Skyvia are the perfect fit. They shine when you’re not just dealing with simple imports but rather managing ongoing data flows, complex transformations, or integrations across multiple systems.
If you need something with more power, automation, and flexibility than the built-in Salesforce tools can offer, third-party tools are the way to go.
Step-by-Step Guide
For many businesses, importing external CSV files (e.g., contact lists from trade shows, marketing campaigns, or CRM exports) into Salesforce is a regular task. Skyvia allows automating the process. This is especially useful when handling bulk data updates or initial data migrations.
Let’s walk through the steps:
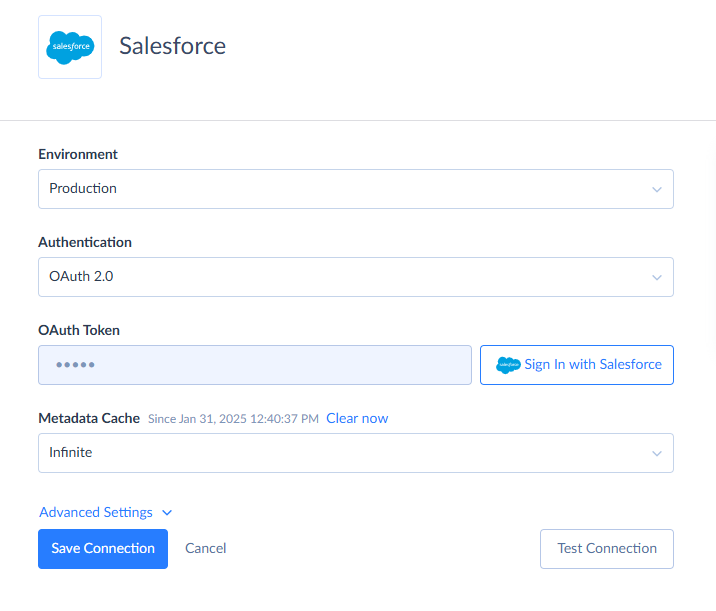
- Log in to your Skyvia account and click + Create New > Connection.
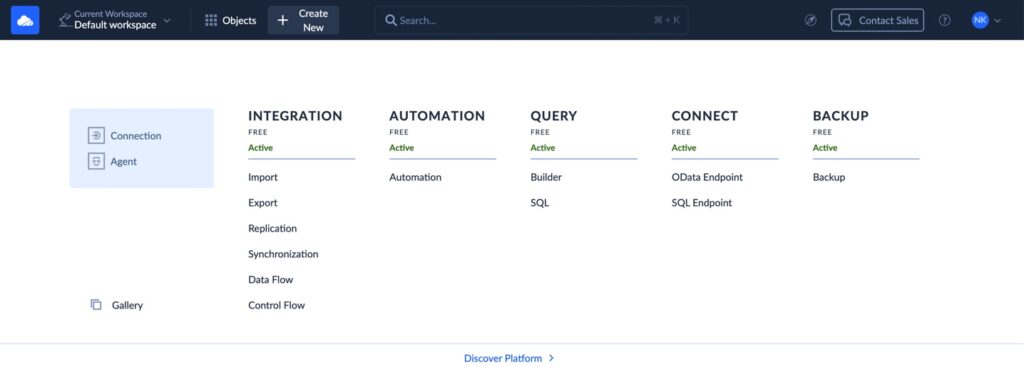
- Choose Salesforce from the list and click Sign in with Salesforce.
- Enter your Salesforce credentials to establish the connection.
- Click + Create New > Import.
- Select CSV (upload manually) as the data source and choose Salesforce as the target. After it, click Add New.
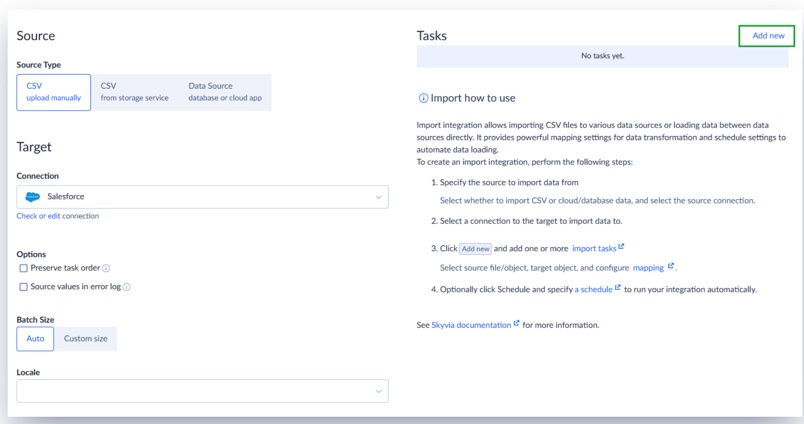
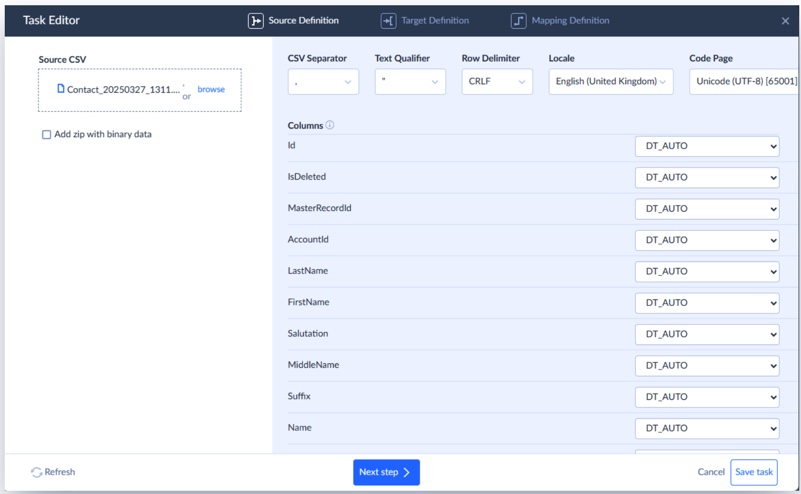
- In the Task Editor, drag and drop your CSV file into the Source area. Double-check the CSV separator for accuracy.
- Select the Contact object and choose the Upsert operation.
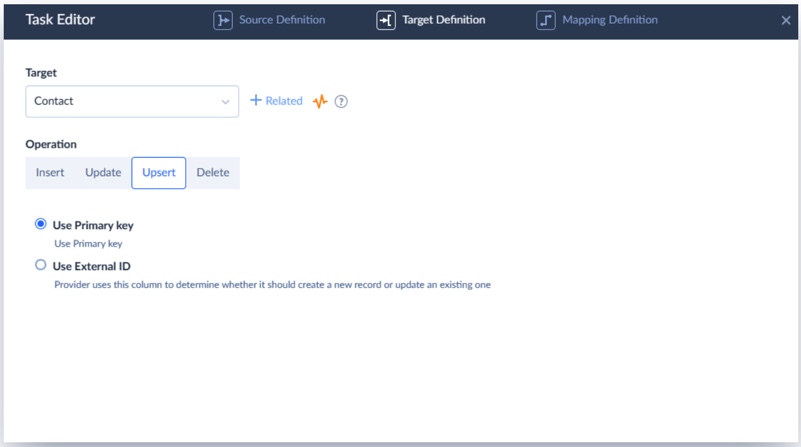
Note: This step ensures only changed records are updated, preventing duplicates
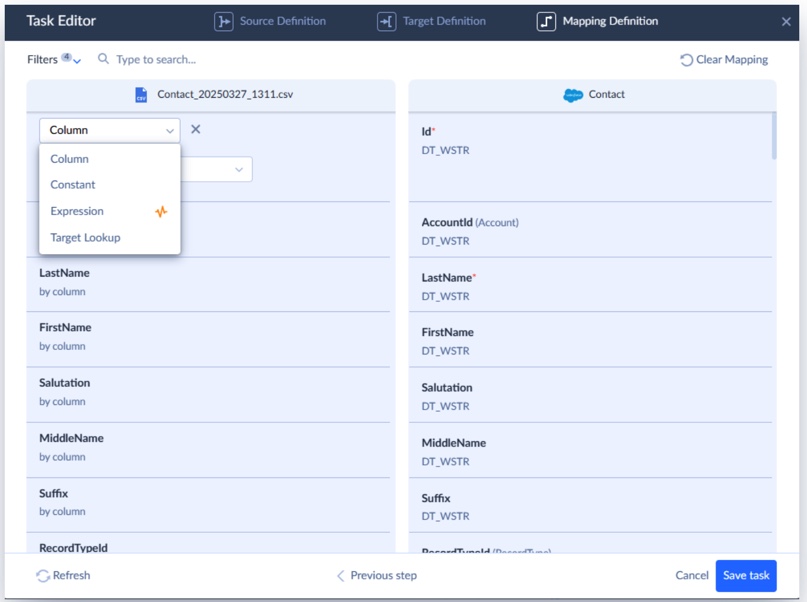
- Skyvia will automatically map fields with matching names between your CSV and Salesforce. For any additional fields, you can manually map them, set constant values, or use expressions for more advanced mapping.
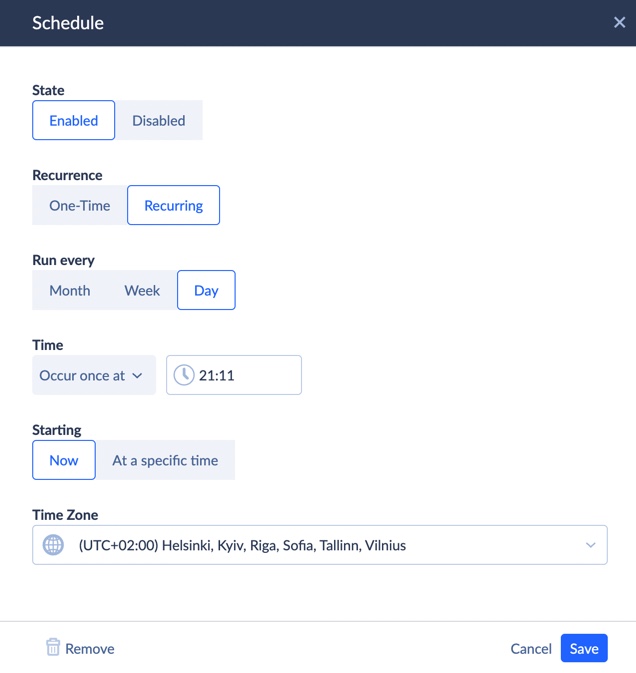
- When everything is mapped, save your task. You can choose to run it immediately by clicking Run, or schedule it for future imports.
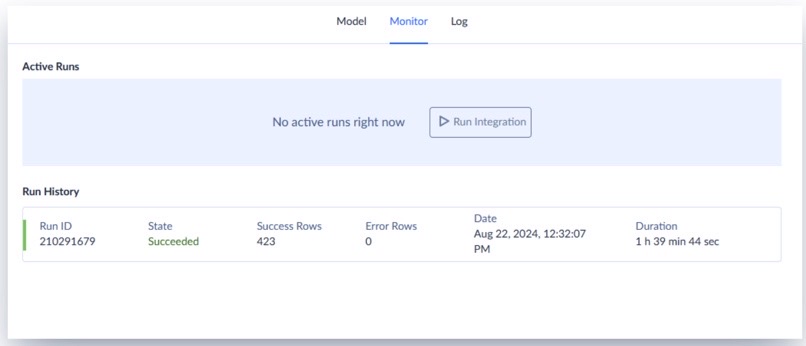
- Review the import results in the Monitor and Log tabs.
Pros
- Full automation. Set it and forget it. Third-party tools enable users to schedule imports, sync data automatically, and transform data without manual intervention each time.
- Advanced features. They fit for integrating multiple data sources, transforming data in real-time, or syncing data between different systems.
- Flexible. Whether it’s CSV, Excel, or connecting Salesforce to HubSpot, Xero, or other apps, third-party systems are versatile.
- No-code solutions. Tools like Skyvia offer drag-and-drop interfaces, so no coding is required to set up data workflows.
Cons
- Learning curve. Some users may feel overwhelmed by the variety of options available.
- Less control. While automation is great, you might lose some of the control and customization available with manual methods or in-depth tools like Data Loader.
- Dependency on third-party platforms. Relying on an external tool means you’re tied to its uptime and service limitations. It’s important to choose a reliable provider.
Common Challenges When Importing CSVs to Salesforce and How to Solve Them
Importing CSV files into Salesforce usually isn’t a hassle. However, roadblocks like duplicates, annoying formatting errors, or encountering Salesforce’s API limits can appear unexpectedly.
Here’s how to tackle each challenge head-on:
1. Duplicate Records: Strategies for Prevention and Cleanup
The challenge:
No one wants to deal with duplicate records. They clutter up your system and lead to inaccurate reporting. This issue is especially common when importing large lists, like new leads from events or marketing campaigns.
How to solve it:
- Use unique IDs to ensure every record is distinct. If your CSV contains an ID (e.g., email or account number), ensure it’s mapped correctly.
- Salesforce Duplicate Rules can be set up to prevent new duplicates when importing data.
- Skyvia’s Upsert feature helps by automatically updating existing records and avoiding duplicates by matching key fields (like email or lead ID). This keeps your data clean without creating new records.
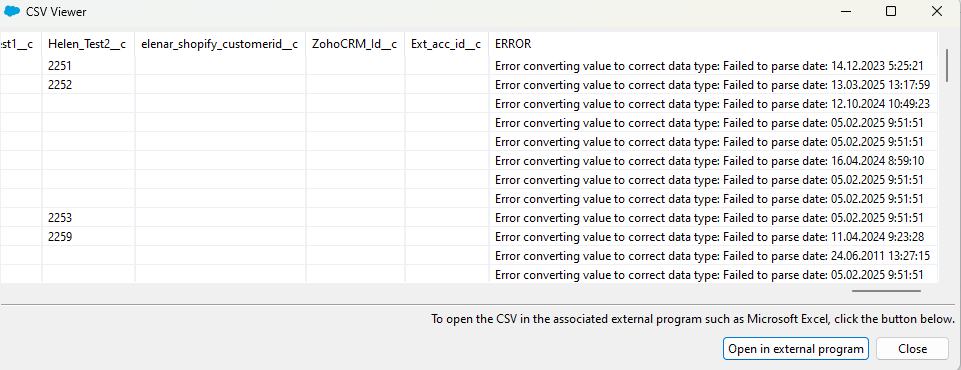
2. Data Formatting Errors (Dates, Picklists, Booleans)
The challenge:
They’re easy to overlook but can cause a lot of headaches when importing. Common problems include incorrect date formats, mismatched picklist values, and boolean fields not being recognized properly.
How to solve it:
- Pre-clean your CSV by checking for formatting issues, especially with dates and values that need to match Salesforce’s picklists or boolean fields.
- If that sounds like a lot of work, tools like Skyvia can handle these transformations on the fly during the import. For instance, it will automatically convert date formats and map picklist values, so you don’t have to manually fix them.
3. Hitting Salesforce API Limits
The challenge:
Salesforce imposes API limits on how many records to import within a specified time frame. If the dataset is large, you might run into these limits, causing errors or delays in the imports.
How to solve it:
- Batch your imports to avoid overwhelming Salesforce’s API. For example, break your import into smaller batches (around 200-500 records) to stay within Salesforce’s limits.
- Skyvia batches data automatically and ensures you never exceed the allowable number of API calls per day.
4. Field Mapping Complexities
The challenge:
Field mapping is one of the trickier parts of importing data, especially when dealing with lookups, relationships, or custom objects. If the relationships aren’t set up correctly, the data might end up in the wrong places or not sync at all.
How to solve it:
- Carefully map the fields to the correct Salesforce object. This is especially important for lookups or relationships where data should be linked to an existing record (e.g., associating a new lead with an existing account).
- Tools like Skyvia make this easier by providing a visual interface to see and map the data accurately. You can even set up automatic transformations for custom objects and relationships, reducing the chance of errors.
5. Large File Timeouts
The challenge:
When importing large files, users may run into timeouts or performance issues, especially if the file size exceeds limits or if trying to import a huge volume of data simultaneously.
How to solve it:
- Use tools specifically designed for bulk data imports. Skyvia, for instance, easily handles large datasets, ensuring that the imports are processed smoothly, even when dealing with hundreds of thousands of records.
- For extra-large files, batch processing is your friend. Breaking up the data into smaller chunks helps avoid timeouts, and Skyvia can automatically manage these batches.
Conclusion
We’ve walked through the three main ways to import CSV data into Salesforce:
- Data Import Wizard.
- Data Loader.
- Third-Party Tools.
Each has its strengths, from simplicity and ease of use to more complex capabilities for handling large datasets.
While Salesforce’s native tools are great for basic imports, they come with limitations. Whether it’s dealing with duplicates, large volumes of data, or the inability to automate recurring imports, these tools can slow you down as your company scales.
For businesses seeking a reliable, automated, and flexible solution, Skyvia is a good choice. It’s a no-code platform that makes data imports seamless and scalable. This solution fits for handling one-time imports or automating the process on an ongoing basis.
Ready to simplify your data imports and focus more on what matters?
Try Skyvia today and see how quickly and easily you can get the data where it needs to go.

F.A.Q. for Import CSV to Salesforce

Can I automate CSV imports into Salesforce for free?
While Salesforce’s native tools don’t support free automation, third-party tools may offer limited free plans for basic automated imports. For ongoing or scheduled imports, paid plans are typically required to unlock full automation features.
What’s the best way to avoid duplicates when importing to Salesforce?
To avoid duplicates, use Salesforce’s duplicate rules and upsert functionality. The upsert operation checks existing records and updates them rather than creating new ones, thereby preventing duplicate entries based on unique identifiers, such as email addresses or account IDs.
How to import multiple values into a multi-select picklist from CSV?
When importing data into a multi-select picklist, separate multiple values in the CSV using semicolons (e.g., “Option 1; Option 2”). During import, these values will be added to the picklist field correctly, with each option being selectable.
How to import checkbox field data from CSV to Salesforce?
For checkbox fields, input TRUE or FALSE in the CSV file. The import process will interpret these boolean values and set the checkbox as checked (TRUE) or unchecked (FALSE) based on the data provided in the file.
