Managing data in Salesforce inevitably requires keeping it clean, accurate, and up-to-date. Regular data cleanups involve removing duplicate records and clearing outdated data. The clean up process may require deleting hundreds of records in multiple Salesforce objects. For example, you may need to perform mass delete reports in Salesforce or mass delete leads records. The main concern here is to find the best way to do that.
There are several methods to perform bulk delete operations in Salesforce: native tools, custom SQL or SOQL queries, and various third-party tools. In this article, we dive deep into Salesforce data deletion specifics, explore all the available mass delete methods, and demonstrate step-by-step guides highlighting best practices.
Table of contents
- Understanding Salesforce Data Deletion Rules
- Ways to Mass Delete Records in Salesforce
- How to Mass Delete Records in Salesforce (Step-by-Step Guide)
- How to Mass Delete Salesforce Records Using Skyvia Data Loader
- Best Practices for Mass Deletion in Salesforce
- Common Errors & How to Fix Them
- Conclusion
Understanding Salesforce Data Deletion Rules
Salesforce records mass delete is a risky action that can potentially lead to data loss, compliance issues, or unwanted business consequences. Before doing it, you should understand how the bulk delete works in Salesforce.
Soft Delete vs. Hard Delete
Salesforce supports two types of delete operations:
- Soft Delete: When you delete records, they move to the Recycle Bin, and they can be restored. The records remain in the Recycle Bin for 15 days, after which they are deleted permanently. This type helps to avoid accidental deletions.
- Hard Delete: The records are permanently removed from Salesforce and become unrecoverable. Hard deletion bypasses the Recycle Bin and is typically used when data needs to be cleared immediately for compliance or storage reasons.
Permission & Profile Considerations
Before performing data cleanup, make sure you are following the requirements:
- Ensure the “Modify All Data” or “Delete” permissions for the relevant objects are granted.
- Enable API access if you use tools like Data Loader, Workbench, or Skyvia Query.
Ways to Mass Delete Records in Salesforce
Let’s overview several options for Salesforce mass delete. All of them are helpful for different needs and levels of technical expertise.
Mass Delete Wizard
Salesforce includes a built-in mass delete records tool in the Setup menu. The tool enables the mass deletion of Salesforce accounts, contacts, leads, and cases. It doesn’t support custom objects bulk deletion and is limited to 250 records per operation.
Pros
- Easy to use
- No installation required
- Supports standard objects
Cons
- Limited to 250 records per operation
- Does not support custom objects
- Lacks advanced filtering options
Best for
Users who need a simple, built-in solution to mass delete records in standard objects.
Salesforce Data Loader
Data Loader is a client application that enables bulk deletion using CSV files. Users export the records they want to delete, list their IDs in a CSV file, and then use Data Loader to process the deletions. This method requires installation and setup.
Pros
- Supports both standard and custom objects
- A free tool provided by Salesforce
Cons
- Requires manual file preparation
- Needs installation on a local machine
Best for
Advanced users who need to bulk delete large volumes of data, including custom objects.
SOQL or SQL Query
Another method of Salesforce mass delete using SOQL or SQL queries. You can write a custom SOQL command in Workbench or use Skyvia Query to manage Salesforce data using SQL.
Workbench (SOQL)
Workbench is a web-based tool that allows users to write SOQL queries to find and delete records. It requires a solid understanding of SOQL, which is helpful for Salesforce administrators or developers.
Pros
- Supports complex queries
- Enables customization
- Available online
Cons
- Requires SOQL knowledge
- Not embedded in Salesforce UI
Best for
Users who are comfortable with queries.
Skyvia Query (SQL)
Skyvia Query, on the other hand, allows users to execute SQL queries against Salesforce data. It supports deleting records in standard and custom objects, and requires no installation. Skyvia Query offers a visual query builder for non-tech users. Its drag and drop interface can help you generate complex queries even without deep SQL knowledge.
Pros
- Supports complex queries
- Enables customization
- Cloud-based and user-friendly
Cons
- May require basic SQL knowledge for complex queries.
- Not embedded in Salesforce UI
Best for
Users who want more flexibility and look for customization opportunities.
Apex Code for Mass Deletion
Another method to delete records in bulk is for those comfortable with coding. You can run Apex scripts in the Salesforce Developer Console. This method provides flexibility and customization options but requires developing skills.
Pros
- Highly customizable
- Can automate deletions
Cons
- Requires developer expertise
- High potential for mistakes if not carefully implemented
Best for
Developers who need full control and automation over the deletion process.
Third-Party Apps & Automation Tools
There are a number of tools provided by third parties that can solve data clean-up tasks. Besides the mass delete feature, these tools often include additional functions like data deduplication, synchronization, and backup.
Pros
- More features than built-in Salesforce tools offer
- Supports advanced filtering and automation
Cons
- Some tools require paid subscriptions
- Can have a learning curve
Best for
Businesses that need advanced deletion features and automation beyond Salesforce’s native tools.
Methods Comparison
We compared all the methods in the table below for your convenience.
| Method | Ease of Use | Requires Coding | Features | Best For |
|---|---|---|---|---|
| Mass Delete Wizard | Easy | No | Built-in tool, limited to 250 records | Deleting a small number of standard objects |
| Salesforce Data Loader | Moderate | No | Supports both standard and custom objects | Deleting large volumes of data via CSV files |
| Workbench (SOQL) & | Moderate | Yes | Supports complex filtering and bulk deletion | Users comfortable with queries |
| Skyvia Query (SQL) | Easy | No | Query builder | Users looking for flexibility and customization |
| Apex Code for Mass Deletion | Complex | Yes | Fully customizable, high automation potential | Developers who need full automation control |
| Third-Party Apps (e.g., Skyvia, Cloudingo, DemandTools) | Easy | No | Automation, deduplication, scheduled deletions | Businesses needing advanced features |
Let’s look at some of them in detail. Below, you will find the step-by-step guides on mass delete in Salesforce.
How to Mass Delete Records in Salesforce (Step-by-Step Guide)
In this section, we demonstrate the methods of bulk delete in step-by-step guides.
Method 1: Salesforce’s Mass Delete Wizard
The easiest way to bulk delete Salesforce records is a mass delete wizard. It’s a built-in tool available in Salesforce Classic and Lightning.
To mass delete Salesforce contacts, accounts, or other standard object records, follow the below steps:
- Go to Setup.
- Look for ‘Mass Delete Records’ In the Quick Find box.
- In the Mass Delete Records window, select whether to delete accounts, activities, contacts, cases, leads, products, or reports.
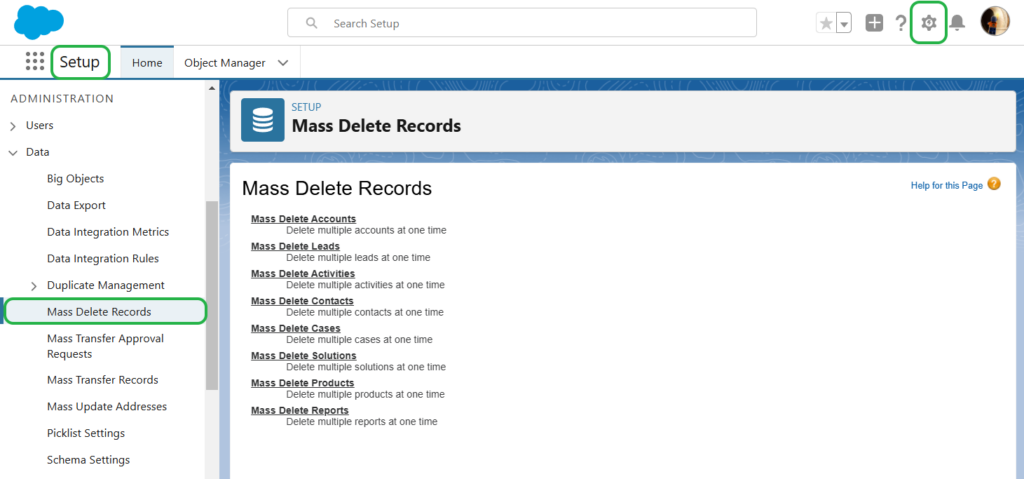
- Indicate the criteria for the records to be deleted and click Search.
- On the list of found records, select the needed records and click Delete.
This method is quite easy and fast. However, the maximum number of records to remove at once is 250, so it might be necessary to perform dozens of such operations to eliminate thousands of records. This is not convenient and is usually time-consuming, so using alternative services becomes inevitable in such cases.
Method 2: Salesforce Data Loader
This method is helpful in the following cases:
- To delete a large number of records.
- For bulk delete Salesforce records in objects not supported by Mass Delete Wizard.
- To schedule regular data deletions.
Data loader supports other operations besides deletions. You can also use it to import data.
Prerequisites
Before using Data Loader, ensure that the API is enabled and that the appropriate user permissions are granted in Salesforce.
If you perform bulk hard delete, enable the Bulk API Hard Delete for your organization.
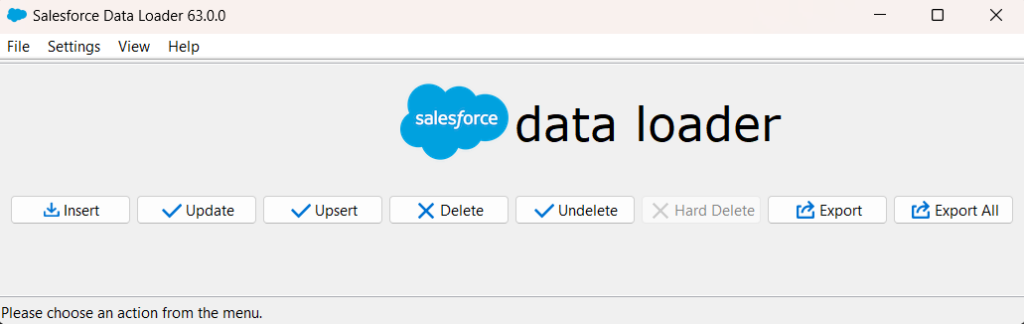
Downloading and installing Data Loader
To start using the Salesforce Data Loader, perform the following steps.
- Install Java Runtime Environment (JRE) version 17 or later for your operating system.
- Download the most recent version of Data Loader at https://developer.salesforce.com/tools/data-loader.
- In the Data Loader folder, find and open the installation file.
- Specify a folder to install the Data Loader.
- Answer the prompts and select your preferences to complete the installation.
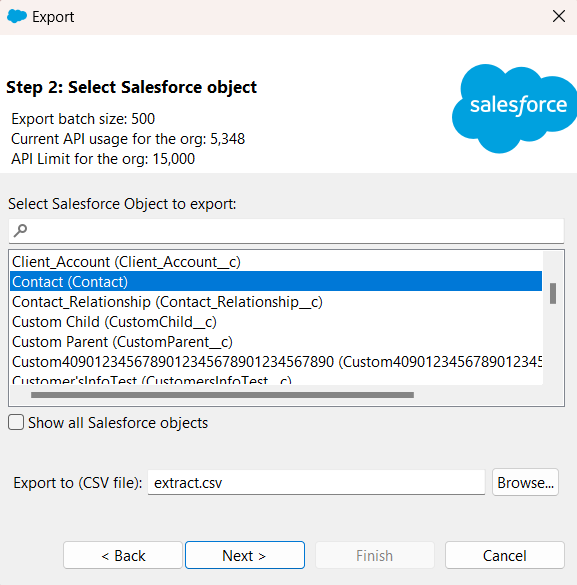
Exporting records with SOQL queries
To delete records with Data Loader, you must extract them from Salesforce first.
- Open the Data Loader on your computer and click Export. To export archived activity records and soft-deleted records, click Export All instead.
- Sign in with Salesforce.
- Choose an object. If your object name isn’t listed, select Show all objects to see all the available objects you can access.
- Select the CSV file to export the data to. Choose an existing file or create a new one. The export replaces the contents if you choose the existing file.
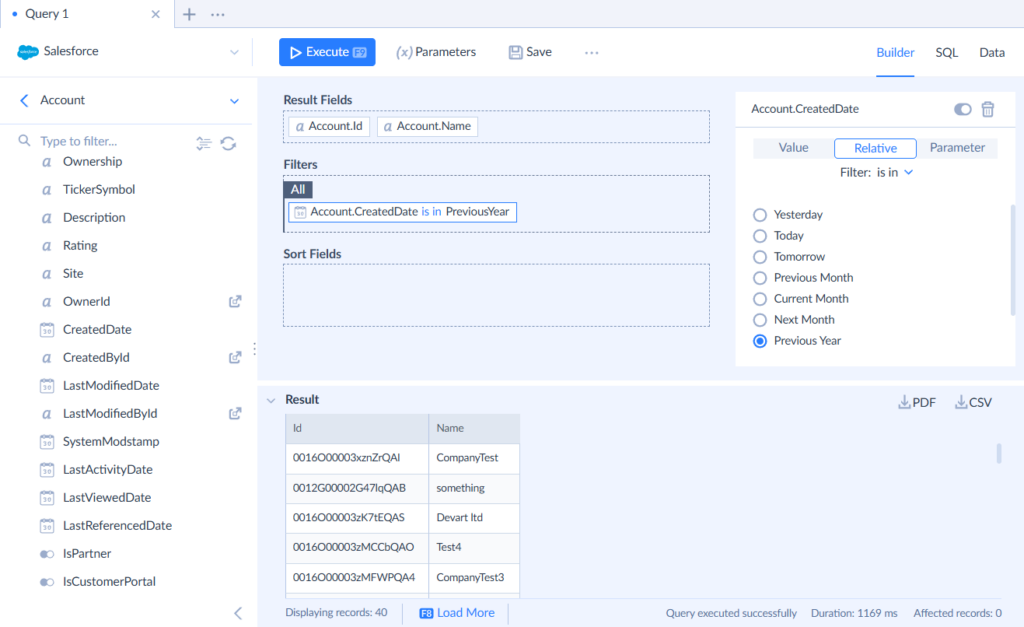
- Create a SOQL query for the data export using only the record ID as the desired criterion.
For example, the query below selects the IDs of contacts created during the last calendar year:
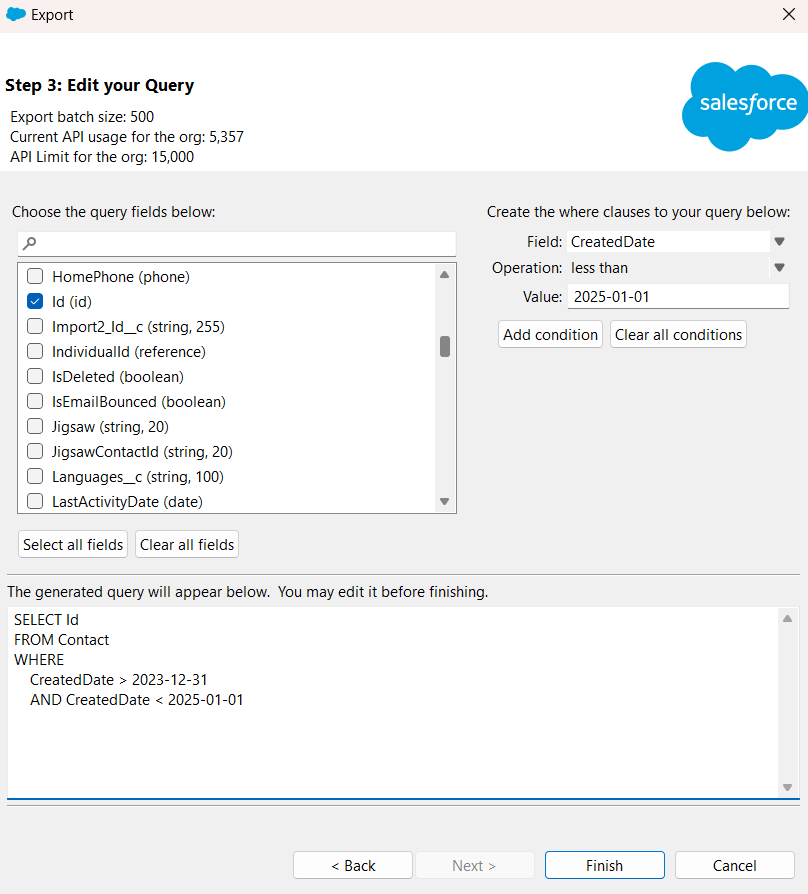
- After the operation is complete, a confirmation window will display the export results.
- To view the CSV file, click View Extraction or OК to close.
Deleting records in bulk using CSV files
To perform mass delete records in Salesforce, do the following.
- Launch the Data Loader and click Delete.
- Sign in with Salesforce.
- Choose the object to delete data from.
- Select the CSV file with the list of records to be deleted.
- Map the ID fields between the selected object and the CSV file.

- Select the folder where to place the log files when the operation is complete.
Method 3: Using Workbench
Workbench is a web-based tool that helps Salesforce developers and administrators manage data. It supports deleting large data volumes from standard and custom Salesforce objects.
Prerequisites
Before using Data Loader, ensure API is enabled and that the appropriate user permissions are granted in Salesforce.
If you perform bulk hard delete, enable the Bulk API Hard Delete.
Exporting records with SOQL queries
You have to export the records to be deleted first. For this, do the following.
- In Workbench, select the environment, API version, and click Login with Salesforce.
- Select an action to perform and Select an object.
- Specify fields and set filters if needed using the visual query wizard. In this case, Workbench will generate a SOQL query automatically. You can also write your custom SOQL query.
- Note: The ID field is required for deletion.
- Set View as to BulkCSV and click Query.
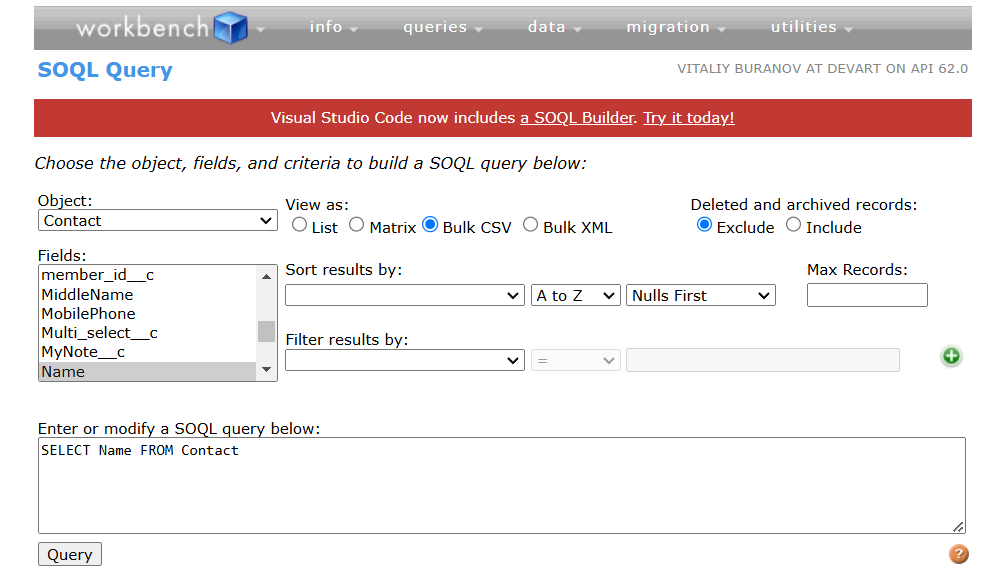
- Download the result file.
Deleting records in bulk using CSV files
Now you can delete records:
- Click Data in the top menu and select Delete.

- Choose the file exported earlier.
- Map the Id field in the Salesforce object to the Id in the CSV file and click Map fields.
- Confirm mapping and select Confirm Delete.
Method 4: Using Skyvia Query
Skyvia Query is an online SQL client and query builder tool for retrieving and managing cloud and relational data with SQL statements. It provides a visual Query Builder to compile queries via UI and an SQL editor for users who are familiar with SQL.
Prerequisites
To run queries in Skyvia, you need an active Skyvia account and a valid Salesforce connection.
Not registered yet? Go for it now.
Deleting Salesforce Records with SQL Statement
To mass delete Salesforce records using SQL command, do the following.
- Go to Skyvia and click +Create New.
- Find Query and choose SQL.
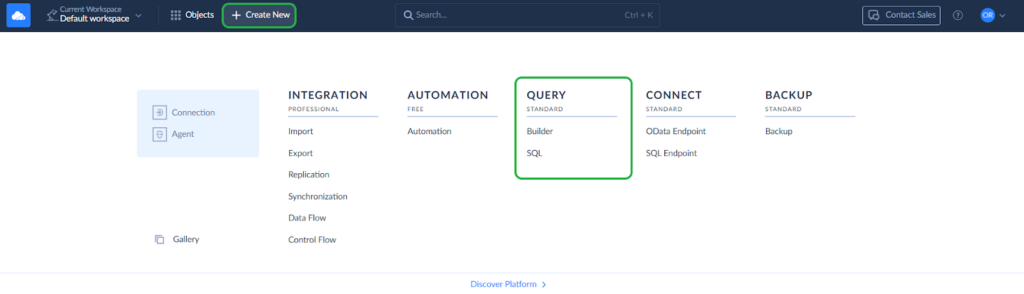
- Select the existing Salesforce connection or create a new one. Once selected, all the available objects will be displayed on the left.
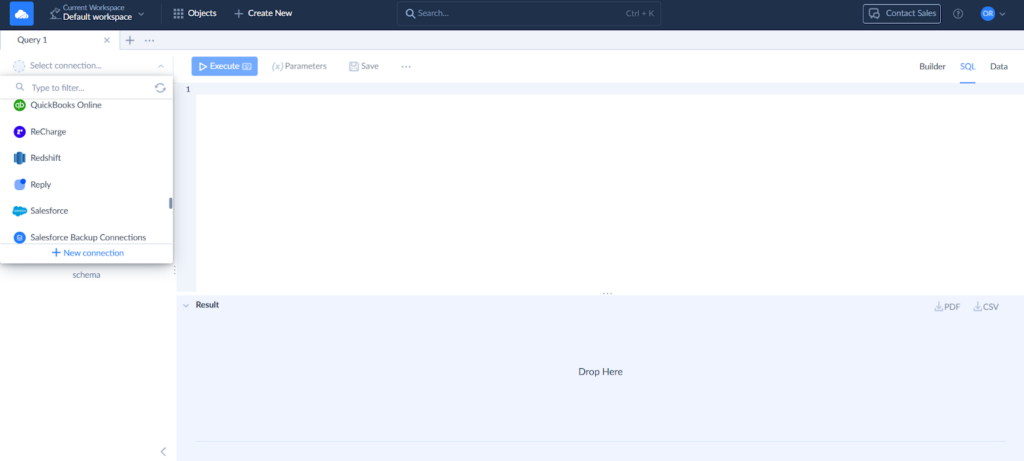
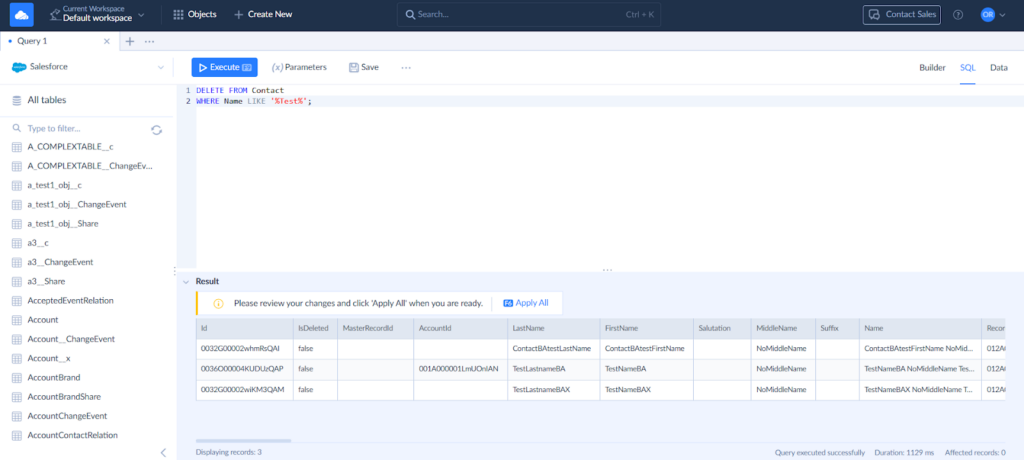
- Type the mass delete SQL statement and click Execute.
- Check the result preview and click Apply All if everything is right.
For example, the following command deletes contacts containing Test in their names:
DELETE FROM Contact WHERE Name LIKE ‘%Test%’;
Method 5: Apex Code for Mass Deletion
Apex enables users to access the Salesforce back-end to perform various data manipulation tasks and create custom applications. In terms of mass delete, Apex allows you to do simple one-time deletions or create a reusable delete script, which you can run by schedule. See below for instructions on how to run a simple one-time deletion code.
Writing a simple Apex script for bulk deletion
To delete Salesforce records using Apex, do the following.
- In Salesforce, click the gear icon and open Developer Console.
- Click Debug and select Open Execute Anonymous Window.
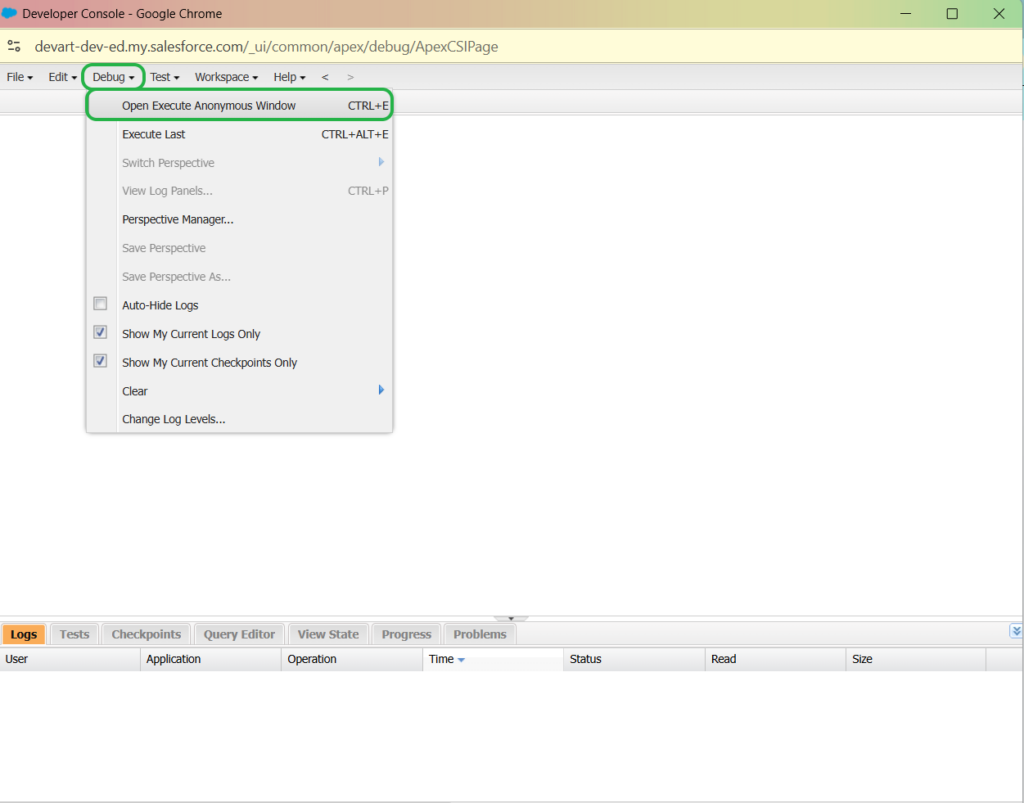
- Paste the script and click Execute.
For example, the script below deletes the contacts containing test in their names.
List<Contact> contactsToDelete = [SELECT Id FROM Contact WHERE Name LIKE '%Test%'];
if (!contactsToDelete.isEmpty()) {
    delete contactsToDelete;
    System.debug(contactsToDelete.size() + ' contacts deleted.');
} else {
    System.debug('No contacts found with "Test" in their name.');
}
Method 6: Using Third-Party Apps
If you are not interested in built-in tools, coding methods, and writing SOQL and SQL queries, you can always use a third-party tool for Salesforce mass delete. There are a number of third-party tools on the market. Below, we compare five top-rated tools.
- DemandTools is a data quality toolset for Salesforce CRM, offering functionalities such as de-duplication, normalization, standardization, comparison, import, export, and mass delete.
- Cloudingo is a Salesforce data quality tool focusing on deduplication and data cleansing. It can detect duplicates, mass delete unwanted records, automate maintenance, and help visualize data.
- Skyvia is a cloud data platform that provides data integration, backup, and management solutions. It allows users to perform mass deleting Salesforce records using a user-friendly interface. It also provides diverse solutions for data manipulation and data orchestration.
- Insycle is a data management platform that provides an intuitive interface for Salesforce users to manage, cleanse, and delete data in bulk. It can mass delete Salesforce records, detect duplicates, automate data maintenance, and track changes for audits.
- Dataloader.io is a cloud-based data loader for Salesforce, allowing users to import, export, update, and delete data in bulk.
| Tool | Ease of Use | Requires Coding | Best For | Additional Features |
|---|---|---|---|---|
| DemandTools | Moderate | No | Data deduplication and mass deletion | Data standardization, import/export capabilities |
| Cloudingo | High | No | Data cleansing and deduplication | Automated maintenance, data quality dashboards |
| Skyvia | High | Optional (for SQL) | Mass delete operations and data integration | Data integration and automation, cloud backup |
| Insycle | High | No | Mass editing and deletion tasks | Supports standard and custom objects, advanced filtering |
| Dataloader.io | High | No | Bulk data operations | Scheduling capabilities, secure performance |
How to Mass Delete Salesforce Records Using Skyvia Data Loader
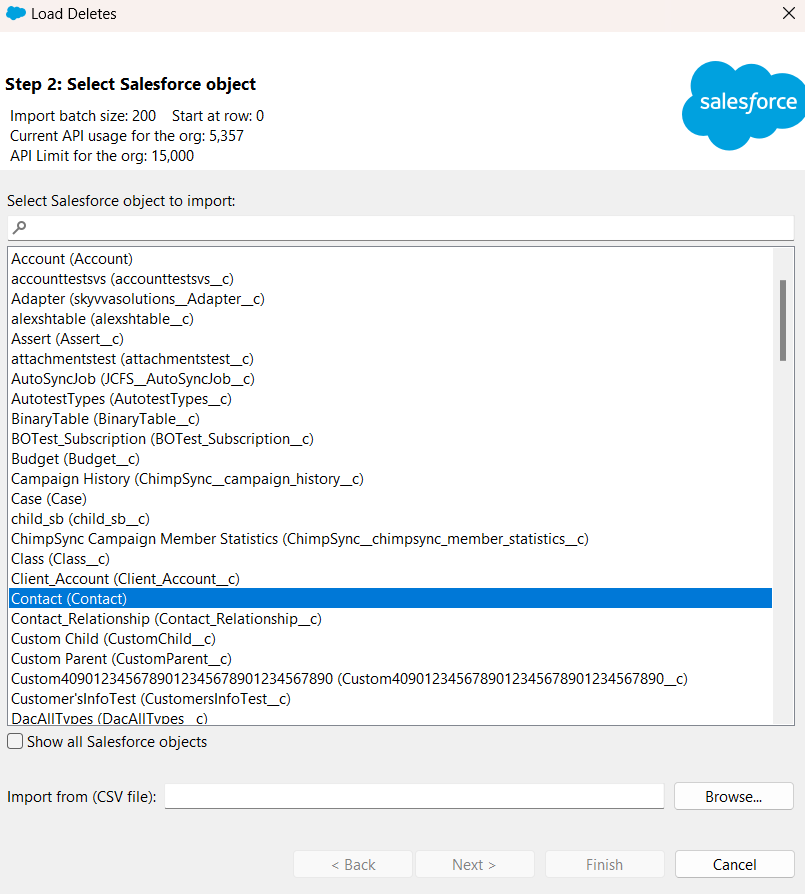
This method helps with deleting Salesforce records via CSV files. It’s really useful for removing a huge number of records in standard and custom objects. Below, we show step-by-step instructions on how to do it with Skyvia via Import tool. In our example, we delete accounts from Salesforce. You can also mass delete tasks leads, reports, or any other data using the same approach.
Prerequisites
To mass delete Salesforce records with Skyvia Import, you need an active Skyvia account, a valid Salesforce connection, and a CSV file with record IDs to be deleted. Explore ways to export data from Salesforce in the Skyvia blog.
To keep your data clean with Skyvia, don’t hesitate to get a two-week trial.
Bulk Delete Salesforce Records by CSV Using Skyvia Data Loader
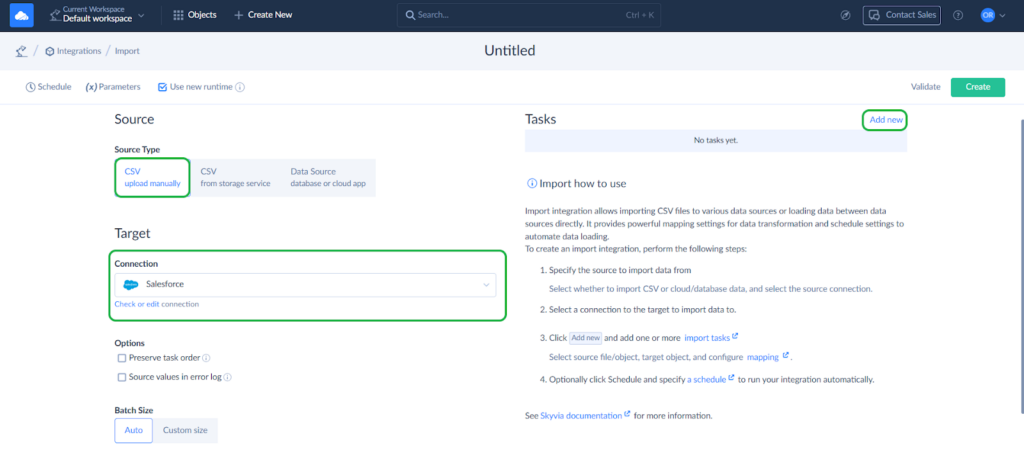
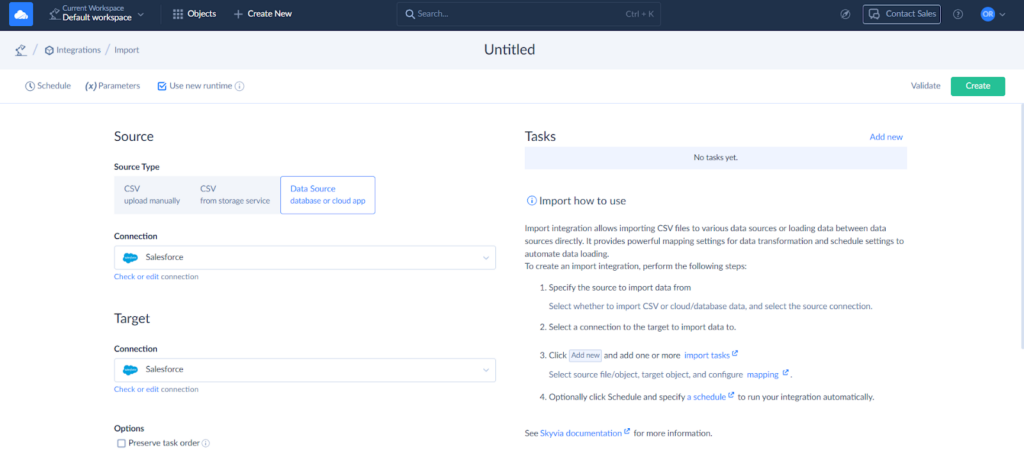
- Click +Create New in the top menu and select Import in the Integration column.
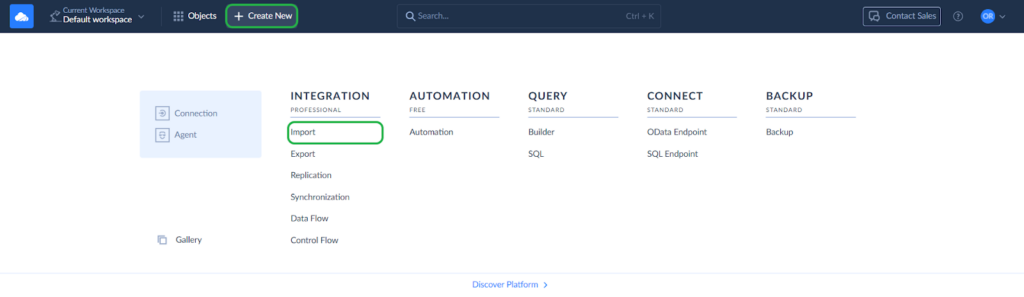
- Set the source type to CSV upload manually. To get a CSV file from the supported storage service, choose CSV from the storage service.
- Select Salesforce connection as Target.
- Click Add new to create an import task.
- Upload your CSV file. And proceed to the next step.
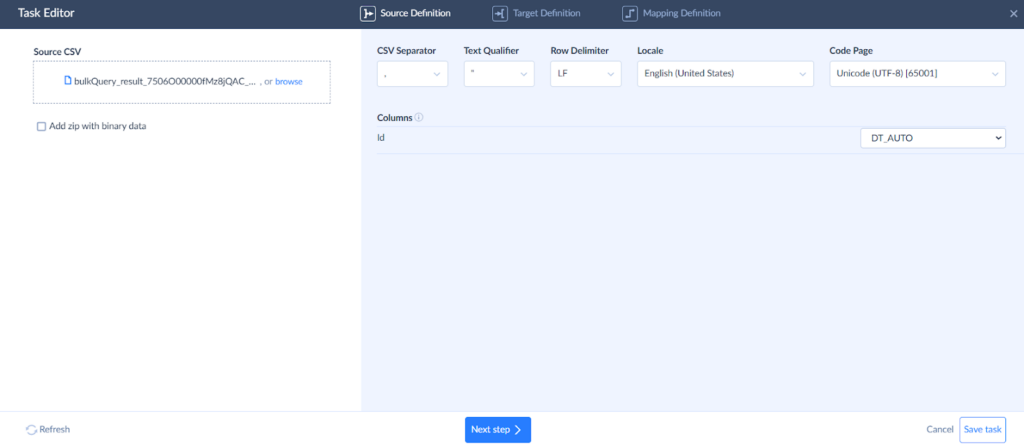
- In the Target drop-down list, select the object where the records will be deleted. Then, select the Delete operation and proceed further.
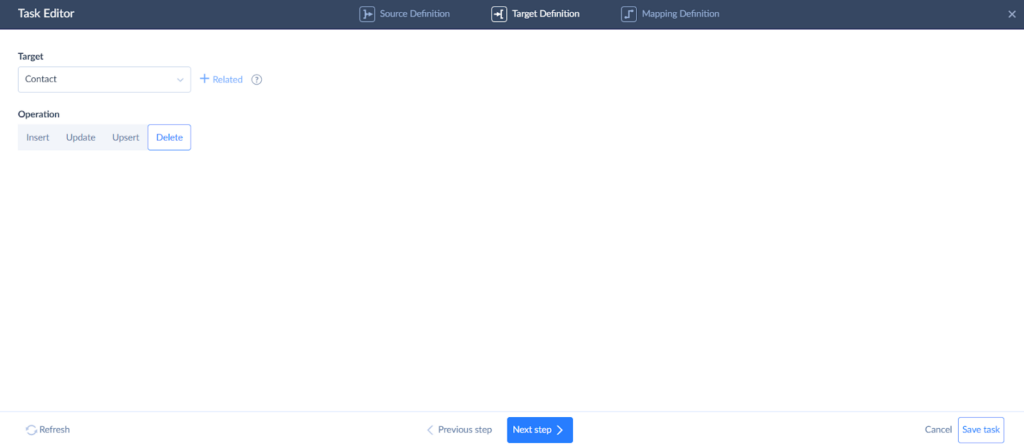
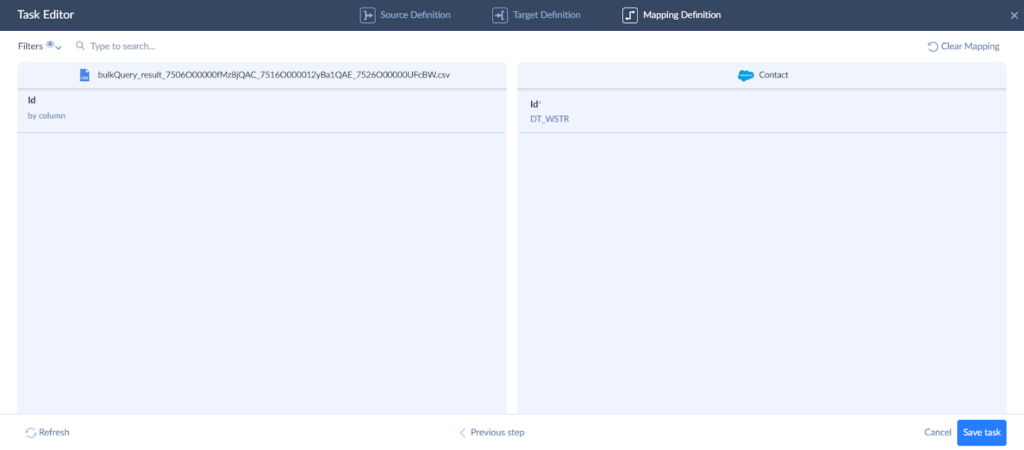
- In the last step of the task editor, map the source file columns to the target fields and save the task.
- Save the integration and run it. Check the integration results on the Monitor and Log tabs.
Batch Remove Salesforce Contacts by Filters Using Data Loader
If the records for deleting can be received from Salesforce itself, Skyvia offers an alternative and much simpler way to mass delete them. You just need to create an import integration and select the same Salesforce connection as both the source and the target. This method doesn’t require CSV files; just do the following.
- Create a new import integration from the menu.
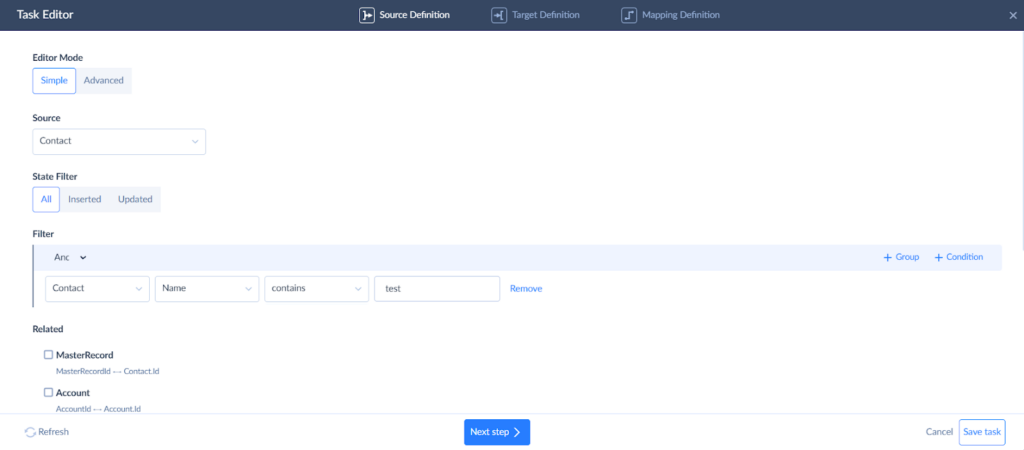
- Set the data source type as Data Source database or cloud app and select the same Salesforce connection as a Source and Target.
- Add a new import task. Select the source object in the drop-down list and set filters if needed. For example, we delete the contacts containing ‘test’ in their names.
- Select the target object and choose the Delete operation.
- Map the fields. In our case, they are mapped automatically.

- Save the integration and run it. You can schedule it to run automatically at a specific time or within a specific period.
In the same way, you can mass delete Salesforce accounts, mass delete Salesforce opportunities, or other records in the standard or custom Salesforce objects.
Best Practices for Mass Deletion in Salesforce
When performing bulk delete in Salesforce, you must consider the importance of this operation and you have to be aware of the consequences. Define the deletion objectives and consider security concerns. Plan the data deletion logic carefully and evaluate potential risks. We collected the best practices for mass records deletion.
- Backup First – Always create a full backup before deleting records to prevent unrecoverable data loss. You can try secure Skyvia Backup.
- Check Relationships – Understand how deleting a record affects related objects and records.
- Use Filters Carefully – Double-check filters before executing a mass delete to avoid accidental deletions.
- Test in a Sandbox – Run deletions in a test environment to confirm the expected result.
- Communicate with Teams – Inform relevant teams before performing large-scale deletions to prevent workflow disruptions.
- Monitor Deletion Logs – Keep track of deleted records using audit logs or change tracking.
Common Errors & How to Fix Them
If something can go wrong, it will. Thus, we collected several potential problems you may face when performing bulk delete in Salesforce and added some hints to their solutions.
| Error | Cause | Solution |
|---|---|---|
| Insufficient permissions | User lacks Delete/Modify All Data rights | Check the profile permissions and update them if needed. |
| API access restricted | API disabled for a user | Enable API access in Salesforce. |
| Record Locking | Related records prevent deletion | Check the records relations before deleting. Delete related records first. |
Conclusion
Mass delete of Salesforce records can be done in multiple ways, starting with built-in tools like Mass Delete Wizard and ending with third-party wizard solutions or custom SOQL or SQL commands. While some methods require technical skills, Skyvia offers a more accessible and efficient way to manage bulk deletions with minimal effort. Whether you need to clean up outdated data or remove unnecessary records, choosing the proper method will save time and help keep your Salesforce environment organized.
FAQ for Bulk Delete Records in Salesforce

What happens to deleted records in Salesforce?
When you delete a record, it moves to the Recycle Bin (soft delete) and can be restored within 15 days. However, if you perform a hard delete, the records are permanently removed and cannot be recovered.
Can I automate mass deletions in Salesforce?
Yes. You can use third-party tools like Skyvia, Cloudingo, or DemandTools to schedule and automate mass deletions based on predefined rules.
Can I undo a mass delete in Salesforce?
Yes, in case you performed a soft delete. You can recover your records from the Recycle Bin. In case of hard delete, the records are unrecoverable.