

Salesforce has become a cornerstone for managing customer relationships and data in businesses of all sizes. However, for many users, exporting Salesforce data to Excel remains an essential step for in-depth analysis, creating custom reports, or sharing insights with stakeholders. While Salesforce provides native options for exporting data, the diverse needs of businesses often demand more flexible and efficient solutions.
This article explores five practical ways to export Salesforce data to Excel, catering to scenarios ranging from simple one-time exports to automated workflows for seamless data synchronization. Whether you’re a beginner or an advanced user, this guide will help you choose the right approach to streamline your data export process.
Table of contents
- Salesforce Interface Data Export Options
- Salesforce Data Loaders
- Excel Original Interface
- Excel Add-Ins
- ODBC Drivers and OData Endpoints
- The Best Fits of Each Method
- Conclusion
1. Salesforce Interface Data Export Options
One of the easiest ways to export data from Salesforce to Excel is by using the Salesforce interface’s built-in export options, which include data export (for large exports) and reports export (for custom report data).
Here’s a step-by-step guide on each method:
Salesforce Data Export
The Salesforce Data Export native method is proper when exporting large datasets from the Salesforce organization, for example, for a complete backup. This method provides flexibility, especially for basic data backup or reporting needs directly within Salesforce, and allows users to export all data from Salesforce in a structured format.
Let’s see how this approach works.
- Navigate to Setup. In the Setup search bar, type Data Export and select Data Export from the results under Data Management.
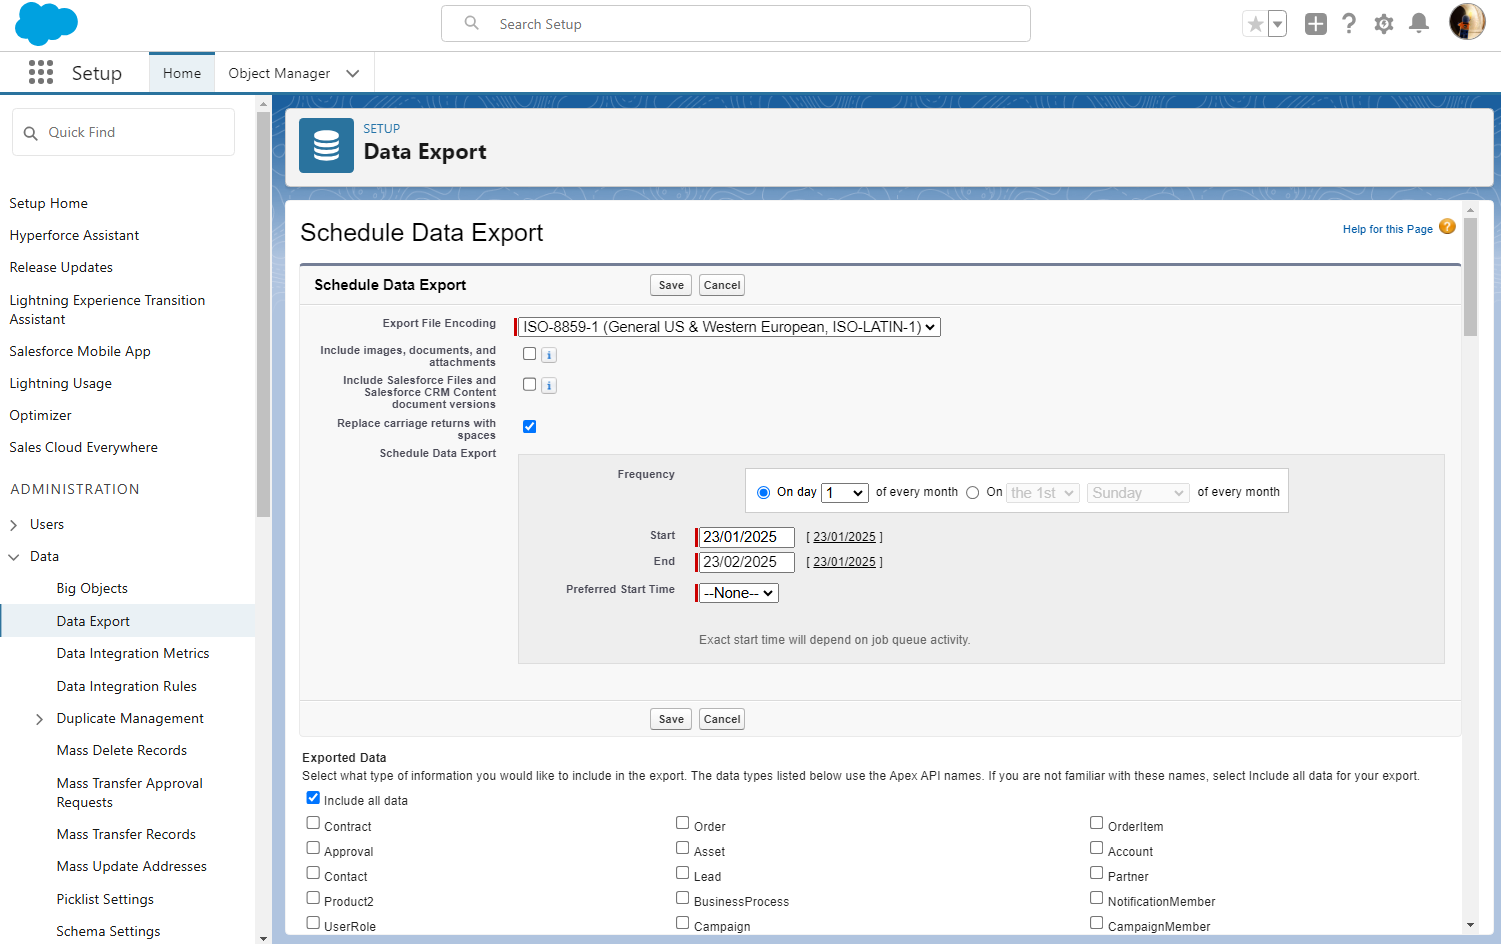
- Select either Export Now (for an immediate export) or Schedule Export (to export data at a specific time, such as weekly or monthly).
- Select the desired data format (CSV or Excel) for easier use in Excel.
- Choose the data objects you want to include in the export (e.g., Accounts, Contacts, Opportunities) or select Include All Data to export everything.
- Click Start Export or Save to schedule. Salesforce will begin preparing the data, which may take time, depending on the data size.
- When the export is ready, Salesforce will send an email with a download link. The exported data file will be in ZIP format with CSV files for each data object.
- Unzip the file, open the CSV files, and view the data in Excel.
Exporting Salesforce Reports
Salesforce Reports allows users to create and export specific reports in Excel-friendly formats.
- Navigate to the Reports tab from the Salesforce main dashboard and create a new report or open an existing one.
- Add filters, fields, and groupings as needed to tailor the report to include only the data you want to export. This step is especially useful if you need specific subsets of data, like monthly sales or activity reports.
- Once the report is ready, click the Export button.
- Choose Export View (Formatted or Details Only) and file format (XLS or CSV).
- Save the exported file to your computer and open it directly in Excel for analysis.
Pros and Cons of Using Salesforce Interface Export Options
Pros
- Simple and Accessible. No third-party tools or apps are required.
- Automated Export Schedules. The scheduled export option is perfect for regular data backups.
- Custom Reports. Using Salesforce Reports allows for highly tailored exports, pulling only the specific data you need.
Cons
- Data Export Limits. Data export is limited to weekly or monthly frequency for non-premium users.
- File Size Constraints. Large exports may require manual handling due to file size limits.
- Formatting Limitations. Reports export may require formatting adjustments for optimal readability in Excel.

2. Salesforce Data Loaders
Another popular way to export data is using data loaders. These tools allow you to export data from Salesforce to Excel as CSV files, make changes to these files in Excel, and import changed CSV files back to Salesforce. Many such data loaders are available on the Internet, and many of them have free versions.
Here, we’ll review the native Salesforce built-in data loader and the third-party Skyvia Salesforce data loader and consider their pros, cons, and most popular use cases.
Salesforce Data Loader
The Salesforce Data Loader is a native client application that is primarily effective for exporting data in bulk and is especially useful for large datasets. It supports various file formats, including CSV, XML, and Excel, and allows the import and export of up to 5 million records via a wizard UI or a command line (for Windows users).
This tool is perfect for administrators and developers seeking precise control over their operations, offering features like field mapping and error logging to ensure a smooth workflow. The user-friendly wizard simplifies the export process, while the command-line functionality supports task automation and scheduling.
Follow the steps below to start working with it:
- Download and install the Salesforce Data Loader tool.
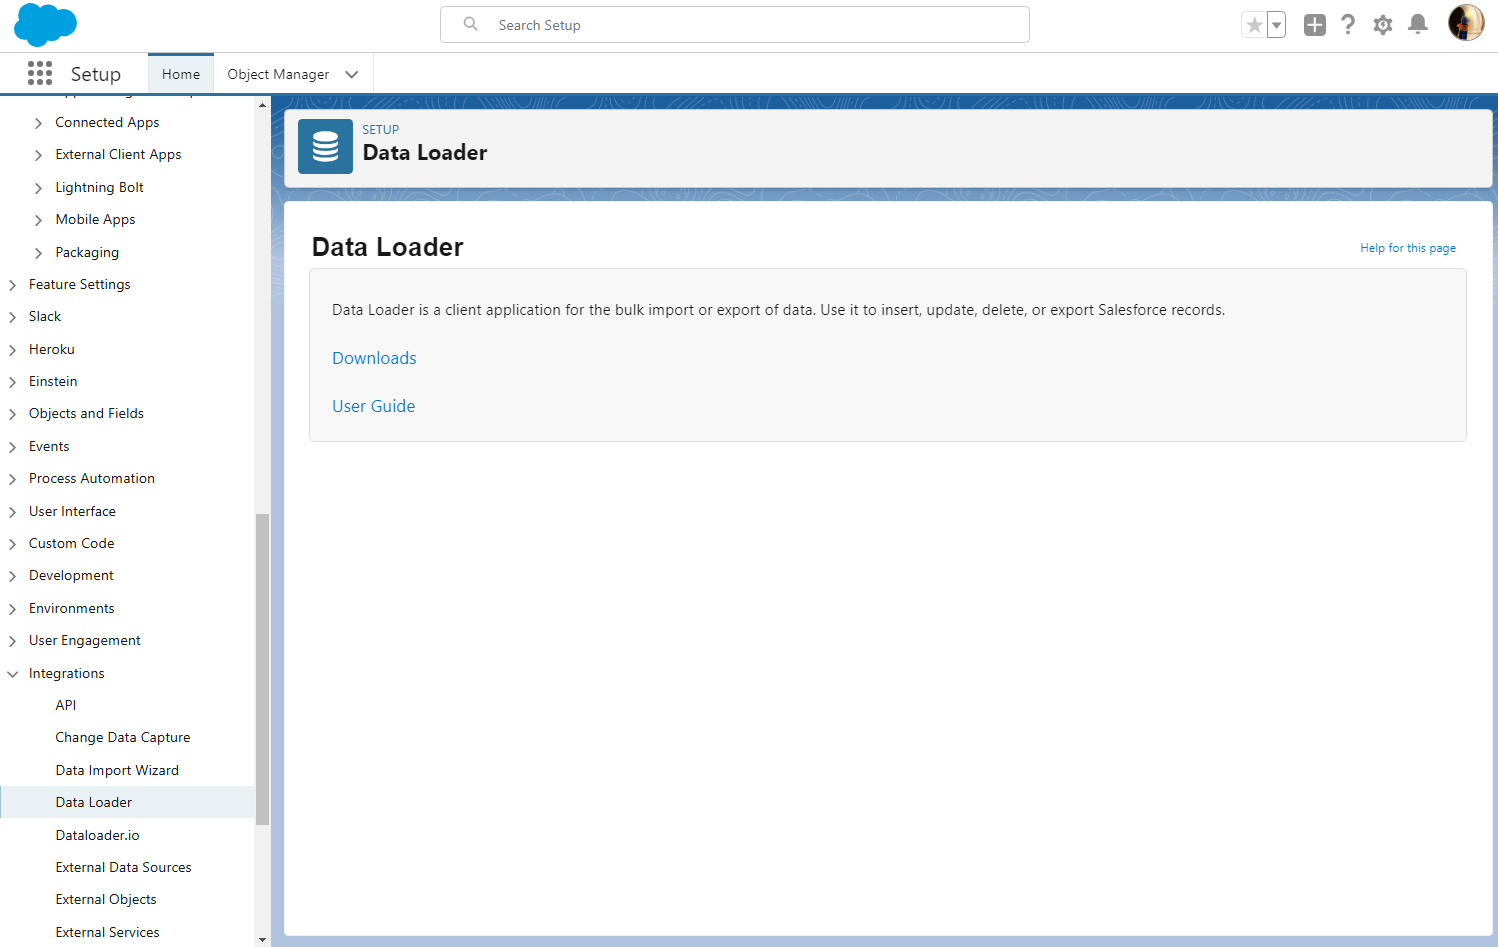
- Open Data Loader, log in with your Salesforce credentials and select the object you wish to export (e.g., Accounts, Contacts).
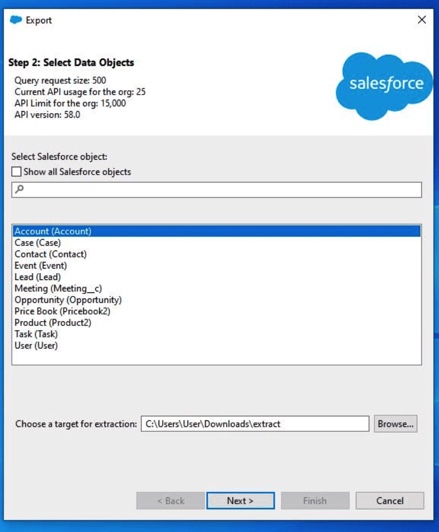
- Specify the file path where the exported data will be saved.
- Follow the prompts to finish the export process.
Skyvia Salesforce Data Loader
Skyvia Salesforce Data Loader is a tool that perfectly works for exporting, importing, and syncing data between Salesforce and other platforms, including direct data export into Excel. Unlike Salesforce’s native Data Loader, Skyvia is fully cloud-based, so there’s no need for installation or manual updates. It also offers a no-code interface, so non-technical users may start exporting easily.
The platform provides advanced filtering options, allowing users to export only the necessary records. Its intuitive design supports quick setup and seamless integration with 200+ platforms, making the solution ideal for businesses of all sizes. Automated scheduling allows users to set up recurring export tasks, ensuring data is always up-to-date without requiring manual intervention.

Here’s a step-by-step guide to using Skyvia Data Loader to export Salesforce data to Excel.
- Visit Skyvia’s website and sign up for a free account if you don’t already have one.
- Once logged in, go to Integration from the Skyvia page.
- Select + CreateNew > Connection.
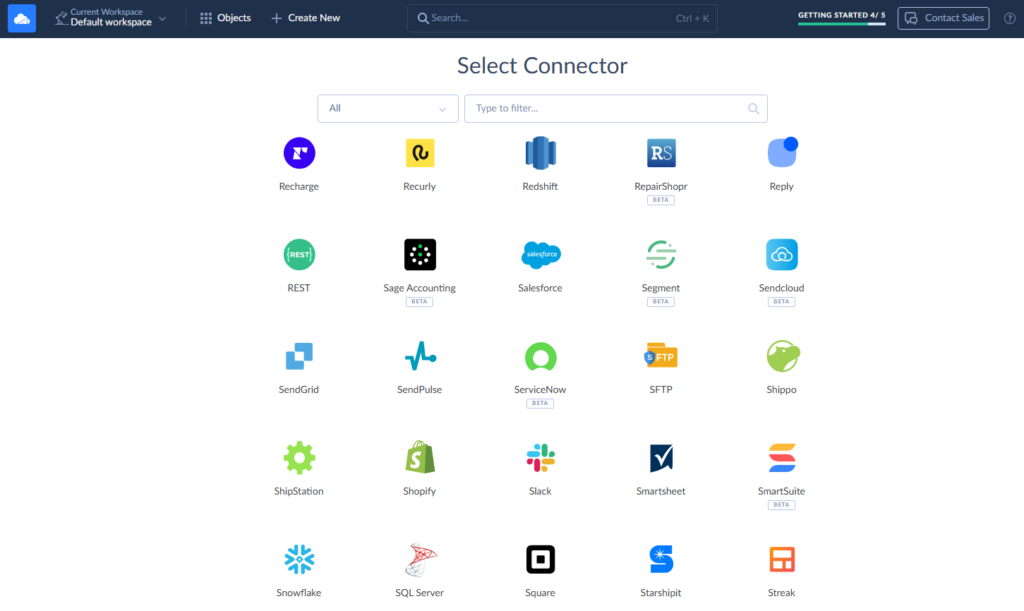
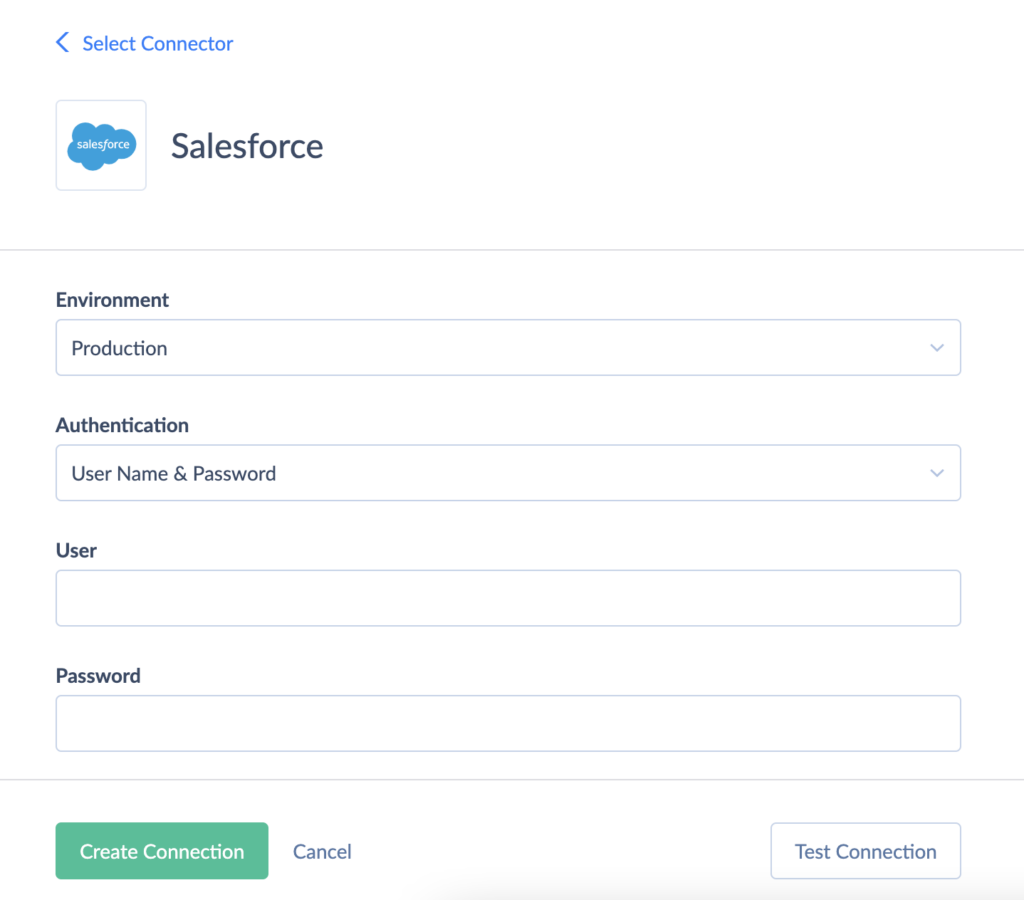
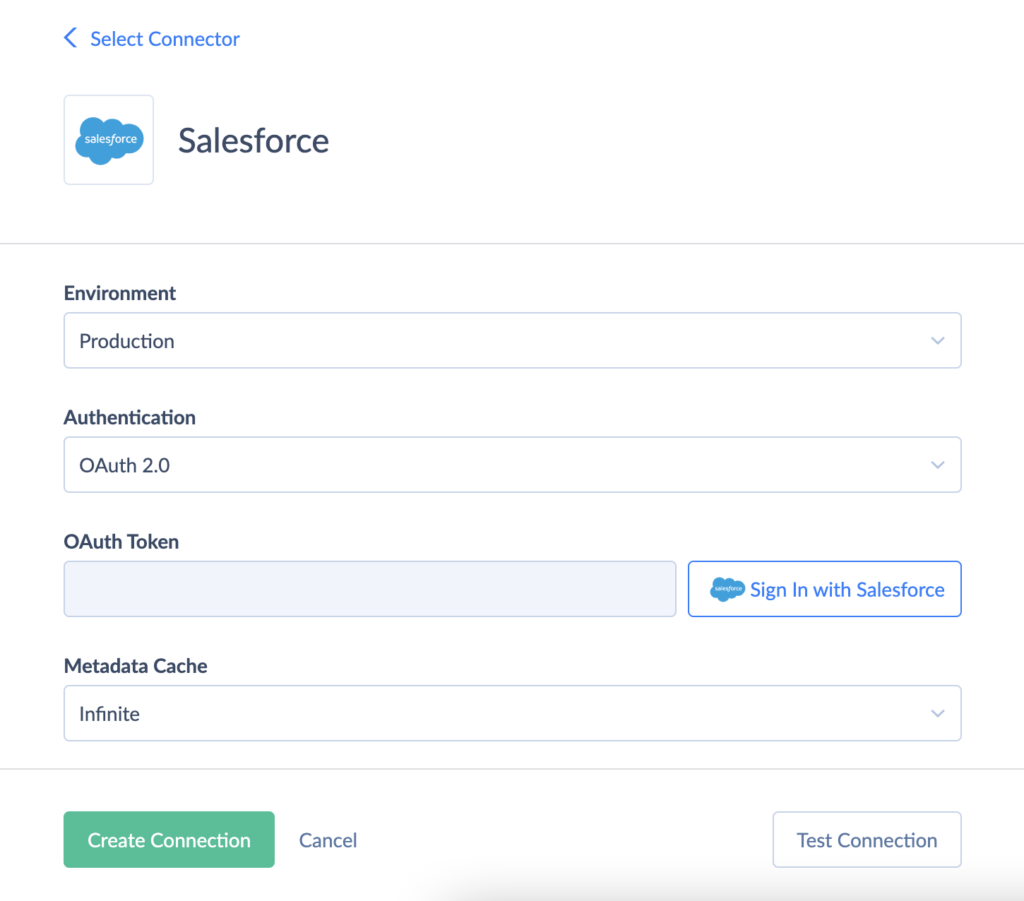
- Select Salesforce Connector in the connectors list, set the appropriate parameters, and click Create Connection.
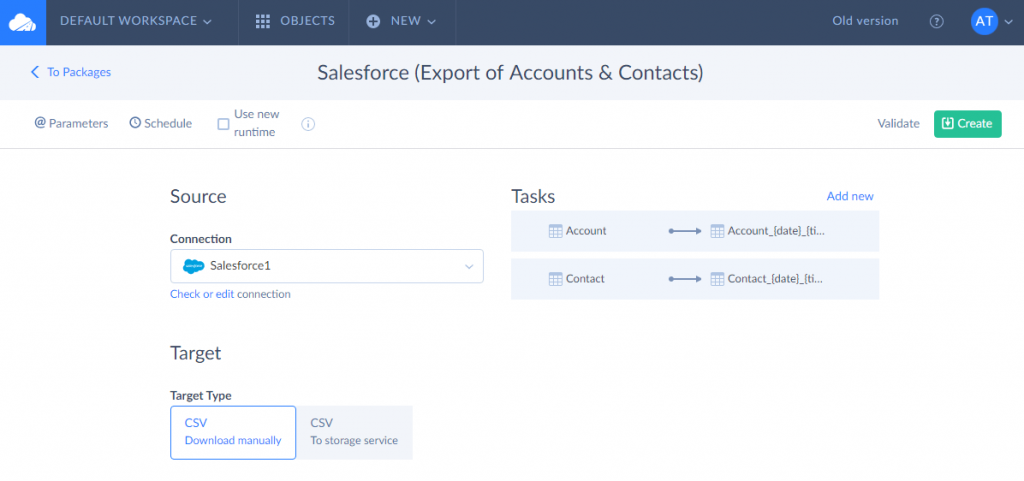
- Select + Create New and click Export in the Integration column.
- Select Source (Salesforce) and Target (CSV Download manually).
- Go to the Task Editor and click Add new.
- Select the Object (for example, Accounts) in the Source Definition tab.
Note: In this step, you can select the object’s columns list. By default, all its columns will be exported, but you can deselect any columns you don’t need to include.
- Select the data for export in the Object filter, specify the Target File Name, and click Next step.
- Check the data in the Output Columns tab and click Save.
- If necessary to add another object, repeat steps 6-9.
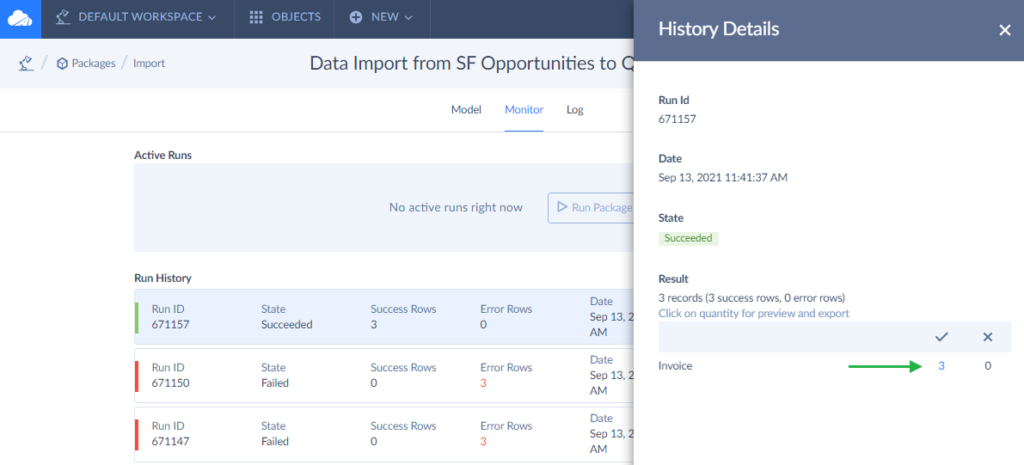
- To execute the export task immediately, click Run. The file will be generated and available for download.
- To automate exports, set up a Schedule. Skyvia’s scheduling feature allows you to set up hourly, daily, or weekly exports, which is convenient for keeping Excel data updated with the latest Salesforce information.

Once the export is complete, download the Excel file using the Monitor and Log tabs.
Note: You can automatically download the Salesforce export file to the cloud storage or FTP/SFTP.
Pros and Cons of the Salesforce Data Loaders
Pros
- Bulk Data Handling. Both tools excel at managing large datasets, with the native Data Loader supporting up to 5 million records and Skyvia offering seamless bulk operations across platforms.
- User-Friendly Interfaces. The native Data Loader provides a wizard for guided workflows, while Skyvia features a no-code, intuitive cloud-based interface suitable for non-technical users.
- Automation Capabilities. Skyvia supports scheduled exports and syncing, reducing manual intervention, while the native tool allows command-line automation for Windows users.
Cons
- Native Tool Installation. The native Data Loader requires installation and manual updates, which may not be ideal for cloud-focused workflows.
- Resource Intensity. Large-scale operations on the native tool can be resource-intensive, potentially affecting performance on lower-spec systems.
- Feature Gaps. Skyvia lacks advanced developer-centric features, like field-level error reporting, which are available in the native tool.
3. Excel Original Interface
Getting data from Salesforce to Excel through the original interface is a perfect solution for Microsoft Office Professional Edition users. Unlike data loaders, in this case, the data are displayed directly in the Excel UI; you do not need to use intermediate CSV files.
To export data:
- Open a blank Excel workbook.
- Ensure Power Query Is Available in Excel.
Note: Power Query is integrated into Excel under the Data tab in versions 2016 and later. For older versions, you might need to install the Power Query add-in.
- Confirm that API access is enabled for your Salesforce account (available in Enterprise, Unlimited, Developer, or Performance editions).
- Generate a Security Token if necessary (via Settings > My Personal Information > Reset My Security Token in Salesforce).
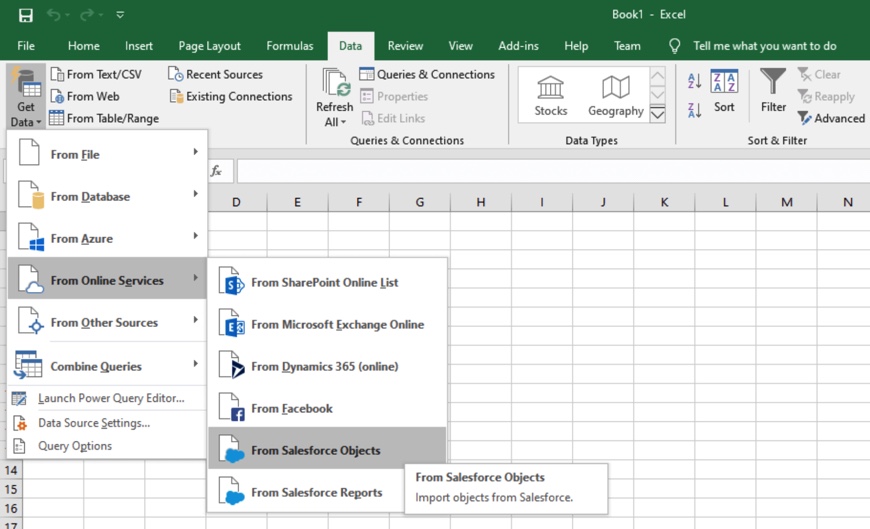
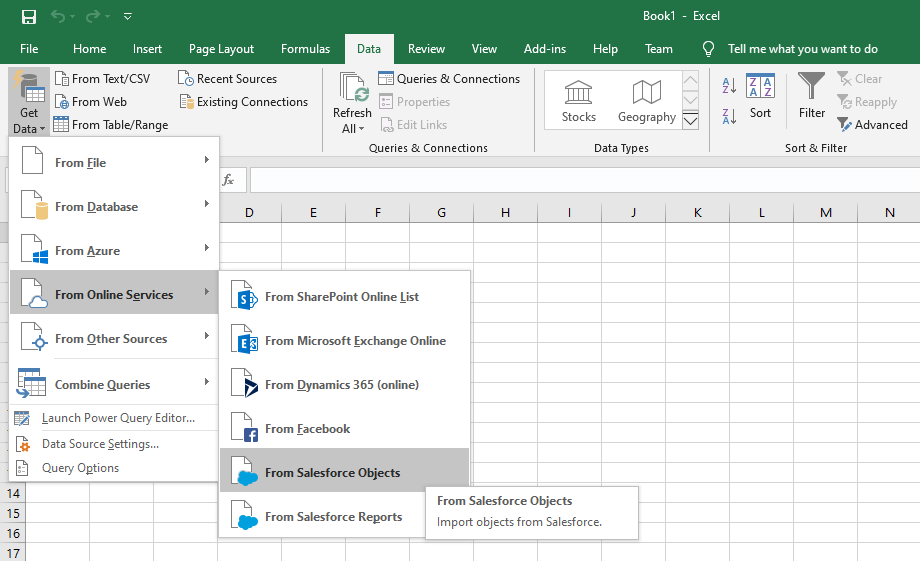
- Click the Data tab, then Get Data > From Online Services > From Salesforce Objects.
- Select between connecting to the Production or Custom environment in the opened window and sign in to Salesforce.
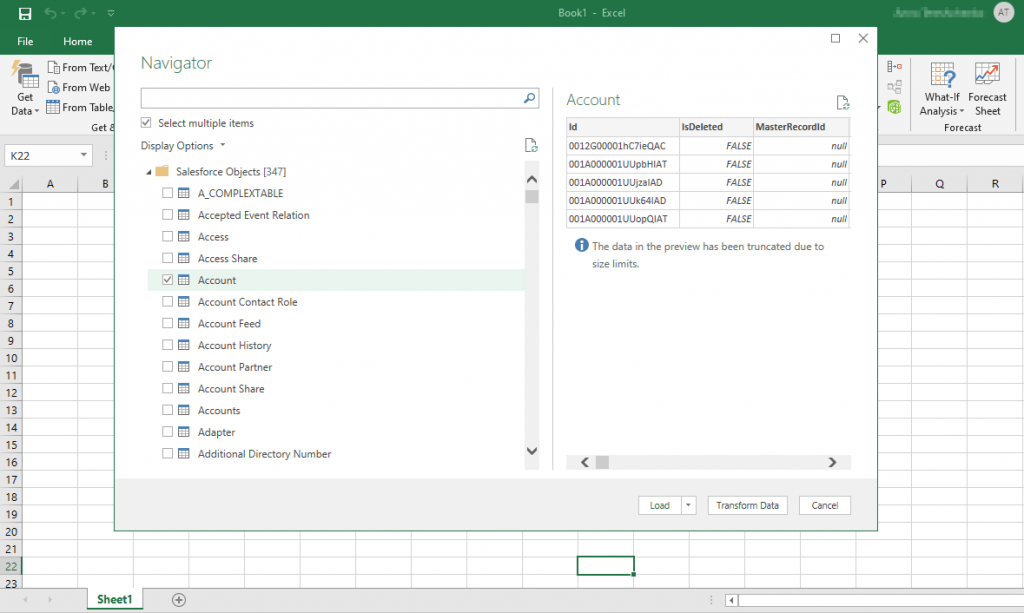
- Having signed in to Salesforce, select the objects you want to export to Excel in the Navigator window.
- If you want to export more than 1 object, click the Select multiple items check box. On the right, you can preview a table.
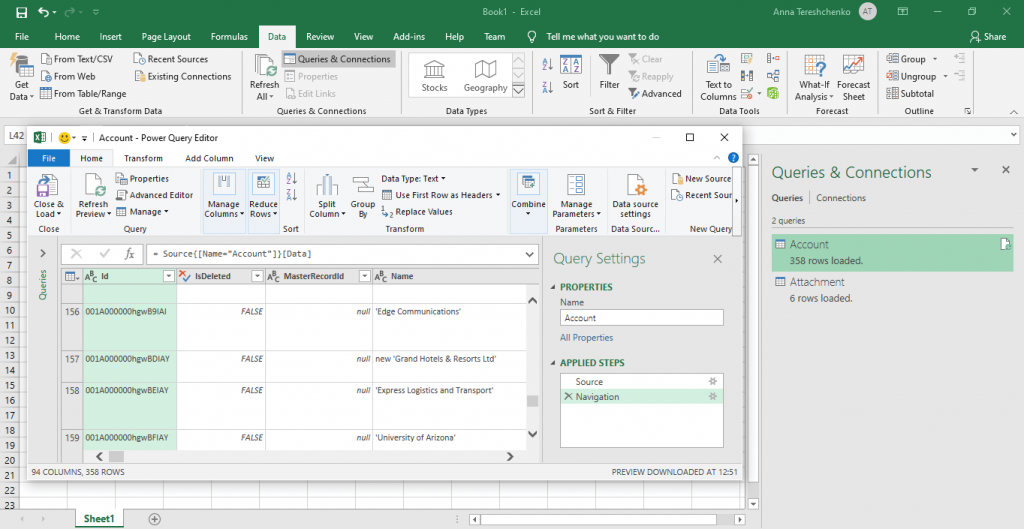
- Click Load to export data to the Excel worksheet. As we had selected two objects, Account, and Attachment, the corresponding data were downloaded and looked like in the picture below.
Pros and Cons of Using the Excel Original Interface
Pros
- Flexible Data Source Options. Excel can connect to various data sources, including databases, online sources, and cloud services.
- Data Transformation Capabilities. Power Query lets users clean and transform data before loading it into the worksheet, making data prep easier.
- Direct Integration with Excel. Data loads directly into Excel without third-party tools, allowing immediate access to Excel’s built-in features like charts and pivot tables.
- Live Data Connections. Excel allows data refresh options for some sources, so you can update data directly from the source without re-importing.
Cons
- File Size Limitations. Excel struggles with huge datasets, which can slow down the application or result in errors if the file exceeds Excel’s row and column limits.
- Limited Automation. While you can manually refresh connected data, Excel’s native tools don’t support fully automated exports or scheduling without using macros or external scripts.
- Data Source Compatibility. Not all data sources or formats are natively supported, and setting up connections to some databases may require technical knowledge.

4. Excel Add-Ins
The next way to pull Salesforce data into Excel is to use Excel Add-Ins for Salesforce. It enables companies to work with Salesforce contacts, accounts, opportunities, leads, users, attachments, tasks, and other objects as they would with usual Excel worksheets. Add-ins also allow companies to perform data cleansing and deduplication and apply Excel’s powerful data processing and analysis capabilities to this data.
In this section, we’ll discover the useful Excel Data Add-ins for data export, their pros, cons, and use cases, and go through the step-by-step example of the most popular one to see how such connections work.
Popular Excel Add-ins for Data Export
- Skyvia Query connects with various cloud services like Salesforce, HubSpot, and Google Sheets to pull data into Excel using SQL queries.
- Power BI Publisher allows users to export Power BI reports and visuals directly into Excel.
- XL-Connector enables seamless export and import of Salesforce data directly within Excel, including support for large data sets and bulk operations.
Let’s consider how to realize such a kind of export with Skyvia Query Excel Add-In.
This add-in is one of the most popular solutions in this area, pulling data directly into Excel from many data sources, such as Salesforce, HubSpot, Google Sheets, MySQL, etc. With it, users can use SQL queries to select and filter data or a visual query builder.
- Open Excel, go to the Insert tab, and select Get Add-ins.
- Search for Skyvia Query, then click Add to install the add-in.
- The add-in will appear in the right sidebar, connecting you with various data sources.
- Open the Skyvia Query pane in Excel.
- Log in with your Skyvia account or create a new one if you don’t already have one.
- Go to Skyvia and click New Connection.
- Select your data source (e.g., Salesforce, HubSpot, MySQL).
- Enter the credentials for the selected source and authorize access.
- Once connected, the data source and available objects (like Contacts and Accounts) will appear in the add-in pane.
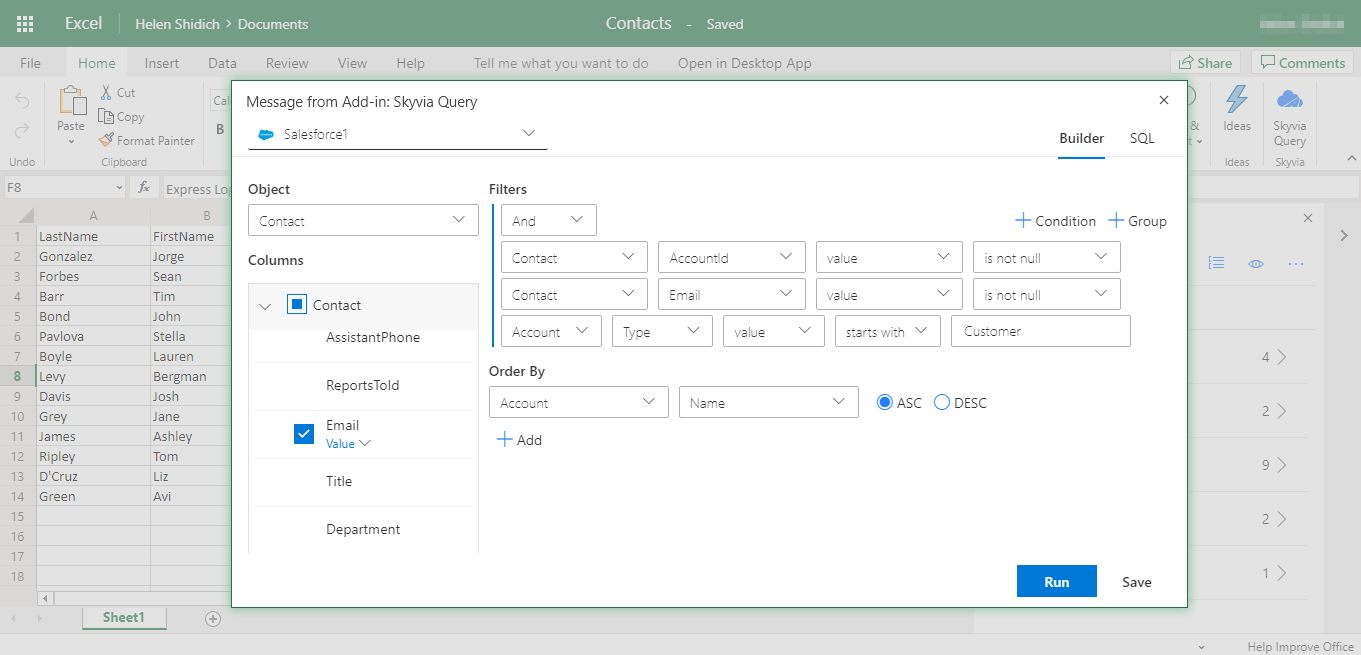
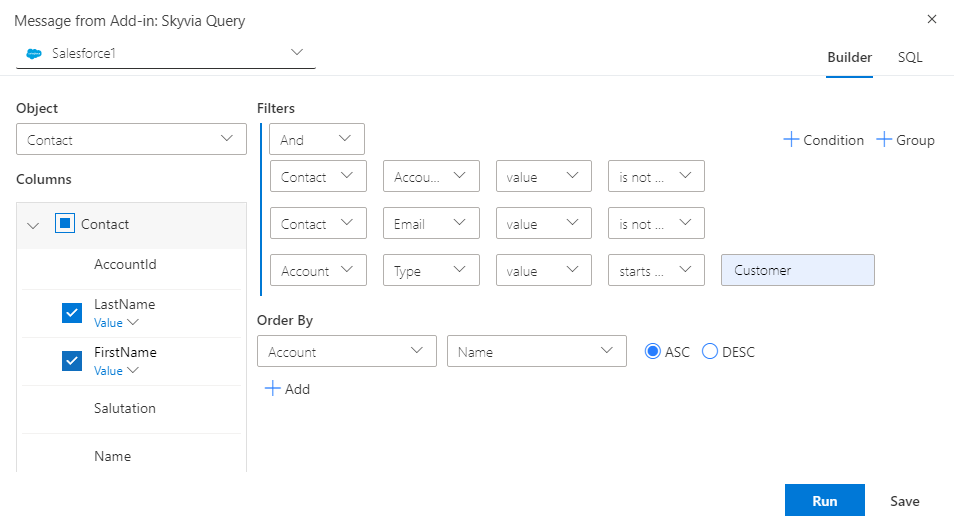
- Use the Visual Query Builder if you prefer a code-free experience or write an SQL query for precise data control.
- Select the desired fields and apply filters to refine your dataset.
- Click Run Query to execute your selection.
- The data will load directly into your Excel worksheet, which you can refresh or modify.
- To keep your data up-to-date, click the Refresh button. Skyvia will pull the latest data from the source, making it ideal for live updates.
Pros and Cons of Excel Add-ins
Pros
- Seamless Integration. Tools like Skyvia Query, Power BI Publisher, and XL-Connector make it easy to directly connect external platforms such as Salesforce or Power BI to Excel, streamlining workflows.
- Real-Time Data Access. These add-ins synchronize up-to-date data, allowing users to use the latest information without manual exports.
- Customization Options. Advanced filtering, aggregation, and visualization features let users tailor their data views to specific needs.
- Time-Saving Automation. Automated updates and syncing capabilities reduce the time spent on repetitive tasks.
Cons
- Performance Limitations. Handling large datasets may cause Excel to lag, impacting the efficiency of all three tools.
- Learning Curve. Tools like Power BI Publisher and XL-Connector may require training or prior familiarity, especially for non-technical users.
- Cloud Dependency. Skyvia Query and Power BI Publisher rely on stable internet connections for their functionality.
- Cost Implications. Advanced Skyvia Query and XL-Connector features may require premium plans, adding to operational expenses.
5. ODBC Drivers and OData Endpoints
ODBC drivers and OData endpoints offer dynamic methods for connecting Salesforce data to Excel. While ODBC drivers enable a direct connection between applications like Excel and databases, OData endpoints allow data access via a standard REST API protocol. Both methods support real-time data interactions but best suit different use cases.
Let’s consider each method in detail.
1. Exporting Salesforce Data Using ODBC Drivers
Open Database Connectivity (ODBC) drivers act as intermediaries between Excel and Salesforce, allowing Excel to pull Salesforce data in a structured format.
You may use one of the top three ODBC drivers, like Progress DataDirect Salesforce ODBC Driver, CData Salesforce ODBC Driver, or Skyvia’s Universal ODBC Driver, to export data from Salesforce to Excel.
Let’s consider how this method works in the example of Skyvia’s.
This driver supports 200+ data sources via Skyvia Connect SQL endpoints, including Salesforce. Unlike most ODBC drivers on the market, this driver offers a pay-for-traffic pricing model, which can be helpful if you don’t need to load large data volumes.
Steps to Use ODBC Drivers for Salesforce to Excel Exports
Note: Before installing an ODBC driver, ensure you use a matching Excel and ODBC Driver; e.g., if you use the 64-bit version of Excel, you must install a 64-bit ODBC Driver. Being installed for a specific data source, such as Salesforce, ODBC drivers can work with Excel and many other tools—that is a great plus for them.
Let’s consider step-by-step how this approach may be useful.
- Open Skyvia, click +Create New, and create a Salesforce connection.
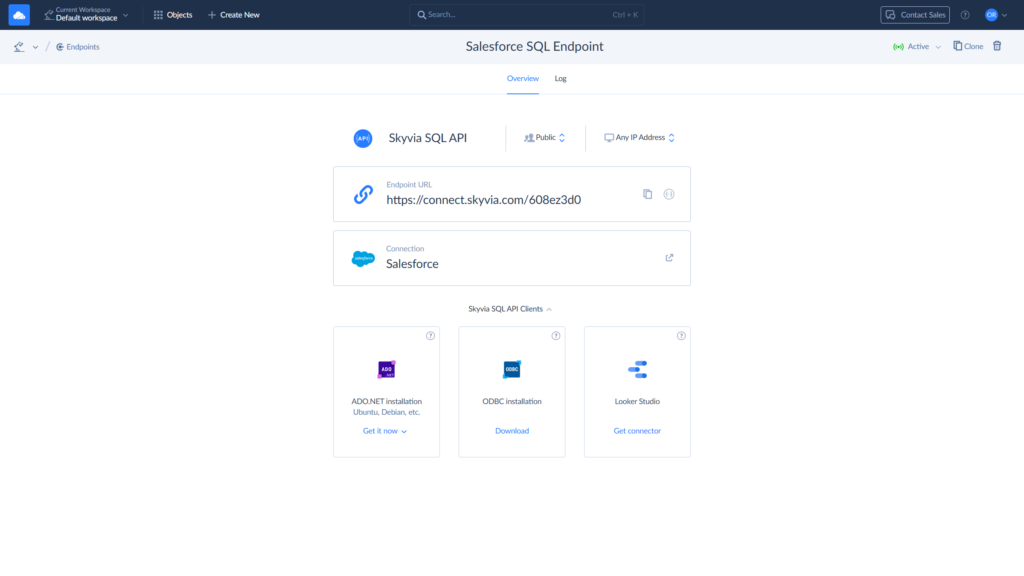
- Choose SQL Endpoint from the Connect category in the menu and create it.
- After you create an SQL endpoint, download the ODBC driver to continue.
- After you install the driver, you can register your SQL endpoint as an ODBC data source. Read more about registering data sources here.
- In Excel, go to the Data tab, choose Get Data > From Other Sources > From ODBC, and select the Salesforce ODBC connection.
- You can now use SQL queries in Excel to pull specific Salesforce data tables, columns, or filtered records.
- Run the query to load data directly into Excel. The data can then be refreshed periodically for updated records.
Pros and Cons of Using the ODBC Drivers
Pros
- Direct Data Loading. There is no need for intermediate files; data loads directly into Excel.
- SQL Query Flexibility. SQL is used to select and filter data, giving users control over the data they retrieve.
- Real-Time Updates. An ability to refresh data to reflect current records without re-exporting.
- Broad Compatibility. Support for ODBC connectivity across multiple third-party products.
- Universal Data Mapping. Salesforce data types and functions are mapped to ODBC data types and functions, which all ODBC-compatible tools understand.
Cons
- Complex Setup. Configuration may require technical knowledge, especially for defining SQL queries.
- API Usage Limits. Frequent queries may exceed Salesforce API limits, impacting data retrieval.
- Performance Impact. Large or complex queries can slow down Excel performance.
- One-Way Data Flow. There is no possibility to load modified data back to the source.
- Third-Party Reliance. There is no Salesforce original ODBC driver; i.e., only third-party ODBC drivers are available.
2. Exporting Salesforce Data Using OData Endpoints
Open Data Protocol (OData) is an OASIS standard that defines the best practice for building and consuming queryable and interoperable RESTful APIs in a simple and standard way.
Unlike ODBC, OData allows creating an endpoint to receive Salesforce data via OData or use the already created one by simply pasting its URL into Excel. However, creating an OData endpoint yourself is a challenging task.
To reduce time, costs, and effort, you can use third-party solutions like Skyvia Connect to simplify the use of OData. It is a cloud solution that doesn’t require downloading, hosting, or maintenance. You don’t need to develop any API. Just do a few steps:
- Generate endpoint.
- Configure settings.
- Set the data access options.
Steps to Use OData Endpoints for Salesforce to Excel Exports
Set up a connection with the Skyvia Connect endpoint
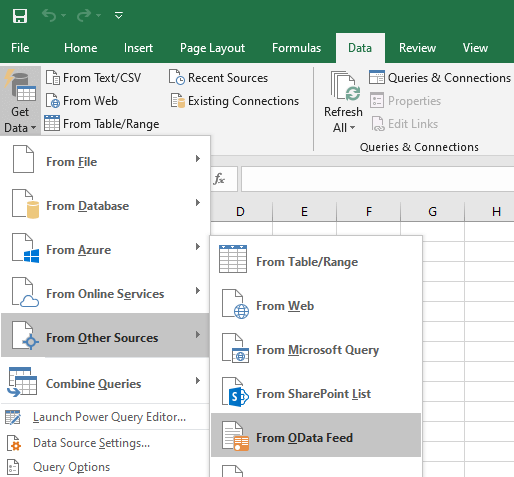
- Click the Data tab, then Get Data > From Other Sources to set up a connection with the Skyvia Connect endpoint.
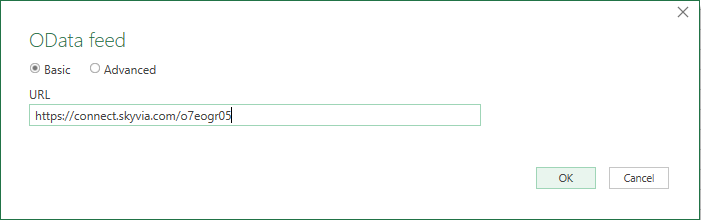
- Click From OData Feed.
- In the pop-up window, select Basic, paste the required endpoint URL, and click OK.
- Specify a link to the Salesforce endpoint in Skyvia Connect and fill out the User Name and Password fields.
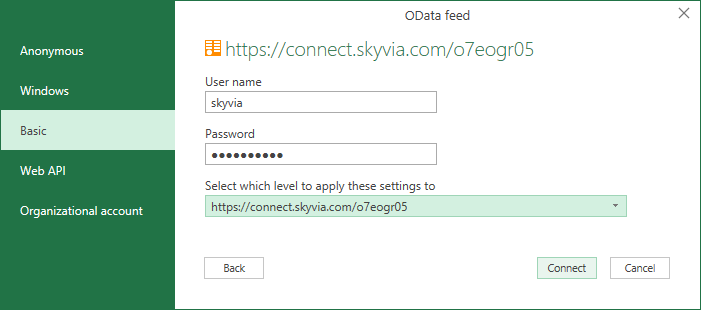
- Click Connect. Microsoft Excel will attempt to connect to the specified URL and display the list of Salesforce objects added to the endpoint in Skyvia.
Note: Please note that Microsoft Excel requires an OData connection to be authenticated through Windows authentication or HTTP basic authentication. You need to use HTTP basic authentication.
Exporting Data
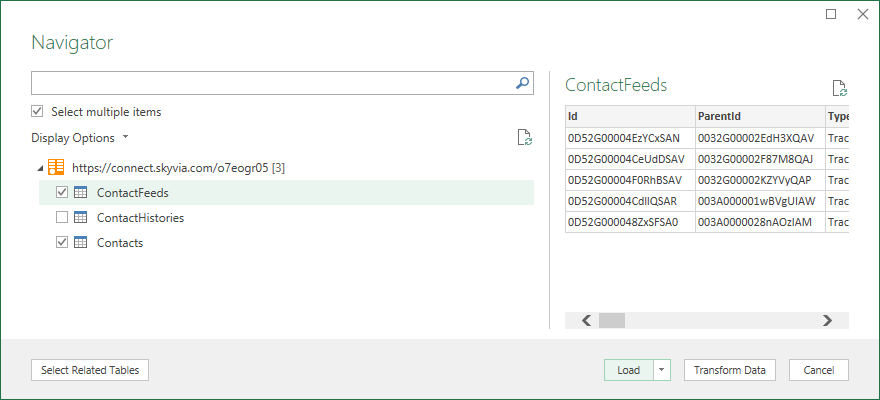
- Select the Contacts and ContactFeeds tables and click Load.
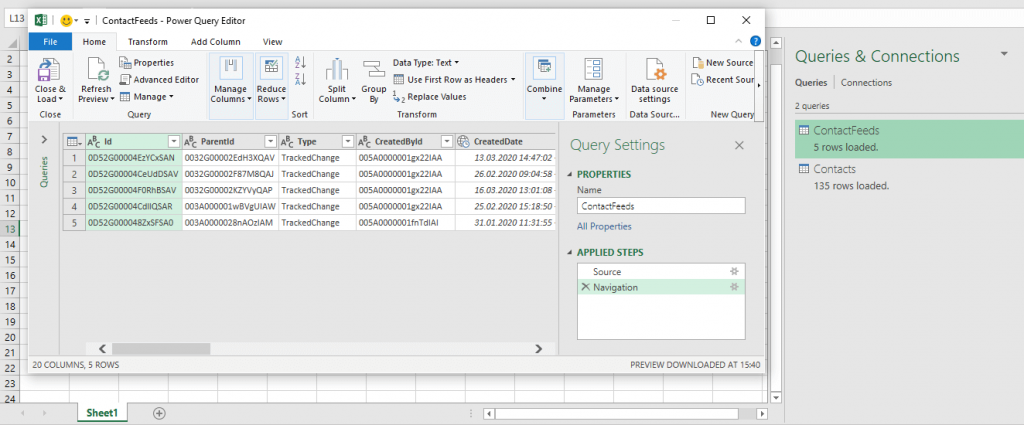
- Optionally, you can click the Transform Data button. It allows you to change the data being loaded to Excel, i.e., to filter something, add some columns, etc. However, this applies only to the data being loaded into Excel. The data in Salesforce will not be changed anyhow.
- The worksheet is filled out with the data from the specified table.
Pros and Cons of Using the OData Endpoints for Salesforce to Excel Exports
Pros
- Real-time Data Access. Data is accessed in real-time from Salesforce without creating duplicates.
- Wide Compatibility. Many tools, including Excel and BI applications, support OData, making it a versatile integration choice.
- Easy Setup. Minimal technical setup compared to SQL or custom API connections is required.
- Secure Access. Endpoint authentication provides access to endpoint data only to authenticated users, with the option to limit IP addresses for endpoint data access.
- No Credential Sharing. There is no need to share Salesforce credentials.
Cons
- API Usage Limits. High-frequency queries may consume API usage, impacting performance for real-time updates.
- Compatibility Issues. Some Salesforce field types or custom data structures may not be compatible with OData.
- Manual API Work. Need to build API manually or use paid services.
- Update Limitations. It’s impossible to update Salesforce data from Excel.
The Best Fits of Each Method
The table below summarizes which method aligns best with specific business needs, helping companies choose the most suitable option for exporting Salesforce data to Excel.
| Method | Business Cases to Fit |
|---|---|
| Salesforce Interface Data Export Options | Suitable for one-time bulk exports of complete Salesforce datasets. Perfect for backups or archiving purposes. Fits businesses requiring manual exports on a scheduled basis (weekly or monthly). |
| Salesforce Data Loaders | Fits for large-scale data migrations or transfers (up to millions of records). Best for businesses needing custom SOQL queries or incremental updates. Works well for data cleansing and advanced mapping requirements before export. |
| Excel Original Interface | Useful for quick ad-hoc data imports for analysis and reporting. Fits cases where users want to manually process or visualize smaller datasets. Suitable for businesses needing basic manipulations without advanced automation. |
| Excel Add-Ins | Fits businesses needing real-time connectivity to Salesforce data within Excel. Good for dynamic reporting and interactive dashboards. Best for users who prefer no-code solutions with easy configuration. |
| ODBC Drivers and OData Endpoints | Excellent for businesses requiring continuous, automated data syncing between Salesforce and Excel. Fits advanced use cases involving SQL queries or live updates for dashboards. Best for organizations with hybrid multi-platform integration needs. |
Conclusion
Exporting data from Salesforce to Excel offers multiple approaches, each catering to different business needs and technical expertise levels. Choosing the perfect export method depends on your team’s needs for data frequency, customization, and technical resources. With the right approach, exporting data from Salesforce to Excel can empower teams with up-to-date insights, streamline reporting, and enhance decision-making.

FAQ for Export Data from Salesforce to Excel

Can I automate exports from Salesforce to Excel?
Yes, several methods support automation. Third-party add-ins like Skyvia offer scheduling capabilities, allowing you to automate regular data syncs without manual intervention.
The Salesforce Data Loader can also automate tasks if configured with command-line options, though it requires more technical setup.
Which method is best for real-time data access in Excel?
ODBC Drivers and OData Endpoints offer the closest to real-time data access in Excel. With ODBC drivers, you can run SQL queries to retrieve and refresh data directly, while OData endpoints allow for on-demand data access without storing data duplicates, keeping Excel sheets up-to-date.
Are there limits on data volume when exporting from Salesforce to Excel?
Yes, different methods have volume considerations. For instance, Salesforce Data Loader can handle bulk exports effectively but is subject to Salesforce’s API usage limits.
Third-Party Add-ins may have volume limitations based on subscription levels.
Salesforce Reports may limit the number of rows per report.
What’s the best option for a non-technical user who needs frequent data exports?
Third-party add-ins like Skyvia and Salesforce Reports Export are excellent for non-technical users. Skyvia provides a no-code interface with automated scheduling, and Salesforce Reports allow users to customize and export data without complex setup, making both accessible and user-friendly.
