Are you looking for ways how to import a CSV file into SQL Server? Whether you’re integrating data from different platforms or updating your databases, importing CSV files is a common yet crucial task. In this guide, we explore the reasons why businesses import CSV to SQL Server. We will walk you through three methods for MS SQL CSV import:
- Using the BULK INSERT command
- SQL Server Management Studio’s Import Wizard
- Automated cloud-based ETL tools like Skyvia
By the end of this article, you’ll be equipped with the knowledge to choose the method that best fits your needs, ensuring a successful data import process.
Table of contents
Why to Import CSV to SQL Server
If you’ve ever worked with data, you know how messy things can get when dealing with different formats and systems.
Imagine you exchange data between 2 separate systems with different structures and architectures. How do we implement that if one is using a NoSQL database like PayPal’s Go and the other is using SQL Server, for instance? Just export a CSV file from the NoSQL database and complete the SQL import CSV.
The comma-separated values (CSV) format has been the easiest and fastest solution to this problem since 1972. While CSV is a simple and universal format, SQL Server provides a structured, scalable, and efficient way to store, manage, and analyze data. It is rated 4.5 out of 5 in Gartner Peer Insights and 4.4 out of 5 on G2 Crowd. Moreover, SQL Server stays in the top 3 among hundreds of competitors.
CSV to SQL Import Benefits
Let’s consider why importing CSV files to SQL Server is so essential.
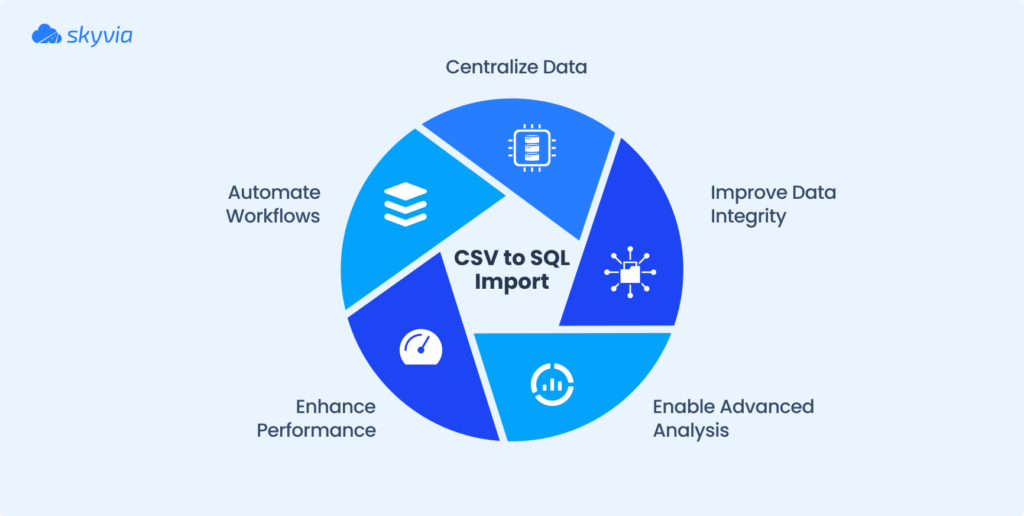
- Centralize Data – Store scattered data from multiple sources in one secure location.
- Improve Data Integrity – SQL Server helps enforce rules, validate data, and prevent duplicates.
- Enable Advanced Analysis – Run SQL queries, create reports, and integrate data into business intelligence tools.
- Automate Workflows – Set up scheduled imports for real-time updates and synchronization.
- Enhance Performance – SQL Server processes large datasets much faster than spreadsheets or flat files.
Everyday Use Cases for CSV to SQL Import
You may ask, what’s the point of the described benefits without using them in real life? Let’s look at CSV to SQL import in practice. Companies across various industries insert CSV into SQL for different reasons. Some typical scenarios include:
- Finance & Banking – importing transaction records, customer data, or payment logs from CSV files provided by banks or payment processors.
- E-commerce & Retail – migrating product catalogs, customer orders, or inventory lists from CSV exports of online stores.
- Healthcare – transferring patient records, appointment schedules, or medical test results into SQL databases for better management.
- HR & Payroll – loading employee details, attendance logs, or payroll reports from external HR software.
- Marketing & CRM – importing leads, campaign results, or customer feedback from marketing tools into SQL Server for analysis.
- Custom Software Development – using SQL Server as the backend for their applications and importing CSV files to update databases dynamically.
The import of CSV to the SQL Server is worth the effort. The next step is to decide how to do that. Below, we review the best methods to import CSV files to SQL Server.
How to Import CSV File in SQL Server (3 Easy Ways)
There are several ways to upload a CSV file to MSSQL table:
- BULK INSERT is an SQL command that imports files into a database table. It allows you to import large datasets quickly. Bulk import supports various file formats, including CSV to MSSQL. Use it if you are OK with coding.
- SQL Server Management Studio Import CSV Tools. This is a Microsoft native wizard for SQL server upload from CSV. It is great for small to medium datasets, and it doesn’t require coding. You have to install SSMS to do that.
- Using third-party ETL Tools. Though there are various data integration tools on the market, we will demonstrate this method using Skyvia Cloud Solution, a no-code platform for solving various data-related tasks. If you don’t want to install any software and write complex SQL commands, you can use Skyvia to import SQL Server SQL Server Import from CSV.
We compared all these methods in the table below.
| Method | Complexity | Performance | Best For | Requires SQL? |
|---|---|---|---|---|
| BULK INSERT | High | High | Large datasets | Yes |
| SSMS Wizard | Medium | Moderate | Small-to-medium datasets | No |
| ETL Tools | Easy | High | Automated workflows | No |
Let’s look at each method of CSV to SQL import in detail.
Prerequisites
Before trying SQL import CSV to table, you need a sample CSV and a target table in SQL Server:
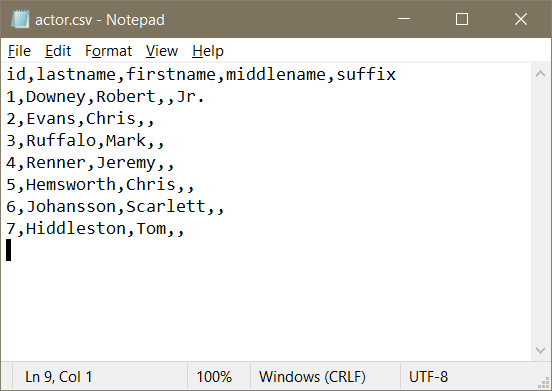
- Download a copy of the actor.csv file from here. Remember where you saved it.
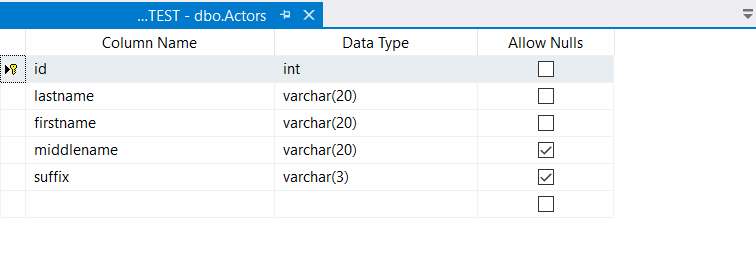
- Create a sample target table in your database. Use any database administration tool, like SSMS or DbForge. You can use the command below or add a table manually.
CREATE TABLE Actors (
    id INT PRIMARY KEY IDENTITY(1,1),
    lastname VARCHAR(20) NOT NULL,
    firstname VARCHAR(20) NOT NULL,
    middlename VARCHAR(20) NULL,
    suffix VARCHAR(3) NULL
);
The target table is structured the same in SQL Server.
In this tutorial, we use our sample server and database names. Replace them with your values.
Method 1: Using BULK INSERT for CSV to SQL Import
BULK INSERT is an SQL command that imports files into a database table. You can run it from SQL Server Management Studio or any other SQL Server tool.
- Clear the records prior to bulk load from CSV. TRUNCATE TABLE command deletes all the records in the target table.
- Bulk insert data from CSV file to SQL table. Run the BULK INSERT command. The location of the CSV should follow the rules of the Universal Naming Convention (UNC).
- Specify the file format. FORMAT=’CSV’ tells SQL Server what file format it’s dealing with.
- Tell SQL what row to count records from. FIRSTROW = 2 because the first row contains the column names. If there are no column names in the file, set FIRSTROW to 1.
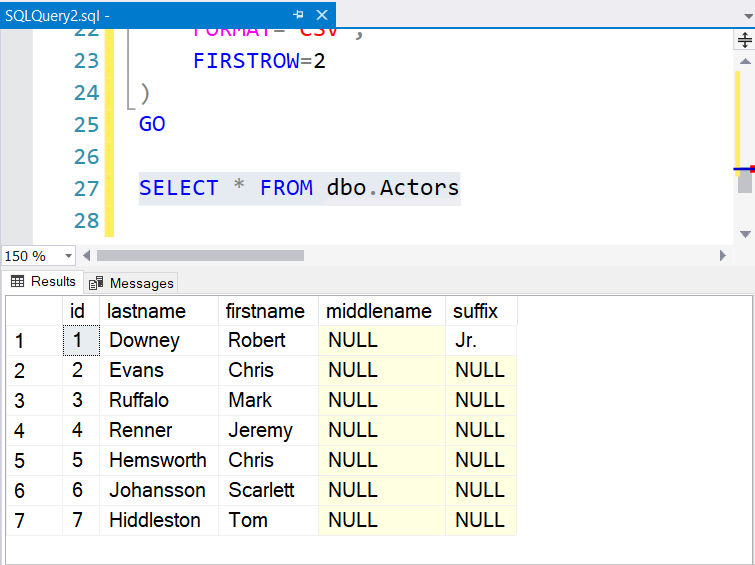
For bulk insert CSV to SQL Server, run the command below.
-- truncate the table first
TRUNCATE TABLE dbo.Actors;
GO

-- import the file
BULK INSERT dbo.Actors
FROM 'C:\Documents\Skyvia\csv-to-mssql\actor.csv'
WITH
(
        FORMAT='CSV',
        FIRSTROW=2
)
GO
As a result, you imported data from CSV to the MSSQL table.
Pros
- It is much faster than using a GUI interface;
- No need to parse the data. BULK INSERT does it for you. If the target column uses a data type too small for the data, an error will occur;
- Scheduling of execution possible in SQL Server Agent;
Cons
- You cannot take a CSV from cloud storage like Google Drive or OneDrive;
- Allows only SQL Server as the target database;
- Requires careful file preparation.
- Requires a technical person to code, run, and monitor.
Best For
One-time import of large datasets by users who are familiar with SQL syntax.

Method 2: Using SQL Server Management Studio Import CSV Tools
Another useful tool is the SQL Server Management Studio Import wizard.
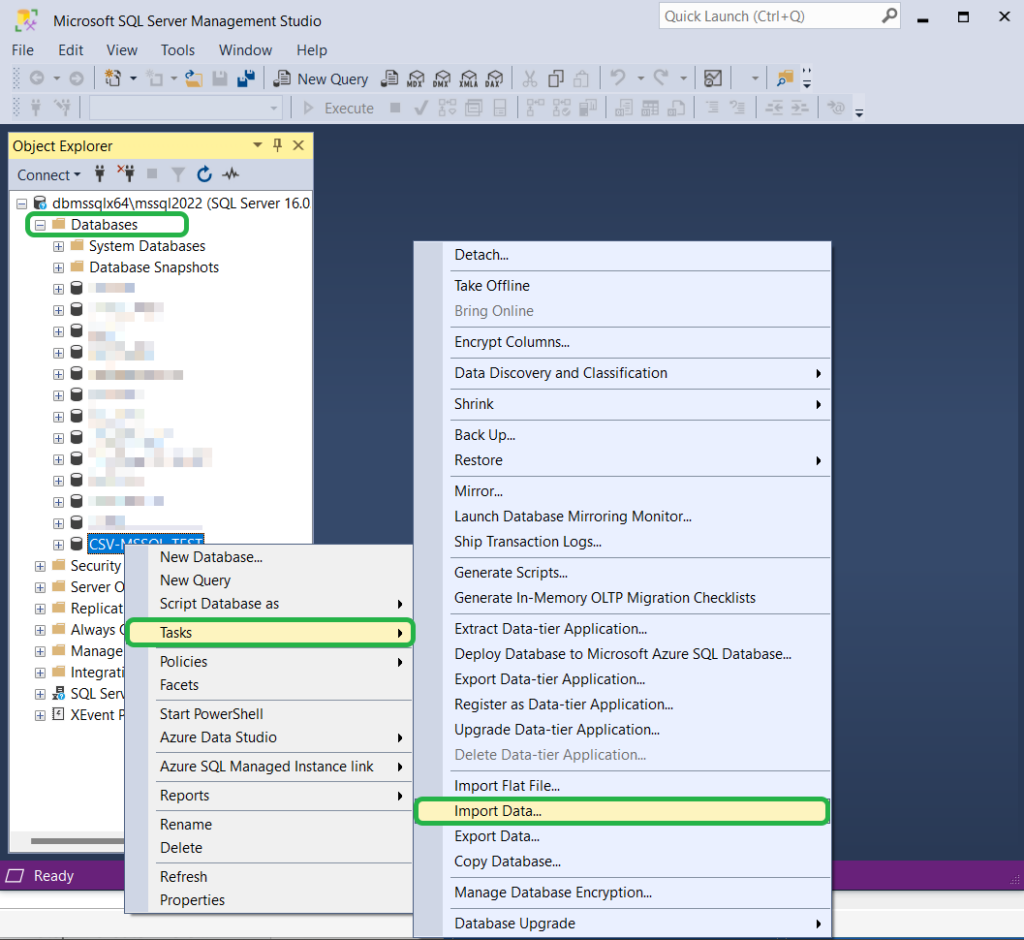
Step 1. Select the Target Database
- In the Object Explorer, expand the Databases folder and select the target database.
- Right-click that database and then select Tasks -> Import Data.
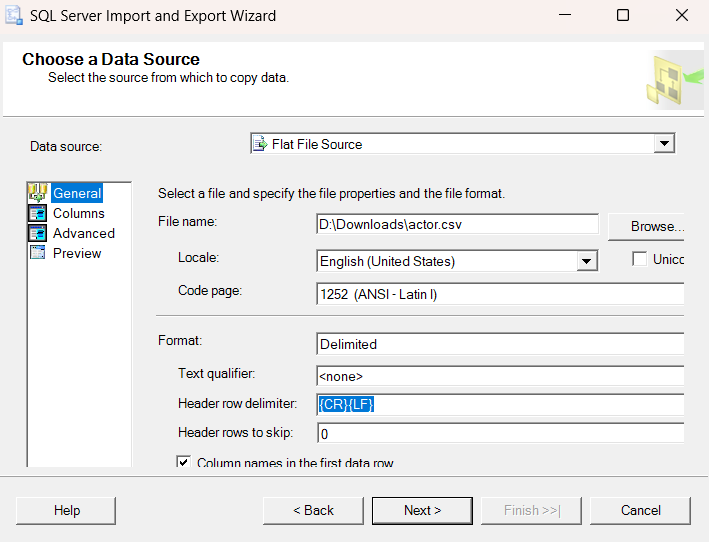
Step 2. Define the Source
- Click Next on the welcome screen and select the Flat File Source.
- Select the source file. Click Browse and specify the file location.
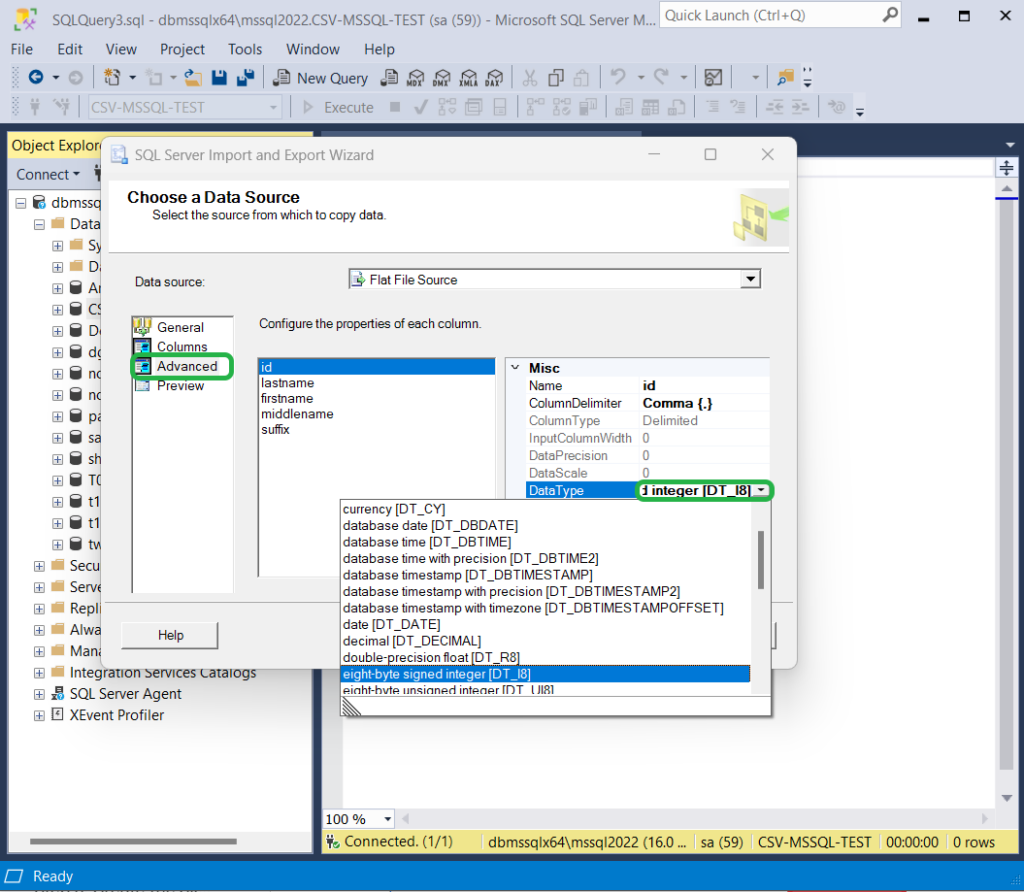
Step 3. Configure File Options
SSMS can detect the correct data types for each column. But if the automatic detection of data types and sizes is off, define them manually.
Pro tip: Whenever you import data from one platform to another, it’s best to match the correct types and sizes. Why? – To avoid errors and headaches.
- Click Advanced on the left.
- Select a column and set the type and size.
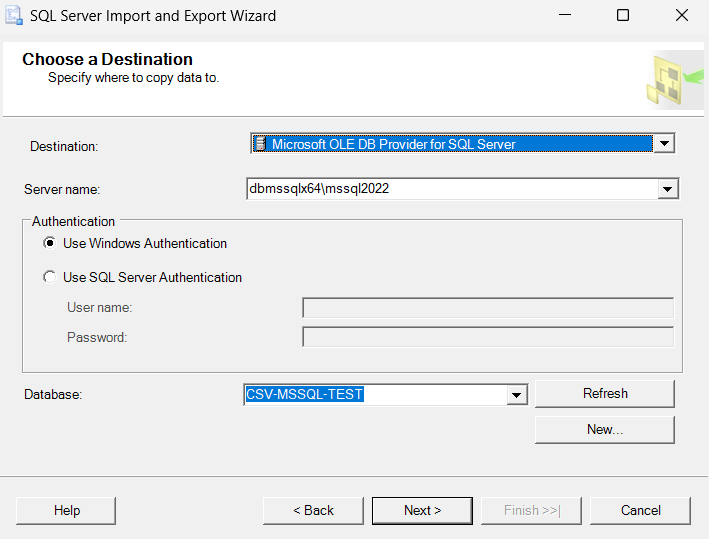
Step 4. Define the Destination
To specify the SQL Server as the target for import, do the following.
- Select Microsoft OLE DB Provider for SQL Server.
- Specify the SQL Server name and enter the necessary credentials. Select the Database name and click Next.
- Specify the Database Table.
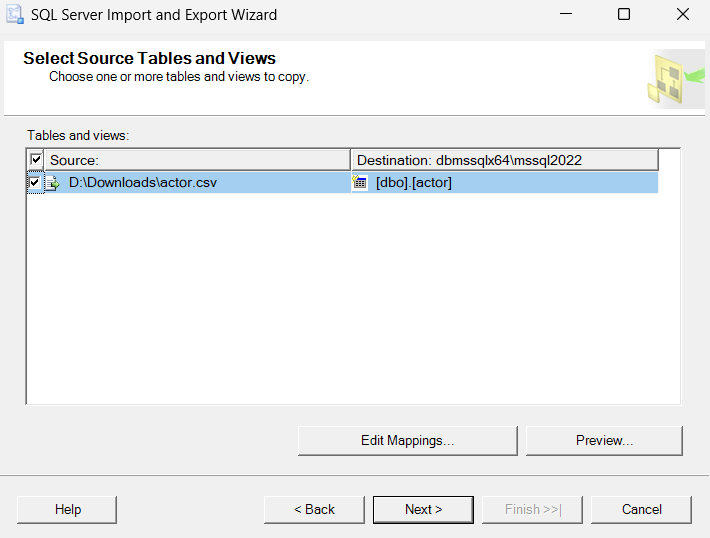
- Click Edit Mappings to see if the columns from the source match the target and set the mapping options below.
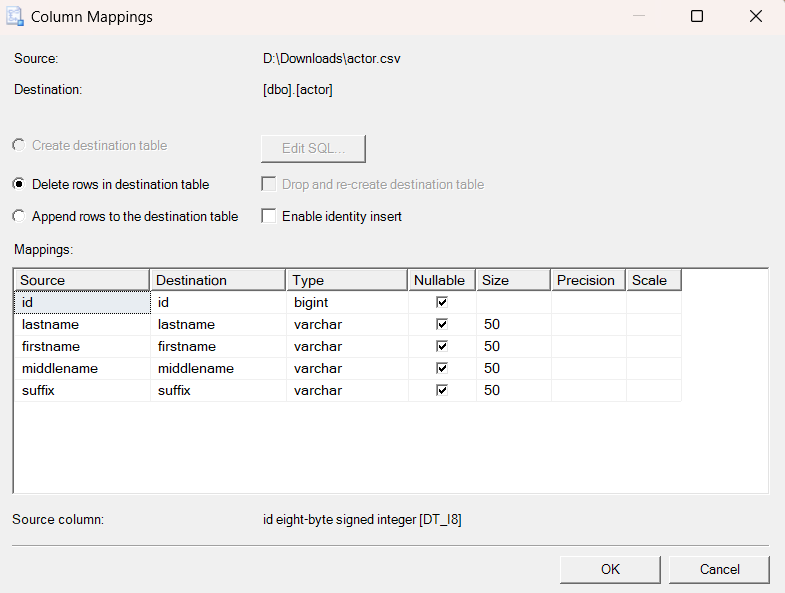
Note: If you attempted to import using BULK INSERT earlier, there is data present in the target table. To avoid duplicates or errors, delete rows in the target table or recreate a table.
- Optionally Save to an SSIS Package or Run Immediately. SSIS package allows you to schedule the import to run at regular intervals. In our case, we will just run it immediately.
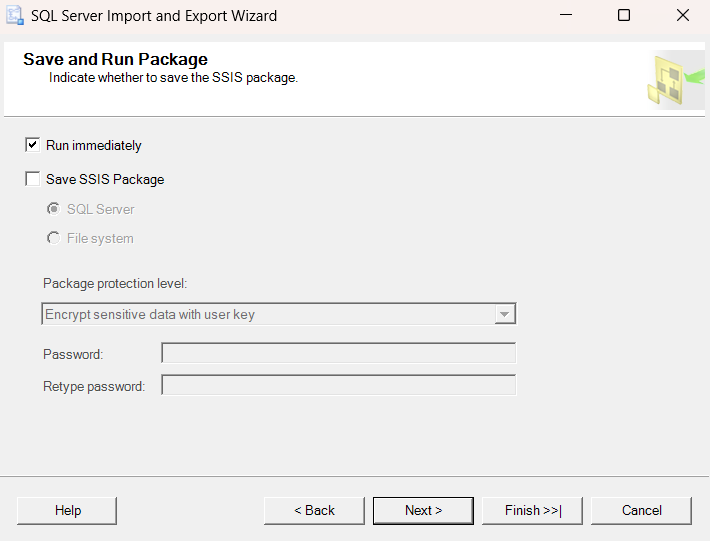
- Choose Next to see a summary of your settings. Click Finish to run the import.
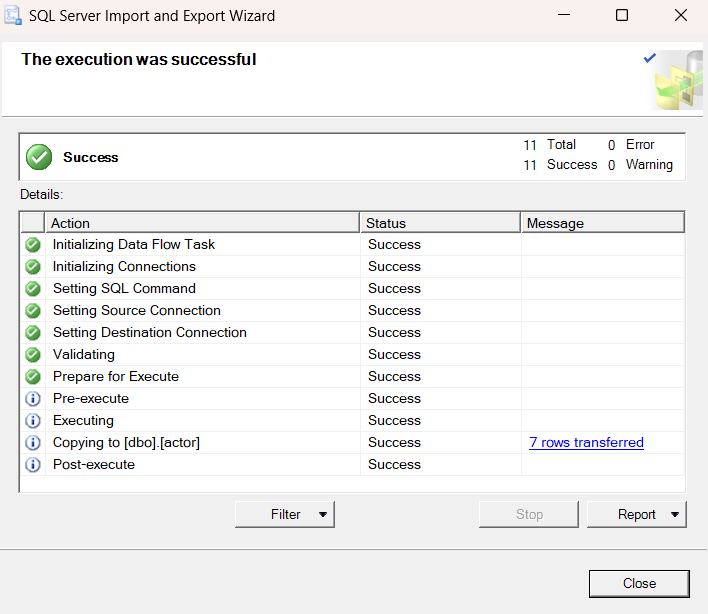
That’s it for importing CSV to SQL Server using Import Data in SSMS.
Pros
- No coding is required;
- If column mappings match the source and target, it just works;
- Allows many data sources and destinations, not just SQL Server;
- Saving to SSIS catalog and scheduling is possible but limited to what was defined;
Cons
- If you don’t have the specifications of the column types and sizes in the CSV file, column mapping is cumbersome;
- No way to get the CSV from Google Drive, OneDrive, or a similar cloud storage.
Best for
This method is the most helpful for one-time loads with no coding. It is great for importing files with few columns and a small data volume.
Method 3: Using ETL Tools – Skyvia Cloud Solution
This method involves using a no-code cloud ETL tool to import the CSV file to SQL Server. Unlike the two methods mentioned, this approach enables automatic CSV to SQL import from cloud storage like Google Drive, FTP, Amazon S3, DropBox, and others. In this section, we show how to use Skyvia to import the CSV file from Google Drive to SQL Server.
Prerequisites
- Account. To start, you need an active Skyvia account. You can register in Skyvia right now and get a free 2-week trial for any available subscription plan.
- Connections. To import CSV from Google Drive to SQL, you need to connect to both of them.
Follow the steps below to import CSV to SQL using Skyvia Import.
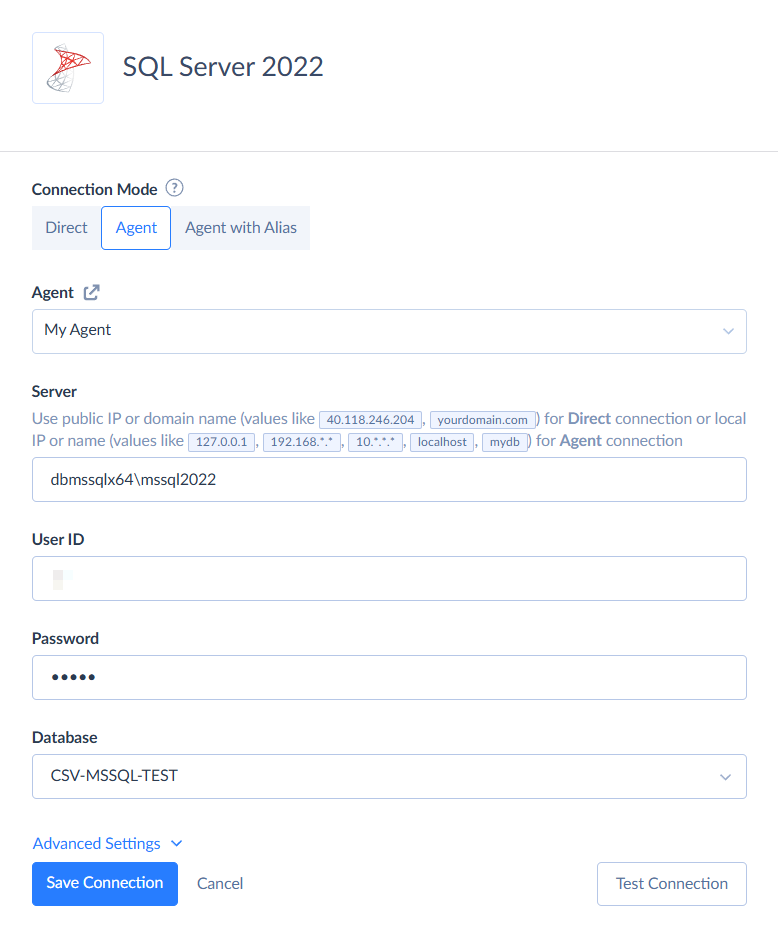
Step 1. Create SQL Server Connection
- Create a new Agent from the menu (optionally). If your SQL Server is protected from external connections, you need an Agent application to allow Skyvia to connect to a remote SQL Server.
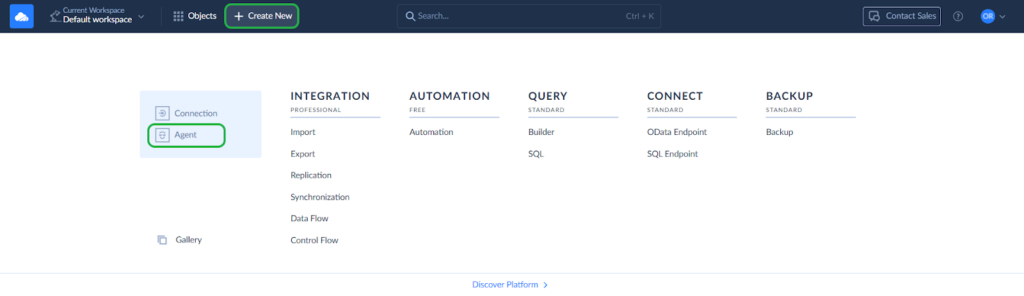
- Follow the installation and downloading instructions on the page.
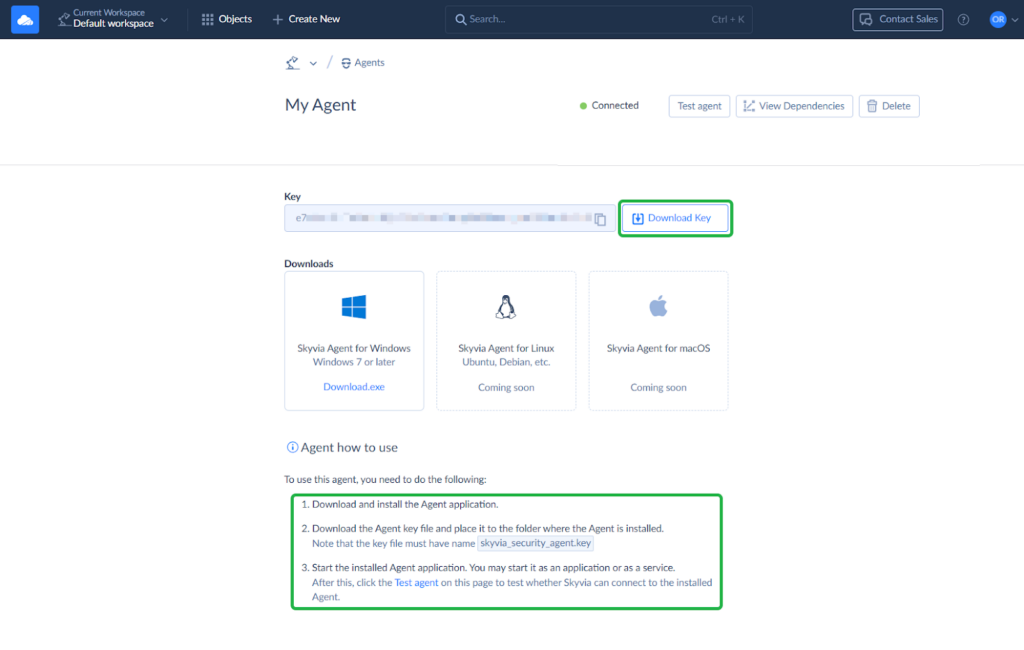
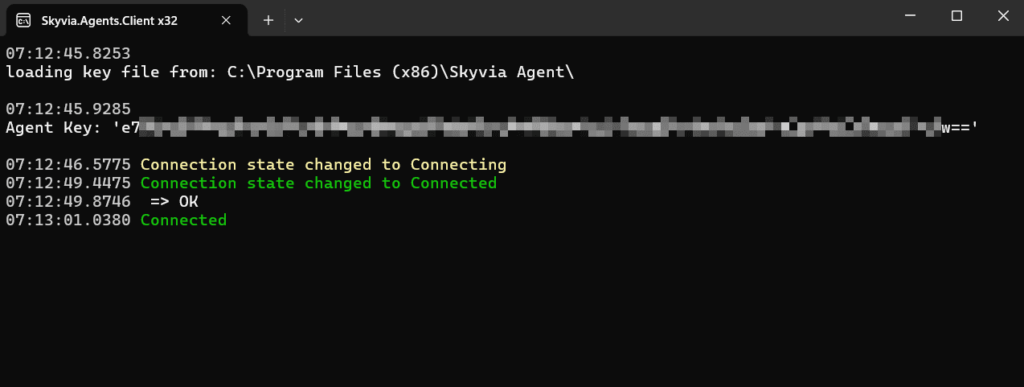
- Run the installed Skyvia agent application.
- Create a new connection and select the SQL Server.
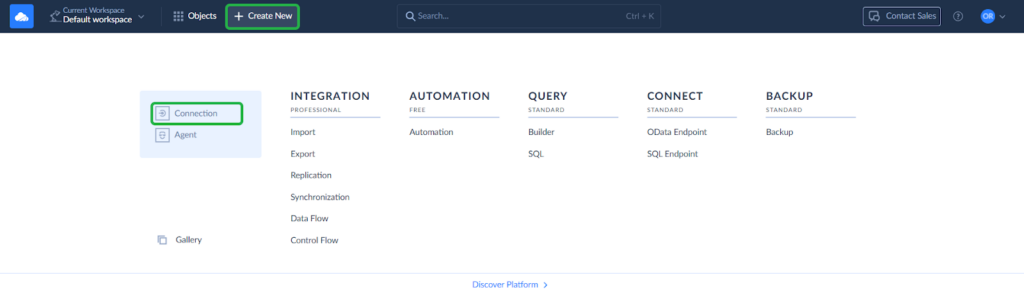
- Click the Agent under Connection Mode and select the agent you created earlier.
- Enter the server name, credentials, and database name.
Step 2. Create Google Drive Connection
- Create a new connection from the menu and select Google Drive.
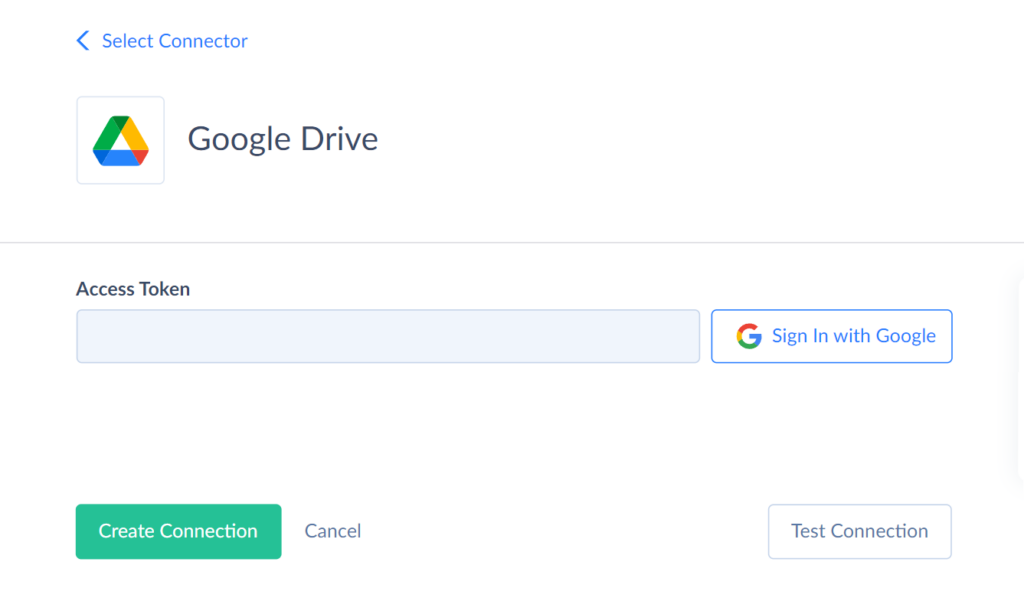
- Sign in with Google and save the connection.
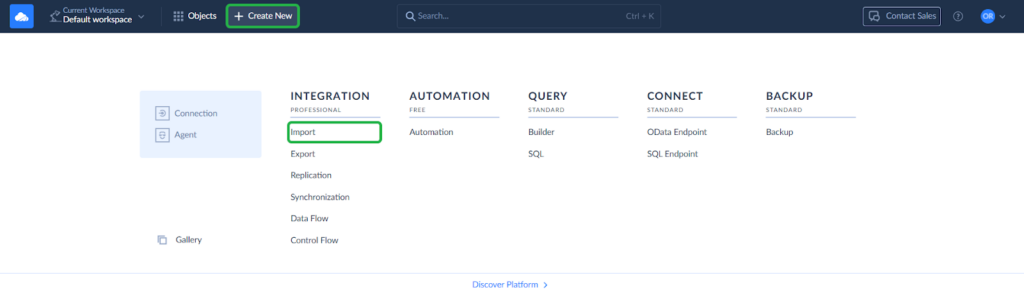
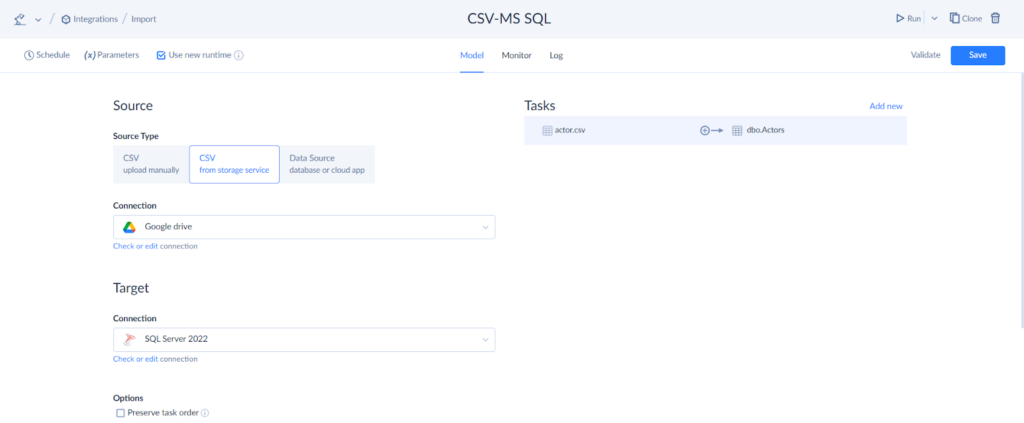
Step 3. Create the Skyvia Integration to Import CSV File to SQL Server
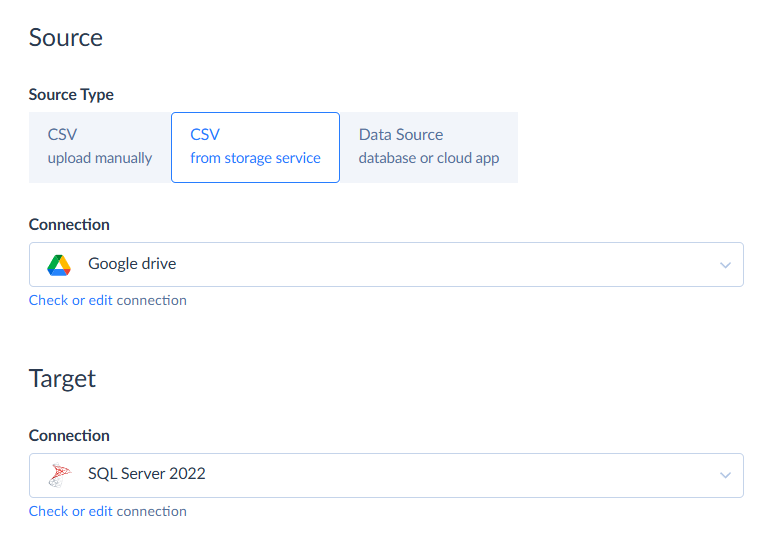
- Create a new import from the menu.
- Select your Google Drive connection as a source and SQL Server connection as a target.
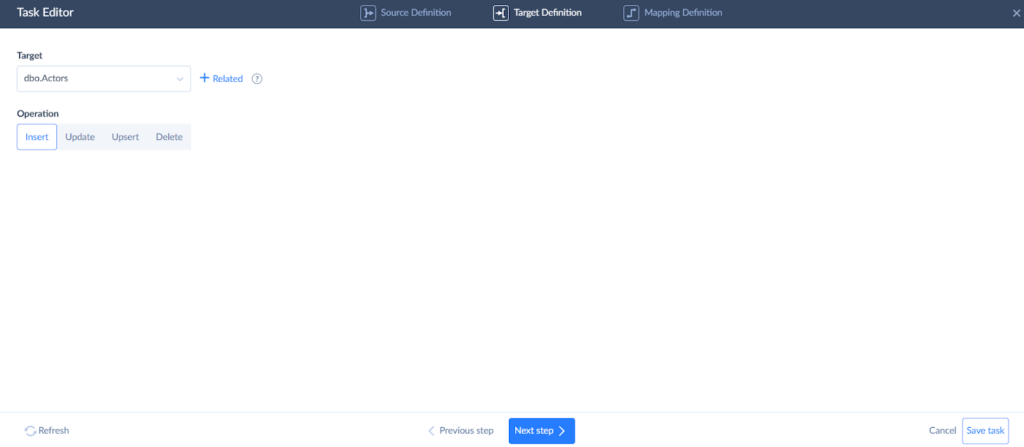
Step 4. Create Import Task
- Click Add new in the integration editor to create a new task.
- Select the actor.csv file in Google Drive. Skyvia will automatically detect the columns in the file.
- Make the Text Qualifier blank and the Code Page Western European Windows (1252). Finally, set the id column to DT_I4 (Integer).

- Select the operation to perform. Skyvia allows you to insert, update, or delete data. Let’s select the Insert operation.
- On the mapping definition tab, map the source file columns to the target table columns. Mapping allows you to transform your Source data to fit the Target data structure. Skyvia maps the columns with the same names automatically. You can change the automatic mapping and map other fields using available mapping types: Column, Constant, Expression, and Lookup.
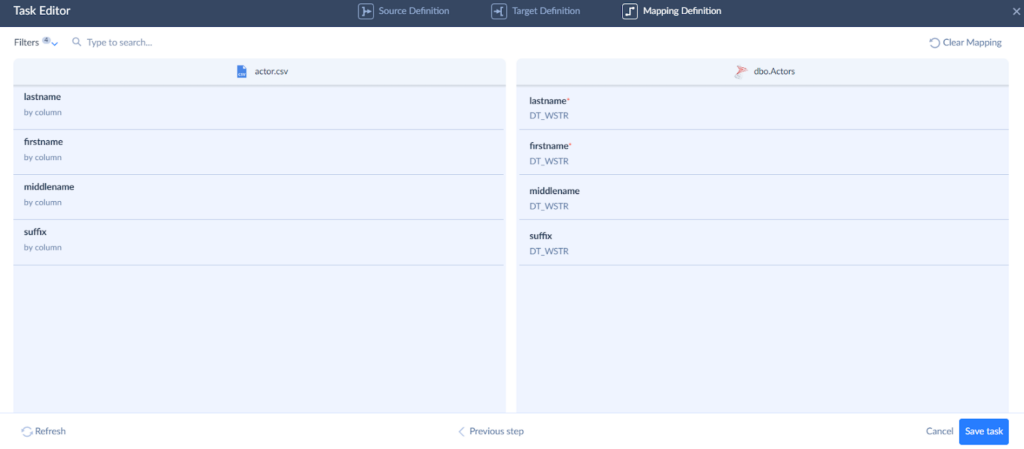
- Save the task and the integration. You can add multiple tasks to import several CSV files at once.
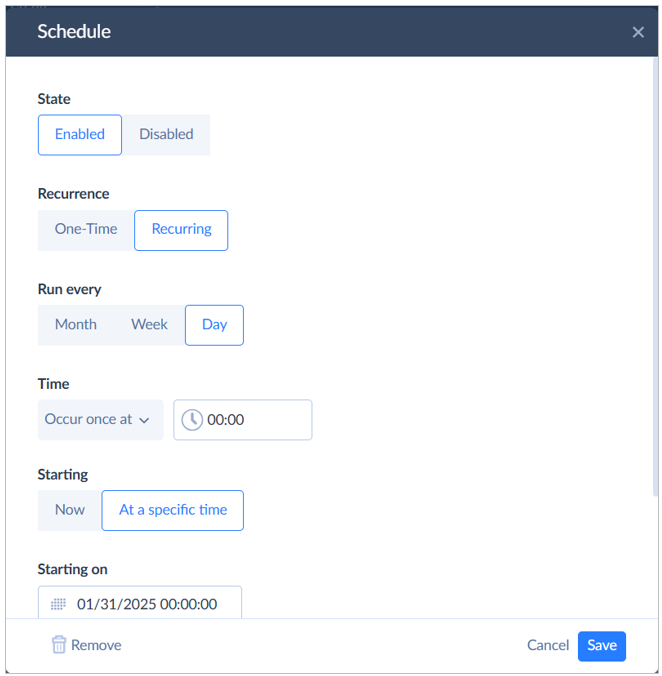
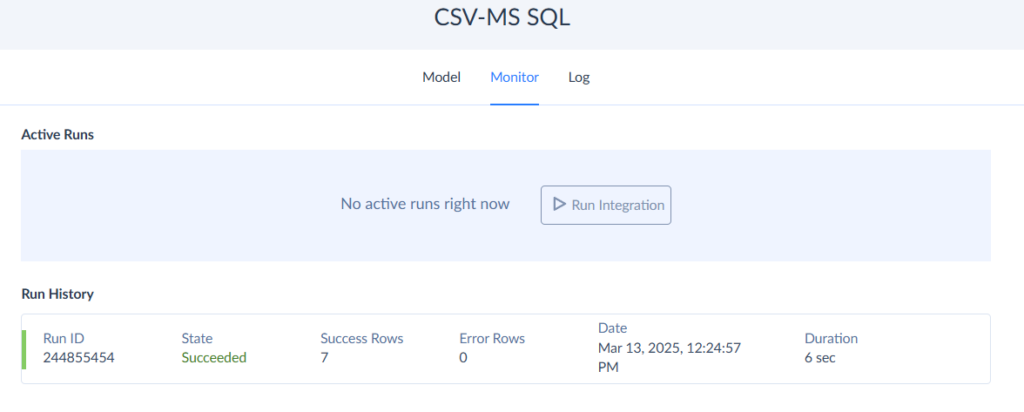
Step 5. Run the Integration and Check Results
- You can run the integration manually or schedule it for automatic runs.
- Track the integration results on the Monitor or Logs tabs.
Pros
- Skyvia supports various data sources, including cloud apps, storage services, and databases.
- Schedule an unattended integration execution.
- Free plan and 2-week trial.
- No need to install development tools.
- Rated 4.8 in G2’s Best ETL Tools and 4.8 in Gartner Peer Insights.
Cons
- Sometimes, queueing can take longer than the actual runtime duration. This can be improved.
- Advanced transformations are available for paid plans.
Best for
Long-term integrations, when you need to perform regular imports from different files. It is also helpful for scenarios including more than one target and complicated transformations.
Alternative Methods for Importing CSV Files to SQL Server
There are also several alternatives to the mentioned methods that you can use to import data from CSV to an MS SQL table. We outlined them below.
Using OPENROWSET for CSV to SQL Import
If you prefer working with SQL queries, the OPENROWSET function is a flexible way to import CSV data without involving external tools. This method allows you to treat a CSV file as a table and query it directly within the SQL Server.
Best For:
- One-time imports where you don’t want to set up complex configurations.
- Ad-hoc queries on CSV data before inserting it into a table.
Using PowerShell for CSV to SQL Import
PowerShell is a scripting tool that enables automation of CSV imports into SQL Server. By using Import-CSV and Write-SqlTableData, you can create scheduled jobs for automatic data updates.
Best For:
- Automating recurring imports.
- Handling CSV data transformations before inserting them into SQL Server.
- IT administrators who prefer scripting solutions.
Automating Imports via SQL Server Integration Services (SSIS)
SQL Server Integration Services (SSIS) is a robust ETL (Extract, Transform, Load) tool that can automate CSV-to-SQL imports.
Best For:
- Enterprises managing frequent or high-volume CSV imports.
- Complex data processing needs, such as transformation and validation before inserting data.

Conclusion
Importing CSV files into an SQL Server is a critical task for businesses looking to centralize data, improve accessibility, and enhance performance. Throughout this guide, we explored three primary methods for achieving this:
- BULK INSERT – ideal for developers and database administrators who prefer a fast, code-based solution for large datasets.
- SQL Server Management Studio (SSMS) Import Wizard – an excellent choice for users who prefer a GUI-based approach for small to medium-sized data imports.
- ETL Tools like Skyvia – the best option for automating recurring imports, integrating cloud data, and managing more complex workflows.
Each method has its strengths, and the right choice depends on your business needs, data volume, and technical expertise.
Explore More
Looking for more SQL Server tips and best practices? Check out these articles:
- How to Import CSV to MSSQL table using SSMS
- SQL Server Data Warehouse: Easy and Practical Guide
- Best ETL Tools for Microsoft SQL Server for 2025: A Deep Review
FAQ for Import CSV File to SQL Server

Can I automate CSV imports into SQL Server?
Yes. SQL Server Integration Services (SSIS) or cloud-based ETL tools like Skyvia allow you to schedule and automate imports.
Is there a way to import CSV files from Google Drive or OneDrive directly?
Yes. Cloud-based no-code ETL tools like Skyvia can import CSV files directly from cloud storage, eliminating the need for local file downloads.
Can I import multiple CSV files into SQL Server at once?
Yes, with Skyvia you can automate the process and import multiple files into SQL Server in a single integration.