Have you ever wondered why Salesforce and ERP integration systems can feel like trying to solve a puzzle blindfolded? If you’re nodding your head, you’re not alone. The journey to harmonizing these two vital systems can be an emotional roller coaster.
Imagine this: You’re in the driver’s seat of your business, trying to navigate the winding road of Salesforce and ERP integration. Frustration builds as data refuses to flow seamlessly. Processes become sluggish, and errors rear their ugly heads. It’s an anxiety-inducing experience, like crossing a minefield without a map.
But fear not, because there’s a silver lining to this cloud of chaos. In this guide, we’re about to unveil a fantastic cloud integration tool that’s easy to use. It’s the key to addressing those pain points that keep you up at night.
We understand that uncertainty and anxiety can cloud your path, but we’re here to tell you that pain can become your greatest gain. So, fasten your seatbelt and get ready to discover how you can break free from the Salesforce and ERP integration chaos once and for all.
Table of Contents
- What is ERP?
- How Salesforce and ERP Integration Drives Business Success
- The Benefits of Salesforce and ERP Integration
- Advancing Salesforce and ERP Integration with Skyvia
- Best Practices in Salesforce and ERP Integration
What is ERP?
Enterprise Resource Planning, or ERP, is the backbone of operations in many businesses worldwide. It’s like the central nervous system. It coordinates and streamlines various functions within an organization. ERP systems handle finance, human resources, manufacturing, and supply chain management. Think of it as the conductor of a grand orchestra. It ensures that every instrument plays in harmony to create a beautiful symphony of efficiency.
Now, imagine ERP as a versatile tool that transcends industries. While it’s commonly associated with manufacturing and distribution, it doesn’t there. ERP has found a home in sectors as diverse as healthcare, finance, and retail. It’s adaptable to the unique needs of each industry. It offers tailored solutions to complex challenges.
But, ERP systems come with their own benefits and challenges. The benefits are like the sweet fruits of hard labor. They include enhanced productivity, streamlined processes, and data-driven decision-making. But, the journey to put an ERP system in place can be like a rollercoaster ride. These challenges include costs, time-consuming deployments, and employees’ resistance to change.
With ERP’s significance now clear, let’s explore Salesforce’s role in the integration puzzle. Is Salesforce an ERP system on its own? Or are they distinct entities that can coexist harmoniously? Let’s unravel the mysteries in the upcoming section.
Salesforce and ERP: Are They the Same?
Now, it’s time to uncover the relationship between Salesforce and ERP systems. Let’s begin by unraveling the primary functions of Salesforce.
Salesforce is a Customer Relationship Management (CRM) tool. It’s like a seasoned detective, focusing on managing customer interactions with finesse. It’s a hub for sales, marketing, and customer support activities. Imagine it as the Sherlock Holmes of your business. It helps you solve the mysteries of customer preferences, leads, and sales pipelines.
Now, let’s step into the ring to compare and contrast Salesforce with ERP systems. ERP systems are like the Swiss Army knives, handling various organizational functions. But Salesforce is the CRM scalpel, precision-focused on customer-centric operations. The distinction lies in their core purposes. ERP caters to internal processes like finance and HR. Meanwhile, Salesforce prioritizes external customer interactions.
But the question is: Can Salesforce serve as an ERP?
This debate can be as polarizing as discussing which is better, coffee or tea. Some argue that Salesforce can indeed function as an ERP. Smaller businesses with less complex needs are their examples. It’s like saying a Swiss Army knife can replace a toolbox in certain situations. But, ERP systems are like seasoned captains steering the ship of enterprise operations. It’s a responsibility Salesforce, in its CRM essence, may not fully embrace.
But, Salesforce and ERP systems can coexist harmoniously. In the next section, we’ll delve into the strategic importance of integrating Salesforce with ERP.
How Salesforce and ERP Integration Drives Business Success
Integrating Salesforce and ERP is like building a bridge. A bridge between the customer-focused world and your internal operations. It means your team has access to accurate data to make decisive actions. It’s like switching from navigating with an old, unreliable paper map to a GPS that guides you on the most efficient route.
Real-World Success Story from a Real-Estate Company
Let’s have a real-world example to showcase the potential of this integration.
A real estate company has an ERP system. And they need to integrate it into Salesforce and Mailchimp. They also needed to push back some data from Salesforce to the ERP system. So, they decided to look for third-party tools that can do these.
So, they found their dream tool and the seamless integration they ever wanted. Check out the full story here.
This real-world success story illustrates the potential of integration, transforming chaos into harmony. The following section will discuss the benefits of Salesforce and ERP integrations. We will uncover the advantages that await businesses on this integration journey.
The Benefits of Salesforce and ERP Integrations
It’s time to unlock the treasure chest of benefits of this integration quest.
Simple Data Distribution
Integrating Salesforce with your ERP system simplifies data distribution to a remarkable degree. It’s like having a well-oiled machine that automatically shares information across departments. This streamlining not only saves time but enhances operational efficiency.
Advanced Control and Comprehensive Analytics
Integration offers you the reins to control your data and processes more effectively. With comprehensive analytics, you can delve deeper into your data. So, you will gain valuable insights that would have remained hidden in the chaos.
Boosted Efficiency and Elevated Customer Engagement
Integration streamlines business processes, making them as efficient as a high-speed train. This newfound efficiency extends to customer relationship management. It’s where you can engage with customers in a more personalized and timely manner.
Minimizes Inaccuracies and Duplication in Data Input
One of the benefits of integration is its ability to reduce errors and duplicate data entry. It’s like having a diligent proofreader who spots typos before they mark your document. This isn’t just about short-term gains. It’s a long-term investment that saves costs and improves data quality over time.
But wait, there’s more to uncover in our next section! We’ll walk you through the steps of how to integrate Salesforce and ERP. Get ready to embark on a practical journey towards integration success.
Advancing Salesforce and ERP Integration with Skyvia
The cloud integration solution used by the real-estate company earlier is Skyvia. So, it’s more than a simple reason to bring you the easy steps to integrate Salesforce into your ERP system.
And what more can you ask for? At the time of writing, Skyvia has a 4.8 customer satisfaction rating in G2. And a 4.9 rating in Gartner Peer Insights. So, the numbers speak of a happy integration journey ahead.
Whether you’re connecting Salesforce to Microsoft Dynamics 365, NetSuite, or Xero, the key steps remain consistent.
General Steps
The following are the general steps:
STEP 1: Create Connections
Begin by setting up the essential connections in Skyvia. You’ll need a connection for Salesforce and another for your chosen ERP system. Ensure that accounts for both systems are active, providing the necessary credentials. Depending on your requirements, you may need more connections. Simply follow the general steps below for each of those connections.
Creating a connection in Skyvia is easy. Check out the steps below:
- Login to Skyvia if you haven’t done so.
- Then, click NEW from the top panel of the page, and select Connection.
- Type the name of the connector you need in the search box. For example, Salesforce.
- Click your desired connector from the search results.
- Give your new connection a descriptive name.
- Configure the connection. You will need the credentials for your connector to work.
- Then, click Test Connection to see if you can connect.
- Finally, if you have a successful test connection, click Save connection or Create connection.
Do the same steps for creating connectors for your ERP system. The following sections will show the different Skyvia connectors we are covering.
Salesforce Connector
Find below the screenshot of the Salesforce connection sample.
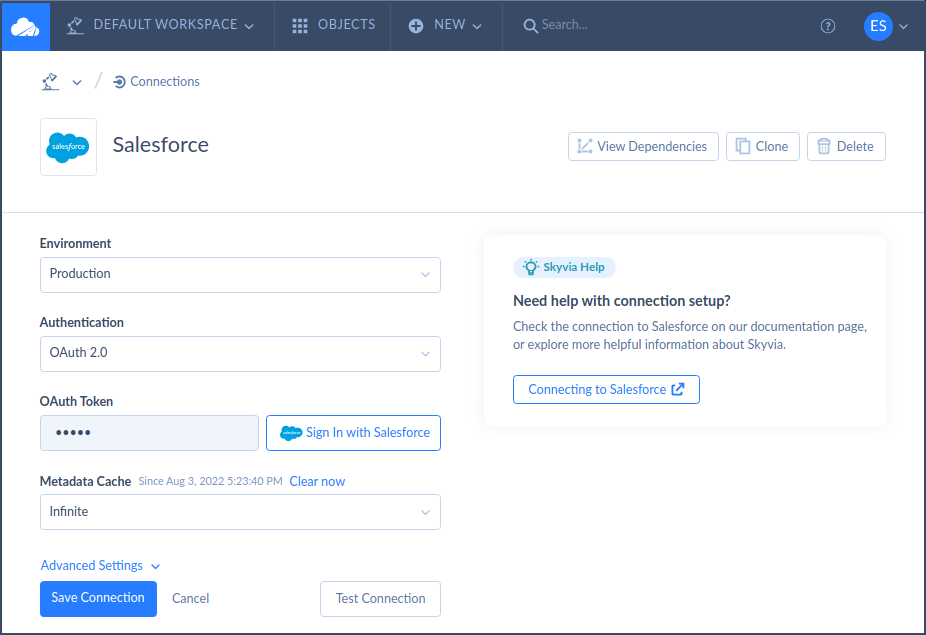
You only need a few boxes to fill. And the most important is the Salesforce OAuth token. To get that token, sign in to Salesforce. Note that Skyvia will not store your Salesforce credentials. And the best part of saving the connection is about reuse. You can reuse this same connection on other Salesforce integration projects.
For more information about connecting to Salesforce, see the official documentation.
NetSuite Connector
NetSuite is a comprehensive cloud business management solution from Oracle. It provides ERP, CRM, and other business solutions. Skyvia can integrate with Netsuite with the same general steps as earlier. But you need to use a connector for NetSuite.
Below is the configuration for the NetSuite Connector in Skyvia:
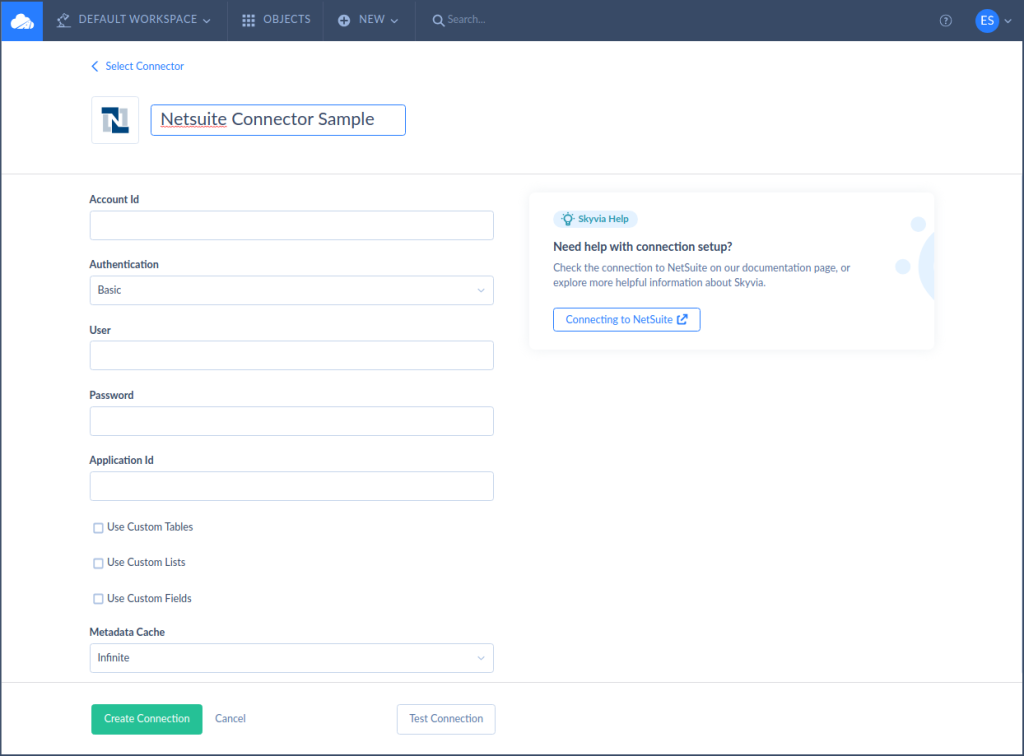
You can get the Account ID, Application ID, and the rest from your NetSuite administrator. Or from someone who’s an expert in NetSuite in your company. Input them in the form above. Then, test the connection. And finally, click Create Connection.
Once you have a successful connection, you can use it in any Skyvia integration package.
If you need more help connecting to Netsuite, click the Connecting to NetSuite button. It will take you to the documentation.
Xero Connector
Xero is a finance app covering automatic bank feeds, accounts payable, invoicing, and more. Skyvia can do a 2-way integration between Salesforce and Xero. So, you can create invoices for your Salesforce customers and more. All you need is to create a Xero connection in Skyvia and follow the general steps earlier.
Below is the screenshot for the Xero connector configuration:
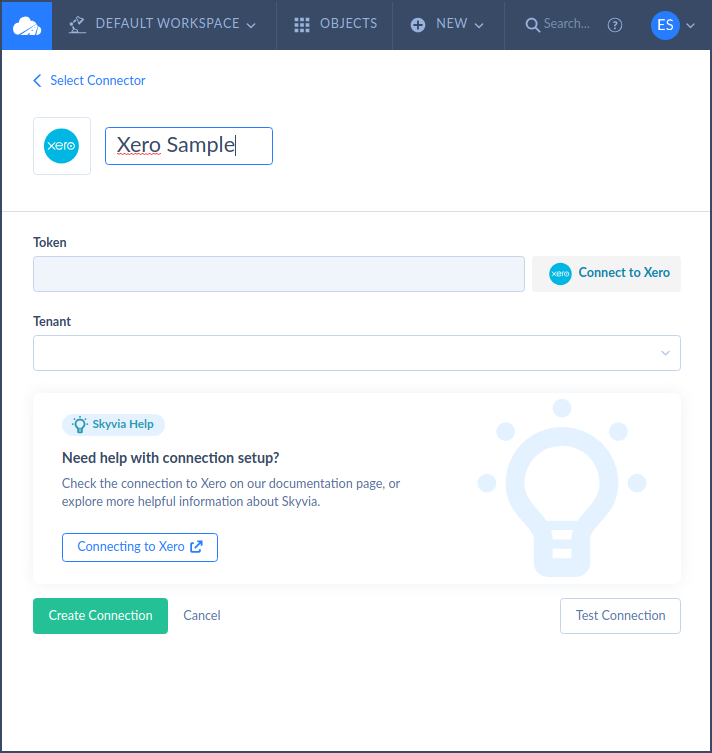
Sign in to Xero to get an Access Token. Then, provide the Tenant. Then, test the connection. And finally, click Create Connection.
A successful Xero connection will let you use it in Skyvia integration packages.
If you need more help connecting to Xero, click the Connecting to Xero button. It will take you to the documentation.
In-House ERP Using SQL Server
Some companies develop their own ERP in-house. And they prefer storing it in a relational database like Microsoft SQL Server. But it doesn’t matter whether the ERP is custom-made or not. Skyvia can connect with them.
So, this section will focus on creating a connection to a relational database like SQL Server.
But first, let’s see where your SQL Server is. Is it on-premise or in the cloud?
Connecting to On-Premise SQL Server
If your SQL Server is on-premise, you need to download and install the Skyvia Agent. With this, Skyvia will have an encrypted connection to your on-premise SQL Server.
The following are the steps you can follow to install and configure the Skyvia Agent:
- Login to Skyvia if you haven’t done so.
- Then, click NEW from the top panel of the page, and select Agent.
- Name your agent. You will use this name when you create an SQL Server connection.
- Download the Agent to the Windows machine you will use to connect Skyvia to your SQL Server.
- Double-click to run the Skyvia Agent installer and follow the prompts.
- Download the Skyvia Agent Key File and place it in the folder where you install the Agent.
- Run the Skyvia Agent.
Then, you will see a Terminal app running. Below is what it looks like so you will have an idea.
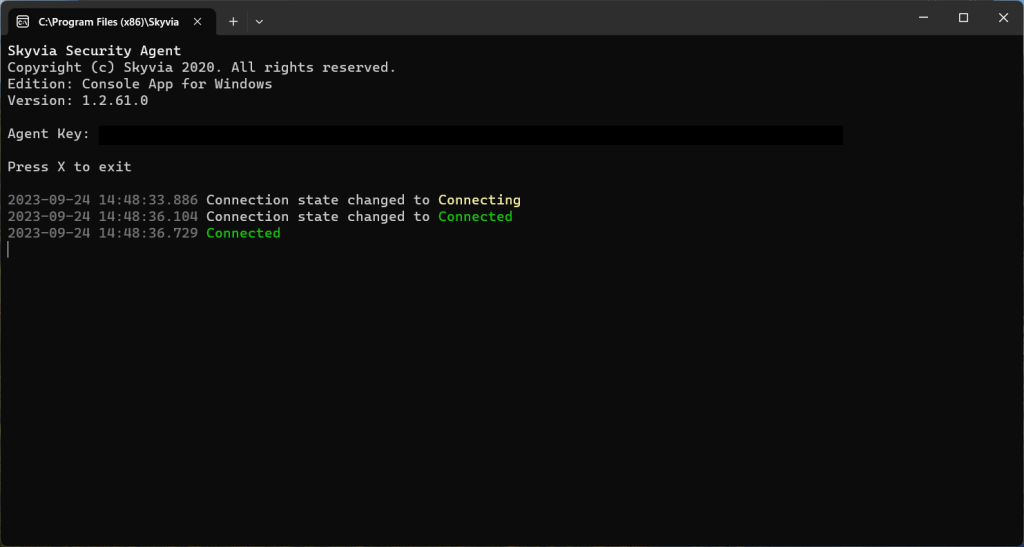
You will see when Skyvia connects to SQL Server from Skyvia itself. Or, the messages will show up in the Skyvia Agent app.
Then, you can make a Skyvia connection for SQL Server. Here’s another example:
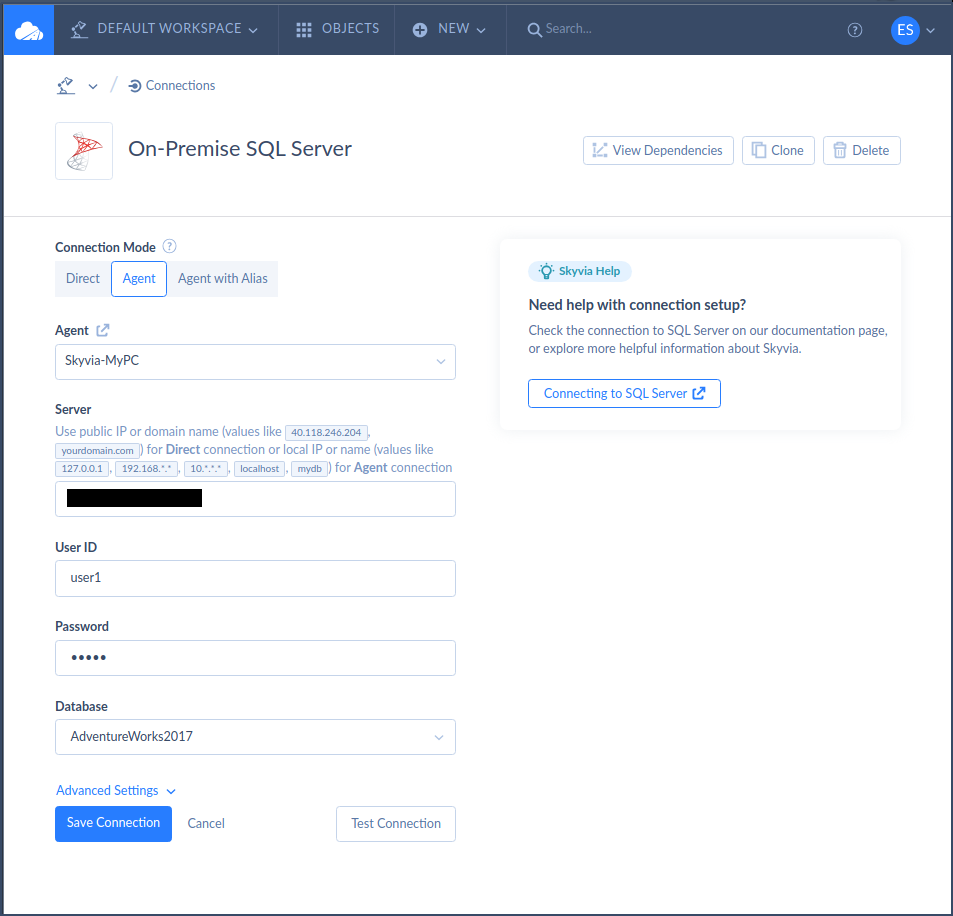
Use an Agent connection mode and specify the name of your Agent. We used the Skyvia-MyPC Agent for this example. Then, specify your server’s IP address.
If you need a step-by-step example with pictures, check out this article.
Connecting to Azure SQL
Your ERP’s SQL Server can also be in the cloud. In the following example, we use Microsoft Azure as the cloud provider. Before you create an Azure SQL connection, you need to whitelist Skyvia’s IP addresses in Azure. Or, it won’t work.
Below is the Azure SQL connection in Skyvia:

It’s the same Skyvia connector for SQL Server. But instead of using the Skyvia Agent, it’s in Direct Connection Mode.
Now that connectors are set, you can use them for any data pipeline you create. The next step will discuss that.
STEP 2: Create Integration
Skyvia offers two integration methods: Import integration and Control Flow with Data Flow. For simpler requirements, Import integration may suffice. But more complex needs may need Control Flow logic and data transformations in Data Flow. This flexible approach ensures that your integration caters to your specific needs. And the best part? Skyvia can integrate both ways. Make Salesforce the target and the ERP system the source. Or, flip their roles where Salesforce becomes the source.
In this article, we will focus on using Skyvia Control Flow.
Skyvia Control Flow and Data Flow
If you need more control over how to integrate two sources of data, your best bet is the Skyvia Control Flow. It lets you do integrations in a specific order. For example, you may want to backup the target data first. Then, you may also want to format the data before copying from the source. And the Control Flow has the necessary components for all your integration needs.
The Control Flow works with the Skyvia Data Flow. The Control Flow defines which of the Data Flows will run first and which will run next. And not just that. You can also apply many transformations to your data before you can load it to the target.
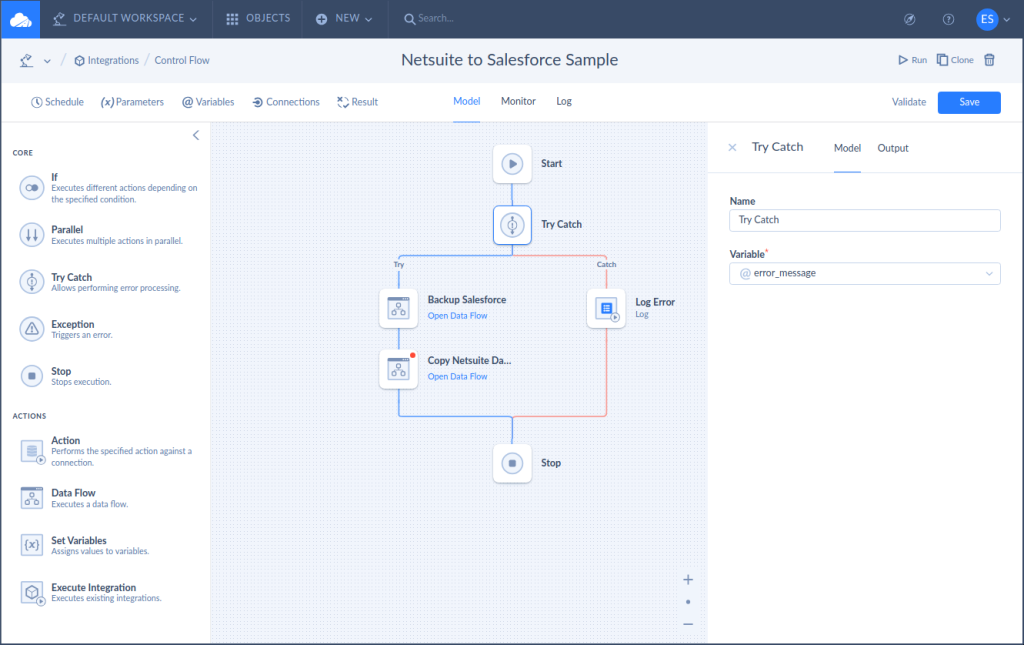
Control Flow Example
Below is an example of a Control Flow that backs up Salesforce data first. If there’s no error, the Data Flow to process the data from NetSuite to Salesforce proceeds. The Try Catch component does the trick to catch any error in the two Data Flows. When an error occurs, it logs the problem in the log file. Then, execution stops.
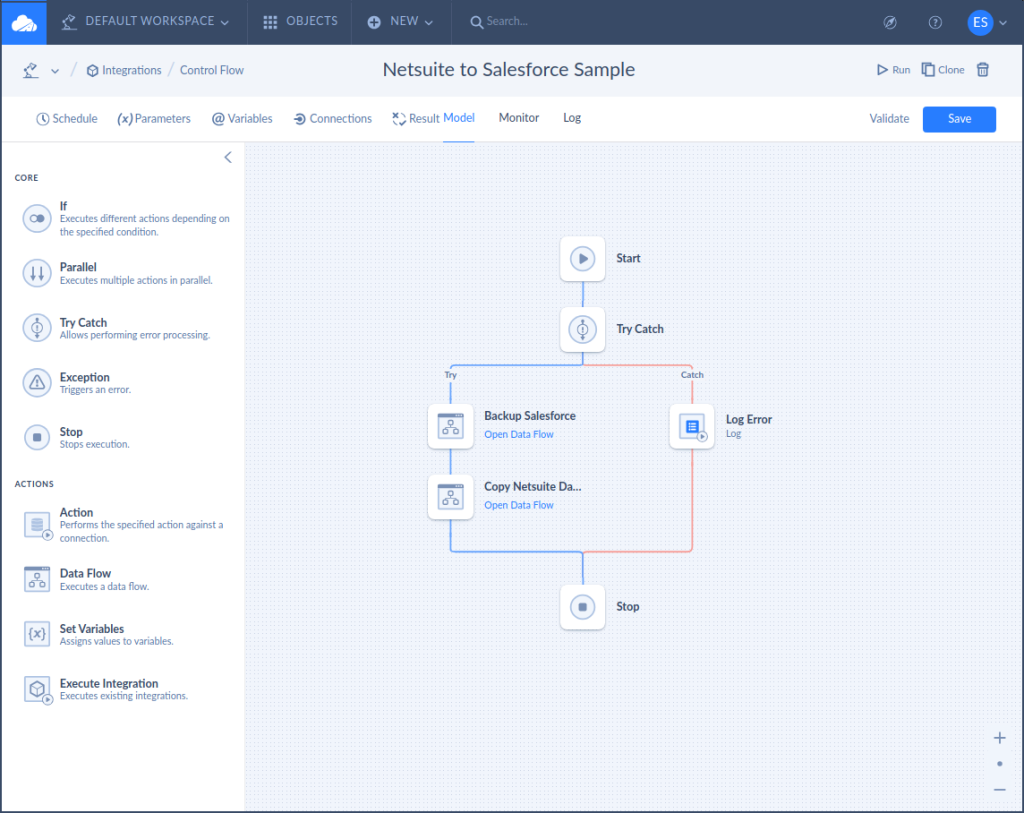
Let’s see the configuration of each component in the following screenshots. First, here’s the setup for the Try-Catch component. You need to add a variable to store the error details. In the example below, we used the @error_message variable.
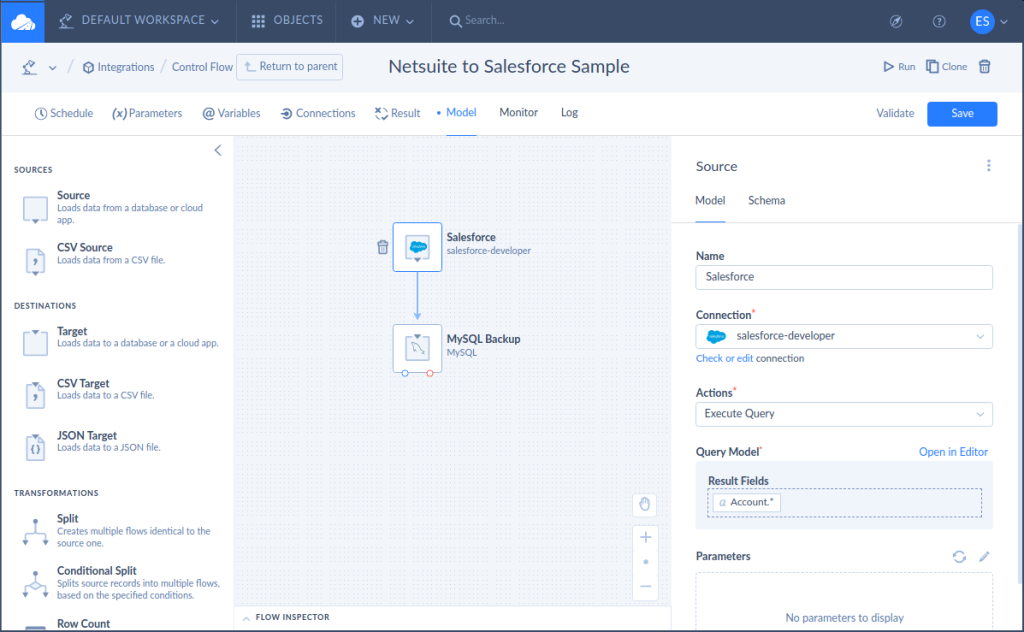
Then, check out the Data Flow design for the backup. The sample backs up the Salesforce Account data to a MySQL database.
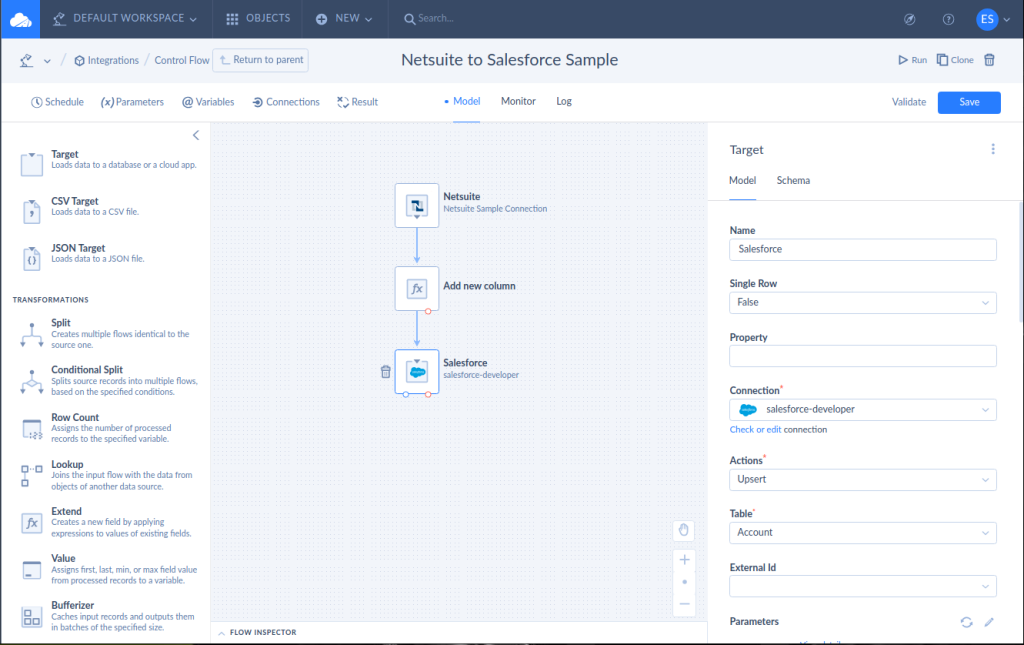
And the following is the Data Flow for integrating Salesforce and Netsuite ERP. Notice the Extend transformation component. It adds a new column before loading to Salesforce Account data.
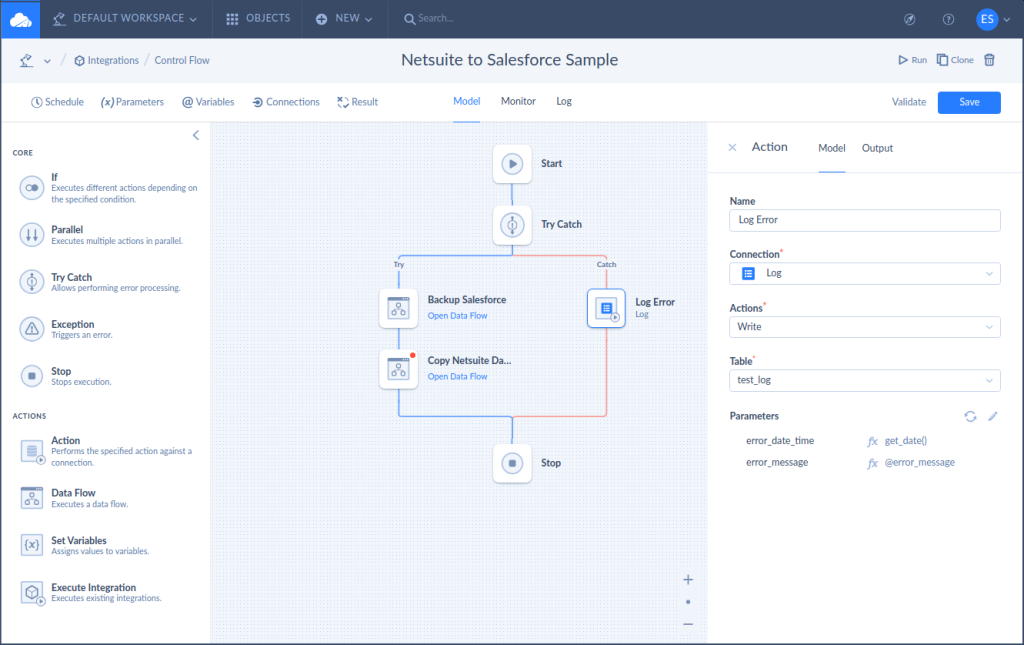
Finally, check out the Action component to log the error.
The following are the steps to do the above:
- Click NEW.
- Under INTEGRATION, click Control Flow.
- Then, drag a Try-Catch component to the canvas and configure it.
- Then, add 2 Data Flows under the Try flow. One for the Salesforce backup and the other for the Netsuite-Salesforce integration.
- Configure each Data Flow as seen above.
- Finally, add 1 Action component to the Catch flow and configure.
As you have seen above, with just a few clicks, you can do a Salesforce and ERP integration in Skyvia. Everything is without coding. When dealing with other ERP systems, you only need to configure a different connector.
For more information, visit the official documentation for the Control Flow and Data Flow.
STEP 3: Run, Test, and Adjust
Save your integration package and run the integration process. After execution, check the Run History. You can verify it there if the integration succeeded or encountered errors. If issues arise, troubleshoot by identifying the source of the error. Then, make necessary adjustments.
If everything is good, you can create a recurring schedule, so, it will run on its own next time.
Best Practices in Salesforce and ERP Integration
As our integration journey nears its completion, we’re about to explore a broader horizon. That’s integrating Salesforce with ERP systems beyond what we have discussed so far… Whether it’s NetSuite, SAP, or any other ERP software, the foundational steps are quite similar. In my experience, it holds true whether you use code or any other integration tool.
But here’s the catch: You need more technical skills, effort, and energy to accomplish the same. With Skyvia, it’s a lot easier to do. Here are the general steps again:
- Create Connections.
- Create Integration.
- Run, test, and adjust.
To make your Salesforce and ERP integration successful using Skyvia, here are some tips and best practices:
- Define Clear Objectives: Start by clearly defining your integration goals. What specific data needs to be synchronized, and for what purpose? Having a well-defined objective ensures that your integration efforts remain focused and effective.
- Plan Ahead: Create a detailed integration plan that outlines the steps, timelines, and responsibilities. This plan serves as your roadmap, guiding you through the integration process.
- Data Mapping: Pay close attention to data mapping. Ensure that data fields in Salesforce align correctly with those in your ERP system. Mapping errors can lead to data inconsistencies.
- Error Handling: Develop a robust error-handling mechanism. Not every integration will go flawlessly, so it’s essential to have a plan in place to address errors promptly and efficiently.
- Security Measures: Prioritize data security. Ensure that data transferred between systems is encrypted and protected. Implement access controls to restrict unauthorized access.
- Regular Monitoring: After integration, establish a routine for monitoring data flow and system performance. Regular checks help identify issues before they become significant problems.
Ending Takeaways
It’s a thrilling journey through the labyrinth of Salesforce and ERP integration. We’ve explored the intricacies of ERP systems. We also dissected the roles of Salesforce and ERP. Then, unveiled the strategic significance of integration. We’ve dived deep into the benefits of harmonizing these powerful platforms. And learned the essential steps for successful integration using Skyvia.
Unlock Integration Success with Skyvia
Ready to embark on your integration journey? Try Skyvia for free. And discover why reviews are raving about this user-friendly cloud integration platform. With Skyvia, you can turn chaos into seamless data harmony. It will empower your business to thrive in the modern landscape. Don’t miss the chance to experience integration success like never before!