Customer relationship management (CRM) and enterprise resource planning (ERP) tools are two necessities that companies use to make their business productive. Though Salesforce and NetSuite both offer CRM-like features, they serve different purposes from a global point of view. Salesforce CRM, for instance, is a perfect choice for efficient customer management and satisfaction rates. NetSuite, in turn, is a stable ERP system that allows organizations to effectively manage their daily operations and resources.
At some point, organizations might need the Salesforce to NetSuite integration to enhance their business operation effectiveness and improve collaboration between finance and sales teams. This article provides a step-by-step guide that is applicable to any workflow. It also includes a range of tools to connect NetSuite and Salesforce, along with a real-world example of integration implementation.
Table of contents
- Why Integrate Salesforce with NetSuite?
- Benefits of Integrating NetSuite with Salesforce
- Integration Methods: Choose What Works Best
- Comparison of Integration Methods: Which One to Select
- Step-by-Step Guide to Integrating Salesforce with NetSuite
- Common Use Cases for Salesforce NetSuite Integration
- Top Tools for Salesforce and NetSuite Integration
- Example: Integrating Salesforce and NetSuite with Skyvia
- Challenges of the Salesforce and NetSuite Integration and How to Overcome Them
- Conclusion: Build a Smarter Workflow with Salesforce NetSuite Integration
Why Integrate Salesforce with NetSuite?
The connection between Salesforce and NetSuite is only a drop in the ocean of similar cases where a CRM system needs to be synchronized with ERP software. Many companies face a number of difficulties bringing together a customer management tool with an enterprise planning system, since their purposes and structures differ. Anyway, organizations feel the need to connect these services since such a fusion grants numerous benefits.

In this section, we cover a number of reasons to integrate Salesforce and NetSuite:
- Align all business operations across departments.
- Provide a comprehensive view of each customer to grant a personalized experience for them.
- Avoid duplicate data entries and records across organizations.
- Eliminate delays in revenue processing and budgeting.
- Enhance collaboration between the Sales and Finance departments.
- Improve the accuracy of reporting.
Benefits of Integrating NetSuite with Salesforce
Once integrated, Salesforce and NetSuite enable a seamless data flow between front- and back-office operations. In this section, we cover some positive outcomes businesses can expect from integration
Up-to-Date Data Across Systems
Businesses involve vast amounts of data from sales, finance, marketing, support, and other departments. However, it needs to be gathered and managed properly to allow organizations to run effectively. For instance, changes in Salesforce data or invoices should be reflected in the NetSuite accounting software and vice versa.
It’s possible to update databases by using different methods. Traditional data entry techniques, for example, are time-consuming and inefficient since any mistake made while data processing may prevent a company from receiving its payments on time. Thus, companies prefer the NetSuite Salesforce integration as a cost-effective practice to keep their data up-to-date.
360°-View of Customer Profile
No customer wants to wait long to get the information requested. The NetSuite Salesforce integration offers the chance to reduce the time to connect with concerned clients who use your products or services.
Once a customer request is submitted, your support team no longer has to check multiple systems to comprehend the situation. Instead, they can check claim details in a single source of truth as a result of the integration process. That way, the resolution time of the request will be decreased, and the customer satisfaction rate will improve.
Sales and Finance Team Coordination
It’s essential to have strong sales and finance teams aligned around the same data and vision. With Salesforce and NetSuite working as one, both teams have a shared source of information, which allows them to eliminate miscommunication and gain a shared, up-to-date view of key business data (products, customers, orders, payments, etc.). Both sales and finance teams can spend more time growing their business and less time worrying about balancing data.
Streamlined Reporting and Forecasting
With the Salesforce and NetSuite integration, it’s easy to create data reports and dashboards to receive insights into the current business process. What’s more, it provides an opportunity to accumulate historical data and takes it as a base for compound forecasting. Such results may significantly contribute to business strategy creation and elaboration.
Enhanced Productivity
The Salesforce NetSuite integration automates multiple cross-departmental processes and reduces manual input. As a result, the workload of repetitive tasks diminishes, which contributes to better productivity and provides a possibility to concentrate on creative aspects.
Integration Methods: Choose What Works Best
Given the positive effect that the integrated Salesforce and NetSuite offer to businesses, companies look for solutions to connect these two systems. As the demand triggers supply in the market, there are dozens of available methods and tools for integrating CRM and ERP platforms. Here, we explore some efficacious methods of integrating Salesforce and NetSuite.
- Native Connectors
- Third-Party Integration Platforms
- Manual Data Transfer
- Custom API Integration
Native Connectors
SuiteTalk
NetSuite provides a SOAP-based web platform, SuiteTalk, that facilitates integration of NetSuite with other services. It works well with the recent tools as well as the legacy systems.
Here are some key features of SuiteTalk:
- Interaction with any platform or programming language that supports the SOAP standard.
- Role-based authentication model that is similar to that of NetSuite.
- Error-handling architecture with clear warning messages.
SuiteCloud
SuiteCloud is a platform that allows companies to extend the capabilities of the core NetSuite product. It provides a set of solutions for ERP system configuration and customization to adapt it to specific business needs.
SuiteCloud contains many components, but the ones presented below are the most frequently used for integration purposes:
- SuiteScript allows users to customize and automate business processes in a programmatic way using scripts.
- SuiteFlow enables businesses to create event-based workflows to streamline daily operations.
NetSuite Connector
NetSuite Connector is a native solution that allows users to quickly map data between NetSuite and e-commerce platforms, logistics applications, payment systems, and many others. It automates data integration between the ERP systems and the selected third-party tools. That way, the information gets synchronized between the organizational apps, so the quality and precision of business operations are improved.
Third-Party Integration Platforms
iPaaS Solutions
IPaaS stands for integration platform as a service, which can connect NetSuite to other tools with a no-code or low-code approach. Such solutions allow for transforming data on the go before sync. In general, IPaaS platforms promote fast setup, handle errors, and offer templates that considerably simplify the process of integration.
Some of the popular examples of IPaaS solutions are:
- Celigo
- Dell Boomi
- MuleSoft
- Skyvia
Salesforce-Native Apps
Connecting NetSuite to Salesforce is possible by using the extensions on the CRM side. There are multiple apps that can be installed directly in Salesforce via AppExchange.
Some popular examples of Salesforce-native apps for integration with NetSuite include:
- Breadwinner provides real-time synchronization of financial data between systems.
- Peeklogic offers object management and tracking, data synchronization, and workflow automation.
Manual Data Transfer
In certain cases, manual integration could also be a good solution for data exchange between Salesforce and NetSuite. It involves the export of a CSV file from one app and its subsequent import into another system. This process is extremely time-consuming and error-prone. Anyway, manual data transfer might be the only effective one when there is a need for one-time data transfer.
Custom API Integration
This approach is suitable for teams with technical expertise and programming skills. It involves the use of NetSuite and Salesforce APIs.
Note that the NetSuite REST API services are available for those users who have enabled these features in their accounts. Users also need the required permissions assigned to the user role. Check the documentation of the NetSuite REST API Browser to find out the latest updates.
In a nutshell, the custom API integration process includes the following steps:
- Adding a RESTlet script in NetSuite, where a separate JS file needs to be created for each object.
- Creating authentication rules in Salesforce.
- Start data transfer between NetSuite and Salesforce. Though the data sync process can be performed in real-time, batch processing is a better option.
Comparison of Integration Methods: Which One to Select
After having explored the most popular NetSuite Salesforce integration approaches, let’s confront them. For that, we provide a comparison table with their main characteristics. We hope it will help you spot the differences between the methods and see which one could be applicable for your business situation.
| Method | Real-time sync | Coding required | Setup difficulty | Best for | Key limitations |
|---|---|---|---|---|---|
| SuiteTalk | ✅ | ✅ | Medium | Customized workflows | High development effort, slower implementation |
| SuiteCloud tools | ✅ | ✅ | Medium | Business process automation and customization | High development effort, slower implementation |
| Native Connector | ✅ | ❌ | Low | Standard use cases, fast deployment | Limited flexibility, early in rollout |
| IPaaS platforms | ✅ | ❌ | Low | Scalable flows, automation | Depends on vendor capabilities |
| Salesforce-native apps | ✅ | ❌ | Low | Financial visibility, sales-finance sync | Narrow focus, usually finance-centric |
| Manual method | ❌ | ❌ | Low | One-time data transfer for legacy systems | Error-prone, unscalable |
| Custom API | ✅ | ✅ | High | Proprietary logic, total control over integration | Time-consuming, costly, requires maintenance |
Step-by-Step Guide to Integrating Salesforce with NetSuite
Before you start moving data from your Salesforce CRM system to NetSuite, let’s have a general overview of the integration steps. It’s a tool-agnostic approach that could be applied to any integration workflow you select.
Step 1: Define Your Integration Goals
At this initial stage, it’s necessary to define these three core aspects:
- The frequency of data transfer (real-time or scheduled batch loading).
- What needs to be transferred (Opportunities, Invoices, Accounts, and others).
- The direction of data flow (one-way or bi-directional synchronization).
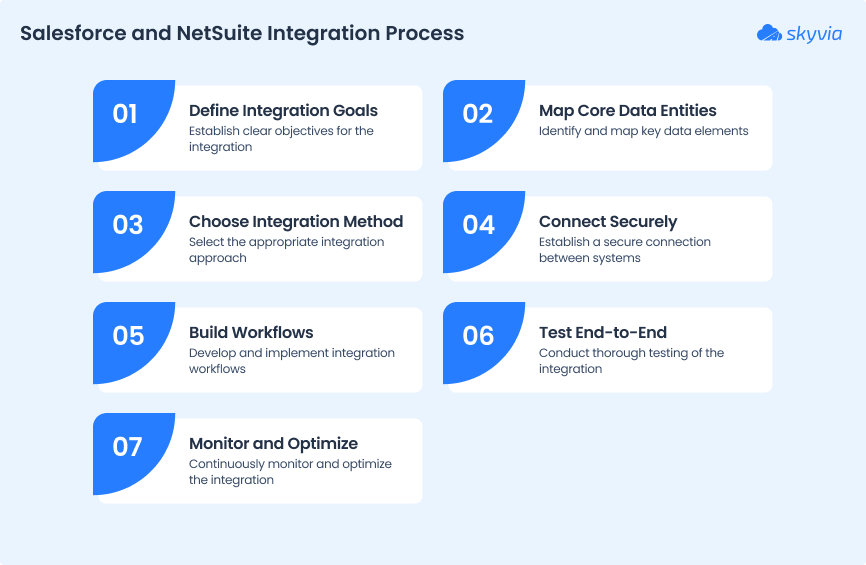
Step 2: Map Core Data Entities
Depending on the data entities chosen during the previous step, you need to think of how to map them. For instance, when syncing customer records or orders, ensure that key fields (names, IDs, dates, etc.) are correctly aligned. Validate data types and formats on both sides, and apply transformations if needed to ensure compatibility.
Step 3: Choose the Right Integration Method
At this step, feel free to refer to the integration methods described in this article. Preferably, you need to consider an approach that would allow you to send the objects with all the required settings. Also, pay attention to the following factors:
- Technical expertise of the team
- Customization requirements
- Budget
- Urgency of the integration implementation
Step 4: Connect Salesforce and NetSuite Securely
Establish a connection between the CRM and ERP systems before the actual data transfer takes place. With the IPaaS platforms, the whole process is semi-automated and takes several minutes at most. With a programmatic-based setup, it takes a bit more time to establish secure access to data using OAuth authentication methods and secure credentials, and configure user permissions correspondingly.
Step 5: Build Your Workflows
At this point, you need to implement the process designed during the primary step. As all the necessary preparations have taken place during steps 2-4, it’s the right time to build the pipeline for connecting Salesforce and NetSuite. When using no-code tools, for instance, you will need to create logic by choosing the source objects for transfer, applying filters, defining mapping, configuring the target fields, and so on. When writing custom scripts, make sure to handle all the defined integration points – data extraction, transformation, error handling, and loading by using the appropriate APIs and logic for both systems.
Step 6: Test the Integration End-to-End
It’s highly recommended that you test your integration flow before implementing it in the production environment. Feel free to use non-sensitive data or test datasets for these purposes. That way, you can check whether the mapping was performed correctly and validate the error-handling logic.
Step 7: Monitor, Maintain, and Optimize
Once the test flow works correctly, implement the pipeline in the production environment. Use the monitoring and logging mechanisms provided by your integration platform, or implement custom monitoring scripts in case of working with APIs.
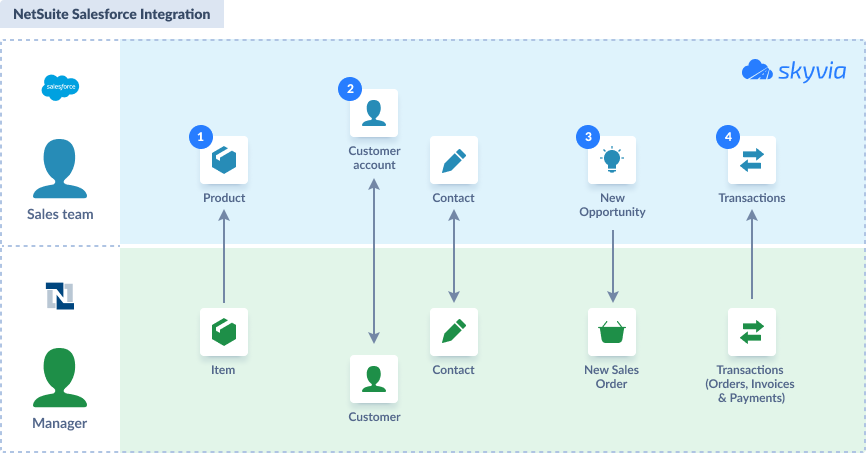
Common Use Cases for Salesforce NetSuite Integration
With so many objects in Salesforce and fields in NetSuite, identifying the right data to sync can be overwhelming. Here are some of the most popular examples of data synchronization between these two systems:
- Synchronizing Salesforce opportunities to NetSuite sales orders;
- Sending information on NetSuite invoices and payment status back into Salesforce.
- Creating NetSuite customers once new accounts are created in Salesforce.
- Changing Salesforce sales status based on payment activities.
Top Tools for Salesforce and NetSuite Integration
As mentioned previously, using third-party tools is one of the ways to connect CRM and ERP. These solutions usually don’t require programming skills, include a GUI for easy integration and flow building, and provide monitoring boards for sync status checks. In this section, we provide some of the most popular and efficient tools for Salesforce to NetSuite integration.
Skyvia
Skyvia is a comprehensive cloud platform that performs a wide range of data-related tasks. It contains solutions for data integration, workflow automation, endpoint creation, backup, and data querying.
Its Data Integration tool is specifically designed to execute various kinds of operations, including import, export, synchronization, and replication. It also allows users to create complex data flows with multiple sources and advanced transformations. Another product of Skyvia called Automation could also be helpful for business workflow optimization by automating repetitive tasks.
Skyvia provides the following benefits for NetSuite Salesforce integration:
- Pre-built connectors to both systems and other 200+ data sources
- Rich functionality to implement both simple and complex integrations
- No-code GUI
- Web-based access
- Task monitoring in real-time with detailed information on errors
- Flexible pricing plans for any business
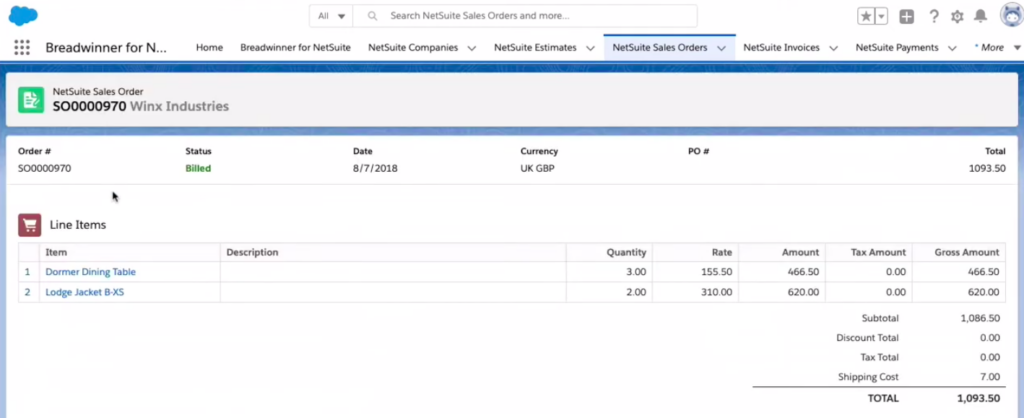
Breadwinner
Breadwinner is a Salesforce-native app that comes in various editions, including one specifically dedicated to integration with NetSuite. It facilitates the creation of NetSuite records (invoices, sales orders, etc.) directly from Salesforce.
This application ensures easy management of custom objects and multiple subsidiaries. It is also compliant with SOC II, Type 2, to provide a secure environment for data exchange.
The core benefits of Breadwinner are the following:
- Built-in Einstein AI for obtaining transparency over your data
- Customization options to set up the integration to your needs
- Robust security in data management
Celigo (Integrator.io)
Celigo is an integration platform as a service that employs a low-code approach to connecting various services on the web. It’s primarily designed for enterprises to help them automate routine processes and cross-platform workflows.
With Celigo, companies can bring various SaaS tools together using already pre-configured templates, which accelerate the setup of the integration processes. At the same time, you can easily create custom integrations that meet your data transfer requirements.

Here are some of the key advantages of Celigo:
- An extensive library of templates for Salesforce NetSuite integration
- Pre-built flows for lead-to-cash, order sync, and other workflows
- AI-driven error handling and support
- Full management of B2B app-to-app management
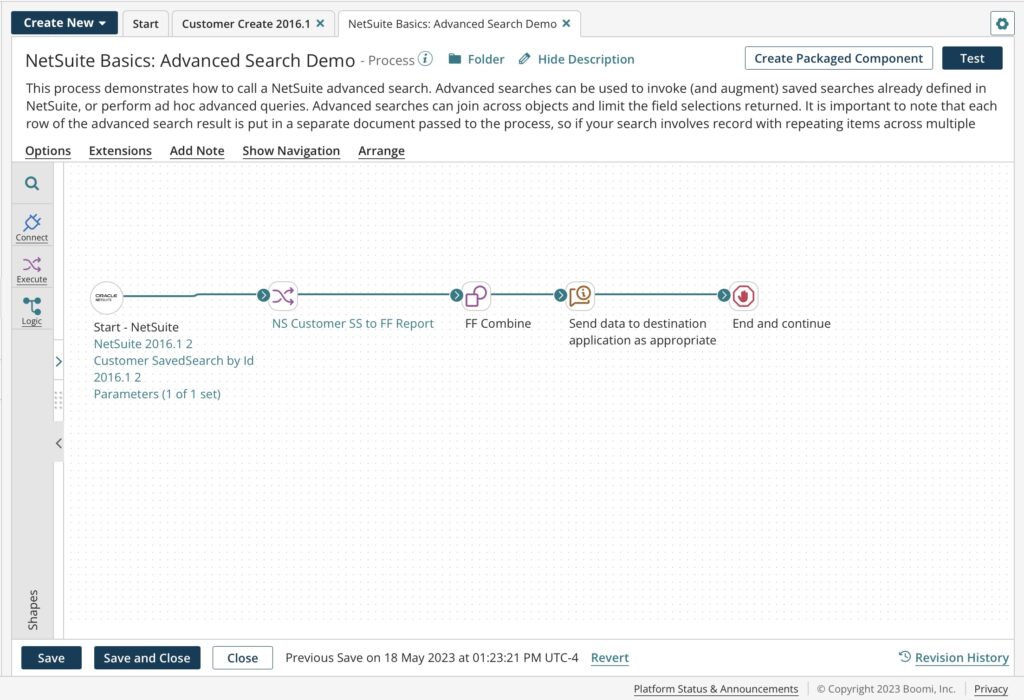
Dell Boomi
Another iPaaS solution to use for NetSuite Salesforce connection is Boomi by Dell. This tool employs the power of AI to help users create, customize, and monitor data flows.
Boomi is popular among large enterprises because it can handle high-volume, real-time data streams. It also supports custom workflows and can orchestrate complex processes with ease.
The most notable features of Boomi are:
- API deployment and management
- Support for event-driven integration workflows
- B2B/EDI management
- Compliance with modern security protocols
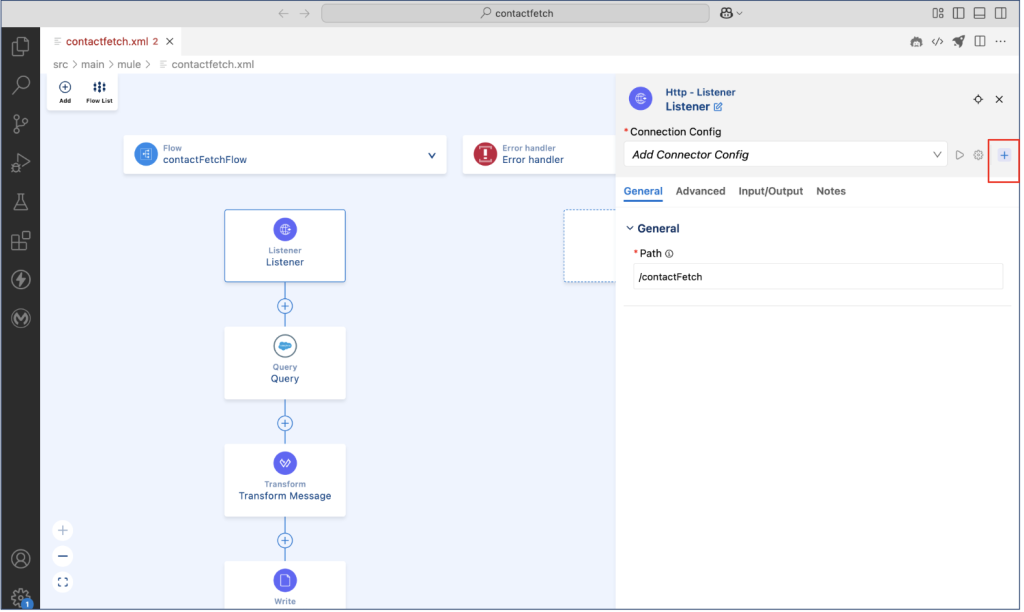
MuleSoft
MuleSoft is an all-in-one platform that allows users to connect various systems within a single workspace. This service is now a Salesforce-owned tool, so it’s often used for integrating CRM data with other systems, such as NetSuite.
This platform offers a high degree of customizability in the workflows and focuses on API connectivity, which makes it a top choice among developers.
MuleSoft’s key benefits:
- API design, test, and validation with built-in mocking service
- AI-based assistance for API development
- Support of SOAP and REST API designs
Comparison of Integration Tools
In the table below, find the comparative analysis of the tools that can be used for Salesforce and NetSuite integration.
| Tool | Setup difficulty | Coding | Best for | Strength |
|---|---|---|---|---|
| Skyvia | Low | ❌ | SMBs | Easy to use, cloud-native, time-to-value |
| Breadwinner | Low | ❌ | Finance teams | Embedded UI, sales-finance alignment |
| Celigo | Medium | ❌ | Mid-size and large businesses | Templates, robust error handling |
| Dell Boomi | High | ✅ | IT teams | Scalable, advanced orchestration |
| MuleSoft | High | ✅ | Enterprises, custom API integrations | Full control, excellent API management |
Example: Integrating Salesforce and NetSuite with Skyvia
To switch from theory to practice, we’d like to show how to easily and quickly configure automated data integration between Salesforce and NetSuite using Skyvia. It offers an efficient way to get fast results out of your data. This platform connects to local and cloud-based services, so you can build ETL, ELT, and reverse ETL solutions.
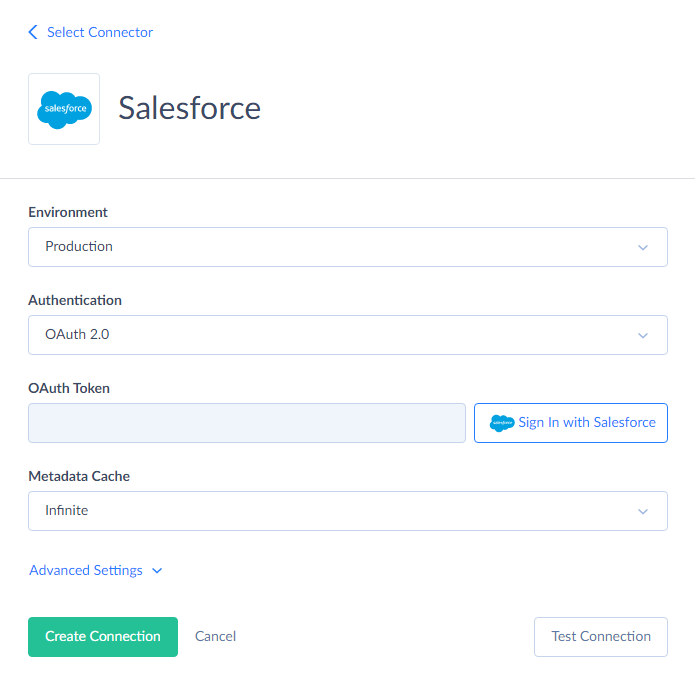
Create Connections for NetSuite and Salesforce
Before implementing any integration scenarios, establish connections between the two services and Skyvia.
Note: Create a Skyvia account if you don’t have one yet. You can also try Skyvia with a free trial version.
- Sign in to your Skyvia account.
- Click +Create New in the top menu.
- Select the Connection option on the left menu.
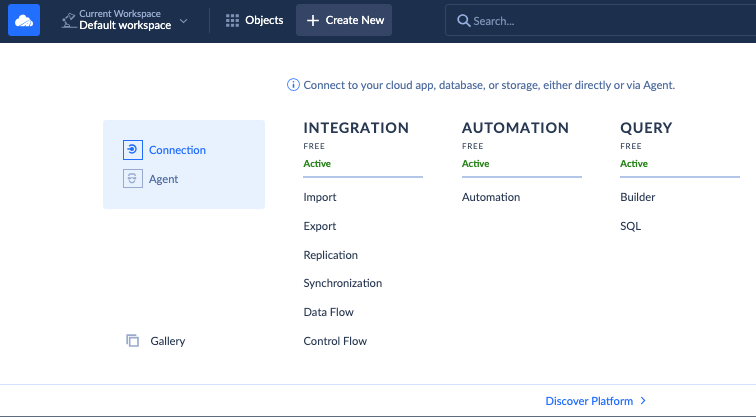
Select the service you want to connect to:
- NetSuite – see the instructions
- Salesforce – see the instructions
Follow the provided guidelines to connect each tool to Skyvia.
Sample Business Case Description
Marketing, finance, sales, and support teams must work together to better target and segment customers and prospects. This allows businesses to reach those most likely to purchase or convert. The most popular objects in integrations are Accounts/Customers, Contacts, Opportunities, Quotes/Estimates, Products/Items, Orders/Sales Orders, Invoices, Credit Memos, and Payments.
Since Skyvia is very flexible and has many capabilities, we demonstrate several possible scenarios for data integration, both simple and advanced:
Option 1. Data Integration (Import Scenario)
This simple scenario is created for data integrations between two data sources. For example, you can import Customers and Contacts from Salesforce to NetSuite and back.
- Click +Create New in the top menu and select Import in the Integration category. In the opened window, you can find the detailed instructions on the right and the workspace with Source and Target data flows on the left.
- Define the Source type and connection (Salesforce, in this example). Select the Target connection (NetSuite, in this example). Specify additional options if needed.
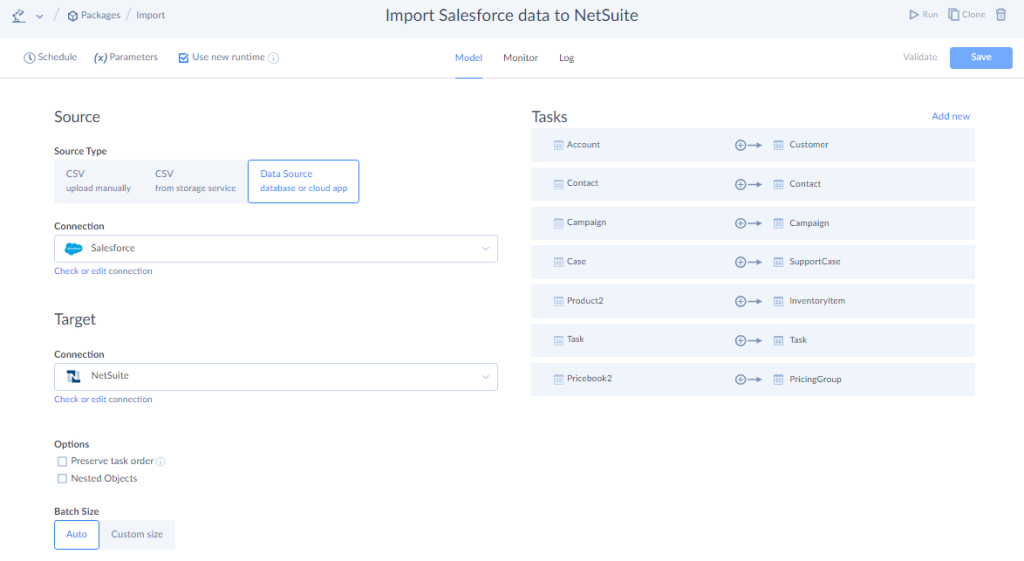
- Use the Add new button on the right to create a new data import task.
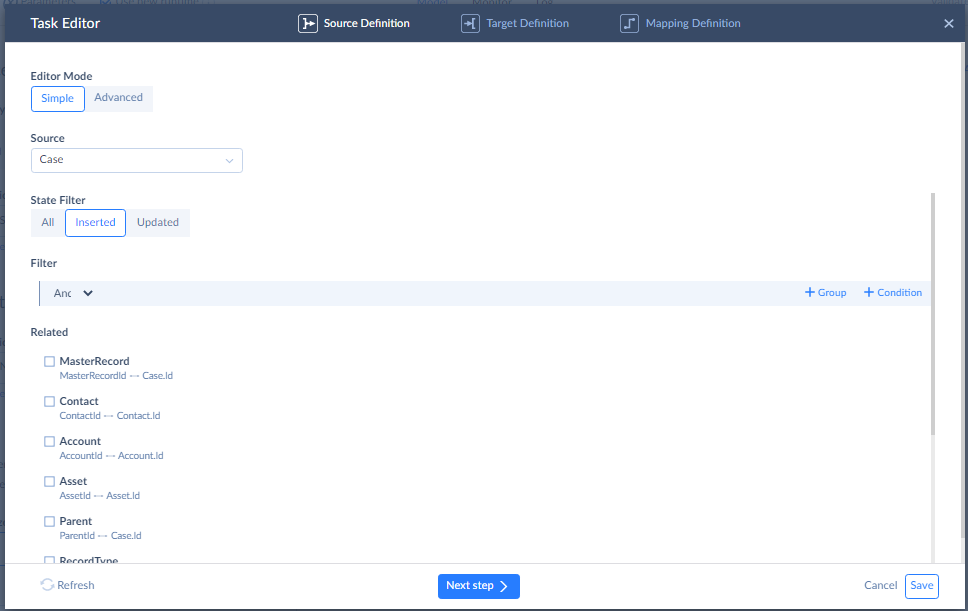
- Specify Source settings: select an object for import, and, if necessary, configure filtering. Alternatively, you can select the Execute Command or Execute Query action to query data (in advanced mode).
- Specify Target settings: select the target object (table) or multiple objects (tables) to import data to and the operation to apply when loading data.
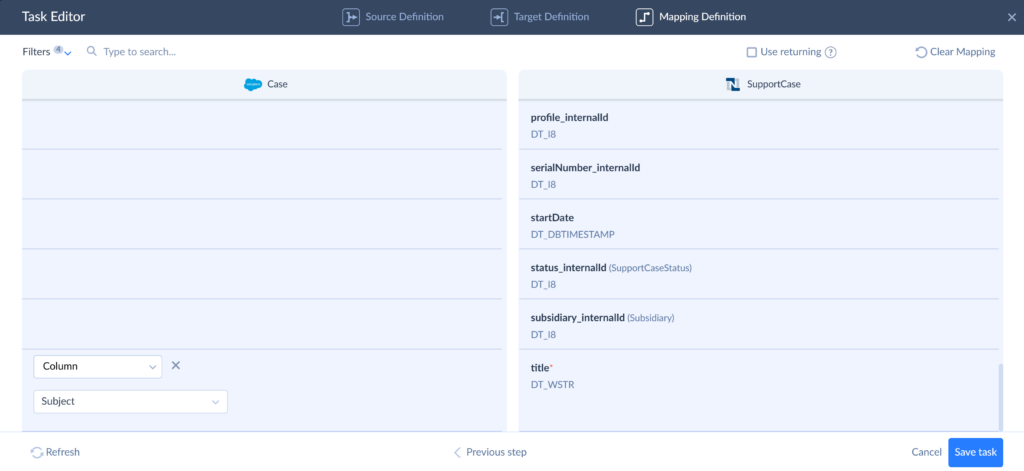
- Configure mapping of target columns to source columns, expressions, constants, lookups, etc.
Important! Make sure to map required fields, otherwise, the integration will fail. In this example, the required fields are company_internalID and title.
The company_internalID field specifies an entity in NetSuite which the support case is linked to. This is typically a customer, but it can also be a contact or vendor. This ID is retrieved from an external system (Salesforce in this example). This mapping ensures that each case is properly linked to the correct NetSuite customer record. To achieve this, we’ll use a source lookup to retrieve the internal ID of the customer from Salesforce:
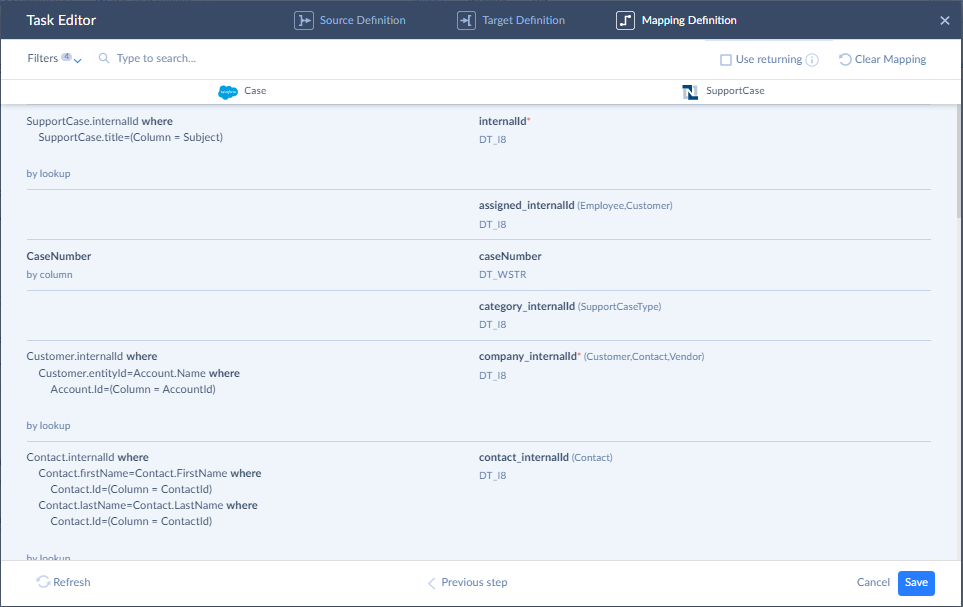
This is how it works:
- Skyvia checks the Salesforce source field AccountId.
- It then looks up a Customer in NetSuite where entityId matches Account.Name in Salesforce.
- If it finds a match, it retrieves the Customer’s internalId.
- That internalId is written into company_internalID on the SupportCase.
The title field in NetSuite SupportCase represents the subject or summary of the case. We’ll map it to the equivalent Salesforce field Subject, using column mapping:
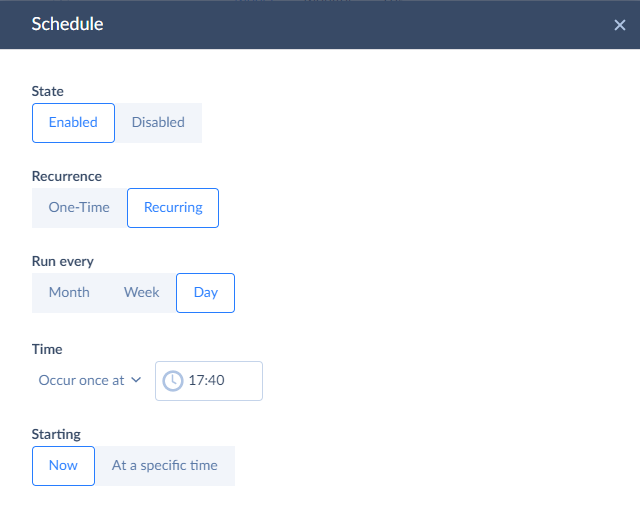
Note: Before saving your Import integration, you can schedule it for automatic execution.
After completing all the import task settings, click the Create button. Now, you can run this integration and get your data transferred from Salesforce to NetSuite.
Advantages of the Import integration scenario
The Import integration scenario works best for ordinary data flows that require regular updates. For instance, when there is a need to import closed Salesforce opportunities into NetSuite sales orders.
With the Import tool, it’s possible to select the required amount of data for migration using filters. It also allows for working with data from a historical perspective, in contrast to the trigger-action integration approach, where data starts to be imported only from the current moment.
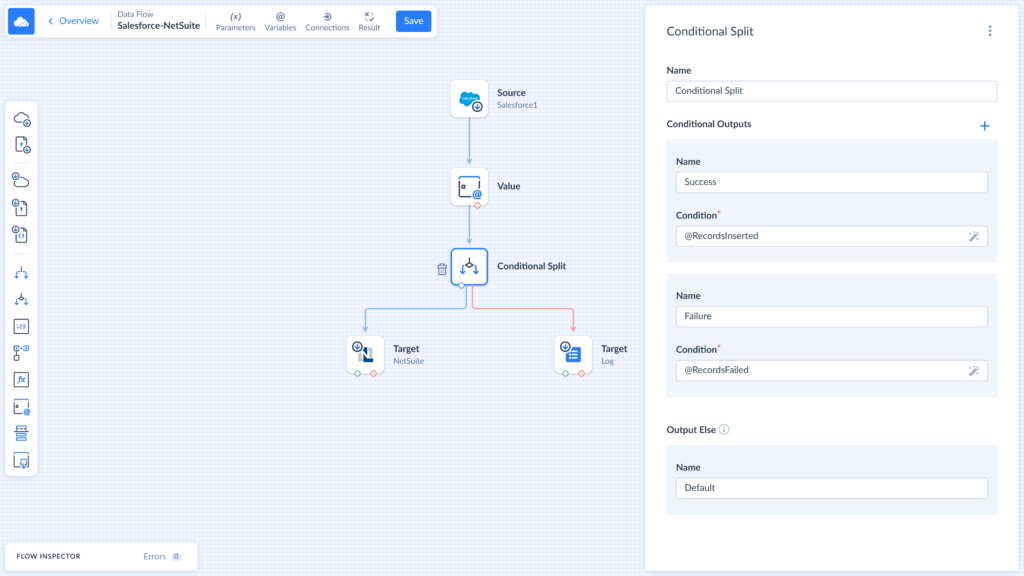
Option 2. Data Integration (Data Flow Scenario)
This flexible scenario is created for complex data integrations. Being an easy-to-use, no-coding tool, Data Flow helps to manage all data integration and transformation requirements in a single unified location.
As an example, let’s synchronize data between the Customer tables in Salesforce and NetSuite. Since we only need to process newly added records, we create a NewData parameter. We use the Value component to update this parameter after each integration run. We also define two variables – RecordsInserted and RecordsFailed – to monitor the integration outcome. Successfully inserted records are sent to NetSuite, while failed ones are logged along with an error message. This routing is managed with the Conditional Split component.
Advantages of the Data Flow scenario
The Data Flow scenario works best for companies that need to integrate data from more than two sources and need constant and regular data updates with complex logic. It allows for connecting multiple data sources at once, applying multistage transformations, enriching data, etc.
Option 3. Automation (Trigger-Based Integration)
This scenario is designed to automate regular and repetitive workflows. It uses event-based mechanisms that trigger data transfer to the destination once a certain action occurs on the source side.
Skyvia allows users to build automation flows in a visual editor. You can either create diagrams manually or run event-based workflows. Alternatively, the automation flows can be executed on a schedule.
In our example, we create an event-driven automation: once an opportunity is closed-won in Salesforce, the appropriate changes are made on the NetSuite customer records side automatically.
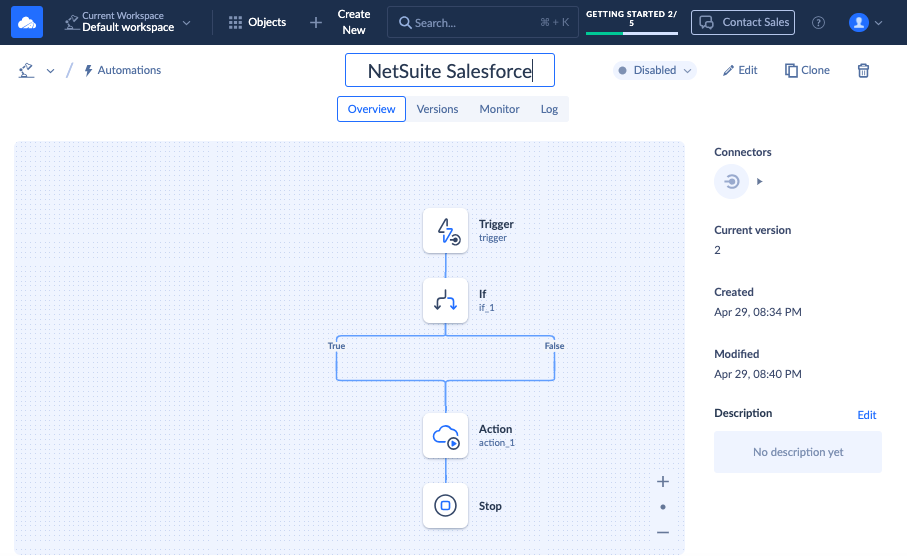
- In the upper menu, click +Create New -> Automation.
- Type the automation flow name and select the trigger type.
- Click on the Trigger icon and perform the needed configurations depending on its type.
- Select the items from the left panel, drag them to the flow, and specify logic for operations.
- Drag the Action item to the flow. Specify the connection details and perform further configurations required.
- Save the automation flow.
- Switch the automation item to the Enabled state in the upper-right corner of the screen to activate it.
Advantages of the Automation Scenario
Workflows with the Automation tool would work best for companies that need event-based or scheduled integrations of data between Salesforce and NetSuite. It transfers only the recently added data from one system to another, helping to avoid unnecessary data loading operations. This tool also provides a wide range of logic operations, so you can configure automations to your taste.
Challenges of the Salesforce and NetSuite Integration and How to Overcome Them
Integrating Salesforce with NetSuite is a complex task that can pose challenges even for seasoned teams. Possible issues may result primarily from the fundamental differences in data structures of each platform. Below are some typical challenges that may interrupt your integration, along with practical solutions to address them.
| Challenge | Solution |
|---|---|
| Field mapping | Apply data transformations to ensure the correct alignment of fields across systems. |
| Record duplicates | Use filters and lookups to find identical records. |
| API limitations | Explore the maximum number of API calls per minute available in Salesforce and NetSuite so as not to run into API limitations. |
| Error handling | Implement logging, alerts, and retry mechanisms. Schedule regular audits and reviews. |
Conclusion: Build a Smarter Workflow with Salesforce NetSuite Integration
Integrating Salesforce and NetSuite isn’t just about syncing data – it’s about enabling better collaboration, faster financial processes, and greater visibility into your operations. In this NetSuite Salesforce integration guide, we have demonstrated a number of methods and tools that can be used for that. We also presented a bunch of real-world examples showing how to connect these systems using various Skyvia tools.
In order to select the method that would be right for you, it’s necessary to analyze your team’s expertise, evaluate business goals, and calculate the budget. No matter whether you choose a native connector, an iPaaS platform, or a custom API solution, the main thing is that you achieve your objectives.
If you value speed, flexibility, and ease of use, Skyvia could be a good option for that. It offers various tools and plans so any business can find the most applicable option for them. What’s more, it makes the integration process easy through the added guidelines right within the integration space!
F.A.Q. for NetSuite and Salesforce Integration
Does Salesforce have a native NetSuite connector?
NetSuite launched an official connector in 2024, powered by Oracle Integration Cloud.
Can I sync custom fields or objects?
Yes. Some native and third-party tools support the transfer of custom data fields from one system to another. Such operations are also possible with custom scripts and APIs.
How secure is the integration?
Both native and third-party tools embed encryption mechanisms, comply with modern security protocols, and implement role-based access control to ensure safe data transfer.
Can I trigger workflows automatically?
Yes. Tools like Skyvia support event-based automations to streamline business workflows.