When we talk about the cloud, it’s mostly about AWS, Azure, and GCP. Despite increasing competition between these “Big Three”, AWS maintains its lead, holding 31-32% of the global market share as of Q4 2024.
The provider currently offers over 240 fully featured services across various domains, including computing, storage, databases, big data, machine learning, and AI. Among these, cloud storage stands out as one of the most widely used solutions, particularly Amazon S3 (Simple Storage Service).
One common operation when working with this service is moving data from Postgres to S3 – a practice driven by business and technical needs. In this article, we’ll explore and compare two methods of exporting data from PostgreSQL database running in Amazon RDS (Relational Database Service) to an S3 bucket, providing you with the most efficient techniques to extract and save your data.
Note: This article assumes that you already have a PostgreSQL instance up and running in AWS RDS and can access the database with rds_superuser permissions using a GUI or CLI tool. Also, you must have your AWS CLI configured correctly.
Table of contents
- What is PostgreSQL in Amazon RDS?
- Amazon S3: What is it?
- Amazon RDS PostgreSQL to Amazon S3 Connection Techniques
- Method 1: Exporting data from AWS RDS Postgres to S3 Using Manual Option
- Method 2: Exporting data from RDS Postgres to S3 Using Automated Option
- Conclusion
What is PostgreSQL in Amazon RDS?
Amazon RDS for PostgreSQL is a fully managed database service from AWS, created for those who prioritize USING a database rather than managing it. With RDS, AWS handles all tasks related to database administration, including backups, patching, monitoring, and scaling.
In fact, it gives you all the power of PostgreSQL – an open-source, feature-rich relational database – and multiplies it with additional cloud perks, including high availability, scalability, security, and seamless integration with other AWS services.
Amazon S3: What is it?
Amazon S3 is a go-to solution for storing anything and everything, from tiny text files to petabytes of data. It’s secure, scalable, and highly durable, with objects replicated across multiple Availability Zones.
Think of it as your cloud-based hard drive – but way better. With its literally depthless storage capacity, pay-as-you-go pricing, and various data accessibility tiers, S3 covers everything a business could need in terms of backups, big data, machine learning, and even website hosting.
Amazon RDS PostgreSQL to Amazon S3 Connection Techniques
When working with AWS S3 and RDS, it’s often necessary to move data between these two services. This is especially common in scenarios such as:
- Data migration: Moving data between systems or environments.
- Backups: Creating secure copies of your data for recovery purposes.
- Analytics: Exporting data for analysis using tools like Amazon Athena or Redshift.
- Archiving old records: Storing infrequently accessed data cost-effectively.
- Machine learning: Providing large datasets for training models.
- Data sharing: Enabling collaboration with external teams or partners.
In the following sections, we’ll explore two methods for exporting data from RDS to S3:
- Manual export: Perform directly from a PostgreSQL instance using the aws_s3 extension.
- Automated export: Use Skyvia for a no-code, scheduled data export.
| Method | Best for | Automation | Cost | Complexity |
|---|---|---|---|---|
| AWS S3 extension | AWS-native, simple exports such as: – Data lake integration; – Moving large datasets to S3 for the purpose of data archiving and backup. | Manual at its core; can be automated with tools like AWS Lambda and Amazon EventBridge. | It’s calculated based on the pay-as-you-go model. | Medium |
| Skyvia | – Regular updates and synchronization; – Data integration tasks that require automation and scheduling; – Complex integration scenarios that involve data relations and splitting. | Fully-automated | Freemium (free tier available); paid plans for advanced features starting from $79/mo. | Low |
Method 1: Exporting data from AWS RDS Postgres to S3 Using Manual Option
Step 1: Enable the AWS S3 Extension
Before exporting data, we need to enable a unique feature in PostgreSQL called aws_s3, which allows us to send data directly to S3.
- Open your PostgreSQL database (you can use a tool like PGAdmin4 or the command line).
- Run this command to install the extension:
CREATE EXTENSION aws_s3 CASCADE;- To confirm that it’s installed, check the list of installed extensions:
SELECT * FROM pg_extension;This should show aws_s3 and aws_commons in the results.
Note: Some versions of RDS may not support this extension. To check, run this command using the AWS CLI:
aws rds describe-db-engine-versions --region us-east-1 --engine postgres --engine-version 14.4Look for the “s3Export” string in the output: if you find it there, your RDS instance supports this feature. If it’s not included in the output, you may need to upgrade your PostgreSQL engine version.
Step 2: Give Permission to Write Data to S3
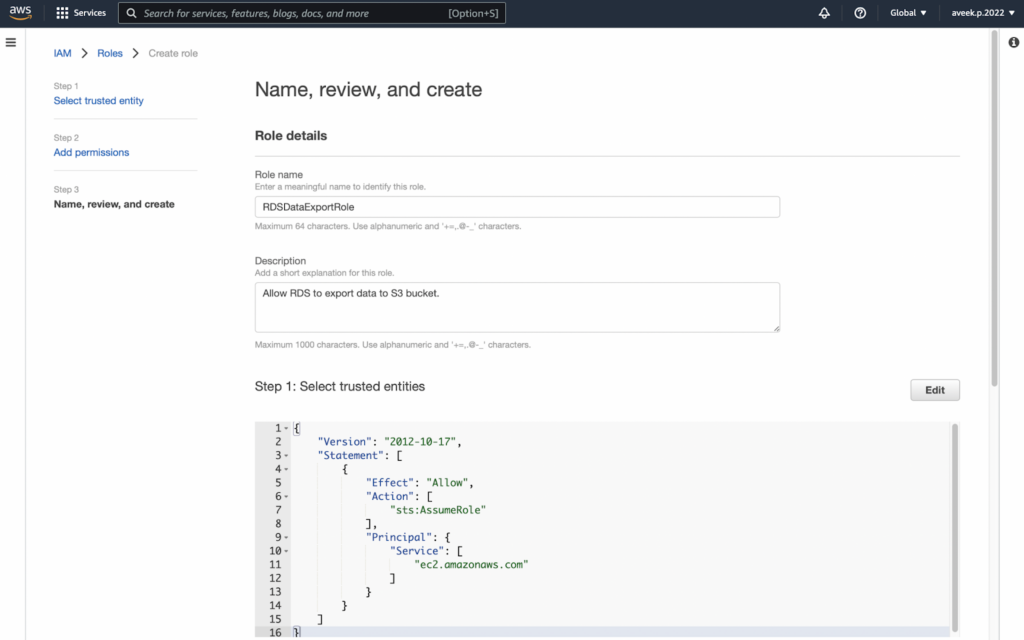
By default, your RDS database doesn’t have permission to send data to an S3 bucket. You need to create an IAM role that allows RDS to export data.
- Go to the IAM section in the AWS сonsole and create a new IAM policy that grants the S3:PutObject permission. Make sure to adjust the source bucket name accordingly:
{
    "Version": "2012-10-17",
    "Statement": [
        {
            "Sid": "RdsDataExport",
            "Action": [
            "S3:PutObject"
            ],
            "Effect": "Allow",
            "Resource": [
                "arn:aws:s3:::rds-data-export-demo/*"
            ]
        }
    ]
}
- Create a new role in IAM that the RDS instance can assume and attach this policy to the role:
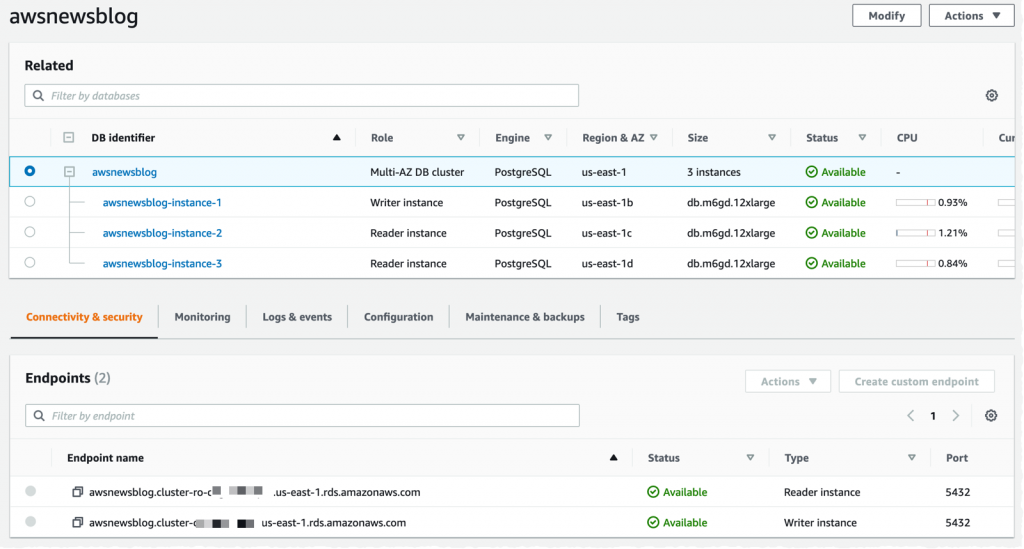
- Link the IAM role to your RDS instance:
- Open the RDS console and select the DB instance to which you will connect.
- In the Connectivity and Security settings, scroll to Manage IAM Roles.
- Select the newly created role and enable it with the s3Export feature.
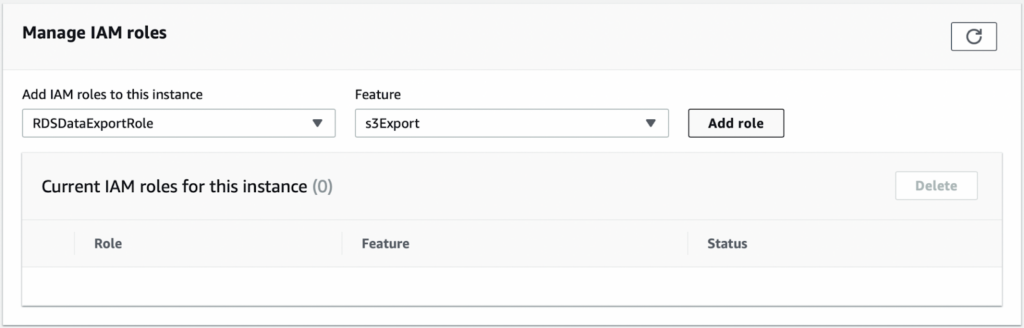
With this done, your RDS instance will have permission to write data into the S3 bucket.
Step 3: Set Up the S3 Export Path
Now that permissions are set, we must tell PostgreSQL where to send the exported data in S3. This is done by defining a URI (Uniform Resource Identifier) that contains:
- Bucket Name → The S3 bucket where the file will be stored.
- Path → A prefix that defines the folder or naming pattern in S3.
- AWS Region → The region where your S3 bucket is located.
To create this URI, use the following SQL command:
SELECT aws_commons.create_s3_uri(
   'rds-data-export-demo',
   'export',
   'us-west-1'
) AS s3_export_uri;
This S3 connection will be provided to the aws_s3.query_export_to_s3 function in the next step, when we actually export data.
Step 4: Export Data to S3
The aws_s3.query_export_to_s3 function expects the following parameters to export the data to an S3 bucket:
- SQL Statement – This is a simple string with the SQL statement to select the data you want to export. For example, if you have a table called customers, you can export all its data with the following SQL statement: SELECT * FROM customers_export.
- S3 URI – The S3 connection that was created in the previous step.
Once all parameters are set, execute the function:
SELECT *
FROM aws_s3.query_export_to_s3(
    'SELECT * FROM customers_export',
    :'s3_export_uri'
);
If everything is set up correctly, the function will create a file in S3 with the contents of what has been selected in the SQL statement.
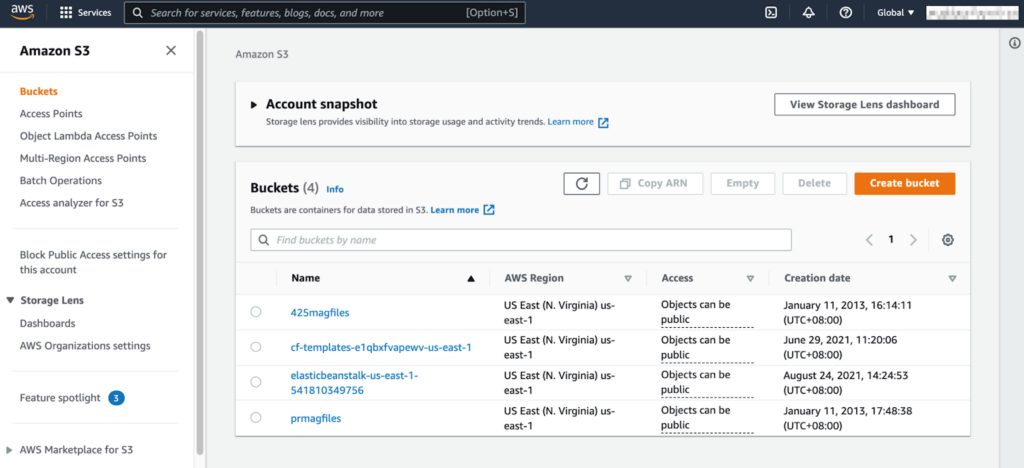
To view the file in S3, use the AWS CLI to first list the files in the bucket and then download it to the local machine.
aws s3 ls s3://rds-data-export-demo/Step 5: Verify and Troubleshoot
If the export doesn’t work, here are some common things to check:
- Permissions issue: Ensure your IAM Role has S3:PutObject access and is properly attached to the RDS instance.
- Region mismatch: Ensure the S3 bucket and RDS database are in the same AWS region.
- Check AWS logs: If the command fails, check the AWS RDS logs.
Manual method’s advantages
- Full control over data selection and formats: Users can define exactly which data is exported, how it’s formatted, and where it is stored in S3.
- No third-party services involved: Everything is managed entirely within AWS, ensuring stronger security control via IAM roles and policies.
Manual method’s drawbacks
- Admin access: The aws_s3 extension requires administrative or root user privileges to the RDS database instance, which users might not have.
- IAM roles and permissions setup: For the RDS instance to export data to S3, it necessitates correct IAM roles and policies, whose setting might be challenging to some users.
- Automation requires technical skills: You cannot automate export tasks unless you know how to write cron jobs for scheduling exports. Also, the server must always be up and running to execute scheduled tasks.
Method 2: Exporting data from RDS Postgres to S3 Using Automated Option
The manual method described above offers clear advantages, such as complete control over exported data and secure access managed through IAM roles. However, the need for cloud configuration can make it overly complex for general users. In the following section, we’ll explore how Skyvia can facilitate this process, making your export to S3 a breeze.
Skyvia is a leading SaaS platform that offers powerful data integration capabilities. With its user-friendly interface and no-code approach, it’s recognized by G2 Crowd as one of the top ETL tools for ease of use. Skyvia’s accessibility empowers even non-technical users to build robust data pipelines for moving data across various cloud platforms, including Amazon RDS and S3.
Step 1: Sign up to Skyvia
Go to Skyvia and sign up. After signing up, you’ll get a Default Workspace where you can create and manage objects like connections, agents, and integrations – a one-stop shop for everything that can be done within the Skyvia platform.
For this use case, we first need to establish connections to both the PostgreSQL database running on Amazon RDS and the S3 bucket. These connections will then be used to create an integration task that will export data from PostgreSQL to S3.
Step 2: Create Connections
First, let’s create a connection to our RDS instance. To establish a successful connection, you’ll need the following details:
- RDS database public endpoint – the connection string for your database instance, available in the RDS management console under Connectivity and Security. Copy the endpoint and port where PostgreSQL is running.
- Database username – the master username used to access the database.
- Database password – the master password for authentication.
- Default database – the specific database Skyvia will connect to for exporting data to S3.
Note: Make sure the Security Group allows inbound connections to the RDS instance, or the connection may fail.
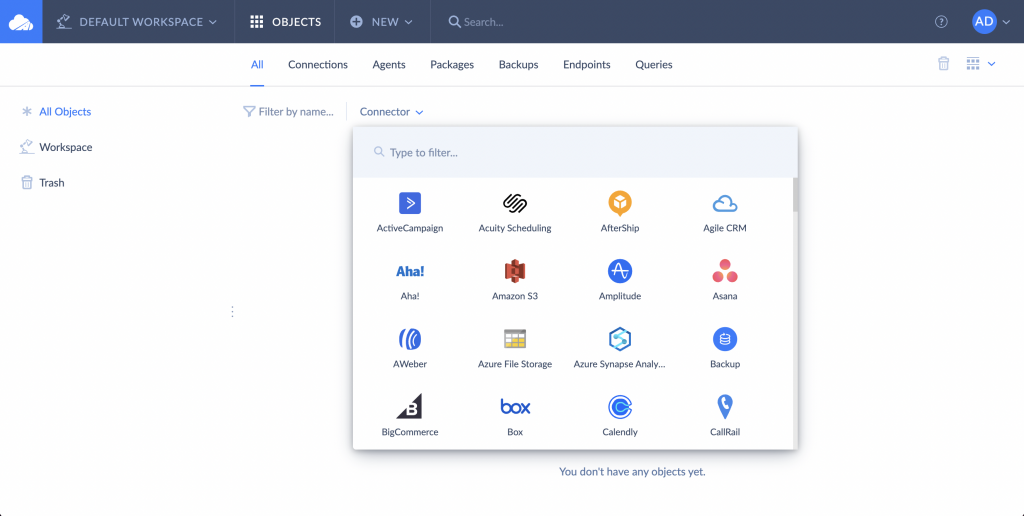
Go to the Connections tab and click +Create New. In the search bar, type PostgreSQL and select the connector.
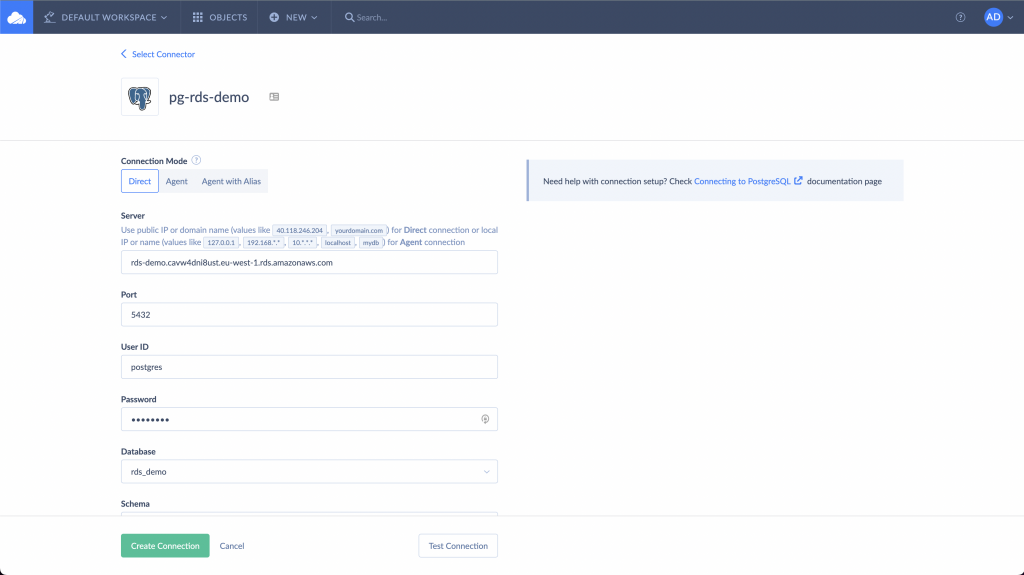
Set Connection Mode to Direct and fill in the required fields:
- Server – Enter the RDS database public endpoint.
- Port – Specify the PostgreSQL instance port.
- User ID – Enter the database username.
- Password – Use the master password for authentication.
- Database – Select the target database from the drop-down list.
Click Test Connection to verify the setup. If the test is successful, click Create Connection to finalize.
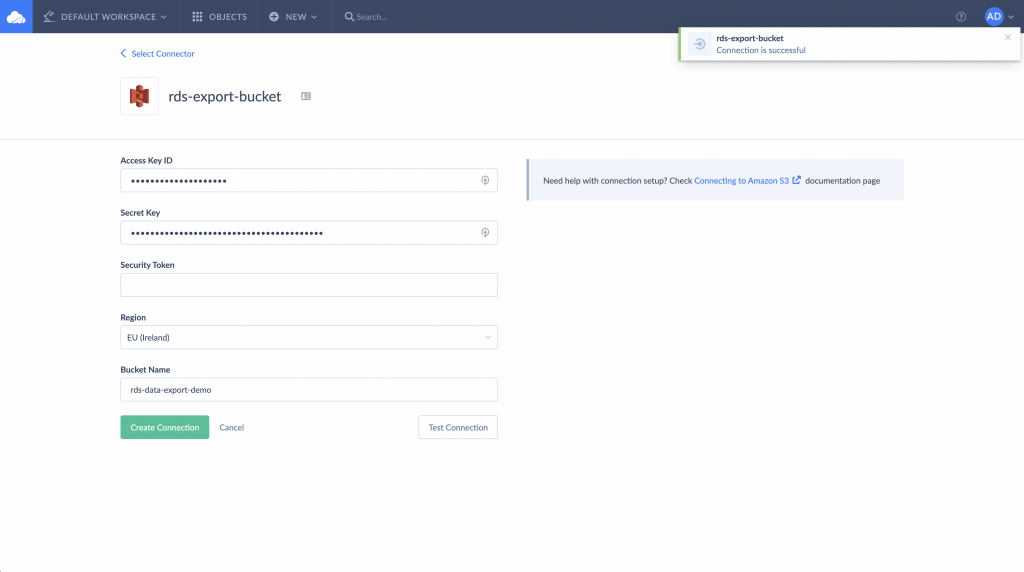
To connect Skyvia to your Amazon S3 bucket, you’ll need an access key ID and secret key from the AWS Management Console. If you don’t have these credentials yet, follow AWS’s official guide to create an access key.
- In Skyvia, go to Connections and click +Create New.
- On the Select Connector page, choose Amazon S3.
- Enter the required details:
- Access Key ID – Your AWS access key ID.
- Secret Key – Your AWS secret key.
- Region – The AWS region where your S3 bucket is located.
- Bucket Name – The S3 bucket where data will be exported.
- Click Test Connection to validate the setup.
- If successful, click Create Connection to finalize.
Step 3: Create an Integration to Export Data
Now that we’ve set up the RDS and S3 connections, we’ll use them to create a Skyvia integration to perform AWS RDS Postgres export to S3.
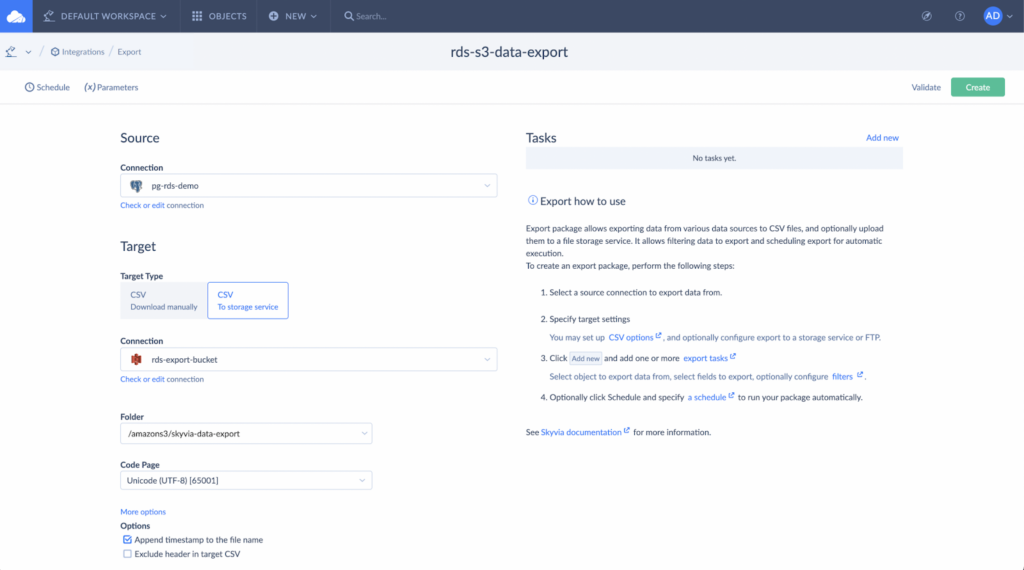
In Skyvia, click +Create New and select Export. Set up the source and target:
- Source Connection → Select the RDS Postgres connection.
- Target Type → Choose CSV To storage service.
- Target Connection → Select the S3 connection created earlier.
- Folder → Enter a folder name where the exported files will be stored in S3.
Keep the other settings at default and proceed.
As a next step, create a Task to define the actual data export process. On the right-hand pane, click on Add new for Tasks.
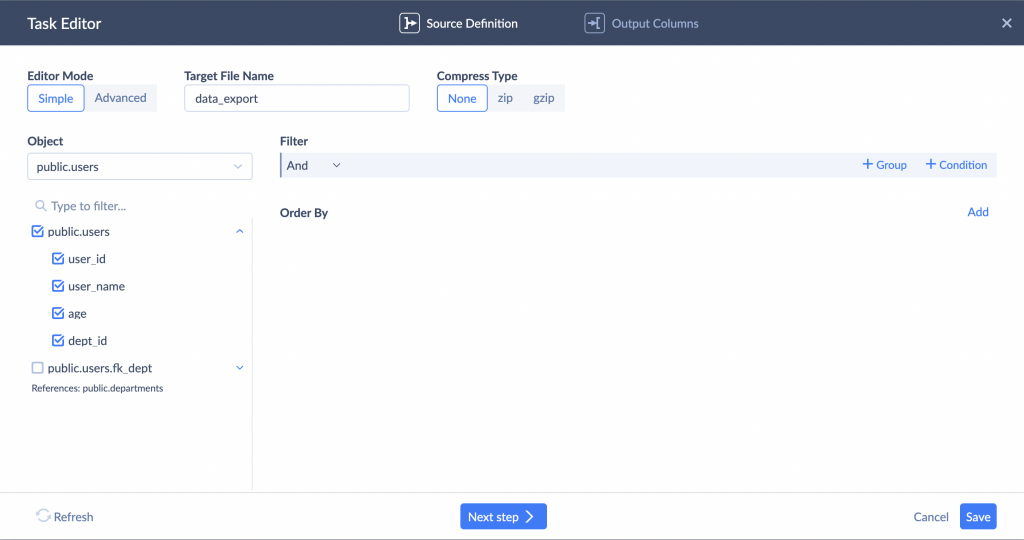
- On the Task Editor page:
- Set the Editor Mode as Simple.
- In the Target File Name enter a name for the exported file.
- For the Compression Type choose zip, gzip, or None based on your preference.
- Within the specified Object select the checkboxes next to the fields that you want to export in the CSV file; unchecked fields will not be included.
- If needed, apply Filters and Order By settings to refine the exported data.
- Click Next Step to map the database fields to the exported file. For simplicity, we’ll leave the field names unchanged and click Save.
- Click Validate and Create to save the integration. Once this is done, click Run to export data from Amazon RDS PostgreSQL to S3.
Step 4: Run and Monitor
Click on the Monitor tab to see the integration status. The initial state is Queued, which is then updated once the execution is completed.
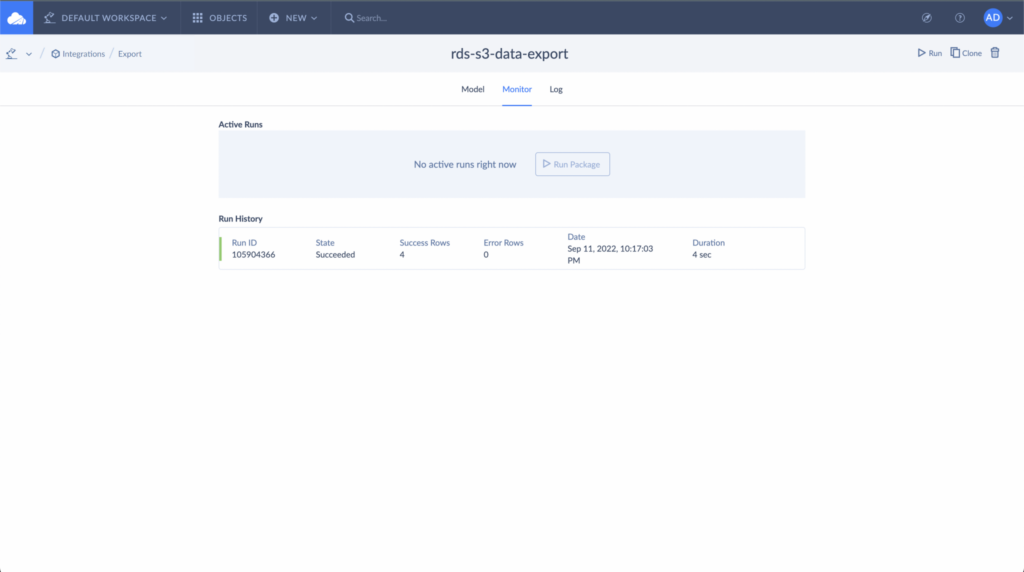
To verify the export, navigate to the S3 bucket in the AWS Management Console and download the file to your local machine. Here, you can open the file in your preferred code editor and view the contents.
With its advanced automation options, Skyvia is an excellent choice for scheduling integrations on a regular basis. To automate export tasks, click Schedule and configure the timing.
You can set it to run daily, on specific weekdays, or at intervals of a few hours or even minutes, achieving near real-time data integration.
Advantages of using Skyvia
- Ease of use: With the Skyvia connector, even non-technical users can create data pipelines and export data from Amazon RDS to S3 buckets.
- No-code approach: Skyvia’s intuitive GUI allows users to easily filter, sort, and select columns for export.
- Scheduling and automation: These options come built-in, enabling automated data exports from Amazon RDS to S3.
- No installation required: Since Skyvia is cloud-based, everything works within the platform without third-party extensions.
- Scalability: Easily handles growing data volumes and adapts to larger workloads as your business needs expand.
Disadvantages of using Skyvia
- Cost considerations: While Skyvia offers affordable pricing, high-volume exports may require higher-tier plans, increasing costs.
- Dependency on an external service: Adding an intermediate service, however reliable, increases the potential risk of failure. Since Skyvia is a third-party platform, you rely on its availability and uptime for scheduled exports.
Conclusion
As we’ve seen, exporting data from Amazon RDS to S3 using the native aws_s3 extension offers flexibility and control but comes with its share of challenges. The manual setup can be complex, especially when configuring permissions.
Fortunately, there’s a simpler way. The Skyvia cloud platform removes technical barriers to data integration. With its intuitive, no-code interface, advanced functionality, and affordable pricing, Skyvia is your reliable partner for data operations of any complexity.
FAQ for AWS RDS Postgres to S3

What are the prerequisites for exporting data from AWS RDS Postgres to S3?
You need an Amazon RDS PostgreSQL instance (version 11+), an S3 bucket, an IAM role with proper permissions (S3:PutObject), the aws_s3 extension enabled in PostgreSQL, and appropriate database user privileges.
How can I verify if my PostgreSQL version supports S3 exports?
Run this AWS CLI command:
aws rds describe-db-engine-versions –region your-region –engine postgres –engine-version your-version
If “s3Export” appears in the output, your version supports S3 exports.
What best practices should I follow to ensure a successful data export process?
The best practices are as follows:
– Set up IAM roles and permissions correctly
– Keep RDS and S3 in the same AWS region
– Validate the aws_s3 extension
– Test the connection before exporting
– Enable logging for troubleshooting.