

HubSpot export CSV giving you a headache?
You log in, hit export… and half your data’s missing. Maybe the custom fields didn’t show up. Maybe the filters weren’t right. Whatever it is, exporting a simple CSV from HubSpot shouldn’t be this frustrating.
This guide breaks it all down, step by step. Whether you’re backing up contacts, moving deals to another tool, or just pulling a report, we got you covered.
You’ll learn how to export the data you actually need, skip the common mistakes, and even automate the whole thing if you’re tired of doing it over and over.
Ready?
Table of Contents
- Can You Export CSV from HubSpot?
- Preparing to Export Data to CSV from HubSpot
- Manual CSV Export Options in HubSpot
- Limitations of CSV Export in HubSpot
- Automate CSV Export from HubSpot with Skyvia
- Other Ways to Export HubSpot Data to CSV
- Best Way to Export CSV from HubSpot: Side-by-Side Comparison
- Troubleshooting HubSpot Export CSV Issues
- Conclusion
Can You Export CSV from HubSpot?
Well, of course!
Why you’re here tells us you want to know more. But first, let’s break down what data you can pull out of HubSpot.
Contacts
You can export contact records with all their associated details — name, email, phone, lifecycle stage, and even custom properties.
Before exporting, you can apply filters to narrow it down (like just contacts from last month or tagged under a certain campaign).
Example:
Pull a CSV of all contacts from your “Newsletter Subscribers” list to import into a different email platform.
Companies
Company records include details like company name, domain, phone, industry, and any custom fields you’ve added.
This is useful for reporting or syncing B2B data with external systems.
Example:
Export companies with annual revenue over $1M to hand over to your sales team for outreach.
Deals
You can export deals from your pipelines, complete with deal names, stages, close dates, amounts, and owners.
Filters let you export only active, won, or lost deals, or filter by pipeline.
Example:
Export all closed-won deals in Q2 to calculate sales performance.
Tickets
Tickets help track customer support issues. You can export them with ticket status, pipeline stage, owner, and associated contact or company.
Example:
Export support tickets tagged “urgent” from last week to share with your CS manager.
Products
If you’re using HubSpot’s product library, you can export all items, including names, prices, and SKUs.
This is handy for e-commerce reporting or syncing with inventory tools.
Example:
Export all products with a price above $500 to update a pricing spreadsheet.
Custom Properties
HubSpot also lets you export property definitions — basically a list of your custom fields and their settings.
This is useful for audits or preparing for data migration.
Example:
Export custom property definitions to document your CRM setup before switching tools.
Reports
You can export report data (table format only) from dashboards. Visuals like charts and graphs don’t get exported to CSV.
Still, you can export raw data from reports for deeper analysis in Excel or Sheets.
Example:
Export a table report showing total deals by rep to analyze team performance outside HubSpot.
💡 Quick Tip: When using HubSpot export data to CSV, always double-check your filters and columns before downloading. It saves you from missing key info later.
Before you hit that export button, let’s make sure your data’s clean, filtered, and ready to go.
What should you check before exporting? Let’s run through a quick checklist.
Preparing to Export Data to CSV from HubSpot
Before you download anything, let’s make sure your export goes smoothly.
Bad exports usually come from missing fields, bad filters, or permission issues — all stuff you can avoid with a little prep.
Think of this as your quick HubSpot export checklist before hitting “Export.”
Check Your Permissions
First things first — do you have permission to export data?
HubSpot limits export access based on user roles. If you don’t see the export button, that’s probably why.
Fix it: Ask your HubSpot admin to update your role or export it for you.
Clean Up Your Data
It’s tempting to export everything, but junk in means junk out.
Go through your contacts, deals, or lists and clean up duplicates, fix missing values, or update outdated fields.
Why this matters: If you’re preparing HubSpot data for export to another tool, bad data causes errors and wasted time.
Select the Right Columns
HubSpot lets you pick which columns to include. Don’t just go with the default. Make sure all the fields you need — especially custom properties — are selected.
Tip: You can customize columns in the view before exporting. HubSpot saves that view for next time.
Apply Filters (If Needed)
Don’t want the whole database?
Use filters to narrow it down by deal stage, contact owner, lifecycle, date ranges — whatever makes sense.
This is a must if you’re trying to filter HubSpot before exporting to include only relevant data.
Example: Filter to only export contacts created in the last 30 days for a monthly marketing report.
Choose the Right Format
HubSpot gives you options: XLS, CSV, or XLSX. For most tools and uploads, CSV is the safest choice — it’s clean, simple, and supported almost everywhere.
Unless you need formatting or special Excel functions, go with CSV.
💡 Quick Tip: If you’re exporting for backup, grab all fields. But if you’re sending data to another app, less is more — just pick what you need.
Ready to Hit Export?
Now that your filters are in place, your fields are selected, and your data’s squeaky clean…
Let’s walk through how to export different data types in HubSpot — starting with contacts.
Need to export just a list or certain deals? We’ll cover all that next.

Manual CSV Export Options in HubSpot
If you’re not using integrations or automation tools, no worries — HubSpot still lets you export data manually with just a few clicks.
We’ll walk through how to export contacts, deals, companies, tickets, lists, reports, and even custom properties.
Export Contacts
Need a CSV file of your contacts? It’s simple.
- Go to CRM > Contacts.
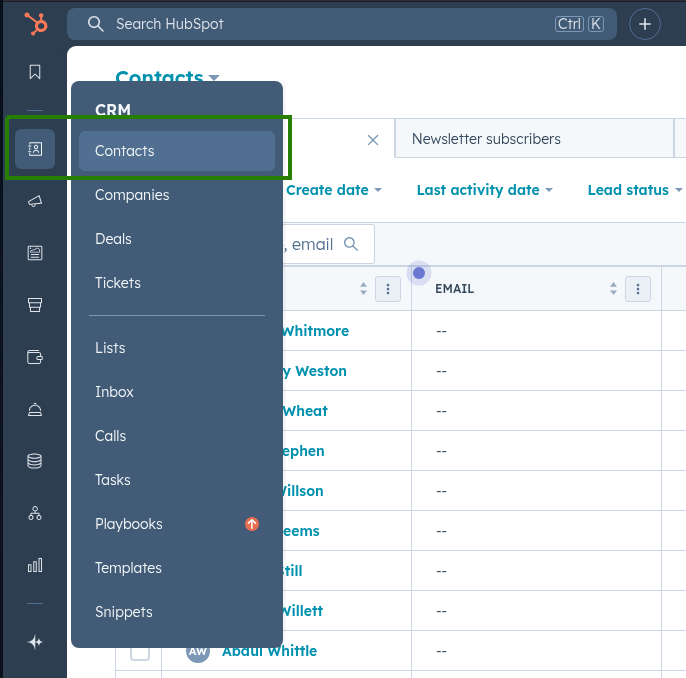
- Choose a View or Apply filters if needed (like lifecycle stage = Lead)
- Click Export. Know the location of the button below (boxed in green):
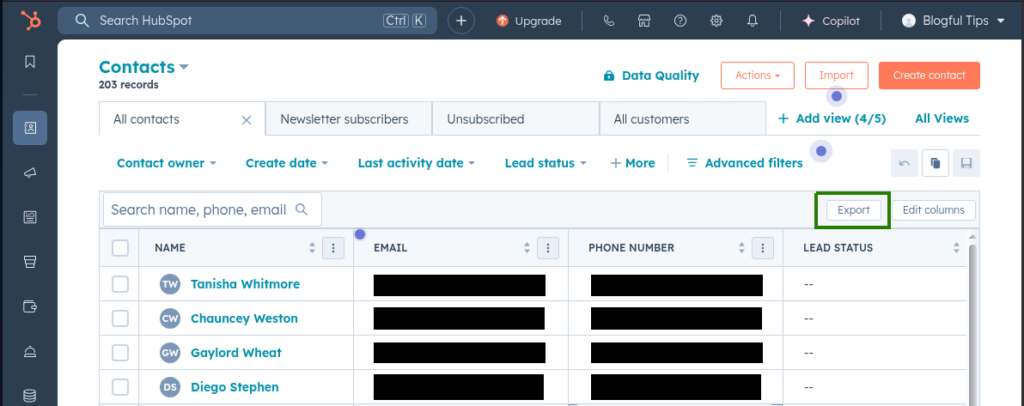
- Choose CSV as your File format.
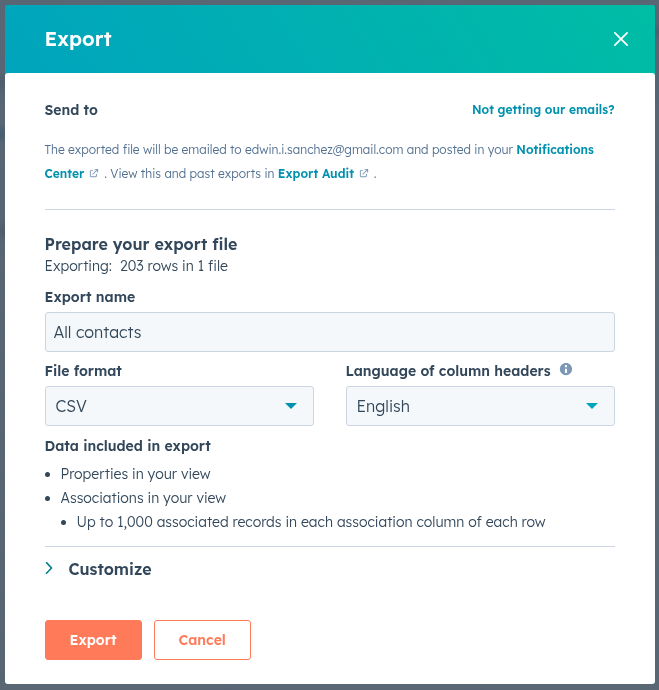
- Click Export — check your email to download the CSV file.
Exporting HubSpot contacts with all your custom fields? Make sure those fields are visible in your view before exporting.
Example:
Export all contacts who filled out a webinar form, including job title and signup date.
Export Deals, Companies, and Tickets
You can also export other key CRM objects like deals, companies, and support tickets.
Just follow the same general steps:
- Go to the object you want (Deals, Companies, or Tickets)
- Apply filters — like “Only open tickets” or “Deals in Q2”.
- Click Export.
- Choose CSV file format and go.
- Check your email for the exported CSV.
Need to export deals from a specific pipeline? Use the pipeline filter first before exporting.
Example:
Export all open deals from the Enterprise pipeline so you can prep for your next sales meeting.
Export Lists
If you’re working with a list — static or active — HubSpot lets you export those too. Lists are a way to segment and organize records based on specific criteria. Check out a sample below:
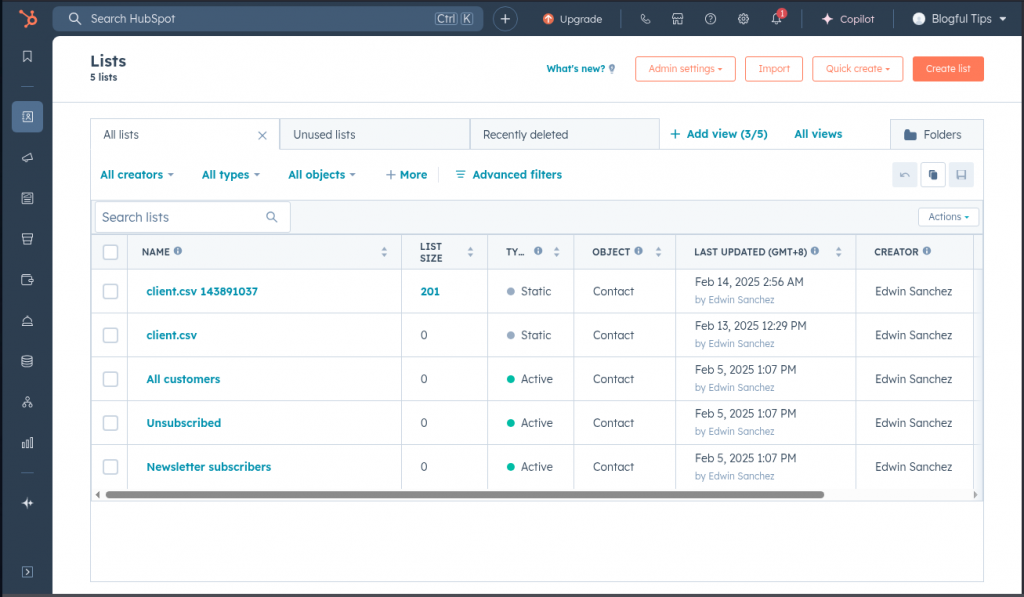
- Go to CRM > Lists.
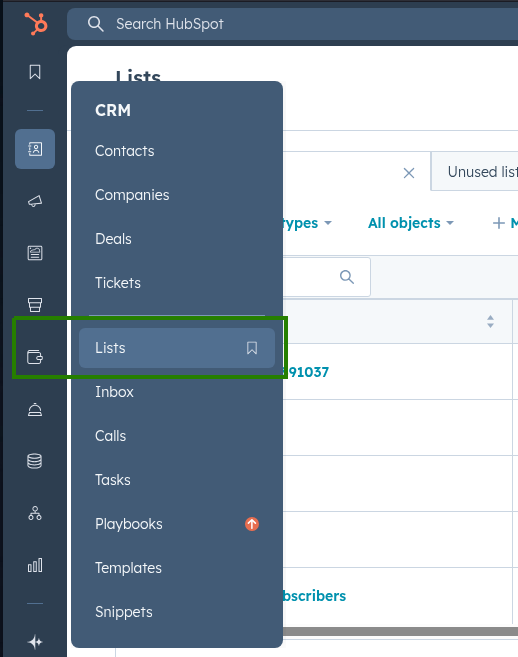
- Select your list.
- Click Export.
- Choose CSV and hit export.
Active lists update automatically, so they’re great for ongoing segmentation. Static lists are fixed snapshots. So, if data changes, it stays the same.
Example:
Export an active list of newsletter subscribers who opened an email in the last 7 days.
Export Reports
You can download the raw data from most table-style reports in HubSpot — just not the visuals like pie charts or graphs.
To export:
- Go to your Dashboard.
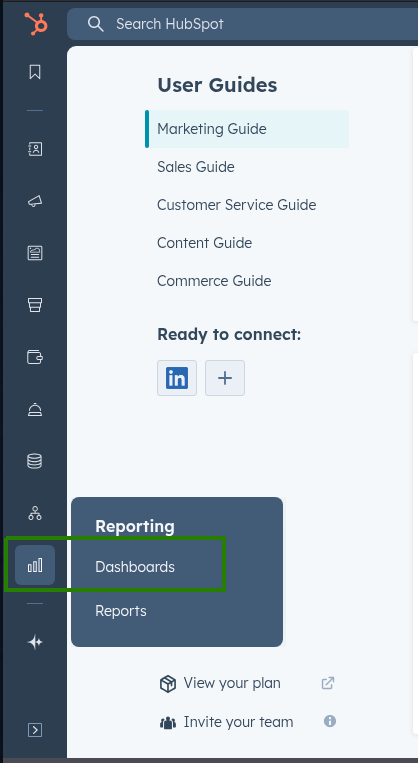
- Find the report you want.
- From the report within the dashboard, look for the menu in the top-right corner. Click Export unsummarized data.
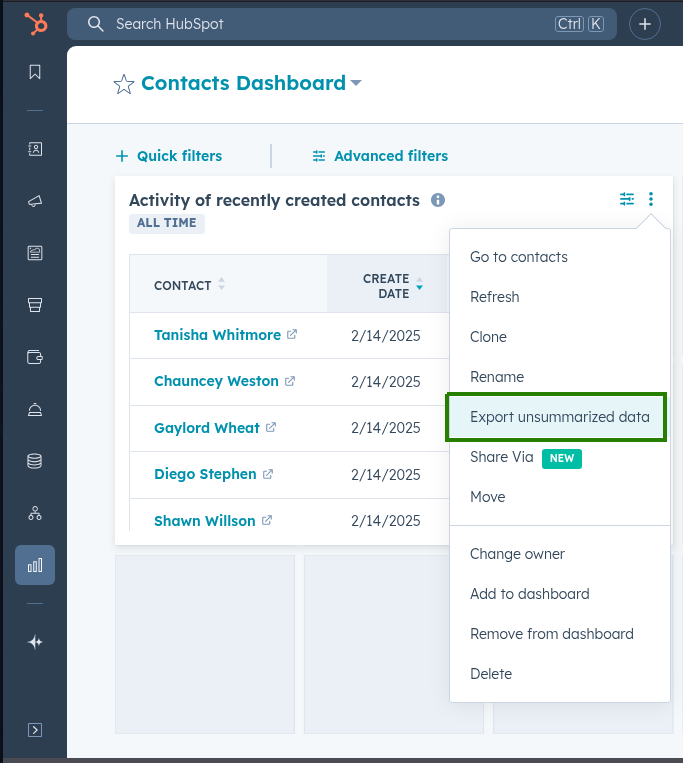
- Choose the CSV file format and hit Export.
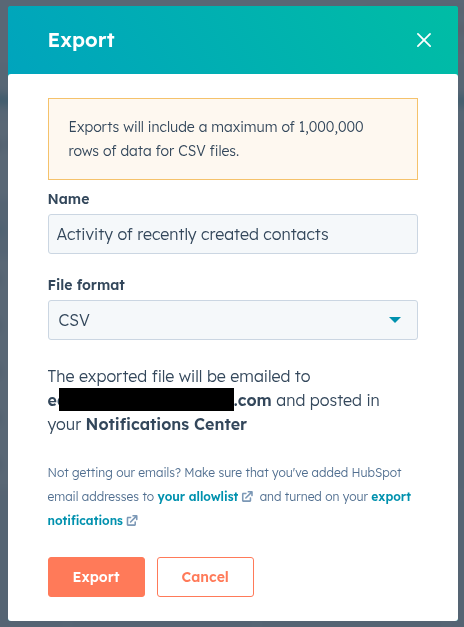
- Check your email for the CSV file.
This is a quick way to get metrics out of HubSpot and into Excel or Google Sheets for deeper analysis.
Example:
Export a deals-by-owner report in CSV format to track team performance offline.
Export Custom Properties
You can also export your property definitions — helpful for audits, migrations, or just documenting your setup.
Here’s how:
- Go to Settings > Properties.
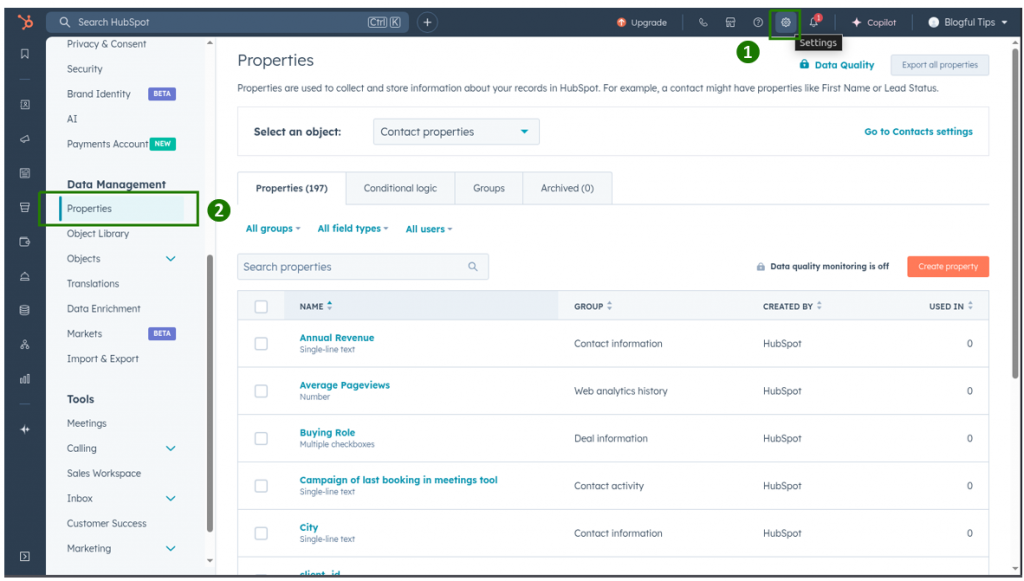
- Click Export all properties.
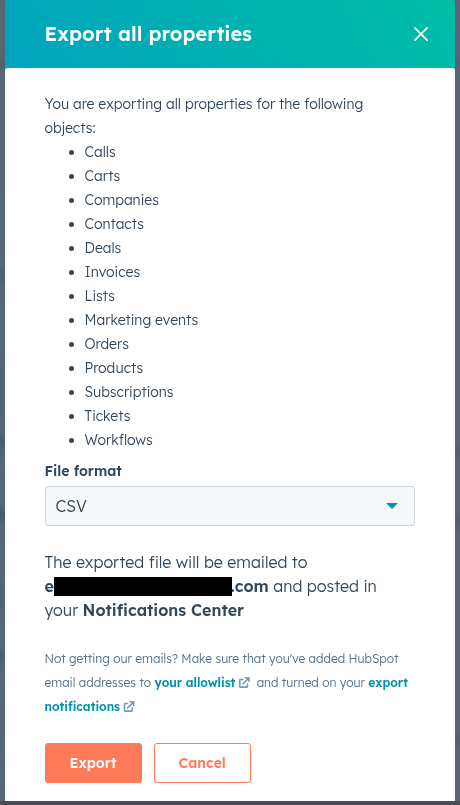
- Choose CSV to download your fields, internal names, and settings, and hit Export.
- Check your email to download the CSV.
Example:
Export all custom contact properties before switching to a new CRM to keep your setup consistent.
💡 Quick Tip: What you see in your HubSpot view is what ends up in your CSV. So take a second to double-check your filters and selected columns before exporting.
Wondering why your export is missing fields or why you can’t export linked records like Contacts + Deals together?
Let’s look at the limitations of HubSpot CSV exports — and how to work around them.
Limitations of CSV Export in HubSpot
Exporting CSVs from HubSpot is super handy — until you hit a wall. Some things just don’t export the way you expect, and a few common HubSpot CSV export issues can trip you up if you’re not ready.
Let’s go over the most important HubSpot export limitations so you don’t waste time later.
Max File Size
HubSpot has file size limits for exports, especially for large datasets.
If your export is too big, it may fail, or you’ll get it broken into parts via a ZIP file.
Quick fix: Apply filters to break large exports into smaller chunks.
Limited Columns
You can’t export every field in one go, especially if your records have a lot of custom properties.
There’s a cap on the number of columns that can be exported. In most cases, it’s around 250 columns — anything more gets trimmed off.
Tip: Prioritize only the fields you need. You can always run a second export for the rest.
Associated Records Aren’t Included
If you’re exporting contacts, you won’t automatically get the deals or tickets linked to them — and vice versa.
Each object (Contacts, Deals, Companies, etc.) must be exported separately.
This is one of the most common HubSpot export limitations folks run into when trying to view everything in one spreadsheet.
Workaround: Use HubSpot’s reports to create a joined view, then export the table if possible.
Charts and Visuals Can’t Be Exported
Reports with charts, graphs, or dashboards? You can’t export those as CSV.
Only the raw table data behind them can be exported.
Alternative: Take a screenshot or export the underlying table instead.
CSV Format Quirks
Sometimes CSV exports show weird characters, missing line breaks, or misaligned data when opened in Excel or Google Sheets.
Fix it:
- Always open the file using UTF-8 encoding
- Double-check column headers and delimiters (especially if your data includes commas)
💡 Quick Tip: If your HubSpot export isn’t working or data seems missing, double-check your filters, view settings, and file size. Nine times out of ten, it’s one of those.
Tired of repeating the same export steps every week?
Let’s look at how you can automate HubSpot CSV exports using a tool like Skyvia — so you can save time and skip the manual work.
Automate CSV Export from HubSpot with Skyvia
Manually exporting the same data every week? That gets old fast.
That’s where Skyvia steps in — a no-code platform that lets you schedule automatic HubSpot exports to destinations like Google Drive, Dropbox, or FTP. No scripts. No stress.
Skyvia supports filters, custom field selection, and even lets you map HubSpot fields to match your target file layout. So you can keep your reports up to date without lifting a finger.
Step-by-Step: Set Up HubSpot Export CSV Integration in Skyvia
Here’s how to get it done in a few simple steps:
1. Create a HubSpot Connection
- Log in to your Skyvia account.
- Click +Create New > Connection.
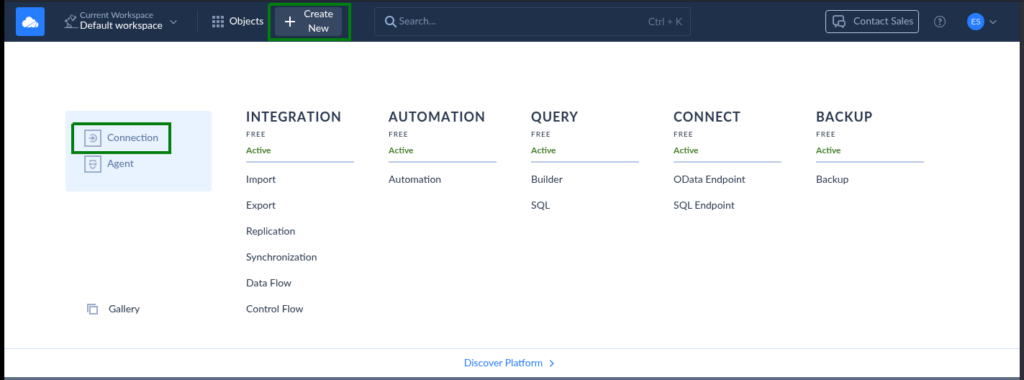
- Search and choose HubSpot from the list.

- Sign in with your HubSpot account and authorize access.
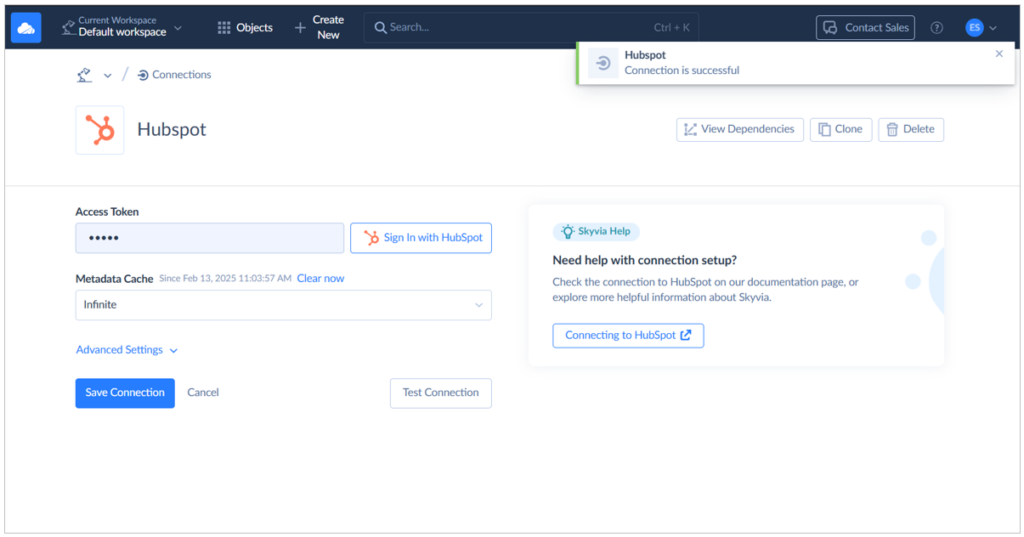
- Name your HubSpot connection, and save it.
Boom — Skyvia can now access your CRM data. Check out what it looks like from below:
2. Set Up Your Target (CSV Destination)
Decide where you want to send your exported CSV files:
- Google Drive
- Dropbox
- FTP/SFTP server
- Or other cloud storage.
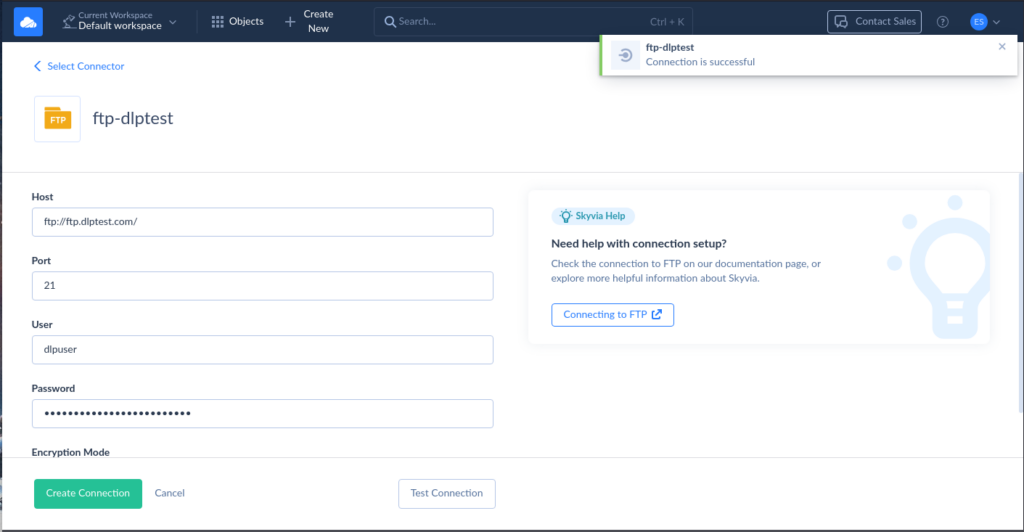
Create a connection to your target platform just like you did with HubSpot. Below is a successful connection to an FTP location:
3. Create a New Export Integration
- Go to + Create New > Export
- Choose your HubSpot connection as the source. Use the one you created earlier.
- Pick the object to export (like Contacts, Deals, or Companies)
- Apply filters (e.g., export only closed-won deals or contacts added last 30 days)
- Select your CSV target (like Dropbox or FTP). Use the storage connection you created earlier.
- Click Save and set up a schedule — daily, weekly, hourly… you choose.
Check out a sample HubSpot export to CSV using Skyvia. It uses the same HubSpot and FTP location created earlier.

And here’s the recurring schedule so it’s automatic:
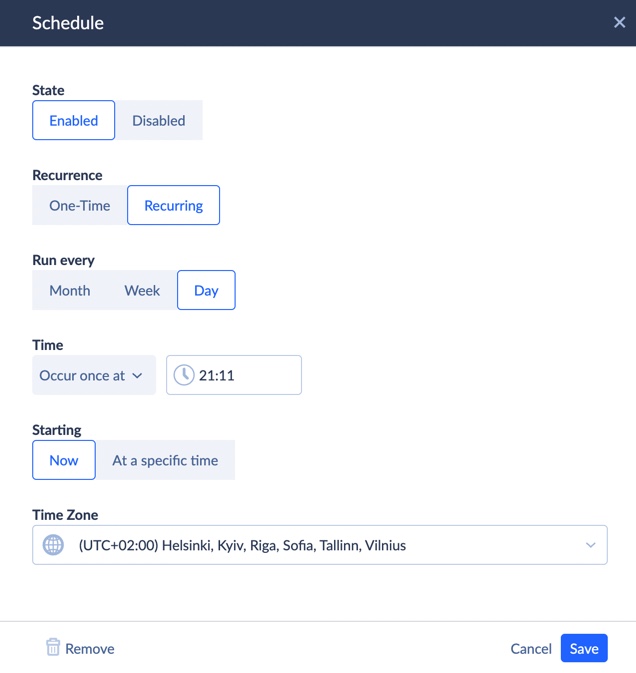
And that’s it — you’re now exporting CSVs from HubSpot on autopilot.
💡 Quick Tip: Need multiple exports for different teams? Set up separate Skyvia tasks for each one — marketing gets contacts, sales gets deals, support gets tickets. Prefer to handle things with scripts or want even more control?
Let’s check out other ways to export HubSpot data to CSV — including full CRM export and using the HubSpot API.
Other Ways to Export HubSpot Data to CSV
Skyvia is great for no-code folks — but it’s not the only way to get your data out of HubSpot.
If you’re an admin or a developer, there are other tools and built-in options that give you more control and flexibility.
Let’s walk through them.
Full CRM Data Export (Admin Only)
If you’re an admin and need everything — contacts, companies, deals, tickets, products — HubSpot offers a full CRM export.
Here’s how:
- Go to Settings.
- Scroll to Data Management > Import & Export.
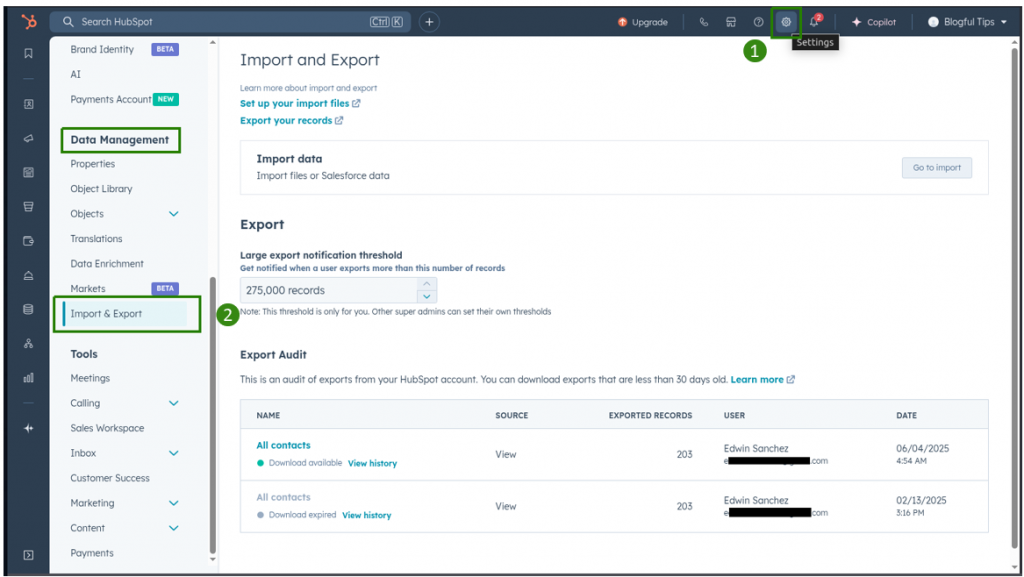
- Choose the object to export from the list.
This is perfect for backups, migrations, or closing down an account.
Example:
Export all CRM data for backup and store it on a secure storage like SFTP.
Export via HubSpot API
Want full control over what, when, and how you export?
Use the HubSpot API to write custom scripts. You can export anything you can access in the CRM — and push the CSV wherever you want, like an FTP server. Here’s a simple Python example that fetches contacts via API and writes the data to a CSV, then uploads it to an FTP location:
import requests
import csv
from ftplib import FTP

# Replace with your actual HubSpot private app token
HUBSPOT_TOKEN = 'your_private_app_token'

# Step 1: Get contacts from HubSpot
headers = {
    'Authorization': f'Bearer {HUBSPOT_TOKEN}',
    'Content-Type': 'application/json'
}
response = requests.get('https://api.hubapi.com/crm/v3/objects/contacts', headers=headers)
contacts = response.json().get('results', [])

# Step 2: Write contacts to CSV
csv_file = 'contacts_export.csv'
with open(csv_file, 'w', newline='', encoding='utf-8') as f:
    writer = csv.writer(f)
    writer.writerow(['First Name', 'Last Name', 'Email'])  # Add more if needed
    for c in contacts:
        props = c['properties']
        writer.writerow([props.get('firstname'), props.get('lastname'), props.get('email')])

# Step 3: Upload CSV to FTP
ftp = FTP('your.ftp.server')
ftp.login('ftp_user', 'ftp_password')
with open(csv_file, 'rb') as f:
    ftp.storbinary(f'STOR {csv_file}', f)
ftp.quit()
This is a flexible way to automate complex exports, especially for enterprise needs.
Use Google Sheets or Excel Add-ins
If you’re a light user and just want to pull data into a spreadsheet now and then, this one’s easy. Use tools like the Skyvia Excel Add-In to place your HubSpot data to Excel.
Check out a sample Excel spreadsheet with a query result from HubSpot using the Skyvia Excel Add-In:
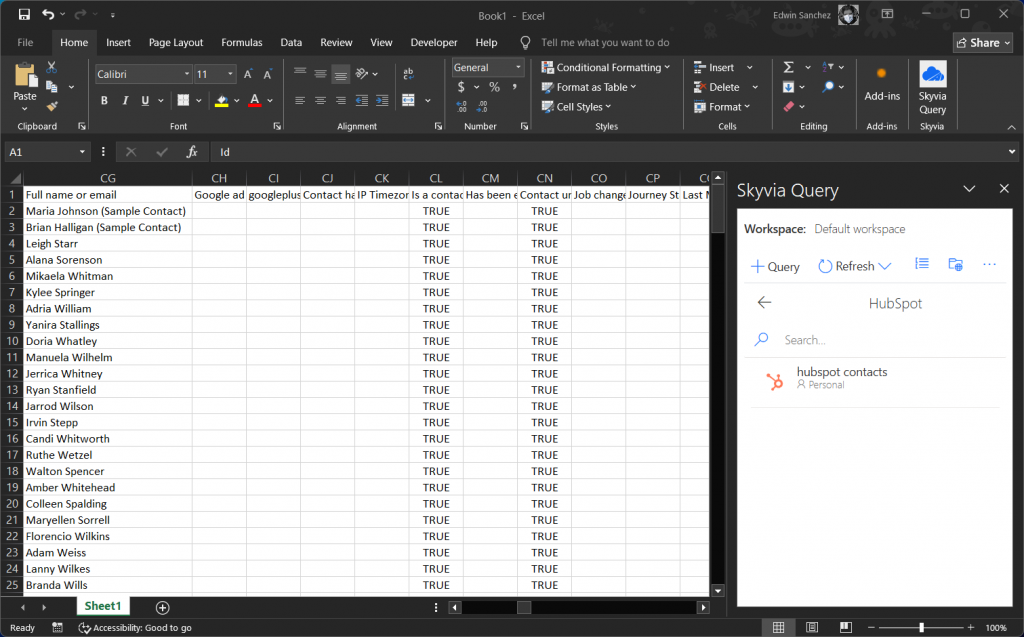
These add-ins connect HubSpot to Google Sheets or Excel. From there, you can tweak your data and export as CSV anytime.
Example:
Use Skyvia Excel Add-in to refresh a contact list in Microsoft Excel every morning — then export to CSV and share with your team.
💡 Quick Tip: Need one-time exports? Use the built-in tools. Need control? Go API. Need hands-free simplicity? Skyvia or Sheets add-ons are your best bet.
Not sure which method is right for you?
Let’s compare HubSpot’s native export, Skyvia, and other popular options side by side.
Best Way to Export CSV from HubSpot: Side-by-Side Comparison
Still unsure which export method fits you best? Here’s a quick side-by-side look at your main options:
| Method | Best For | Setup Time | Skill Level | Customizability |
|---|---|---|---|---|
| Native HubSpot Export | Quick one-time exports (contacts, deals, reports) | None – ready to use | Beginner-friendly | Low – limited filters and fields |
| Skyvia Export Integration | Scheduled exports to cloud (Google Drive, FTP) | ~15–30 minutes | No-code users | Medium – supports filters, mapping |
| Full CRM Export | Backup or migration (admin-only) | 5–10 minutes | Admin only | Low – all or nothing |
| HubSpot API + Scripts | Developers who want full control | 30–60 minutes or more | Advanced (coding skills) | High – fully customizable |
| Google Sheets or Excel Add-ins | Marketers and light users | 10–15 minutes | Beginner to Intermediate | Medium – basic filter options |
💡 Quick Tip: If you just need a quick CSV for a report, stick with native export. But if you’re doing it often — or need it hands-free — automation or scripts are totally worth it.
If something’s missing in your CSV, the export failed, or the button’s just… gone — don’t worry.
Let’s walk through a few quick fixes for common HubSpot export issues.
Troubleshooting HubSpot Export CSV Issues
Ran into trouble while trying to export data from HubSpot?
You’re not alone — a few common glitches can trip things up, but most have easy fixes.
Let’s break them down.
Export Button Not Showing
You’re looking everywhere, but the Export option just isn’t there.
Most of the time, this means your HubSpot user role doesn’t have permission to export data.
Only users with export access can see and use that button, and permissions are set by your HubSpot admin.
Example:
Your marketing intern logs in to export a contact list but can’t find the export button. Turns out, they’re not assigned export rights under their user role.
Export Fails or Gets Stuck
You click export… and nothing happens. Or worse, the file just never arrives.
This usually happens when:
- The file is too large
- There’s a temporary issue on HubSpot’s end
- You’re exporting too many columns or rows at once
Fix: Try breaking up your export with filters or reducing the number of properties selected.
Example:
You’re exporting 50,000 contacts with 200+ properties, and the process hangs. You apply a “last 30 days” filter and reduce to 50 properties — export works like a charm.
Missing Fields or Incomplete Data
You run the export and — surprise! — your CSV is missing fields or showing empty values.
The most common causes:
- Those fields weren’t visible in your current table view
- You didn’t select them in the export options
- The data doesn’t exist for some records (e.g., not every contact has a job title)
Fix: Double-check your view and make sure all key properties are selected before export.
Example:
You expect to see “Job Title” in the contact export, but it’s blank for most rows. After checking, you realize only 30% of contacts ever had that field filled in.
Wrong Characters or Broken Formatting
Sometimes your CSV looks messy when opened — weird symbols, broken line breaks, or data shoved into the wrong columns.
This usually happens when:
- The CSV isn’t opened with UTF-8 encoding
- Your data contains commas or line breaks that mess with formatting
- Excel auto-detects the wrong delimiter
Fix: Use “Import” instead of “Open” in Excel or Sheets, and pick the correct encoding and separator.
Example:
A contact’s note field includes commas and quotes, causing the data to spill into extra columns. Opening the file with Excel’s import tool fixes the formatting.
Hitting HubSpot API Limits
If you’re using a script or third-party tool like Skyvia and your export suddenly fails or stalls, you might be bumping into HubSpot’s API rate limits.
Here’s what you need to know:
- HubSpot’s default limit is 250,000 API calls per day
- There’s also a short-term burst limit: 100 calls every 10 seconds
- Hitting either limit can cause your export to slow down or stop completely
Fix:
- Space out your automated exports
- Use filtering to reduce the data pulled
- For heavy-duty exports, consider running them during off-peak hours
Example:
You schedule three large Python exports at the same time — one for contacts, one for deals, one for tickets. Two run fine, but the third fails. Turns out you hit the burst limit. Spacing them 10 minutes apart solves the issue.
💡 Quick Tip: If your export fails, check both the data volume and your API usage. Most third-party tools show you how many calls you’ve used.
Conclusion
Exporting data from HubSpot doesn’t have to be a guessing game.
You’ve got options — whether you just need a quick CSV, a weekly automated report, or a full backup for migration.
Let’s recap your choices:
- Use HubSpot’s native export for simple, one-time exports
- Set up Skyvia to automate CSV exports on a schedule
- Try full CRM export for admin-level backups
- Use the HubSpot API or tools like Coupler.io for custom workflows
No matter what method you go with, always double-check your filters, pick the right fields, and test a small export first.
Ready to Take the Next Step?
Here are some helpful next reads:
- How to Integrate HubSpot and Snowflake
- How to Integrate HubSpot and NetSuite
- Integrate HubSpot and Shopify Ultimate Guide
- Best Methods of Integrating HubSpot with Salesforce
- How to Connect HubSpot to MySQL In Various Ways

F.A.Q. for HubSpot Export CSV

Is there a free way to export all HubSpot data?
- Yes — if you’re an admin, you can use the Full CRM Export in your HubSpot settings.
It gives you a ZIP file with multiple CSVs, covering all your main CRM objects.
How do I export email data or activity logs?
- You can’t export detailed email interactions or activity logs in bulk through HubSpot’s built-in export.
For that, you’ll need to use the HubSpot API or third-party connectors that support those object types.
