

Salesforce organizes contacts, opportunities, and financial outcomes. Google Drive quietly hoards the work itself: contracts, proposals, invoices, documentation proving things actually happened. When those two don’t truly connect, compensation becomes a team’s responsibility: links pasted into comments, files renamed three times, storage limits creeping up.
A thoughtful Salesforce Integration with Google Drive reshapes how workflows flow. As a result, Salesforce can finally be the operational center for everything customer-related, while Drive acts as the records keeper.
We’ll walk through the practical paths – native features, third-party tools, and custom setups – and explain where each makes sense. We’ll also look at advanced patterns and how platforms like Skyvia fit in if you want automation that goes beyond simple file linking.
Table of contents:
- Understanding Your Integration Needs: Choosing the Right Path
- Method 1: Native Salesforce Capabilities
- Method 2: Third-party Applications
- Method 3: Custom API-Based Integration
- Core Benefits of a Deep Salesforce-Google Drive Integration
- Advanced Strategies & Best Practices for Optimization
- Common Pitfalls to Avoid
- Conclusion
Understanding Your Integration Needs: Choosing the Right Path
Connecting Salesforce to Google Drive has layers and may serve very different goals. That’s why it’s worth asking, “What exactly are we connecting here?” and “What exactly do we want to get?”
- Some teams just want to see Drive files inside Salesforce without eating up storage.
- Others need automated backups, CSV imports, or structured data sync.
- And a few want deep, custom file operations controlled entirely by code.
Those are very different goals, and they will require very different approaches. Below is a practical breakdown of the main integration paths available in 2026.
Native: Salesforce Files Connect
Files Connect looks into Google Drive, Quip, SharePoint, and Box and displays what it sees there in the Salesforce UI. Nothing is moved or copied anywhere. It sounds super easy, but here’s a little rain for this parade:
- Setup requires OAuth configuration in Google Cloud and Salesforce.
- Limited automation.
- Forget about advanced folder logic or structured data sync.
Third-Party Platforms (e.g., Skyvia & AppExchange Tools)
These solutions can be of two categories:
- File connectors from AppExchange (e.g., Google Drive Connector, Drive Connect) that are focused on UI-level file access.
- Integration platforms like Skyvia focus on structured data movement, automation, and backups via CSV import/export.
If your goal is automation rather than just file previews, this approach is for you. However, as with everything else in this world, there are a few cons:
- CSV-based data exchange (not embedded Drive UI viewing).
- Subject to Salesforce API limits at high volumes.
Custom API Integration
Teams that need the fullest control possible over the integration can build a custom integration using Salesforce Apex callouts and Google Drive REST APIs. According to tradition, here are the trade-offs:
- Requires development resources.
- Ongoing maintenance when APIs change.
- Higher implementation cost.
| Method | Best For | Strengths | Limitations |
|---|---|---|---|
| Files Connect | Viewing Drive files inside Salesforce UI | No duplicate storage, real-time access, native experience | Complex OAuth setup, limited automation |
| Skyvia (No-Code Automation) | Backups, imports, scheduled data sync | Wizard-based setup, automation, transformations | CSV-focused, API limits on heavy sync |
| Custom API Integration | Advanced file operations & full control | Complete flexibility, tailored logic | Coding required, ongoing maintenance |
Method 1: Native Salesforce Capabilities

You can connect Salesforce to the most popular external data storage using the CRM’s native Salesforce Files Connect. This tool doesn’t move anything. Instead, it makes your records available directly through Salesforce UI. Sounds easy, but its implementation is complex.
Best for
- Direct file access from records.
- Avoid duplication.
- Real-time previews and search.
STEP 1: Enable Salesforce Files Connect for your organization
- Sign In with Salesforce.
- On the Setup page, search for Files Connect in the Quick Find box. Click Edit and select the Enable Files Connect checkbox.
- Choose file-sharing options applicable to your scenario.

STEP 2: Let users and administrators access Files Connect data sources
After enabling Salesforce Files Connect, you must grant users and administrators permission to access the external data sources from Salesforce.
- Search Permission Sets in Setup Quick Search.
- Create a new permission set and enable Files Connect Cloud.

STEP 3: Create an Authentication Provider for Google Drive
To use Google Drive as an external data source, you must create an authentication provider.
- Go to https://console.cloud.google.com and sign in using your Google App for Work admin account.
- Click Create Project, enter the project name and location, and click Create.
- Navigate to APIs & Services in the project dashboard.
Then, go to the Library tab and search for Google Drive API. Select the Google Drive API and click Enable API.

- Click Credentials on the left.
- Click Create Credentials, select OAuth client ID, select Web application, and click Create.
Note: You need the client ID and secret values to create an authentication provider in Salesforce. Thus, we recommend saving them to a text file.
STEP 4: Create an Authentication Provider in Salesforce

- In Salesforce, search for Auth. Providers in the Quick Find box, select it, and click New.
- Select OpenID Connect for Provider Type, and specify the following parameters:
- Name – the name to display in Salesforce.
- URL Suffix – Suffix at the end of the URL path will be generated automatically.
- Consumer Key – the client ID obtained from the Google project.
- Consumer Secret – the client secret obtained from the Google project.
- Authorize Endpoint URL: https://accounts.google.com/o/oauth2/auth?access_type=offline&approval_prompt=force (Use this URL when editing the Google project).
- Token Endpoint URL: https://accounts.google.com/o/oauth2/token
- Default Scopes: https://www.googleapis.com/auth/drive
- After you save the Auth. Provider, find the Callback URL at the bottom of the page and copy it to a text file.
- Edit the Project in Google Developer Console. In the API Manager, click Credentials and select the previously created web app.
- In the Authorized Redirect URIs section, add the Callback URL copied when creating the authentication provider in Salesforce and click Save.
STEP 5: Define an External Data Source for Google Drive
To access Google Drive files directly from Salesforce, define the external data source.

- In the Salesforce Setup menu, enter External Data Sources in the Quick Find box, then select External Data Sources.
- Click New External Data Source and set Label, Name, Type, Identity Type, Authentication Protocol, Authentication Provider, Scope, and Start Authentication Flow on Save.
- Sign in with Google and allow it to access your Salesforce data.
Now, your Google Drive files are accessible from the Files tab in Salesforce apps.
Pros
- It helps to access, share, and search external data from multiple storage locations like Google Drive within Salesforce.
- Files are embedded in Salesforce, allowing all involved team members to access the most up-to-date documents directly from Salesforce.
Cons
- The setup process for Files Connect may be quite complex as it requires multiple configuration steps.
- Files Connect provides basic integration capabilities, but it may lack advanced features offered by third-party connectors, like automated folder creation, advanced document generation, or others.
Method 2: Third-party Applications
The market offers lots of tools that solve different tasks and cover various business needs. They can help you integrate Salesforce and Google Drive, involving minimal effort and resources. Let’s look at one of them.
Skyvia is a cloud platform offering various services to perform data-related tasks. This method involves loading data from CSV files on Google Drive into Salesforce via supported connectors, or extracting Salesforce data into CSV files and keeping them in Google Drive. The integration is possible in both directions, and it doesn’t require coding.

Note: To connect Salesforce and Google Drive using Skyvia, you need an active Skyvia account. Register now and get a two-week trial for any of its paid plans.
Best for
- Scheduled exports of Salesforce data to Google Drive.
- Automated imports from Drive CSV files into Leads, Contacts, etc.
- Transformations, mapping, and upserts without writing code.
Salesforce Data Export to Google Drive
Data loss is a nightmare for any business. Backup is the surest shield to help you sleep and operate soundly. The example below shows how to perform daily backups of your Salesforce contacts to an external file on Google Drive.
To export data from Salesforce to Google Drive, perform the following steps.
STEP 1: Create Connections to Data Source
- For the Salesforce connection, you have to select the Environment and the Authentication type and specify other connection parameters and settings.

- When creating a connection to Google Drive, you need only the access token, which is automatically generated when you sign in with Google.

STEP 2: Create Export
When you need to export Salesforce data to Google Drive, you have to use Skyvia Export. Skyvia reads Salesforce data, exports it to a CSV file, and places the file in the required folder on Google Drive.
To set up the Export, you have to do the following:
- Create a new Export: Click +Create New –> Export in the Data Integration block.
- Select the Salesforce connection as a Source.
- Select Target type CSV to storage service, then select your Google Drive connection as the Target. Optionally set the target folder.
Click More options to set the additional CSV options for the target file, if needed.

STEP 3: Configure Export Task
- Click Add new on the right to open the package task editor.
- Select the Salesforce object to be exported from the dropdown list. By default, all the fields of the table are selected for Export. You can clear the checkbox fields to exclude some fields from the Export.
- Add filters if needed.

- Optionally define the target file name.
- On the Output Columns tab, drag and drop the fields to change their order in the result CSV file.

STEP 4: Scheduling Automatic Integration Run
Skyvia allows scheduling integrations for automatic execution. After saving the task, click Schedule in the top left corner of the package editor page. You can set the integration to run on specific weekdays and recur every few hours or minutes.

STEP 5: Integration Execution and Results
You can see the result of the last five integration runs on the Monitor tab. The Log tab shows the integration results for different periods.
Click the certain run to check the number of successfully processed records or the failed ones.

Businesses may need to export data from multiple objects at once in a single integration. To do that, just add more tasks to the same integration and enjoy.
Data Import from Google Drive to Salesforce
Fast and safe data exchange is an important process for businesses. With automated data import, you can avoid human errors and exchange data in a few clicks. In addition to Backup Skyvia, you can load data in the opposite direction, from Google Drive to Salesforce.
To do that, you will need Import integration. Skyvia will open the Google Drive file, extract the data, and load it into the required Salesforce object.
To set up the Import integration, perform the following steps.
STEP 1: Create a New Import Integration
- Click +Create New -> Import in the Data Integration block.
- Select CSV from the storage service Source type.
- Select your Google Drive connection as Source and Salesforce connection as Target.

STEP 2: Add an Import Task
- Click Add new on the right to create a new task.
- Select the source file in the Source Definition tab. Skyvia will read the file and display a list of its fields. Adjust the CSV options if necessary.

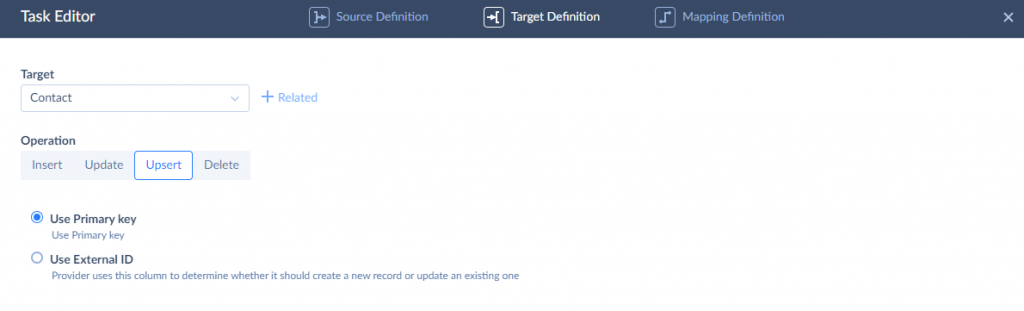
- Select the target object and choose the operation. The insert operation creates new Salesforce records from the source file. Update operation modifies the existing records. The Upsert operation inserts the new records and updates the existing records. The Use Primary Key and Use External ID marks indicate how Skyvia detects what records to change.
- The source file and target table structures may differ sometimes. Thus, to perform a smooth Import, you must map source and target fields. Skyvia maps the fields with equal names automatically.

STEP 3: Integration Execution and Results
After you configure your import, you can run the integration manually or set the schedule. When the run is completed, you can check its results as described above.
Pros
- Wizard-based configuration makes integration straightforward without development work.
- Scheduled imports and exports eliminate manual CSV handling.
- Field mapping, lookups, filtering, and upserts are supported during import.
- Google Drive is just one connector among many (more than 200, to be precise), which matters if Drive is part of a larger data flow.
- Core capabilities are available without upfront commitment.
Cons
- Skyvia does not provide live Drive file access inside the Salesforce UI.
- Sync frequency and volume are subject to Salesforce API limits.
- Not built for collaborative document workflows. If your goal is editing shared files from inside Salesforce records, a file-linking solution is more appropriate.

Method 3: Custom Integration Solutions
If your organization has very specific requirements and none of the described methods meet your business needs, you can build a custom integration for Salesforce and Google Drive. With this method, you can send web requests from Google Drive to Salesforce and operate the files directly with a coding approach.
Best for
- You need highly specific file logic.
- You want programmatic file creation, folder rules, or advanced metadata control.
- Security and behavior must be fully tailored.
STEP 1: Create a Project in the Google Developers Console
- Go to https://console.cloud.google.com and sign in using your Google App for Work admin account.
- Click Create Project, enter the project name and location, and click Create.
STEP 2: Create an Authentication Provider for Google Drive
- Navigate to APIs & Services in the project dashboard.
- Then, go to the Library tab and search for Google Drive API. Select the Google Drive API and click Enable API.

- Click Credentials on the left.
- Click Create Credentials, select OAuth client ID, select Web application, and click Create.
STEP 3: Create an Authentication Provider in Salesforce
- In Salesforce, search for Auth. Providers in the Quick Find box, select it, and click New.
- Select OpenID Connect for Provider Type, and specify the following parameters:
- Name – the name to display in Salesforce.
- URL Suffix – Suffix at the end of the URL path will be generated automatically.
- Consumer Key – the client ID obtained from the Google project.
- Consumer Secret – the client secret obtained from the Google project.
- Authorize Endpoint URL: https://accounts.google.com/o/oauth2/auth?access_type=offline&approval_prompt=force (Use this URL when editing the Google project).
- Token Endpoint URL: https://accounts.google.com/o/oauth2/token
- Default Scopes: https://www.googleapis.com/auth/drive
- After you save the Auth. Provider, find the Callback URL at the bottom of the page and copy it to a text file.
- Edit the Project in Google Developer Console. In the API Manager, click Credentials and select the previously created web app.
- Click Save. Scroll down the page to the Salesforce Configuration section and copy the Callback URL entry to a text file. Add this URL as the Authorized Redirect URIs in Google Console for the web client created on STEP 2.
STEP 4: Create Named Credential in Salesforce
- Go to Setup and search for Named Credentials.

- Specify Label and Name.
- Use https://www.googleapis.com/drive/v2 for the URL.
- For Identity Type, select Named Principal.
- For the Authentication Protocol, choose OAuth 2.0.
- Select the Authentication Provider created on STEP 3.
- Enable the Start Authentication Flow and click Save.
- After that, you will be redirected to the Google login page to sign in.
- Give your permission to access Google Drive.
After that, you will be redirected to the Named Credential detail page. The Authentication Status will become Authenticated.
STEP 5: Make a Callout
Now, you can make calls to the Salesforce API from the Google Developer Console to operate with Google Drive files.
Pros
- The coding approach allows the design of an integration for the needs of the specific organization or team.
- This method allows you to fully control your integration and manage its capabilities and limitations, data flow, and security protocols.
Cons
- This method is quite complex to set up and maintain; it requires programming skills and technical expertise.
- You may need to involve a specialist or a team to set up and maintain such an integration, which may lead to additional costs.
Core Benefits of a Deep Salesforce-Google Drive Integration

A shallow connection attaches a file. A deep integration changes how documents move, who controls them, and how much you pay for storing them.
Radically Reduced Salesforce Storage Costs
Salesforce storage adds up quickly, especially when sales, support, and marketing start uploading images, contracts, and media files daily. Shifting documents to Google Drive while keeping them accessible from Salesforce dramatically reduces pressure on your CRM storage limits.
Use Google Drive’s scalable cloud capacity strategically, and the CRM stays focused on structured data, not acting as a document warehouse – a role it plays not that well.
Operationally Clean Document Management
When files live inside structured Drive folders and are intelligently linked to Salesforce records, document chaos disappears. Contracts, proposals, onboarding files, screenshots – everything has a defined place and a clear relationship to the customer.
That is not just about convenience. It reduces version conflicts, duplicate uploads, and constant debates over the final version. The CRM becomes a reliable navigation layer, not a dumping ground.
Real-Time Collaboration Without File Duplication
We know what integrations can bring, but the list of things they eliminate is impressive as well. No re-uploading, no emailing attachments back and forth, and no manual syncing. Everyone sees the latest version. Sales updates a proposal, legal comments, and finance reviews, all without fragmenting the document trail.
Workflow Acceleration and Automation
For many, integration is about saving some space in their storage. However, it also makes the whole process easier.
Files get linked to records automatically, get organized into structured folders, or get exported for backups. And just like that, notifications, approval flows, and structured document management are no longer separate manual steps, but become part of the CRM lifecycle.
The result is cutting repetitive work and removing the minor mistakes that quietly accumulate into measurable productivity drag nobody traces back to the source.
Strengthened Security and Compliance Control
Access controls become clearer:
- Permissions can be managed centrally.
- Activity can be audited.
- Sensitive documents remain governed rather than scattered across inboxes and desktops.
For regulated teams, this is foundational. A structured integration reduces risk while keeping collaboration fluid.

Advanced Strategies & Best Practices for Optimization

A connected system and a functional system are not the same thing. Here’s what separates integrations that scale from ones that become everyone’s least favorite workaround.
Automate Folder Structures from Salesforce Records
Do not let users create folders manually. Instead, you can use API logic, Salesforce Flows, or paid connectors like Drive Connect to automatically create folders when significant events occur:
- Create a top-level folder per Account.
- Create subfolders only when an Opportunity reaches a defined stage (e.g., “Qualified” or “Closed Won”).
- Write the Drive folder URL back to a Salesforce field for traceability.
- Prevent duplicate folder creation with conditional logic.
The main secret here is that the structure should be predictable. If two people create the same folder manually, the system design has failed.
Automate Document Generation from CRM Data
Do not copy CRM data into proposals manually. Instead, you can use document-generation tools or Drive templates connected to Salesforce data.
Here’s how this implementation pattern may look in practice:
- Trigger: Opportunity moves to “Closed Won.”
- Action: Generate a Google Doc from a template.
- Save: Store it automatically inside the Opportunity’s folder.
- Optional: Convert to PDF and attach to the record.
It’s important to maintain a single source of templates in Drive. Before implementing them widely, version them centrally and test with small datasets.
Implementing Smart File Naming Conventions and Tagging
Decide your naming structure before users start uploading files.
For example, you can use this approach:
- Start with date (YYYY-MM-DD).
- Include record type or short identifier.
- Keep names under 100 characters.
Automate naming using Salesforce merge fields where possible. Do not rely on user discipline alone. If naming rules are optional, they will not be followed.
Defining User Permissions and Sharing Rules (Salesforce & Google Drive side)
Do not treat Salesforce and Google Drive security separately. After they both said “I do” to your integration, they are a united system. When a folder is created:
- Automatically assign Viewer/Editor roles based on Salesforce team roles.
- Use Shared Drives instead of personal drives for client data.
- Restrict permission editing at the folder level if required.
Misaligned permissions between integrated systems can sneakily create security gaps. Keep Salesforce sharing settings and Drive access rules under regular review, on a timeline your team can realistically commit to. Here’s your basic checklist (but focus on your needs):
- Identify folders not linked to any active Salesforce record.
- Review inactive files older than your retention threshold.
- Monitor API usage in Salesforce and Google admin panels.
- Validate that automation triggers are still aligned with business stages.
Automation reduces clutter. Audits prevent accumulation. Yet even the most polished and glorious structure fails if users ignore it, don’t know how to use or maintain it, or don’t see the value in it.
Provide:
- A short guide explaining where files are stored.
- Clear rules for naming and uploads.
- Examples of automated document flows.
Assign a chosen one (RevOps or Sales Ops) responsible for governance. Monitor adoption metrics, such as folder creation accuracy or template usage.
Technology creates possibilities. Process makes it sustainable.
Common Pitfalls to Avoid

A failed integration is rarely a technology problem. Yes, that fact is painfully hard to admit, especially during a team meeting. It’s a planning problem and a habits problem. Here’s what that looks like in practice (and how to avoid that, of course).
Poor Planning and Undefined Requirements
Compare: “We need everything synced,” and “We need these records and those files synced this often under these conditions.” Which one sounds promising?
Before choosing Files Connect, Skyvia, or a custom API route, you need to answer some boring questions:
- What should trigger a folder or file creation?
- Which file types should be in scope?
- Do you need live linking or scheduled data export?
- What are acceptable sync delays?
- What are API usage expectations?
Planning is cheaper than refactoring.
Ignoring Security and Permission Settings
A connected system with mismatched access is integrated in name only. It’s just a more efficient way to share the wrong things with the wrong people.
Typical issues:
- Over-inherited Drive folder permissions.
- Manual sharing that bypasses governance rules.
- Salesforce access does not match Drive access.
- OAuth scopes are configured too broadly.
Here’s how you can make the effects of these issues milder:
- Automate role-based permissions during folder creation.
- Use Shared Drives for customer documents.
- Audit folder inheritance regularly.
- Align Salesforce sharing rules with Drive roles intentionally.
In short, the rule of thumb to keep in mind, especially during the initial stages, is that security should be designed, not assumed.
Lack of User Training
Time for a bit of harsh truth – even a technically sound setup can fail through misuse. Common patterns to look for:
- Files uploaded outside the defined structure.
- Naming conventions ignored.
- Users are manually creating duplicate folders.
- Confusion around automated document flows.
So, fix this early:
- Provide role-specific training.
- Offer short reference guides.
- Monitor adoption metrics.
- Reinforce conventions during the onboarding of new employees.
Integration design is only half the system. Behavior completes it.
Choosing the Wrong Integration Method
Each method solves a different problem.
- Files Connect works on a UI-level file access.
- Skyvia is built for structured data sync, automation, and backups.
- Custom API integration is when the goal is deep customization.
Selecting a method based on familiarity rather than need leads to inefficiency. Conduct a short proof-of-concept against your real use case before committing.
Match the method to the objective, not the other way around.
Scope Creep in Custom Integrations
Custom projects expand quickly when boundaries are unclear.
Let’s say your requirement is “create folders per Account.” Quite straightforward, but still it might turn into additional metadata tagging, AI classification, permission overrides, analytics dashboards, and version logic.
To avoid this scenario, you can do the following:
- Define a minimum viable scope.
- Separate launch features from “phase two.”
- Use change-control processes for additions.
- Prioritize stability over feature expansion.
When planning, governance, training, and scope are managed deliberately, it does exactly that. When these are overlooked, the integration becomes another system to maintain instead of a system that supports growth.
Conclusion
Considering a Salesforce-Google Drive integration as just a technical adjustment is a mistake usually caused by the easy, accessible-to-anyone nature of Drive. Done properly, it turns scattered files into structured assets and reduces the small inefficiencies that accumulate over time into a snowball of brainstorming sessions and fixes.
There isn’t a single “best” method:
- Native tools are practical for direct file access.
- Third-party platforms introduce automation and structured data workflows.
- Custom integrations give you complete control, but at the cost of complexity.
Start by defining your goal. Are you solving storage pressure? Automating backups? Structuring document workflows? Once that is clear, there will be direction signs to the right path.
If automation and structured sync are part of your plan, start your free trial with Skyvia today and see how quickly you can connect Salesforce and Google Drive without adding operational complexity.

FAQ for Salesforce Google Drive Integration

Can I integrate Google Drive with Salesforce without coding?
Yes. Third-party applications like Skyvia and Drive Connect allow for seamless integration without requiring coding skills.
Can I automate file management between Salesforce and Google Drive?
Yes. Third-party tools like Skyvia can automate file synchronization, manage version control, and schedule data exports. Integrations built using the coding approach can also provide tailored automation features.
How do I choose the best integration method for my business?
Consider factors like budget, required features, ease of implementation, maintenance efforts, and customization needs. If you need advanced automation and features, third-party tools are a great option. If you need complete control, a custom integration may be the best choice.
Is it safe to integrate Google Drive and Salesforce?
Yes. Both Google Drive and Salesforce are compliant with security regulation standards. If you use a custom integration method, you can control access and user permissions on your own. If you use third-party applications for integration, use the tool with strong security measures.
More Articles About Salesforce Integrations
See other capabilities of data integration with Skyvia:
- HubSpot and Salesforce Integration: Best Practices for Connection
- Asana and Salesforce Integration: 2 Easiest Methods
- Snowflake to Salesforce Integration: Best Code-Free Connectors
- How to connect Shopify and Salesforce
- Salesforce QuickBooks Integration: 3 Different Ways
- Simple ways to connect Jira and Salesforce
