

Data warehousing is one of the most effective approaches to handling big data effectively. So, the market offers many commercial and open-source DWH tools for various business needs. However, Google BigQuery remains among the top solutions, as it effectively allows users to store and process large data volumes with near-to-zero delays.
Anyway, it’s important to load data into BigQuery correctly to take the most value out of it. This article discovers key methods to transfer and upload data into this data warehouse.
Table of contents
- What is Google BigQuery?
- Different BigQuery Data Load Types
- Advantages of BigQuery
- Disadvantages of BigQuery
- Methods for Loading Data into BigQuery
- Data Preparation for BigQuery Upload
- Method 1: Upload CSV File Data
- Method 2: Input Data from JSON Documents
- Method 3: Use Google Cloud Storage to Upload Data
- Method 4: Loading Data Using BigQuery Web UI (Cloud Console)
- Method 5: Loading Data Using the CLI
- Method 6: Loading Data Using REST API
- Method 7: Streaming Data Ingestion
- Method 8: Data Transfer Service
- Method 9: Loading Data Using Skyvia
- Conclusion
What is Google BigQuery?
Google BigQuery is a serverless data warehouse platform that helps businesses scale easily and at an affordable cost. Since it’s part of the global Google infrastructure, it offers extended functionality that goes beyond standard data warehousing options:
- Gemini. This is an AI-based assistant that facilitates the overall user experience with Google tools.
- Multiple data types support. This DWH allows users to consolidate versatile data within a single workspace, including structured and unstructured types. It also supports data formats from legacy and open-source systems.
- Real-time analytics. Integrated Apache Flink and Apache Kafka engines enable users to build and run real-time streaming pipelines.
- Built-in machine learning (ML). Inside Google BigQuery, there are embedded ML models used to derive predictions and insights.
- Enterprise features. Cross-region disaster recovery, operational health monitoring, data backup, etc., are among the most popular options that facilitate day-to-day enterprise operations.
Different BigQuery Data Load Types
Given the universality of this data warehouse, there are different ways and methods for bringing data there.
- It’s possible to import data into BigQuery from files of the following formats:
- Datastore exports and Filestore exports.
- Importing datasets from Google Cloud Storage units.
- Integrating data from other Google systems (Google Ads Manager, Google Analytics, Google Drive, etc.).
- Getting datasets from external sources (Cloud Spanner, Apache Spark, cloud-based MySQL, cloud-based PostgreSQL, etc.).
- Executing SQL queries against data sources of your choice.
- Loading Python Notebooks from Google Collaboratory.
Advantages of BigQuery
1. Simplified Management
BigQuery is a fully managed serverless platform that eliminates the need to manage, update, and optimize the underlying infrastructure. How is it possible? It’s because Google handles all those aspects and ensures excellent performance, availability, and scalability.
2. Advanced Features
BigQuery offers built-in options offering advanced functionality:
- Geospatial data types and functions (BigQuery GIS)
- Natural language processing (Data QNA)
- ML and AI integrations (BigQuery ML)
- Visualization tools (Google Data Studio).
With all these functions, you can easily transform and analyze data without going through complex configuration or normalization processes.
3. Disaster Recovery
BigQuery offers a range of protective mechanisms to keep data safe. Thanks to automated backups and recovery, you can promptly restore data upon request. It’s also possible to compare historical data from previous backups if there is a need to.
Moreover, Google stores data in various physical data centers in dispersed locations, which allows organizations to easily meet data storage compliance requirements.
Disadvantages of BigQuery
1. Need for Strong SQL Skills
It’s necessary to have extensive knowledge of SQL, including dialects for DDL and DML, to query data with BigQuery. Profound SQL skills are also required for query optimization (unoptimized queries can lead to excessive costs).
2. Limited Integrations
Even though BigQuery connects to services within the Google Cloud Platform and other external data sources, it generally doesn’t offer many connectors. Therefore, third-party data integration solutions are needed. One of them is Skyvia, a cloud-based data platform that allows users to connect BigQuery with pre-built 200+ data sources (databases, cloud applications, flat files, storage systems, etc.) in a few clicks and with no coding. This tool also offers API endpoint creation to connect to a variety of services, which might be a good option for engineers with a high level of technical expertise.
Methods for Loading Data into BigQuery
Manual Data Loading
The most straightforward way to load data is to insert it manually. For instance, you can use DML operations to add data to a table with INSERT statements either via the BigQuery Web UI or programmatically via a client library.
It’s also possible to add data to the DWH by simply uploading flat files of supported formats, which is very simple and rather fast. This could be an ideal option if you need to perform such an operation occasionally. In case you need to scale data loads, consider automating the process with the solutions provided below.
Automated Methods
Batch Data Loading
This method is useful for loading a dataset in a single operation. Google offers the BigQuery Data Transfer Service to batch-loading from Google SaaS apps and third-party systems.
Batch loading is also possible by extracting data from cloud storage or local files in a supported format. Besides, you can also use Firestore and Datastore exports to import data in batches.
ETL (Extract, Transform, and Load) tools are also popular for batch data ingestion. They allow you to schedule one-time or recurring jobs.
Streaming Data
This approach is well-suited for real-time or continuous data flows. It enables you to stream data as individual records or batches directly into a BigQuery table. Streaming API or Google Dataflow with Apache Beam are common for streaming pipelines.
Third-Party Solutions
Some third-party applications, such as Skyvia, can load data into BigQuery. Such solutions allow users to import data in batches as well as in streams. All data pipeline configurations take place in a user-friendly visual interface.
A tangible advantage of Skyvia and other similar solutions is that they allow users to keep all integrations in one place. So, you can configure data loading to and from BigQuery, involving multiple sources, as well as setting up data transfers between other applications, all within the same dashboard. This adds convenience for businesses to keep track of day-to-day data-related operations.
Data Preparation for BigQuery Upload
Each company has its own IT infrastructure, software toolkit, data volumes, etc. Therefore, pay attention to each of these factors before importing any data into the Google BigQuery data warehouse and select the appropriate methods.
For example, if you are going to upload files, check which formats are supported. In case you need to batch load data from other sources, check the list of supported data sources. To stream data into BigQuery, make sure to have a subscription in Pub/Sub.
Note that BigQuery also offers built-in data preparation with Gemini to preprocess data for specific purposes.
Choosing File Format
When extracting data from a file, make sure it corresponds to one of the supported formats: ORC, CSV, JSON, Parquet, and Avro. Also, Filestore exports and Datastore exports are available.
Support for Schema Identifying
BigQuery can automatically detect the table schema with self-describing formats. On the other hand, users need to explicitly provide a schema or use a schema auto-detection feature for formats like JSON or CSV.
Flat Data vs. Nested and Repeated Fields
Arvo, JSON, ORC, and Parquet files, along with Firestore exports, support nested and repeated fields. If you need to build a hierarchical data structure inside a DWH, feel free to use any of these formats.
Embedded Newline
BigQuery requires JSON files to be newline-delimited, which means they need to contain a single record per line.
Encoding
BigQuery’s primary encoding format is UTF-8, which supports both flat and nested or repeated data. Additionally, it supports ISO-8859-1 encoding for CSV files containing flat data.
Data and Time
When loading CSV or JSON files, make sure that the DATE columns use the dash (-) separator. Also, the date must be in the following format: YYYY-MM-DD (year-month-day).
Check the TIMESTAMP column values to make sure they use a dash (-) or slash (/) separator for the date portion of the timestamp. The date must be in one of the following formats: YYYY-MM-DD (year-month-day) or YYYY/MM/DD (year/month/day). The timestamp’s hh:mm:ss (hour-minute-second) part must use a colon (:) separator.
Creating a Dataset
For some data loading methods, it will be necessary to create a dataset first. In BigQuery, it’s a top-level object that is used to organize and control access to the tables and views.
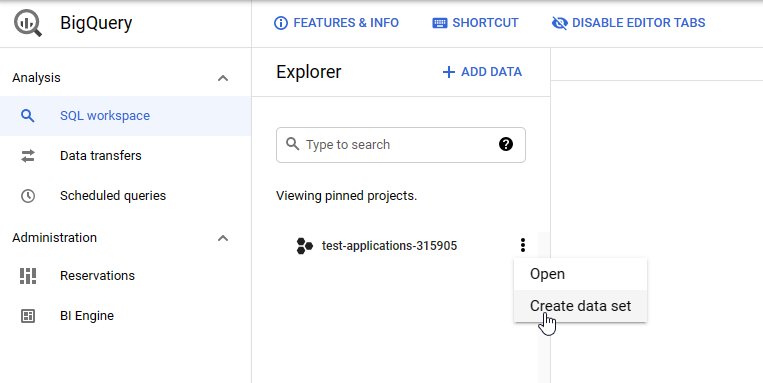
- Navigate to Google BigQuery Console and click the Create data set option on the project.
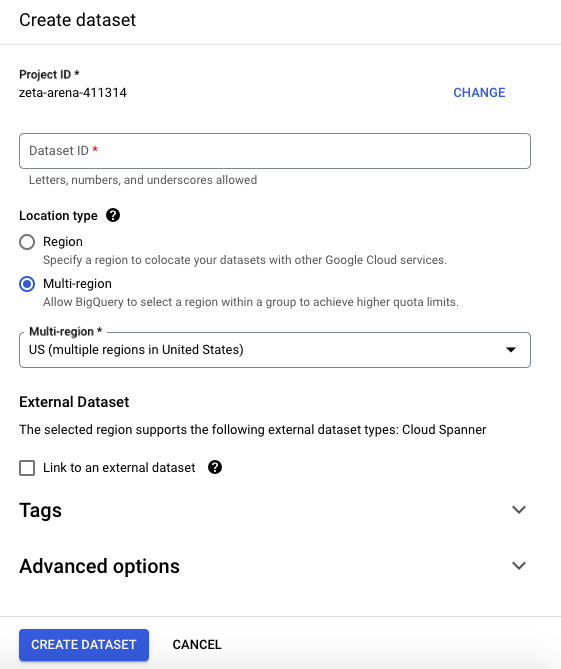
- Indicate the name and data region, which corresponds to the physical location of the data.
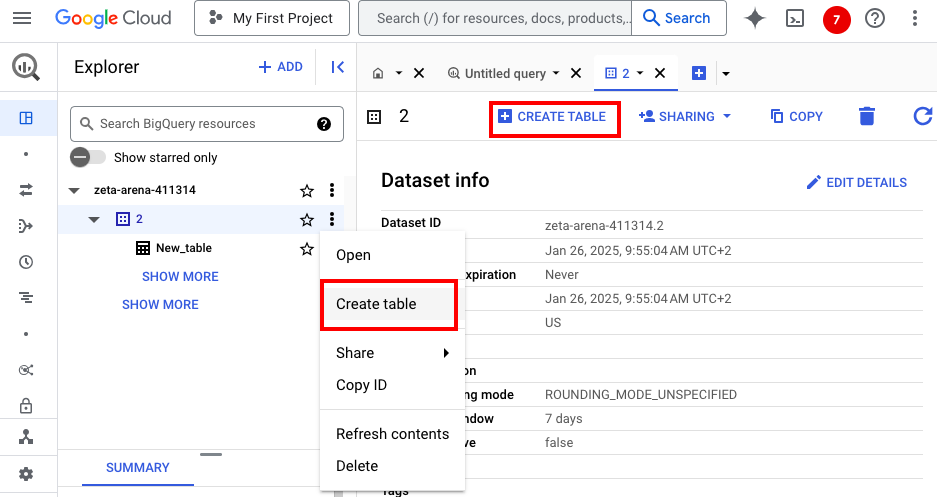
- To create a table, click on the dataset and select the Create Table option from the context menu or from the panel.
Choosing a Sample Data Set
Later in this article, we review some practical examples of how to load data into BigQuery. Therefore, we prepare this sample dataset, provided below, for all the data loading operations.
| user_id | first_name | last_name | age | address |
|---|---|---|---|---|
| 001546 | Barry | Stevens | 21 | 82, Kings Road |
| 002546 | Harry | Potter | 30 | 785/88B, Lakewood |
| 020054 | Sam | Smith | 25 | 010, Mud Lane |
| 015778 | Kevin | Lee | 31 | 875, Melrose Avenue |
| 002336 | Matt | Harris | 27 | 99/110, Lake Drive |
Before loading production data into BigQuery, you might also consider experimenting with the sample data set first.
Method 1: Upload CSV File Data
Uploading a CSV file from a local computer or cloud storage creates a new table in the selected dataset. In this example, we review the first case.
We rely on the Web UI of the BigQuery console since it’s a user-friendly and convenient option, especially for those new to BigQuery. It allows users to easily upload files, create and manage BigQuery resources, run SQL queries, etc. The only downside of this Web UI is its slower performance compared to other available options.
Now, let’s look at the procedure for uploading a CSV file into BigQuery via Web UI.
- Click Add and select the Local file option.
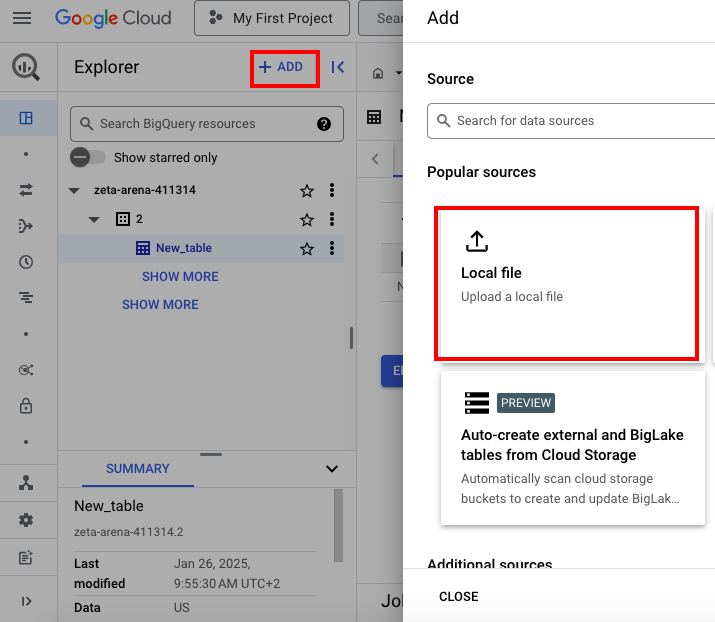
- Provide all the requested details in the window that appears:
- Select the CSV file from your computer.
- Select the dataset or create a new one.
- Indicate the name of the new table created upon CSV file load.
- Specify schema or select the Automatic schema detection option.
- Provide other details if needed.
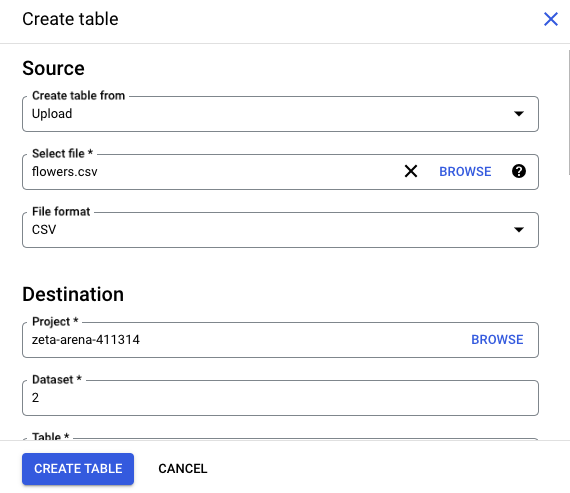
- Check all the details once again and click Create table.
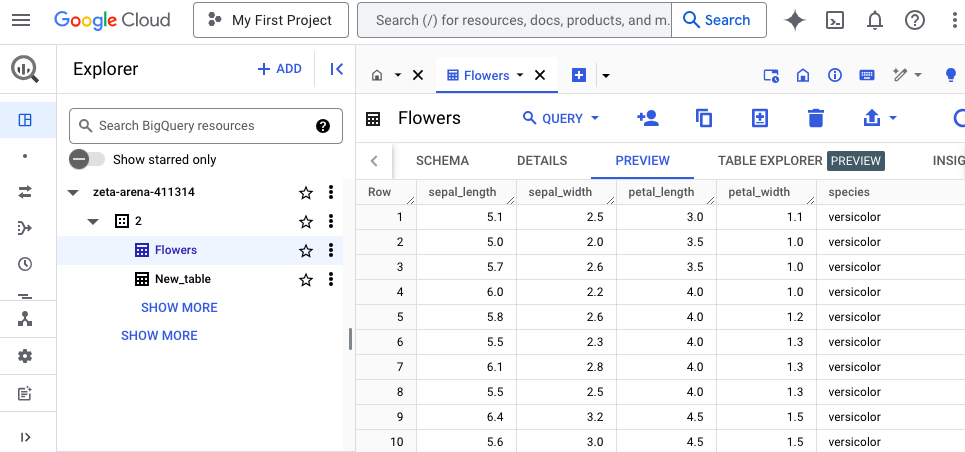
- Go to the newly created table and click Preview to observe the loaded data.
Method 2: Input Data from JSON Documents
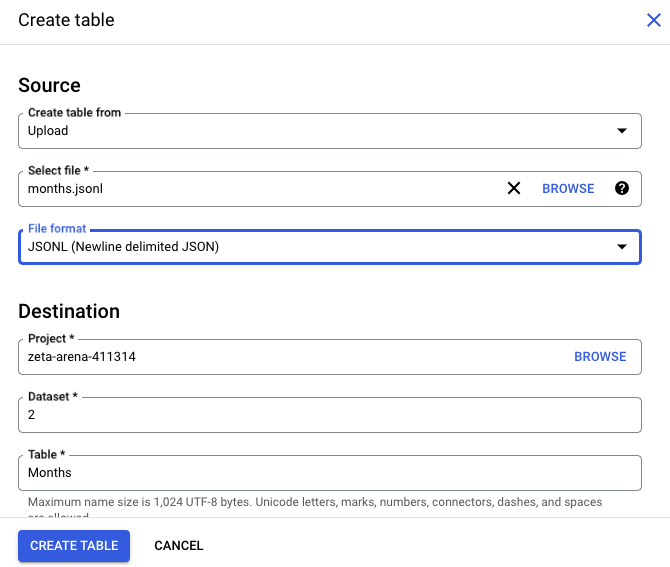
- Click Add and select the Local file option.

- Provide all the requested details in the window that appears:
- Select the JSONL file from your computer.
- Select the dataset or create a new one.
- Indicate the name of the new table that will be created upon JSONL file load.
- Specify schema or select the Automatic schema detection option.
- Provide other details if needed.
- Check all the provided details and click Create table.
- Go to the newly created table and click Preview to observe the loaded data.
Method 3: Use Google Cloud Storage to Upload Data
- Click Add and select the Google Cloud Storage option.
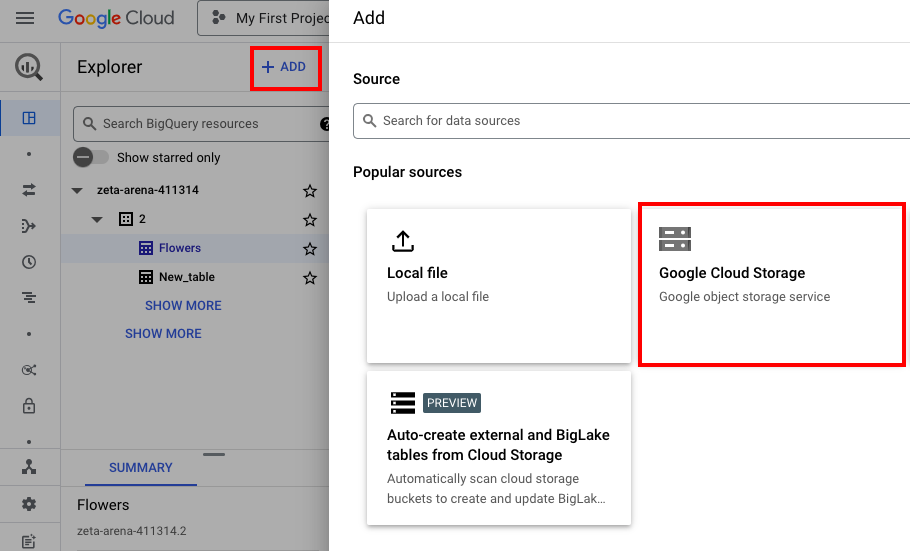
- Click Browse and select the bucket from your Google Cloud Storage space. Then, select the files from that bucket.
Note: It’s possible to get data from the bucket containing files supported by BigQuery (ORC, CSV, JSON, Parquet, and Avro). Otherwise, it will be grayed out.
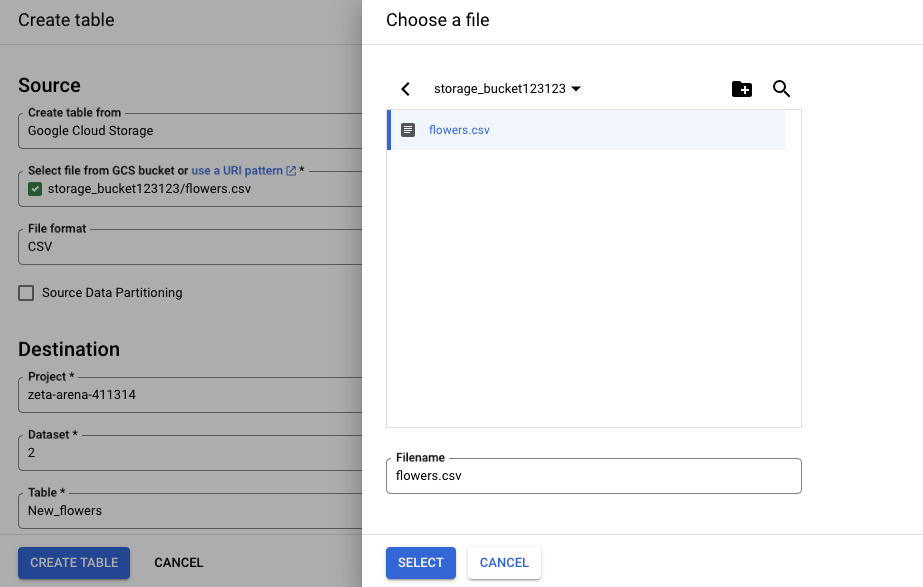
- Specify the dataset to store data in and indicate the table name for the data.
- Check all the details once again and click Create table.
- Go to the newly created table and click Preview to observe the loaded data.
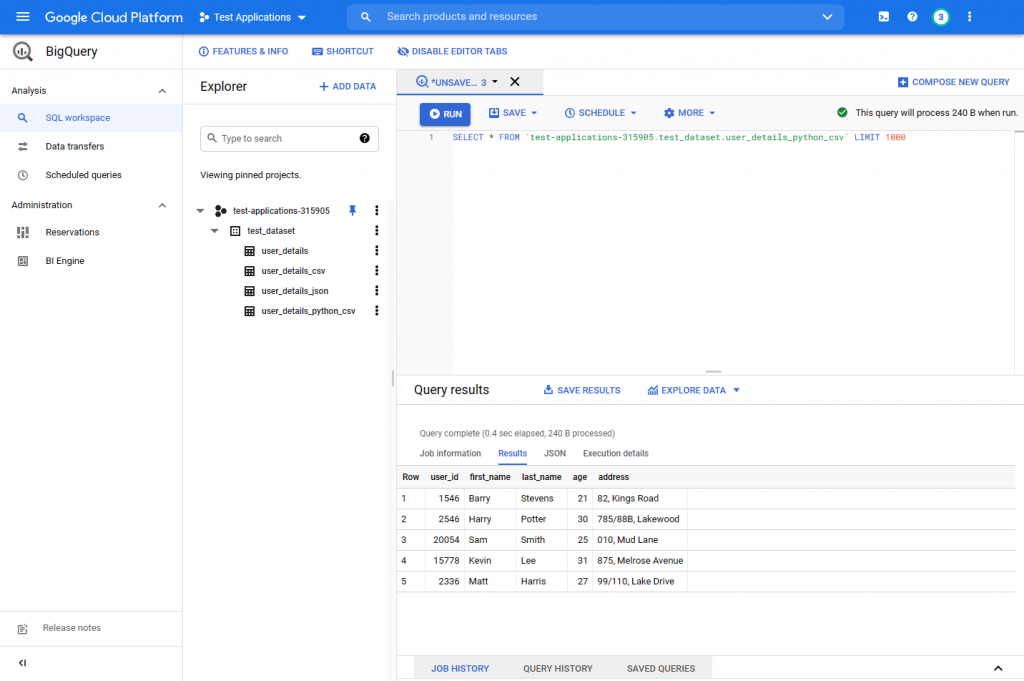
Method 4: Loading Data Using BigQuery Web UI (Cloud Console)
For this case, it’s necessary to first create a database before getting started. This operation was described in the step-by-step instructions earlier in this article. Then, follow the steps provided below.
- Create an empty table and define a schema.
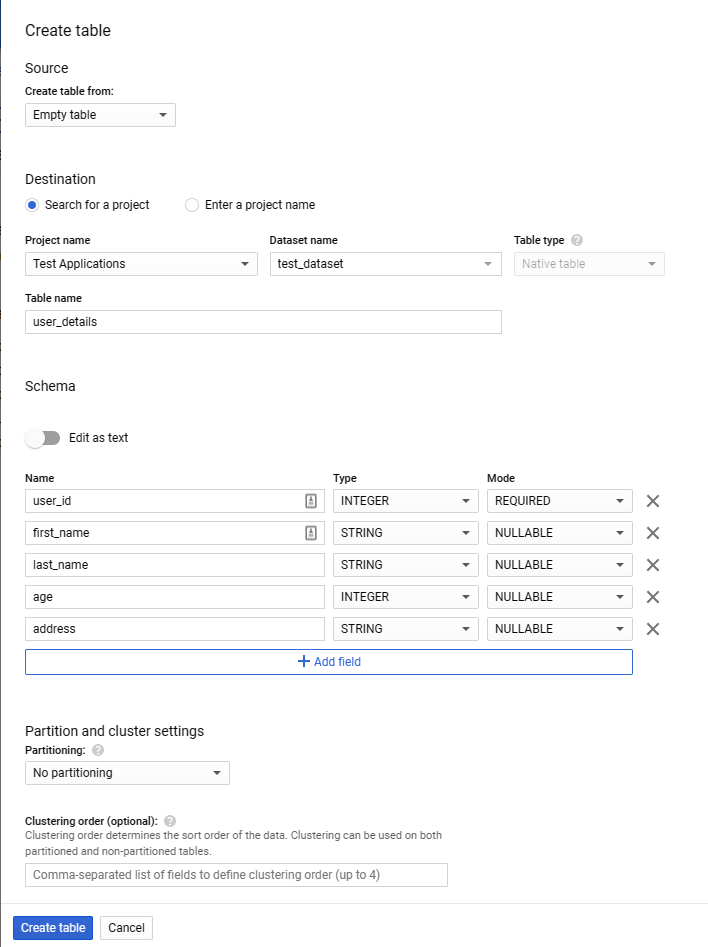
- To start loading data via DML, use the following INSERT query within the BigQuery SQL workspace.
INSERT
    `test-applications-315905.test_dataset.user_details` (user_id,
    first_name,
    last_name,
    age,
    address)
VALUES
    (001546, 'Barry', 'Stevens', 21, '82, Kings Road'),
    (002546, 'Harry', 'Potter', 30, '785/88B, Lakewood'),
    (020054, 'Sam', 'Smith', 25, '010, Mud Lane'),
    (015778, 'Kevin', 'Lee', 31, '875, Melrose Avenue'),
    (002336, 'Matt', 'Harris', 27, '99/110, Lake Drive');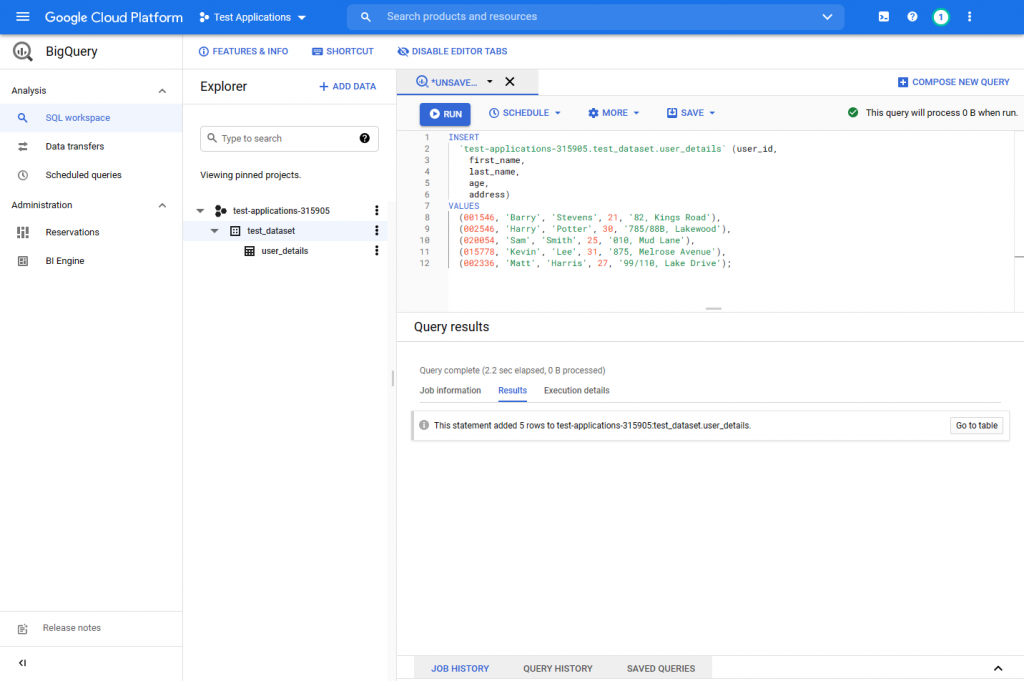
Method 5: Loading Data Using the CLI
The bq command-line tool is a Python-based CLI that is a preferred method for processing large datasets. Users can create CLI commands and store them as scripts to simplify interactions with BigQuery.
The scripted approach is particularly beneficial for dataset troubleshooting and monitoring. The only downside of CLI is that it requires in-depth knowledge of the BigQuery platform and the underlying data structure to use the CLI interface.
Now, let’s see how to use this bq CLI to load a JSON data set into BigQuery. As shown below, the command explicitly defines the table schema.
NOTE: Make sure that the JSON file is in Newline-Delimited format, which is also known as JSONL.
- Add JSON file details and provide details needed to connect to the dataset.
bq load --source_format=NEWLINE_DELIMITED_JSON \
test_dataset.user_details_json user_details.json \
user_id:integer,first_name:string,last_name:string,age:integer,address:string
- Query the “user_details_json” table to verify that data was loaded successfully.
bq show test-applications-315905:test_dataset.user_details_json
Method 6: Loading Data Using REST API
Another method for loading data into BigQuery is by using the REST API. Integrating BigQuery with your proprietary software, applications, or scripts is an ideal option.
The best way to utilize API is through the client libraries for different programming languages provided by Google. These libraries carry out the following functions:
- Directly communicate with the REST API.
- Handle all the low-level communications (authentications, for instance).
- Eliminating the need to create API calls from scratch.
NOTE: This method requires strong programming skills and a deep understanding of the client library functionality.
The following code is an example of loading data with the Python client library using a CSV file stored in the Google Cloud Storage Bucket.
from google.oauth2 import service_account
from google.cloud import bigquery

# Create Authentication Credentials
project_id = "test-applications-xxxxx"
table_id = f"{project_id}.test_dataset.user_details_python_csv"
gcp_credentials = service_account.Credentials.from_service_account_file('test-applications-xxxxx-74dxxxxx.json')

# Create BigQuery Client
bq_client = bigquery.Client(credentials=gcp_credentials)

# Create Table Schema
job_config = bigquery.LoadJobConfig(
    schema=[
        bigquery.SchemaField("user_id", "INTEGER"),
        bigquery.SchemaField("first_name", "STRING"),
        bigquery.SchemaField("last_name", "STRING"),
        bigquery.SchemaField("age", "INTEGER"),
        bigquery.SchemaField("address", "STRING"),
    ],
    skip_leading_rows=1,
    source_format=bigquery.SourceFormat.CSV,
)

# CSV File Location (Cloud Storage Bucket)
uri = "https://storage.cloud.google.com/test_python_functions/user_details.csv"

# Create the Job
csv_load_job = bq_client.load_table_from_uri(
uri, table_id, job_config=job_config
)

csv_load_job.result()
Now, a new table has been created within the dataset.
Method 7: Streaming Data Ingestion
This approach is suitable for continuous real-time data processing, inserting one record at a time. This is done using the “tabledata.insertAll” API reference. Streamed data is first written to the streaming buffer and then written to the actual table in columnar format.
This code block adds a new record to the “user_details” table.
from google.cloud import bigquery
from google.oauth2 import service_account

# Create Authentication Credentials
project_id = "test-applications-xxxxx"
table_id = f"{project_id}.test_dataset.user_details"
gcp_credentials = service_account.Credentials.from_service_account_file('test-applications-xxxxx-74dxxxxx.json')

# Create BigQuery Client
bq_client = bigquery.Client(credentials=gcp_credentials)

# Data to Insert
rows_to_insert = [
{u"user_id": 254475, u"first_name": u"Alice", u"last_name": u"Marie", u"age": 32, u"address": u"45, Lex Drive"}
]

# API Call
bq_client.insert_rows_json(table_id, rows_to_insert)
Note that users cannot update or delete records while the data is in the streaming buffer. Due to that, these streaming inserts are more suitable for data streams that do not require immediate alterations to the data. Below, find an example of streaming data to the “user_details” table.
If you try to delete the row immediately, it will throw an error since the data is still in the streaming buffer.

Method 8: Data Transfer Service
This fully managed Data Transfer Service ingests data from other Google SaaS applications such as Google Campaign, Ad Manager, YouTube reports, external storage providers like AWS S3, and data warehouses like AWS Redshift or Teradata. This is one of the best options to tackle big data extraction and migration.
- In the BigQuery Console, open the left menu and select Data transfers.
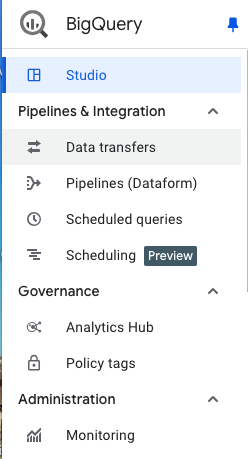
- You will be asked to enable Data Transfer API to use this service if you haven’t done that previously.
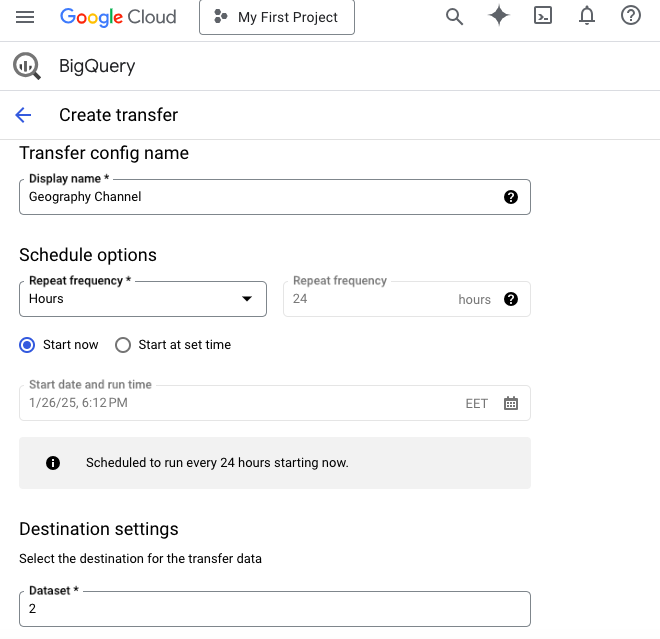
- Select the data source of your interest from the drop-down list.
- Provide all the requested details in the Create transfer window. For instance, for the YouTube Channel source, it’s necessary to indicate its display name, repeat frequency, dataset, and table suffix.
Method 9: Loading Data Using Skyvia
Skyvia is one of the third-party integration solutions that enable data loading from external sources into BigQuery. It can also transfer data to other data warehouses, databases, and cloud apps. To use Skyvia, you do not need any locally installed software except for a web browser and a registered account.
Using Skyvia is simple since it doesn’t require any programming knowledge or coding skills. This platform also allows you to automate data transfer to BigQuery by setting schedules.
There are three steps to confirm data transfer to BigQuery with Skyvia:
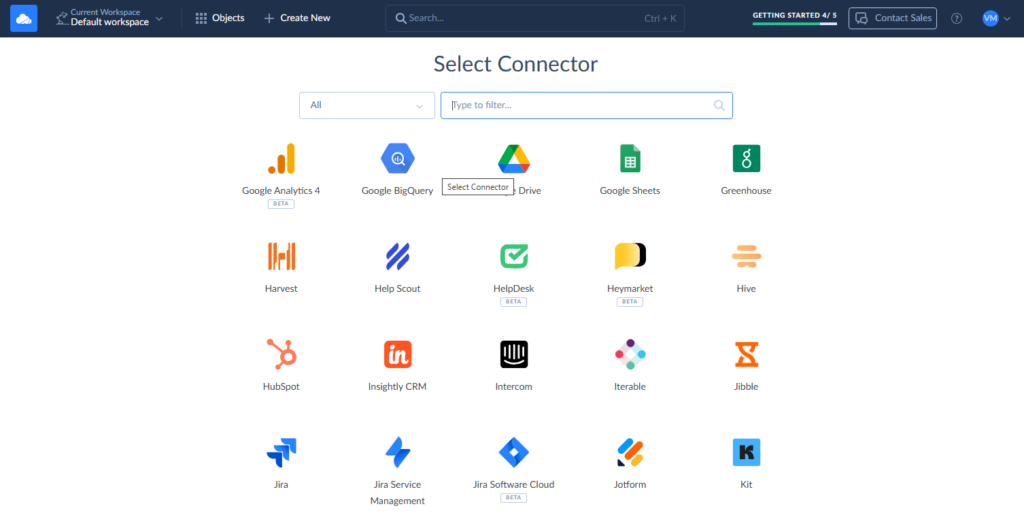
Step 1: Create a Connection to BigQuery in Skyvia
- To create a connection, go to +Create New – > Connection and select Google BigQuery from the list of available data sources.
- In the BigQuery connector window, sign in via OAuth 2.0 and specify other parameters required (Project ID, DataSet ID, Cloud Storage Bucket).
Before loading data to BigQuery, you need to follow the same procedure to create a connection to the data sources you are interested in.
Step 2: Create an Import Task to Load Data
- From the upper menu, go to +Create New -> Import.
- Find the needed tool from the Source drop-down list. It can be a CSV file from file storage or from your local computer, a database like SQL Server, or a cloud app like BigCommerce, HubSpot, QuickBooks, etc.
- Select BigQuery from the Target drop-down list.
- Click Add task on the right panel to create the import logic.
- Select the source data first. Then, pick up the target object in BigQuery to load data to and specify the DML operation type (INSERT, UPSERT, UPDATE, DELETE). Afterward, configure the mapping settings between the source and BigQuery and save the task.

Repeat steps 4-5 to add tasks for other data objects.
Step 3: Schedule Your Package for Automatic Execution
If you need to execute imports automatically, without human intervention, consider the scheduling options. For that, click Schedule and specify the exact time at which a one-time data load needs to take place. Alternatively, you can set an interval at which the data packages will run regularly into BigQuery.
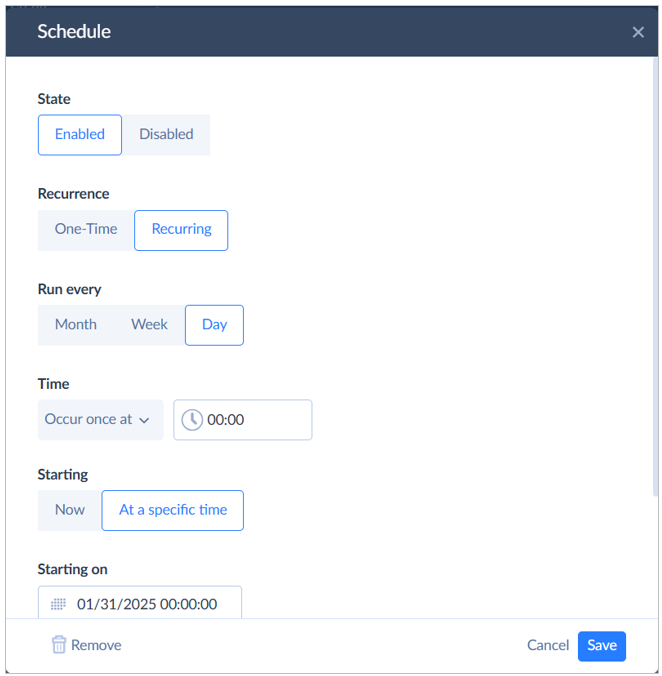
Once the package is scheduled, click Run to start the data loading processes.
Check the Monitor tab to see the outcomes.
Conclusion
Google BigQuery introduces multiple methods for data ingestion and interaction. In this article, we have discussed popular and easy-to-use data import techniques.
In a real-world scenario, use the approach that meets your specific business case. Load latency, data change frequency, and reliability are some aspects that impact the selection of a data load method. In some cases, you might need to combine several techniques to optimize the overall data pipeline.
In addition to the built-in options, third-party solutions, like Skyvia, enable users to automate data import. What’s more, you can extract data from 200+ data sources in several clicks via a web interface.
FAQ for Load Data into BigQuery

How can I ensure my CSV file is correctly formatted for import?
Before loading CSV files into BigQuery, check the following:
– No nested or repeated data in CSV.
– Remove BOM characters.
– Follow the DATE and TIMESTAMP formats when loading data from CSV files.
– Meet the CSV file size limits described in the load jobs limits.
How does BigQuery ensure data security during the loading process?
BigQuery encrypts data at rest using AES-256 encryption. In transit, the data is encrypted using TLS. Access controls enforced through IAM enable organizations to manage and control who can access and manipulate data within BigQuery.
Can I integrate data from multiple sources into BigQuery?
Yes. You can even import data from multiple sources simultaneously using Skyvia’s Data Flow tool.
