")
Summary. Efficient CSV import and export processes are crucial for getting the most from Amazon Redshift. Discover five reliable methods to handle CSV data transfers, each explained with clear advantages and potential drawbacks. Follow recommended best practices to streamline workflows and enhance data accuracy within your Redshift environment.
Businesses are generating more data than ever and moving their infrastructure to the cloud. But what does this mean in practice? On one hand, it enables better analysis and leads to increased revenue. On the other, it brings challenges like data errors, duplication, and complexity.
With various cloud infrastructure solutions available, it’s important to have the right tools for data management. In this article, we will focus on Amazon Redshift, a fully managed cloud data warehouse offered by Amazon Web Services (AWS).
When it comes to loading data into Redshift, things can get tricky. There are too many components to get along — check compatibility, maintain data accuracy, or manage the size of files. These challenges can slow down workflows and affect the results.
This is where the GIGO (Garbage In, Garbage Out) principle comes into play: the quality of the output depends on the input. If the data isn’t clean and well-prepared, it’s hard to expect meaningful insights or results.
In this article, we will learn how to work with CSV files in Redshift. We will look at the ways of importing data into the Redshift cluster from an S3 bucket and exporting it from Redshift to S3. The instructions are aimed at beginners and intermediate users and assume a basic understanding of AWS and Python.
Table of contents
- What is Amazon Redshift?
- How to Load Data to and from Amazon Redshift
- Best Practices for Redshift CSV Operations
- Conclusion
What is Amazon Redshift?
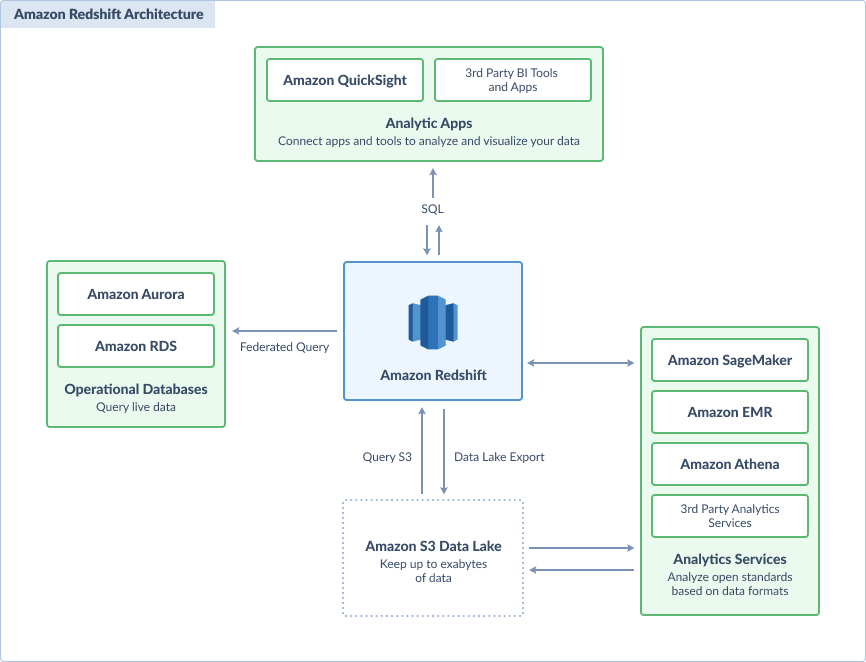
Amazon Redshift is one of the world’s most popular data warehouses. It supports Massively Parallel Processing Architecture (MPP), which allows users to process multiple nodes simultaneously. According to a study by AWS & IDC, Redshift users’ analytics teams are 30% more productive, and their data management platform expenses are 47% lower.
Redshift supports distributed workloads on large datasets and can store up to 16 petabytes in a single cluster. Users can load and transform data and make it available for analytics or business intelligence tools.
Key features include:
Flexible Scaling
Concurrency Scaling automatically modifies query processing power to prevent unexpected surges in workload.
For hundreds of concurrent inquiries, it adds resources in seconds and stops them when they are no longer required. Additionally, each cluster receives free concurrent scaling credits for up to one hour daily.
Query Performance
Redshift supports numerous users and analyzes information from operational databases, data lakes, and warehouses while providing consistently high performance at any size.
To improve query execution time and cut costs, it makes use of zone maps, columnar storage, query optimizer, result caching, and compression techniques like LZO and AZ64 encoding.
Data Sharing
With real-time data sharing across accounts, organizations, and regions, Amazon Redshift improves access to data and partner collaboration.
Query Editor V2 helps developers and analysts to explore, analyze, and share queries. This supports cross-functional analysis and organization-wide data exchange.
AWS Integration
Native integration with other AWS services like S3, Dynamo DB, SSH, and AWS DMS allows users to securely move, alter, and load their data.
Built-In AI Tools
Users can build, train, and implement SageMaker models using SQL queries with Amazon Redshift ML. It allows users to extract useful information from their reports for financial forecasting, churn detection, personalization, and natural language processing.
How to Load Data to and from Amazon Redshift
In this article, we will explore different methods for importing and exporting CSV files to and from Amazon Redshift, including the benefits and drawbacks of each.
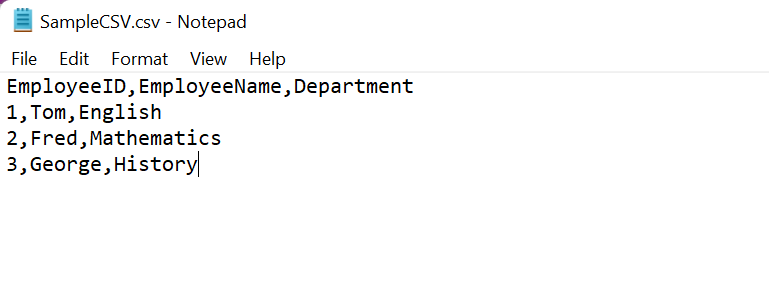
The industry-standard flat file CSV (Comma-Separated Values) is among the most widely used formats in Amazon Redshift. In CSV, columns are separated by commas, and the data is stored in plain text. Because of its compatibility and ease of use, CSV is a preferred choice for data transfer and storage.
Loading Methods
- Using the COPY Command To Transfer Data from Amazon S3 to Redshift. COPY is a command that allows users to import large volumes of data from S3 buckets. Since Redshift supports parallel imports, it doesn’t require much time to ingest large datasets.
- Auto Import Data into Redshift using third-party tools. ETL tools such as Skyvia, Fivetran, or AWS Data Pipeline automate the CSV import process for Redshift. Users can set up an import task with no code, map CSV fields to tables, and schedule recurring loads. This is ideal for businesses that require continuous data synchronization with minimal oversight.
- Building Custom Data Pipeline with Python. Python allows advanced users to create custom ETL pipelines to transfer data into Redshift. Developers can connect to Redshift, extract information from multiple sources, modify it as needed, and then move it using libraries like psycopg2 and boto3. This method works best for large-scale automation and custom ETL routines.
Unloading Methods
- Extracting CSV from Redshift Using UNLOAD Command. The UNLOAD command allows you to quickly extract data to an S3 bucket. It has options to filter and separate the exported rows. This method is commonly used for backup, reporting, and sharing with other systems.
- Automated Export from Redshift to CSV using third-party tools. ETL tools such as Skyvia, Hevo, or Airbyte enable automated Redshift exports to CSV. These tools help businesses schedule exports with a user-friendly interface, filtering, and mapping features.
Load Data from Amazon S3 to Redshift, Using COPY Command
One of the most common ways to import from a CSV to Redshift is by using the native COPY command. Using it, you can import flat files directly to the Redshift data warehouse. For this, the CSV file needs to be stored within an S3 bucket in AWS.
S3, short for Simple Storage Service, allows you to store files of any type. To import from a CSV to Redshift using the COPY command, follow these steps:
- Create the schema on Amazon Redshift.
- Load the CSV file to the Amazon S3 bucket using AWS CLI or the web console.
- Import the CSV file to Redshift using the COPY command.
Note. Generate AWS Access and Secret Key to use the COPY command.
Let’s see a few examples of how to use the Redshift COPY command.
REDSHIFT COPY COMMAND EXAMPLES
- Create a cluster in Redshift.
- Create the schema as per your requirements.
We will use the same sample CSV schema as mentioned above. To create the schema in Redshift, you can simply create a table using the following command.
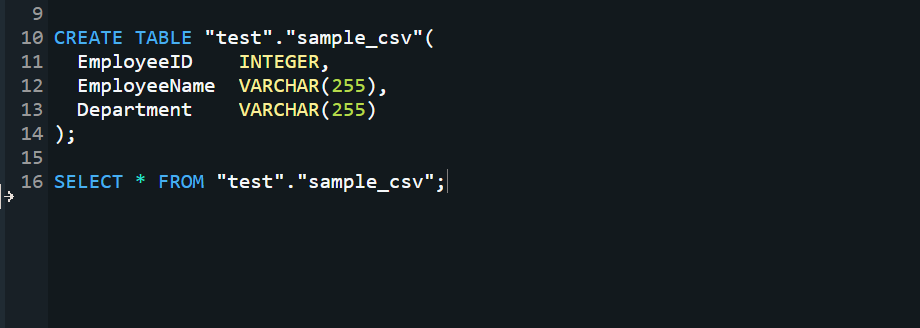
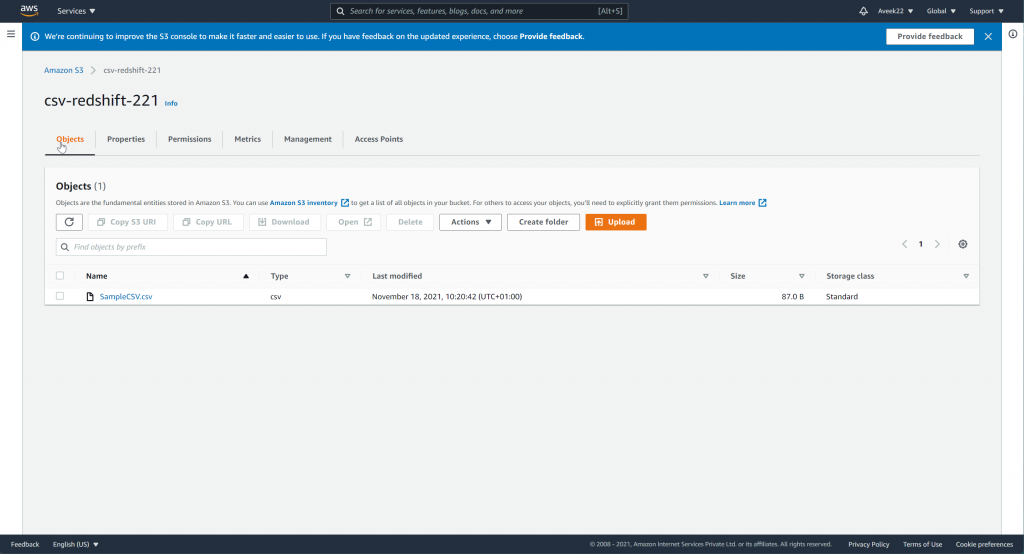
- Load data into an S3 bucket which can be done by either using the AWS CLI or the web console. If your file is large, consider using the AWS CLI.
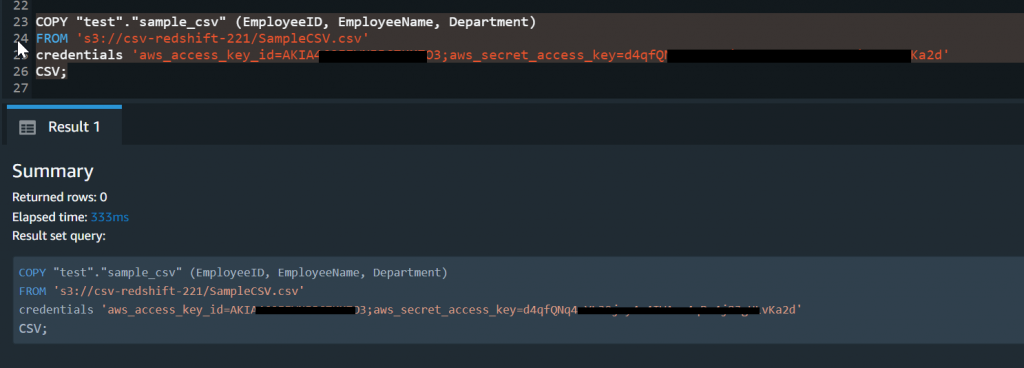
- Now, when the CSV file is in S3, you can use the COPY command to import the CSV file. Head over to your Redshift query window and type in the following command.
COPY table_name
FROM 'path_to_csv_in_s3'
credentials
'aws_access_key_id=YOUR_ACCESS_KEY;aws_secret_access_key=YOUR_ACCESS_SECRET_KEY'
CSV;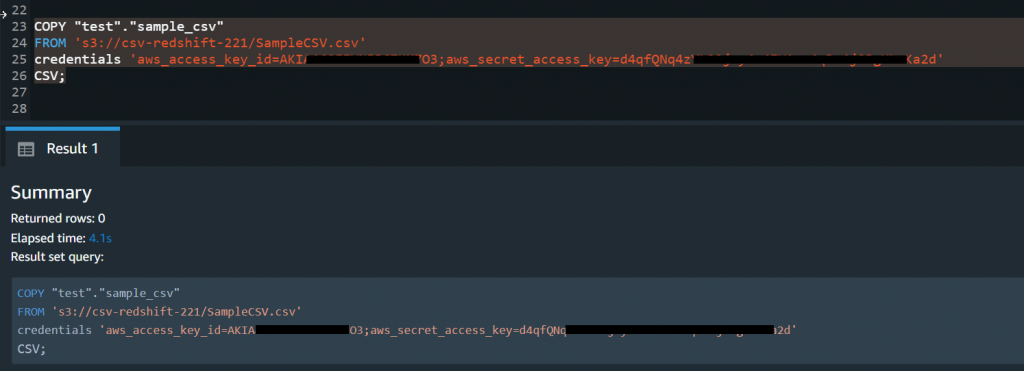

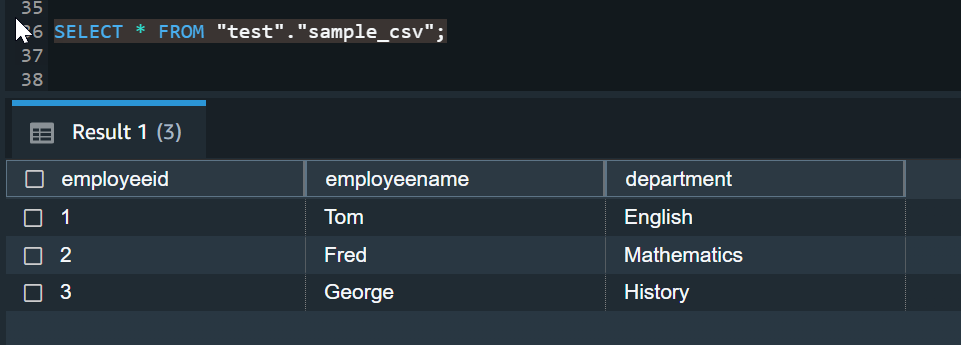
- Once the COPY command has been executed successfully, you will receive the output as in the above screen print. Now, you can query your data using a simple select statement.
If you do not want to import all the columns from the CSV file into your Redshift table, you can specify only the needed ones while using the COPY command. In this case, only the data from selected columns will be imported.
As you can see in the above figure, you can explicitly mention the names of the commands that need to be imported to the Redshift table.
REDSHIFT COPY COMMAND TO IGNORE HEADER FROM TABLE
Another scenario using the COPY command is that your CSV file might contain a header you want to ignore while importing into the Redshift table.
In such a case, you must add a specific parameter IGNOREHEADER to the COPY command and specify the number of lines to be ignored. Usually, if you want to ignore the header, which is the first line of the CSV file, you need to provide the number 1.

PROS OF LOADING DATA USING COPY COMMAND
- Optimized for bulk loading;
- Supports various file formats – CSV, JSON, AVRO, and more;
- Parallel processing;
- Direct AWS integration.
CONS OF LOADING DATA USING COPY COMMAND
- Complex setup;
- No built-in scheduling;
- Error handling is limited;
- Requires AWS credentials.
Auto Import Data into Amazon Redshift with Skyvia
Regularly moving data into Amazon Redshift manually can be time-consuming, and it’s important to minimize errors and guarantee data consistency.
Third-party ETL tools like Fivetran, Integrate.io, or Skyvia automate the process and make data integration more reliable. However, not all ETL tools are the same — some demand coding expertise, while others are expensive or lack special features or flexibility.
Skyvia provides a no-code solution that works for large enterprises and SMBs with limited technical resources. It integrates with 200+ sources and can perform ETL/ELT and Reverse ETL, build data pipelines, share data via REST API, and more.
To start the process with Skyvia, sign up for a free trial. Then, follow these 3 simple steps:
- Set up an Amazon Redshift connection;
- Configure import and mapping settings between CSV file and Redshift;
- Schedule import.
STEP 1. CONNECTION SETUP
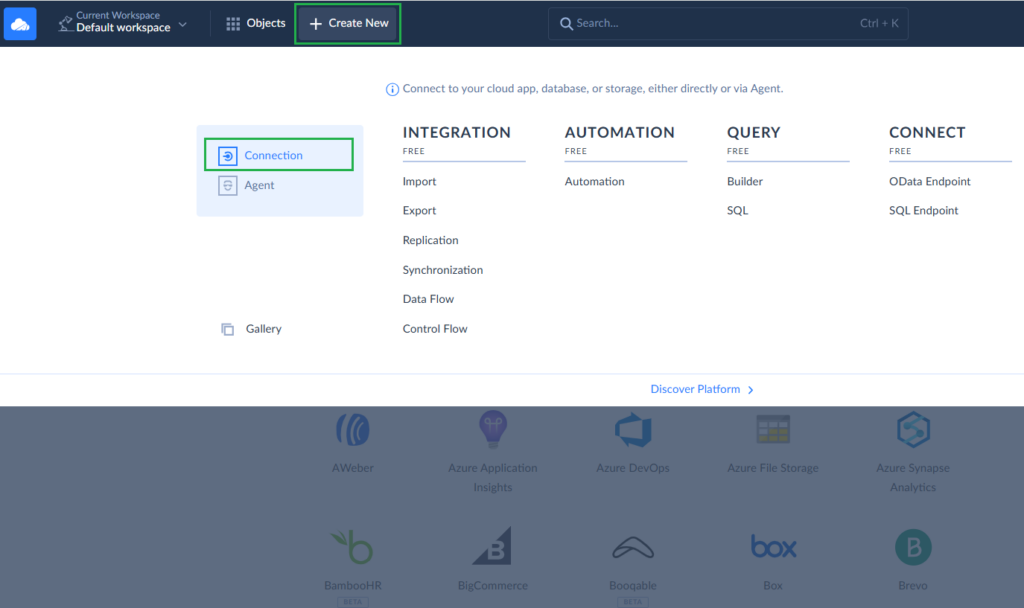
- From the main menu in Skyvia, click Create New > Connection.
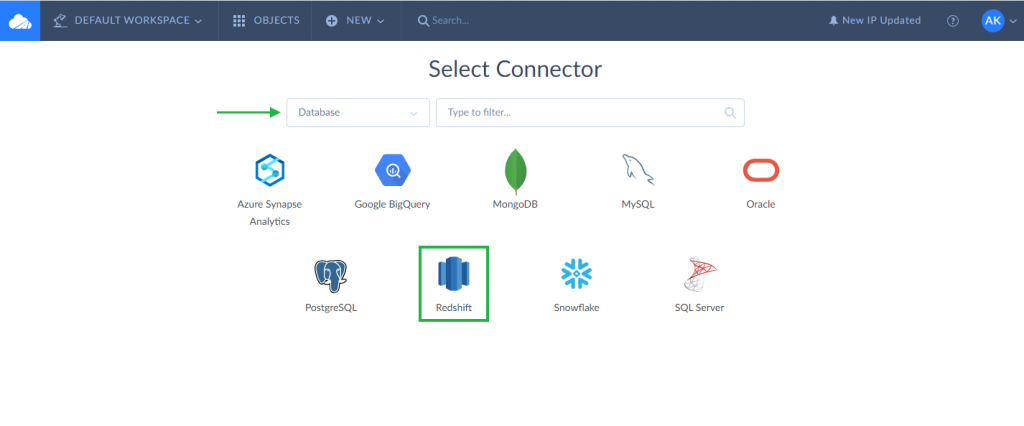
- Select Redshift from Skyvia’s list of data warehouses.
- In the connection window, enter the required parameters like Server, Port, User ID, Password, and Database.
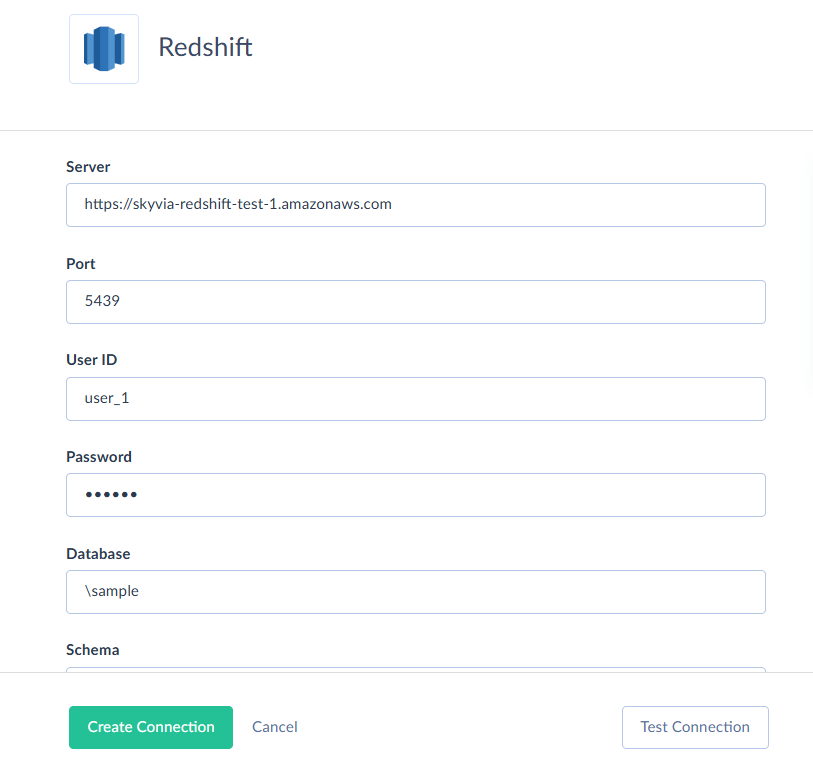
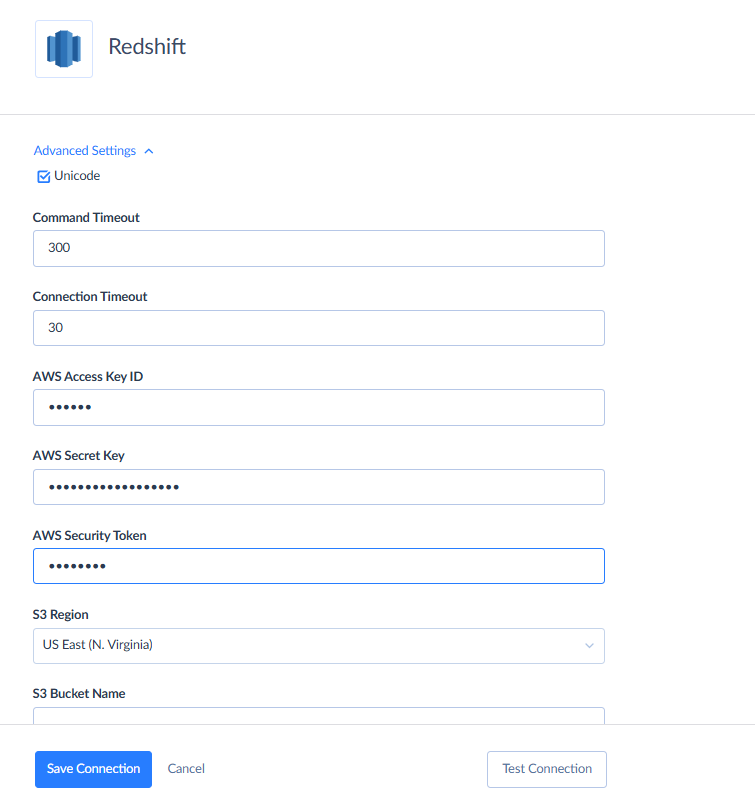
- Click Advanced Settings and set parameters for connecting to Amazon S3 storage service. Among them are S3 region to use and either AWS Security Token or AWS Access Key ID and AWS Secret Key.
- Check whether the connection is successful and click Create.
You have completed the first step and connected to Amazon Redshift.
STEP 2. IMPORT SETTINGS AND MAPPING
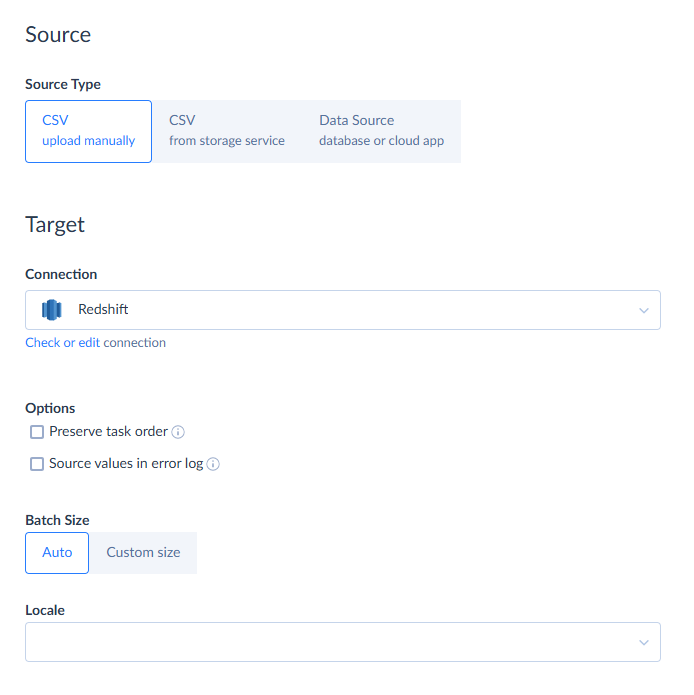
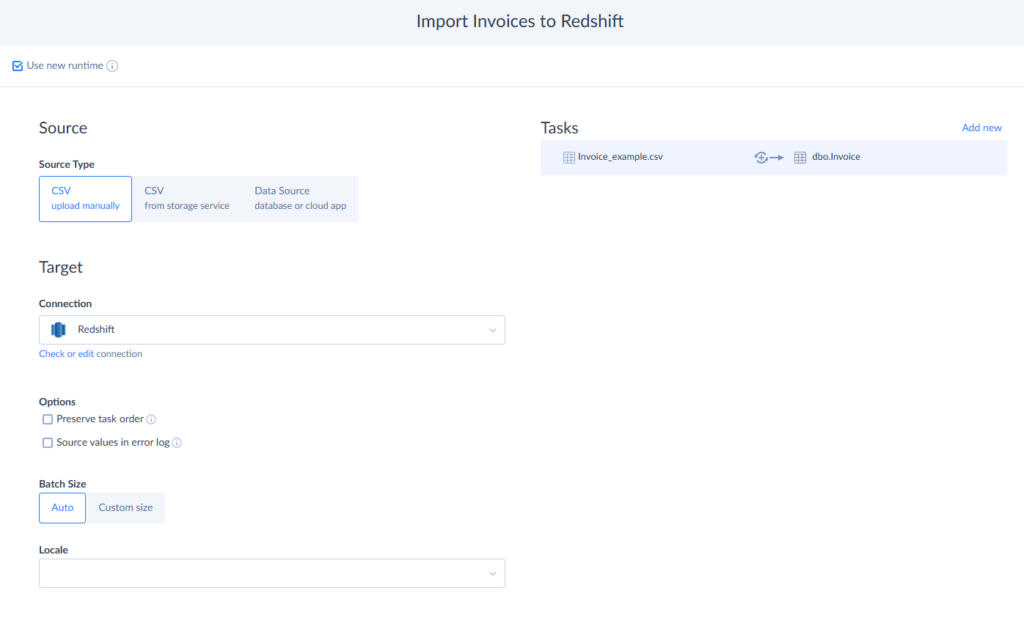
- In Skyvia’s main menu, click Create New > Import.

- Select CSV as source and Redshift connection as target. You can upload CSV files from your PC or a file storage service like Dropbox, Box, FTP, etc.
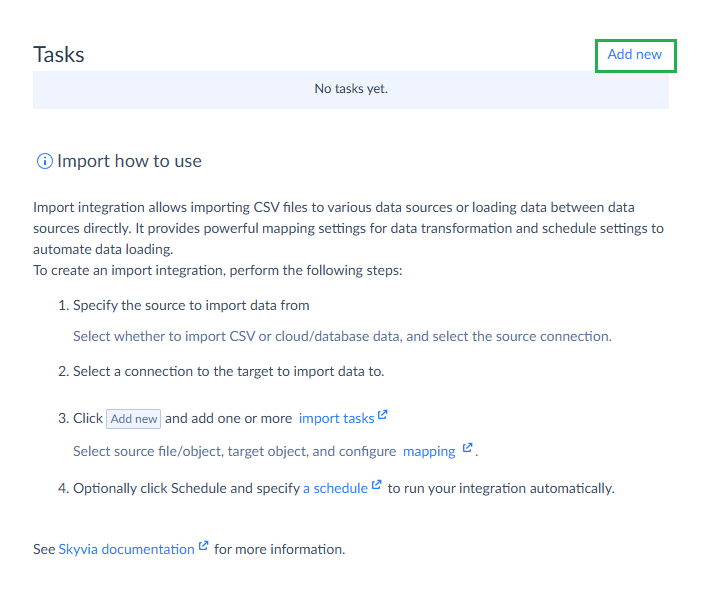
- In a Task area, click Add new. You are free to add as many tasks as you need. Skyvia allows performing several import tasks in one package and, thus, importing several CSV files to Redshift in a single import operation.
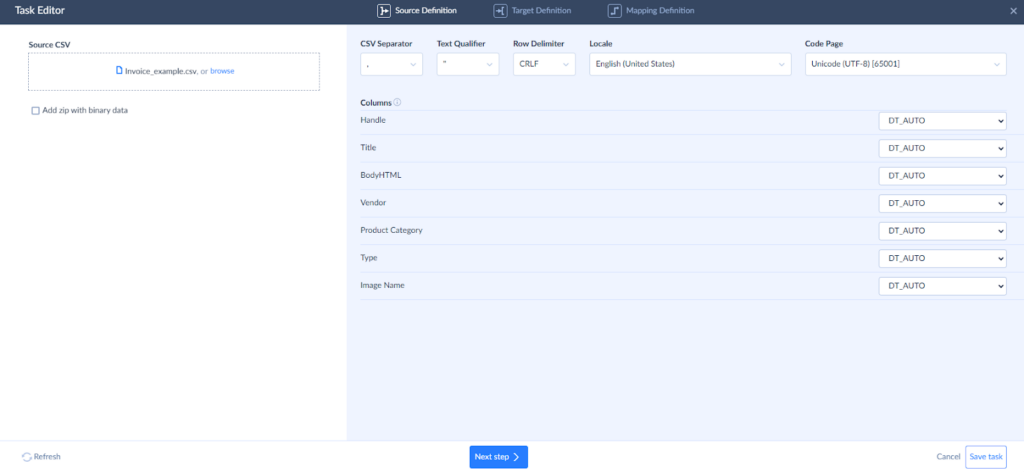
- In the task editor, upload a prepared CSV file. As the file is uploaded, Skyvia displays a list of detected columns and allows you to explicitly specify column data types.
- Next, select the target object in Redshift, and choose an operation type — Insert, Update, Upsert, or Delete.
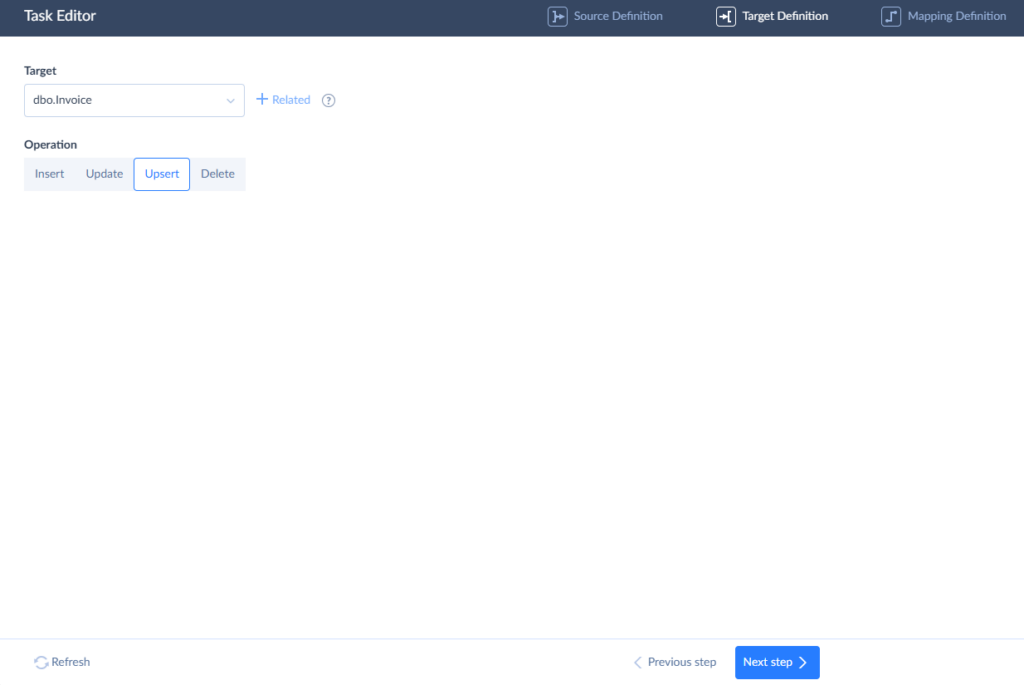
- Columns with the same names in CSV and Redshift are mapped automatically. Map all required source columns to target ones using expressions, constants, and lookups, then save the task.
You can add another task in case you have another CSV file.
Read more about CSV import to Redshift with Skyvia.
STEP 3. JOB AUTOMATION
Automate uninterrupted data movement from CSV to Redshift on a regular basis by setting a schedule for your import package. Click Schedule and enter all required parameters.
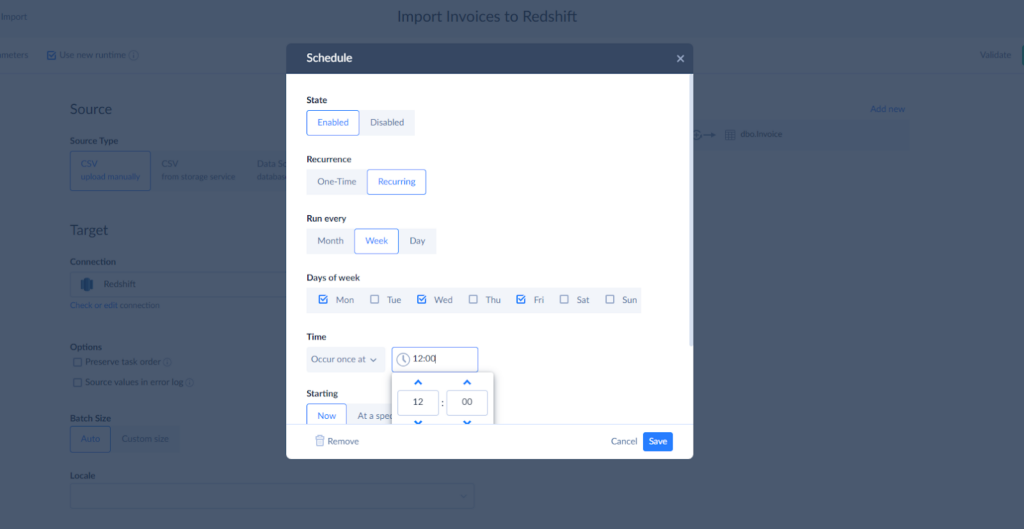
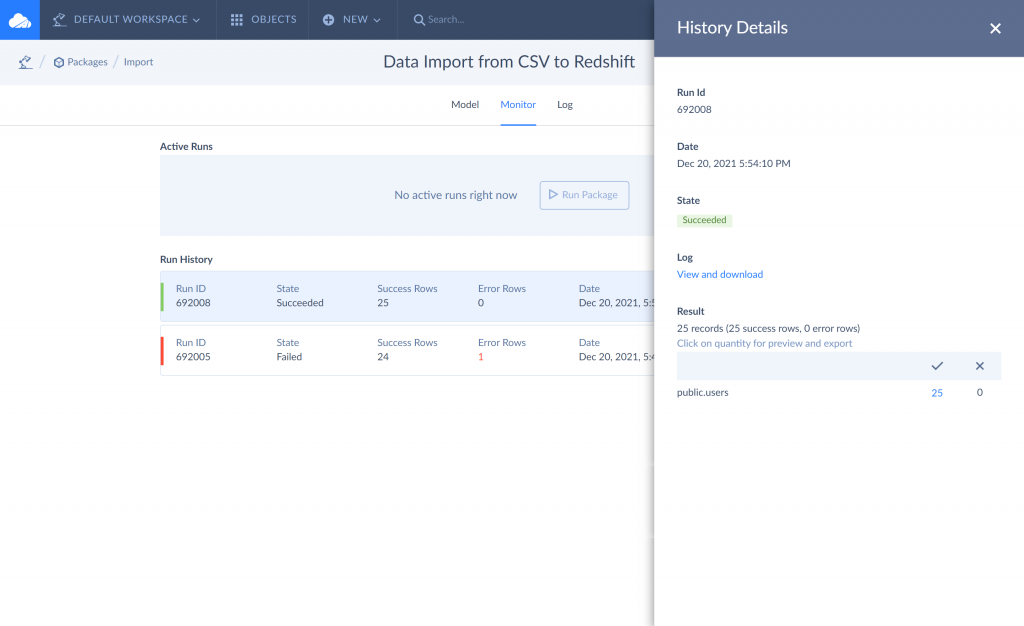
For the first time, we recommend running import manually to check how successfully your package has been executed. If some of your columns are mapped incorrectly, you will see errors in logs and will be able to adjust settings. Moreover, Skyvia can send error notifications to your email.
PROS OF AUTO IMPORT DATA USING SKYVIA
- User-friendly interface and no coding required;
- Flexible mapping;
- Automated scheduling;
- Multiple data sources – can import from CSV, databases, cloud apps, and file storage.
CONS OF AUTO IMPORT DATA USING SKYVIA
- Dependent on Third-Party Service;
- Supports only the CSV format for file importing.
Load Data from S3 to Redshift Using Python
Python is one of the most popular programming languages in the modern data world. Almost every service on AWS is supported with the Python framework, and you can build your integrations with it.
- You can use available libraries to connect to Redshift using Python. To do this, you need to use a library “psycopg2”. This library can be installed by running the command as follows.
pip install psycopg2- Once the library is installed, you can start with your Python program. You need to import the library into your program as follows and then prepare the connection object. It is prepared by providing:
- the hostname of the Redshift cluster;
- the port on which it is running;
- the name of the database;
- and the credentials to connect to the database.
conn=rd.connect(
host=‘host_example’
port=‘port_example’
database=‘database_example’
user=‘user_name’
password=‘user_password’
)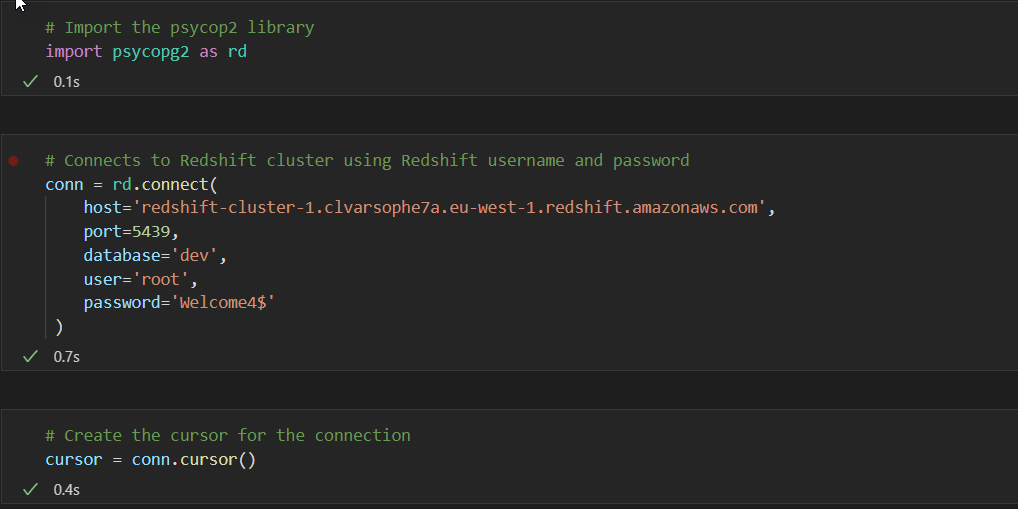
- Once the connection is established, you can create a cursor that will be used while executing the query on the Redshift cluster.
cursor=conn.cursor()- In the next step, you need to provide the query that needs to be executed to load data into Redshift from S3. This is the same query that you have executed on Redshift previously.
COPY test.sample_csv (EmployeeID, EmployeeName, Department)
FROM ‘file_path’
credentials ‘aws_access_key_id=your_key;aws_secret_access_key=your_key’
IGNOREHEADER 1
CSV;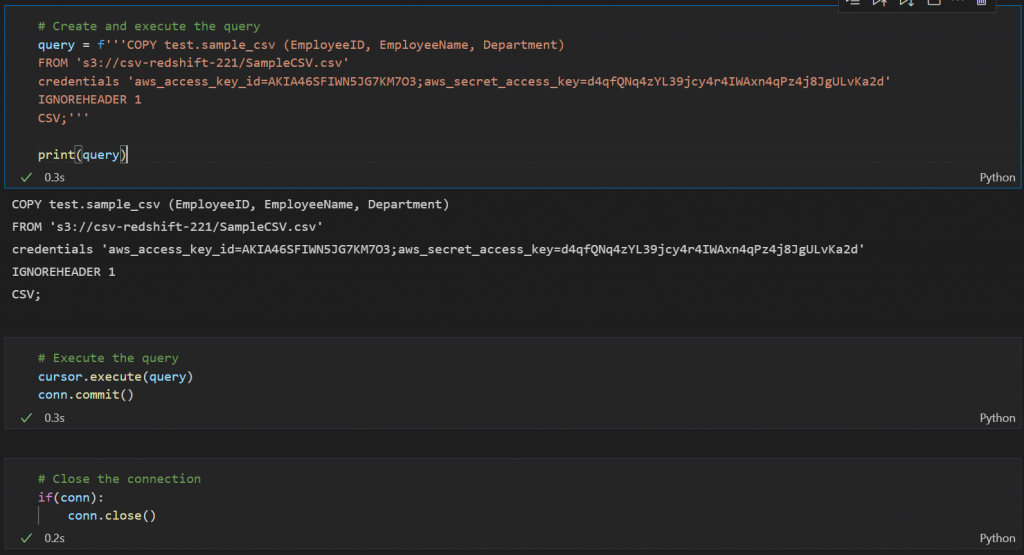
- Once the query is prepared, the next step is to execute it. You can execute and commit the query by using the following commands:
cursor.execute(query)
conn.commit()
Now, you can go back to your Redshift cluster and check if the data has been copied from the S3 bucket to the cluster.
PROS OF LOADING DATA USING PYTHON
- Highly customizable;
- Integration with other Python libraries;
- No third-party dependency.
CONS OF LOADING DATA USING PYTHON
- Requires development effort;
- Performance optimization needed;
- No built-in scheduling.
Export Data from Redshift, Using UNLOAD Command
Loading data out of Amazon Redshift can be done using the UNLOAD command. You can simply select the data from Redshift and provide a valid path to your S3 bucket. You can also filter data in the select statement and then export it as required.
- Once the query is ready, use the following command to unload from Redshift to S3:
UNLOAD ('SELECT * FROM test.sample_csv')
TO 's3://csv-redshift-221/Unload_'
credentials 'aws_access_key_id=AKIA46SFIWN5JG7KM7O3;aws_secret_access_key=d4qfQNq4zYL39jcy4r4IWAxn4qPz4j8JgULvKa2d'
CSV;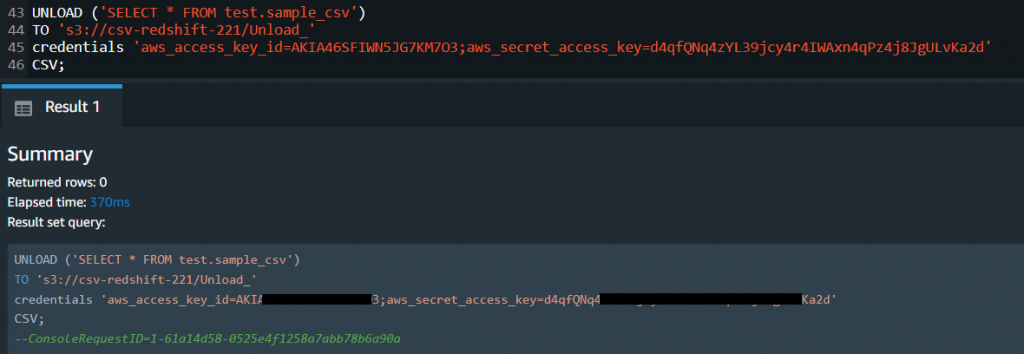
- Once the UNLOAD command is executed successfully, you can view the new file created under the S3 bucket.
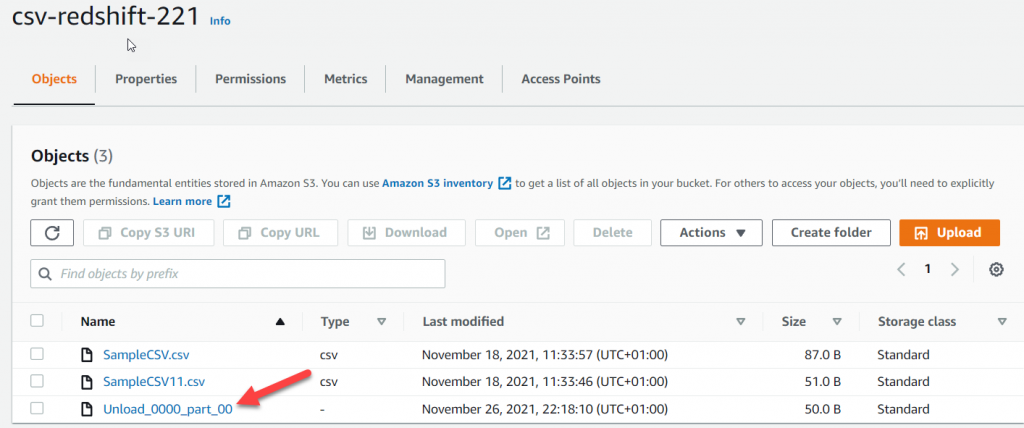
The file is now available in the S3 bucket and can be downloaded.
PROS OF EXPORTING DATA USING UNLOAD COMMAND
- Optimized for large exports;
- Supports parallel exporting;
- Supports custom query.
CONS OF EXPORTING DATA USING UNLOAD COMMAND
- Requires AWS credentials;
- No automation for periodic exports;
- Large exports can be expensive;
- Manual cleanup is required.
Unload Data from Redshift to CSV with Skyvia
With Skyvia, you can unload data from Redshift just as you loaded it. To do this:
- Sign in to Skyvia.
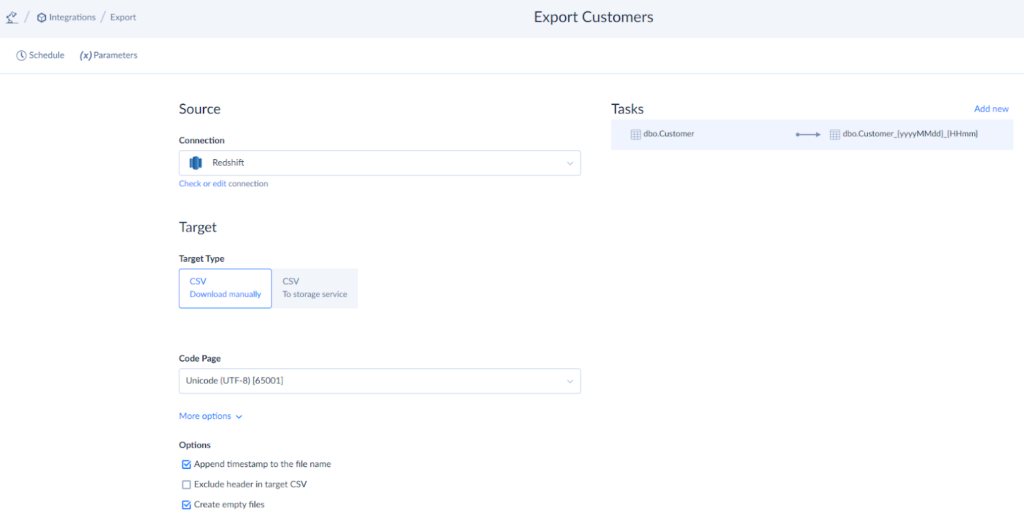
- Click Create New > Export.
- Select Redshift as a source and storage or manual downloading as a target.
- Filter data you want to export and configure other file settings.
- Set a schedule for your integration and run the export.
Read more about Redshift export to CSV.
PROS OF UNLOADING DATA USING SKYVIA
- User-friendly for those without coding skills;
- Automate tasks with scheduled workflows;
- Exporting related objects and binary data;
- Data filtering;
- Integration with 200+ pre-built sources.
CONS OF UNLOADING DATA USING SKYVIA
- Dependent on external services;
- Limited customization compared to native Redshift UNLOAD.
Best Practices for Redshift CSV Operations
Large datasets might take a long time to load and require a lot of processing capacity. Make the most of loading and unloading data by using these approaches.
- Choose the right loading method. Amazon Redshift supports multiple loading options, including the COPY command for bulk imports, INSERT for small datasets, and AWS Data Pipeline or third-party ETL tools for more complex workflows. Select the method that best suits your data volume and uploading frequency.
- Compress your files. Compressing data files before loading speeds up the process. Amazon Redshift supports various compression formats, such as GZIP and BZIP2.
- Use parallel processing. When using COPY to load data or UNLOAD to export it, break large datasets into smaller files to enable parallel processing. This will reduce the time needed for transfers.
- Verify data. Before loading, validate file formats, column mappings, and encoding to prevent errors. When unloading, confirm that exported files maintain the correct structure and consistency across multiple destinations.
- Schedule and monitor data transfers. Automate loading and unloading tasks using AWS Lambda, Amazon Redshift Scheduler, or external ETL tools. Monitor logs for errors and resource usage.
Conclusion
In this article, we’ve described several ways to import CSV to Redshift and vice versa.
The COPY and UNLOAD commands are built-in options to handle large data transfers, while Python scripts allow customized workflows with more flexibility.
If you’re looking for an automated solution, ETL tools like Skyvia make the process easier with an intuitive interface and scheduling features. Try out Skyvia’s free plan and discover how it can work for you.