Traditional cash desks in physical shops still exist, but little real cash goes there. In online shops, a cash desk is at the checkout, and it obviously accepts only online payments.
So, the main question for the shop owners is to decide which payment gateway to implement. It’s not so easy since each payment provider imposes different commissions on transactions at the checkout. What’s more, the availability of payment getaways depends on the country.
Stripe could be a decent option since it offers acceptable transaction fees and is available in many countries. It integrates with CRM systems like HubSpot and Pipedrive, e-commerce platforms like Shopify, and many other services. In this article, learn how to connect Stripe with Shopify and unveil the pitfalls of such integration.
Table of Contents
- Benefits of Integrating Stripe with Shopify
- Methods of Integrating Stripe with Shopify
- Tips for Managing Shopify Payments via Stripe
- Conclusion
Benefits of Integrating Stripe with Shopify
Stripe, together with Shopify, make up a hit mix with benefits that businesses can’t resist.
- Simplicity. The embedded payment module on Shopify is intuitive and makes the checkout process straightforward. It helps users to navigate the payment window with no fatigue and stress.
- Security. It’s safe to say that Stripe offers strong security compared to other payment providers. Payments made on Shopify with this gateway are encrypted, protecting sensitive data.
- Diversity. Even though Stripe accounts can be registered in around 50 countries, businesses can still accept payments from all over the world. This payment provider supports 135+ currencies and various payment methods, including credit cards, debit cards, Apple Pay, and Google Pay. It introduces a great opportunity for businesses to sell their products worldwide and expand their reach.
- Customization. The appearance of the payment window can be aligned with your website branding style. Unified design plays a significant role in consistency within audience interactions and marketing communications.
- Support. Stripe guarantees 24/7 customer support, so you can address your issue anytime and get a response shortly.
Seems impressive, right?
Along with all these advantages of the Stripe to Shopify integration, don’t forget about the costs the payment provider imposes. This payment gateway can be added to Shopify for free, but it will charge extra for each transaction. The amount depends on a number of factors, including pricing plan, card issue country, and so on.
Methods of Integrating Stripe with Shopify
There are two types of integration between Stripe and Shopify.
- Inserting a Stripe payment gateway on Shopify.
- Exchanging data between Stripe and Shopify using third-party data integration tools like Skyvia.
These two approaches are different and can’t be used interchangeably, but they can be used together to ensure better transaction management and financial data analysis.
Direct Integration through Shopify Admin
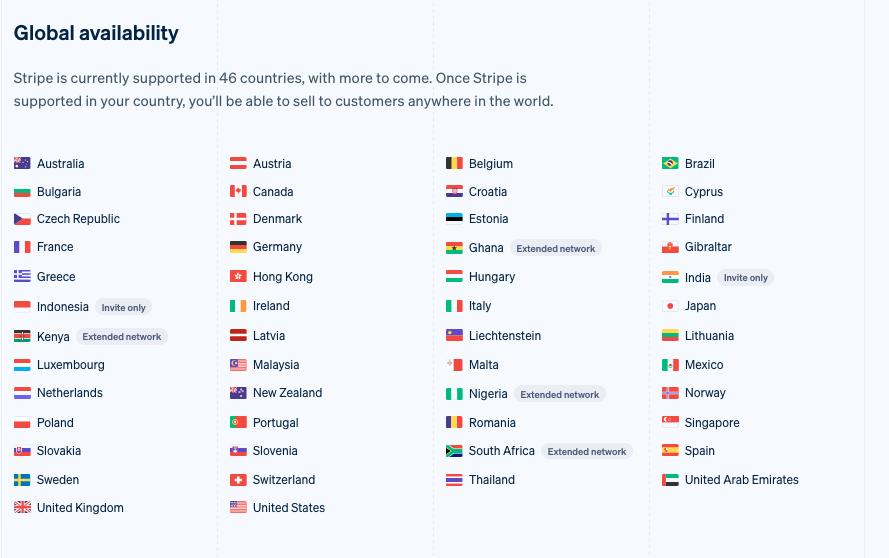
Stripe service is available in nearly 50 countries around the world. You can create a Stripe account only if your bank account and business are registered in the following countries:
Anyway, Stripe allows you to accept payments from all over the world. Even if your business operates in the US, you can still sell your products worldwide and receive payments in different currencies.
Before we proceed to the tutorial on how to integrate Stripe on Shopify, you need to bear these nuances in mind:
- Even though Stripe is supported in 50 countries, it can’t be added to Shopify in all these countries. The reason is that Shopify implemented its own getaway called Shopify Payments that runs on the Stripe engine. For that reason, it’s impossible to add Stripe as a separate payment provider in the countries listed below. See Case 1 for details.
- You can add Stripe payment getaway only in those countries that are supported by Stripe but not supported by Shopify Payments. See Case 2 for details.
- In countries supported neither by Stripe nor by Shopify Payments, you can select and embed any other available payment gateway.
Case 1. Activate Shopify Payments
For the countries listed below, Shopify Payments is the default payment method on Shopify. Stripe is unavailable on the list of the payment options in these countries.
| ?? Australia ?? Austria ?? Belgium ?? Canada ?? Czechia ?? Denmark | ?? Finland ?? France ?? Germany ?? Hong Kong SAR ?? Ireland ?? Italy | ?? Japan ?? Netherlands ?? New Zealand ?? Portugal ?? Romania ?? Singapore | ?? Spain ?? Sweden ?? Switzerland ?? United Kingdom ?? United States |
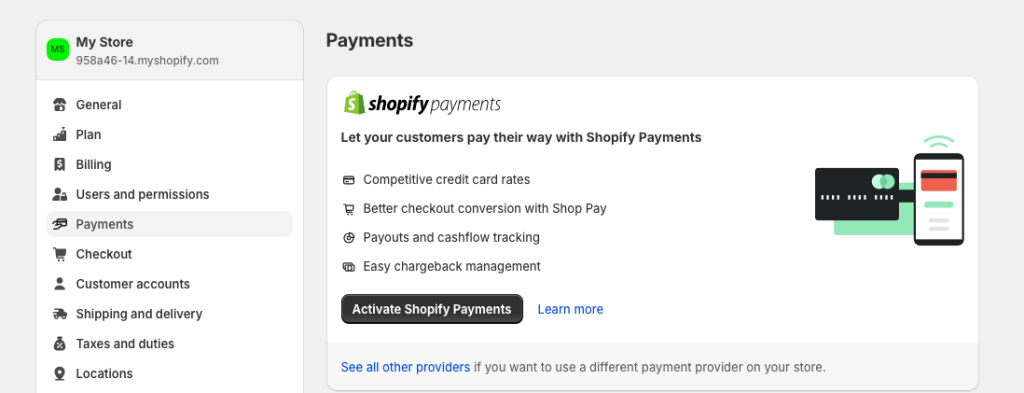
All you have to do is activate Shopify Payments if your business operates in one of the countries mentioned above.
- In your Shopify store settings, go to Payments on the left menu.
- Click Activate Shopify Payments.
- Proceed with the on-screen instructions.
Case 2. Activate Stripe Gateway
The Stripe payment gateway option is available in the following countries.
| ?? Bulgaria ?? Brazil ?? Croatia ?? Cyprus ?? Estonia ?? Gibraltar ?? Ghana | ?? India ?? Indonesia ?? Hungary ?? Greece ?? Kenya ?? Latvia ?? Lithuania | ?? Liechtenstein ?? Luxembourg ?? Malaysia ?? Malta ?? Mexico ?? Nigeria ?? Norway | ?? Poland ?? Slovakia ?? Slovenia ?? South Africa ?? Thailand ?? United Arab Emirates |
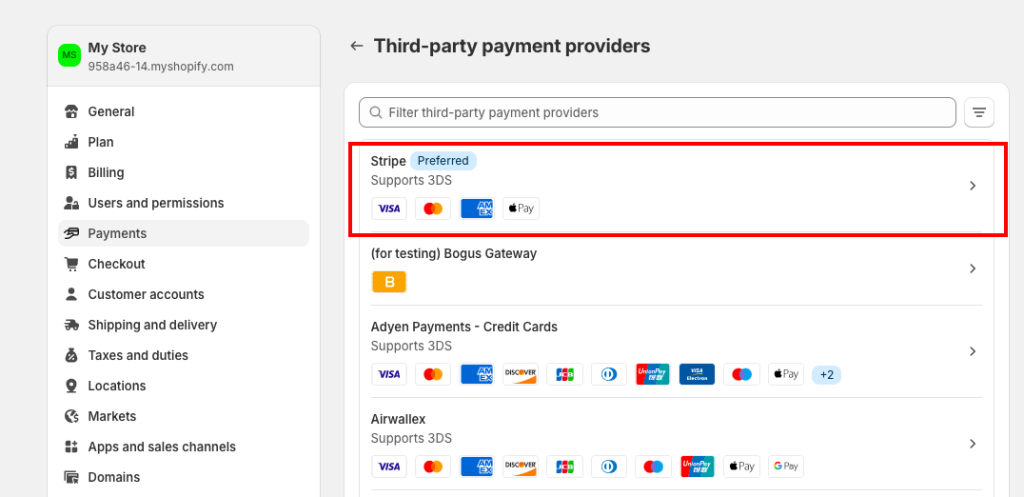
To add Stripe gateway to Shopify:
- Click on the option that appears and proceed with the in-app instructions.
- In your store settings, go to Payments on the left menu.
- Click Choose a provider and type Stripe in the text box.
When everything is set up, make a test order to verify that the chosen payment option is available at the checkout on your Shopify store.
Connect Stripe with Shopify Using Skyvia
Another approach to integrating Stripe with Shopify implies data exchange between these two systems using Skyvia. This platform contains a wide set of tools for various data-related tasks. The Data Integration and Automation solutions would be the most suitable for the Shopify to Stripe integration.
Given that the Stripe Dashboard provides a detailed overview of each particular transaction, it makes sense to consolidate all payment data there, making it a single source of truth. If you have Shopify Payments, PayPal, or other gateways at the checkout on Shopify and use Stripe to process other business transactions, Skyvia will help you consolidate all payments in Stripe.

Automation Tool
The Automation tool allows you to create event-driven workflows between Shopify and Stripe in the visual builder. For instance, once a new transaction is made on Shopify, a trigger invokes an action to copy transaction data to Stripe.
Sample scenario: Create a new Stripe payment from a Shopify order
The first thing to do is establish a connection with Shopify and Stripe from Skyvia in a few clicks.
Then, follow the steps below to create an automated workflow:
- In the top menu, click +Create New and select Automation.
- Name the automation workflow and set Connection as a trigger type.
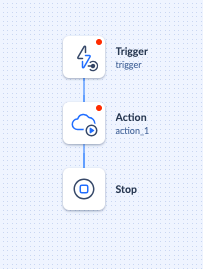
- Click on the trigger and select the Shopify connection from the list.
- Select New Record under the trigger and the preferred table and column with transaction data.
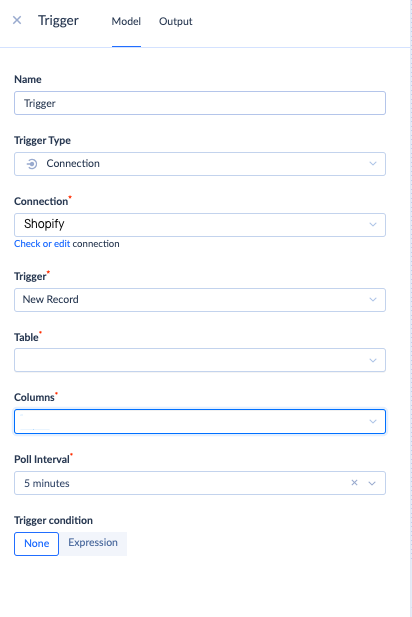
- Add the Action component from the panel on the left to the automation workflow and click on it.
- Select Stripe connection.
- Select the required DML operation and a table where the information from Shopify needs to be stored.
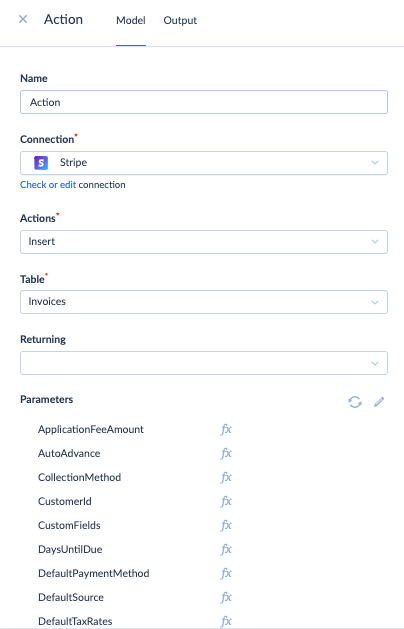
- Save the automation workflow and turn to the overview mode.

- To start the automation, set it to the Enabled state.
- Check the progress and outcomes of the automation workflow under the Monitor and Log tabs.
Check official Skyvia documentation for detailed guides.
Data Integration Tool
With Skyvia, you can import data from Shopify to Stripe on a regular basis. The Import tool offers a user-friendly interface for connecting both services, mapping their data structures, and scheduling regular data transfers from Shopify to Stripe.
Another solution is the Replication tool, which allows you to copy transaction data from Shopify and Stripe to the data warehouses. That way, you will create a solid base for financial analytics and reporting.
Sample scenario: Send payment data from Shopify to Stripe
In this article, we explore the data integration scenario of sending payment transaction data from Shopify to Stripe using the Import tool. This scenario will be useful if you use Shopify Payment, PayPal, or another payment gateway on the Shopify store but use Stripe to record other transactions.
The first thing to do is establish a connection with Shopify and Stripe from Skyvia in a few clicks.
Then, follow the steps below to transfer transaction data from Shopify to your Stripe account.
- In the top menu, click +Create New and select Import.
- Under the source, select Shopify. Under the target, set Stripe.
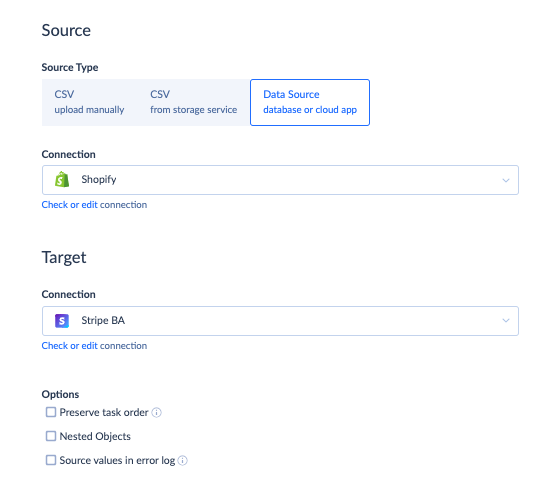
- Click Add task.
- In the source settings, select Orders from the drop-down of Shopify items.
- In the target settings, select the PaymentIntents item.
- In the mapping settings, establish the correspondence between fields in two systems for correct integration.
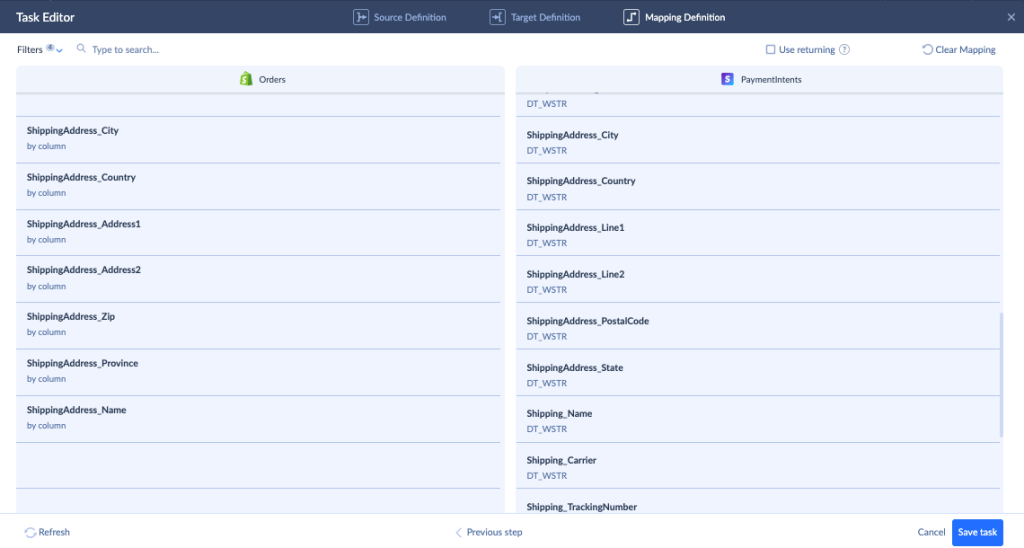
- Save the task.
- Save the integration flow.
If you want to make the data transfer recurring, click Schedule. Select the interval or particular times to make your integration recurring. That way, you will automate the Shopify to Stripe integration, facilitating the financial data management.
Overall, Skyvia is an excellent tool for creating integration since it:
- Remains among the top user-friendly data integration tools.
- Can be accessed from anywhere at any time.
- Connects to 200+ sources.
- Has pricing plans available for companies of any size in any industry.
Tips for Managing Shopify Payments via Stripe
Currency Conversions
As you know, Stripe supports 135+ currencies, so it can accept payments from all over the world. If your business sells products in different countries, Stripe will accumulate separate balances for each currency. If the transaction currency differs from your bank account currency, Stripe will automatically convert it at a small fee. The actual conversion rate for every transaction is available on the payment overview page.
Financial Reporting
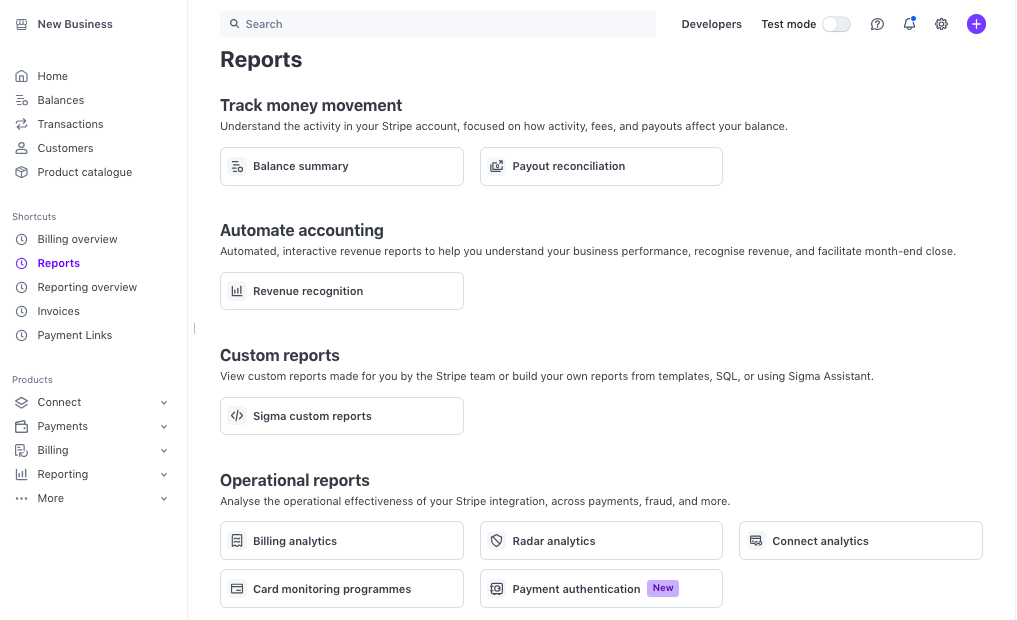
Stripe offers financial reports that will help you with accounting management. They summarize everything that has impacted your Stripe balance. They can be generated on a daily, weekly, or monthly basis.
Fraud Prevention
Stripe includes the Radar module that helps to identify fraudulent transactions. It’s based on the machine learning engine that provides real-time transaction scoring and evaluates the likelihood that a payment is fraudulent.
Each payment includes information on the outcome of risk evaluation, which is available on the Stripe Dashboard. Payments with high risk are blocked by default.
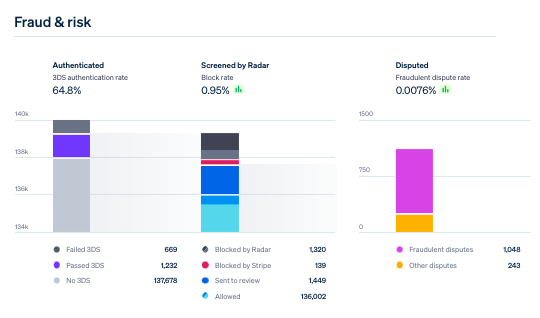
It’s possible to set custom rules on Radar to block transactions from certain locations or cards. This helps to elevate security and enhance the overall reliability of payment processing.
Conclusion
Payment gateways like Stripe are integral parts of online shopping engines nowadays. It’s important to select the right payment option that would go well with the business locations and geographical markets in which you operate.
There are many nuances in adding Stripe as a payment gateway on Shopify, and we have listed them in this article. Also, you may consider data integration between these two services to maintain consistency in transaction management and cash flow. This could be done with the Skyvia platform, which is easy to use and has a free version for newcomers!


