

Summary
- Method 1: Manual CSV Export/Import – The simplest but most manual approach, exporting data from HubSpot and importing it into SQL Server via CSV files, suitable for one-off transfers but not ongoing sync.
- Method 2: Skyvia – A no-code automation platform that keeps HubSpot and SQL Server in sync with scheduled jobs, transformations, and minimal setup effort.
- Method 3: ODBC Drivers (Direct Local Access) – A technical method that connects HubSpot data to SQL Server through ODBC drivers, enabling direct querying but requiring local configuration and maintenance.
- Method 4: Custom API Integration (The Developer’s Choice) – A fully custom solution using HubSpot’s API and SQL Server scripts, offering maximum control at the cost of engineering time and ongoing support.
HubSpot is great at what it does:
- Marketing automation;
- CRM workflows;
- Lead tracking.
But when reporting gets serious, you start to feel the walls. Advanced joins, long-term historical storage, blending marketing with finance or ERP data — that’s not HubSpot’s sweet spot.
And that’s where the silo problem kicks in. Sales and marketing data live in HubSpot, while revenue, invoices, and operational metrics sit elsewhere. If you want a proper cross-department view — pipeline to revenue, cash campaign — you need everything in one place.
Moving HubSpot data into SQL Server opens that door. Once it’s there, you can plug into Power BI or Tableau, build deeper analytics, archive historical records, and connect marketing performance with real financial outcomes.
In this guide, we’ll walk through four practical ways to connect HubSpot and SQL Server — from manual CSV exports to custom API builds and automated no-code integrations — so you can pick the method that fits your team and your goals.
Table of Contents
- The Data Silo Problem: Why Sync HubSpot with SQL Server
- Method 1: Manual CSV Export/Import
- Method 2. No-Code Automation with Skyvia
- Method 3: ODBC Drivers (Direct Local Access)
- Method 4: Custom API Integration (The Developer’s Choice)
- Best Practices for HubSpot & SQL Server Integration
- Conclusion
The Data Silo Problem: Why Sync HubSpot with SQL Server
HubSpot does a great job handling engagement data — contacts, deals, campaigns, lifecycle stages. But the moment you want to connect that data to finance systems, ERP records, or internal operational databases, things start to fragment.
This is the classic data silo problem.
Marketing metrics live in HubSpot. Revenue data sits in accounting. Customer fulfillment might be tracked in another system entirely. If these systems don’t talk to each other, reporting becomes manual, fragmented, and often inconsistent.
Syncing HubSpot with SQL Server solves that at a structural level.
Data Consolidation
By moving HubSpot data into SQL Server, you create a central layer where marketing, sales, and financial data can coexist. Instead of exporting reports and reconciling spreadsheets, you join deals with invoices, campaigns with actual revenue, and contacts with support history — all in one query.
Advanced BI
Once HubSpot data lands in SQL Server, you can plug directly into Power BI, Tableau, or other BI tools. This unlocks deeper modeling, custom KPIs, cohort analysis, and pipeline-to-revenue tracking that simply isn’t possible inside HubSpot’s native reporting.
Historical Archiving
HubSpot isn’t designed to be your long-term data warehouse. Syncing to SQL Server allows you to store historical snapshots, preserve deleted records, and maintain long-term performance data for trend analysis and compliance needs.
Method 1: Manual CSV Export/Import
This is the most straightforward way to move HubSpot data into SQL Server. No connectors, no APIs — just export the data and load it manually. It works, but it’s exactly as manual as it sounds.
Best For
One-time migrations or occasional data transfers where ongoing updates aren’t required. This method works when you just need to move data once, but it’s not suitable for continuous sync since the data becomes outdated immediately after export.
Step-by-Step Guide
1. Export Data from HubSpot
Go to your HubSpot object (Contacts, Deals, Companies, etc.), click Export, choose CSV format, and download the file.
2. Prepare the File (Optional)
Open the CSV in Excel or another tool to clean column names, remove unnecessary fields, and ensure formats match your SQL schema.
3. Use SQL Server Import/Export Wizard
Open SQL Server Management Studio (SSMS), right-click your database → Tasks → Import Data.
Choose Flat File Source and upload the CSV.
Map columns to your target table and run the import.
4. Verify the Data
Run a simple SELECT query to confirm that records were inserted correctly.
That’s it. Simple. Manual. Done.
Pros
- No additional software required.
- Easy to execute for small datasets.
- Full control over which fields you export.
- Suitable for quick, one-time migrations.
Cons
- No automation. Data becomes outdated immediately.
- Error-prone if done repeatedly.
- Manual schema mapping every time.
- Not scalable for large or frequent updates.
- No real-time or scheduled sync.
Method 2. No-Code Automation with Skyvia
This method involves integrating data through cloud platforms such as Skyvia, Hevo Data, Fivetran, Stitch, and Coefficient. While their functionalities may vary, these tools share common core principles: pre-built connectors, a pipeline designer, automated workflows, a no-code approach, and continuous synchronization between data sources.
We’ll demonstrate the advantages of this method using the Skyvia platform.
Best For
- Users without technical expertise.
- Businesses seeking a quick and easy setup.
- Teams that require automated data syncing.
- Businesses managing multiple data sources.
Reverse ETL: Pushing SQL Insights back to HubSpot
When evaluating key sales metrics, it is important to have a holistic view across multiple sources. For example, active sales are recorded in HubSpot CRM, while passive sales from an online shop are stored in SQL Server. Analyzing them separately can lead to a fragmented vision. That’s why it’s crucial to integrate all sales information into a single source of truth – with HubSpot CRM as the central system.
In this scenario, we’ll transfer passive sales data from SQL Server to HubSpot using Skyvia Import – a wizard-based ETL tool for bidirectional, no-coding integrations between supported sources.
Step 1. Create Connections
- Sign in to Skyvia, or, if you don’t have an account yet, create it for free.
- Click +Create New, select Connection, and choose SQL Server.
Note: Skyvia supports two connection methods for SQL Server: direct and with an agent. Use a direct connection if your SQL database is accessible via the internet. If it is on a local computer or network, you’ll need to install the Skyvia Agent application to make a secure connection.
- Provide SQL Server credentials: server address, user ID, password, and database name.
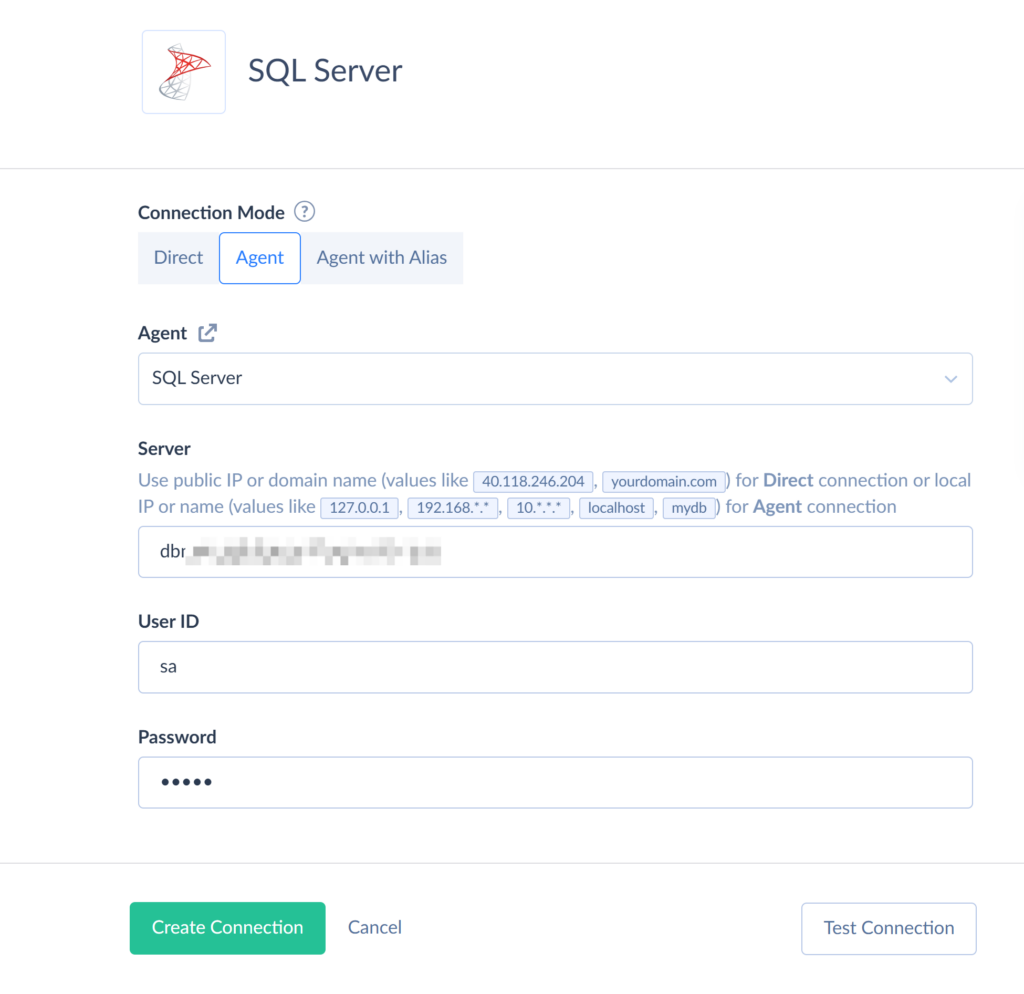
- Click Create Connection.
To connect Skyvia to HubSpot, perform the following steps:
- In Skyvia, go to Connections and click +Create New.
- On the Select Connector page, choose HubSpot.
- On the connection configuration page, click Sign in with Hubspot.
- Log in with your HubSpot credentials.
Note: The connection is enabled via OAuth authentication, meaning that you don’t have to share your HubSpot credentials with Skyvia. Instead, Skyvia generates a secure authentication token, which is bound to the connection.
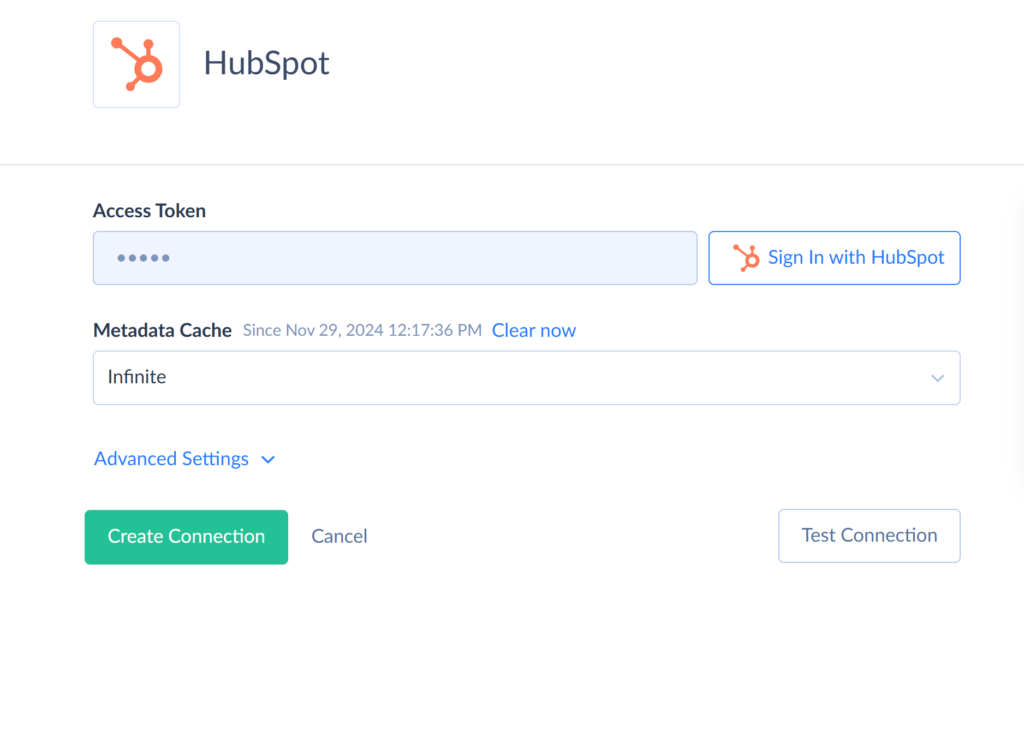
- Click Create Connection.
Step 2. Create an Import Integration
Once both connections are ready, let’s create an integration to import sales information from SQL Server to HubSpot.
- In the top menu, click +Create New and select Import.
- Set the corresponding source type. For the SQL Server to HubSpot import, choose Data Source database or cloud app. Select the SQL Server connection as Source and the HubSpot connection as Target.
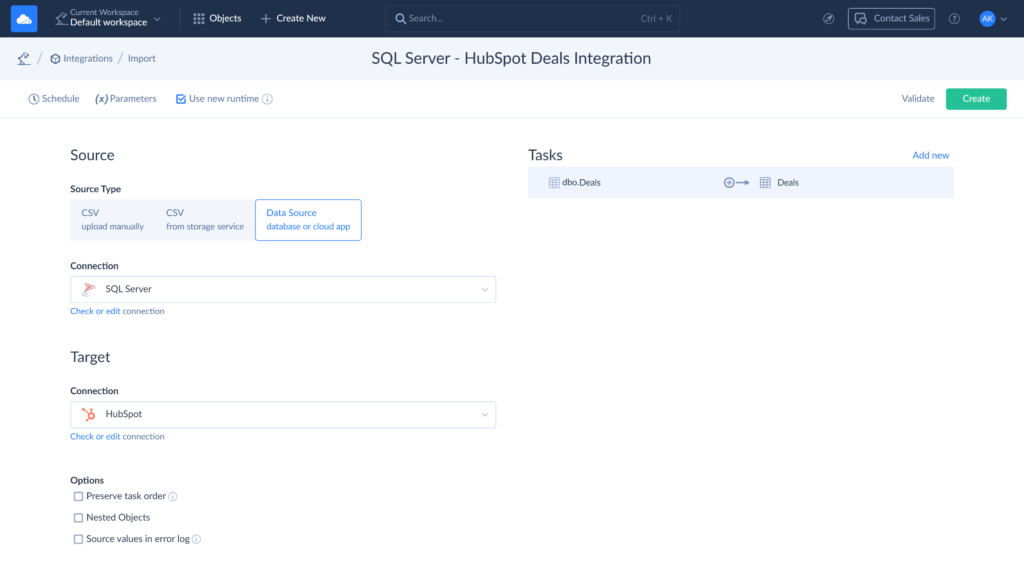
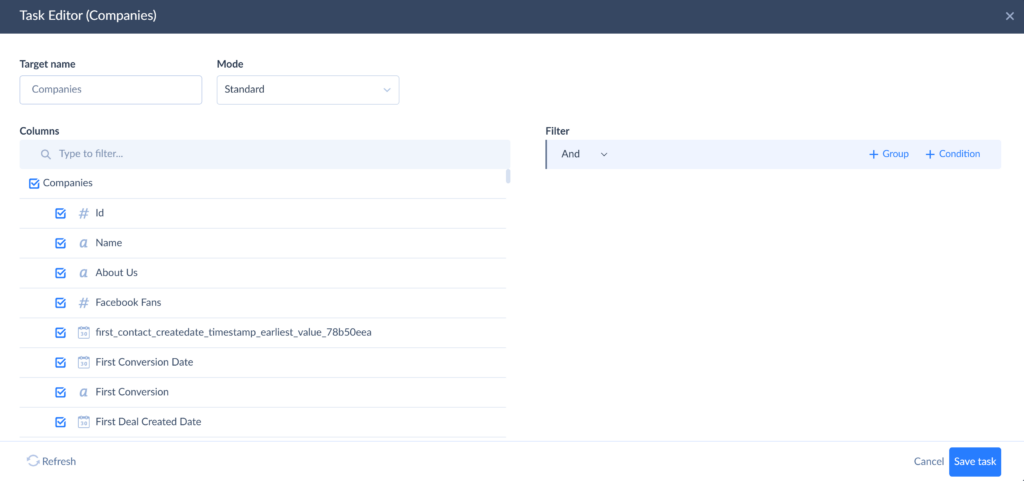
- Click Add new to create an import task. This will open the task editor window.
- On the Source Definition page, select a table to import data from (dbo.Deals for this example).
- On the Target Definition page, select an object to import your data to and one of the available operations. Since we’re importing information about deals for the first time, we’ll choose the Insert operation.
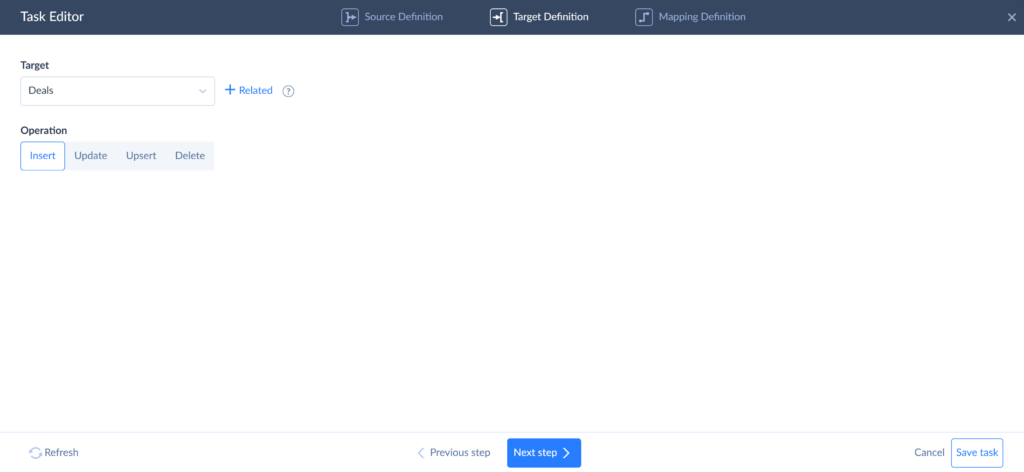
- Click Next step and proceed to mapping.
- On the Mapping Definition page, map target to source columns. Make sure to map all required columns, otherwise, the integration will fail.
- Click Save task.
Step 3. Run the Integration
On the import configuration page, click Create to set up an integration. Click Run to start transferring deal information from SQL Server to HubSpot.
You can schedule the integration to run at a specific time. To do this, click Schedule and configure the execution timing.

Data Replication to SQL Server
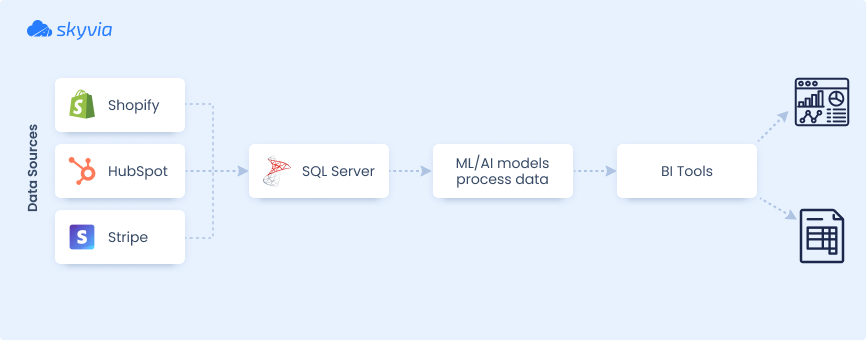
Such integrations are commonly conducted to ensure data consistency for strategic planning and forecasting. Large volumes of data are gathered from multiple sources and then processed with ML and AI algorithms to generate predictions.
SQL Server’s extensive integration capabilities make it a popular choice for data consolidation with a further connection to ML/AI tools.
For this scenario, we’ll use Skyvia to replicate HubSpot data to SQL Server. This approach is convenient and straightforward. It requires no manual mapping plus offers incremental updates to keep the data continuously up to date.
Follow the steps below to configure the replication.
Step 1. Set Up Configuration Parameters
Note: Before you proceed with configuring replication, ensure you have valid connections for SQL Server and HubSpot. If not, perform the same actions as outlined in Step 1 of the first scenario.
- Сlick Create New in the top menu and select Replication.
- Select HubSpot as a Source and SQL Server as a Target connection.
- Under Options, select the necessary checkboxes:
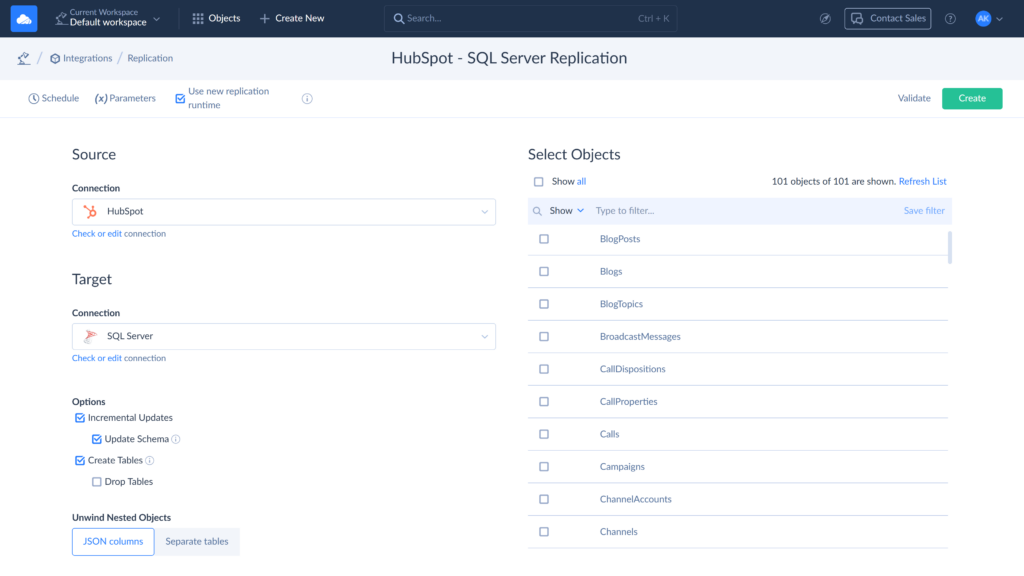
Note: For this replication, the Incremental Updates and Create Tables options are enabled by default.
- Incremental Updates allow tracking metadata changes and updating data without reloading the entire dataset. It also includes Update Schema as a sub-option.
- Create Tables instructs Skyvia to automatically create source tables in the target database during the initial replication.
Step 2. Select Data for Replication
Choose objects for replication from the table. You can select either specific objects or all displayed objects:
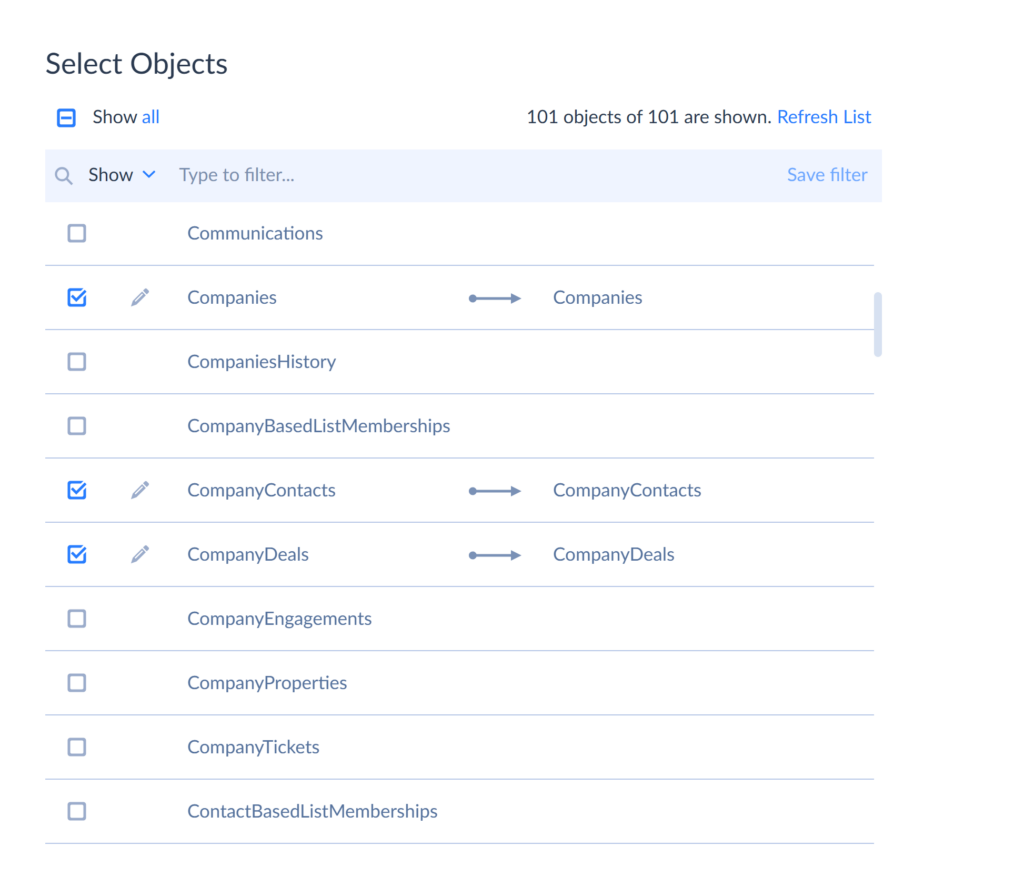
Within the selected objects, specify the fields for replication: click the Edit icon next to an object and choose the fields you want to replicate.
Note: By default, Skyvia replicates all fields of the selected objects. To exclude specific fields, simply uncheck their boxes.
Select the replication mode as Standard.
Note: Selecting Incremental Updates on the main configuration page lets you set a replication mode for each object. Choosing Standard mode automatically applies default replication behavior to each object.
Click Save task.
Step 3. Run the Replication
On the main configuration page, click Create to set up an integration. Click Run to start replicating data from HubSpot to SQL Server. You can track its progress in the Monitor or Logs tabs.
Click Schedule to configure automatic execution.
Once the replication is completed, a copy of your HubSpot data will be available in the SQL Server.
How to Handle HubSpot API Limits: The Power of Incremental Updates
Here’s something teams usually discover the hard way.
HubSpot has strict API rate limits. If you try to reload your entire Contacts or Deals table every hour, you’ll quickly run into 429 Too Many Requests errors. Once that happens, your sync pauses, retries kick in, and reporting starts lagging behind.
That’s the problem with naive full reloads — they’re noisy, inefficient, and unnecessary.
The Skyvia Solution
With Skyvia, you don’t need to reload everything.
Skyvia’s Incremental Updates feature tracks records based on system fields like createdate or lastmodifieddate. On each run, it only pulls records that were newly created or updated since the previous sync.
No duplicates. No full-table refresh. No wasted API calls.
It’s smart enough to know what changed — and ignore what didn’t.
The Benefit
This approach can reduce data traffic by up to 99%, especially as your HubSpot database grows.
- The SQL Server stays up to date.
- The sync runs faster.
- The HubSpot API usage stays comfortably within standard or free tier limits.
Comparison: Why Skyvia vs. Other Cloud Tools?
Once you move beyond manual CSV exports, the real choice usually comes down to automation tools vs. developer-built integrations. Here’s how they stack up for HubSpot → SQL Server sync.
| Method | Best For | Complexity | Customizability | Maintenance |
|---|---|---|---|---|
| Skyvia (No-Code Automation) | Businesses needing quick, automated sync without engineering effort | Low | Medium to High | Zero maintenance |
| ODBC-Based Integration | SQL Server admins needing direct local querying | Medium | Low to Medium | Medium (driver updates & config) |
| HubSpot REST API (Custom Build) | Companies requiring full control and custom logic | High | High | Constant updates |
Advantages of Using Skyvia
Integrating SQL Server and HubSpot with Skyvia is fast and straightforward. But beyond ease of use, there is more to this:
- Multifunctionality: Skyvia is capable of a wide range of data-related tasks, including synchronization, replication, cloud backup, and process automation.
- User-friendly interface: With the platform’s intuitive design, all users have the best experience regardless of their technical expertise.
- Flexible pricing: There is a free plan to get started, along with scalable paid subscriptions.
- Secure data sharing: With Skyvia, which is hosted in the Microsoft Azure cloud, you can securely share information in-house or with external partners – without the need to move or duplicate data.
Considerations of Skyvia
While Skyvia is a powerful and user-friendly integration tool, there are a few factors to consider before choosing it as your solution:
- Cost: The free plan has limited functionality and is suitable only for small-scale data volumes. Skyvia does offer affordable pricing, but advanced features require higher-tier plans, which are paid.
- Limited customization: With over 200 pre-built connectors, Skyvia supports a wide range of applications. However, for other sources you will need to set up a connection manually by defining source API endpoints and metadata in the JSON format via REST connection editor.

Method 3: ODBC Drivers (Direct Local Access)
Open Database Connectivity (ODBC) is a standardized database API that allows applications to communicate with external data sources using SQL as a common language. In simple terms, it acts as a universal bridge between tools like SQL Server, Power BI, or Excel and systems like HubSpot.
Each data source requires its own ODBC driver — think of it as a translator. The driver converts standard SQL queries into requests that HubSpot understands, and then translates the responses back into tabular data your reporting tools can consume.
This method is especially appealing to Power BI and Excel users who want a direct, live connection to HubSpot data without introducing a cloud integration layer. Instead of building a warehouse pipeline, you query HubSpot in near real time from your desktop BI environment.
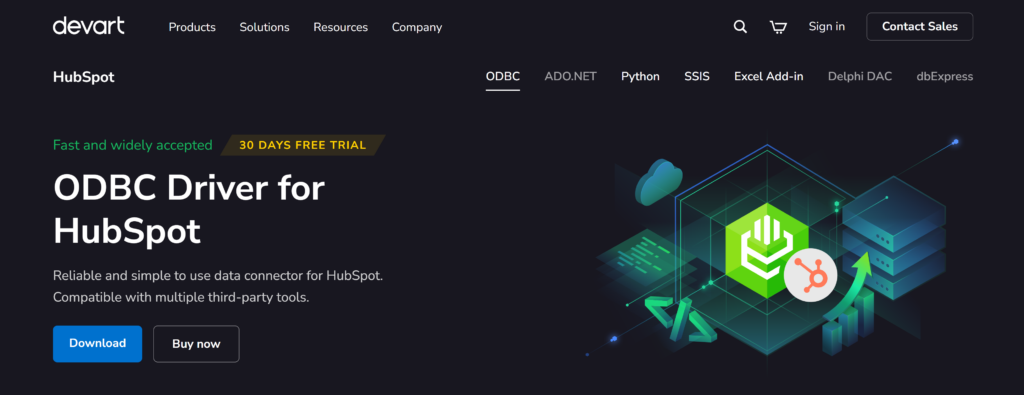
For this example, you could use a dedicated driver such as the Devart ODBC Driver for HubSpot.
Note: Users need SQL Server Management Studio (SSMS),the appropriate ODBC driver installation, and .NET Framework 4.5 or higher. for this setup.
Best For
- Database administrators & data analysts.
- Organizations prioritizing on-premise control.
- SQL Server users looking for a direct connection.
- Companies focused on read-only data analysis.
Implementation Steps
Prerequisites
Before initiating the integration, make sure the following prerequisites are met:
- Bitness compatibility: The Devart ODBC driver, SQL Server, and SSMS must all share the same architecture – either 32-bit or 64-bit.
- Installation requirements: Both the Devart ODBC Driver for HubSpot and SQL Server should be installed on the same machine. Additionally, ensure that .NET Framework 4.5 or higher is installed.
Step 1. Set Up the System
- Download and install the Devart ODBC Driver.
- Set up a system DSN (Data Source Name):
- Open the ODBC Data Source Administrator on your system.
- Navigate to the System DSN tab and click Add.
- Select Devart ODBC Driver for HubSpot from the list and click Finish.
- Configure the connection settings by providing necessary authentication details and specifying any required connection parameters.
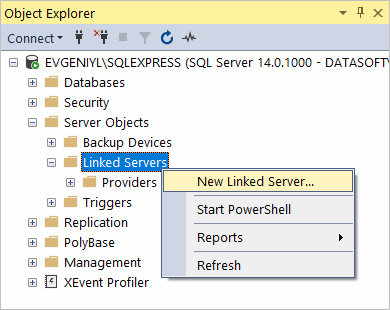
Step 2. Configure a Linked Server in SSMS
- Launch SSMS and connect to your SQL Server instance.
- In the Object Explorer pane, expand Server Objects, right-click Linked Servers, and select New Linked Server.
- In the New Linked Server dialog, populate the fields:
- Linked server: Enter a name for the linked server (e.g., “HUBSPOT”).
- Server type: Select Other data source.
- Provider: Choose Microsoft OLE DB Provider for ODBC Drivers.
- Data source: Enter the name of your DSN configured in the previous step (e.g., Devart ODBC Driver for HubSpot).
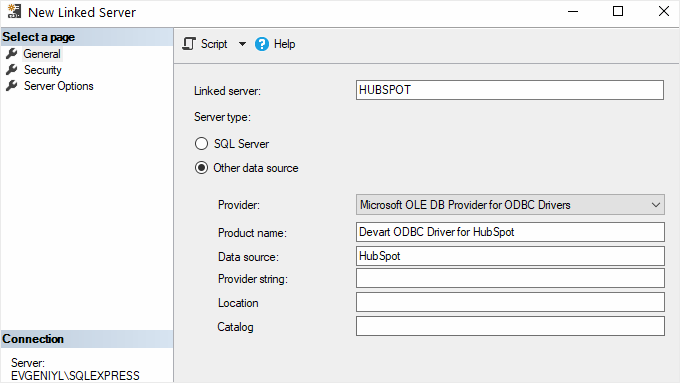
- Click OK to create the linked server.
Step 3. Enable Allow in-process Option for MSDASQL Provider
- In SSMS, expand Server Objects > Linked Servers > Providers.
- Locate MSDASQL, right-click on it, and select Properties.
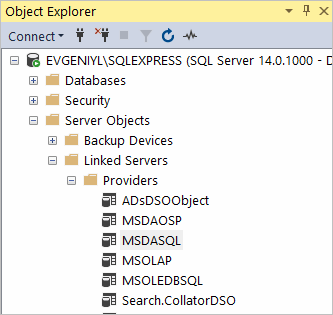
- In the Provider Options window, check the Allow in-process option and click OK.
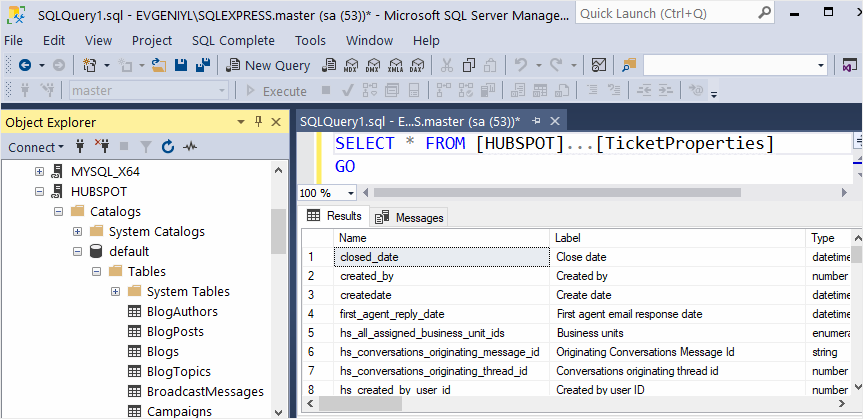
Step 4. Query HubSpot Data
- In SSMS, open a new query window.
- Execute SQL queries to retrieve data from HubSpot tables via the linked server:
Pros
- Direct SQL Server integration: Enables SQL Server to access HubSpot data in real-time without third-party middleware.
- Standardized interface: Using ODBC-compliant methods makes it a widely accepted and stable integration approach.
- Supports SQL queries: Enables directly querying HubSpot using SQL syntax.
- No coding required: Unlike API-based integrations, the ODBC method doesn’t need programming expertise.
Cons
- Performance considerations: Querying large HubSpot datasets directly from SQL Server may impact performance due to API response times.
- Limited write capabilities: ODBC drivers primarily support read operations; writing data back to HubSpot may require additional configurations or API usage.
- Manual setup: Unlike cloud-based tools, the ODBC method requires installation with further manual configuration.
- Dependency on external software: Employing third-party ODBC drivers may involve licensing costs.
- Potential compatibility issues: The driver, SQL Server version, and SSMS must match in bitness, which can sometimes lead to setup challenges.
Method 4: Custom API Integration (The Developer’s Choice)
If you want full control, this is the path. HubSpot exposes a comprehensive REST API that allows you to extract CRM objects, marketing data, sales pipelines, service tickets, and even account-level metadata directly into SQL Server.
On paper, it’s powerful. In practice, you’re building and maintaining your own integration layer.
HubSpot’s API ecosystem includes:
- CRM API – Contacts, Companies, Deals, custom objects
- Marketing API – Campaigns, forms, email performance
- Sales API – Pipelines, meetings, tasks
- Service API – Tickets and support interactions
- Settings API – Account configuration and API usage monitoring
You can combine endpoints, shape the schema however you want, and load the data into SQL Server using your own logic and infrastructure. But flexibility comes with responsibility.
Best For
- Organizations with dedicated engineering teams.
- Businesses needing highly customized logic or non-standard workflows.
- Companies requiring tight control over data structures and security.
- Large environments where integration is part of a broader internal platform strategy.
Implementation Steps
- Define integration requirements: Identify the data entities (e.g., contacts, deals) that need synchronization between HubSpot and SQL Server.
- Determine the direction of data flow:
- From HubSpot to SQL Server: use HubSpot APIs to extract data and insert it into SQL Server.
- From SQL Server to HubSpot: utilize HubSpot APIs to push data from SQL Server into HubSpot.
- Set up authentication: obtain necessary credentials (e.g., API keys, OAuth tokens) from HubSpot to authenticate API requests.
- Develop data retrieval and transformation logic using programming languages or integration platforms:
- Call HubSpot APIs and fetch the required data.
- Transform the data into a format compatible with SQL Server schemas.
- Implement data loading into SQL Server: utilize SQL Server’s data import capabilities to insert or update records based on the transformed data.
- Schedule regular data synchronization: if needed, set up automated tasks or services to perform data synchronization at defined intervals.
Pros
- Full control over data extraction, transformation, and loading.
- Ability to design custom schemas tailored to business logic.
- Real-time or near-real-time sync is possible with proper architecture.
- Maximum flexibility for automation and custom triggers.
- No third-party licensing fees.
Cons
- Requires solid development expertise.
- OAuth 2.0 implementation adds authentication complexity.
- HubSpot API rate limits can cause 429 errors without careful optimization.
- Frequent API version updates require ongoing code adjustments.
- Pagination, batching, retries, and logging must be built from scratch.
- Continuous maintenance and monitoring become a long-term engineering task.
Note: There’s no subscription cost, but the developers’ hours may provide more insight. You’re responsible for:
- Authentication flows;
- Handling rate limits;
- Adapting to API changes;
- Maintaining infrastructure;
- Troubleshooting failures.
Best Practices for HubSpot & SQL Server Integration
Once systems have connected, the real work begins. A clean sync is about properly structuring, securing, and scheduling data so it won’t break under pressure.
Schema Mapping: Handling HubSpot IDs & Picklists
HubSpot objects come with internal IDs like hs_object_id, hubspot_owner_id, and various association IDs. These are critical for maintaining relationships between contacts, companies, and deals.
Best practice? Always store those internal IDs in SQL Server, even if you don’t display them in reports. They’re your anchor points for joins and incremental updates.
Picklists (dropdown fields) also need attention. HubSpot stores them as internal values, not always the user-friendly labels you see in the UI. You can either:
- Store the raw internal value and map it in your BI layer.
- Translate it during sync, so SQL Server holds readable values.
Just be consistent. Mixing raw values and labels leads to messy reporting later.
Data Security: Using the Skyvia Agent Behind a Firewall
If your SQL Server lives behind a corporate firewall, direct cloud access may not be allowed.
That’s where the Skyvia Agent comes in.
The Agent is a lightweight application installed inside your local network. It creates a secure outbound connection to Skyvia, so no inbound ports need to be opened. In other words, the database stays protected, and you still get automated sync.
This setup is especially useful for organizations with strict security policies or on-prem environments.
Scheduling: Real-Time vs. Smart Frequency
It’s tempting to set the sync to run every few minutes. And technically, with Skyvia, you can schedule jobs every N minutes depending on the plan.
But here’s the reality: just because you can run it every 5 minutes doesn’t mean you should.
HubSpot enforces API rate limits. If you combine high-frequency schedules with large datasets or full reloads, you’ll hit throttling issues sooner than you expect.
A better approach looks like this:
- Use incremental updates instead of full reloads
- Set 15–30 minute intervals for operational dashboards.
- Use hourly sync for stable production pipelines.
- Keep daily batches for non-critical reporting.
The goal isn’t maximum speed. It’s a reliable, predictable data flow that doesn’t break under load.
Conclusion
Connecting HubSpot with SQL Server breaks down silos and turns CRM activity into real business insight. Whether you’re blending marketing data with finance, building advanced dashboards, or archiving historical records, the integration layer enables it.
Yes, you can move data manually. And yes, you can build a fully custom API integration if you have the engineering resources. But both come with trade-offs — either in time, maintenance, or long-term complexity.
For most teams, a dedicated integration platform delivers the best return on investment. You get automation, scheduling, incremental updates, and monitoring without turning your data pipeline into a permanent side project.
If your goal is reliable sync without constant babysitting, automation wins.
Ready to automate your HubSpot data pipeline? Try Skyvia for free today.

FAQ for Hubspot to SQL Server

Can I synchronize data between HubSpot and SQL Server in both ways?
Yes, bidirectional synchronization is possible using custom API integrations or third-party cloud tools. ODBC-based methods primarily support read-only access, so writing back to HubSpot may require API configurations or additional integration layers.
How can I ensure data consistency during the integration?
Use incremental updates, schema mapping, and automated data validation to prevent duplicates and mismatches. Custom API integrations offer real-time syncing, while third-party tools provide pre-built data integrity checks for maintaining accuracy.
What are some common use cases for HubSpot and SQL Server integration?
Sales & marketing alignment: Sync lead and deal data for better insights.
Customer support: Centralize interactions for improved service.
Advanced reporting: Combine CRM & SQL data for in-depth analysis.
Predictive analytics: Use AI/ML models on integrated data for forecasting.
