Filling in the product details for each and every item in Shopify might take ages. Updating product characteristics and prices at once might also take days of human labor.
A great alternative to manual work is to bulk import CSV to Shopify with a list of all products and their parameters, including photos. With CSV import to Shopify, order updates and customer information actualization can be automated.
This article discusses possible ways to automate Shopify CSV import, contrasting them with the manual method. It also introduces built-in functionality in Shopify and Skyvia service for CSV bulk loading.
Table of Contents
- Introduction to Shopify CSV Import
- Different Kinds of Data Importable from CSV to Shopify
- Manually Import CSV into Shopify
- Automated CSV Import to Shopify using Skyvia
- Services Suitable for Automated Import
- Key Features of Skyvia
- Summary
Introduction to Shopify CSV Import
Due to its structure, CSV has become very common on the Internet. Two programs can exchange data by importing or exporting CSV files if they support this format.
Shopify has an in-built option for manually uploading CSV files. This method is suitable for importing products, customers, contracts, and other objects. It works best for minor updates of already existing items.
However, the manual method is ineffective when major updates or bulk additions are necessary. For instance, when switching to Shopify from Magento or another e-commerce platform, CSV data upload appears too tedious, requiring too much effort and attention. Therefore, a need to streamline the process of loading tons of data emerges.
Different Kinds of Data Importable from CSV to Shopify
A range of instances can be imported to Shopify via CSV either manually or using tools.
- Products. A detailed overview of how to import/export products is provided above.
- Inventory. The file structure for inventory is similar to that of products but contains a slightly different set of columns. See details on inventory CSV import.
- Customers. Similarly to products, there’s a CSV template file with the structure. It helps to create customer lists and then upload them into Shopify. See details here.
- Contracts. It’s possible to import contracts into the Subscription section of the Shopify online store from other apps. See details here.
The above-mentioned objects can be loaded into the Shopify store via CSV file. However, many other instances can’t be integrated in the same way.
Here comes Skyvia to import orders, customers, inventory levels, products, etc. Moreover, with mapping and transformation applied, almost any data from Shopify can be exported to other systems.
Manually Import CSV into Shopify
Shopify offers in-built functionality for manually importing CSV files within the Product section. There are two common scenarios for uploading information about products into Shopify:
- Relocating to Shopify from another e-commerce platform.
- Making updates to your current Shopify store.
Now, look at each case’s specific instructions for manual CSV file upload.
NOTE: The CSV file size mustn’t exceed 15 MB in size. Otherwise, consider Skyvia for importing large files.
- Importing Products from Another Store
NOTE: Before uploading a CSV file with product data into Shopify, check whether it corresponds to the needed format. For that, download a sample CSV file, check whether the structure of your file corresponds to that in the sample, and make adjustments if needed.
- Log into your Shopify account.
- Go to the Products section.
- Click Import in the upper-right corner of the page.
- Click Add file and select the needed CSV file with the product data from your computer.
- Select Overwrite product with matching handles to substitute details for already existing products with those from the CSV file.
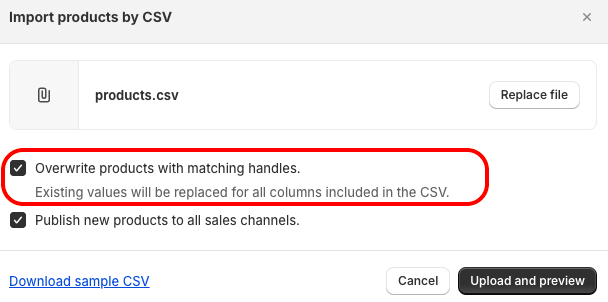
- Click Upload and review to check the import details.
- Click Import products.
Once the import process is complete, you’ll receive a confirmation email to the account associated with the Shopify online store.
- Making Bulk Product Updates
Before making mass updates to the products on Shopify, it’s necessary to export them into a CSV file first.
- Log into your Shopify account.
- Go to the Products section.
- Click Export in the upper-right corner of the page.
- Select the export options for the products to be exported.
- Select the CSV file for Excel option.
- Click Export products.
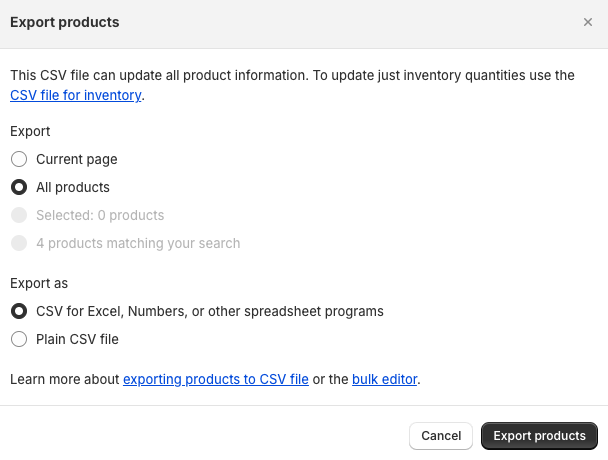
The file arrives at your email address. Download it from there, make the appropriate changes to product values using the spreadsheet program, and import the file to Shopify.
- Go to the Products section.
- Click Import in the upper-right corner of the page.
- Click Add file and select the needed CSV file with the product data from the computer.
- Select Overwrite product with matching handles.
- Click Upload and review to check the import details.
- Click Import products.
Disadvantages of Manual Method
Even though the manual method is rather transparent and simple to implement, it mightn’t be the best option for uploading multiple CSV files into Shopify. The major disadvantage is that it can’t be automated in any way – every time there comes an update to a product or new items are added, everything has to be done manually. Another drawback of the manual method is the absence of error detection when the wrong structured CSV file gets uploaded.
Automated CSV Import to Shopify using Skyvia
Specific data automation and integration tools are needed to optimize the transfer of bulk data into Shopify. Let’s have a look at how to streamline CSV import with Skyvia – a universal SaaS platform designed for multiple data-related tasks. It allows users to build conventional and complex data integration pipelines, perform bi-directional sync, load data into a data warehouse, automate CSV import, etc.
How to Import Products to Shopify
Let’s introduce a real use case for importing CSV with Products data into Shopify.
One of Skyvia’s clients has an online shop cooperating with multiple vendors supplying goods for it. Vendors regularly send product data as CSV files to the FTP server, and the website admin needs to load them to Shopify onwards. As the total number of product items exceeds 200,000, it might take ages to update everything manually every time a supplier adds new items or changes existing product characteristics.
Luckily, there’s Skyvia for CSV import into Shopify to automate everything and ensure a hands-free experience. It helps connect Shopify and FTP, set mapping, and schedule data transfer.
NOTE: Some Shopify objects, such as Products and Orders, have a compound structure since several fields include nested objects. When importing CSV files into Shopify using Skyvia, it’s necessary to map them in JSON format, which is complicated and time-consuming. So, it’s better to use a template product CSV file or download existing products from Shopify into a CSV file to use as a base for updates and adding new items. If your vendors are regularly updating their stock and sending it to you, you may also ask them to follow the CSV file structure.
To import data from CSV to Shopify, proceed as follows:
- Log into Skyvia.
- Configure the Shopify connector.
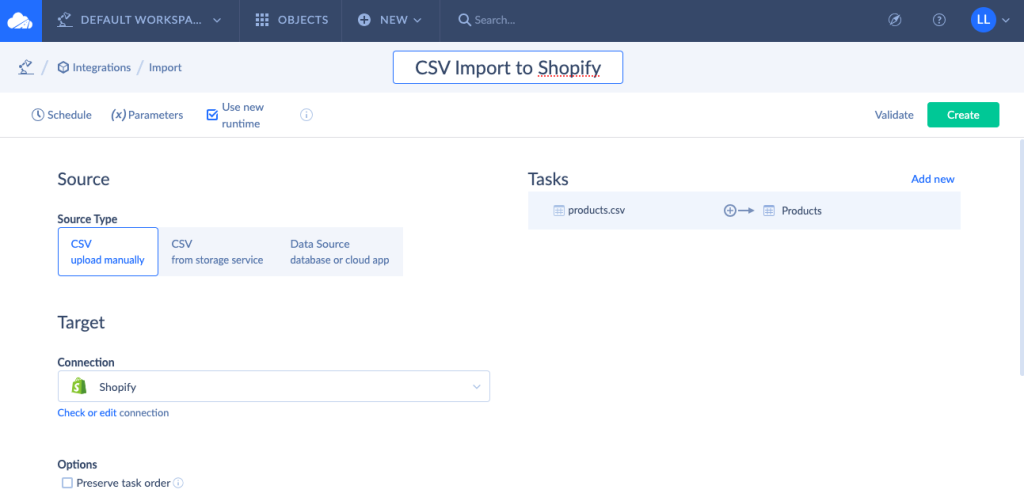
- Go to +NEW->Import in the upper menu.
- Select CSV upload manually or CSV from storage service as a source.
- Select the Shopify connector as a target.
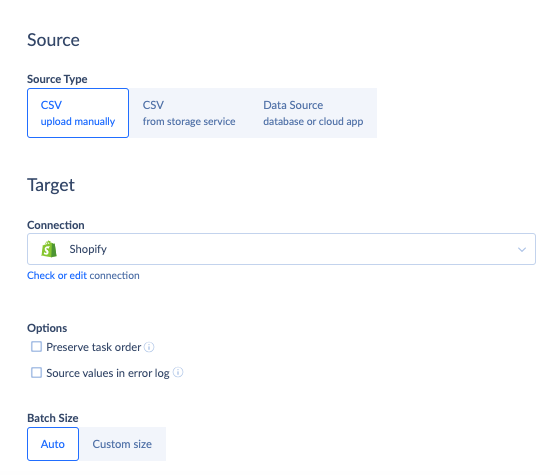
- Click Add task. Select the source CSV file and set mapping between CSV and Shopify. Save the task.
- Repeat step 6 for other CSV files, if any.
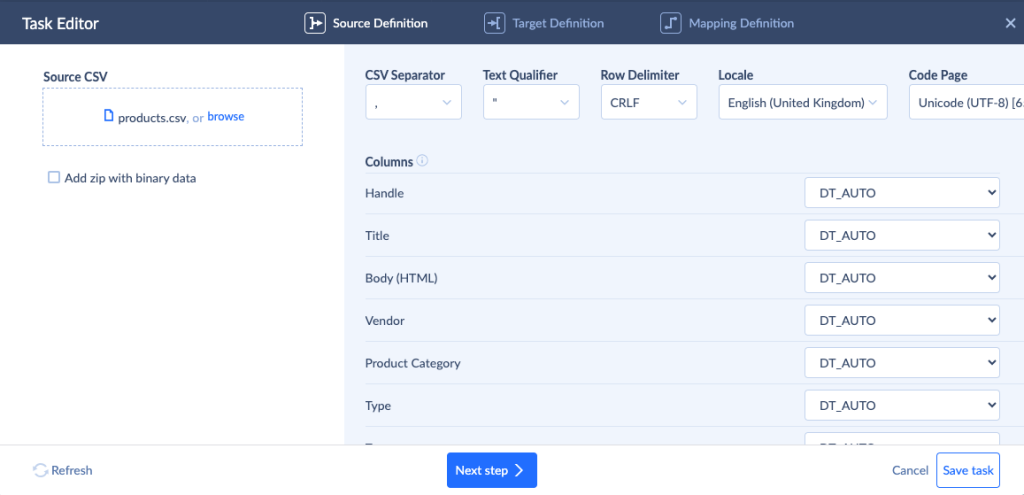
- To ensure products get updated regularly in Shopify, click Schedule and define the timing parameters for the integration.
- Click Run to start the import.
All new products and updates are already under the Products section.
If your vendors regularly update products and upload refreshed CSV files to Dropbox, Amazon S3, FTP, SFTP, or Azure File storage, Skyvia allows users to configure automatic file uploading using the file mask option.
In the Task Editor, under the Source Definition tab, click Use File Mask under CSV Mode. Specify the folder to load CSV files from, the file mask, and the timezone.
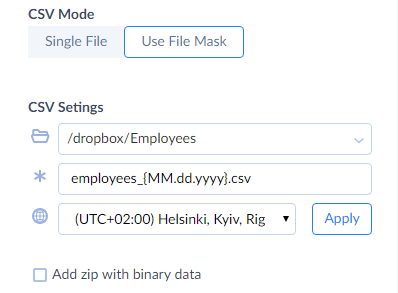
Although file masking isn’t included with a free plan, it is included with many other useful options in the paid version of Skyvia. The cost starts at $15 and depends on the number of data records operated.
How to Import Orders to Shopify
In case there are multiple channels for exposing and selling goods online, it’s worth synchronizing order information across various points of sale. The solution is to first export order data from Etsy, eBay, or other marketplaces into a CSV file and then import it into Shopify using Skyvia.
- Log into Skyvia.
- Go to +NEW->Import in the upper menu.
- Select CSV upload manually as a source.
- Select the Shopify connector as a target.
- Click Add task.
- Select the CSV file with orders and set mapping between CSV and Shopify. Save the task.
- Click Run to start the import.
Now, the orders are added to Shopify.
Services Suitable for Automated Import
As mentioned above, Skyvia allows data to be transferred from other platforms, online services, and applications to Shopify. Skyvia supports 180+ tools in various categories:
- CRM software (Salesforce, HubSpot, Dynamics 365, Zoho CRM, etc.)
- Accounting software (FreshBooks, QuickBooks, Xero, etc.)
- E-commerce platforms (Shopify, Magento, WooCommerce, etc.)
- Marketing automation tools (Mailchimp, Constant Contact, etc.)
Find the list of all supported connectors here.
Just select the integration scenario from the menu, make several clicks, and schedule the data transfer.
Key Features of Skyvia
The flagship product of Skyvia is called Data Integration. It comprises several tools, each designed for a particular integration scenario:
- Export. This platform can extract data from cloud apps into CSV files directly to computer or supported file storage systems, including FTP, SFTP, DropBox, Box, Google Drive, OneDrive, Amazon S3, and Azure File Storage.
- Import. Skyvia uses CSV files as a source for importing data to apps, data warehouses, and databases.
- Advanced Data Pipeline / Data Pipeline Designer. Skyvia offers Data Flow and Control Flow tools for more complex data integration scenarios. Data Flow can operate CSV files both for sophisticated import and export operations.
Note that advanced pipelines are available under paid Skyvia plans. Feel free to check them!
Skyvia’s Data Integration functionality also includes tools for data warehousing and data synchronization.
Advantages of Skyvia
- No-code user interface
- Only a web browser is required
- Advanced transformation and mapping
- Filtering conditions
- DML operations supported
- Compliance with security standards and regulatory requirements
- Informative documentation and tutorials
Case Studies
Skyvia imports data to Shopify from CSV files or other services, though its capabilities go far beyond the boundaries of this use case. This SaaS platform can transfer data in another direction – from Shopify to other online and offline tools.
Summary
Loading data into Shopify becomes necessary when products are added or updated or when the entire online store gets migrated from another e-commerce platform. When minor changes and updates to existing products are needed, using the manual CSV upload method within Shopify is fine. However, store migration or bulk updates certainly need a touch of automation.
Skyvia platform, designed for transferring data between different sources, could be your best helper. It automatically loads data from CSV files and matches it to Shopify fields. Moreover, it can establish the connection between Shopify and other apps or databases for the import/export of orders, contacts, products, and other objects.


