Summary
- Manual exports (CSV) work when the task is occasional, the dataset is small, and “good enough for now” is acceptable.
- SSIS with ODBC drivers makes sense in environments where SQL Server already runs the show, and there’s in-house expertise to maintain packages, mappings, and inevitable schema changes.
- Automated cloud integration with Skyvia is a natural fit when Salesforce data needs to arrive in SQL Server quietly and continuously, without scripts to guard or pipelines that break the moment something changes.
Connecting data from Salesforce to SQL Server contributes to more accurate data analysis and efficient reporting. Moving data in another direction helps companies enrich their customers’ profiles. However, SQL Server to Salesforce integration has a reputation for being a challenging task.
Salesforce APIs have limits, object schemas don’t map cleanly to SQL tables, and even small details like data types or deleted records can derail an otherwise “simple” pipeline. Keeping the data accurate and up to date over time is usually harder than the first successful run.
This guide walks through the real ways teams handle Salesforce-SQL Server integration in 2026. Just the options that work, where they shine, and where they quietly cause trouble, with enough clarity (and sanity) to help you pick the right one.
Table of Contents
- Why Integrate Salesforce with SQL Server? (Common Use Cases)
- Method 1: Manual Export via CSV (The “Free” Way)
- Method 2: SSIS & ODBC Drivers (The “IT Traditional” Way)
- Method 3: Automated Cloud Integration with Skyvia (The “Modern” Way)
- Step-by-Step Guide: How to Automate Salesforce to SQL Server
- Comparison: Manual vs. SSIS vs. Skyvia
- Conclusion
Why Integrate Salesforce with SQL Server? (Common Use Cases)
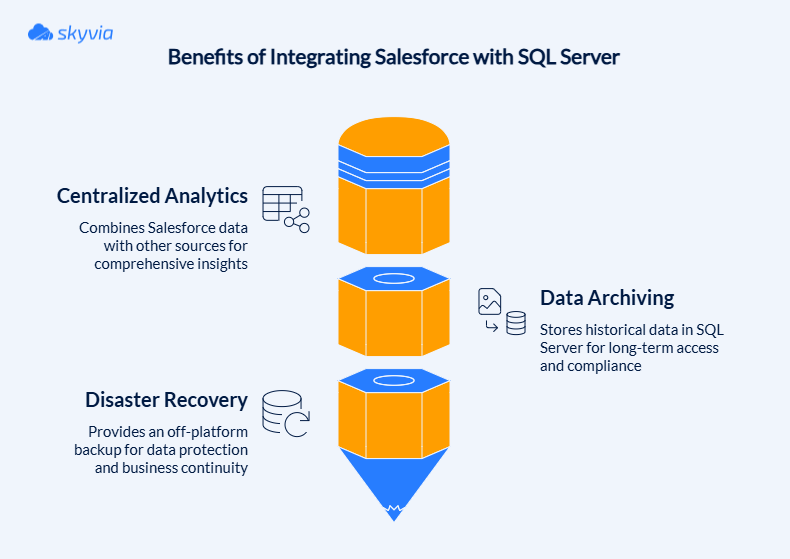
Teams rarely link the two for fun or to maintain the integrity of the architecture; rather, they do so because Salesforce by itself becomes insufficient as data ages, accumulates, or requires questioning rather than display.
The reasons usually fall into three very practical buckets.
Centralized Analytics
Sales metrics don’t mean much when they live on an island. Revenue forecasts need context. Pipeline needs history. Customer data needs to be compared to what actually happened in finance or operations.
Moving Salesforce data into SQL Server lets teams stop exporting CSVs and start asking proper questions. CRM activity can be joined with ERP data, billing records, or multi-year history, and analyzed without worrying about API limits or slowing down Salesforce users. That is where SSRS or Power BI becomes useful, not just decorative.
Data Archiving
Salesforce is optimized for what’s active, not for everything that ever happened.
Closed deals from five years ago, inactive leads, old activities – you’re not a hoarder, they do still matter, just not inside the core CRM. Pushing that data into SQL Server keeps it searchable and compliant while taking pressure off Salesforce storage and performance.
The key difference is intent. Archiving to SQL Server isn’t about “getting rid of data.” It’s about moving it somewhere that’s cheaper, calmer, and better suited for long-term questions, without losing access or control.
Disaster Recovery
Cloud platforms fail in quiet ways. Records get overwritten. Integrations push bad updates. Someone cleans up “unused” data that turns out to be critical a month later.
Replicating Salesforce data into SQL Server creates an off-platform safety net. Not a recycle bin. Not an export someone forgot to run. A real copy of your CRM data that exists outside Salesforce’s control and limits.
For many teams, this isn’t about replacing Salesforce backups – it’s about having a second source of truth that can be queried, restored, or validated when something feels off.
Method 1: Manual Export via CSV (The “Free” Way)
SQL Server has a whole ecosystem of native and third-party tools for importing data from other sources. Let’s start by exploring SQL Server Import and Export Wizards, standard tools for data movement.
SQL Server Import Wizard can extract data from different data sources:
- SQL Server databases
- Oracle
- Flat files like CSV
- PostgreSQL
- MySQL
- Azure Blob Storage.
Importing data directly from Salesforce requires a third-party ADO.NET provider or an ODBC driver. However, there’s a workaround involving a CSV file containing Salesforce data.
There are several Salesforce tools for exporting Salesforce data to CSV files, both in the cloud, like Skyvia Data Loader or Dataloader.io, and locally installed, like the Salesforce Data Loader tool.
Step-by-Step Guide
We’ll explore the data import case using the Data Loader tool.
- In your Salesforce account, go to Setup.
- Under Platform Tools, click Data Management and select Data Loader.
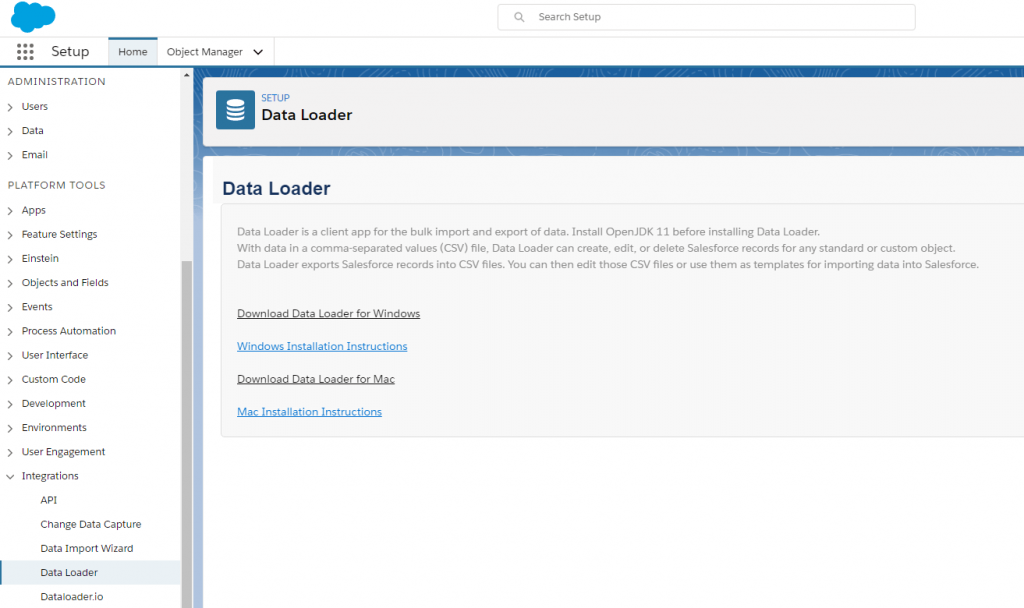
- Download and install an appropriate version of Data Loader.
- In your Salesforce account, select the necessary data objects to be exported into a CSV file.
- Use the SQL Server Import Wizard to upload Salesforce data into SQL Server tables.
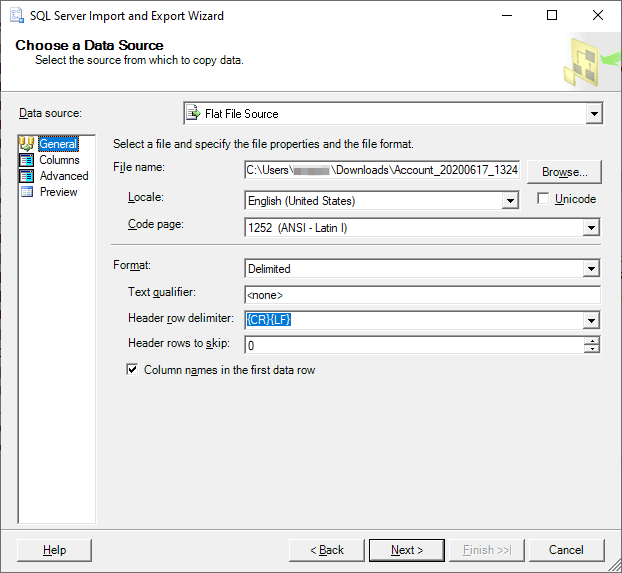
Note: This integration method is unidirectional.
Pros
- Built-in tool, no need for extra downloads and installations.
- Easy to use with Microsoft-typical interfaces.
- Compatible with other SQL databases and flat files.
Cons
- No direct connection to Salesforce.
- No way to compare lost or modified data.
- Data export limitations on data restoration, deduplication, etc.
Method 2: SSIS & ODBC Drivers (The “IT Traditional” Way)
This setup relies on ODBC drivers or SSIS connectors to translate Salesforce’s APIs into something SQL Server can consume. Once everything is wired together, data can be pulled on a schedule, reshaped inside SSIS, and stored locally for reporting or downstream systems. On paper, it’s powerful. In practice, it becomes a small system of its own that needs to be watched.
It’s also very much an “inside the server room” solution. Nothing happens automatically unless someone explicitly designs it that way. Every transformation, every field mapping, every retry logic is something you decide, build, and later remember how it works.
That’s where the trade-offs start to matter.
Pros
- You can control the flow, transformation, and arrival of data in SQL Server using SSIS.
- If SSIS packages, SQL Server Agent jobs, and Visual Studio projects are already part of daily operations, this approach doesn’t introduce a new mental model. It just extends what’s already there.
Cons
- If it’s your first rodeo, building and maintaining SSIS packages will be challenging, as they require solid SQL, scripting, and integration experience.
- Salesforce API changes, authentication updates, or connector upgrades can quietly break packages that used to work fine.
- SSIS mappings don’t adapt when a Salesforce admin adds or modifies a custom field.
- Connecting cloud-based Salesforce to on-prem SQL Server often requires firewall rules, VPNs, certificates, and security reviews, which slow everything down.
- Monitoring failures, handling retries, and debugging broken packages becomes a recurring task.
Method 3: Automated Cloud Integration with Skyvia (The “Modern” Way)
By the time teams reach this method, they usually have the same realization: the problem isn’t Salesforce or SQL Server. It’s everything in between.
Skyvia approaches Salesforce-SQL Server integration from a different angle – remove the infrastructure friction entirely and focus on outcomes: reliable data, predictable syncs, and minimal maintenance.
It offers several products (ways) to integrate Salesforce and SQL Server data:
- Data Integration product for building ETL and ELT pipelines.
- Skyvia Connect (Web API Server), which works in conjunction with the Salesforce Connect through the OData protocol.
These methods don’t require any coding skills and can be easily implemented by businesses of different sizes, including SMBs and large Enterprises from Fortune 500.
Scenario A: Bulk Data Replication (ELT)

That is the most common starting point: you want Salesforce data in SQL Server for analytics, reporting, or downstream systems.
Skyvia Replication handles this by treating Salesforce as the source of truth and SQL Server as the analytical destination. The moment you select Salesforce objects to replicate, Skyvia inspects their structure and automatically builds the required SQL tables. Columns, data types, relationships – all created for you. No CREATE TABLE scripts. No guessing how Salesforce fields should map.
Once the initial load is complete, Skyvia switches to incremental updates. Instead of reloading entire tables, it tracks changes in Salesforce and applies only the new or modified records. That keeps syncs fast, predictable, and gentle on API limits, even as data volumes grow.
This approach works especially well when SQL Server feeds BI tools, warehouses, or long-term historical storage, without constantly revisiting schema definitions as Salesforce evolves.
Scenario B: Real-Time Data Access (OData)

Sometimes, copying data is the wrong move, or simply too much to bother with.
If the goal is simply to see SQL Server data inside Salesforce, for example, reference records, operational data, or external metrics, Skyvia Connect offers a cleaner alternative.
It turns SQL Server into a secure OData endpoint that Salesforce can consume through Salesforce Connect. From Salesforce’s perspective, the data behaves like native objects. From your perspective, the data stays exactly where it is.
There’s no replication, no storage duplication, and no database ports exposed to the internet. Skyvia acts as a secure proxy, handling authentication, access control, and traffic management. You get live visibility into SQL Server data inside Salesforce, without turning reporting into a data migration problem.
Step-by-Step Guide: How to Automate Salesforce to SQL Server
That is where the contrast with traditional approaches becomes obvious.
Setting up an SSIS package can take days. Setting up Skyvia usually takes minutes. See for yourself.
Step 1: Prepare your Connections
- Click + Create New in the top menu and select Connection in the menu on the left.

- Choose SQL Server from the available Connectors.
- Select SQL Server Connection Mode (Direct, Agent, or Agent with Alias) and specify other required parameters according to the selected mode.
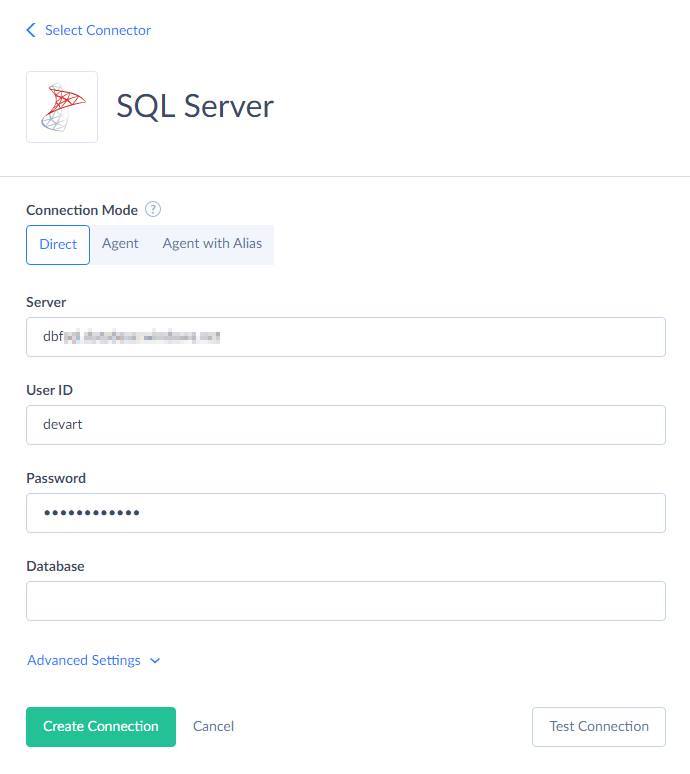
- Create a new Salesforce connection in Skyvia using the same pattern.
Step 2: Create an import to migrate data
- In the top menu, click +Create New and select Import in the Integration column.

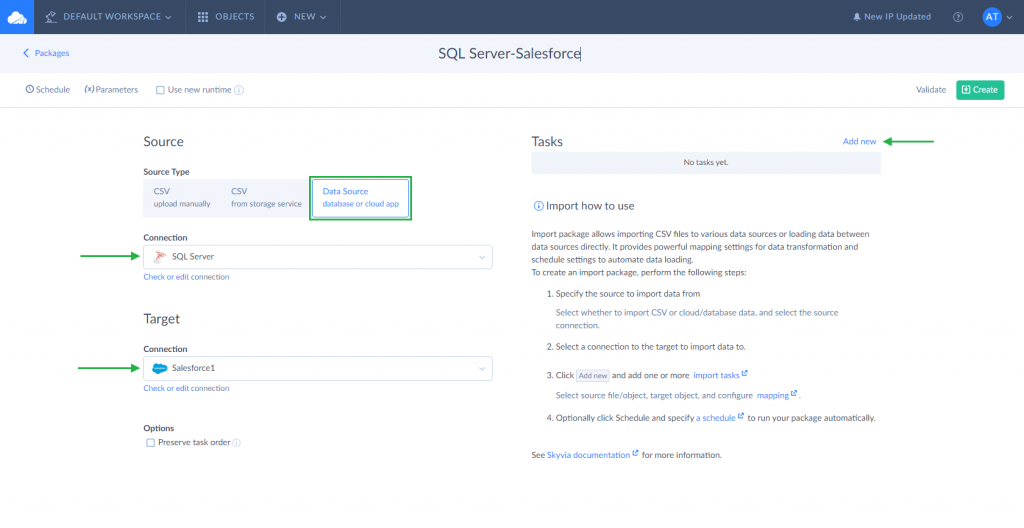
- In the opened editor, select Database or cloud app source type. In the Connection drop-down list, select SQL Server as a source and Salesforce as a target.
- Create a new integration task by clicking Add new.
Note: A task is a unit of an ETL process (data extraction, transformation, and loading). When creating an import, we need to add a task for each SQL Server table.
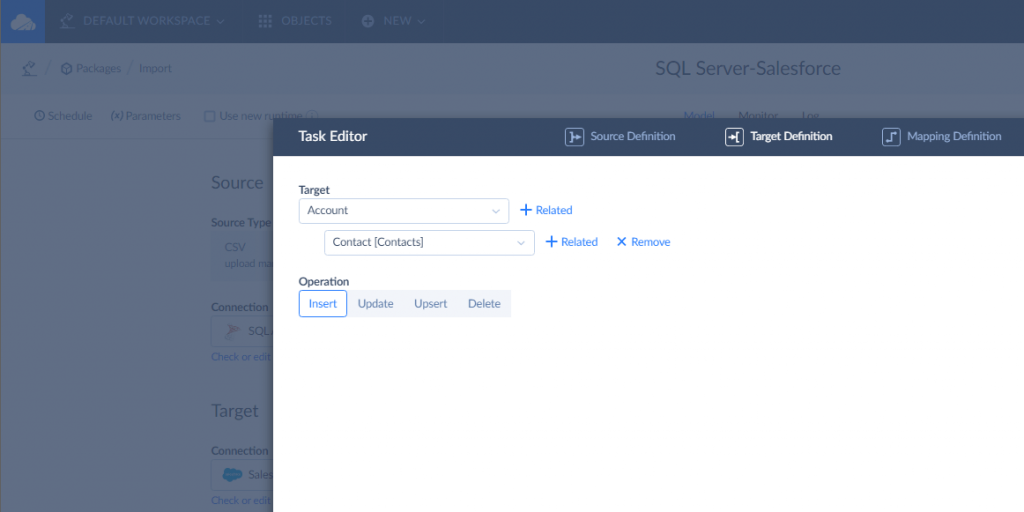
- In the task editor, select data from SQL Server tables, set filters (if needed), and select the DML operation (Skyvia supports not only INSERT for data import but also UPSERT, UPDATE, and DELETE).
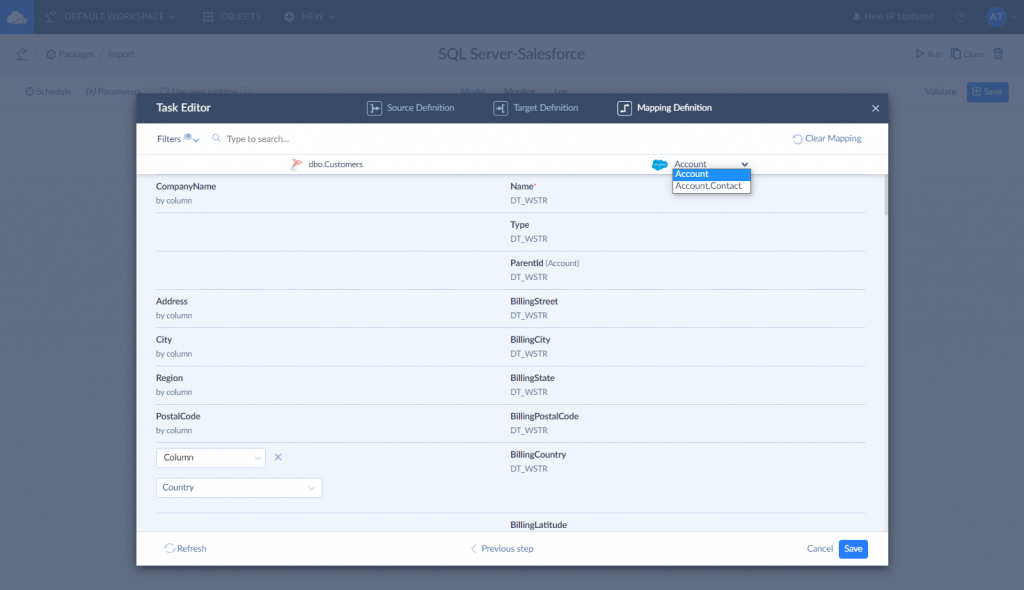
- Configure mapping settings. Skyvia offers numerous mapping types, including Column, Expression, Lookup (Source and Target Lookup), Constant, Relation, External ID, and many others.
- Save the task.
- Finally, click Run to start execution.
Step 3: Schedule recurring data updates
Skyvia lets you schedule the import to run automatically. That might be useful for configuring data loading operations to run periodically or delaying an operation to a later time.
If automated data transfer is needed, click Schedule and set the time preferences for the import task run.
Step 4: Run integration and check the import rules
Click Run to start the integration. You can check the results of the import integration by downloading an Excel file that is available in the Monitor tab.
Comparison: Manual vs. SSIS vs. Skyvia
| Feature | Manual CSV Export | SSIS & ODBC Drivers | Skyvia (Automated Cloud Integration) |
|---|---|---|---|
| Skill Level | Non-technical, manual work | High – DBA/ETL developer | Low to medium – analyst or admin |
| Setup Time | Minutes per export | Days to weeks | Minutes |
| Maintenance | Constant manual effort | Ongoing package and script upkeep | Fully managed, minimal |
| Schema Changes | Manual rework required | Breaks pipelines until fixed | Handled automatically |
| Incremental Sync | Not supported | Custom logic required | Built-in |
Conclusion
By now, it’s clear there isn’t a single “right” way to connect Salesforce and SQL Server. Each approach exists for a reason.
- Manual exports and CSVs are fine when the job is small, time-boxed, and nobody plans to ask “can we automate this?” next month.
- SSIS and ODBC pipelines earn their place in environments that already run on SQL Server muscle memory, where control and customization matter more than speed of setup.
- Skyvia starts to make sense once integrations stop being experiments and turn into something the business quietly relies on, day after day, even as schemas and volumes change.
If you’re at the point where data should move on its own and stay out of the way, Skyvia is an easy place to start. It takes minutes to set up, and you’ll know very quickly whether it’s the right fit for how your team actually works.
FAQ for Salesforce to SQL Server
How do I securely connect a cloud-based Salesforce instance to an on-premises SQL Server?
Typically, through an agent or outbound connection from SQL Server, not by opening inbound ports. This avoids exposing SQL Server to the internet and keeps credentials off the firewall.
Does Salesforce to SQL Server integration consume my Salesforce API limits?
Yes, any integration uses APIs. The difference is efficiency: incremental syncs consume far fewer calls than full reloads or chatty SSIS packages.
Can I synchronize data bi-directionally between Salesforce and SQL Server?
Yes, but only with tools designed for it. CSV and replication are one-way. ETL platforms like Skyvia support controlled two-way sync with conflict handling.
How do I handle “hard deletes” when syncing Salesforce to SQL Server?
Basic exports miss them entirely. More advanced integrations track deletions separately and apply deletes or flags in SQL Server to keep data consistent.


