

In today’s fast-paced, customer-oriented digital world, users expect a seamless payment experience. A secure and convenient payment solution integrated into a vendor’s platform is a sure way for businesses to earn customer trust and build brand loyalty. That’s where payment integrations come in.
Salesforce, a flagship business platform, and Stripe, a top payment provider, make a perfect duo when it comes to visibility into transactions and customer behavior. Is your payment process aligned with the customer journey? If not, this might be the right time to rethink your approaches for enhanced user experience. Read on to discover how to integrate Stripe to Salesforce and the benefits it can bring.
Table of contents
- What is Stripe?
- What is Salesforce?
- Why Integrate Salesforce with Stripe?
- Salesforce Stripe Integration Methods
- Method 1: Using the Stripe Connector for Salesforce
- Method 2: Custom Integration using Apex and JavaScript
- Method 3: Third-Party Integration Tools
- Best Practices for Salesforce Stripe Integration
- Common Challenges & Troubleshooting Tips
- Conclusion
What is Stripe?
Stripe is a leading payment processing platform designed to help businesses accept payments online quickly and securely. Its feature-rich functionality, fraud prevention mechanisms, and native integration options make it the #1 choice for many businesses, particularly in the e-commerce domain. Stripe is distinguished by high transaction processing speed and security due to its easy-to-use suite of payment APIs. From a business perspective, it’s a very convenient tool for embedding payments into websites and online stores.

Key Features
- Pre-built integrations and libraries for every tech stack, from React and PHP to .NET and iOS.
- Supports 135+ currencies and a wide range of payment methods, and works with various banks globally.
- Comprehensive security features include tokenization, encryption, and built-in compliance with the Payment Card Industry (PCI) data security standards.
- ML-based fraud protection with Stripe Radar that detects and blocks fraudulent transactions.
Common Use Cases for Stripe
- Marketplaces and e-commerce websites
- Subscription-based services
- CRM platforms
What is Salesforce?
Salesforce, also known as SFDC, is the world’s leading CRM platform and is trusted by thousands of brands. For five subsequent years, it has been gaining the top 3 Forbes ranking as the most innovative company. Salesforce provides companies with a SaaS product that covers all stages and moments of the customer lifecycle. One of its many remarkable features is flexibility: Salesforce allows customization of virtually everything on the platform, from front-end interfaces to database models.
Like Stripe, it supports a wide range of integrations via AppExchange, APIs, and custom development.
Key Features
- Unified view of every customer by consolidating all related data – contact details, communication history, purchase behavior, service issues, and preferences – within a single pane of glass.
- Automation of all steps of the sales process, from lead capture to deal closure.
- Automation of marketing tasks, including email nurturing, segmentation, A/B testing, behavior tracking, and campaign performance analytics.
- Synchronization of calendars, contacts, and schedules with popular email platforms like Microsoft Outlook and Gmail.
- Built-in analytics and reporting tools for visualizing key metrics, tracking KPIs, and monitoring team or campaign performance in real time.
Common Use Cases for Sales
- Sales process management
- Customer relationship management
- Marketing automation
- Customer service and support
- Analytics and reporting
- Partner relationship management
- Subscription and billing management (when integrated with billing platforms like Stripe)
- Field service management
Why Integrate Salesforce with Stripe?
Data visibility is always an advantage, especially when it comes to finance and sales. Integrating CRM with accounting applications allows you to constantly collect sales data and track statistics in real time, enabling better decision-making. Moreover, it can help enrich a customer profile for more personalized future interactions and cross-selling opportunities. But that’s not all. Here are some of the key benefits of integrating Salesforce with Stripe:
- Customer data synchronization. Create a 360° customer overview — a single, integrated environment for sales, marketing, and finance teams to work together. Access unified customer data on both platforms. Business users receive information about clients faster, meaning they can resolve issues more quickly, bypassing the accounting link.
- Streamlined payment processing. Free your sales and support teams from the necessity of manual payment handling and data re-entry. Integrating the Stripe payment gateway with Salesforce makes it possible to initiate and monitor payments directly from within the SFDC platform.
- Improved sales and financial data accuracy. Stripe-Salesforce real-time sync of payment data makes spreadsheets and manual reconciliations a thing of the past. Build your financial reports, forecasts, and sales performance metrics on up-to-date, accurate data only. Minimize the risk of errors and ensure complete, timely data, always.
- Automated billing and Salesforce subscription management. Handle recurring payments and subscriptions more efficiently. The Salesforce Stripe integration lets you embed Stripe’s advanced billing features into Salesforce workflows, automating the entire billing lifecycle.
- Enhanced customer experience. Convenient and frictionless payments are a major driver of customer satisfaction. By integrating Stripe with Salesforce, businesses facilitate their customers’ checkout experience, making it faster and available in their preferred payment method.

Salesforce Stripe Integration Methods
The three methods explored below are the most practical and widely used ways to connect Stripe with Salesforce: they are well documented and cover a full spectrum of technical skill levels. Although there could be a few variations, most of them fall under these main categories:
- Native Stripe connector for Salesforce
- Custom API integration using Apex + JavaScript
- Third-party tools
Here’s a quick comparison of the methods, with full details following in the next sections.
| Criteria | Native Stripe Connector | API Integration | Third-party Tools |
|---|---|---|---|
| Key differences | Built and maintained by Stripe, tightly integrated with the Salesforce Platform | Full-code, developer-driven integration; max flexibility | Low-code, drag-and-drop automation; connects multiple apps |
| Ease of implementation | Admin-friendly; guided setup | Requires Salesforce + API dev skills | No-code, but the setup varies by tool |
| Cost | Free but requires Salesforce licenses | Depends on internal dev resources; no license cost, but higher dev effort | Varies: freemium to enterprise pricing |
| Best for | Businesses needing fast, secure access to Stripe data inside Salesforce | Companies with complex workflows or custom logic requirements | Small/medium teams needing quick automation without dev effort |
| Customizability | Moderate | High | Low to moderate, depends on the tool |
Method 1: Using the Stripe Connector for Salesforce
This method is ideal for standard use cases. It enables native integration with Salesforce through Stripe’s in-house developed connectors. The solutions are available at the AppExchange, the Salesforce store of pre-built and customizable apps.
- Stripe Connector for Salesforce Billing (deprecated): originally designed to integrate with Salesforce’s Billing and CPQ modules. Focused on supporting subscription-based billing workflows.
- Stripe Connector for Salesforce Platform (recommended): a more modern, general-purpose connector that works with Salesforce CRM, core, and platform products. Built to support broader use cases, including e-commerce, customer management, and custom apps.
Best for
- Customer payment visibility for sales teams.
- Automated workflows based on payment events.
- Non-subscription-based businesses.
Pros
- Native integration: built by Stripe specifically for Salesforce.
- Secure & compliant: OAuth-based authentication and secure API key usage maintain data integrity and protect sensitive customer/payment info.
- Webhook support: enables real-time updates from Stripe.
- Quick setup with a no-code wizard: friendly for admins and business users.
Cons
- One-way sync by default: the connector primarily pushes Stripe events into Salesforce but doesn’t sync Salesforce data back to Stripe without custom development or middleware.
- Lack of out-of-the-box automation: while the webhook sync is real-time, there’s limited logic to act on the data unless you build Flows, Apex triggers, or custom automation.
- Minimal reporting/analytics: Stripe data in Salesforce is not deeply visualized – reporting may require linking to Salesforce Analytics/Tableau CRM.
Step-by-step Guide
Step 1. Install the Stripe connector
- Navigate to the Stripe connector installation guide to get the installation link.
- Enter the Salesforce organization where you plan to install the connector. After logging in, you’ll be directed to the installation page.
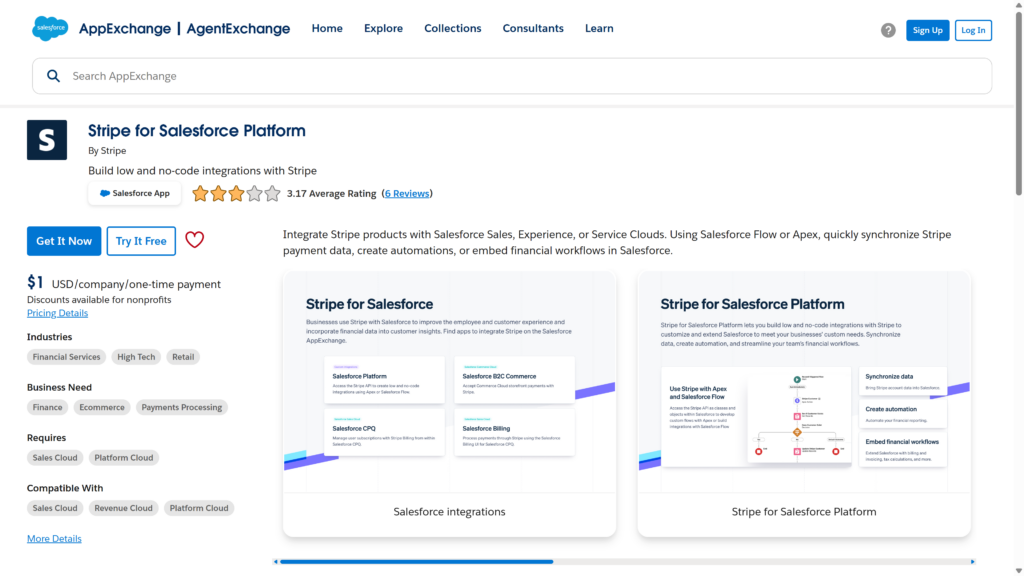
- Choose Stripe for Salesforce Platform and click Get It Now.
- Follow the prompts to install the app.
- Choose Install for Admins Only (recommended by Stripe for better control of user access and permissions).
- Approve third-party access in the dedicated modal to enable data exchange between Salesforce and Stripe.
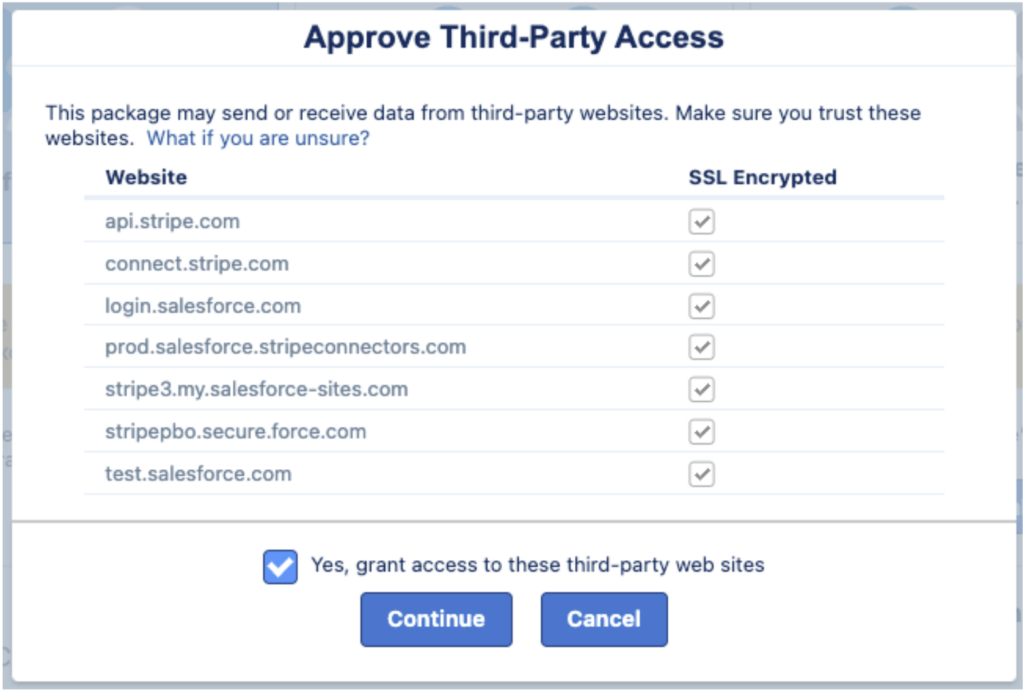
- Click Continue to complete the package installation.
Step 2. Configure the permission set
Assign a permission set
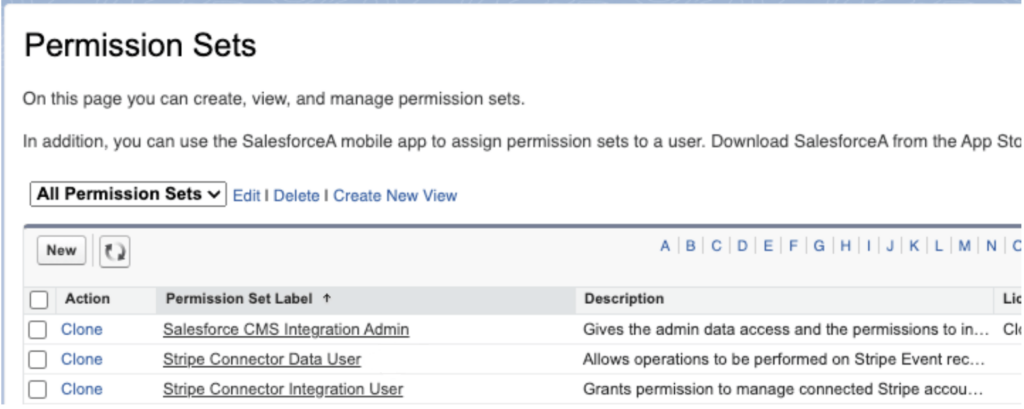
The package incorporates two permission sets that enable access to specific application features:
- Stripe Connector Integration User: for users managing setup configurations and event subscriptions.
- Stripe Connector Data User: grants access to Stripe_Event__c object records.
- Navigate to Setup → Users → Permission Sets.
- Assign the permission set based on user activity:
- Stripe Connector Integration User: for setup/admin tasks.
- Stripe Connector Data User: for general data access.
Note: Permission set assignments may vary.
- Integration User: requires cloning the permission set and manually enabling certain system-level privileges, as Stripe system permissions cannot be packaged due to limitations in Salesforce AppExchange apps. Follow the guidance in the official documentation for detailed steps.
- Data User: choose Stripe Connector Data User on the Permission Sets page. Click Manage Assignments → Add Assignments. Assign the permission set to the required users.
Step 3. Launch the initial setup wizard
- In App Launcher, search for and open Stripe for Salesforce Platform.
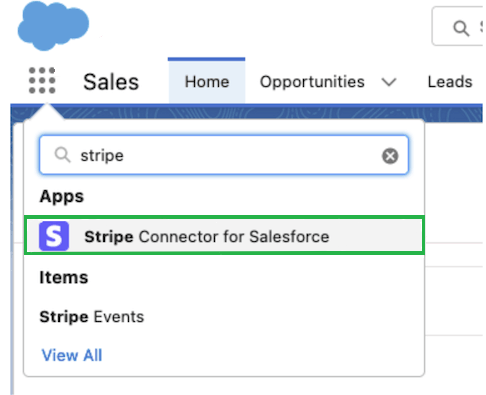
- Click Get Started and complete the steps outlined in the setup prompt:
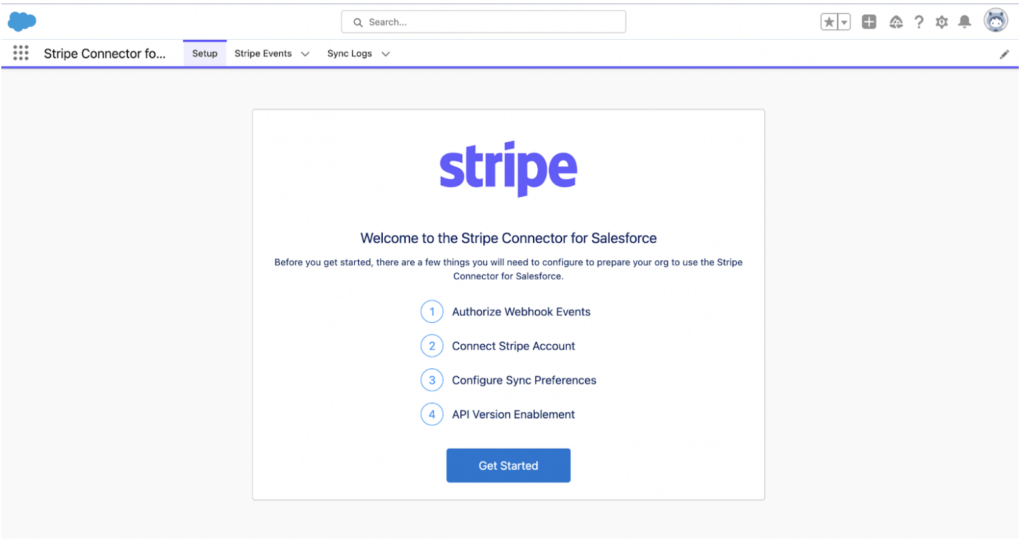
- Authorize webhook events. In the new window click Allow to grant your org necessary permissions.
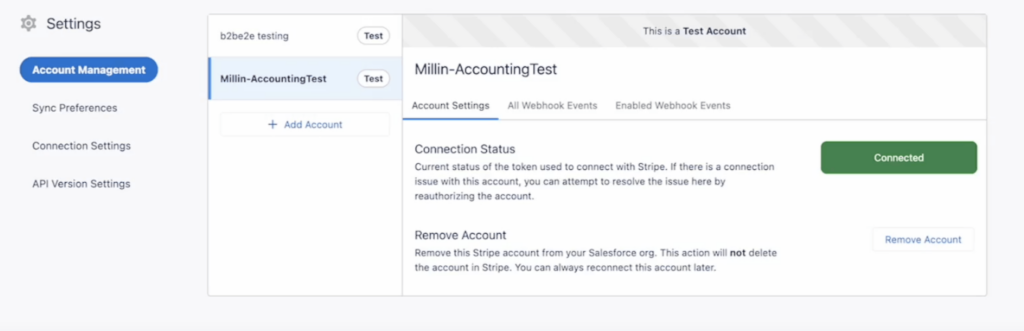
- Enter your Stripe API key. Click Add Account.
- Choose a Stripe API version (usually the latest) from the drop-down list.
- Click Install Package and finish the setup wizard.
Step 4. Use metadata for Salesforce and Stripe record linking
Stripe’s application offers to add the necessary client data to the metadata field. If you add a Salesforce account ID as metadata for each Stripe customer, you can see payments related to a specific Salesforce customer. However, this step is not automated – you must manually enter the correct payment data into the CRM.
Step 5. Configure webhooks
- In App Launcher, open Stripe for Salesforce Platform.
- Select your connected Stripe account.
- Click All Webhook Events.
- Choose a Stripe Object and toggle on the events you want Salesforce to track.
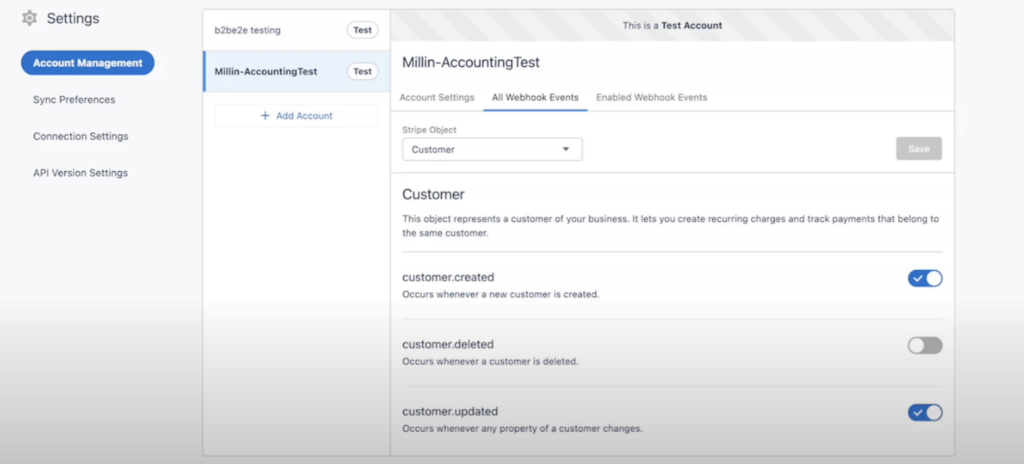
5. Save your settings.
Step 6. Testing the integration
Simulate Stripe events in test mode
- In the Stripe dashboard, switch to test mode.
- Use Stripe’s test card numbers to simulate transactions.
- Trigger events such as:
- payment_intent.succeeded
- invoice.paid
- charge.refunded
Verify in Salesforce
- Go to Stripe Event Logs or the Stripe Object Records in Salesforce.
- Check that the appropriate records have been created and linked to the correct Salesforce Accounts or Opportunities.
Method 2: Custom Integration using Apex and JavaScript
This method involves using Apex, Salesforce’s proprietary programming language, and JavaScript, often within Lightning Web Components (LWC), a UI development framework on the SFDC platform. It offers the highest level of customization and is often preferred over low-code tools when it comes to complex, non-trivial tasks.
Using code allows you to programmatically define the logic behind multi-layered scenarios, such as dynamic checkout flows based on user roles or regions, payment-triggered workflow automation, multi-step transactions with validation, partial payments, and more.
Best for
- Specialized workflows that cannot be addressed by standard integration tools.
- Complex data handling scenarios.
Pros
- Unique implementation: supports custom solutions that precisely fit business requirements.
- Full control: enables precise control over integration, including security & performance.
- Scalability: adjusts to accommodate growing business needs.
Cons
- Development effort: requires technical expertise and resources to build and maintain custom Salesforce integrations.
- Longer implementation timeline: the method involves building the logic from scratch, including defining business requirements, writing, testing, and deploying custom code, authentication & security setup, etc.
- Maintenance overhead: requires constant upkeep to accommodate API changes.
Step-by-step Guide
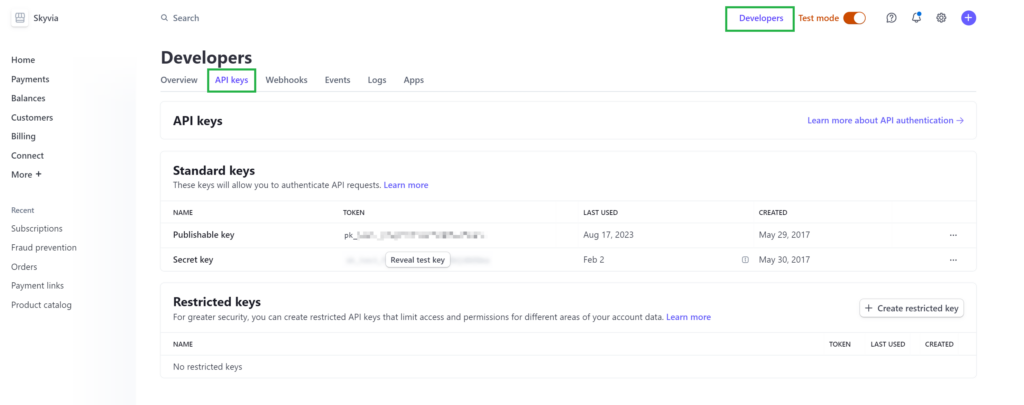
Step 1. Set up Stripe API keys
- Log in to Stripe.
- In your Stripe account, navigate to Developers → API keys.
- Retrieve the publishable key and secret key.
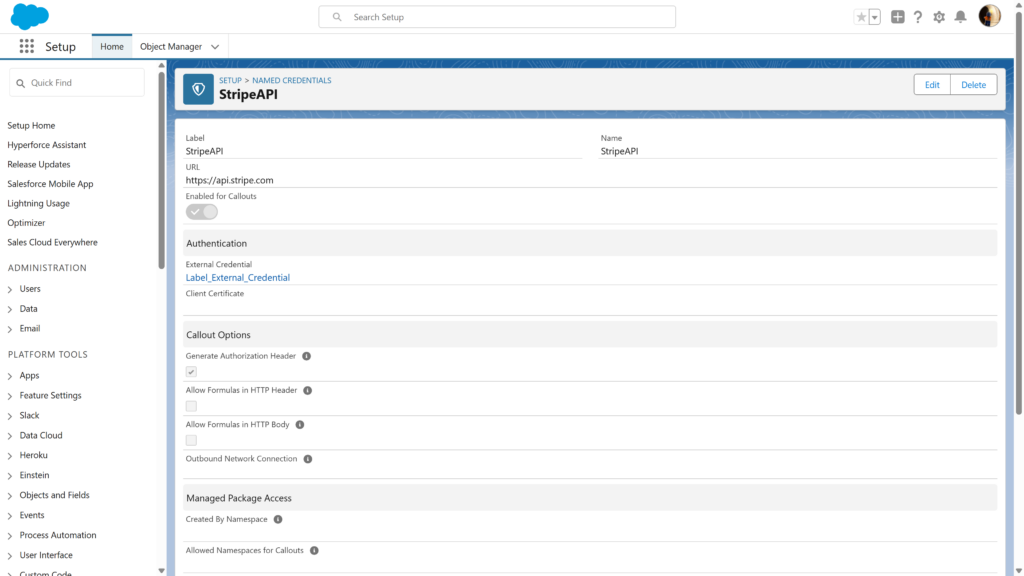
Step 2. Set up Salesforce named credentials
In Salesforce, named credentials serve to provide a secure way to call out to external APIs. The credentials specify the endpoint URL and the required authentication parameters (username, password, OAuth, etc.) in one definition.
- In Salesforce Setup, enter Named Credentials in the search box and click on it.
- Select New to create a new credential.
- Specify the required parameters:
- Label: StripeAPI
- Name: StripeAPI
- URL: https://api.stripe.com
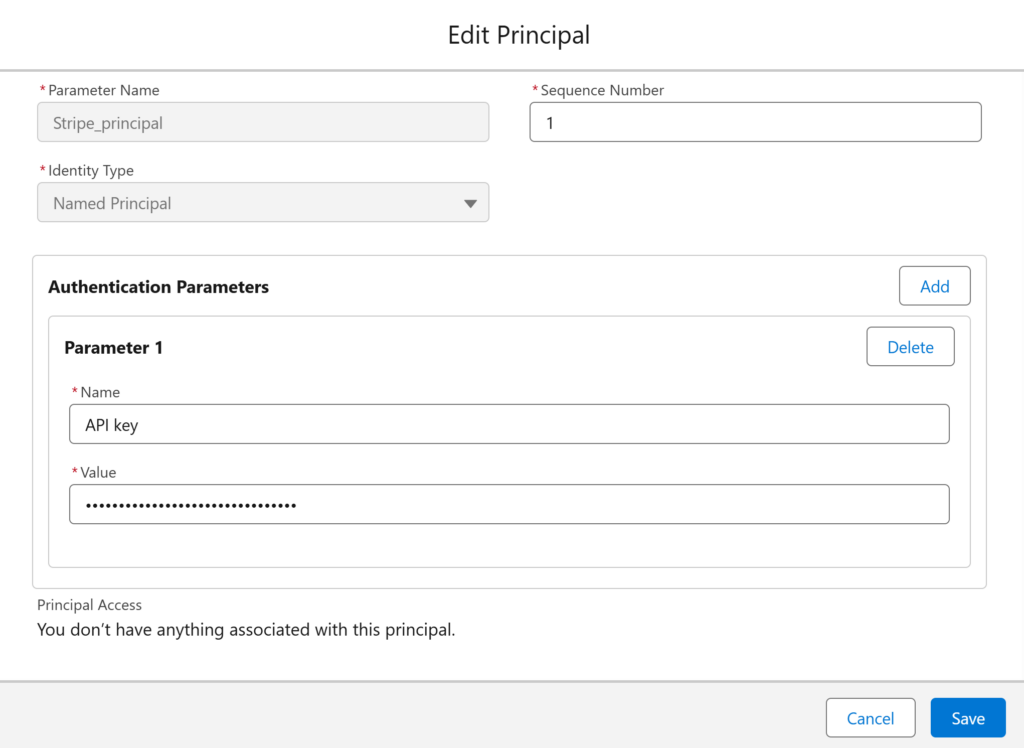
Note: Before creating a named credential, you must first create and configure an external credential to link it to. The external credential defines how Salesforce authenticates to an external system. You’ll also need to create a principal record within the external credential – this acts as the “login identity” Salesforce uses to communicate with Stripe. This is the step where you enter the API keys retrieved from your Stripe account.
Overall, the process looks like this:
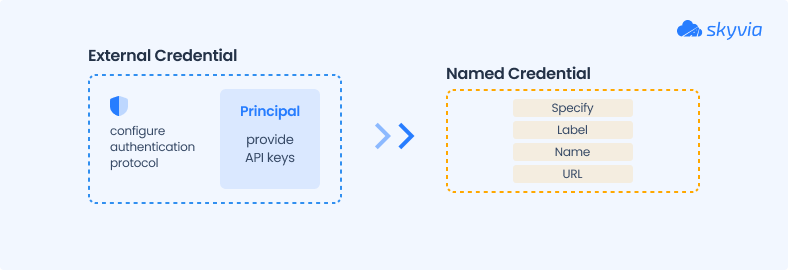
Once your principal is saved and tied to the external credential, your named credential (StripeAPI) will inherit that authentication setup.
Step 3. Develop Apex classes for making API requests
This step involves specifying custom logic that you write in Apex on the server-side.
- In Salesforce Setup, navigate to Developer Console.
- Click File → New → Apex Class.
- Name the apex class.
- Add the Apex class code.
Note: For more details and code examples, visit the official documentation.
Step 4. Configure frontend interactions using JavaScript or LWC
This step is about integrating Stripe’s payment elements within Salesforce. It involves initializing Stripe inside your LWC’s JavaScript file.
- Use the loadScript function to include Stripe’s JavaScript library in your LWC.
- Configure the Stripe component with your publishable API key.
- Inside your component’s HTML and JS, set up Stripe’s payment elements.
- Implement functions to manage payment submissions and handle responses from Stripe.
Step 5. Configure webhooks and event handling
Webhooks allow Stripe to send real-time event notifications to Salesforce:
- Create a public site in Salesforce: set up a Salesforce site to expose an endpoint for receiving Stripe webhooks.
- Develop an Apex REST class: create an Apex class annotated with @RestResource to handle incoming webhook events.
- Register the webhook in Stripe:
- In your Stripe dashboard, go to Developers → Webhooks.
- Add endpoint: enter the Salesforce Site URL and select the events you want to listen for (e.g., payment_intent.succeeded).
Step 6. Test and deploy
Thoroughly test the integration before deployment.
- Using Stripe’s test mode, simulate transactions without processing real payments.
- Validate success and failure cases, ensuring proper error handling and data synchronization.
- Review Salesforce debug logs and Stripe’s logs to identify and resolve issues.
Method 3: Third-Party Integration Tools
This method enables fast, no-code integrations by utilizing cloud platforms such as Skyvia, Zapier, Workato, Tray.io, MuleSoft, and others. While their capabilities vary in complexity and how they handle data volumes, these tools share more similarities than differences:
- Most of these platforms offer drag-and-drop or visual workflows to connect applications.
- They all provide pre-built connectors or templates for common systems, including Stripe and Salesforce.
- They automate repetitive tasks using conditional logic, triggers, and actions.
- Support for real-time data flows or batch syncing, depending on the platform and your plan.
Best for
- Teams without technical resources looking for fast and easy integrations.
- Marketing and sales teams automating lead-to-payment workflows.
- Businesses needing multi-app workflows, e.g., Salesforce → Stripe → Slack or Gmail.
Pros
- No/low-code setup: allows for building integrations through visual interfaces without writing code.
- Quick deployment: pre-built connectors and templates make it fast to get up and running.
- Workflow automation: customize workflows to trigger actions like invoice creation, status updates, or syncing customer data.
- Multi-app connectivity: can connect not just Stripe and Salesforce, but also other platforms in the same flow.
Cons
- Limited customization for complex use cases: low-code tools may hit limits when you need deeply customized logic or heavy API manipulation.
- Cost can scale quickly: as pricing often depends on task volume or workflow complexity, it can get expensive for high-usage or enterprise-grade setups.
In the sections below, we’ll demonstrate the ease and efficiency of this integration method using Skyvia. We’ll walk through two practical scenarios for connecting Stripe and Salesforce, both being common customer use cases:
- Automate the customer data upload from the payment gateway to the CRM system (as a periodic update).
- Upload pending payment information from Stripe PaymentIntents to Salesforce Opportunities.
Since Skyvia is a highly flexible platform with a wide range of capabilities, there are several ways to set up periodic data updates, such as data import or synchronization.
In this guide, we’ll focus on the most advanced option – the Data Flow.
Scenario 1: Automate Customer Data Upload from Payment Gateway to CRM
This integration facilitates data visibility between different departments, such as sales and accounting. Regular syncs of a financial application and CRM ensure the relevance of data, allowing businesses to maintain a database of customers who have interacted with their companies in the past.
Things to Consider Before You Start
Before we proceed with the implementation, it’s important to understand how data is structured and stored in Stripe and Salesforce, as this impacts your integration setup. Stripe stores customer-related information in the Customers object, including data about those who made a payment or are still in the payment process. The Customers table also doesn’t have a field that records the last modification date – the limitation that complicates incremental data syncing.
At the same time, Salesforce offers several candidate objects that could receive incoming Stripe data:
- Leads: best fit in terms of data filling and adequacy.
- Contacts: the most populated and commonly used object for business representatives; suitable if your Stripe records represent real individuals you plan to engage.
- Customers: least fit for two reasons. In Stripe, the Customers table contains data of those users who haven’t yet made a purchase, so in fact, they aren’t yet customers. Also, the Salesforce Customers object may lack the necessary fields to store Stripe data effectively.
So, for this integration, we’ll synchronize Stripe’s object, Customers, with Salesforce’s Lead object.
Step-by-step Guide
Step 1. Sign up and configure your Skyvia account
Sign in to the platform with your Skyvia account. If you don’t have one yet, you can create it for free. After signing in, you are provided with a default workspace – a one-stop-shop for all operations on the Skyvia platform.
In the next step, we’ll establish connections to both Stripe and Salesforce – we’ll need them to create an integration that moves Stripe’s data into Salesforce.
Step 2. Connect Skyvia to Stripe and Salesforce
First, let’s create a connection to Stripe.
- In your Skyvia account, click + Create New. Choose Connection.
- Select Stripe from the list of connectors.
- Specify the API key to create the connection.
Note: You can generate the API keys in your Stripe account.
- In case you need to retrieve data from the connected account, specify Connected Account Id (optional).

- Click Create Connection.
To create a connection to Salesforce, follow these steps:
- Click + Create New and choose Connection.
- Select Salesforce from the list of connectors.
- On the connection configuration page, specify the environment in which to perform operations.
- Click Sign in with Salesforce.
- Log in with your Salesforce credentials.
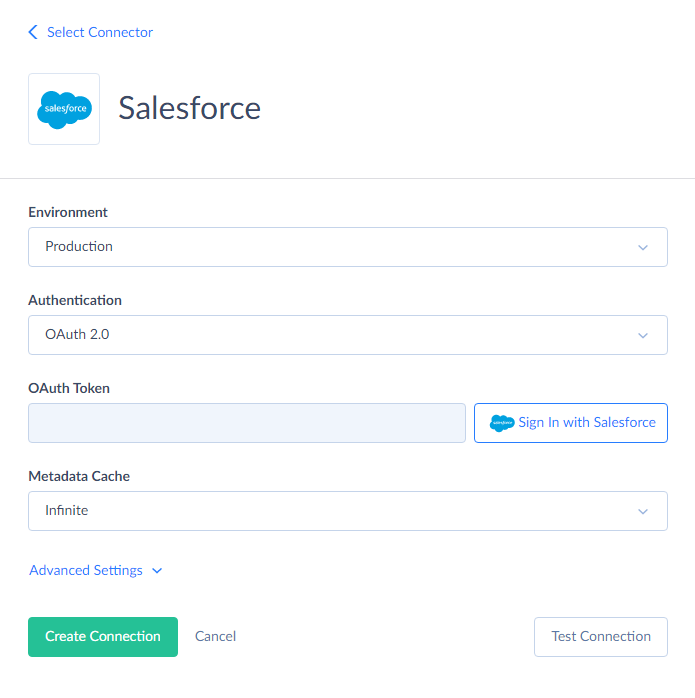
Note: The connection is enabled via OAuth authentication, so you don’t have to share your credentials with Skyvia. Instead, Skyvia generates a secure authentication token, which is bound to the connection.
- Click Create Connection.
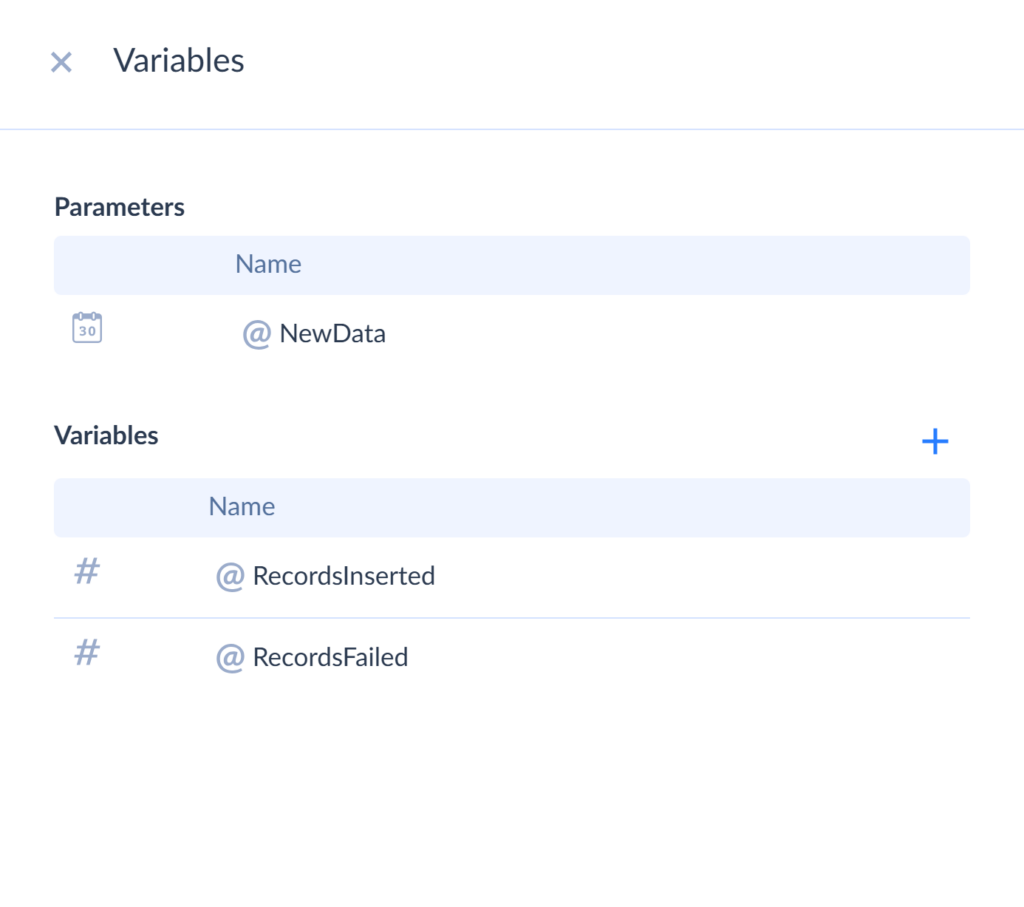
Step 3. Specify variables for the data flow
As mentioned before, for this use case, we’ll be using Data Flow – a visual pipeline designer for advanced synchronization scenarios.
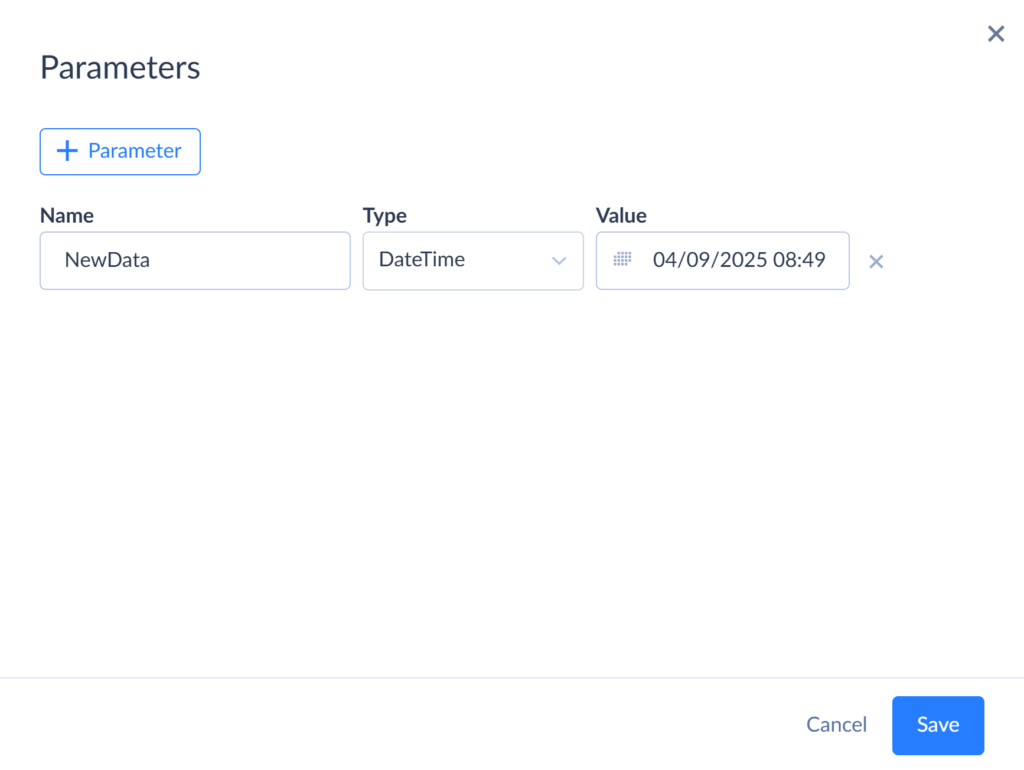
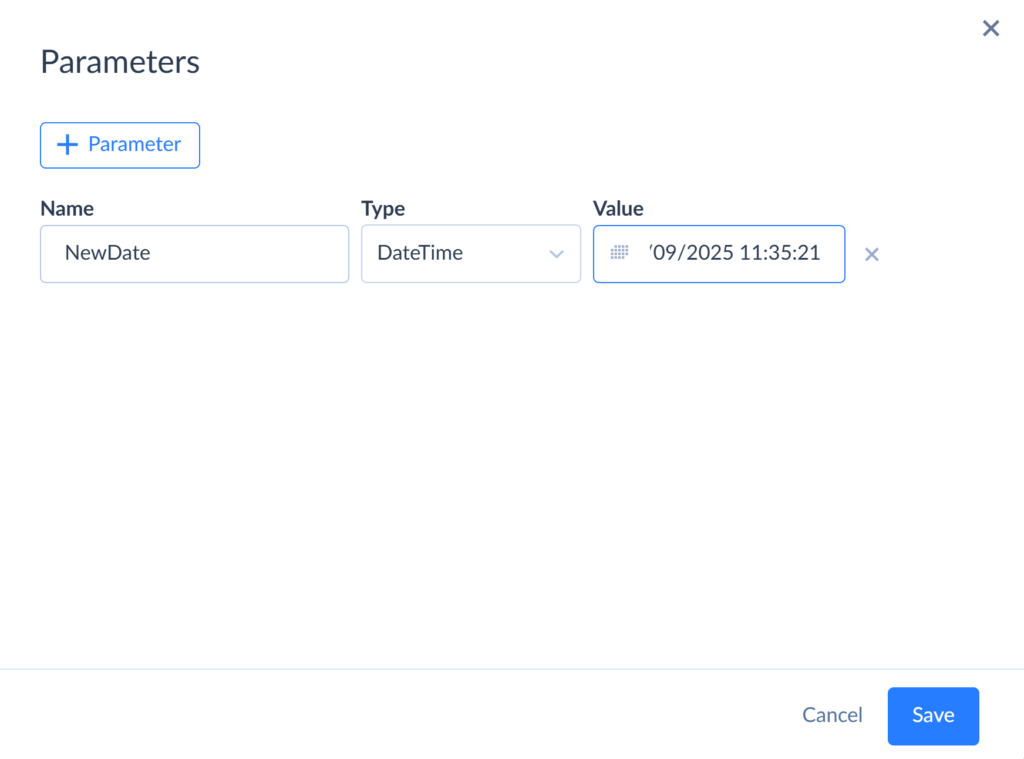
To start, let’s create parameters and variables that will define the integration. The first parameter transferred between runs is the date the data was created. Since we only need to retrieve new data with each execution run, we specify the parameter NewData:
- In Skyvia, click + Create New and choose Data Flow.
- In the Data Flow editor, click Parameters in the top-left toolbar.
- In the modal that opens, click + Parameter.
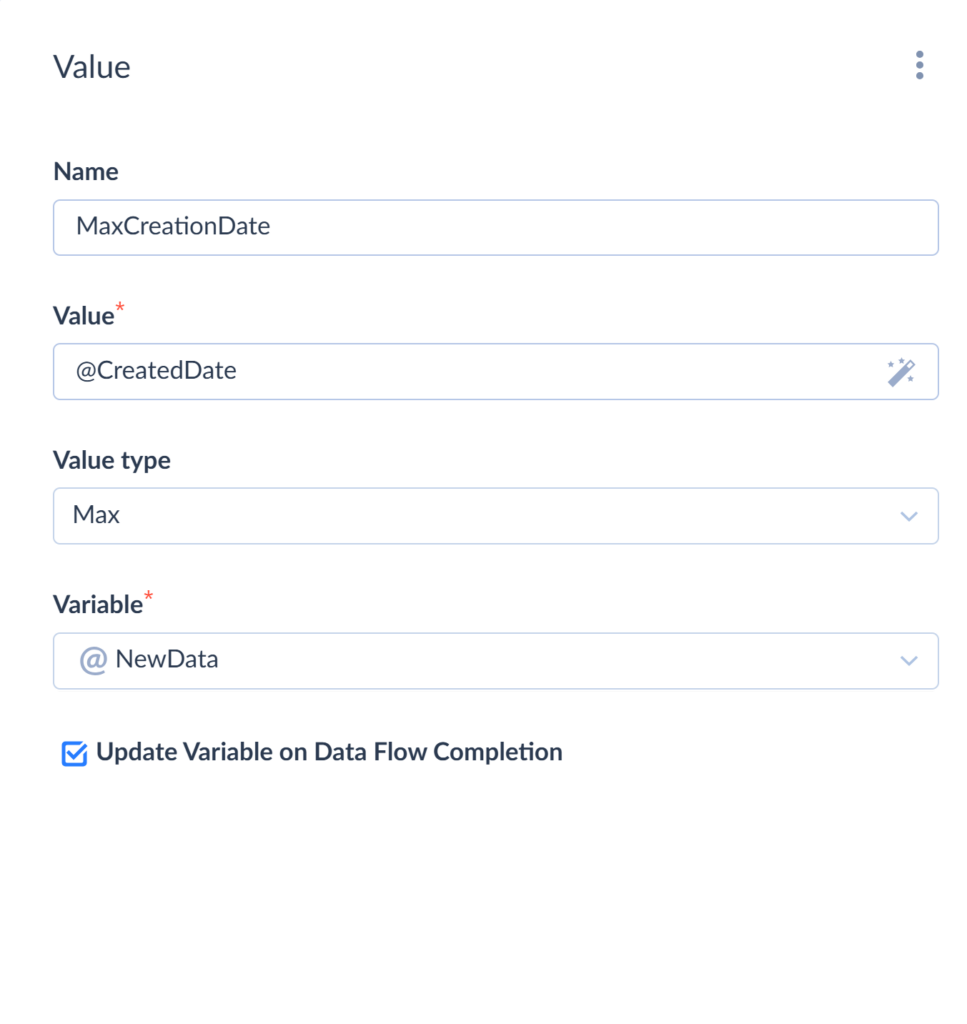
After completing the cycle, this parameter should be updated to ensure that only new data will be retrieved during the next execution. To do this, we’ll create the MaxCreatedDate parameter using the Value component.
- In the Data Flow editor, choose Value from the list of components on the left.
- Drag the component onto the canvas.
- Configure the parameters:
- under Value specify the input field (in this case, CreatedDate)
- select max for the Value type
- choose NewData for Variable
4. Check the Update Variable on Data Flow Completion box to enable automatic updates after each run.
We’ll also specify the number of successful and failed rows as variables:
- Choose Variables in the top-left toolbar on the left.
- Click + to add a variable.
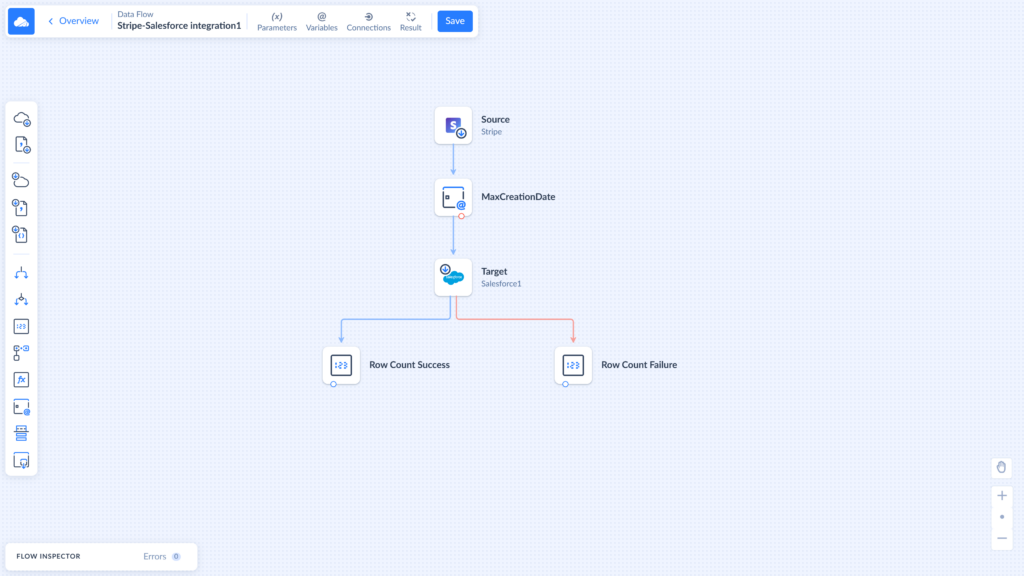
Step 4. Define data flow from Stripe to Salesforce
In this step, we’ll connect pre-created connectors into a dataflow. Let’s start with the Source component.
- Choose Source from the list of components on the left and drag it onto the canvas.
- Configure the connection parameters: choose Stripe for Connection and Execute Command for Actions.
- Select the fields whose values should be transferred to Salesforce. In this example, the fields are: Name, City, Country, Address (line 1, line 2), ZIP code, State, email, phone, date of account creation, and Metadata (for Last name and Company name lines are mandatory for Salesforce).
We also select MAXDATE, an internal variable that stores the most recent timestamp from the previous update, and map it to the NewData parameter.

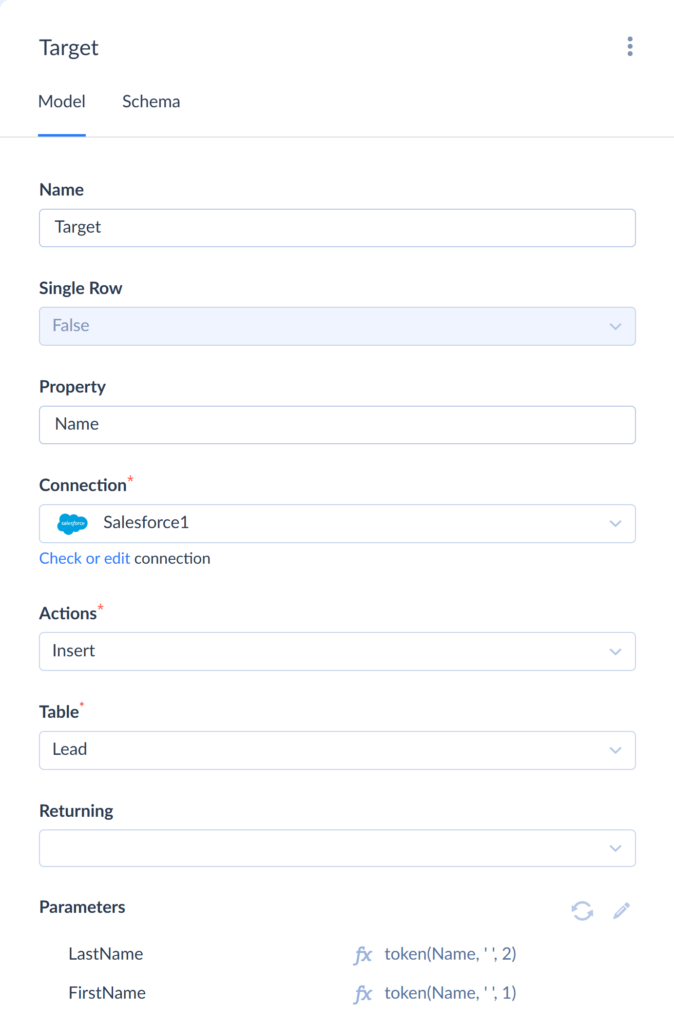
Next, configure the Target component.
- Choose Target from the list of components on the left.
- Drag the component onto the canvas.
- Configure the connection parameters:
- choose Salesforce for Connection
- choose Insert for Actions
- choose Lead for Table
Step 5. Map Stripe to Salesforce fields
In the Mapping Editor, map the Source fields to Target columns.
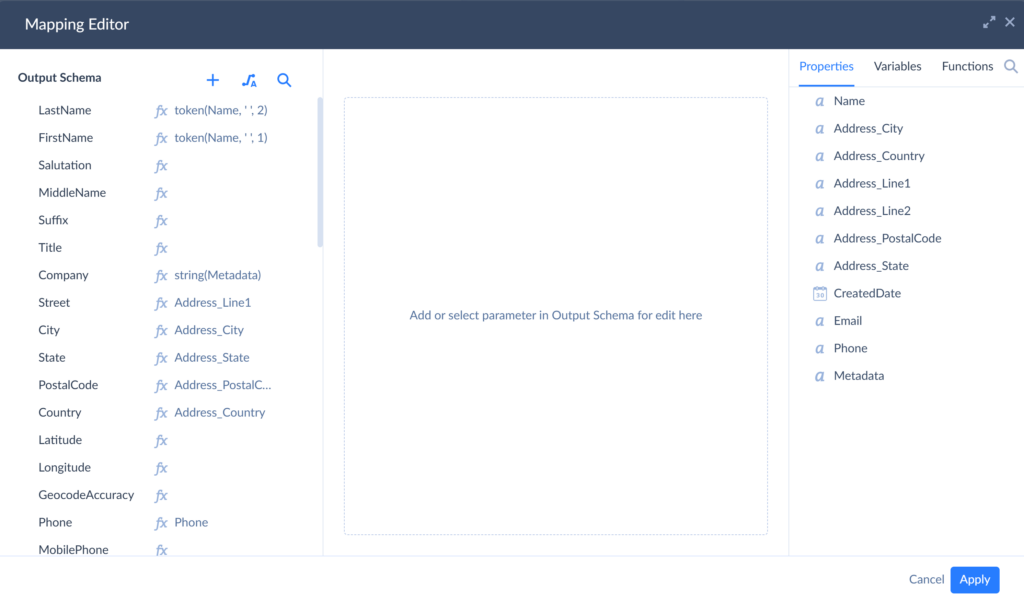
Note: Salesforce requires the Last Name field, but Stripe doesn’t have it – it only provides a single Name field. To address this, we use the Token function to extract the necessary data from Stripe’s Name field.
We also need to convert the Company line, as the platforms apply a different number of fields: in Salesforce, it’s a single field, while Stripe splits it into two fields that need to be merged.
Step 6. Configure the Result setting
The last step is to configure the Result settings. Here, we’ll define what counts as success/error rows by using the preset variables.
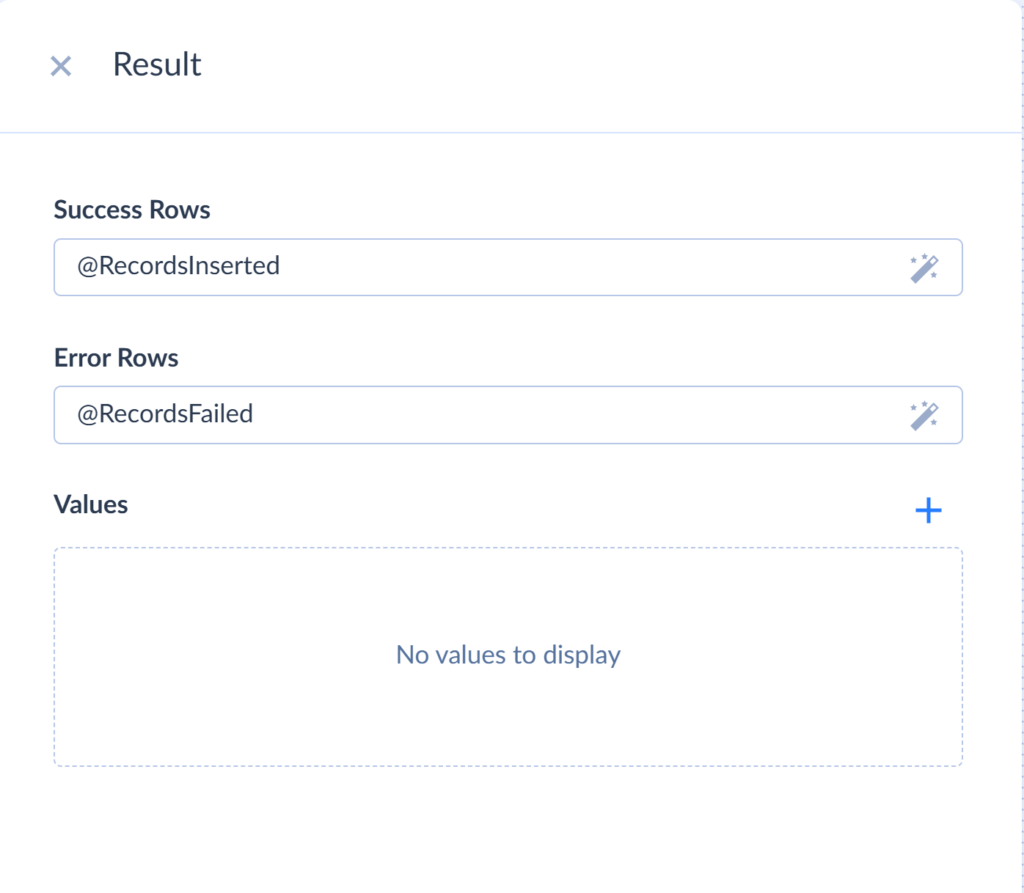
Once done, save and run the integration.
Step 7. Schedule and automate data synchronization
You can schedule your data flow for automatic execution. This option is useful for setting up periodic runs on specific days and times, or for delaying execution to a later point. To enable automated data synchronization, click Schedule on the Overview page and configure the timing.
Step 8. Monitor integration workflow
When the run is completed check the integration results in the Monitor tab. If errors occur, navigate to Logs tab and click the run results to review the failed records.
Scenario 2. Upload pending payment information from Stripe PaymentIntents to Salesforce Opportunities
It’s a common case to have clients who’ve been billed but, for some reasons, haven’t completed their payment. These prospects are potential customers with a strong likelihood of converting.
Since Stripe stores data on these unfinished transactions, it’s a fair opportunity to turn that information into potential deals as well as understand why the client left without completing the purchase.
Things to Consider Before You Start
Like in Scenario 1, it’s important to consider the differences in how Stripe and Salesforce store payment data.
Stripe uses two key objects to track payments:
- PaymentIntents: stores data about in-progress or attempted payments.
- Charges: records finalized payments, including successful transactions and any associated refunds.
Since this integration scenario focuses on analyzing incomplete transactions, we’ll work with the PaymentIntents object, selecting clients based on their payment statuses, such as requires_confirmation, processing, and others.
In Salesforce, the most appropriate object for representing payment transactions is the Opportunity. It uses the StageName field to display the current status of a deal within the sales pipeline, such as Prospecting, Qualification, Needs Analysis, Proposal/Price Quote, Closed Won, etc.
Since the payments we’re syncing haven’t yet been completed, we’ll map them to opportunities in the Need Analysis stage.
Step-by-step Guide
Step 1. Connect Skyvia to Stripe and Salesforce
Establish connections to Stripe and Salesforce, as outlined in Step 2 of Scenario 1.
Step 2. Specify variables for the data flow
As in the previous case, you must first create a parameter for regular data updates. This parameter is updated every time the Data Flow is running:
Enable automatic updates after each run using the Value component (see Step 3 in Scenario 1).
Next, create two variables to count successful and unsuccessful uploads:

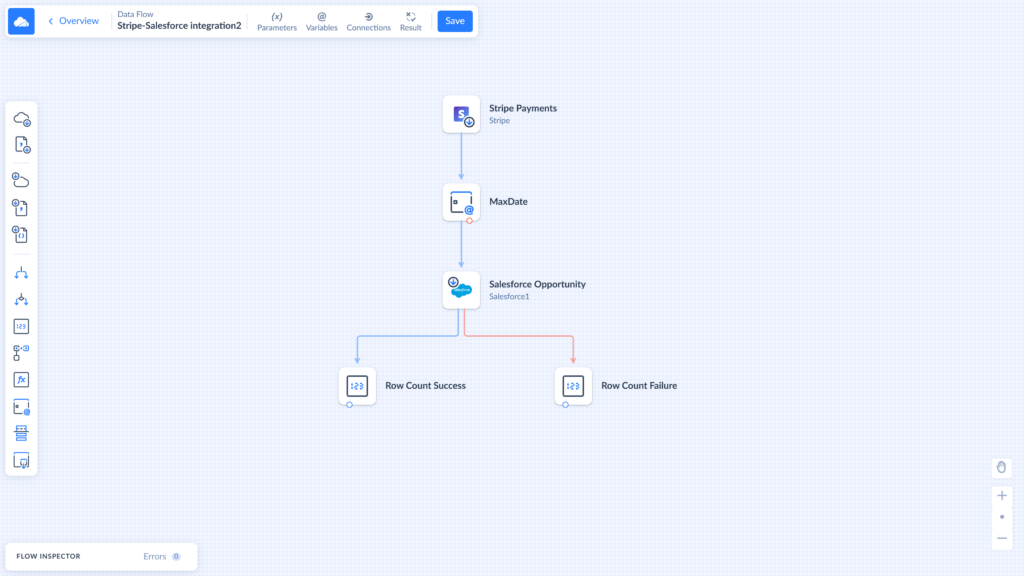
Step 3. Define data flow from Stripe to Salesforce
In this step, we’ll connect pre-created connectors into a dataflow. To configure the Source component:
- Choose Source from the list of components and drag it onto the canvas.
- Specify Stripe for Connection and Execute Command for Actions.
- Select PaymentIntents to choose clients with different statuses except for the successful ones:
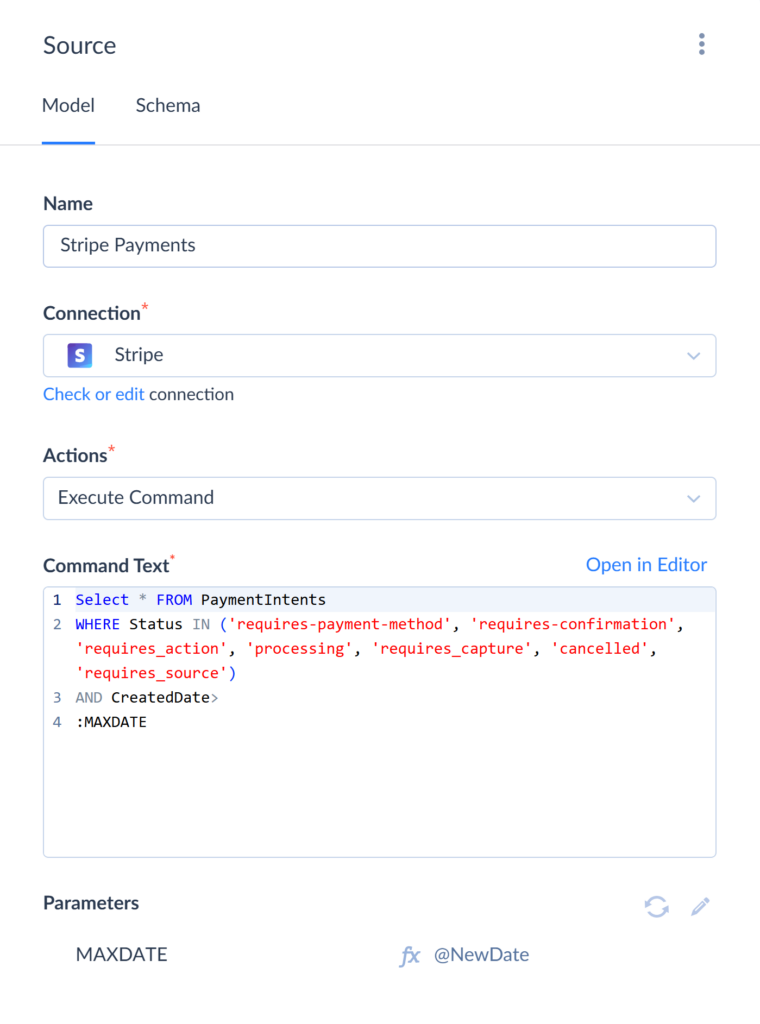
As in the previous case, we’ll use the MAXDATE variable to retrieve only new records during the next execution.
Next, we’ll work with the Target connector, which is Salesforce. Configure the connection parameters:
- Specify Insert for Actions.
- Choose Opportunity for Table.

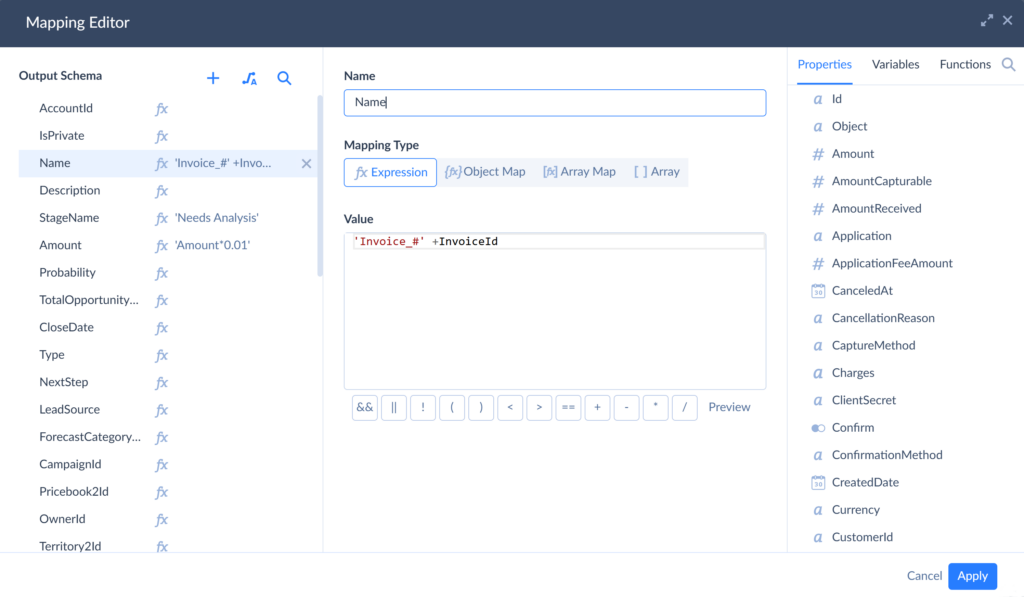
Step 4. Map Stripe to Salesforce fields
In the Mapping Editor, use auto-mapping to match Source and Target columns. Most fields are mapped automatically, with a few exceptions:
- Name: Salesforce requires a unique name when creating a new Opportunity. In this example, the name is generated as: Invoice + InvoiceID.
- StageName: This is a required field in Salesforce, set here to Needs Analysis.
- Amount: must be adjusted using Amount*0.01, since Stripe stores values in cents, while Salesforce expects amounts in dollars.
Step 5. Configure the Result setting
Configure the Result settings by defining success/error rows with the preset variables. Once done, save and run the integration.
If necessary, set the schedule to run the integration automatically.
Best Practices for Salesforce Stripe Integration
Synchronizing Salesforce and Stripe is a common business case. Following the tried-and-tested practices outlined below will help you implement it in the most efficient way.
- Prioritize security by using secure API keys, setting appropriate permission levels, and regularly auditing access.
- Evaluate available methods through the lens of your business needs. Consider criteria such as data volume, the necessity of real-time processing, and customization level. Choose the one that best fits your needs.
- Regularly monitor integrations for errors or discrepancies. Set automated alerts for failed runs.
- Optimize performance by using efficient synchronization methods and avoiding unnecessary API calls.
Common Challenges & Troubleshooting Tips
| Challenge | Why it is important | Troubleshooting |
|---|---|---|
| Data synchronization issues | Inaccurate or delayed synchronization can lead to discrepancies in customer data, payment statuses, and financial records. | Implement real-time sync: use webhooks and APIs to ensure real-time data updates between both platforms. Error logging: maintain logs for synchronization processes to monitor failures and successes. Regular data audits: periodically verify data consistency to identify and rectify mismatches. |
| Currency and amount discrepancies | Stripe often records amounts in the smallest currency unit (e.g., cents), while Salesforce may use standard units (e.g., dollars), leading to potential mismatches. | Data transformation: apply appropriate conversions during data transfer (e.g., divide Stripe amounts by 100 to match Salesforce’s format). Field mapping: ensure that currency fields are correctly mapped and formatted in both systems. |
| API limitations and rate limits | Exceeding API call limits can result in failed transactions or delayed data updates. | Optimize API calls: batch requests where possible and avoid unnecessary calls. Monitor usage: keep track of API usage to stay within limits and plan for scaling needs. Implement retry logic: incorporate mechanisms to retry failed API calls after a delay. |
| Webhook configuration and management | Improperly configured webhooks can lead to missed or duplicate events, affecting data integrity. | Secure webhooks: validate webhook signatures to ensure authenticity. Idempotency: design webhook handlers to be idempotent, preventing duplicate processing. Logging and monitoring: keep detailed logs of webhook events and monitor for anomalies. |
Conclusion
Stripe – Salesforce integration is an important step to optimize your payment processes and enhance user experience. Its key benefit lies in leveraging Stripe’s robust payment infrastructure within your Salesforce CRM, allowing for seamless management of all payment processes directly from the platform.
In this article, we explored three integration methods that cater to different business needs and technical skill levels. Choose the one that fits your goals best, and start leveraging its benefits today.
Ready to connect Stripe with Salesforce? Contact us for a free consultation or sign up for a demo to explore how Skyvia can simplify your integrations.

F.A.Q. for Stripe Salesforce Integration

Do I need technical skills to integrate Salesforce and Stripe?
It varies by method. Custom integrations require technical skills; third-party tools and connectors require minimal technical expertise.
Can I automate recurring billing using Salesforce and Stripe?
Absolutely, recurring billing automation is a common benefit of Salesforce Stripe integration.
