Do you need to sync PostgreSQL with Salesforce? If so, you’re leveling up your business with tailor-made reports, automation, analytics, or simply saving on Salesforce storage costs.
Your Salesforce edition may limit you to what you can do with the raw information available. Even with Salesforce Unlimited, you may need reports and functionalities unavailable at the moment.
If you have someone in your team who knows PostgreSQL and Salesforce, this guide will provide all the methods available to them. Here’s what we’re going to discuss:
Table of Contents
- Quick Overview of Salesforce
- Quick Overview of PostgreSQL
- What is PostgreSQL and Salesforce Integration
- What Sort of Data Can Salesforce Share With PostgreSQL?
- Considerations Before Data Integration
- Summary of Methods to Connect Salesforce and PostgreSQL
- Method 1. Integration of PostgreSQL and Salesforce Using Third-Party Tools
- Method 2. Integrate PostgreSQL and Salesforce using Custom Coding and Libraries
- Method 3. Native Salesforce Features
- Conclusion
Quick Overview of Salesforce
Salesforce is the #1 Customer Relationship Management (CRM) system. It is good for small businesses and big enterprises alike. You can handle prospective and existing customers with confidence using various Salesforce products. It started in 1999, and today, more than 150,000 companies trust it for marketing, sales, services, and more.
On the technical side, Salesforce has an open architecture. Using Application Programming Interfaces (APIs), you can share its data with other applications.
Quick Overview of PostgreSQL
PostgreSQL is a powerful, open-source object-relational database. It has been in active development for over 35 years. You can use it alongside your app for storage and data warehouse. It’s a favorite among developers, according to the StackOverflow Survey 2024. It’s also among the top 5 databases according to the March 2025 DBEngines rankings.
PostgreSQL runs on all major operating systems. It is also offered as a database service by major cloud providers. Querying using Standard Query Language (SQL) is its major feature. However, extensibility makes it stand out among other databases.
What is PostgreSQL and Salesforce Integration
PostgreSQL and Salesforce integration is the process of linking a PostgreSQL database and Salesforce CRM to share data and extend functionality. You can export data from Salesforce CRM to a PostgreSQL database. Or Salesforce can import data from a PostgreSQL database.
You may be wondering when this will be applicable to you.
7 Reasons to Integrate PostgreSQL and Salesforce
Here are seven compelling reasons why you would want to integrate the two.
Centralized Data for Analytics & Reporting
Salesforce holds valuable customer and sales data, but your reports within it can be limited. By syncing data to PostgreSQL, businesses can use BI tools like Tableau, Power BI, or custom SQL queries to get deeper insights.
Merging Salesforce Data with Other Business Systems
Companies often store data in multiple systems—ERP, marketing platforms, or financial software. This is a major gap in Salesforce reporting. But a PostgreSQL database can act as a central hub to make it easier to join Salesforce data with other sources for a complete business view.
Historical Data Storage & Compliance
Salesforce may not retain long-term historical records due to storage limits and costs. So, offloading older data to PostgreSQL helps ease these limits. It also helps with compliance (GDPR, HIPAA) and long-term analytics while keeping Salesforce lean.
Real-Time Data Synchronization for Automation
Some business processes require real-time updates. Syncing Salesforce data with PostgreSQL enables faster automation, such as triggering actions in external apps based on Salesforce updates.
Scalability for High-Volume Transactions
PostgreSQL is built for handling large datasets efficiently. For businesses with high transaction volumes (e.g., e-commerce, finance), offloading data from Salesforce to PostgreSQL improves performance and scalability.
Data Backup & Disaster Recovery
Salesforce has its own backup options, but they can be expensive and limited. A PostgreSQL integration allows companies to maintain a separate, regularly updated backup for disaster recovery.
Reducing Salesforce Storage Costs
Salesforce storage can be costly, and data archiving is often necessary. By transferring older or less frequently used records to PostgreSQL, companies save on Salesforce storage fees while still retaining access to important data.
While the list above is an exciting journey to extend Salesforce, you need to know what Salesforce can share with PostgreSQL. Let’s discuss them next.
What Sort of Data Can Salesforce Share With PostgreSQL?
If you’re wondering what you can get out of Salesforce to PostgreSQL and vice versa, this is the place. The following are some of them:
- Standard and Custom Objects: Objects like Contacts, Accounts, and Leads are some of these. If you link Salesforce with QuickBooks, you can store invoices and other financial information in Salesforce custom objects. You can also integrate with these custom objects as well.
- Audit and Log Data: These include Login History (Who accessed Salesforce and when), field history tracking (Changes made to key records), and events log.
- Activities and Interaction Data: These includes Emails, Calls, Meetings (Logged activities from Salesforce) and Tasks (Pending follow-ups and completed actions).
- Sales & Marketing Data: You can export Campaigns (Marketing efforts and responses), Products and Price Books (Items, pricing, and discounts), and Quotes and Orders (Sales transactions and fulfillment).
- User and Role-Based Data: Salesforce can share Users & Roles (Salesforce users and their permissions) and Sharing Rules (Access control details).
- Integration & External Data: These include Connected Apps – Data from third-party tools linked to Salesforce (e.g. QuickBooks) and Custom Reports & Dashboards (Data pulled from multiple objects for deeper insights).
Considerations Before Data Integration
Things can go wrong during Salesforce to PostgreSQL integration. So, it’s recommended that you consider factors like data compatibility, mapping, error handling, performance, and security. These and more are in the following sections.
1. Data Selection & Scope
Choosing what data to integrate needs a few considerations. Here are some of them:
- What data do you need? – Standard objects (Accounts, Contacts) or custom objects (Invoices, Orders)?
- How much data? – A few thousand records, millions, or more?
- How often does it change? – Real-time updates or daily batch sync?
Tip: Avoid syncing unnecessary data to reduce storage costs and complexity.
2. Data Compatibility
Salesforce native tools accept data from CSV, XML, JSON, and Parquet files. If you’ll use third-party, no-code solutions, you can extend this list even more. These tools allow integration to PostgreSQL with low or no code. Just make sure you map the correct Salesforce object column to the PostgreSQL table column.
The data type and size should be compatible. Unlike CSV data, PostgreSQL imposes strict column data type and size. For example, a Salesforce column data containing 34500.01 won’t fit in a PostgreSQL integer column. Even more, text data is not compatible with numeric columns.
Tip: Review the target data type and size for your data mapping. Make sure whole numbers go to integer columns, text to text columns, and so forth.
3. Data Storage & Performance in PostgreSQL
When a PostgreSQL database is your target and reports and other functionality will come from this database, consider the following:
- Schema Design – Should you mirror Salesforce tables or normalize the structure for better queries? Note that normalizing the structure requires database design skills.
- Indexes – Add indexes on frequently queried fields to speed up lookups.
- Partitioning – Helps with large tables to improve performance.
- Incremental Updates – Should you update only changed records or overwrite the entire dataset?
Tip: Use timestamps or record IDs to track changes efficiently. Better yet, use Change Data Capture (CDC) if your tool has it. This will efficiently handle changes and improve performance.
4. Data Security & Compliance
Handling personal or sensitive data in or out of Salesforce needs special handling to avoid data theft from prying eyes. Consider the following security and compliance requirements:
- Encryption – Protect sensitive data like customer details.
- Access Controls – Limit who can read/write data in PostgreSQL.
- GDPR & HIPAA Compliance – Ensure regulations are followed if handling sensitive data.
- OAuth & API Authentication – Use secure tokens for Salesforce API access.
Tip: Enable Salesforce Field-Level Security to control what data gets exported.
5. Handling Data Changes & Deletions
Changes in Salesforce include updated and deleted data. Know how you will handle them by considering a few factors below:
- Do you need to export deleted Salesforce records into PostgreSQL?
- Soft Deletes: Salesforce marks records as deleted (isDeleted=true).
- Hard Deletes: Records are permanently removed (may cause sync issues).
- How will updates be handled?
- UPSERT (Update or Insert) – Keeps PostgreSQL in sync with new and modified records.
- Full Refresh or Full Load – Drops and reloads all data (costly but ensures accuracy).
Tip: If using CDC (Change Data Capture), you can track only modified records.
6. Error Handling & Logging
Whether you’re coding or otherwise, you need to anticipate that syncs can fail. It’s better to handle this than ignore it. Here are a few suggestions:
- Create an error log table in PostgreSQL.
- Capture API errors and retry failed records.
- Set up alerts for failures (e.g., missing records, API rate limits).
Tip: Use Salesforce Debug Logs and PostgreSQL logs to troubleshoot sync issues.
7. Cost Considerations
There are cost considerations based on what you already have. Consider the following:
- Salesforce API Limits – Salesforce restricts daily API calls based on your editiion. If API access is not included, you will have a hard time integrating. You may consider upgrading your Salesforce edition or buying API access. Otherwise, you are limited to manual exports to CSV files. Then, use scripts to export/import to PostgreSQL.
- PostgreSQL Storage Costs – Large datasets may require optimized indexing and partitioning. Indexes consume storage too, so this will add to your storage cost. This is true whether your PostgreSQL instance is on-premises or deployed in the cloud.
- Developer Effort vs. Integration Tools – Is it cheaper to use an ETL tool instead of custom coding? ETL tools may have subscriptions but it’s faster to develop. Coding will take longer adding to your cost per hour or per month per developer.
Tip: Estimate Salesforce API usage before deciding on a sync frequency. Plan for storage and compare the cost for custom coding vs. integration tool costs.
Aside from the list above, you also need to consider which integration method to use for your project. The following sections will help you consider them.
Summary of Methods to Connect Salesforce and PostgreSQL
Each integration method has its good and not-so-good side. You have to pick the one that fits your needs. To give you a quick idea of different integration methods, below is a comparison table:
| Method Group | Method | Best For | Skill Level | Customizability |
|---|---|---|---|---|
| Using 3rd-Party Tools | Using No-Code integration tools (Skyvia, Matillion, Hevo, Apache Nifi) | Quick implementations and organizations lacking dedicated developers | Low to Medium | Medium to High |
| Custom Coding | Using Scripts, Libraries, and APIs (REST, SOAP, Bulk) | Organizations needing full control of the integration process and with developers skilled with languages and Salesforce libraries (e.g., Python / simple-salesforce) | High | Very High |
| Apex Coding | Organizations with skilled Apex developers needing complete control of the integration process. | High | Very High | |
| Salesforce Native Tools | Salesforce Connect | Organizations with small datasets to link and those avoiding Salesforce storage costs. | Medium | Low |
Let’s explore each of the methods in the following sections.
Method 1. Integration of PostgreSQL and Salesforce Using Third-Party Tools
Third-party tools offer a balance between ease of use and flexibility. Some have graphical user interfaces and use components that users can drag and drop to a canvas. They sometimes add a bit of scripting or formulas within these components to extend graphical features.
Some examples of third-party integration tools are Mulesoft, Matillion, Hevodata, and Skyvia.
Step-by-step Guide Using Skyvia
In this section, we will use Skyvia as our third-party, no-code solution for Salesforce to PostgreSQL and vice versa. Skyvia is a cloud-first data platform that offers easy integration using a graphical user interface. It’s capable of integrating hundreds of data sources including Salesforce and PostgreSQL. You can import, export, migrate, backup, replicate, and more with Skyvia.
Skyvia is also rated as one of the easiest ETL tools by users, according to G2. As you will see later, doing integrations with Skyvia involves a few steps only with very straightforward interfaces.
To integrate PostgreSQL and Salesforce with Skyvia, you need two connections, one for Salesforce and the other for PostgreSQL. Then, depending on your objective you choose either an Import or Data Flow integration. If you need fine control involving several Data Flows, you can use a Control Flow.
How to Create Skyvia Connections
Skyvia connections are like your keys to enter a data source. To create a connection, sign in to your Skyvia account and follow the steps below:
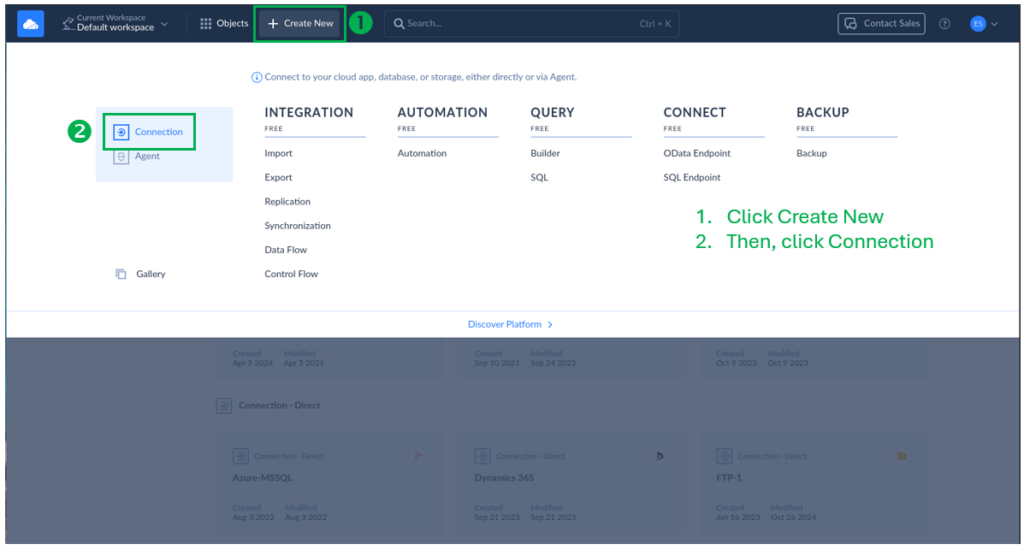
- Click the + Create New button at the top of the page, then click Connection.
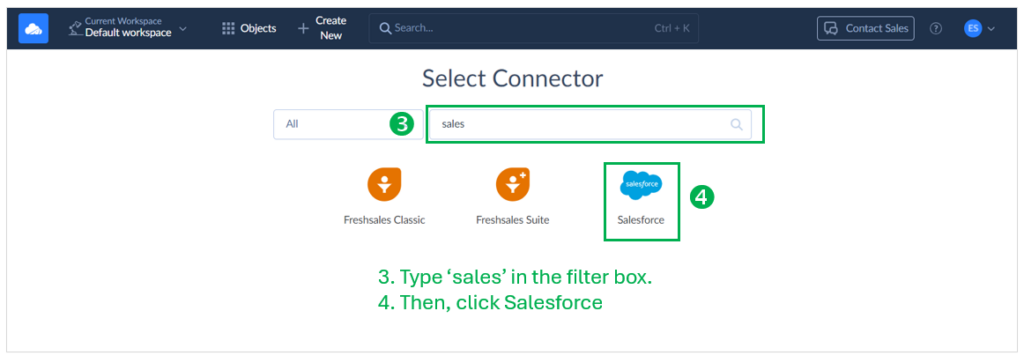
- Select from the list of connectors. Filter the list by typing ‘sales‘ or ‘salesforce’ into the filter box. Then, click Salesforce.
- Fill out the connection form and sign in to Salesforce to get an OAuth token.
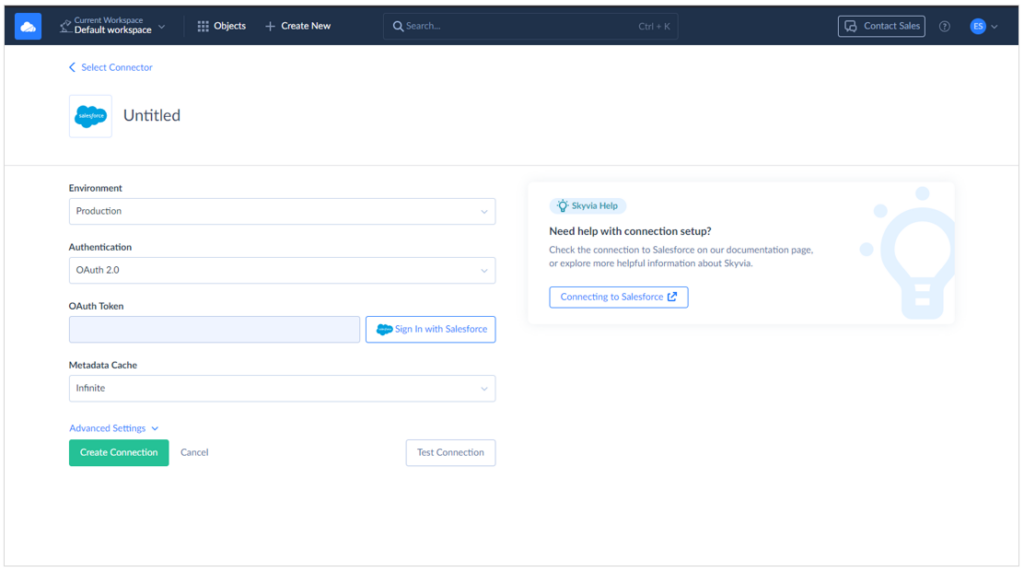
- Click Test Connection. You will see a Connection is successful in the upper right once the test is good.
- Rename the Untitled connection name with your desired connection name (e.g., Salesforce prod, Salesforce test, etc.). Below is my Salesforce connection:
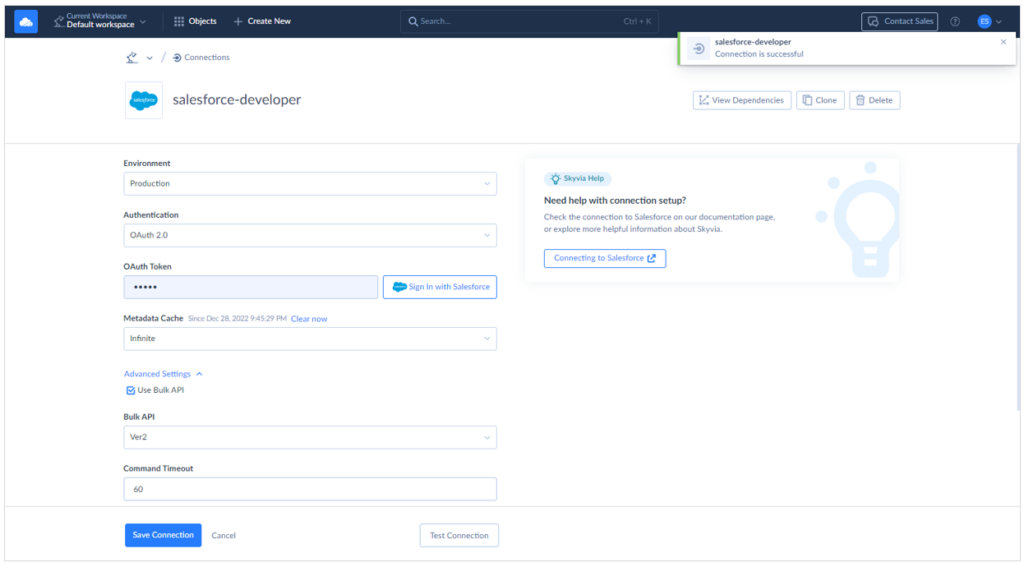
- Finally, click the Create Connection button to save your new connection. Click Save Connection when modifying an existing connection.
- Repeat steps 1 to 6, but choose the PostgreSQL connector and fill out the connection form. Have your valid PostgreSQL credentials with you. Below is my successful Supabase cloud PostgreSQL connection:
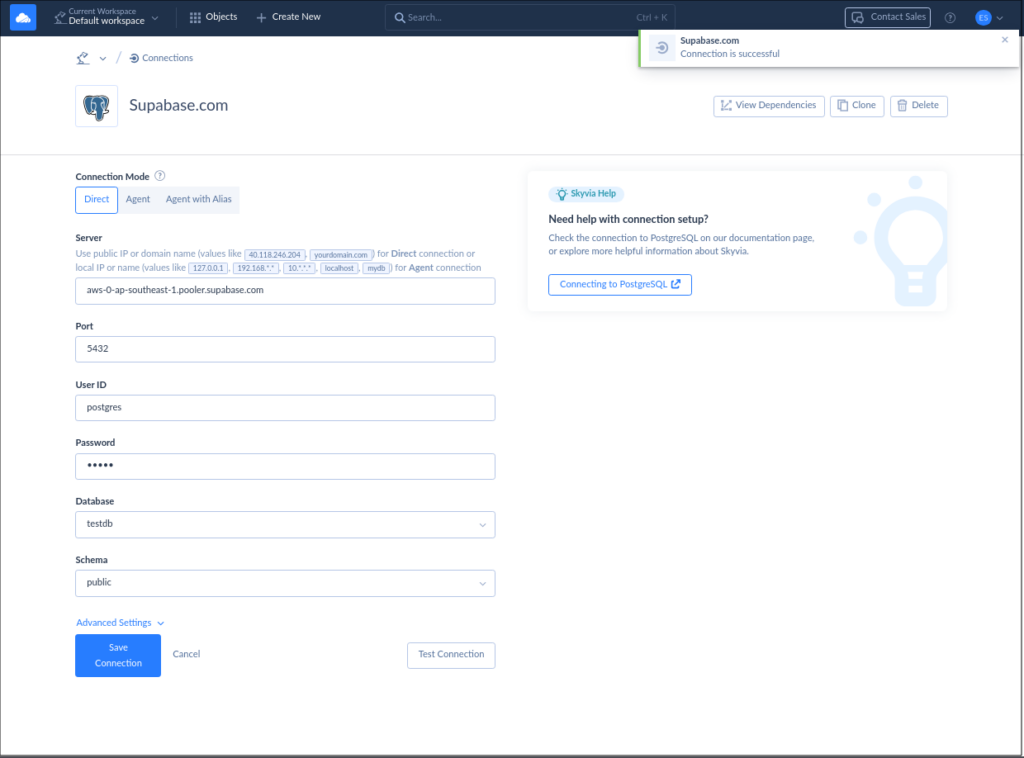
This is an easy configuration, but if you have connection problems, consult your system administrator.
How to Import Data from PostgreSQL to Salesforce Using Skyvia
Skyvia Import is a simple way to get data from a source to a destination. In this case, we’re going to get some data from PostgreSQL and write it to Salesforce. It’s plain and simple to make. The following are the simple steps:
- Click + Create New, and under INTEGRATION, select Import.
- Choose Data Source as the Source Type.
- Then, select the PostgreSQL connection we created earlier (Supabase.com) from the dropdown list as the Source.
- Choose the Salesforce connection we created earlier (salesforce-developer) as the Target.
- Click Add New to add a new task, then choose the PostgreSQL contacts table on the next page.
- Choose a State Filter. Choose between All, Inserted, and Update. All is the default, which means all rows in the source table.
- Click Next step and select the target Salesforce object from the dropdown list. In this case, we will use Contacts.
- Choose the Operation (Insert, Update, Upsert, Delete).
- Map the source columns (PostgreSQL table) to target columns (Salesforce Contacts). Source column names with the same name as Target column names will map automatically. See a sample below:
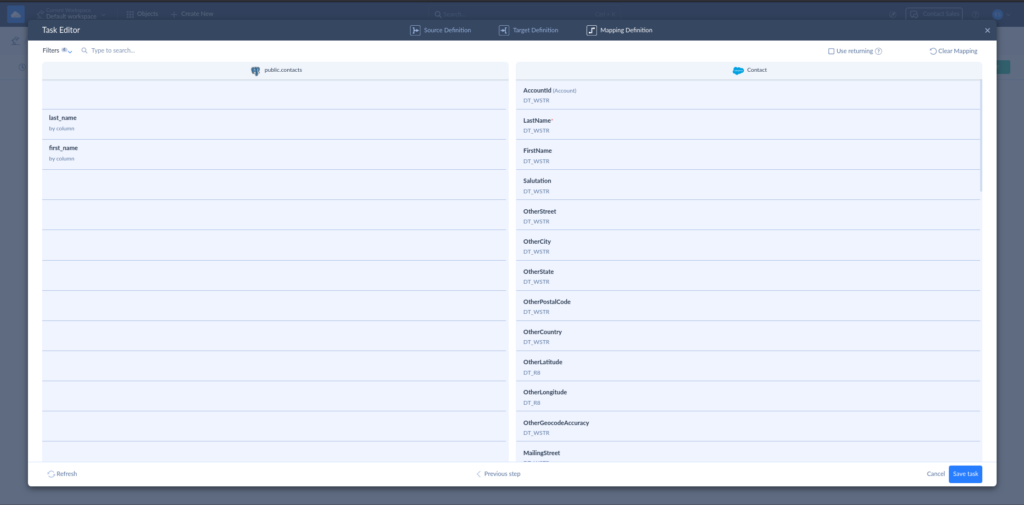
- Click Save Task.
- Repeat steps 5 to 10 for more PostgreSQL tables and Salesforce objects, if applicable. In our sample, we only have 1 table, so it ends after saving the first task.
- Give your Skyvia Import a name and click Create to save it. See the final configuration below:
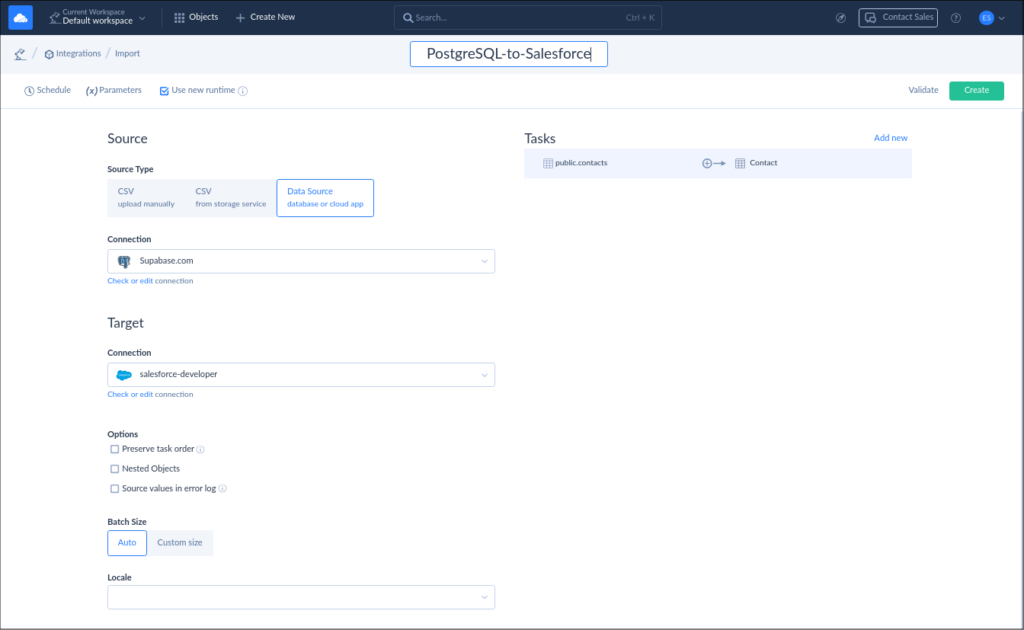
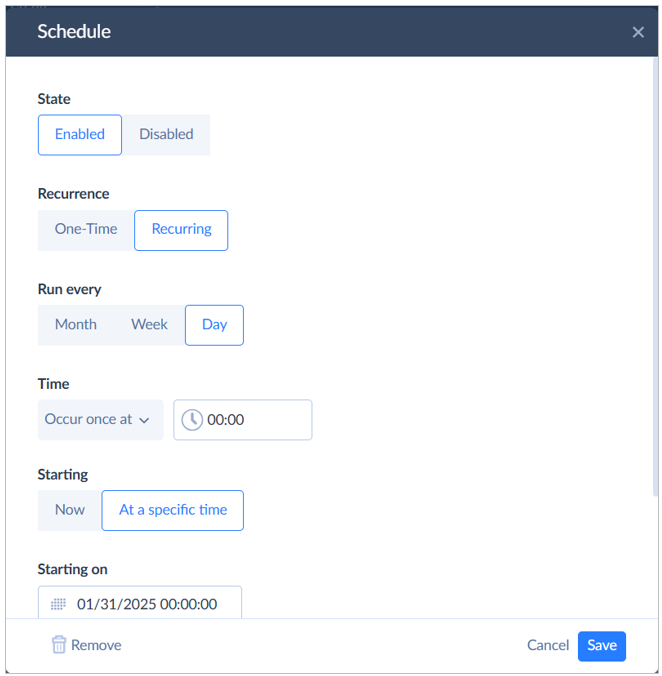
If you want to run this import regularly, create a schedule by clicking Schedule in the upper-left corner of the page. Otherwise, you can run the Import integration by clicking Run in the upper-right corner of the page. Below is a sample of setting up a 12-midnight schedule that runs daily.
How to Export Data from Salesforce to PostgreSQL Using Skyvia
We’re going to export the Contacts data from Salesforce into the PostgresSQL contacts table. Logically, you can use the Skyvia import and reverse the source and target connections. So, the Source becomes Salesforce, and the Target becomes PostgreSQL.
However, in our next example, we will use Skyvia Data Flow.
Check out the following steps:
- Click + Create New and under INTEGRATION, select Data Flow. You will be redirected to a blank canvas.
- Drag the Source component to the canvas.
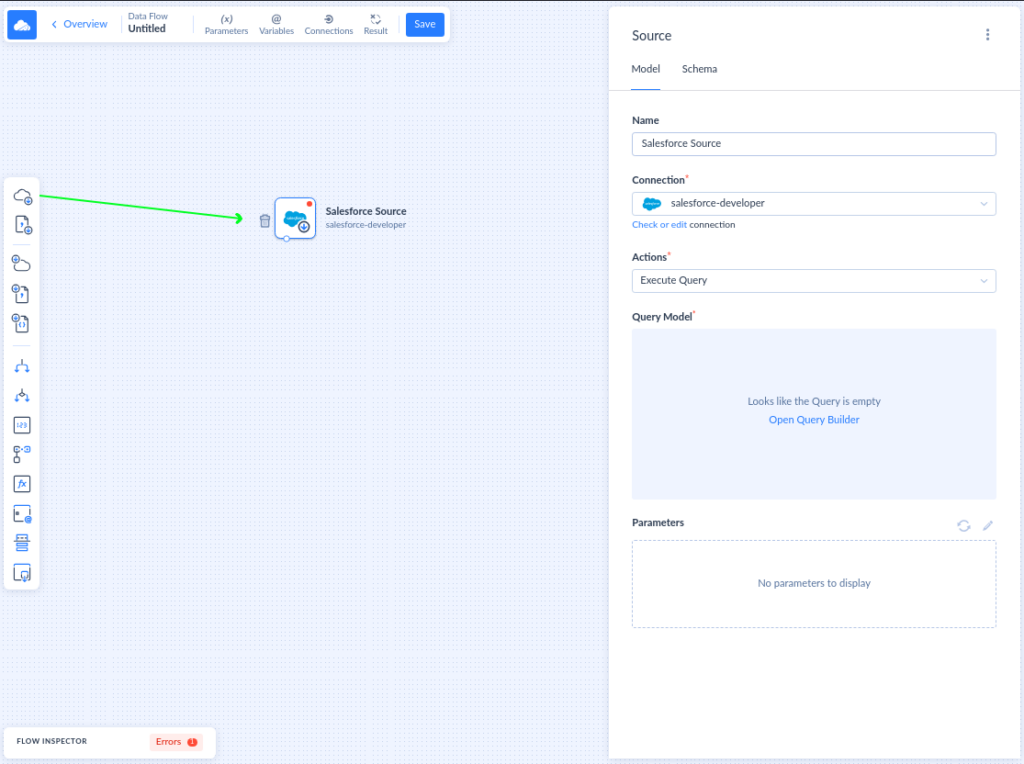
- Configure the source by giving it a name, setting the connection to Salesforce, and choosing the Execute Query action. See a sample below:
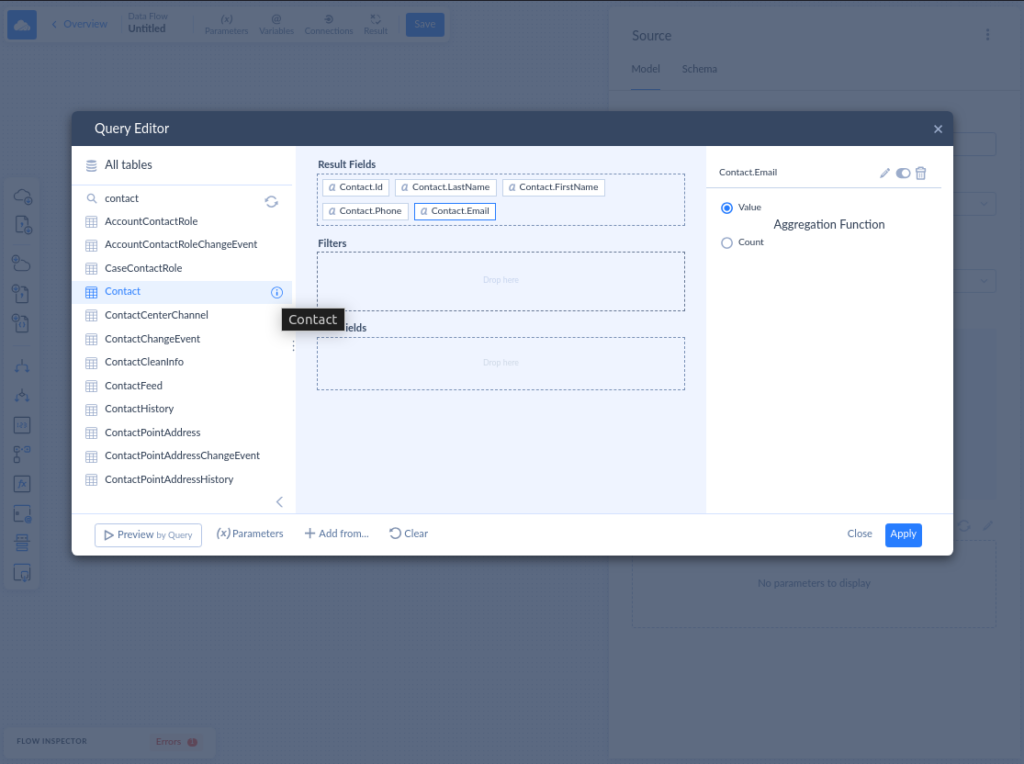
- Click Open Query Builder to set the Salesforce object to Contacts and select the fields. You can optionally set filters and sort order here too. Then, click Apply. See the sample below:
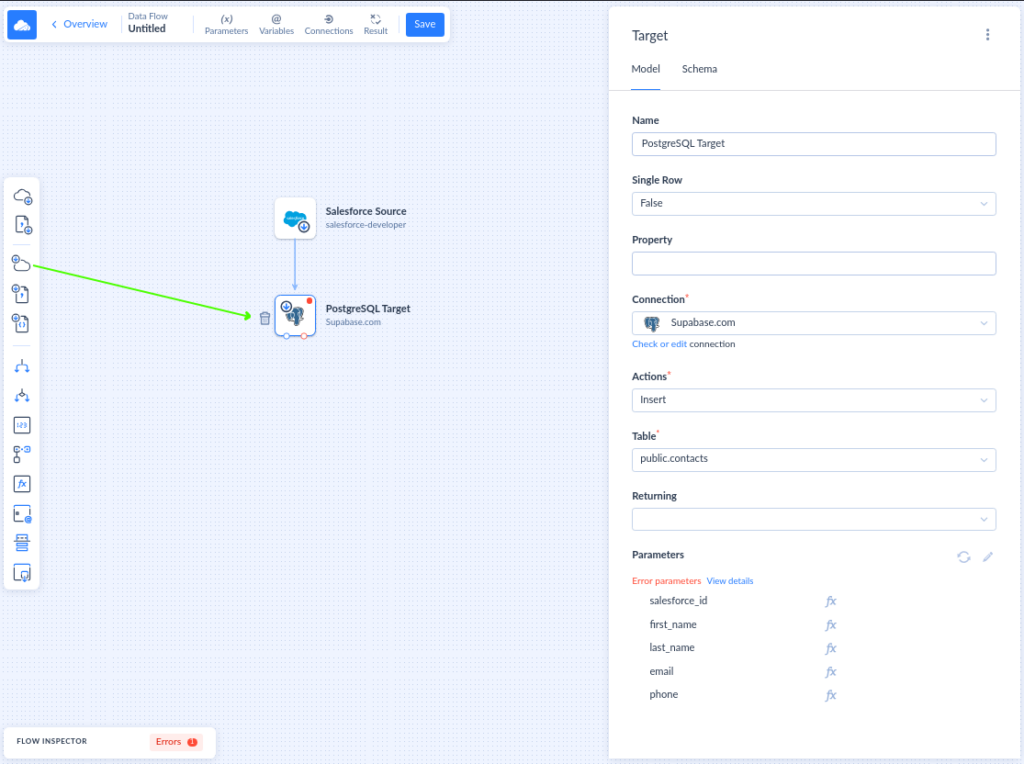
- Drag the Target component into the canvas and connect the Source to the Target. To connect, click the small circle below the Source component and drag it into the Target component.
- Configure the Target by specifying the name, connection, action, and table. See a sample below:
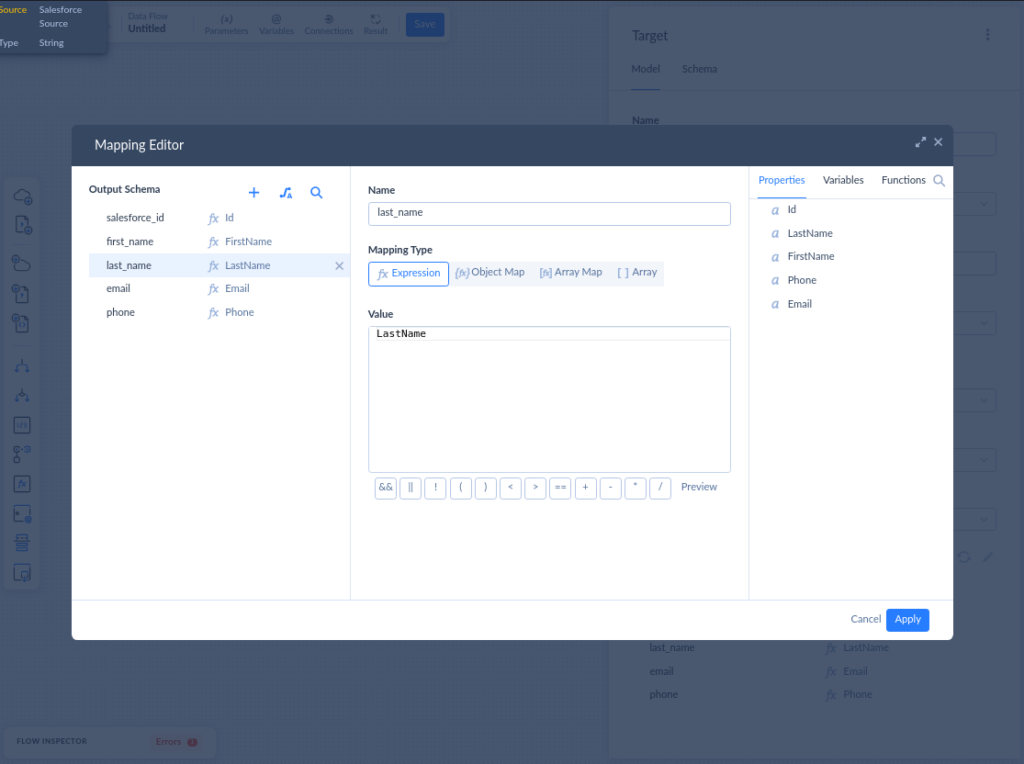
- Then, under the Parameters, click the pencil icon to map the source to target columns. Another window will open. Click the Auto Mapping icon to map the same name columns. You can manually set the mapping by clicking a PostgreSQL column and then clicking a Salesforce column under Properties. Do this to all PostgreSQL and Salesforce columns. Then, click Apply. See a sample below:
- Click Save and name your Data Flow integration.
- You can also set a schedule by clicking the Schedule icon in the upper-right corner of the page. Then, set up your preferred schedule. Then, click Save. The schedule configuration is the same as the Skyvia Import Schedule.
This is a simple example of a Data Flow. Consult the documentation for more information.
Pros of Using Third-Party Tools
- Ease-of-Use. Third-party tools commonly use a graphical user interface. Some add drag-and-drop of visual components to diagram the data flow. Pre-built connectors, templates, and components reduce development time compared to custom coding.
- Error Handling and Logging. Tools allow you to handle errors and logging through visual components. This will make it easier to troubleshoot failed syncs.
- Scalable. Advanced tools can handle increasing data volumes as your business grows.
- Advanced Scheduling. Third-party tools have advanced scheduling for running batch processes unattended. This will reduce manual processes and human errors.
Cons of Using Third-Party Tools
- Cost: Tools with high subscription fees are not good for businesses with limited budgets.
- Learning Curve: You may be unfamiliar with the tool at first, so training is required.
- Customization Limits: Tool features may not cover every unique business requirement. So, users may resort to workarounds that may not be efficient.
- Vendor Dependency: Vendors of third-party tools have their own update schedules, support policies, and downtime that may disrupt your operations from time to time.
Method 2. Integrate PostgreSQL and Salesforce using Custom Coding and Libraries
Another method to integrate PostgreSQL into Salesforce is by using custom coding. You can either use Apex from Salesforce or another programming language like Python.
We’re going to use Visual Studio Code alongside PostgreSQL. So, you will need the following installed on your computer to make this work:
- Visual Studio Code
- Salesforce CLI
- PostgreSQL database engine
Then, you need the following VS Code extensions and tools:
- Salesforce Extension Pack
- A PostgreSQL tool like pgAdmin or dbForge Studio for PostgreSQL.
Note that we will also need a PostgreSQL table to export the Salesforce Contacts. Below is a sample using dbForge Studio for PostgreSQL:
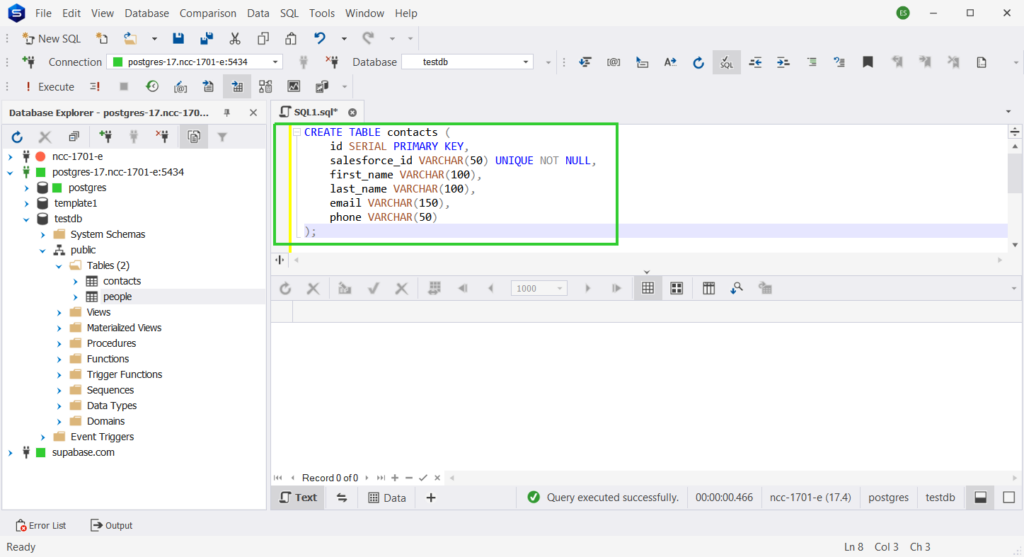
The above table needs the Salesforce Contact ID, last name, first name, email, and phone. If you have installed everything we need, we are ready to code.
Let’s start with Apex.
Using Apex to Integrate PostgreSQL and Salesforce
In addition to the above VS Code extension, you also need to install the Apex VS Code extension. Then, follow the steps below:
1. Setup the Project in Visual Studio Code
Create a folder where you will place the Apex code, then open it in Visual Studio Code. Open a Terminal and run the following command:
sfdx force:project:create -n SalesforcePostgresIntegrationThis will create the Apex project named SalesforcePostgresIntegration. See a sample from my Terminal below:
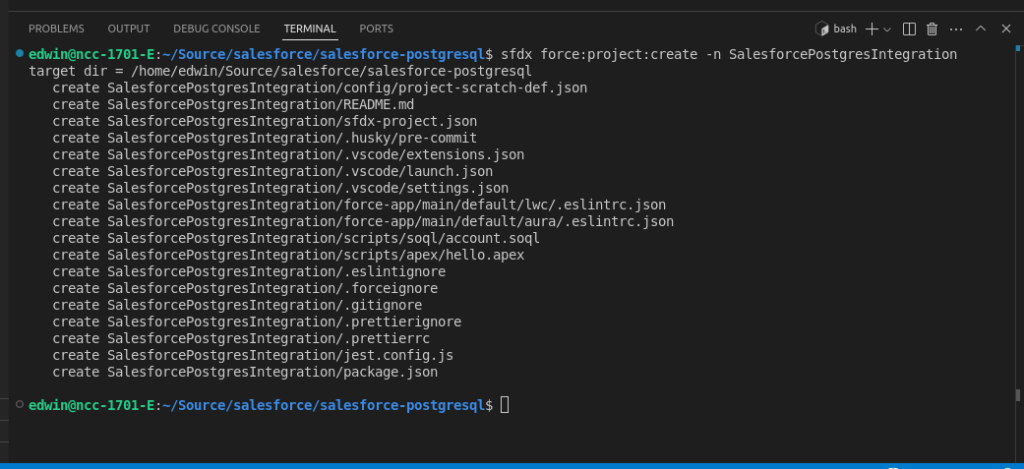
Then, change the path to your new Apex project folder and authenticate with Salesforce. From the Terminal:
cd SalesforcePostgresIntegration
sfdx force:auth:web:login
A browser will open to let you log in to Salesforce using your credentials. Now, retrieve your Salesforce metadata using the following Terminal command:
sfdx force:source:pull2. Create the Apex Class
Apex cannot connect directly to PostgreSQL. So, you need a middleware API or a web service. Then, you need the API URL that the Apex class will use. To start creating the class, from the VS Code Explorer, right-click force-app/main/default/classes and select New File. Name the file PostgresContactSync.cls. See the illustration below:
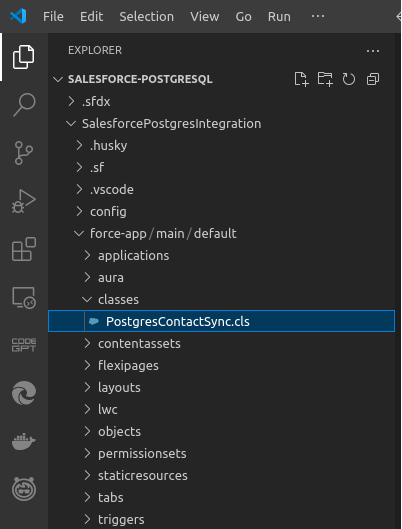
The logic flow in the code should go like this:
- Query the Salesforce Contacts using SOQL and retrieve the Id, FirstName, LastName, Email, and Phone.
- Store the results in a List.
- Serialize the List using a JSON format for web service transport.
- Using an HTTP request, send the list to the web service to write the Contacts list to PostgreSQL.
- Wait for the result and display it using HTTP response.
Below is the sample code in Visual Studio Code:
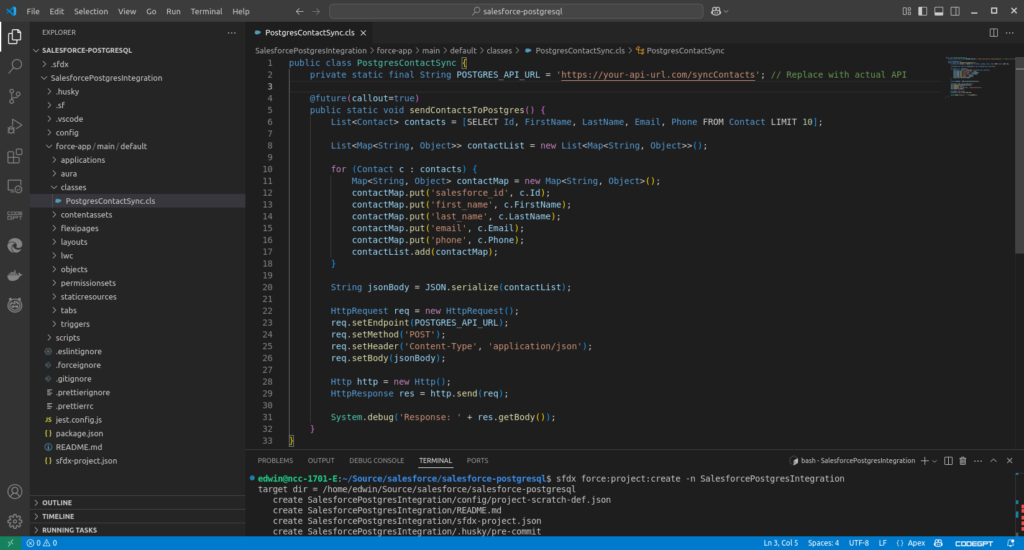
Don’t forget to replace the POSTGRES_API_URL with the correct URL from your web service configuration.
Below is a sample middleware API using Node.js. Note that this is a separate project from the Apex one.
const express = require('express');
const { Pool } = require('pg');

const app = express();
app.use(express.json());

const pool = new Pool({
    user: 'salesforce_user',
    host: 'localhost',
    database: 'testdb',
    password: 'StrongPassword123',
    port: 5434
});

app.post('/syncContacts', async (req, res) => {
    try {
        const contacts = req.body;
        const client = await pool.connect();

        for (const contact of contacts) {
            await client.query(
                `INSERT INTO contacts (salesforce_id, first_name, last_name, email, phone)
                VALUES ($1, $2, $3, $4, $5)
                ON CONFLICT (salesforce_id) DO UPDATE
                SET first_name = EXCLUDED.first_name,
                    last_name = EXCLUDED.last_name,
                    email = EXCLUDED.email,
                    phone = EXCLUDED.phone;`,
                [contact.salesforce_id, contact.first_name, contact.last_name, contact.email, contact.phone]
            );
        }

        client.release();
        res.status(200).json({ message: 'Contacts Synced' });

    } catch (error) {
        console.error(error);
        res.status(500).json({ error: 'Error syncing contacts' });
    }
});

app.listen(3000, () => console.log('Server running on port 3000'));
The pool includes the PostgreSQL credentials. Replace this with your own credentials to your PostgreSQL database.
The code above retrieves the body of the HTTP request, which includes the list of contacts. Then, it attempts to insert the row, but if the salesforce_id exists, an update is performed.
3. Deploy the Apex Code to Salesforce
Once the code is ready, deploy the Apex project to Salesforce. From the Terminal, issue the command:
sfdx force:source:pushThen, assign permissions using the following command:
sfdx force:user:permset:assign -n YourPermissionSet4. Run the Middleware API and the Salesforce Apex Code
To run the API, issue the following command from the Terminal:
node server.jsThen, trigger the Apex callout in Salesforce. Using the Developer Console in Salesforce, run:
PostgresContactSync.sendContactsToPostgres();To check the results, open your PostgreSQL tool and query the contacts table:
SELECT * FROM contacts;That’s how this is done in Apex and a middleware API.
Using Python Scripts and simple-salesforce to Integrate PostgreSQL and Salesforce
You can also use Python scripts with the simple-salesforce library that uses Salesforce REST API. But unlike the Apex code, you don’t need a middleware because Python also has a library for PostgreSQL called psycopg2. And simple-salesforce simplifies the API access so you don’t have to take care of REST API formatting and sessions.
But first, you need to install these libraries if you don’t have it yet using the following Terminal command:
pip install simple-salesforce psycopg2-binaryUsing pip, it will install both simple-salesforce and psycopg2.
Below are the steps:
1. Create a Folder for the Python Project and Open it in VS Code
Create a new folder where you will place this Python project. You won’t see any file in the VS Code Explorer. Then, create an empty Python script file called export_sf_to_pg.py.
2. Create the Python Script
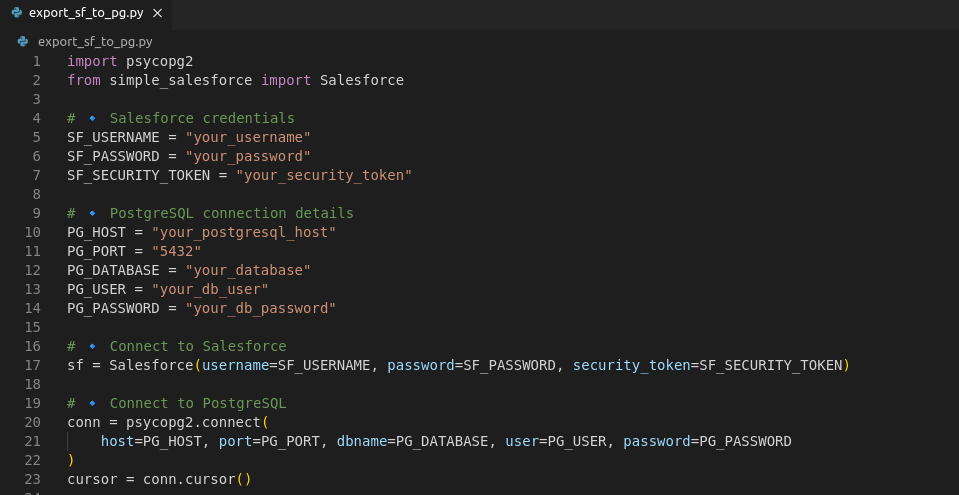
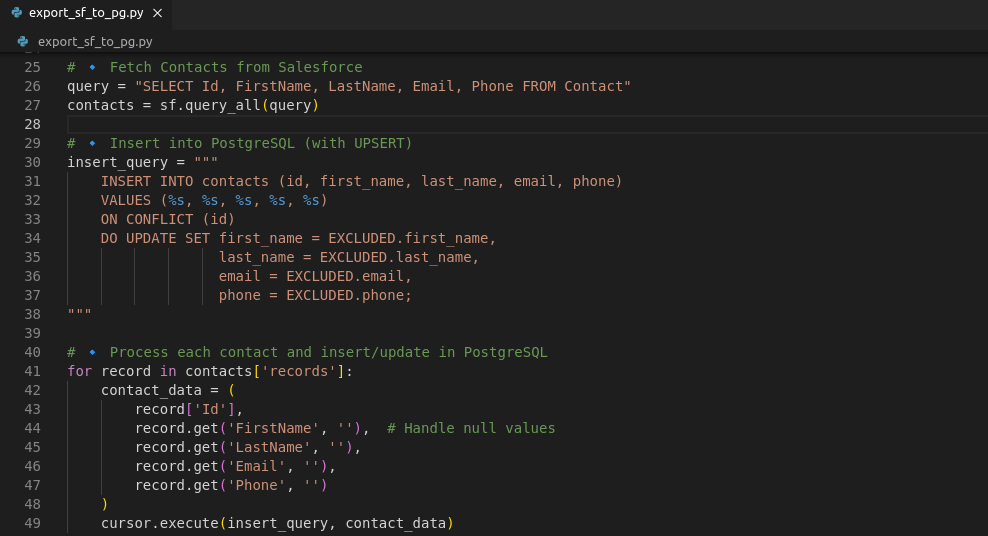
Creating the Python script includes connecting to both Salesforce and PostgreSQL, and processing each record. See the steps below:
- Connect to Salesforce and PostgreSQL. Make sure you replace the Salesforce and PostgreSQL credentials with your own.
- Then, query the Salesforce Contacts and process each contact by doing an Upsert to PostgreSQL.
- Finally, commit the changes and close the connection to Salesforce and PostgreSQL.

3. Run the Script
Open the Terminal in VS Code and run:
python export_sf_to_pg.pyThis will export the Salesforce Contacts to PostgreSQL.
We discussed two code examples for integrating Salesforce into PostgreSQL using Apex and Python. You can also use other programming languages, such as C#, Java, or JavaScript.
Pros of Custom Coding
The most notable advantages of custom coding are the following:
- Very high customization. You are free to define the logic and flow of the integration, unlike a third-party tool’s preset steps and templates.
- Solution is tailored for your unique business needs.
- Scalable and extendable for future use cases.
Cons of Custom Coding
Extensibility and customizability have a cost. Consider the following disadvantages before diving into custom coding:
- Requires coding skills with Apex or another programming language (e.g. Python).
- Custom coding takes longer to finish than using third-party tools.
- Requires maintenance and updates when Salesforce changes API rules and structure.
- API access may not be available for lower Salesforce editions. Consider upgrading to Salesforce Enterprise or Unlimited editions.
Method 3. Native Salesforce Features
Salesforce has native integration tools catering to different integration scenarios. You may opt to choose this rather than look elsewhere for integration solutions. One integration solution is using Salesforce Connect.
Salesforce Connect is a feature that lets Salesforce access and displays external data in real time without storing it inside Salesforce. You need OData to let Salesforce Connect communicate with PostgreSQL. However, PostgreSQL does not natively support OData. So, you need another software to make PostgreSQL OData-compatible. CData and Skyvia can help you make your PostgreSQL OData-compatible.
How to Configure Salesforce Connect for PostgreSQL
Follow the steps below to let your PostgreSQL tables appear in Salesforce.
1. Setup OData for your PostgreSQL Tables
Use a tool like Skyvia or CData to allow viewing your PostgreSQL table(s) using REST API. Without this, your PostgreSQL data won’t integrate into Salesforce Connect.
2. Create External Data in Salesforce
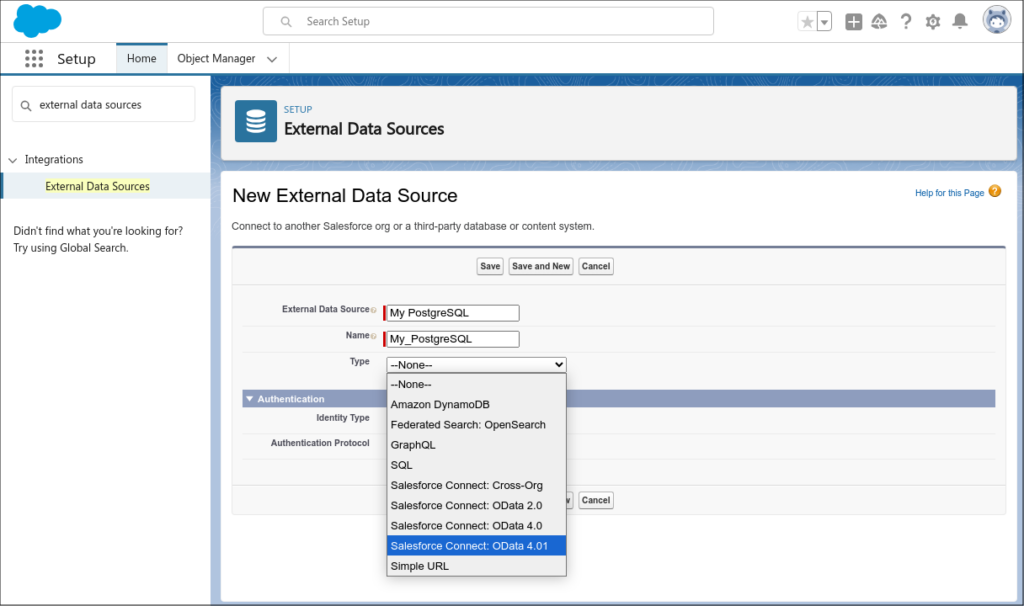
You can create an External Data Source that uses OData-compatible PostgreSQL data by doing the following:
- Log in to Salesforce.
- Click on the Gear Icon (⚙️) → Setup.
- In the Quick Find box, search for “External Data Sources”.
- Under Integrations, click External Data Sources.
- Click New External Data Source.
See a sample below:
3. Configure External Data Source
Configure the External Data Source after creating a blank one. Follow the steps below:
- Name: PostgreSQL External Data
- Type: Salesforce Connect: OData 2.0 or OData 4.0 (depending on your PostgreSQL OData provider).
- URL: The OData service URL of your PostgreSQL database.
- If you don’t have an OData service for PostgreSQL, you’ll need a middleware API (e.g., PostgREST, Teiid, or OData.NET).
- Identity Type: Anonymous or Named Principal (for authentication).
- Click Save, then Validate & Sync to create External Objects.
4. Access External Data in Salesforce
You can access the new external data by following the steps below:
- Go to App Launcher (🔎) → Find External Objects.
- You should see the tables from PostgreSQL (if your OData is correctly configured).
- Create custom reports or list views using this data.
Pros in Using Salesforce Connect
The following are the advantages of Salesforce Connect:
- No Data Duplication. You don’t store external data in Salesforce, so you save storage costs. Good for large databases like PostgreSQL where storage inside Salesforce would be expensive.
- Real-Time Data Access. Fetches data on demand instead of syncing periodically. It also ensures you always see up-to-date data from PostgreSQL
- Easy to Use with External Objects. Can be used in reports, list views, SOQL queries, and even relationships.
- No Heavy API Calls. Reduces API usage compared to traditional REST API syncs. Good for Salesforce editions with API limits.
Cons in Using Salesforce Connect
Below are the not-so-good stuff about Salesforce Connect:
- Read-Only for Most Setups. Standard Salesforce Connect only supports reading external data.
- OData Requirement is a Barrier. Salesforce Connect doesn’t support direct SQL or REST API. PostgreSQL doesn’t natively support OData, so you need a middleware.
- Limited in Lower Salesforce Editions. Salesforce Essentials and Professional don’t support Salesforce Connect. Developer Edition has limited external objects and only OData read access.
- Performance Issues with Large Datasets. Queries fetch live data, so slow external systems will slow down Salesforce. There’s no caching – Every query pulls fresh data, which can be slow.
Conclusion
We discussed PostgreSQL and Salesforce integration – what it is, when do you need one, what factors to consider, and a few ways to integrate. We used third-party tools like Skyvia, custom coding using Apex and Python, and native methods like Salesforce Connect.
You may have varied requirements to integrate. Choose any of the methods presented here considering their pros and cons.
FAQ for PostgreSQL Salesforce Integration
What are the advantages of using a cloud-based integration platform like Skyvia for PostgreSQL and Salesforce?
– No coding required
– Automated data sync & scheduling
– Prebuilt connectors for easy setup
– Secure cloud-based processing.
What types of data can I transfer between PostgreSQL and Salesforce?
– Leads, Contacts, Accounts
– Opportunities, Cases, Custom Objects
– Orders, Product Data
Is the data transfer between PostgreSQL and Salesforce secure when using Skyvia?
Yes, Skyvia uses encryption, OAuth authentication, and secure cloud processing.
What kind of support does Skyvia offer if I have trouble with the integration?
– Help Center & Documentation
– Email & Ticket Support
– Paid plans offer priority support


