Jumping between OneDrive and Salesforce all day is a productivity killer. Sales reps waste time hunting for proposals, contracts, and presentations stored in shared folders. Meanwhile, support teams struggle to link case-related documents to the correct records. Without integration, files get scattered, version control becomes a nightmare, and collaboration slows to a crawl.
Integrating OneDrive with Salesforce can fix all of that. In this guide, we’ll show exactly how to connect the two platforms and streamline companies’ document management once and for all.
Table of contents
- Key Features of Salesforce
- Key Features of OneDrive
- Methods for Integrating Salesforce and OneDrive
- Method 1: Native Tools
- Method 2: Third-Party Integration Platforms
- Method 3: Custom API Integration
- Conclusion
Key Features of Salesforce
Salesforce isn’t just a CRM but a full-blown ecosystem helping businesses sell smarter, support faster, and grow stronger. Here are some of the platform’s core features and the problems they help solve:
- Lead and Opportunity Management. Tracking every customer interaction, deal stage, and next step means that all the info is in one place. No more chasing down email threads or sticky notes.
- Customizable Dashboards and Reports. Get real-time visibility into sales performance, pipeline, and KPIs without waiting on analysts. Great for fast, data-driven decisions.
- Case and Service Management. Help support teams resolve customer issues quickly by organizing all case-related info, notes, and responses inside Salesforce.
- Collaboration with Chatter and Tasks. Sales and service teams can assign follow-ups, tag teammates, and stay aligned without needing to leave the CRM.
- Automation with Flows and Process Builder. Automate repetitive tasks like sending reminders, updating records, or notifying reps, reducing manual effort and human error.
- AppExchange and Integrations. Extend Salesforce with thousands of third-party apps (including OneDrive) to centralize workflows and reduce platform-hopping.
Key Features of OneDrive
OneDrive is a secure, collaborative workspace for modern teams. Let’s see what it brings to the table and how it solves real-world file management headaches:
- Cloud-Based File Storage. Store and access documents from anywhere. No more emailing attachments or worrying about which version is the latest.
- Real-Time Collaboration. Multiple team members can work on the same document at once. Edits sync instantly, so everyone stays on the same page.
- Version History and Recovery. Accidentally overwrite something? OneDrive keeps a detailed version history, so you can easily roll back changes and avoid costly mistakes.
- Folder Sharing and Permissions. Share documents with internal teams or external clients, with fine-tuned access control to protect sensitive info.
- Seamless Integration with Microsoft 365. Open, edit, and comment directly in the cloud on Word, Excel, and PowerPoint files. No downloads are required.
- Mobile and Desktop Access. Whether your team is in the office, on the road, or working remotely, OneDrive ensures they can access and upload files anytime, anywhere.
Methods for Integrating Salesforce and OneDrive
There’s no one-size-fits-all when it comes to integrating Salesforce with OneDrive. Depending on users’ goals, technical skills, and budget, you have a few solid options, each with pros, trade-offs, and best-fit scenarios.
Here’s a quick overview of the three main ways to make the connection happen.
1. Native Integration via Microsoft or Salesforce Apps
This method is most straightforward, using out-of-the-box features or officially supported apps to link Salesforce records to OneDrive folders. It’s simple, no-code, and great for teams needing basic file access and sharing within Salesforce.
2. Third-Party Tools (like Skyvia)
Want something more flexible but still user-friendly? No-code integration platforms like Skyvia let users build automated data flows between Salesforce and OneDrive. You can move files, sync metadata, or even schedule uploads. And forget about coding.
3. Custom API Integration
For those with in-house developers or very specific requirements, building a custom integration using Salesforce and Microsoft Graph APIs gives total control. This route is more technical but allows for deep customization and advanced logic.
The table below compares such methods, providing users with a clear, comprehensive view of each one.
| Method Group | Method | Best For | Skill Level | Customizability |
|---|---|---|---|---|
| Native Integration | Salesforce Files Connect | Teams that need simple file access from OneDrive inside Salesforce. | Beginner / Admin-level | Low |
| Third-Party Tools | Skyvia (No-Code Platform) | Businesses looking for automation, scheduled syncs, or file syncing. | Beginner–Intermediate | Medium |
| Custom Integration | Salesforce + Microsoft Graph API | Enterprises with dev teams and advanced, tailored requirements. | Advanced / Developer | High (Full control) |
Method 1: Native Tools
Files Connect is a great starting point for those looking for a simple, no-fuss way to access OneDrive files right inside Salesforce. It lets organizations link external documents to records without switching tabs or downloading anything. You won’t get fancy automation or deep syncs, but the job gets done with minimal setup for everyday file access and sharing. It’s already built into many Salesforce editions. Users need to turn it on and configure.
Best For
- Sales teams who want to quickly attach proposals, quotes, or presentations stored in OneDrive to leads or opportunities without leaving Salesforce.
- Support teams who need to view customer-submitted files (like screenshots, logs, or forms) without chasing down email threads.
- Small to mid-sized businesses looking for a cost-effective solution that doesn’t require extra software or development work.
Note: This method solves common pain points like scattered file storage, lost version control, and the constant back-and-forth between platforms. It’s especially useful when teams mostly need read-only file access directly within Salesforce records.
Step 1: Enable Files Connect in Salesforce
Before linking OneDrive files to Salesforce records, you’ll need to activate Files Connect in your org settings. This is a one-time setup step that only takes a few minutes, but unlocking the integration features is essential.
Here’s how to get started:
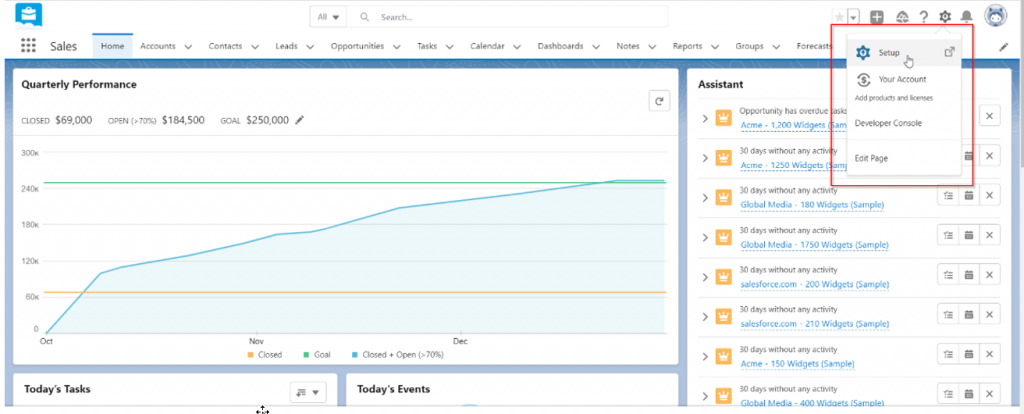
- Click the Gear icon in the top-right corner of your Salesforce screen and select Setup.
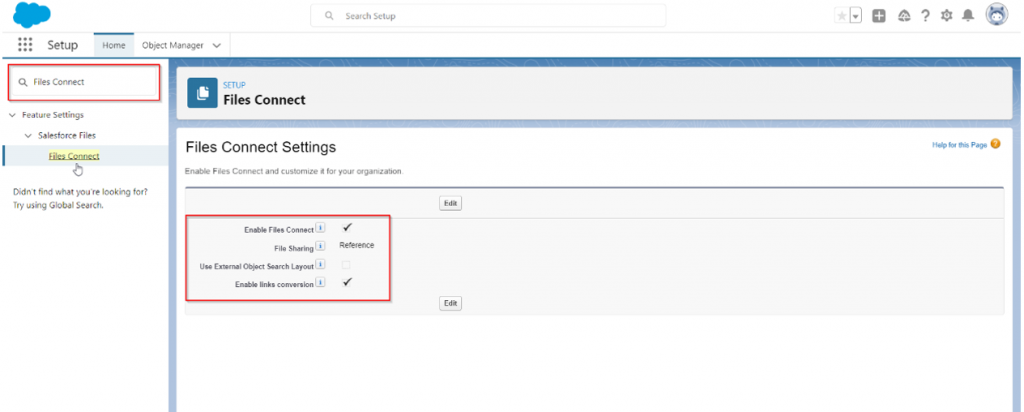
- In the Quick Find box on the left, type Files Connect. Select Files Connect. Here in the “Edit” section, you will find specific options.
- Enable Files Connect. To access remote content repositories from within Chatter.
- File Sharing. Specifies how files get stored in external repositories, such as SharePoint.
- Use External object search layout. Provides a search interface similar to the one used for custom objects.
- Enable Links conversion. Allows external document URLs to get converted to file references posted in the feed.
- Click Edit, and select Enable Files Connect for file sharing.
- Choose the authentication method (usually OAuth 2.0 for OneDrive/SharePoint).
- Save your changes.
Step 2: Creating an Authentication Provider
To connect Salesforce with OneDrive for Business, you first need to create an authentication provider in Salesforce. Then, you’ll register a matching app in Office 365 to complete the handshake.
Part 1: Set Up the Authentication Provider in Salesforce
- Go to Setup in Salesforce.
- In the Quick Find box, type and open Auth. Providers (under the Identity category).
- Click New to create a new provider.
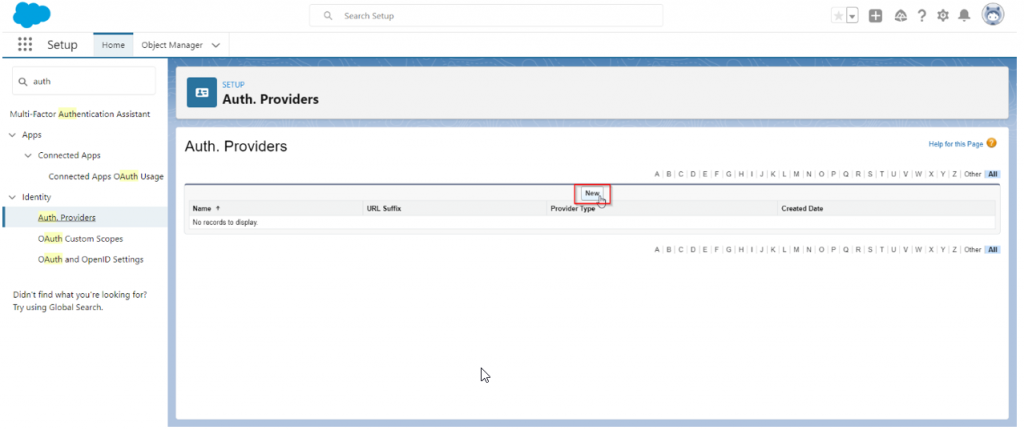
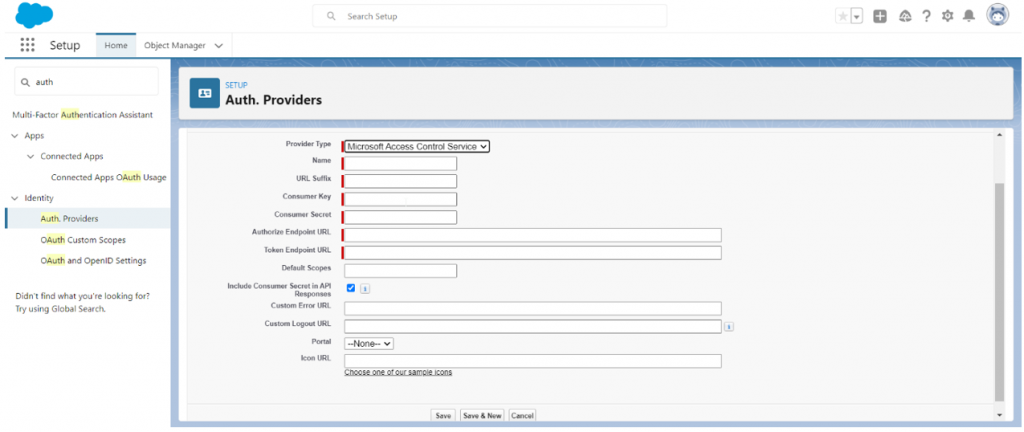
- For Provider Type, select Microsoft Access Control Service.
- Fill in the following fields:
- Name: You can put your name as you want it to appear in Salesforce.
- URL Suffix: This is where you can add a word or phrase to the end of the URL path. By default, the suffix is the same as the entry for the Name.
- Consumer Key: At this point, you can enter a temporary value here and replace it with the actual key later.
- Consumer Secret: At this point, you can enter a temporary value here and replace it with the actual key later.
- Authorize Endpoint URL: This is where you can put a blank that starts with HTTPS.
- Token Endpoint URL: This is where you can put a blank that starts with HTTPS.
- Default Scopes: Optional or leave blank.
6. Click Save. After saving, copy the Callback URL Salesforce generates. You’ll need it when creating the Office 365 app.
Part 2: Register an App in Office 365 (SharePoint)
Log into your Office 365 Admin Account and go to:
https://xyzenterprise-my.sharepoint.com/layouts/15/appregnew.aspx
(Replace xyzenterprise with your actual SharePoint domain).

- Fill out the registration form:
- Client Id: Click Generate, then save it somewhere safe.
- Client Secret: Click Generate, then save it.
- Title: Name your app (e.g., “SalesforceOneDrive”).
- App Domain: Enter your Salesforce domain.
- Redirect URL: Paste the callback URL you copied earlier.
- Click Create.
Part 3: Grant App Permissions
- Now go to:
https://xyzenterprise-my.sharepoint.com/_layouts/15/appinv.aspx - Enter the following:
- App Id: Paste the Client Id from the previous step, then click Lookup.
- Title, App Domain, Redirect URL: Leave the defaults.
- Permission Request XML: Paste this snippet, replacing [PERMISSION] with your needed access level (Read, Write, Manage, or FullControl):
<AppPermissionRequests AllowAppOnlyPolicy="true">
  <AppPermissionRequest Scope="http://sharepoint/content/sitecollection" Right="[PERMISSION]" />
</AppPermissionRequests>- Click Create.
- Set the following options once more:
- App Id: Enter the Client Id you got in the last step, and click Lookup.
- Title: Keep the default value.
- App Domain: Use the default value.
- Redirect URL: Use the default value.
- Permission Request XML: Here, enter a string that looks like this: Replace the [PLACEHOLDER] with one of these values:
- Read
- Write
- Manage
- FullControl
5. Under the same Salesforce Auth. Providers tab, click Edit next to the Authentication Provider you already made and change the following fields:
- Consumer Key: Type in the Client ID you got in the last step.
- Client Secret: Type in the Client Secret you got from the steps before.
- Authorize Endpoint URL: Type in the URL of the Office 365 OAuthAuthorize.aspx page.
Note: Here’s how the URL looks:
https://xyzenterprise-my.sharepoint.com/_layouts/15/OauthAuthorize.aspx
Token Endpoint URL: Here, input the URL in the following format:
https://accounts.accesscontrol.windows.net/xyzenterprice.onmicrosoft.com/tokens/OAuth/2?resource=00000003-0000-0ff1-ce00-000000000000/xyzeterprise-my.sharepoint.com@xyzenterprise.onmicrosoft.com
6. Click Save when finished. The Authentication Provider is now ready for use.
Now that your Salesforce CRM is set up, you can use the power of OneDrive Salesforce Integration by using the Salesforce CRM to access all the information on OneDrive.
Part 4: Update Salesforce Auth. Provider with Real Credentials
- Return to Auth. Providers in Salesforce.
- Click Edit on the provider you created earlier.
- Replace the placeholder values:
- Consumer Key. Your Client ID from Office 365.
- Consumer Secret. Your Client Secret.
- Authorize Endpoint URL. https://xyzenterprise-my.sharepoint.com/_layouts/15/OauthAuthorize.aspx
- Token Endpoint URL:
https://accounts.accesscontrol.windows.net/xyzenterprise.onmicrosoft.com/tokens/OAuth/2?resource=00000003-0000-0ff1-ce00-000000000000/xyzenterprise-my.sharepoint.com@xyzenterprise.onmicrosoft.com
- Click Save.
Pros
- Organized attachments. Keep contracts, quotes, and case files neatly linked to the right leads, opportunities, or support tickets.
- Better collaboration. Teams can work on shared files in real-time, with no duplicates or version chaos.
- Faster onboarding. Sales reps and support agents instantly find the files they need, even if they didn’t upload them.
- Fewer storage headaches. Offload big files to OneDrive while keeping access within Salesforce so you don’t hit storage limits.
- Improved customer experience. Speed up responses with all the proper docs in the right place at the right time.
Cons
- Limited file interaction. Tools like Files Connect offer basic access but not deep file sync or automation.
- Setup can be tricky. Configuring authentication providers and registering apps in Office 365 takes a few careful steps.
- Write access may be restricted. Depending on the Salesforce edition and permissions, you might only get read access to OneDrive files.
- Not available in all editions. Files Connect isn’t included in some lower-tier Salesforce plans.
Method 2: Third-Party Integration Platforms
If native tools feel too limited and custom development seems like overkill, third-party integration platforms offer a practical middle ground. These tools connect apps like Salesforce and OneDrive with minimal setup and no need to write code.
Depending on the platform, you can automate file transfers, trigger workflows, or even sync structured data between systems. It’s a great option for teams that want more control and flexibility without getting too technical.
Several tools are available in this space, including Skyvia, Zapier, Workato, and Integromat (Make). Each has strengths depending on the companies’ use cases. Some focus on real-time automation, others on scheduled data sync or advanced mapping. In the next section, we’ll walk through how to use Skyvia as a practical example of setting this up.

Best For
- Sales and marketing teams that want to automatically upload or sync customer-facing files (e.g., contracts, brochures, proposals) between Salesforce and OneDrive.
- Operations and data teams that need to keep folder structures and metadata aligned across platforms.
- Support teams that manage large volumes of file attachments and want to offload them to OneDrive without losing context in Salesforce.
- Companies with limited dev resources who still need advanced logic, like scheduling, conditional file handling, or multi-step workflows.
Note: If the pain points of your business are manual uploads, scattered file versions, or repetitive data movement between platforms, a third-party integration tool like Skyvia helps eliminate the busy work and bring order to the document processes.
How to Create Skyvia Connections
To integrate OneDrive with Salesforce, you need to have a Skyvia account registered and connections to OneDrive and Salesforce created.
Use the above links to see how to connect to Salesforce and OneDrive.
How to Import Data from OneDrive to Salesforce
- Sign in with Skyvia and create a new Import.
- Click CSV from the storage device.
- Select OneDrive as a Source and Salesforce as a Target.
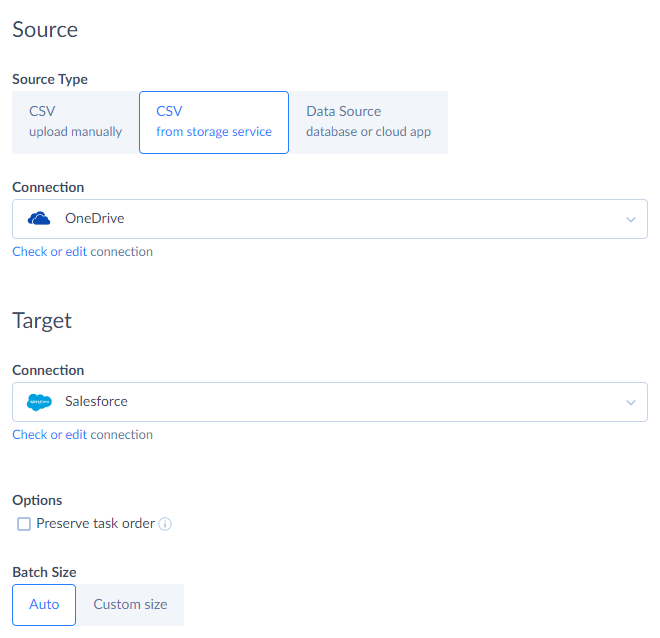
Note: You may also specify additional options if needed, such as configuring the batch size and defining the task execution order when working with multiple tasks.
- Create the package task:
- Click + Add New on the top right of the Skyvia page.
- Select the source file on the Source Definition tab and adjust the CSV options if needed.
- Select the target in the Target definition table, select DML operations.
- Map the fields and save the task. You can transform source data with any available mapping type.

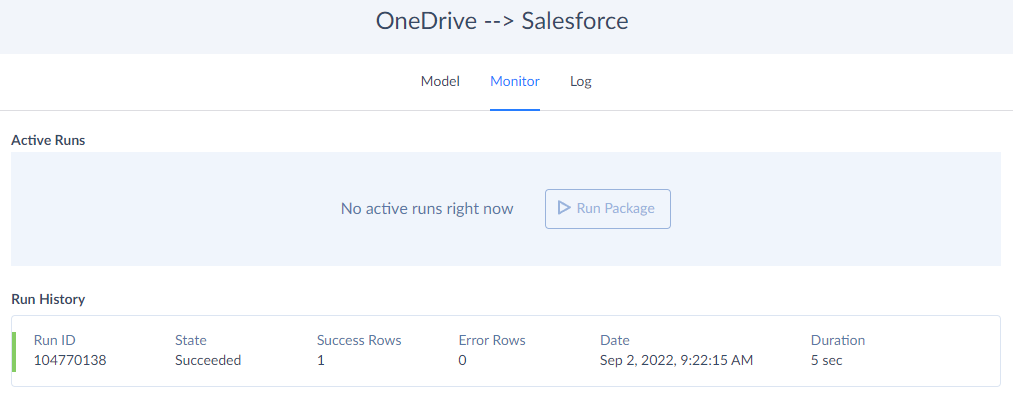
- When completing the mapping, save the task and run the integration.
- You can check the package results on the Monitor and Log tabs.
How to Export Data from Salesforce to OneDrive
Skyvia offers an export solution to connect Salesforce with OneDrive in the opposite direction. It queries the content of the needed Salesforce table, generates the CSV file, and places it in the OneDrive folder.
To integrate Salesforce with OneDrive:
- Sign in with Skyvia and create a new Export integration.
- Select your Salesforce connection as a Source.
- Click on the CSV to storage service Target type.
- Select your OneDrive connection as a Target.
- Choose the folder where the future CSV file has to be placed.
- Enable the other available integration and file options.
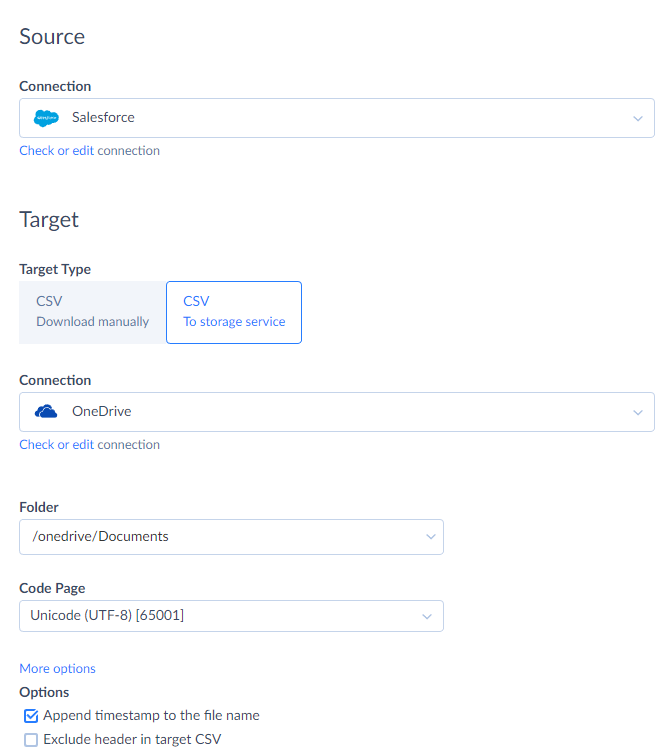
- Create the export task.
Click + Add New, same as was described above, and do the following:
- On the source definition tab, select the task mode. Advanced is more relevant for complex custom commands or Salesforce report exports. We will just export the record from the table without complicated transformations; thus, we select the Simple task mode.
- Under Object, select the source Salesforce table and needed fields. Add filtering conditions if necessary.
- You can change the result file column order and rename the columns on the Output Columns tab.
- Save the task and the integration and run it.
Note: Skyvia allows running the integration automatically using a schedule. You can adjust the frequency according to your business needs.
Go here to explore all available Salesforce OneDrive integration opportunities.
Pros
- Cloud-based and hassle-free. No installation, updates, or maintenance. Just log in and build integrations from your browser.
- Truly no-code. Even non-technical users can create and manage data flows using a clean, wizard-based UI.
- Wide connector support. Connect to over 200+ cloud apps, databases, and file storage services, including Salesforce and OneDrive.
- Flexible functionality. Supports ETL, ELT, reverse ETL, replication, and scheduling in one platform.
- Affordable and scalable. Offers a free plan for light users and cost-effective tiers for growing teams.
Cons
- No real-time triggers. Skyvia works with scheduled jobs, not live webhook-based automation like Zapier or Make.
- Limited support for document-level file management. Users can move metadata and CSV data easily, but full native OneDrive file syncing (like folder structure automation) may require workarounds.
- Some advanced features require a paid plan. While the free version is great for testing, features like advanced data transformation and support of complex integration scenarios require paid subscriptions.
Method 3: Custom API Integration
If your team has some special requirements or needs deep, custom logic that off-the-shelf tools can’t provide, a custom API integration might be the way to go.
This approach includes manually connecting Salesforce and OneDrive using their respective APIs: Salesforce REST/SOAP APIs and Microsoft Graph API for OneDrive.
While it gives users total control, it comes with a price: it’s complex, time-consuming, and requires developer expertise. You’ll need to handle authentication, error handling, data formatting, rate limits, and ongoing maintenance yourself.
It’s rarely the fastest or most efficient option, especially when platforms like Skyvia already handle 80–90% of typical business scenarios out of the box. But it may be worth the investment if you’re incorporating a custom workflow into a more extensive system or need integration deeply tailored to internal processes.
Best For
- Large enterprises that need to embed Salesforce–OneDrive integration into custom-built internal platforms or portals.
- IT and dev-heavy teams with in-house engineering capacity to maintain long-term custom integrations.
- Businesses with strict data governance or compliance requirements that require complete control over how data moves and where it’s stored.
- Organizations needing advanced logic like conditional routing, complex file transformations, or syncing data across multiple internal systems, not just Salesforce and OneDrive.
Note: If the company’s pain points include limited flexibility, data security requirements, or integration with legacy systems, custom APIs give users the power to build exactly what they need but expect a longer path to production.
Pros
- Total control. Users can build exactly what the team needs, with complete flexibility over logic, data flow, error handling, and security.
- Deep customization. It is ideal for workflows that go beyond what standard platforms can support.
- An ability to be embedded in existing systems. Easily tie into proprietary platforms, internal tools, or larger enterprise architecture.
- Support of advanced use cases. Great for multi-step processes, file transformation, metadata management, or integrating with multiple APIs simultaneously.
Cons
- High complexity. It requires skilled developers, a detailed API documentation review, and extensive testing.
- Longer setup time. Custom solutions often take weeks (or months) to design, build, and stabilize.
- Maintenance burden. Users will need to handle ongoing updates, authentication token renewals, error logging, and API version changes.
- Costly in the long run. Dev time, infrastructure, and support can make this option significantly more expensive than no-code tools.
- Overkill for simple use cases. This route may be unnecessarily complex if you’re just syncing files or exporting data.
Conclusion
Integrating OneDrive with Salesforce can seriously streamline workflows, improve file management, and reduce the daily tab-juggling chaos.
There’s no one-size-fits-all solution. The best method depends on each team’s needs, skills, and goals.
- If you’re looking for something simple and built-in, native tools like Salesforce Files Connect are a solid starting point, especially for basic file access and sharing.
- Got complex processes, security policies, or systems that just won’t play nice with plug-and-play tools? Custom API Integration might be the way to go, but be ready to invest in development resources and long-term maintenance.
Need more automation, scheduling, or flexibility without hiring a developer? A third-party no-code platform like Skyvia gives companies powerful tools without the complexity, making it perfect for growing teams and business users.
FAQ for OneDrive Salesforce Integration

Can I connect my personal OneDrive account to Salesforce, or do I need OneDrive for Business?
You’ll need OneDrive for Business. Salesforce Files Connect and Microsoft Graph API (used in third-party or custom integrations) only support enterprise-grade OneDrive accounts. Personal OneDrive accounts are not compatible with these integration methods.
Is coding required to integrate Salesforce and OneDrive using Skyvia?
Nope. Skyvia is a no-code platform, so you can set up and manage integrations using a visual interface and simple wizards. No programming skills are needed. Just connect your accounts, define the data flow, and let it run.
What types of data can I synchronize between Salesforce and OneDrive?
You can sync CSV file data, such as exported Salesforce objects (Leads, Opportunities, Cases, etc.), into OneDrive folders. You can also import structured data from CSVs stored in OneDrive back into Salesforce. While full-document syncing isn’t native, metadata and file records can be integrated.
What happens if there’s an error during the data synchronization process?
Platforms like Skyvia include built-in logging and monitoring. If an error occurs, you’ll see detailed logs explaining what went wrong (e.g., permission issues, format mismatches, API limits). You can then fix the issue and rerun the job manually or let it retry based on the schedule.