
")
Sales and marketing alignment isn’t just some trendy catchphrase. It’s what separates businesses that grow from those that just get by. When your teams are in sync, you see faster deals, higher conversions, and revenue numbers you actually want to brag about. But when systems don’t talk to each other, chaos creeps in: lost leads, insufficient data, missed opportunities.
Enter Salesforce and Marketo Engage, two powerhouse platforms built to drive serious results. Salesforce is your go-to for managing relationships, tracking deals, and making smart moves based on real data. Marketo is the marketing brain behind personalized campaigns, lead nurturing, and customer engagement across every channel.
On their own, they’re impressive. Together, they’re unstoppable.
But here’s the catch: if you don’t integrate them properly, you leave money (and insights) on the table. Data gets trapped, workflows break down, and customers get a disconnected experience.
That’s why in this guide, we’re covering:
- Why hooking up Salesforce and Marketo is a no-brainer for real growth
- The huge upsides, from better collaboration to way sharper analytics
- How to set it up (and avoid common facepalm moments)
- How top no-code data platforms, like Skyvia, can make integration smooth and fast.
Ready to ditch the silos and start working smarter? Let’s make it happen.
Table of Contents
- What is Adobe Marketo Engage?
- What is Salesforce?
- Benefits of Integration Marketo with Salesforce
- Preparing for data integration
- How to Integrate Salesforce and Marketo
- Native Integration vs. Third-Party Platforms: A Quick Comparison
- Method 1. Native Integration Marketo and Salesforce
- Method 2. Third-party Integration Platforms
- Summary
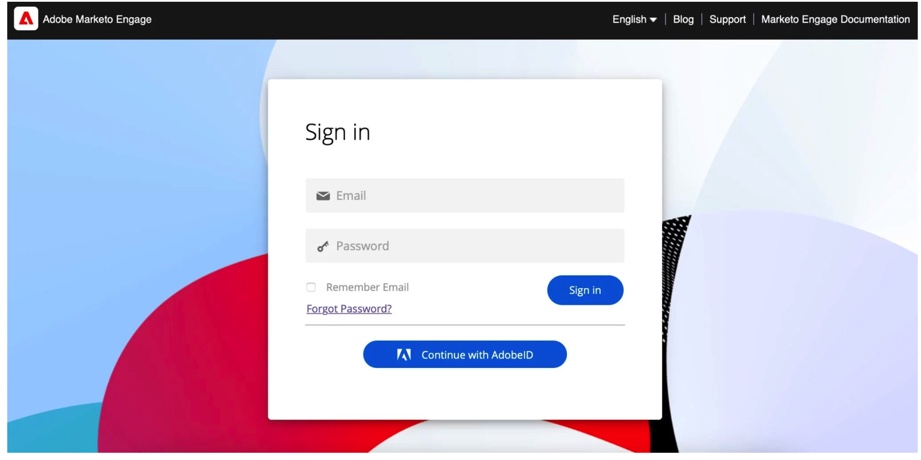
What is Adobe Marketo Engage?
Adobe Marketo Engage is positioned exactly as the screenshot shows it: “Powerful marketing automation.” It’s part of the broader Adobe for Business suite, and it gives companies the tools to run modern, always-on digital marketing without stitching together half a dozen separate systems.
At its core, Marketo helps businesses attract, engage, and nurture prospects across email, web, ads, events, and more. Teams lean on it for things like automated lead nurturing, personalization at scale, and campaign performance tracking — the kind of heavy-lifting that traditional CRMs or simple outreach tools can’t quite handle. That’s why searches around “digital marketing solutions” and “business marketing tools” often lead straight to Marketo.

Its strength comes from how it orchestrates marketing flows end-to-end. You can schedule campaigns, score leads, trigger follow-ups, and analyze revenue impact. All from one place. And when you connect Marketo to Salesforce, the entire sales and marketing loop tightens: marketing sees which leads convert, and sales gets cleaner, richer engagement data to work with.
Key features
- AI-driven audience segmentation and personalization for tailored campaigns.
- Visual campaign building and automation across multiple digital channels, enabling personalized engagement at scale without heavy IT involvement.
- Advanced analytics and performance insights, including predictive analytics and campaign ROI measurement.
- Integration with Adobe Experience Platform (AEP) for unified data management and deeper personalization.
- Cross-channel engagement tools, such as A/B testing, dynamic content, and interactive webinars.
- Seamless data integrations with other platforms and flexible data management.
- Multiple certification programs, including the Adobe Certified Professional and Business Practitioner Expert, are valid for two years, with free online renewal exams available.
What is Salesforce?
Salesforce is the most popular CRM for any business, providing customizable CRM functionality based on the company’s demands. It’s powerful and easy to scale, which makes it ideal for companies of all sizes.
The service has a comprehensive set of features that offer an extensive view of all customer interactions. In addition, it offers a full marketing cloud that includes all marketing channels, such as email, mobile, social media, and the web, in one place.
And Salesforce keeps raising the bar. Marketing Cloud connects all the primary marketing channels, like email, mobile, social, and web, so that users can create seamless, cross-channel campaigns without the usual headaches.
Salesforce AppExchange helps you tap into thousands of third-party apps and integrations, customizing your CRM setup to fit just about any business need.
Key features
- Salesforce AppExchange. Thousands of apps and integrations, both proprietary and open-source, to customize the CRM exactly the way users need it.
- Opportunity Management. A real-time, 360-degree view of every deal on the table: track stages, products, stakeholders, and updates in one place.
- Account Management. The full story behind every customer. Salesforce tracks emails, chats, calls, and more, giving companies a complete history that helps build stronger, more personal relationships.
- User-Friendly Interface. The Lightning UI brings a sleek, drag-and-drop experience to day-to-day work. Automate processes, build custom workflows, and manage tasks without coding.
- AI-Driven Automation. With Einstein GPT and AI-powered insights baked right in, Salesforce delivers next-level personalization, smarter predictions, and automated content generation, helping teams work faster and close deals smarter.
- Advanced Security and Compliance. Salesforce’s latest updates double down on data protection. Your sensitive information stays safe and audit-ready with stronger encryption, tighter security controls, and built-in compliance features.
- Unified Data Cloud. The Salesforce Data Cloud pulls all customer data into a single source of truth, powering real-time reporting, sharper insights, and better decisions without the usual data chaos.
- Slack Integration. Real-time collaboration just got easier. Deep Slack integration lets teams chat, share files, and trigger workflows, all without leaving Salesforce.

Benefits of Integration Marketo with Salesforce
The purpose of CRM is to track and manage all kinds of leads and customers, while marketing automation tools allow for automated marketing campaigns, measurement, and retargeting of customers who left the website. The Marketo Salesforce connector can be a huge time-saver for sales and marketing managers as they ultimately track unlike tasks for different purposes.

Key advantages include:
Enriching Data for a Holistic Customer View
One of the biggest wins of connecting Marketo to Salesforce is how it enriches the data flowing between the two platforms. With cleaner, more complete records, teams finally get that holistic customer journey view everyone talks about but rarely achieves.
You’re no longer guessing where a lead came from or which touchpoint moved them forward.
This integration delivers greater data accuracy, better segmentation, and real-time updates, so marketing and sales are always working from the same source of truth.
Aligning Teams for Better Collaboration
Sales and marketing alignment isn’t just a buzzword. It’s a real operational unlock when these two systems start talking.
By integrating Marketo with Salesforce, workflow handoffs become smoother, and teams stop tripping over duplicate records or outdated notes.
This translates into improved collaboration, streamlined workflow processes, higher accountability, and even better onboarding and training because everyone is finally looking at the same data in the same place.
Driving ROI with Smarter Analytics
Both platforms on their own can surface useful data, but together they give you a far more complete performance picture.
Multi-channel attribution becomes much easier when Marketo’s engagement signals enrich Salesforce’s revenue data.
Teams can run improved ROI analysis, experiment with diverse attribution models, and feed insights back into both sales and marketing.
Add in forecasting and predictive analysis, and suddenly budget conversations feel grounded instead of speculative.
Optimizing Strategy with Comprehensive Lead Scoring
Marketo’s lead scoring becomes dramatically more powerful once it’s tied to Salesforce’s real activity history.
Instead of just tracking email engagement, your scoring model can now consider opportunities, pipeline stages, and sales feedback.
This combination gives you comprehensive lead scoring, sharper segmentation, and more relevant automation. All of which helps marketing aim their efforts where they’ll move the needle most.
Preparing for data integration
Before setting up a Marketo to Salesforce synchronization, it’s essential to understand how the data schema is structured within each tool.
Think of it like remodeling your kitchen. You wouldn’t start tearing down walls without knowing where the pipes and wires run. The same goes for the data.
The key challenge? Every Salesforce and Marketo setup is unique.
Both platforms are flexible, which is great for customization but tricky for integration. Each instance can have custom objects, fields, naming conventions, and workflows that differ wildly from business to business. That’s why, before any sync begins, you need a clear picture of how data is structured on both sides.
Start by auditing:
- What objects and fields exist in Salesforce and Marketo?
- Which fields need to be synced (and how often)?
- What data formats you’re working with?
- Any naming conflicts or mismatches.
Once you’ve mapped out fields and relationships, take the time to test.
Pro tip: Use a Salesforce Sandbox environment before going live.
It’s a safe, isolated testing environment that mirrors your actual Salesforce org but without the risk of messing up live data. You can simulate how the integration behaves, test data mappings, and catch issues early before they impact the team or customers.
Bonus prep tips:
- Back up your data before making changes, just in case.
- Involve marketing and sales ops early; they’ll catch things others might miss.
- Define ownership of the integration (Who’s monitoring it? Who fixes errors?).
- Document everything, and your future self will thank you.
Doing this groundwork sets you up for a much smoother integration. It’s the difference between confidently launching sync and scrambling to fix a broken pipeline under pressure.

How to Integrate Salesforce and Marketo
Once the data is cleaned up and field mappings are in place, it’s time to connect Salesforce and Marketo. There are two main ways to go about it, each with its own strengths and style.
1. Native Integration
Marketo’s built-in connector for Salesforce allows the two platforms to talk directly. It’s tightly integrated and can sync leads, contacts, campaigns, and more in near real-time. It’s a good option, especially if the setup is standard. But it’s not exactly plug-and-play. You’ll need to manage user permissions, carefully configure the sync, and monitor things to ensure nothing breaks as the systems evolve.
2. Third-Party Integration Platforms
If you’re looking for more flexibility and less technical hassle, third-party tools like Skyvia are a great selection. These no-code platforms make designing, automating, and monitoring your syncs easy.
These platforms handle custom fields, build more complex workflows, and help to avoid some of the limitations of the native connector.
Plus, such solutions are easy to use, so you can spend less time fixing things and more time using insights strategically.
Native Integration vs. Third-Party Platforms: A Quick Comparison
| Criterion | Native Marketo-Salesforce Integration | Third-Party Platforms |
|---|---|---|
| Ease of Setup | Moderate. Requires some technical setup and understanding of both platforms. | Easier. No-code/low-code setup with user-friendly interfaces. |
| Flexibility | Limited to standard use cases and mappings. | Highly flexible. Supports complex workflows and custom scenarios. |
| Customization | Basic field mappings and sync options. | Advanced mapping, transformations, filtering, and scheduling. |
| Maintenance Needs | Requires ongoing monitoring and manual adjustments when schema changes. | Automated error handling, alerts, and easier reconfiguration. |
| Cost | Included with Marketo subscription (but may require more internal resources to manage). | Additional cost depending on the tool, but saves time and reduces technical strain. |
| Best For | Teams with strong in-house technical support and standard integration needs. | Teams looking for speed, flexibility, lower maintenance, and non-technical setup options. |
| Scalability | Good for smaller to mid-sized sync needs. | Great for growing businesses with expanding data sources and complex processes. |
In the next sections, we’ll break down both methods to help users find the best approach that fits their team, data, and business goals.
Method 1. Native Integration Marketo and Salesforce
If you want a direct, out-of-the-box connection between Marketo and Salesforce, the native integration is the first option to consider. Adobe offers a built-in connector that enables these two platforms to sync key records, giving both marketing and sales teams a more connected view of leads and customers.
What Data Syncs Natively
Here’s a quick breakdown of what’s supported out of the box.
| Object Type | Sync Direction | Notes |
|---|---|---|
| Leads | Bidirectional | Auto-created in Marketo from Salesforce and vice versa. |
| Contacts | Bidirectional | Commonly synced with linked accounts. |
| Accounts | Salesforce → Marketo | Marketo cannot push updates to Salesforce accounts. |
| Campaigns | Bidirectional | Syncs status, membership, and updates. |
| Opportunities | Salesforce → Marketo | Used for revenue attribution in Marketo. |
| Activities | Marketo → Salesforce | Sales alerts, email opens, clicks, and form submissions. |
| Users | Salesforce → Marketo | Typically for assigning lead ownership. |
| Custom Objects | Optional (read-only in Marketo) | Requires API config; syncs from Salesforce to Marketo. |
Best for
- Companies already deep in the Adobe/Salesforce ecosystem.
- Standard marketing/sales processes with limited need for customization.
- Teams with in-house Salesforce admins or technical support.
- Organizations prioritize real-time lead sync and visibility.
Step-by-Step Guide
Marketo Sales Insight App (AppExchange)
Marketo offers native integration with Salesforce with its Marketo Sales Insight app, which can be downloaded from the Salesforce AppExchange.

What Your Sales Team Sees: Unified Lead and Contact Intelligence
The example above shows what happens once Marketo and Salesforce are fully connected. Suddenly, the sales team isn’t jumping between tools anymore. They get a single, unified view where Leads and Contacts sit side by side, and everything they need to prioritize outreach is right in front of them.
Notice how the interface lets you toggle between Leads, Contacts, Account Contacts, and Opportunity Contacts. That’s the power of native integration: sales reps can quickly scan every type of record without switching tabs or exporting reports. For teams looking for better lead tracking tools or smoother sales lead management, this combined view is a game-changer.
A standout column here is Last Interesting Moment, and this comes straight from Marketo. It pulls in real marketing engagement signals, like webinar attendance, email clicks, form submissions, or high-intent website activity. Instead of calling a lead cold, your reps now know why someone is worth the follow-up.
You can also see columns like Status Header, Engagement, and Type, which help reps instantly spot who’s warming up, who’s stalled, and who needs a nudge. This kind of insight normally lives only in the marketing automation tool, but integration brings it directly into the CRM, where sales actually live.
Want detailed steps? Check out the full installation guide here.
Native Integration Documentation (Manual Setup)
If you need more control, like syncing custom fields, handling custom objects, or setting up complex lead scoring rules, you’ll want to go beyond the basic MSI app. Marketo’s native Salesforce integration offers greater flexibility, but it requires a few more setup steps.
Preparing for Integration: Customizing Fields in Salesforce
The screenshot below shows the very first step in creating a new custom field in Salesforce. You’re in the “New Custom Field” setup flow, and Salesforce asks you to “Choose the field type.” This decision matters more than it seems because each type determines how incoming Marketo data will be stored, displayed, and used in automation rules.

On the left side of the screen, you’ll see options like:
- Checkbox: great for true/false Marketo flags
- Formula: helpful if you need calculated values
- Lookup Relationship: if the data needs to reference another object
- External Lookup Relationship: used when Marketo data is linked to something outside Salesforce
Picking the correct Data Type ensures you don’t run into mapping issues later when Marketo tries to sync values into Salesforce. After selecting the type, click Next to continue naming, permissions, and field-level configuration.
Before you connect Marketo to Salesforce, there’s a bit of prep work worth doing, and it starts with customizing your Salesforce objects. Marketo can push some incredibly useful engagement data into Salesforce, but you need the right fields in place to hold it. Otherwise, those insights have nowhere to land.
Step 1: Prepare Your Salesforce Org
- Log in to Salesforce, click the Setup gear icon, and navigate to Object Manager → Lead → Fields & Relationships.
- Create custom fields like Score, Acquisition Program, and Acquisition Date.
- Set field types, configure field-level security, and update the page layouts for Lead and Contact objects.
- Map your custom fields to ensure they transfer during lead-to-contact conversions.
Tip: Custom formula fields can also be created to automate lead scoring and tracking between systems.
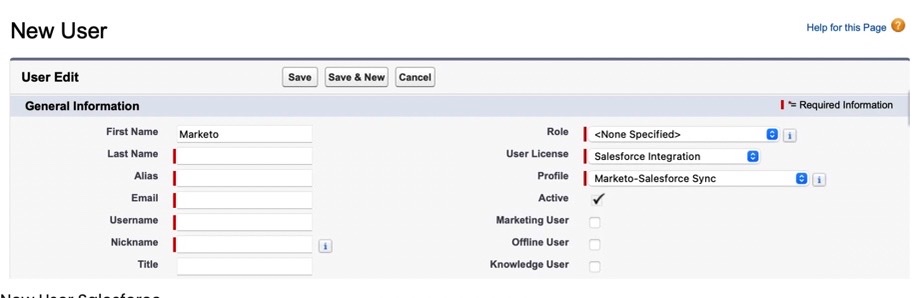
Step 2: Create a Salesforce User for Marketo
- Go to Setup → Profiles and clone the Standard User profile (you can name it something like Marketo-Salesforce Sync).
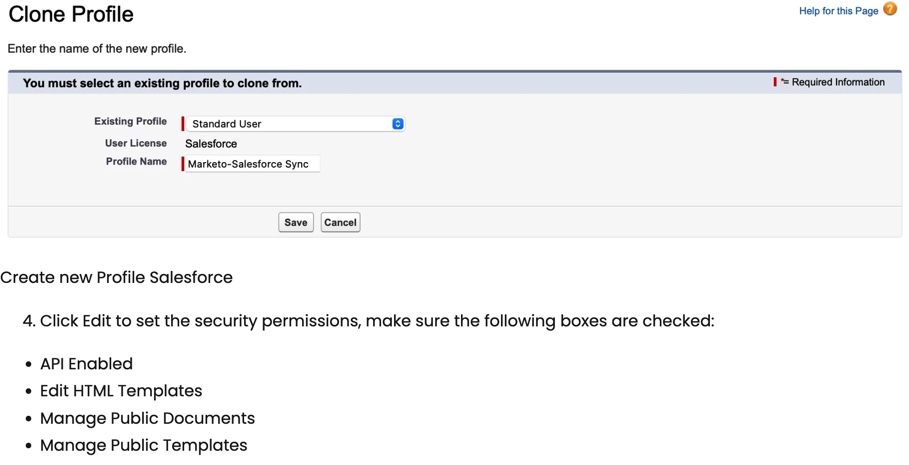
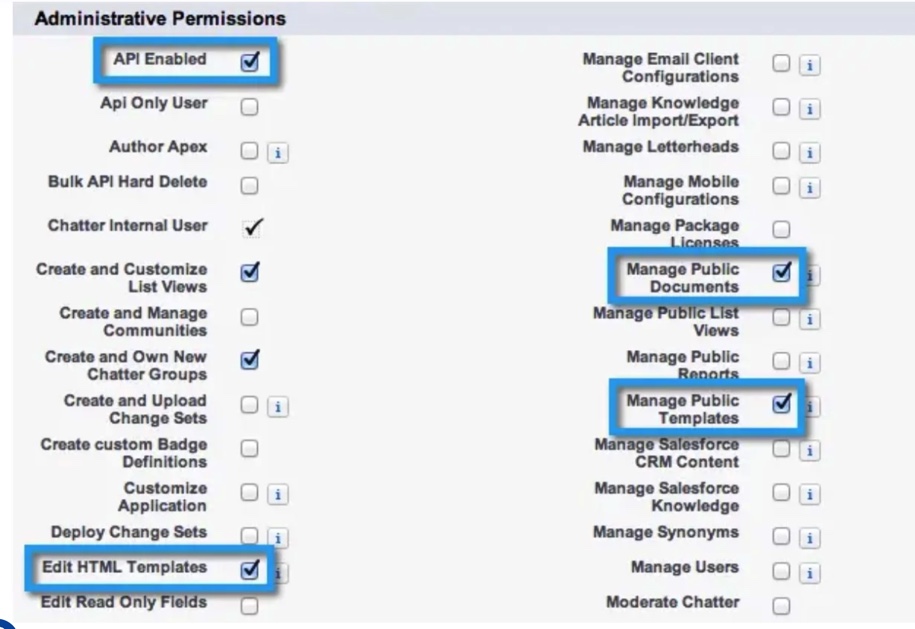
- Edit permissions to allow API access, editing events/tasks, and managing templates/documents.
- Under Object Permissions, give Read, Create, Edit, and Delete access to key objects like Accounts, Leads, Contacts, Opportunities, and Campaigns.
- Save the profile, and then create a new user using this custom profile.
Step 3: Generate a Salesforce Security Token
- Log in with your new Marketo user credentials.
- Click your avatar → Settings → My Personal Information → Reset My Security Token.
- A new token will be emailed to you. Keep it handy for the Marketo connection.
Step 4: Connect Salesforce and Marketo
- Log in to your Marketo instance.
- Navigate to Admin → CRM → Sync with Salesforce.
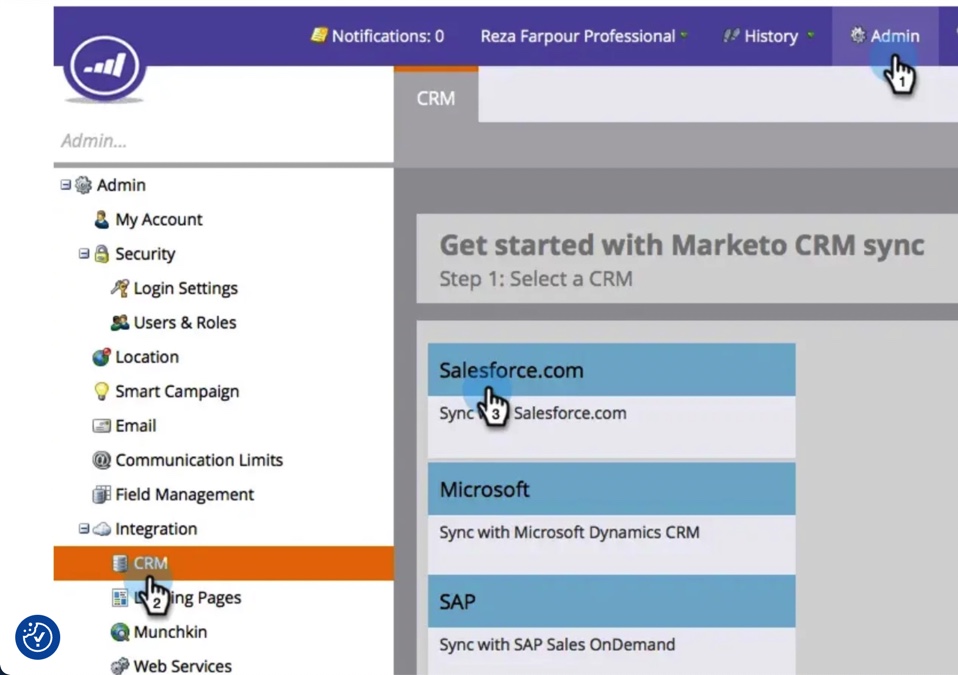
- Enter your Salesforce username, password, and security token.
- Review the warnings and click Confirm Credentials.
- Follow the setup prompts to kick off the Salesforce syncs.
Pros
- Built-in, supported by both Adobe and Salesforce.
- Real-time sync for leads and activities.
- Seamless visibility into lead engagement for sales reps via MSI.
- Direct campaign and status syncing between systems.
- No extra cost if you’re already using both platforms.
Cons
- It requires hands-on configuration and monitoring.
- Limited flexibility with custom workflows and objects.
- The Salesforce schema has priority: custom fields must originate there.
- API limits in Salesforce can throttle sync if exceeded.
- No automatic re-sync if data is missed during downtime.
- It is more technical to manage compared to third-party tools.
Method 2. Third-party Integration Platforms
Native integration works well for many use cases. However, such a solution isn’t a one-size-fits-all. For businesses running on more than just Salesforce and Marketo that need advanced data transformation or want a faster, more flexible setup without digging into code, the native connector can start to feel limiting.
That’s where third-party integration platforms are helpful, and Skyvia is one of the standout options.
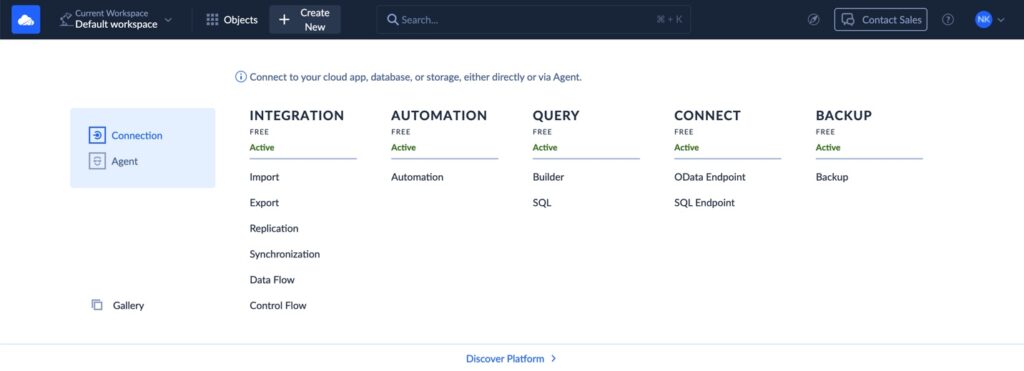
Skyvia is a cloud-based platform that connects both cloud and on-premises applications, enabling users to build ETL, ELT, and reverse ETL pipelines. It provides a broad set of capabilities for data integration, synchronization, and querying, making it easy to extract value from your data with minimal technical effort. The service meets the essential needs of a business in today’s digital world:
- Easily set up, integrate, and maintain.
- Scalable and flexible (capable of meeting any load and providing flexible pricing).
With Skyvia, you can also build and manage complex integration scenarios with many sources by applying Data Flow and Control Flow features. With all of the automation features in Skyvia, you can receive fully automated and trouble-free data processes.
Best for
- Teams that need more customization or flexibility than the native connector allows.
- Companies using more than just Marketo and Salesforce (e.g., adding HubSpot, Snowflake, Google Sheets, etc.).
- Non-technical teams looking for a no-code solution.
- Businesses that want better monitoring, automation, and error handling.
- Organizations managing large data volumes or custom field mappings.
Preparing for data integration using Skyvia
How to easily and quickly configure automated data integration (as a periodic update) between Marketo and Salesforce with the help of Skyvia? Since the platform is very flexible and has many capabilities, we demonstrate two possible scenarios for data integration.
Before implementing them, create connections between Salesforce and Skyvia as well as between Marketo and Skyvia.
- Sign in with Skyvia and click +Create NEW in the top menu.
- Click the Connection on the left menu.
Note: Create a Skyvia account if you don’t have one yet. A free trial version of the tool is also available here.
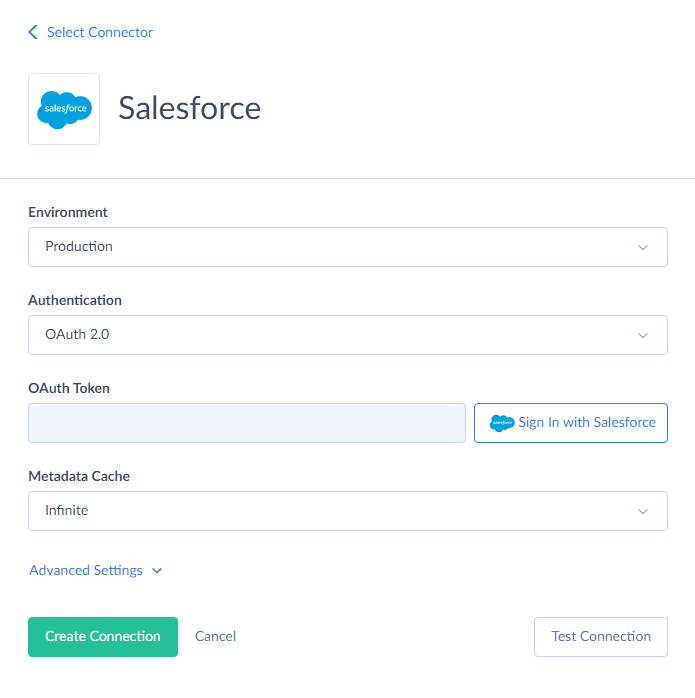
- Select the service you want to connect to on the opened page: Salesforce or Marketo.
- Sign in with the chosen service.
- Enter credentials for your account.
- Click the Create Connection button. In the screenshot below, you can see an example of a Salesforce connection.
- Optional but smart: Test in a Salesforce Sandbox first, especially for large or high-impact syncs.
Note! The default name for a new connection is always Untitled, so don’t forget to rename it to prevent misunderstandings. More details on setting up Salesforce and Marketo connections can be found in the Skyvia documentation.
Setting up Skyvia Import scenario for data integration
This scenario is created for data integrations between two data sources. For example, in this case, we import Leads and Opportunities from Marketo to Salesforce and back.
- Click +Create NEW in the top menu and select Import scenario in the Integration category. In the opened window, you can find the detailed instructions on the right and the workspace with Source and Target data flows on the left.
- Select the data connections (those created in the step above).
- Define the Source Type and apply additional options if needed.
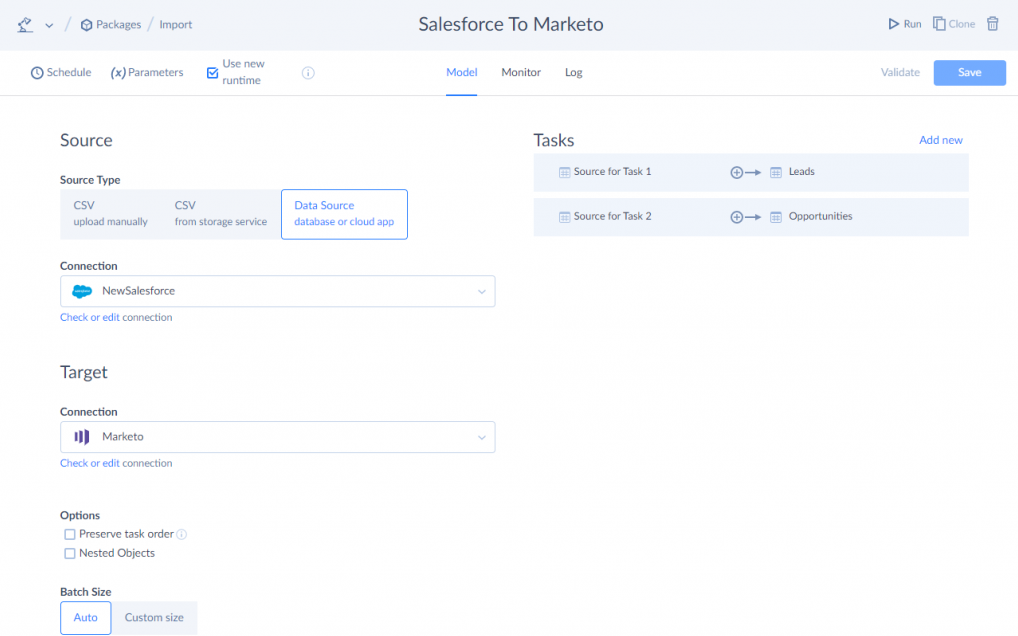
- Use the Add new button on the right to create a new data import task.
- Specify Source settings. Select a source file, cloud app object, or database table/view to import data from, and, if necessary, configure data filtering. Alternatively, you can select the Execute Command or Execute Query action to query data (in advanced mode).
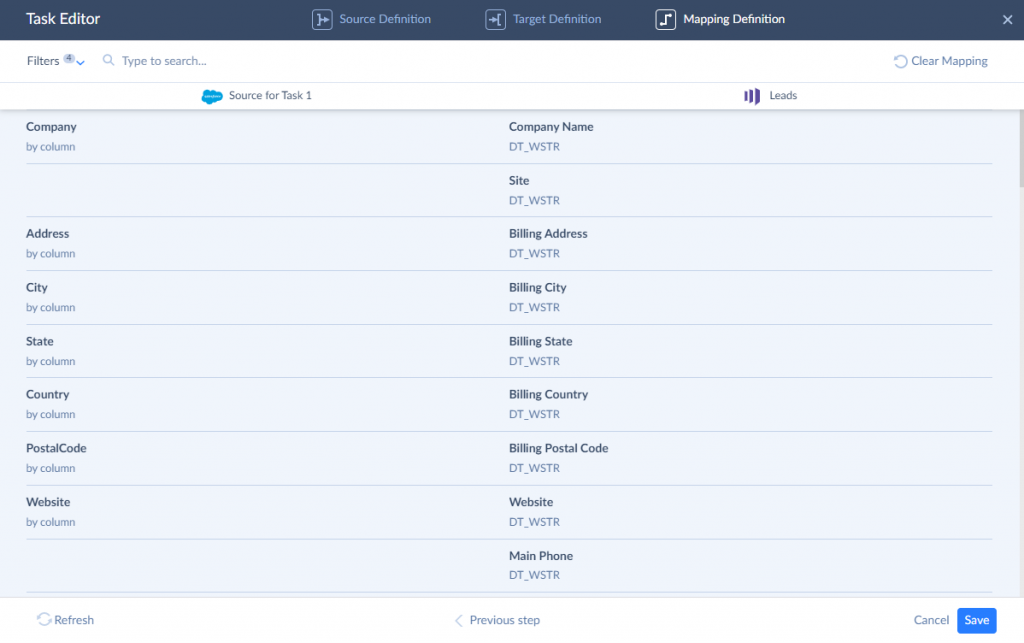
- Specify Target settings. Select the target object (table) or multiple objects (tables) to import data to and the operation to apply when loading data.
- Configure mapping of target columns to source columns, expressions, constants, lookups, etc.
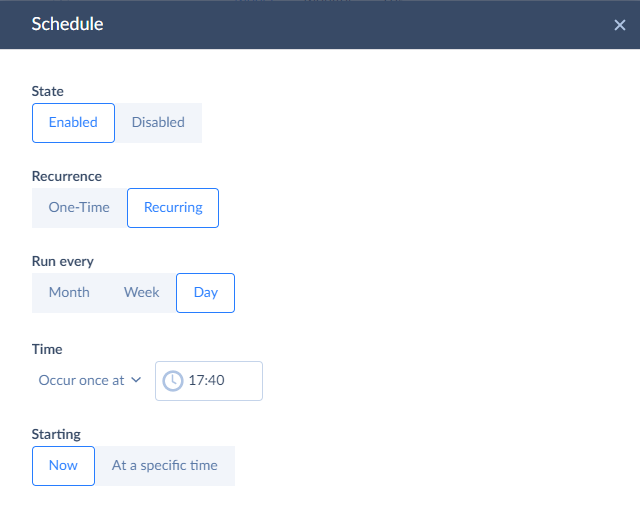
- Before saving your Import integration, you can also schedule it for automatic execution.
- After completing all the Import integration settings, click the Create button. Now you can run this package and get your data integrated.
Note: Certain objects, like Opportunity and Company in Marketo, cannot be retrieved through bulk list endpoints. Instead, they must be fetched individually using specific external IDs, such as externalOpportunityId, externalCompanyId, or marketoGUID.
Setting up Skyvia Data Flow scenario for data integration
This flexible scenario is created for complex data integrations. Being an easy-to-use, no-coding tool, Data Flow helps to manage all integration and transformation requirements in a single unified location. Here, we demonstrate how to synchronize the Leads and Opportunities tables between Marketo and Salesforce.
Note: When you open Data Flow for the first time, it will offer the Fast Guide to the main features, which is very useful for newcomers.
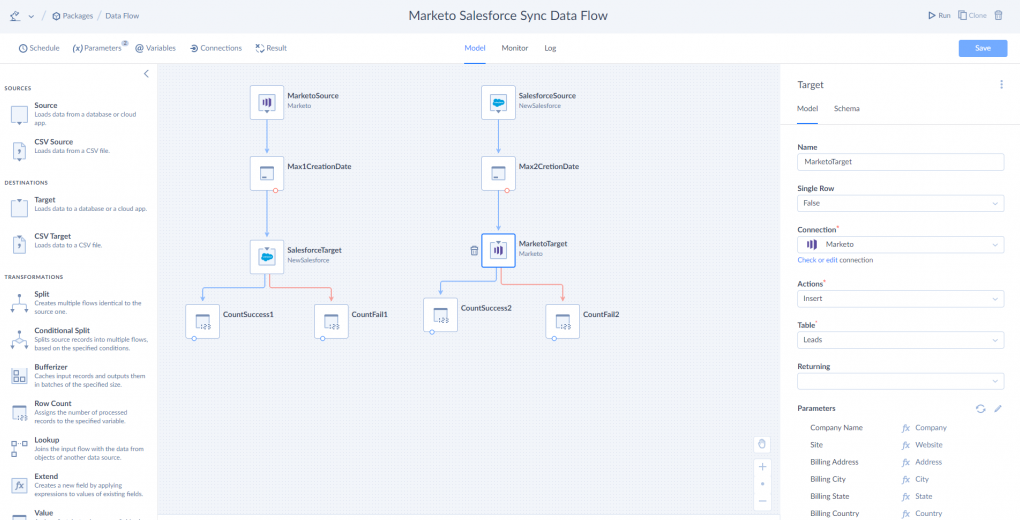
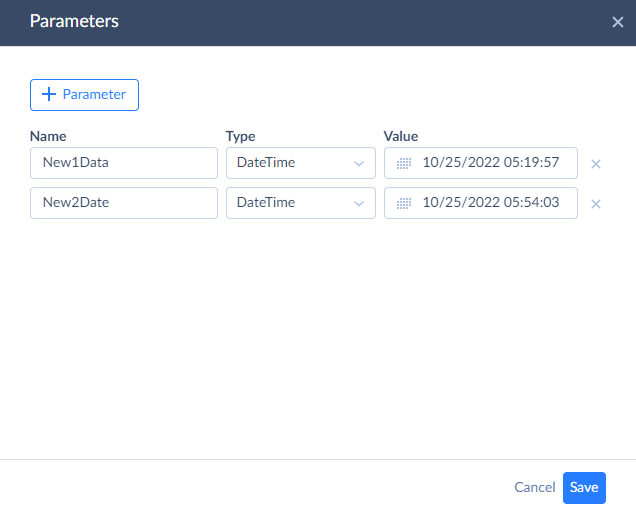
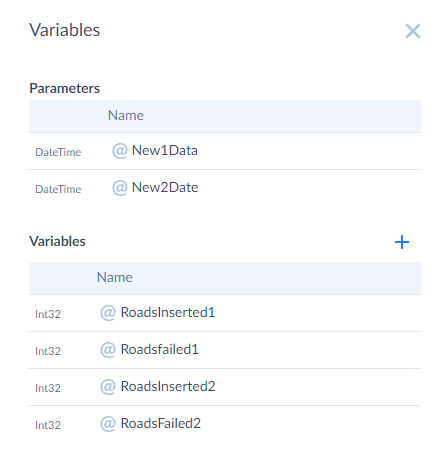
- Create parameters and variables that describe the various objects within data integration. The parameters New1Data and New2Date transfer the date the data was last updated.
- Create two variables to record successful and failed uploads, as Data Flow doesn’t automatically count successfully loaded rows.
- Select the pre-built data sources: Salesforce and Marketo.
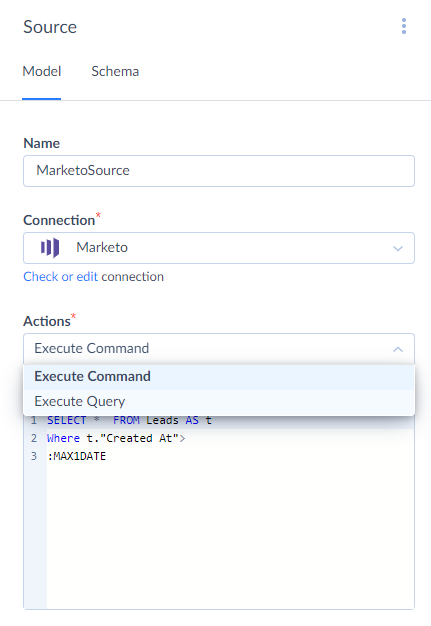
- Configure the Source and Target connector accordingly. You can make a query or execute a command with both connectors. In our example, we run the command within the Source connector.
Note: We can check if the data source is running with a test.
- Select Maxdate (an internal variable that stores the maximum date for further data updates).
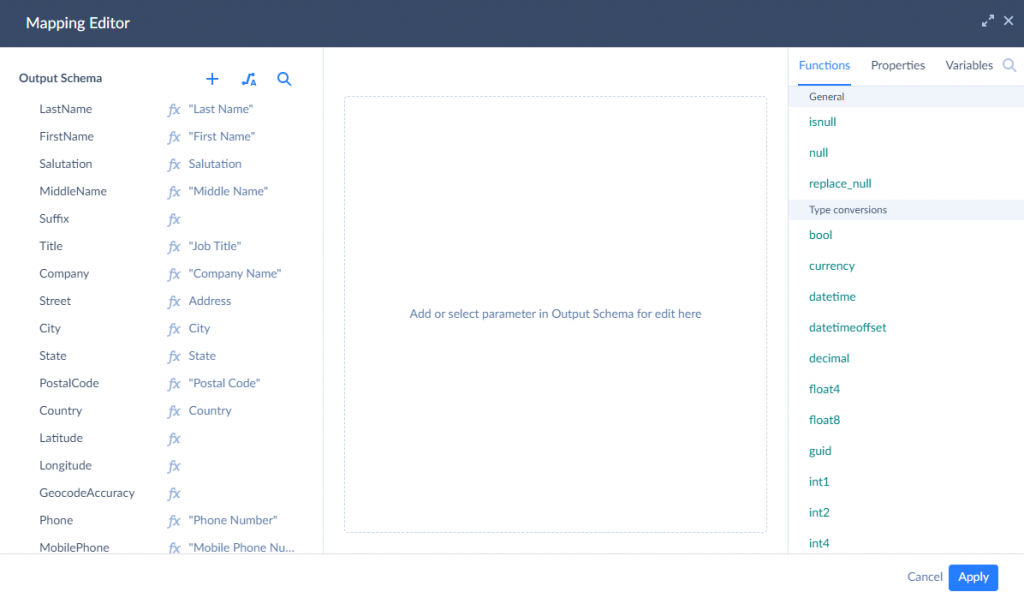
- Set up the Target connector settings: select the Insert operation and work with the Leads table. In the Mapping Editor, we see the list of properties/attributes that can be merged.
- Set up the Result settings. Specifying what we consider a successful number and the number of unsuccessful rows is necessary.
- Save and run the integration and run the integration
package.
Pros
- No-code platform perfect for marketers, ops, and analysts.
- User-friendly i
Interface. - 200+ connectors for databases, cloud apps, data warehouses, and more.
- Drag-and-drop mapping and transformation.
- Advanced error handling with email alerts and logs.
- Easy to schedule and automate data syncs.
- Supports both simple and complex scenarios (including multi-step workflows).
- Cloud-native, no local software or infrastructure required.
- Affordable pricing with transparent plans.
Cons
- For real-time sync, scheduling intervals may not be as immediate as native sync (though near real-time is possible).
- Some complex transformations may still require understanding data logic.
- Additional subscription cost (though often less than maintaining a custom-built integration).
Summary
Integrating Marketo and Salesforce is a strategic move that brings your sales and marketing teams into perfect sync. It provides faster lead handoffs, cleaner data, sharper targeting, and a better overall customer experience.
But great results don’t happen by accident. A successful integration takes solid planning, careful mapping, the right setup, and a commitment to ongoing maintenance.
The native connector is a good starting point if your needs are simple and in-house technical support is strong. But if you’re looking for something more flexible, easier to manage, and ready to grow with your business, Skyvia changes the game. It takes the heavy lifting out of integration and gives you the tools to automate, customize, and scale your data strategy without writing code or calling in a dev team.
It fits those just starting their integration journey or looking to level up.

F.A.Q. for Marketo to Salesforce Integration

What data is synced between Marketo and Salesforce?
Standard sync includes leads, contacts, campaigns, and activities. Some data, like opportunities and accounts, sync only one way (Salesforce → Marketo). Custom fields and objects can be synced with the right setup.
Do I need technical skills to integrate Marketo and Salesforce?
With the native integration, some technical knowledge is helpful. Tools like Skyvia offer a no-code setup, making integration accessible for non-technical users while supporting advanced features.
Can I customize the data synced?
Yes. You can choose which fields to sync, map custom fields, and even apply filters or transformation rules—especially with third-party tools like Skyvia that offer more flexibility than the native connector.
How often does Marketo sync with Salesforce?
Marketo syncs with Salesforce every 5 minutes by default, but sync time can vary based on system load and API limits. For better control, third-party tools like Skyvia let you schedule syncs at custom intervals.
