Imagine that you need to manually insert order information and payment details from your e-commerce website into the accounting system. It’s a tedious process that requires a lot of time and attention. Due to human factors, some data might be inserted mistakenly, leading to a sequence of errors and inconsistencies.
Since many businesses use the Magento platform as the foundation of their online store and QuickBooks as their base accounting system, this article will discuss the integration between these two systems. In particular, we’ll see how to optimize and automate the Magento to QuickBooks integration using native, third-party, and custom solutions.
Table of Contents
- Why Integrate Magento with QuickBooks?
- Best Methods to Connect Magento and QuickBooks
- Method 1: Using QuickBooks Connector
- Method 2: Using Store Manager for Magento
- Method 3: Using Cloud Integration by Skyvia
- Method 4: Custom API Integration (For Advanced Users)
- Choosing the Right Integration Method
- Conclusion
Why Integrate Magento with QuickBooks?
Magento is a global e-commerce platform that allows users to create and customize online stores. Its diversity of features helps businesses solve almost any e-commerce-related task or challenge.
Having an online store is something that requires additional management efforts. For instance, the information about inventory, sales orders, and payments needs to be synchronized with other internal systems an organization uses. As many companies prefer QuickBooks as an excellent accounting tool for administering their operations, including those related to e-commerce stores, we will explore how to integrate Magento with QuickBooks in this article.
Key Benefits of Magento QuickBooks Integration
Let’s review the possible Magento and QuickBooks integration scenarios and the potential benefits each may offer businesses.
| Scenario | Benefits |
|---|---|
| A single source of truth creation | – Since companies usually orchestrate data from multiple systems, a single data source established through integration provides businesses with trusted data.– Prevented loss or redundancy of information. |
| Synchronization of two data sources | – Simultaneous data updates in two systems (Magento and QuickBooks) allow all organizational departments to be on the same page.– Minimized ambiguity, contradiction, and loss of information. |
| Forecasting and trend prediction using AI and ML | – Accumulating available raw data enables AI/ML algorithms to be applied, which assists in deriving valuable insights.– Businesses can quickly use the replicated data in a DWH with embedded analytics tools or external BI tools of choice to create reports/dashboards. |
Challenges Without Integration
Having Magento and QuickBooks as standalone systems is something many organizations still experience nowadays. However, such companies face a lot of inconveniences and challenges by not bringing these two systems together. Here are some common ones:
- Human error. Entering data on sales and payments manually is an error-prone task, which may lead to inconsistencies in the company’s financial statements.
- Time wasting. With non-automated data integration, employees need to manually copy all data from Magento or QuickBooks and vice versa. Executing such tasks often requires a lot of time and additional human resources.
- Taxation challenges. Tracking sales taxes isn’t an easy thing in any case, but it becomes even more exhausting when e-commerce operations take place in various locations around the world. Accountants need to monitor sales and calculate taxes based on the specific country to make sure everything is compliant with the local official regulations.
Who Needs This Integration?
Obviously, the QuickBooks Magento integration is for those who use both services daily. Small businesses will take advantage of such a connection to streamline their daily workflows. Manufacturers and distributors will benefit from it for more effective inventory and stock management.
Best Methods to Connect Magento and QuickBooks
Each organization is unique, even when we refer to companies in the same industry. Every entity decides on its data stack, technological ecosystems, data volumes, update frequency, and other factors. Consequently, the data integration needs differ from one business to another.
The market offers a variety of options for Magento and QuickBooks integration. Some of them don’t require any technical background, while others are more demanding in terms of obligatory programming skills. These approaches also differ in terms of pricing and applicable use cases.
Below, find a brief comparison table, where we shortly introduce each integration method along with its advantages, pitfalls, and pricing.
| Method | Desciption | Pros | Cons | Pricing |
|---|---|---|---|---|
| QuickBooks Connector (OneSaas) | An additional plugin is installed, and the integration configurations are done via Terminal. | – It’s easy to install.– No maintenance is required. | – Additional costs for the extra features.- Limited customization and integration options. | The pricing starts at $1 per month and includes three types of plans with a free trial. |
| Store Manager for Magento | It’s a downloadable desktop tool with an add-on for QuickBooks integration. | – Visual wizard.– Offers a set of several export and import scenarios. | – Only Products can be imported from Magento to QuickBooks.- Web development skills are required. | Pricing is flexible depending on the available features, company size, infrastructure, security, and other parameters. |
| Skyvia | A universal cloud data platform that connects Magento and QuickBooks with no coding. | – Visual wizard.– Easy-to-use, no technical background needed.– Various integration scenarios from basic to complex data flows. | – Lack of video tutorials.- More sophisticated features require additional training. | Volume-based and feature-based pricing. The Freemium model allows you to start using Skyvia for free. |
| Custom APIs | Proprietary APIs allow you to create completely new workflows, data fields, and objects. | – High degree of customization.- Full control over the integration workflow. | – Strong programming skills and technical skills are required.- Regular updates are needed. | The cost of this method depends on the underlying infrastructure pricing and engineers’ salary rates. |
Method 1: Using QuickBooks Connector
Overview & Features
This approach to integrating QuickBooks and Magento is based on the in-house Intuit connector, OneSaaS. It can integrate the accounting system with other popular e-commerce platforms.
Using the OneSaaS Connector requires additional plugin installations and configurations via Terminal. However, this method is simple and intuitive enough that it won’t be difficult to set everything up in minutes.
Note: OneSaaS Connector supports Magento 2.0 version and later.
Here are some of the core options QuickBooks Connector (OneSaas) offers:
- Manual and automated synchronization of Magento order information with QuickBooks.
- The possibility to select orders on various statuses for synchronization (Pending, Processing, and Complete).
- Export of sales receipts from Magento orders to QuickBooks with a description of the payment method. The QuickBooks sales receipt number is the same as the Magento order/invoice number.
- Synchronizing customer details (name, email, billing address) and product information (name, quantity, rate, etc.).
- Sending tax details from Magento to QuickBooks.
- When sending data on downloadable products to QuickBooks, they are saved as non-inventory products.
Step-by-step Setup Guide
- Download the QuickBooks Connector Magento 2.0 plugin.
- Extract the contents of the obtained .zip archive and copy all the files to the Magento installation directory.
- Run the following commands to install the plugin:
php bin/magento setup:upgrade
php bin/magento setup:di:compile
php bin/magento setup:static-content:deploy- Log in to your Magento and select System -> QuickBooks Connector -> Integration link to get the QuickBooks Connector API Key.
- Log in to your QuickBooks Online account and navigate to the Apps tab. Find the Magento Connector from the search bar and install it. At the end of the setup, click Connect.

- Once redirected to the Connections tab in your QuickBooks Connector, click Connect to Magento.
- In the window that appears, paste the Magento API Key provided upon plugin installation. Then, click Connect to Magento.

Afterward, configure the QuickBooks Magento integration by selecting the options on when and how to synchronize data between systems. Check the integration guide to get more details.
Pros and Cons
Based on user reviews on Trustradius, Crunchbase, and other similar platforms, we have outlined the following benefits and limitations of QuickBooks Connector.
| Pros | Cons |
|---|---|
| – Ensures synchronization for Order, Product, and Inventory items. – Native QuickBooks connector. | – Only one-way sync (from Magento to QuickBooks). – Considerably slow performance. – Issues with historical data integration. |
Method 2: Using Store Manager for Magento
Overview & Features
First, it makes sense to look at what Store Manager for Magento is and how it can facilitate the integration of e-commerce stores with QuickBooks. This tool helps to manage your catalog and sales on your Magento 2, Adobe Commerce, and Open Source platforms.
Magento Store Manager provides multiple options for advanced storing, bulk editing, filtering, task automation, ChatGPT integration for working on product descriptions, and many more. When it comes to Magento and QuickBooks connection, this tool provides the following features that could fulfill the integration requirements:
- Inventory management. It’s possible to update products using suppliers’ files and sync data with accounting systems and other sales channels.
- Customer and order management. Export orders and customers to different file formats manually or on a schedule.
How to Install and Configure QuickBooks Addon
Store Manager enables users to eliminate manual data entry and automate all the integration-related processes. It helps you export Magento data, including customers, products, etc., to QuickBooks and import it from your accounting system to an e-commerce store.
- Download a Store Manager on a free trial and use the Quick Start Guide to install this tool.
- Open the tool and navigate to the Addons tab.
- Click the QuickBooks Integration icon to get started.
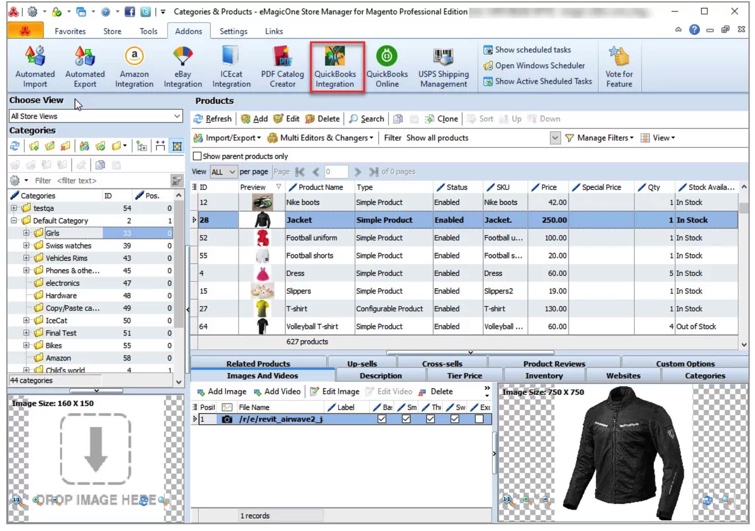
- To start exporting and importing data between QuickBooks and Magento, use the step-by-step wizard provided with the add-on, choosing the appropriate data integration scenario:
- Export Magento 2 Products to QuickBooks
- Export Magento 2 Customers to QuickBooks
- Export Magento 2 Orders to QuickBooks
- Import Products from QuickBooks to Magento
NOTE: The add-on in demo mode allows you to export five items for free just to try how it works.
Exporting Products
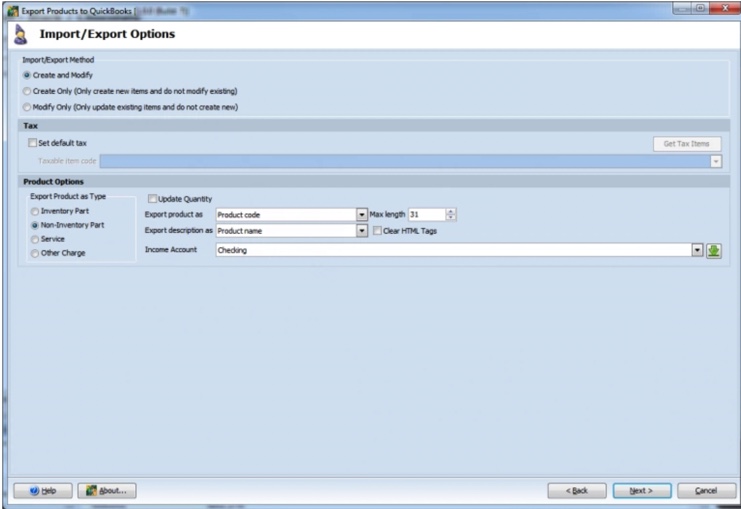
When exporting Magento 2 Products to QuickBooks, you can select the items before launching the add-on. You can also use filters and choose the products during the Preview Data Export step. Then, connect to your QuickBooks accounting tool.
The available export options depend on your QuickBooks software (Desktop or Online). For Desktop, the parent configurable product with its SKU and quantity will be exported without the variations. For Online, the add-on will ship parent configurable products with their SKU and quantity and variations with their SKUs and quantities.
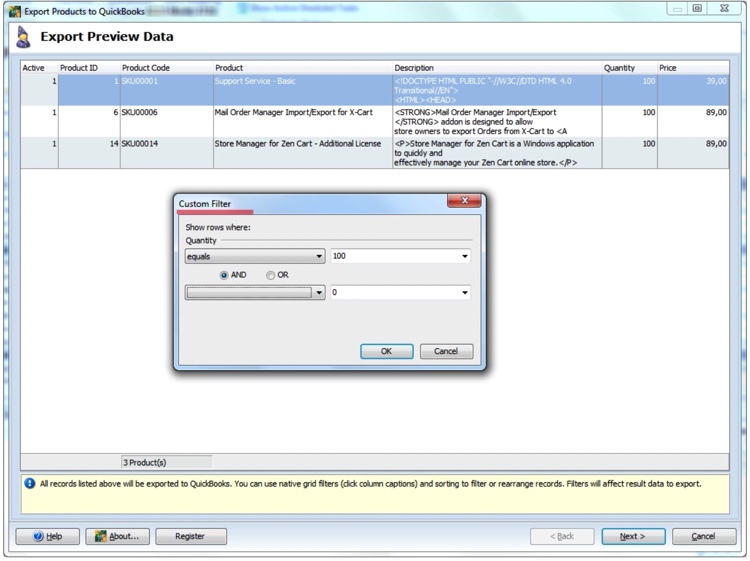
With the add-on, you can create new items, modify existing ones, or carry out both operations when exporting products to QuickBooks. But take in mind that you have to specify product export options:
- Inventory part
- Non-inventory part
- Service
- Other charge
NOTE: Ensure you use a dot(.) as a decimal separator. Otherwise, you will encounter an error, and the process won’t succeed.
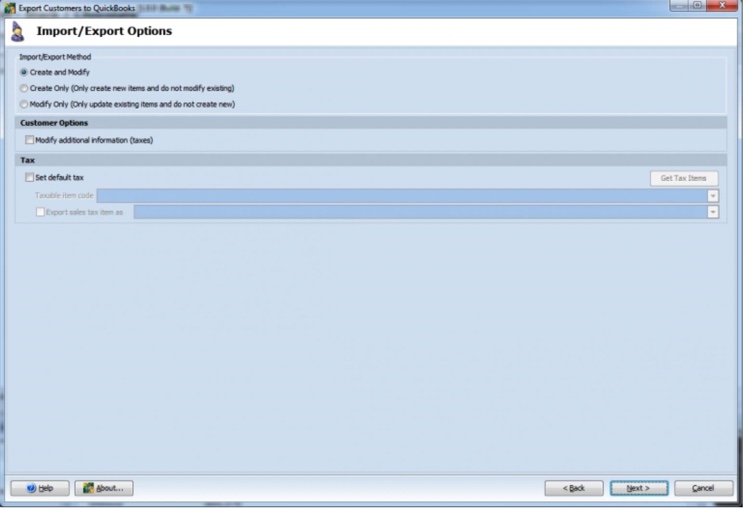
Exporting Customers
In the case of sending the Customers’ data from Magento 2 to QuickBooks, the export wizard allows for adding a new buyer, updating client data, or performing both operations at once.
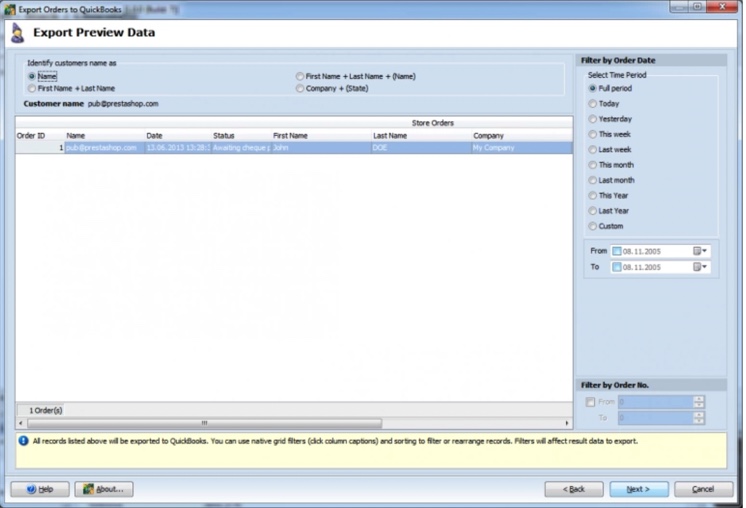
Exporting Orders
When sending Orders from Magento 2 to QuickBooks, export all relevant order data. Remember that you may only create but not update orders. If the customer doesn’t exist, it won’t be possible to export orders, so you will have to associate the order with the appropriate client first.
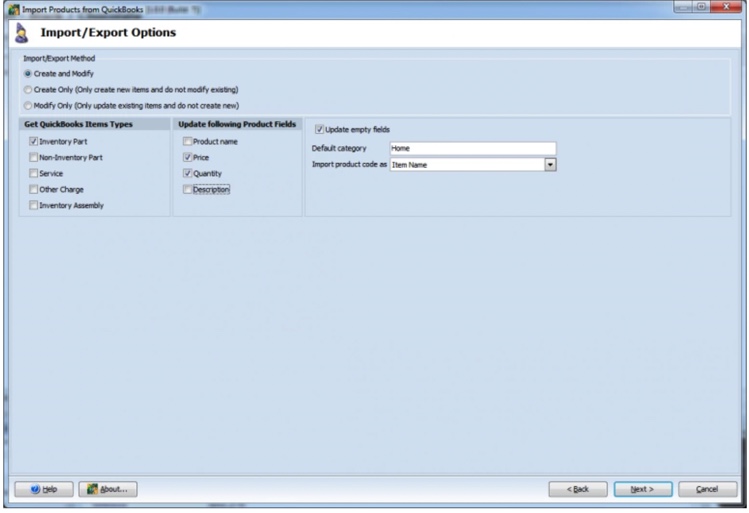
Importing Products
When extracting Products’ information from QuickBooks to Magento using the add-on, it’s possible to:
- Specify the import method (Create or Modify), product type, and field(s) for update.
- When adding new products to Magento, provide the Default category name for import. If the specified category doesn’t exist in Store Manager, it will be created automatically during the data import process.
Pros and Cons
After analyzing user reviews on Trustpilot and G2, we have outlined several advantages and limitations associated with the Store Manager for Magento to QuickBooks integration.
| Pros | Cons |
|---|---|
| – Seamless integration of Orders, Customers, and Products from an e-commerce store with other data systems. – Advanced filtering options for retrieval of only the necessary data. | – Only Product items can be imported from QuickBooks to Magento 2. – Requires fundamental technical knowledge for installation and use. |
Method 3: Using Cloud Integration by Skyvia
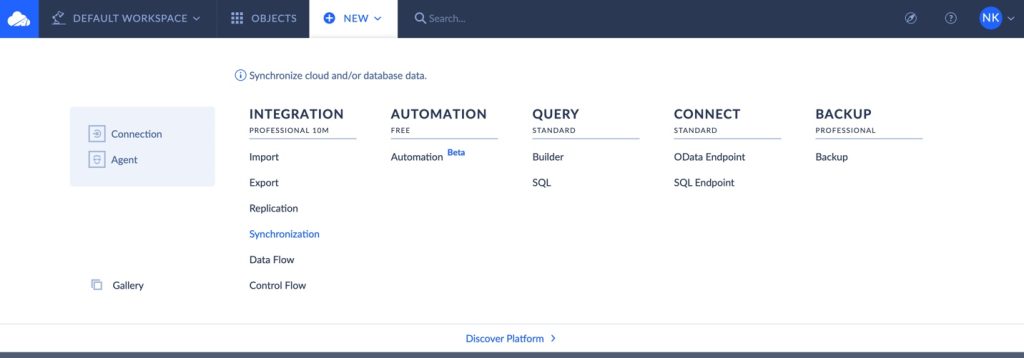
Skyvia is an easy-to-use universal data integration tool that could be an excellent option for connecting Magento and QuickBooks. It seamlessly aggregates data with 200+ pre-made connectors to popular cloud apps, databases, and flat files.
The platform supports various data-related processes, such as:
- ETL, ELT, reverse ETL
- Data migration
- One-way and bi-directional data sync
- Workflow automation
- Backup for cloud apps
- Data sharing via REST API, etc.
Skyvia offers a number of tools for different integration scenarios:
- Import allows users to load data from one DB, cloud app, or CSV file to another DB or cloud app using the ETL or reverse ETL scenarios.
- Export performs data extraction from a cloud app or DB and loads it locally or in cloud storage as a CSV file.
- Synchronization connects two sources, like DBs and cloud apps, and synchronizes data in both directions.
- Replication creates an exact copy of the cloud app in DB, using the ELT scenario and keeping it up-to-date automatically.
- Data Flow and Control Flow enables users to create complex data pipelines according to the appropriate sources and conditions.
In this article, we’ll review the data import and replication scenarios, particularly for Magento and QuickBooks Online integration, based on real business cases.
Magento QuickBooks Import Scenario
Businesses often face the problem of data inconsistencies in different systems. For instance, when a new customer places an order on Magento, personal information and purchase details should also be added into QuickBooks. Instead of adding data manually, the Skyvia integration solution can be used.
Skyvia Import is a powerful ETL tool that integrates data between various systems (with different data schemes and structures). This platform helps improve data accuracy, eliminate manual data entry, and boost workflow efficiency.
Using the real-world example below, we show how to import client details from Magento to QuickBooks using the Skyvia Import tool.
Note: Before starting the Import scenario, you need to connect data sources first. Check the documentation on how to connect Magento and QuickBooks Online with Skyvia.
- Click +Create New in the top menu.
- In the Integration column, click Import.
- Under Source Type, click Data Source and select Magento from the Connection dropdown list.
- In the Target field, choose QuickBooks from the Connection dropdown list.
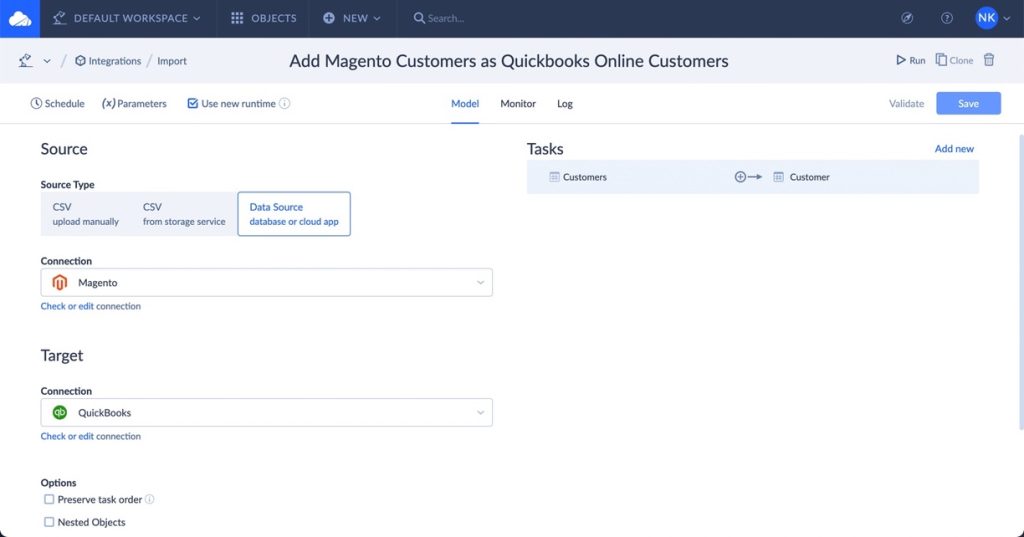
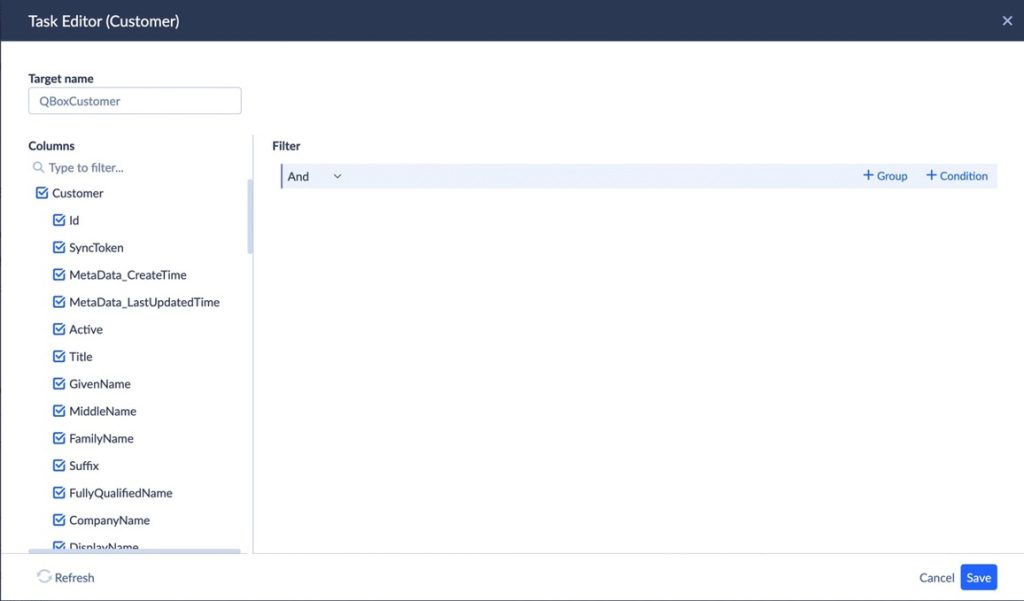
- Go to the Task Editor and click Add new. Select the source table, state filters, and choose the object for filtering (in this case, we select CustomerAddresses_BillingAddress as shown in the screenshot below). Then, click Next step.
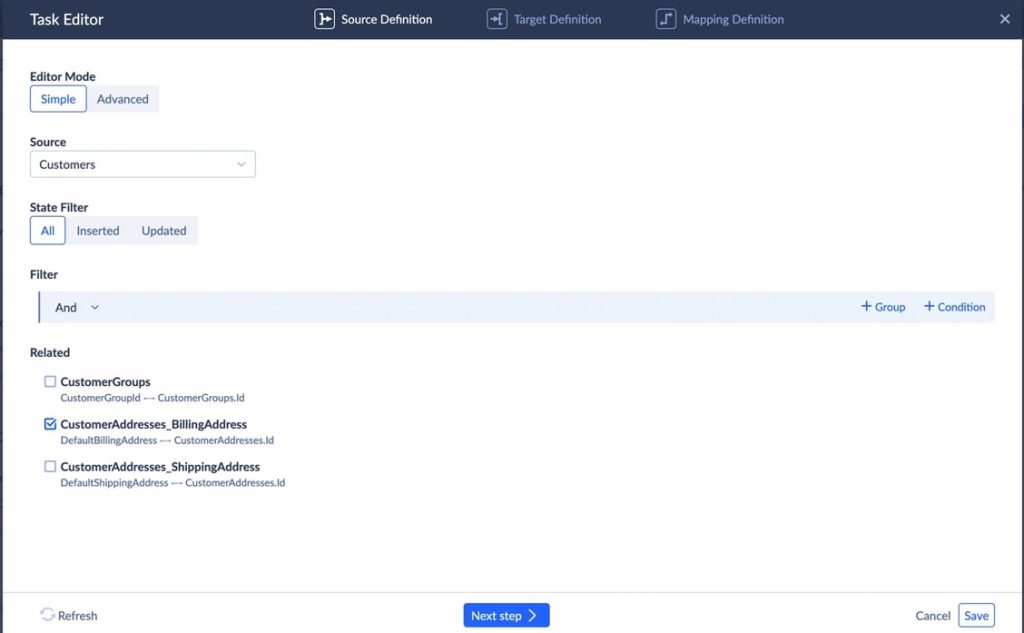
- Select the target table from the dropdown similarly and click Next step again to proceed.
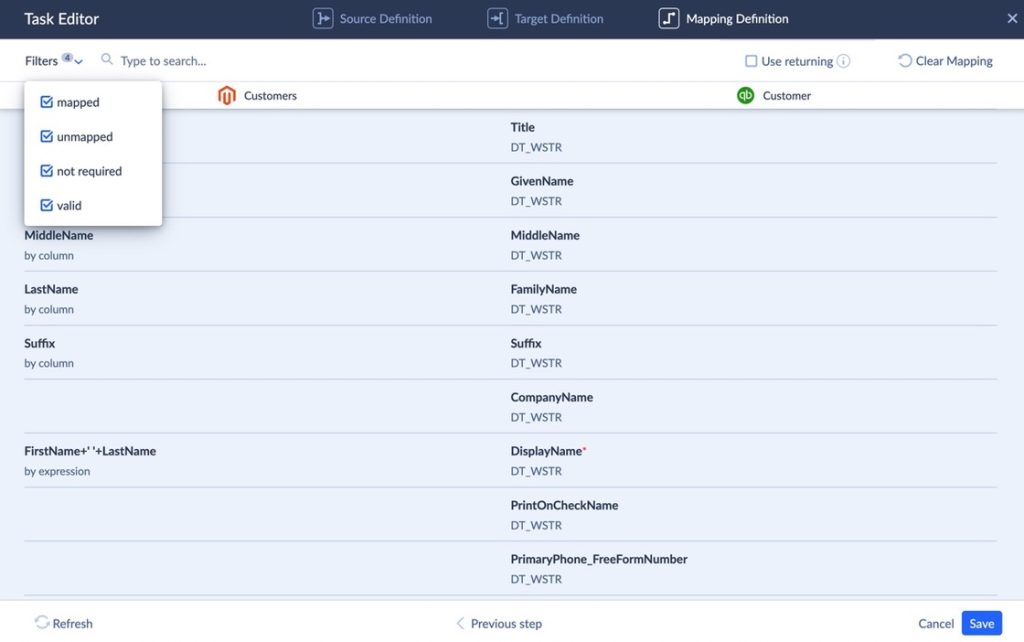
- In the Mapping Definition tab, set mapping by categories and the search type, and filter them as mapped, unmapped, not required, or valid.
NOTE: The same names are mapped automatically; others must be mapped manually. Please pay attention to your screen and click the red colored text “This column must be mapped to do it”.
- Click Save once you have finished with the mapping settings.
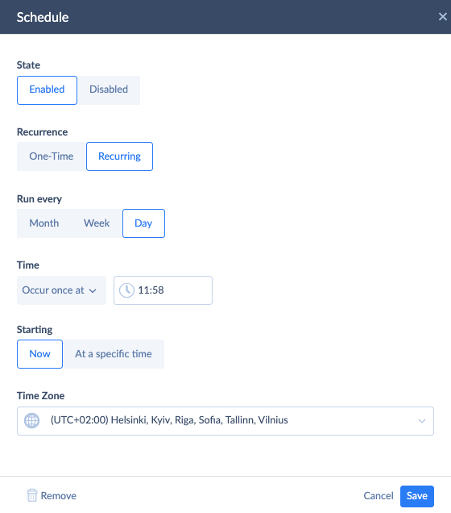
- Start the integration manually by clicking Run in the upper right corner of the screen. Otherwise, consider the automated integration with the Schedule feature.

QuickBooks CSV Data Import & Export Automation
With Skyvia, you can also quickly load data into QuickBooks from an external source or CSV files. For instance, when your vendors upload invoices to file storage, you need to add this data to your accounting system. You can set up the integration scenario with the Skyvia Import to automate the process.
On the contrary, when you need to send bills to your vendors or customers, Skyvia can also assist you. The Export tool can automatically extract and transfer your accounting data to the desired location.
Magento QuickBooks Bidirectional Synchronization Scenario
On some occasions, businesses need to keep several systems aligned in terms of the data they contain. For instance, these may refer to the transaction data, which needs to be the same in both Magento and QuickBooks.
To bring this scenario to life, bidirectional data synchronization would be suitable. Skyvia offers several options for the implementation of data sync, each of which would be more appropriate depending on the particular business scenario or the company’s needs.
Option 1. Import Tool
You may use the Import component described above to synchronize data in two directions. In that case, you will just need to create two different packages for each integration flow (1 – from QuickBooks to Magento, 2 – from Magento to QuickBooks).
Option 2. Synchronization Tool
The bi-directional synchronization scenario is a good choice if one of the apps is still empty. Skyvia copies all data from Magento to QuickBooks (or vice versa) for the first time, preventing the apps from records duplication that way.
To set up and execute data sync with the Synchronization tool, please do the following:
- Click +Create New in the top menu.
- In the Integration column, click Synchronization.
- Under Source, select Magento.
- Under Target, select QuickBooks.
- Go to the Task Editor and click Add new. Select the source table, state filters, and choose the object for filtering (in this case, we select CustomerAddresses_BillingAddress as shown in the screenshot below). Then, click Next step.
- Select the target table from the dropdown similarly and click Next step again to proceed.
- In the Mapping Definition tab, set mapping by categories and the search type, and filter them as mapped, unmapped, not required, or valid.
- Click Save once you have finished with the mapping settings.
- Start the integration manually by clicking Run in the upper right corner of the screen. Otherwise, consider the automated integration with the Schedule feature.
Data Replication from Both Data Sources to the DWH Scenario
Businesses need comprehensive and reliable analytics to support stable growth and informed decision-making. While analyzing data from each system separately doesn’t usually yield the desired results, all data from corporate systems should be gathered in one place. This unified location is typically a data warehouse or database.
To aggregate information from QuickBooks, Magento, and other systems, Skyvia’s Replication can be used. It creates a copy of cloud app data in the selected cloud DWH or DB server and keeps it up-to-date.
Contrary to the Import scenario described above, its configuration is more straightforward because there’s no need for custom mapping and different structure data loading in the source and target. Replication can also automatically create the tables in the target database for transferred data.
Let’s observe how it works with another real-life example, where there is a need to replicate the QuickBooks customers’ data and Magento customers’ and products’ data to DWH.
- Click +Create New in the upper screen menu.
- Select the Replication component.
- Under Source Type, click Data Source and select QuickBooks or Magento from the Connection dropdown list.
- In the Target field, choose the DWH you need in the Connection dropdown list.
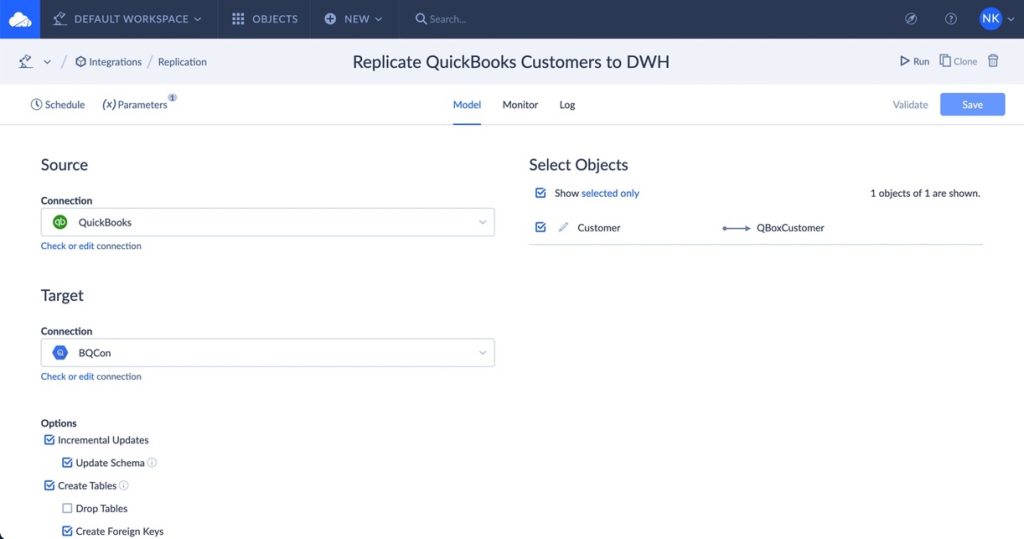
- To add new or updated records for replication, check the Incremental Updates checkbox.
- To add new DB tables for the replication data, select the Create Tables checkbox.

- Go to the Task Editor to select objects for replication.
- Save the changes.
- Start the integration manually by clicking Run in the upper right corner of the screen. Otherwise, consider the automated option with the Schedule feature in the top left menu.
- Click Save when you have finished the scheduling settings.
Feel free to review the video with the detailed step-by-step instructions on how to transfer data to a DWH.
Pros and Cons
Similar to the descriptions of other methods, we also provide a list of the core advantages and notable limitations of the Skyvia platform.
| Pros | Cons |
|---|---|
| – A wide variety of integration scenarios. – No-code approach to data migration. – Support of 200+ connectors, including cloud and on-premises systems. – No local installations – only a web browser and a Skyvia account are required to start. | – Complex data transformations and mapping might require additional training. – Near-real-time data sync is not available under the free tier. |
Method 4: Custom API Integration (For Advanced Users)
If a high degree of customization is preferable when connecting Magento and QuickBooks tools, APIs are recommended. Both platforms have their own APIs that enable data exchange between the source and target systems. They will also serve as a base for creating your custom application interfaces.
When to Choose a Custom API Solution
As we have already reviewed plenty of methods that connect Magento and QuickBooks, you have probably noticed that most of them offer the same set of fields for integration. Custom API creation might come in handy if you need to synchronize non-standard objects and fields. It will also be helpful if you’d like to set custom monitoring dashboards and specific data sync intervals.
How Custom APIs Work
Custom API development enables crafting unique solutions tailored to specific business requirements. Proprietary APIs allow you to create entirely new workflows, data fields, and objects. They also provide a high degree of flexibility to change and adjust your integration processes as soon as required.
When developing new APIs, consider using QuickBooks-related APIs and Magento 2 REST APIs as a base. These APIs offer a set of predefined functions that developers can use to execute requests and receive responses over the HTTP protocol.
Note that developing a custom API makes sense when you have a proprietary application with which you want to integrate data from your accounting application and e-commerce store.
Pros and Cons
Like any other method for integrating Magento and QuickBooks, custom API development has its limitations and advantages.
| Pros | Cons |
|---|---|
| – High degree of customizability to meet specific requirements for synchronization times and data structures. – Full control over the integration workflow. | – Solid technical expertise is required. – Strong understanding of programming languages. – Regular updates are required. |
Choosing the Right Integration Method
With such a variety of methods for Magento QuickBooks integration, it might be perplexing when making a choice. A little spoiler: You can use several methods if you want to; everything depends on your available resources and current business needs.
Anyway, we’d like to help you choose the proper integration method for your particular case. Here are some core factors you need to consider and pay elevated attention to:
- Ease of setup. Analyze your team members’ technical expertise and decide whether they are interested in programming, complex infrastructure configurations, or other complex operations. If so, you can consider creating a custom API for Magento to QuickBooks integration. For your information, Skyvia also offers tools targeted at tech specialists to ensure a customized integration setup.
- Data to sync. Decide which information needs to be exchanged between the two systems. Think of the preferable integration direction for data transfer. Based on these factors, evaluate the available connection methods and the options they provide. For instance, if you need to send the Customer from QuickBooks to Magento, the Magento Store tool won’t be suitable since it can only transfer Product data from the accounting system to the e-commerce store.
- Frequency of sync. Decide whether you need a near-real-time data transfer from one system to another or in both directions or if a daily sync would be fine for you.
- Pricing. If several solutions meet the selection criteria provided above, decide which best fits your budget. Note that all the methods described in this article have flexible pricing depending on the features included, data volume, and other factors.
Comparison of Methods
To further facilitate your decision-making, we have also prepared a comparison table. Here, we evaluate each method’s ease of setup, real-time sync capabilities, business suitability, and pricing.
| Integration Method | Pricing | Ease of Setup | Real-Time Sync | Best for |
| QuickBooks Connector (OneSaaS) | Starts at $1 | Easy | ✅ | Small businesses |
| Store Manager for Magento | Flexible pricing that depends on multiple parameters (features included, user number, etc.) | Moderate | ✅ | Medium-sized businesses |
| Skyvia | Free tier Paid plans start from $79/month | Easy | ✅ | All businesses |
| Custom APIs | Custom | Advanced | ✅ | Large enterprises |
Conclusion
In this article, we have reviewed in detail four methods to integrate data between Magento and QuickBooks:
- QuickBooks Connector (OneSaas)
- Store Manager for Magento
- Skyvia
- Custom APIs
We have also provided a detailed comparison table of these approaches and advice on selecting the most appropriate method for your business. Among all these integration methods, we’d like to focus on Skyvia and its universal approach to working with data. This solution could be suitable for any kind of business since it can handle various data volumes and offers both simple and complex data flows. What’s more, Skyvia can be used for free, so new users can explore how the system works and
F.A.Q.
This question has no exact answer since each company decides upon the best integration method depending on its current integration requirements and business processes. To help you select the best method, we have included a comparison table with four methods in this article.
Sure, you can integrate these two systems using Skyvia. This tool has pre-built connectors to both QuickBooks Desktop and Magento 2 tools. It also allows the setting up various integration scenarios between these two systems without coding using GUI.
Yes, you can synchronize data between QuickBooks Online and Magento in real time. All the methods reviewed in this article support real-time or near-real-time integration between these two systems.
In this case, the data is not aligned between the systems. You need to view the operation logs to see which type of error has occurred. Once fixed, reset the synchronization process.