Ever wondered how to seamlessly integrate Shopify with Mailchimp to create a symphony of customer engagement?
You’re in for a treat if you have a bit of tech know-how.
Picture this: MailChimp and Shopify, two giants in the digital realm, teaming up like a power duo to rock your customer engagement. Don’t worry; you don’t need to be a tech virtuoso to master this integration. In fact, you’ve got your skilled team by your side. Think of it as a collaboration that’s as smooth as a well-rehearsed melody.
This article will be your guide through the world of integrating Shopify with MailChimp, packed with practical insights and tips. Get ready to amplify your business’s tune and make your customers love you!
Here’s a heads-up on our discussion flow:
Table of Contents
- How Can Shopify and Mailchimp Work Together?
- What Types of Data Can You Integrate Shopify and Mailchimp With?
- The Advantages of Integrating Shopify and Mailchimp
- How to Integrate Shopify and Mailchimp with the Mailchimp Shopify App
- Cloud Solutions to Integrate Shopify and Mailchimp
- 12 Best Practices to Integrate Shopify and Mailchimp
- Final Thoughts
So, get ready, and let’s begin.
How Can Shopify and Mailchimp Work Together?
MailChimp is like a friendly postman for emails. It’s a popular tool that helps you send emails to lots of people without breaking a sweat. You can design cool newsletters, track who’s reading them, and jazz up your emails with spiffy graphics.
Shopify, on the other hand, is like a bustling digital market square. It’s where you set up shop online to sell your wares. From snazzy sneakers to handcrafted hats, Shopify’s got your back. It helps you showcase your stuff, manage orders, and even handle payments with a smile.
Now, when these two pals join forces, it’s like peanut butter and jelly making the perfect sandwich. MailChimp and Shopify can shake hands through integration. This means your email list and customer info can have a chit-chat. They share details like what folks bought and when they did it. So, you can fire off awesome emails to your customers without missing a beat. It’s like teamwork for boosting your business!
There are two rock-solid ways to make them work. First, there’s the Mailchimp app in the Shopify store. Then, there are cloud integration solutions. Today, we will discuss both so you can have buyer engagements in no time.
What Types of Data Can You Integrate Shopify and Mailchimp With?
Here’s the lowdown on what data you can share:
- Customer Data. This includes who your customers are, what they’ve bought, and where they live. It’s like sharing your customer’s favorite cake recipe with the next-door baker.
- Purchase History. This is all about what items your customers have bought. It’s like telling your friend about that amazing burger joint you tried last week.
- Product Info. These are details about your products, like names, descriptions, and prices. It’s like showing off your cool gadget collection to fellow tech enthusiasts.
- Order Status. This is where you know if orders are still in the oven or out for delivery. It’s like keeping tabs on your pizza order to know when it’s arriving.
In a nutshell, integrating MailChimp and Shopify is like having two besties who keep each other updated. They’re secure pals, but you should be thoughtful about what you share and keep an eye on their fun conversation. Safety and teamwork for the win!
The Advantages of Integrating Shopify and Mailchimp
Check out the perks of this power duo:
Supercharged Marketing
Integrating MailChimp and Shopify is like adding rocket boosters to your marketing. You can send tailored emails to customers based on what they’ve bought. It’s like giving them a VIP shopping experience, making them feel special, and boosting your sales.
Smoother Operations
Think of it as having a well-oiled machine. When MailChimp and Shopify team up, your order and customer data dance harmoniously. This means fewer manual tasks and more time to focus on growing your business.
Personalized Magic
Imagine you’re a magician tailoring tricks for each audience member. With integration, you can send emails that address customers by name and recommend products they’re likely to love. It’s like having a personal shopper for each customer.
Newbies’ Welcome
Welcoming new customers is like greeting a guest at your home. Integration helps you send automated welcome emails to new Shopify customers, making them feel valued right from the start.
Win-Back Campaigns
People sometimes drift away, like a balloon escaping into the sky. The integration lets you spot inactive customers and create win-back campaigns. It’s like sending a friendly reminder that says, “Hey, we miss you!”
Cart Recovery Charm
Sometimes customers abandon their carts like forgotten treasures. But fear not! Integration can send follow-up emails to remind them about their abandoned carts. It’s like having a polite but persuasive salesperson bring them back to finish their shopping.
Segment Smarts
It’s like sorting a deck of cards into different suits. Integration lets you create specific customer segments, such as location-based groups or those who purchased certain products. This way, you can target your emails precisely.
Insights Galore
It’s like having a crystal ball for your business. Integration provides data on which emails work best and what products are a hit. This helps you fine-tune your strategies and make smarter decisions.
A/B Testing Advantage
It’s like experimenting with different cake recipes to find the tastiest one. Integration lets you run A/B tests on different segments, testing subject lines, visuals, and content. You’ll discover what resonates best with each group.
Growth Spark
Integration doesn’t just make things smooth; it ignites growth. The more you engage customers with personalized emails, the more they’ll stick around and spread the word. It’s like planting seeds that turn into a lush garden of loyal customers.
Continuous Refinement
Like a sculptor perfecting their masterpiece, integration lets you continuously refine your targeting. As you gather more data and learn about your customers, you can adjust your segments and strategies for even better results.
In a nutshell, integrating MailChimp and Shopify is like a match made in e-commerce heaven. It’s a recipe for personalized marketing, seamless operations, and a boost in your business’s star power.
So, go ahead and let these two buddies work their magic! Let’s start with the Mailchimp App for Shopify.
How to Integrate Shopify and Mailchimp with the Mailchimp Shopify App
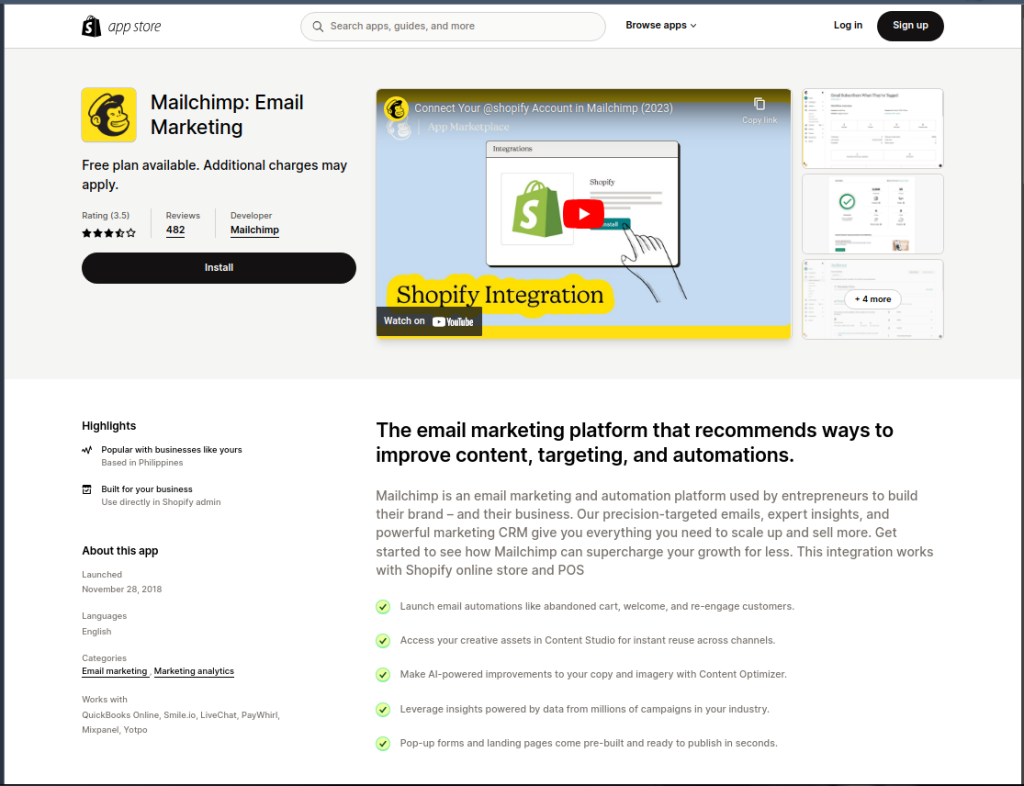
If you’re wondering what this app looks like in the Shopify store, take a look above. That’s your first option to integrate Shopify to Mailchimp.
But first, you need to install it.
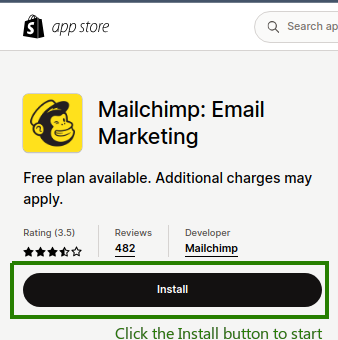
STEP 1: Install the Mailchimp App
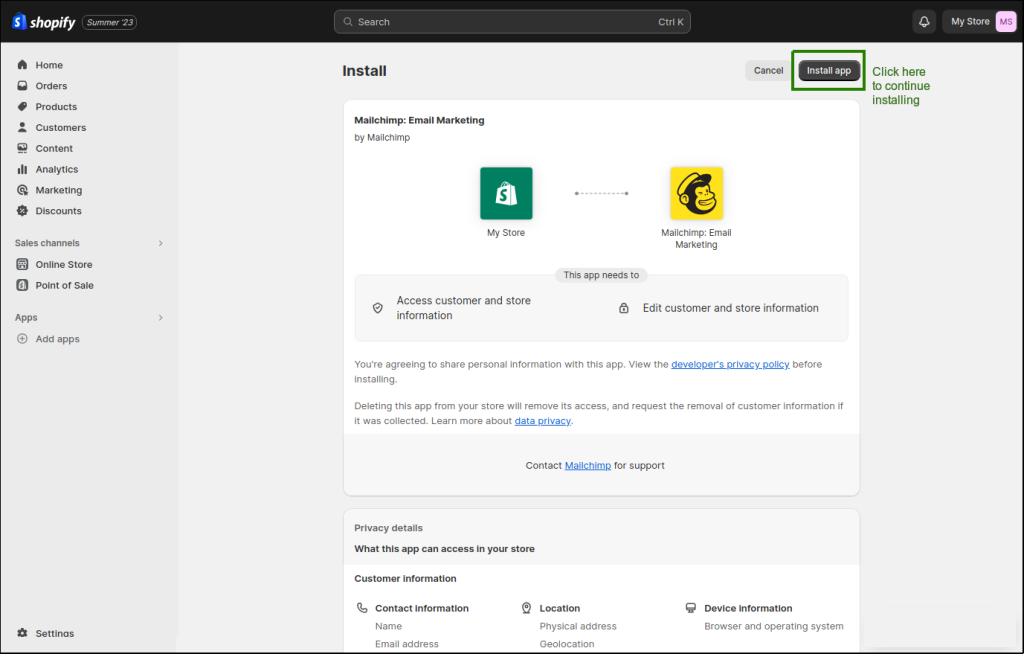
Login to Shopify, then go to the Shopify App Store using this address: https://apps.shopify.com/mailchimp. The page that will appear is the one above. Then, click the Install button to install the Mailchimp app as seen below:
Then, follow the next prompts. Read the privacy agreement, and when you’re done, click the Install App button to continue. Check out the page for that below:
Step 2: Connect Mailchimp Account
After installation, you need to tell Shopify about Mailchimp by providing Mailchimp credentials. You need to log in to Mailchimp to do this. It’s like matching the two for their first date.
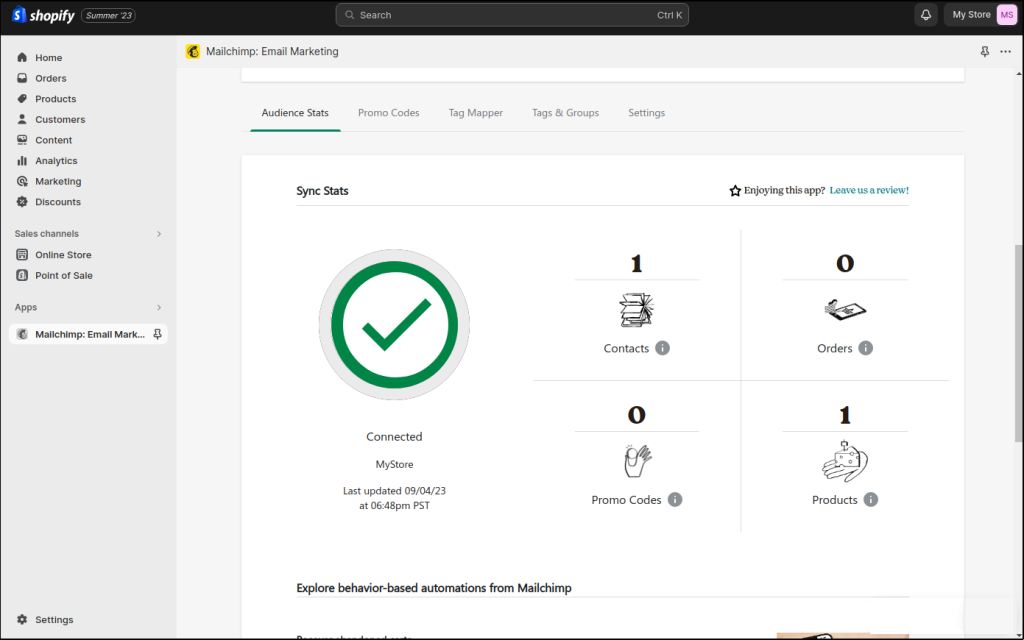
When you’re done, another page will appear so you can review your settings. After reviewing the info, click Sync Now. Check out a sample below:

Then, syncing proceeds. How long this will run depends on the size of the data from your Shopify store. Once this is done, scroll down the page to see the dashboard. You will see numbers about customers, products, and more. When these numbers appear, congratulations! You have shared your Shopify data with Mailchimp. See a sample below using a newly created store in Shopify with one product and one customer:
At this point, your integration of the two is good to go.
Step 3: Go to Mailchimp
You can visit your Mailchimp account to confirm the syncing. And under Integrations, you will see Shopify as one of the connected apps. See a sample below:

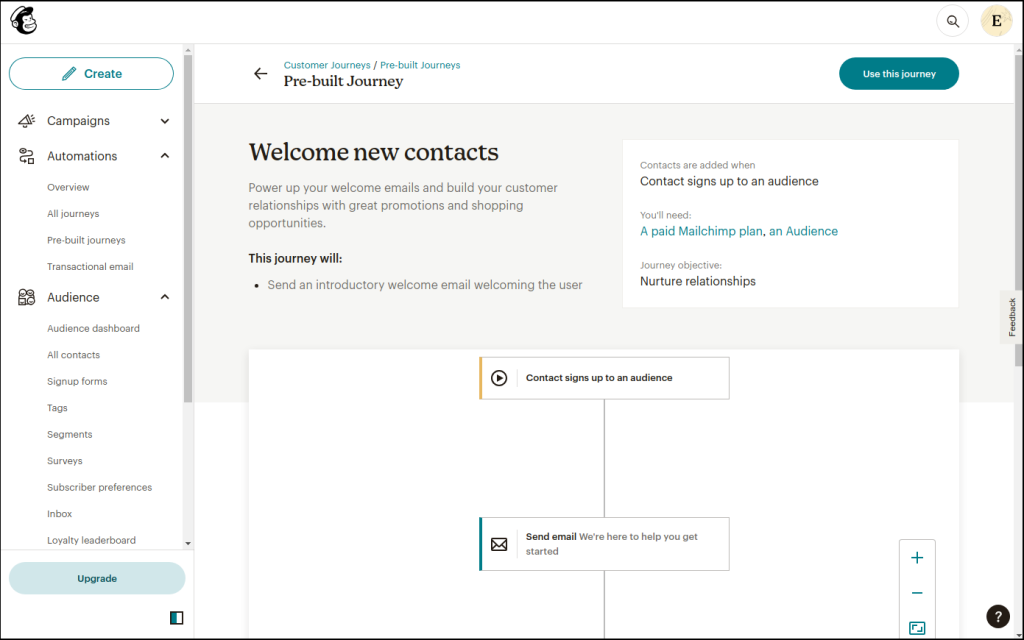
Now that your Shopify customers are in Mailchimp, you can set up campaigns and automations. Below is a sample page about creating an automated Welcome Email for new customers:
Connecting your Shopify store to Mailchimp is only a piece of the puzzle. You need to monitor the performance of your automation. Then, review and adjust as you see fit. You will gain insights as your confidence in using the tools and your customers grow. So, to boost buyer love, improve your strategies by adding more automations in Mailchimp.
There’s more you can do in the Mailchimp App for Shopify and Mailchimp itself. Try to explore each and if you’re stuck on something, you can always contact the Mailchimp support.
Cloud Solutions to Integrate Shopify and Mailchimp
Cloud solutions to integrate Shopify and Mailchimp offer more flexibility in data mapping, transformation, sync scheduling, and more. It’s like having power tools at your disposal instead of using conventional ones.
And the one we recommend is Skyvia.
Overview of Skyvia
Skyvia is like a wizard that magically connects different apps and databases. It’s a cloud-based integration platform that makes data flow between your favorite apps, just like a river flowing smoothly.
Skyvia can connect not just Shopify and Mailchimp but also other apps and databases. And this includes Zendesk for Help desk support. Or Google Analytics for tracking website performance. For a full list of connectors, please visit this link.
Advantages of Integrating Shopify and Mailchimp Using Skyvia
- Easy Setup: Skyvia is user-friendly, so you don’t need to be a tech guru to set things up. It’s like following a recipe—step by step.
- Automated Data Sync: It’s like having a synchronized dance routine. Skyvia keeps your customer data in Shopify and MailChimp in perfect harmony, so you’re always up-to-date.
- Flexible Mapping: Skyvia lets you decide what data goes where. It’s like arranging puzzle pieces—you create the picture that makes sense for your business.
- Scheduled Sync: Imagine an automated reminder that keeps you organized. Skyvia can schedule regular data syncs, so you don’t have to lift a finger.
- Transformations: It’s like having a translator for data. Skyvia can reshape info to fit the format you need, making integration smoother.
- Security Measures: Skyvia takes security seriously. It’s like having a trusty lock on your digital treasure chest, keeping your data safe.
- No Coding Required: You don’t need to be a coding whiz. Skyvia’s user interface is like a friendly guide, making integration a breeze.
- Scalability: As your business grows, Skyvia grows with you. It’s like a reliable partner that can handle more as your needs expand.
In a nutshell, integrating MailChimp and Shopify with Skyvia is like having a smooth conveyor belt for your data. It brings together the power of both platforms without the hassle, keeping your information in sync and your business running like clockwork.
While the Mailchimp app for Shopify provides a straightforward integration for basic needs, Skyvia offers a more comprehensive and versatile solution for businesses with more complex data integration and synchronization requirements.
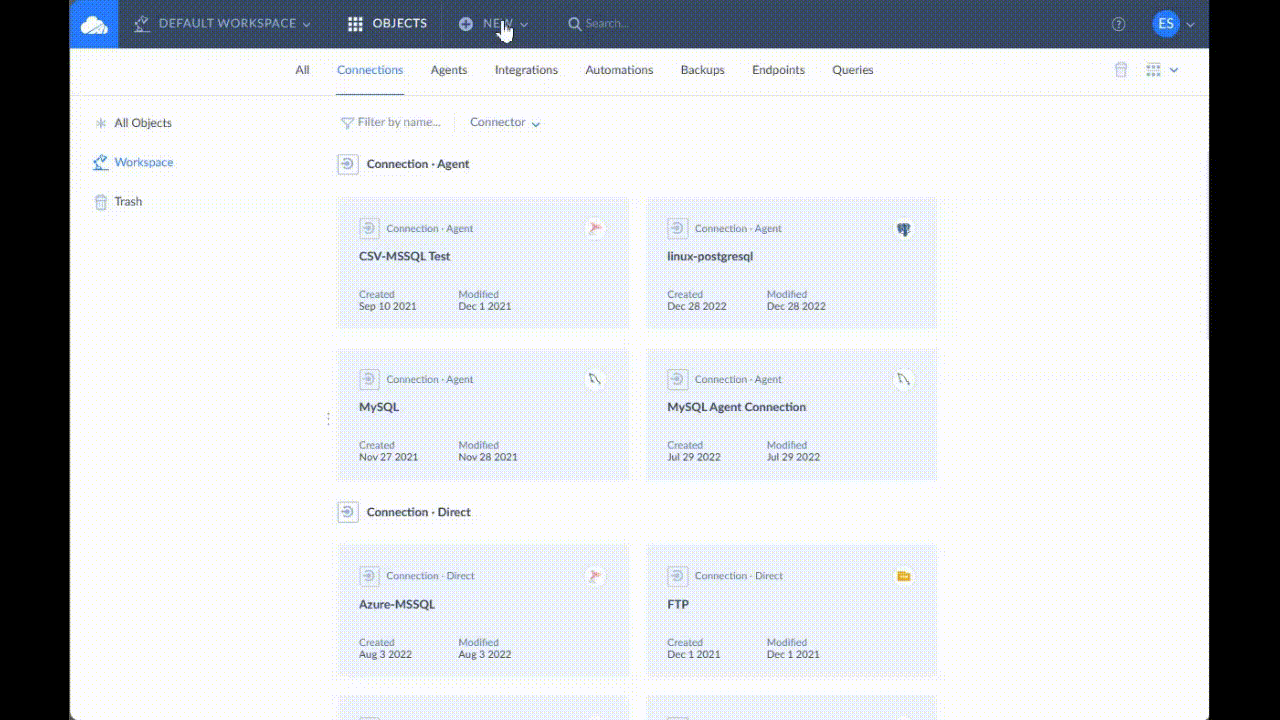
How to Integrate Shopify and Mailchimp Using Skyvia
Integrating the two powerhouses in Skyvia is easy. Here are the steps:
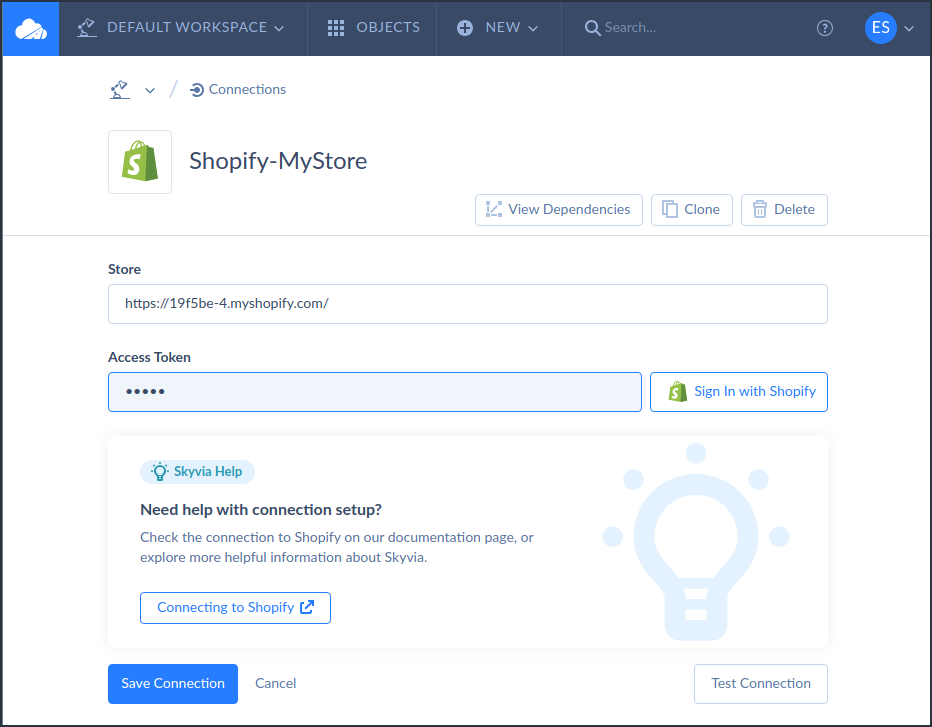
Step 1: Create the Connections to Shopify and Mailchimp
You need two connections. One for Mailchimp and the other for Shopify. Whichever you create first does not matter.
To create a Mailchimp connection, see below:
Creating a Shopify connection is almost similar. See the configuration below:
The rest of the steps remain the same.
Note that Skyvia does not store your Username and password. In fact, both Shopify and Mailchimp are big on security. And they provide access tokens to Skyvia, like secondary keys to a secured area of your house. So, rest assured your accounts are safe.
Step 2: Create Integrations for Shopify and Mailchimp
There are a variety of ways to let Shopify and Mailchimp talk together in Skyvia. There’s the Import integration like the one featured next.
Skyvia Import
One simple solution is using the Skyvia Import, like the one you see below:
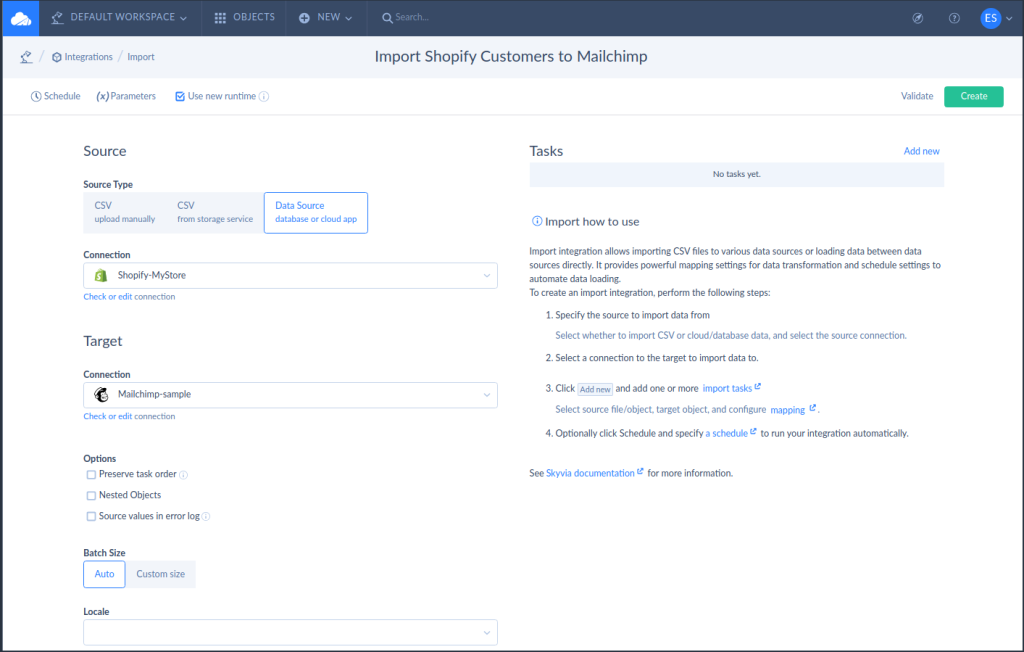
To do this, you need the following steps:
- Click NEW.
- Under INTEGRATION, select Import.
- Then, choose Data Source as the Source Type.
- Next, choose the Shopify connection you made as your Source.
- Then, choose the Mailchimp connection you made as your Target.
- Add Tasks to specify the information you want to import, like customers.
- Then, follow the prompts to map fields and specify if you want to insert, update, or delete.
Then, you can create a schedule for the Import so you don’t have to do this again and again. Check out the sample below:
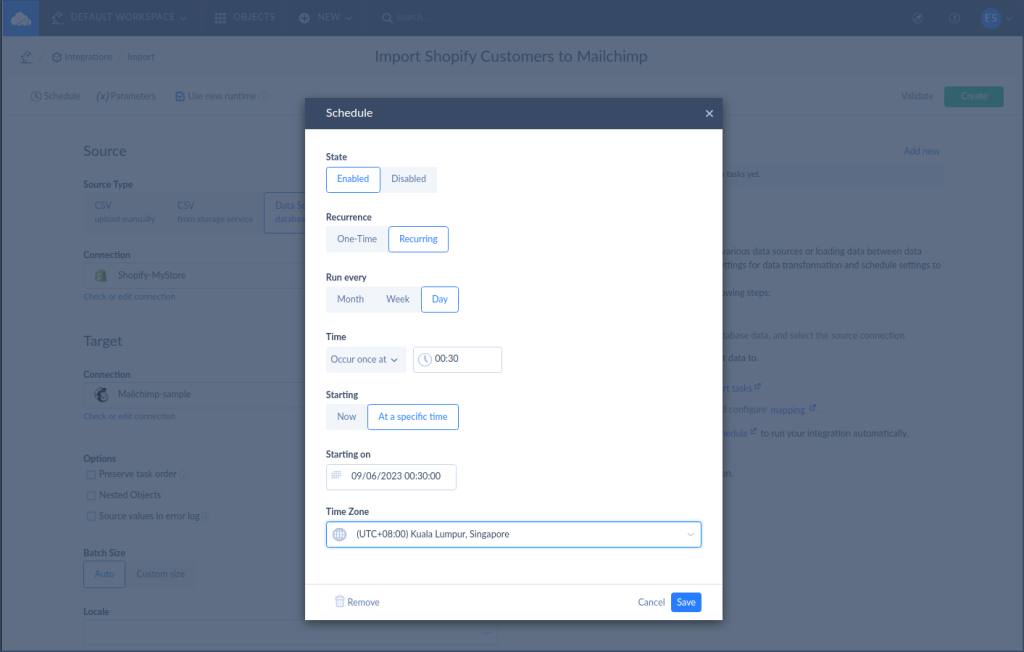
This one lets you do the syncing between Mailchimp and Shopify every day at 12:30 AM.
For more information about the Import integration, see the official documentation here.
Skyvia Control Flow and Data Flow
A fun and advanced way to sync Shopify and Mailchimp is through Skyvia Control Flow. It allows you to do integration tasks in a specific order. With Skyvia Control Flow, you have a clean designer of your data pipeline. It also has a set of different components to organize your process flow.
One of the components in the Control Flow is the Data Flow. A Data Flow component lets you integrate one or more data sources while enabling advanced data transformations. The Control Flow defines which of the Data Flows will run first and which one will follow.
Skyvia Control Flow and Data Flow Example to Integrate Shopify and Mailchimp
Below is a sample of a Control Flow that backs up customer info in Mailchimp. Then, Shopify and Mailchimp sync follows. It uses 2 Data Flow components to do that. The backup Data Flow runs first. Then, the Data Flow for Shopify and Mailchimp runs next.
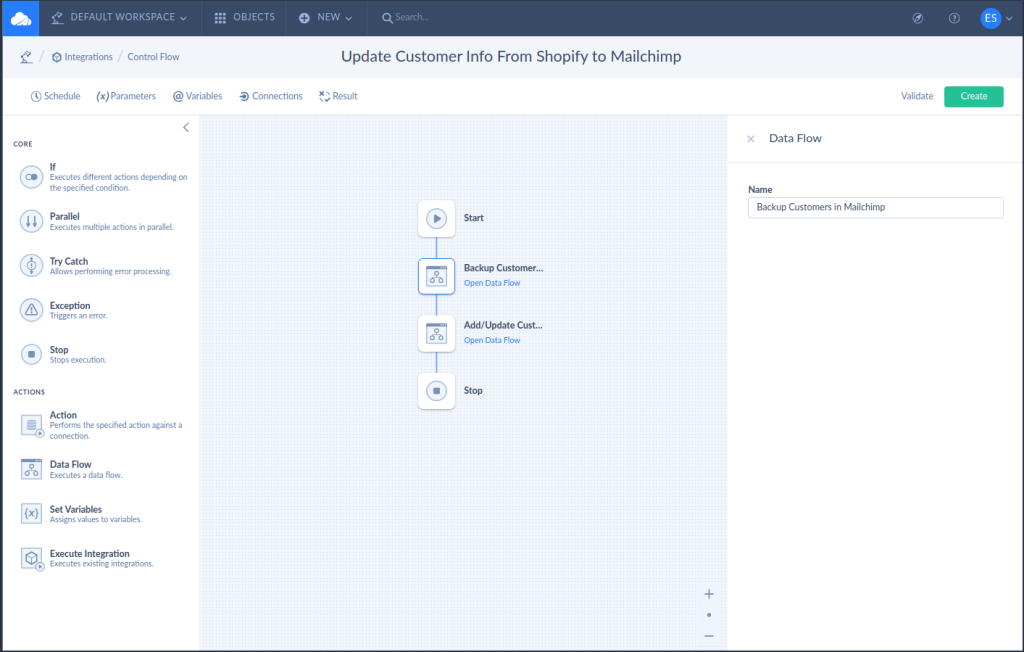
And the backup process dumps the customer info into a CSV file. Check out the Data Flow setup of the backup procedure below:
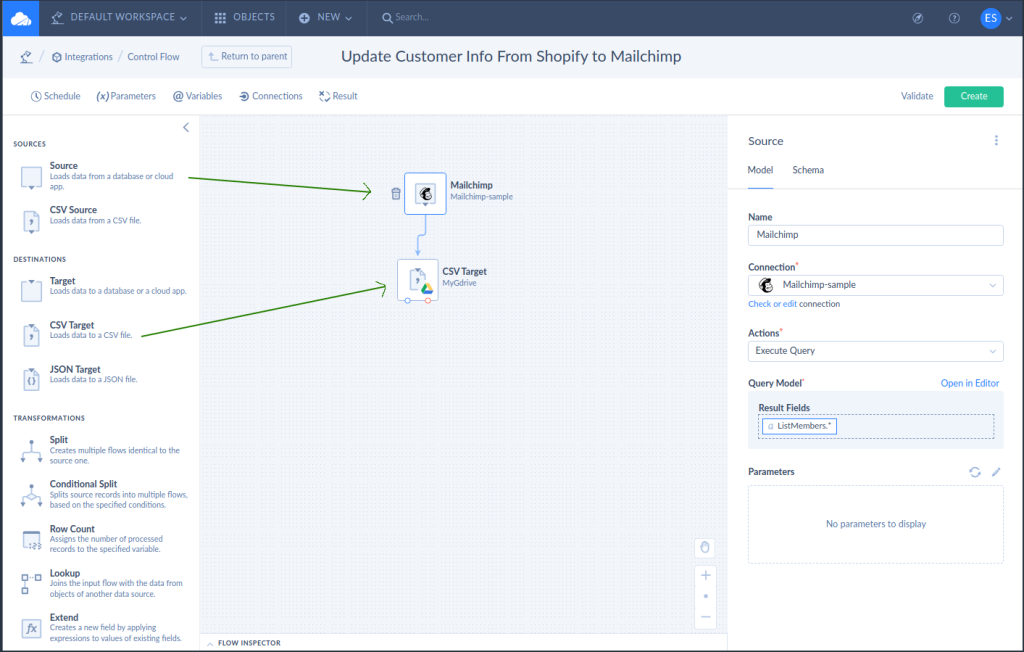
After extracting the data from Mailchimp, it writes all the information in a CSV file in Google Drive. But CSV files in a Google Drive is not the only option. You can choose whatever target you wish, like a relational database.
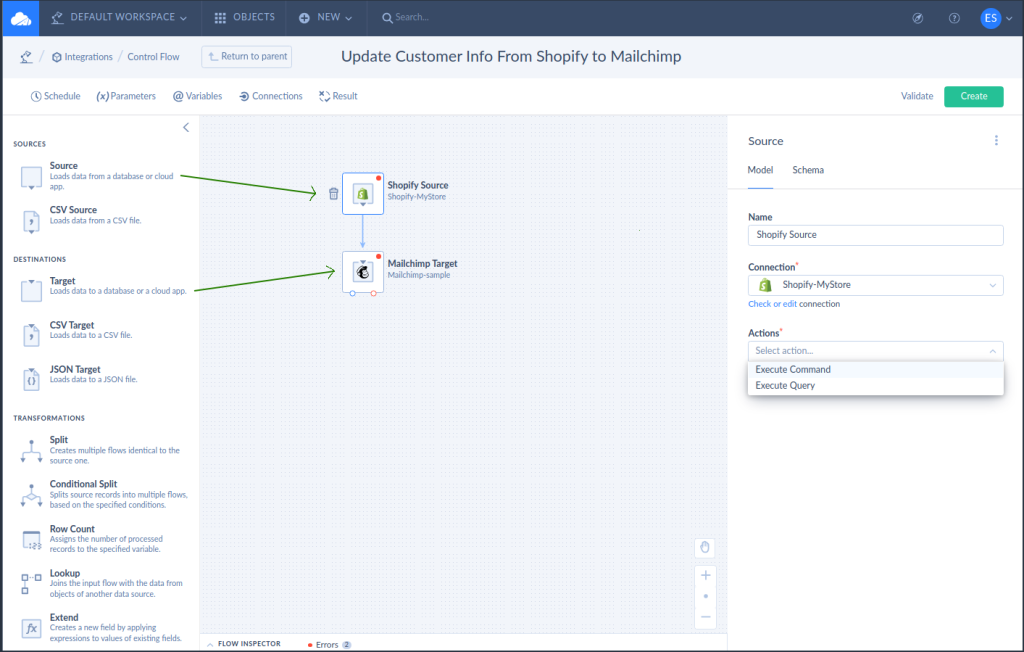
Meanwhile, here’s an unfinished simple Data Flow setup to sync Shopify to Mailchimp. The Shopify customer list is the source, while Mailchimp is the target.
You can do a Control Flow in Skyvia without coding using the steps below:
- Click NEW.
- Under INTEGRATION, click Control Flow.
- Then, add Actions and Data Flows to the Control Flow and configure.
- Finally, create a schedule like the one in the Import integration.
For more details, check out the official documentation for Control Flow and Data Flow.
12 Best Practices to Integrate Shopify and Mailchimp
Here are some best practices to ensure silky smooth and successful integration:
1. Plan Ahead
Like plotting a treasure hunt, plan what data you want to sync between MailChimp and Shopify. Decide which customer segments to target with your email campaigns.
2. Keep Data Clean
Before integration, tidy up your data. Make sure customer information is accurate and consistent on both platforms. It’s like prepping a canvas before painting.
3. Segment Strategically
Don’t go overboard with segments. Keep it focused and relevant. Targeting smaller, well-defined groups is like delivering personalized messages that hit the bullseye.
4. Test in Stages
Like cooking a complex dish, start with a small batch. Test the integration with a subset of data to ensure it’s working as expected before syncing everything.
5. Maintain Permissions
Only share what’s necessary. Make sure you’re complying with privacy regulations and that you have the right permissions to use customer data.
6. Regular Monitoring
Keep an eye on your integration. Check if data is syncing correctly, and monitor email campaign performance. It’s like tending to a garden to ensure everything grows smoothly.
7. Use Automation Wisely
Automate where it makes sense, like sending welcome emails or abandoned cart reminders. But don’t forget the human touch—some communications might still require personalization.
8. Keep Platforms Updated
Stay up to date with changes and updates in both MailChimp and Shopify. It’s like maintaining your tools for optimal performance.
9. Data Security
Ensure that any sensitive customer data is securely transferred between platforms. Skyvia and other integration tools provide encryption, but it’s wise to double-check.
10. Monitor Results
Keep track of how your integration impacts your business. Monitor open rates, click-through rates, and conversion rates to understand what’s working and what needs improvement.
11. Educate Your Team
If you’re working with a team, make sure everyone understands the integration process. It’s like making sure all the players know their roles on the field.
12. Adapt and Evolve
Just like a ship adjusting its sails, be ready to adapt your integration strategy based on results and changing business needs.
Remember, integrating MailChimp and Shopify is about boosting customer love. Following these best practices will help you make the most out of this dynamic partnership.
Final Thoughts
Making besties out of Shopify and Mailchimp is simple. You’ve seen two options to do that here. One is using the Mailchimp app for Shopify. And the other is using a more robust solution like Skyvia.
You will feel a bit uneasy if this is your first time. But once this is in place, you will only monitor results and, if needed, refine the process. This is something you can do. Others have made it. So, you are not alone.
It’s free to start with Skyvia if you’re considering integration now. Why not try it today and see how you can make better integrations between Shopify and Mailchimp?