

Summary
- Command Line Import: Ideal for advanced users seeking performance and control over large-scale imports directly from the server.
- MySQL Workbench: Offers a user-friendly GUI option for small-to-medium data imports and visual database management.
- phpMyAdmin: Suited for shared hosting environments, providing a quick and straightforward import process directly through a browser.
- Python Scripts: Best for developers creating automated pipelines or handling complex data transformations.
- Skyvia: A no-code platform that automates CSV imports into MySQL, ideal for non-technical users or teams needing scheduled, recurring imports.
Different organizations may need different methods to import their data into MySQL. In this guide, we’ll cover five practical methods and three powerful tools to help you streamline your data import process.
Here’s a quick overview of the methods we’ll explore:
- Manual Import using MySQL Workbench: Simple and ideal for small datasets without automation needs.
- Using MySQL Command Line: Efficient for tech-savvy users comfortable with scripting.
- Using PHPMyAdmin: A user-friendly interface for non-technical users to import CSVs.
- Automated Import with Third-Party Tools: Advanced, no-code solutions like Skyvia for scalable and recurring imports.
- Python Scripts: A highly customizable approach for developers needing full control over data transformation and import automation.
Whether you’re looking for a manual, code-free solution or need more customization, this tutorial will walk you through each method, with short overviews to guide your decision. By the end, you’ll have a clear understanding of how to automate importing CSV files into MySQL without a hassle.
Table of contents
- How to Import CSV Files to MySQL Tables
- Method 1: Importing CSV into MySQL Using Command Line
- Method 2: Importing CSV into MySQL Using Workbench
- Method 3: Importing CSV Using phpMyAdmin
- Method 4: Importing CSV to MySQL Using Python
- Method 5: Importing CSV into MySQL Automatically Using Skyvia
- Summary
How to Import CSV Files to MySQL Tables
Let’s explore the simple and effective ways we can use to import CSV files into MySQL tables.
Are you comfortable with a tech-focused approach? The command line is a fast and efficient way to import CSV files. With just a few SQL commands, data is ready to be used. It’s ideal for users who enjoy a hands-on experience.
If you prefer a user-friendly interface, MySQL Workbench is a great option. Its simple wizard makes importing CSV files intuitive and straightforward. This method works well for beginners and those who prefer a visual tool over command lines.
phpMyAdmin is a good solution if you’re working through a web browser. The platform’s import feature simplifies uploading CSV files without requiring any coding. Upload the file, map your fields, and let phpMyAdmin handle the rest.
If automation is your thing, Python is a fantastic tool. Using libraries like Pandas and SQLAlchemy, you can write scripts to import CSV files into MySQL seamlessly. However, this method requires knowledge of Python and technical expertise, so it might be challenging for business users.
If you’re unfamiliar with Python scripts, selecting a data integration tool to import such files automatically is better.
Looking for a hassle-free solution? No-code tools like Skyvia make the process effortless and automate MySQL CSV import. Users can integrate data from various systems into their data storage with just a few clicks.
Such platforms cater to both technical experts and business users. For instance, when business users need an ad-hoc report but can’t wait for analysts, they can quickly handle it using these intuitive tools.

Method 1: Importing CSV into MySQL Using Command Line
This approach addresses common challenges like handling large datasets efficiently and avoiding the limitations of GUI tools. It offers precise control over the import process, ensuring faster performance and reduced errors, especially for bulk data operations.
It also provides a powerful and resource-friendly solution for users seeking a reliable and straightforward way to manage server-side imports without relying on third-party tools.
Follow these steps for smooth data import.
Step 1: Prepare the CSV File
Ensure your CSV file is structured correctly. You must include column headers that match the column names in the MySQL table. Use consistent delimiters (e.g., commas for separating fields).
Example:
id,name,email
1,John Doe,johndoe@example.com
2,Jane Smith,janesmith@example.com
Save the file with a .csv extension, such as data.csv. Keep this file accessible on the same server as your MySQL instance.
Step 2: Create a MySQL Table
Open your terminal or command prompt and enter the following command:
mysql -u your_username -pThen, replace your_username with your MySQL username. Enter your password when prompted. Once inside the MySQL command line, choose the database where you want to import the data:
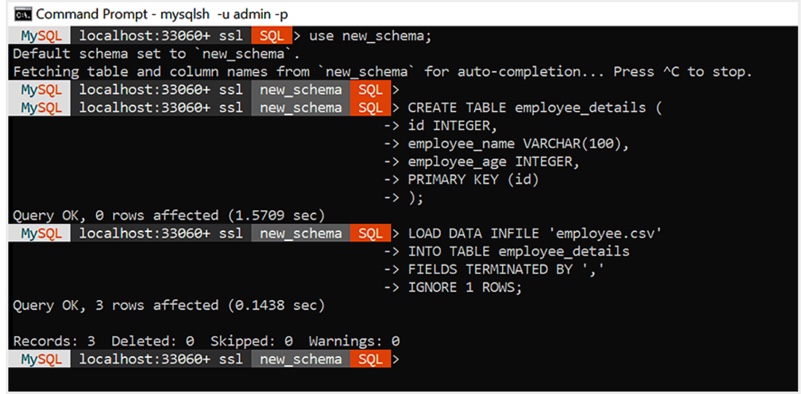
USE your_database_name;Here, replace your_database_name with the name of your target database. Define the table structure to match the CSV file columns:
CREATE TABLE your_table_name (
    id INT,
    name VARCHAR(100),
    email VARCHAR(100)
);
Replace your_table_name with the desired table name. This table will hold the imported data.
Step 3: Place the CSV File
Ensure the CSV file is saved on the server where MySQL is installed and note the absolute file path (e.g., /path/to/data.csv). You will need this path for the next step.
If the CSV file is located on your local machine, upload it to the server using tools like SCP, SFTP, or any file transfer method supported by your server.
Step 4: Import the CSV File
While still in the MySQL command line, use the LOAD DATA statement to import the CSV file:
LOAD DATA INFILE '/path/to/data.csv'
INTO TABLE your_table_name
FIELDS TERMINATED BY ','
ENCLOSED BY '"'
LINES TERMINATED BY '\n'
IGNORE 1 ROWS;
Enter this SQL command directly into the MySQL prompt.
Explanation of options:
- FIELDS TERMINATED BY ‘,’: Specifies that fields in the file are separated by commas.
- ENCLOSED BY ‘”‘: Indicates text fields are wrapped in double quotes (if applicable).
- LINES TERMINATED BY ‘\n’: Sets the line break format for each row.
- IGNORE 1 ROWS: Skips the header row in the CSV file.
Note: Ensure the MySQL user has sufficient privileges to access the file location.
Step 5: Verify the Data
After the import, run a query to confirm that the data has been correctly loaded into the table:
SELECT * FROM your_table_name LIMIT 10;Here, replace your_table_name with the name of your table. This command will display the first 10 rows, allowing you to quickly verify that the data matches the CSV file. Double-check the table structure, CSV formatting, and the LOAD DATA statement if the data is incorrect or incomplete.
Limitations
While the command-line method is powerful and efficient, it requires users to understand SQL syntax and server permissions, which can be challenging for non-technical users.
Additionally, it lacks a user-friendly interface, making it less suitable for those who prefer GUI-based or automated solutions for managing data imports.
Best For
This method is ideal for businesses managing large-scale imports, such as migrating bulk records or performing regular updates on extensive datasets.
It’s particularly well-suited for scenarios requiring precise control over the process, such as handling complex structures or automating server-side operations.
Bypassing GUI limitations offers a fast, resource-efficient solution for technical users working with high-volume or frequent transfers.
Method 2: Importing CSV into MySQL Using Workbench
This method addresses the need for a user-friendly, GUI-based approach to data imports. It simplifies the process for users who prefer visual tools, making it easier to map columns and validate data before importing.
It fits small- to medium-sized datasets and is for those looking for a straightforward way to manage imports without writing SQL commands.
Let’s set it up, create a target table, and import CSV data.
Step 1: Install MySQL Workbench
Before starting, download the Community Edition and open it. Then, navigate to Database> Manage Connections from the top menu.
Create a new connection by providing the following details:
- Connection Name: Any name you prefer.
- Hostname: Your server’s IP address or hostname.
- Port: Use the default port 3306 unless configured otherwise.
- Username and Password: Credentials for accessing the Database.
Afterward, go to the Advanced tab in the connection settings and add OPT_LOCAL_INFILE=1 in the Others text input field. This step ensures Workbench can upload data from local files.
Click Test Connection to verify it. If successful, save the connection settings by clicking OK.
Step 2: Create a Table in MySQL Workbench
Prepare Your CSV File.
Date,Band,ConcertName,Country,City,Location,LocationAddress,
2023-05-28,Ozzy Osbourne,No More Tours 2 - Special Guest: Judas Priest,Germany,Berlin,Mercedes-Benz Arena Berlin,"Mercedes-Platz 1, 10243 Berlin-Friedrichshain",
2023-05-08,Elton John,Farewell Yellow Brick Road Tour 2023,Germany,Berlin,Mercedes-Benz Arena Berlin,"Mercedes-Platz 1, 10243 Berlin-Friedrichshain",
2023-05-26,Hans Zimmer Live,Europe Tour 2023,Germany,Berlin,Mercedes-Benz Arena Berlin,"Mercedes-Platz 1, 10243 Berlin-Friedrichshain",
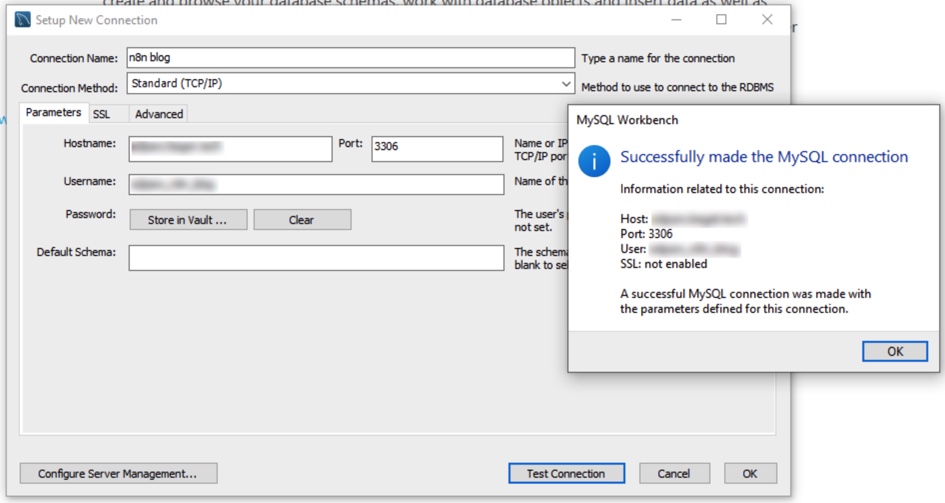
2023-07-07,Depeche Mode,Memento Mori World Tour 2023,Germany,Berlin,Olympiastadion Berlin,"Olympischer Platz 3, 14053 Berlin-Charlottenburg",In the main dashboard, click on the + icon next to MySQL Connections to create a new connection to your database in Workbench. A dialog box, Setup New Connection will appear.
Enter:
- The connection name (e.g., “MyDatabaseConnection”),
- The IP address or hostname of your database server (e.g., localhost or 127.0.0.1 for a local server)
- The default port for MySQL is 3306. Leave it as is unless your database uses a different port.
- The username you use to log in to your database (e.g., root).
Click the Store in Vault… button to securely save your password, or leave it blank to enter the password manually each time you connect.
Then, click the Test Connection button to verify it. If successful, you’ll see the confirmation pop-up. If not, review the entered details for accuracy and ensure your database server is running.
Click OK to save the details. Your new connection will now appear on the main dashboard.
Select your database schema in the Schemas panel, right-click on Tables, and choose Create Table.
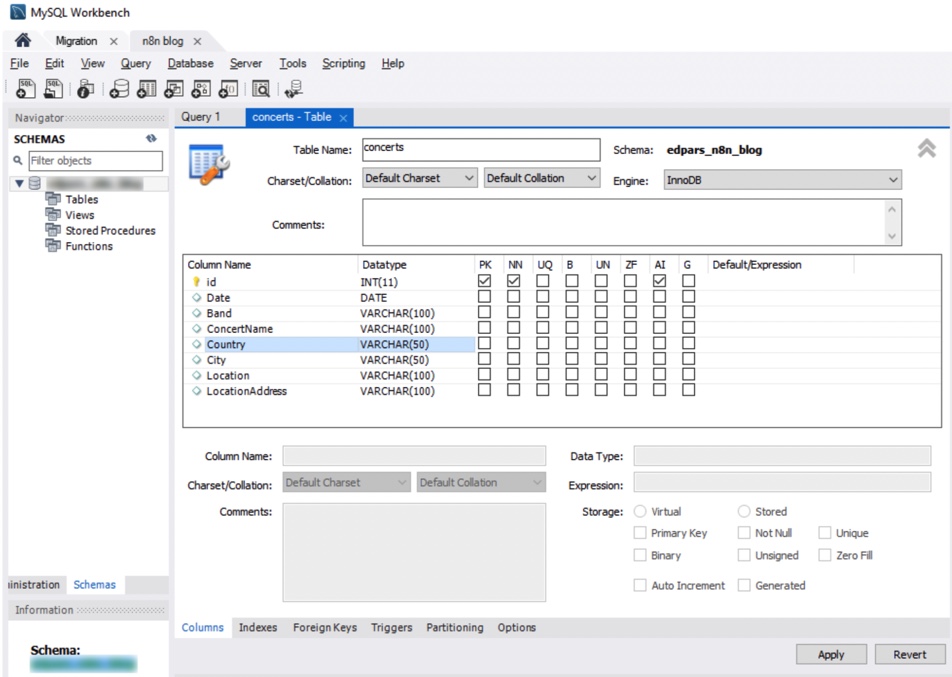
Name the table (e.g., concerts) and define columns to match the CSV file:
- Date: DATE
- Band: VARCHAR(100)
- ConcertName: VARCHAR(200)
- Country: VARCHAR(100)
- City: VARCHAR(100)
- Location: VARCHAR(200)
- LocationAddress: VARCHAR(255)
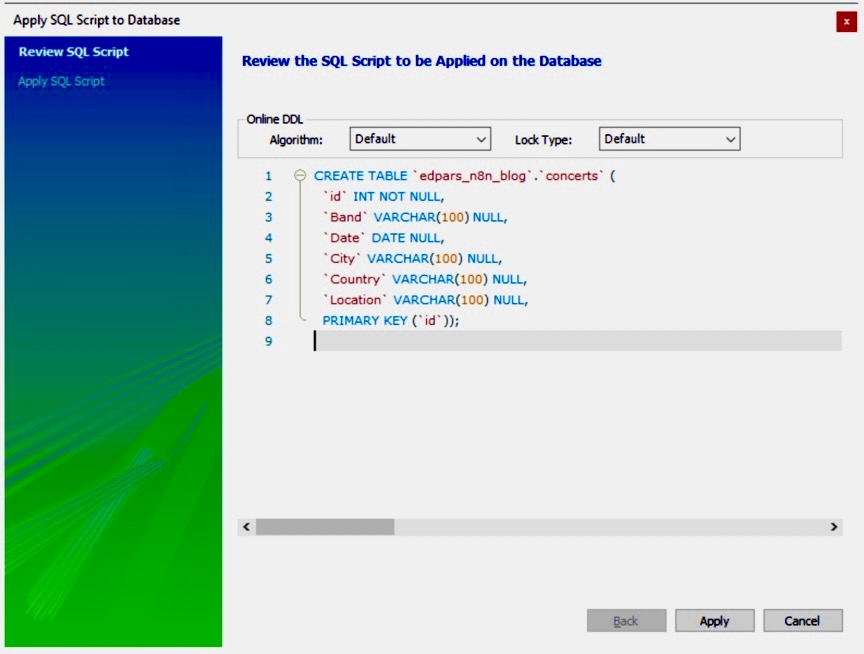
When finished, click Apply to save the table.
Step 3: Import the CSV File
Right-click on the target table (e.g., concerts) and choose Table Data Import Wizard. Then, select the CSV file to import and click Next.
Here, you must ensure each column in the CSV file maps correctly to a corresponding table column. Adjust the mappings if necessary and proceed by clicking Next.
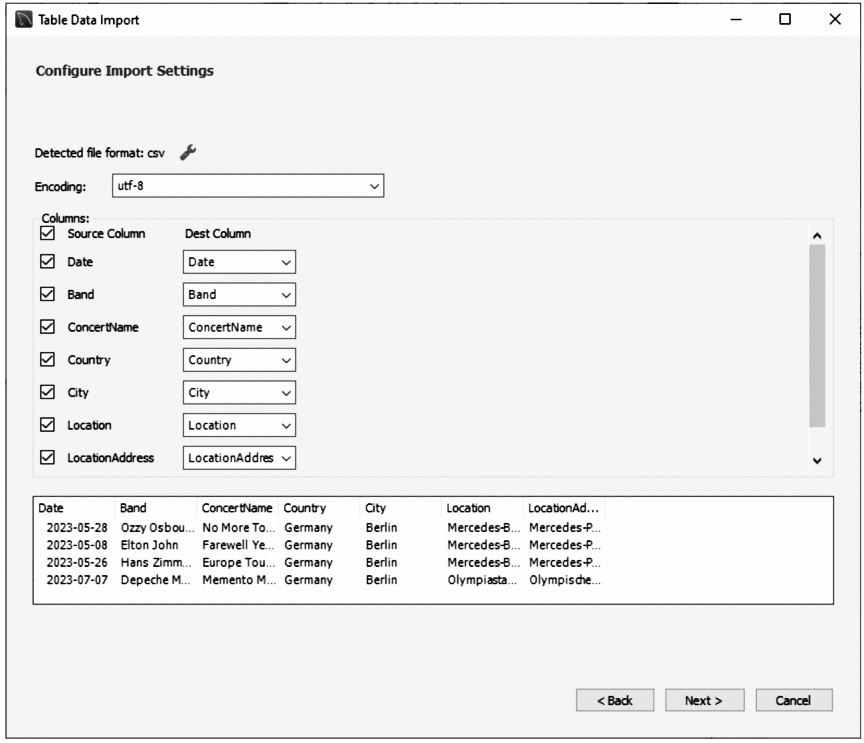
Review the settings and click Start Import. You may monitor the progress in the wizard window. If successful, a confirmation message will appear. In case of errors, review the log messages for explanations.
Step 4: Verify the Import
When the Import Wizard is closed, right-click on the table in the Schemas panel and choose Select Rows.
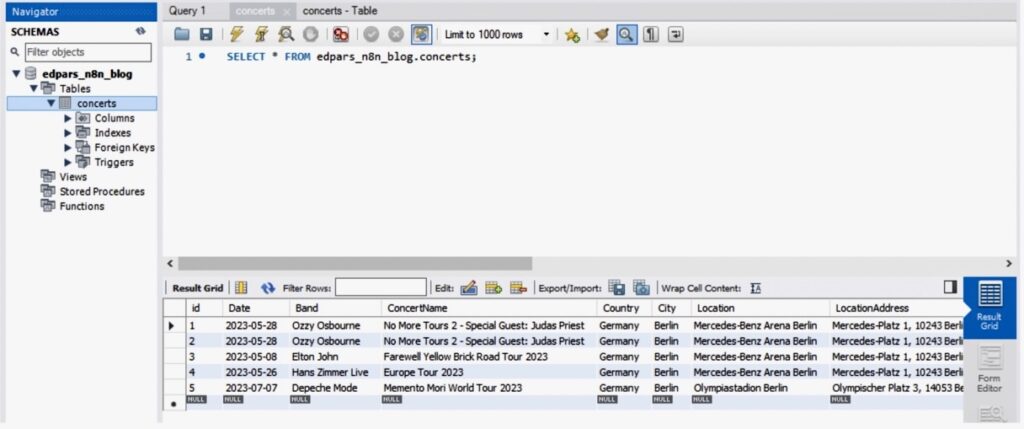
Confirm that the data matches your CSV file, and voila, success. The data is now imported into MySQL and ready for use.
Limitations
Despite being user-friendly, this method may struggle to handle large datasets efficiently, making it less suitable for bulk imports. Additionally, it requires manual intervention for each import, which can be time-consuming and impractical for recurring or automated data workflows.
Best For
Such a method is a good choice for businesses that need a user-friendly, GUI-based solution for managing small to medium-sized datasets.
It especially fits for non-technical users or teams working on ad-hoc data imports, like uploading customer lists, product inventories, or transactional records.
This method provides a straightforward interface with minimal setup, making it suitable for occasional imports or scenarios where simplicity and ease of use are priorities.
Method 3: Importing CSV Using phpMyAdmin
This approach provides a web-based solution for managing database imports. It benefits users working in shared hosting environments or without direct access to command-line tools.
This method is perfect for quick, ad-hoc imports, offering an accessible interface for uploading and mapping data.
Follow these steps to import data effortlessly.
Step 1: Prepare the CSV File
Before starting, ensure that each column in the CSV file matches the structure of the target table in the database.
Use consistent delimiters (e.g., commas) to separate values. Include a header row if required (e.g., id, name, email). Save the file with a .csv extension, for example, data.csv.
Example:
id,name,email
1,John Doe,john.doe@example.com
2,Jane Smith,jane.smith@example.com
3,David Johnson,david.johnson@example.com
Step 2: Access phpMyAdmin
Open your web browser and navigate to the phpMyAdmin login page. This is usually located at http://yourdomain.com/phpmyadmin or http://localhost/phpmyadmin for local installations. Enter your username and password, then click Go to log in.
Step 3: Select the Database
- In the left-hand menu, click on the Database you want to import the CSV file.
- If you need to create a new table, follow the steps in Step 4.
Step 4: Create a Table (if not already created)
If the table you want to import data into already exists, click on the SQL tab in phpMyAdmin and run a CREATE TABLE statement to create it.
Example:
CREATE TABLE your_table_name (
    id INT,
    name VARCHAR(100),
    email VARCHAR(100)
);
Click Save to create the table.
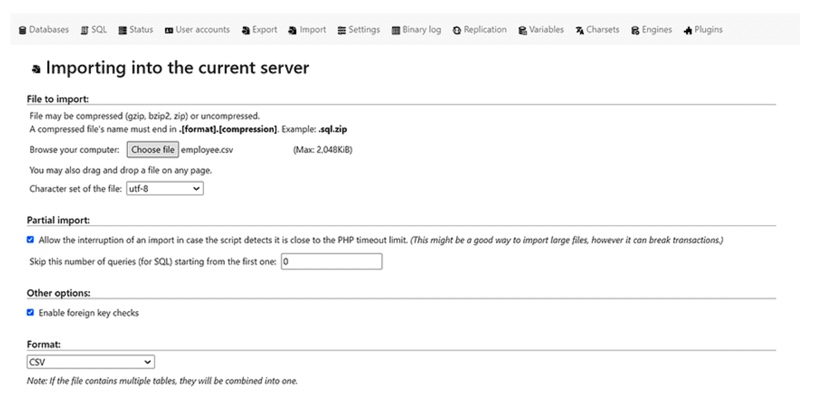
Step 5: Import the CSV File
In the phpMyAdmin interface, click on the Import tab in the top menu. After that, under the File to Import section, click the Browse button and select your CSV file from your computer.
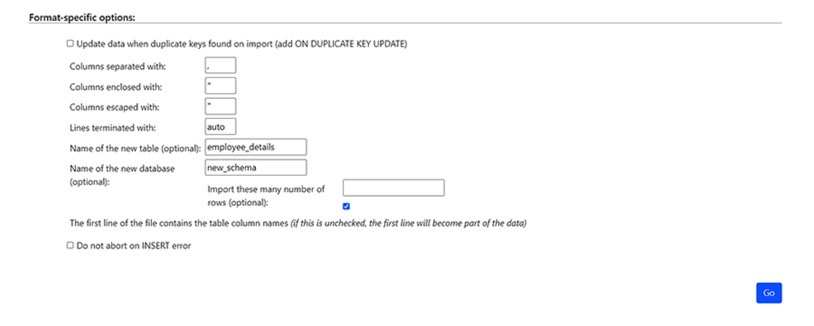
The next step is to configure the import options:
- Format: Select CSV from the dropdown menu.
- Fields terminated by: Enter , if commas separate the fields in your CSV file.
- Fields enclosed by: Enter ” if text values are enclosed in double-quotes.
- Lines terminated by: Keep the default \n for line breaks.
- Column names: If your CSV file has a header row, tick the option to ignore the first line.
After finishing, click Go to start the import.
Step 6: Verify the Import
Once the import is complete, phpMyAdmin will display a success message indicating the number of rows imported.
To verify, go to the Browse tab of the target table and review the imported records.
If the import failed or the data appears incorrect:
- Double-check the CSV structure and import settings.
- Correct any issues and repeat the process.
Step 7: Troubleshooting (if needed)
If you encounter errors, phpMyAdmin will provide a log with details.
Common issues and fixes:
- Ensure the table columns match the CSV file structure.
- Ensure your CSV file uses UTF-8 encoding.
Limitations
The solution may not handle large datasets effectively, often timing out during bulk imports. Additionally, its web-based interface can be less secure for sensitive data and lacks advanced automation features, making it unsuitable for recurring or complex import tasks.
Best For
Importing CSV files using phpMyAdmin is an excellent choice for small to medium-sized data imports where a simple, GUI-based approach is preferred.
It’s okay for businesses or teams without extensive technical expertise, such as managing customer records, uploading product catalogs, or updating inventory data.
This method works well for ad-hoc imports and is particularly useful for users who want a straightforward solution without relying on command-line tools or additional software.
Method 4: Importing CSV to MySQL Using Python
This method is perfect for users looking to automate repetitive imports, transform data during the process, or integrate imports into larger workflows. Python’s powerful libraries (pandas and mysql.connector) give developers precise control over how data is read, cleaned, and inserted into MySQL databases.
This guide explains using Python with the pymysql and pandas libraries to handle CSV-to-MySQL imports.
Step 1: Prepare Your Environment
Download Python from python.org and install the mysql-connector-python and pandas libraries using pip:
pip install mysql-connector-python pandas- mysql-connector-python: A Python library to connect to MySQL databases.
- pandas: A library for data manipulation and handling CSV files.
Step 2: Prepare Your CSV File
Your CSV file should have headers that match the MySQL table column names. Save it as a .csv file, for example, data.csv.
Example:
id,name,email
1,John Doe,john.doe@example.com
2,Jane Smith,jane.smith@example.com
3,David Johnson,david.johnson@example.com
Step 3: Create a MySQL Table
Open MySQL and log in with your credentials.
mysql -u your_username -pUse the database where you want to import the data.
USE your_database_name;Ensure the table matches the CSV structure.
CREATE TABLE your_table_name (
    id INT,
    name VARCHAR(100),
    email VARCHAR(100)
);
Step 4: Write the Python Script
Open your preferred text editor or IDE and create a new Python script file (e.g., import_csv.py). Copy and paste the following code:
import mysql.connector
import pandas as pd

# Database connection
connection = mysql.connector.connect(
    host='localhost',         # Replace with your host
    user='your_username',     # Replace with your MySQL username
    password='your_password', # Replace with your MySQL password
    database='your_database'  # Replace with your database name
)

cursor = connection.cursor()

# Load the CSV file into a pandas DataFrame
csv_file = 'data.csv'  # Replace with the path to your CSV file
data = pd.read_csv(csv_file)

# Iterate through the DataFrame and insert records into the MySQL table
for index, row in data.iterrows():
    cursor.execute(
        "INSERT INTO your_table_name (id, name, email) VALUES (%s, %s, %s)",
        (row['id'], row['name'], row['email'])
    )

# Commit the transaction
connection.commit()

print("Data imported successfully!")

# Close the connection
cursor.close()
connection.close()
Then, replace your_username, your_password, your_database, and your_table_name with your database credentials and table details.
Step 5: Run the Script
In this step, you need to save the Python script file, open a terminal or command prompt, navigate to the folder containing your script, and run it:
python import_csv.pyStep 6: Verify the Import
Log in to your MySQL database and verify the imported data by running a query:
SELECT * FROM your_table_name LIMIT 10;Check that the records from your CSV file are correctly loaded into the table.
Limitations
Using Python to import CSV files requires programming knowledge, which can be a barrier for non-technical users.
Setting up and maintaining scripts for imports can be time-consuming and prone to errors, especially for those unfamiliar with Python or database operations.
Best For
Importing CSV files into MySQL using Python fits businesses that require automation, scalability, and flexibility in their workflows.
This method works well for technical users with large volumes, recurring imports, or intricate transformations. It allows seamless integration into broader pipelines, perfect for use cases like automated reporting, real-time processing, or syncing information across platforms.
Method 5: Importing CSV into MySQL Automatically Using Skyvia
Importing CSV files into MySQL automatically using data integration platforms like Skyvia solves the pain points of managing recurring data imports without technical expertise. It provides an import CSV to MySQL without coding for users who want to:
- Automate the process.
- Eliminate manual work.
- Ensure consistent, error-free imports.
With its intuitive interface and cloud-based platform, Skyvia simplifies handling large datasets and integrates seamlessly with cloud storage services like Google Drive or Dropbox.
Using Skyvia, you can automatically import CSV files into MySQL with minimal setup. Follow these steps to complete the process.
Step 1: Sign Up and Log In to Skyvia
The first step is to visit the Skyvia website and sign up for a free account if you don’t have one. Then, log in to your account to access the dashboard.
Step 2: Create a New Integration Task
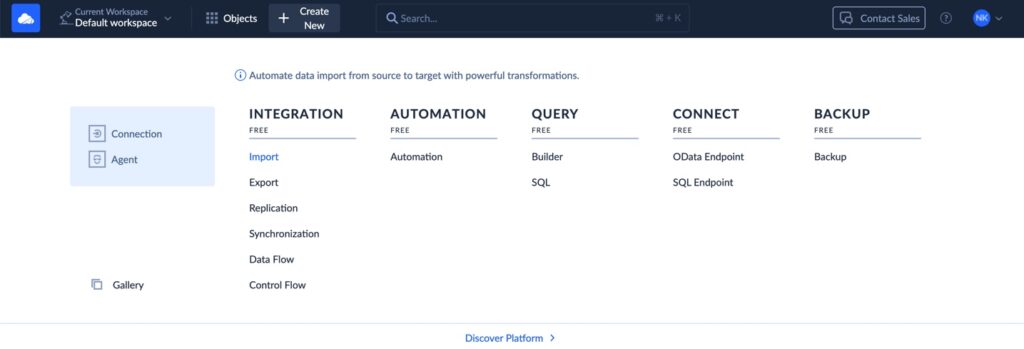
From the dashboard, click on Integration, select + Create New, and choose the Import option to set up a data import process.
Step 3: Connect to the MySQL Database
Click New Connection, select MySQL from the available options as a target, and enter the required credentials here.
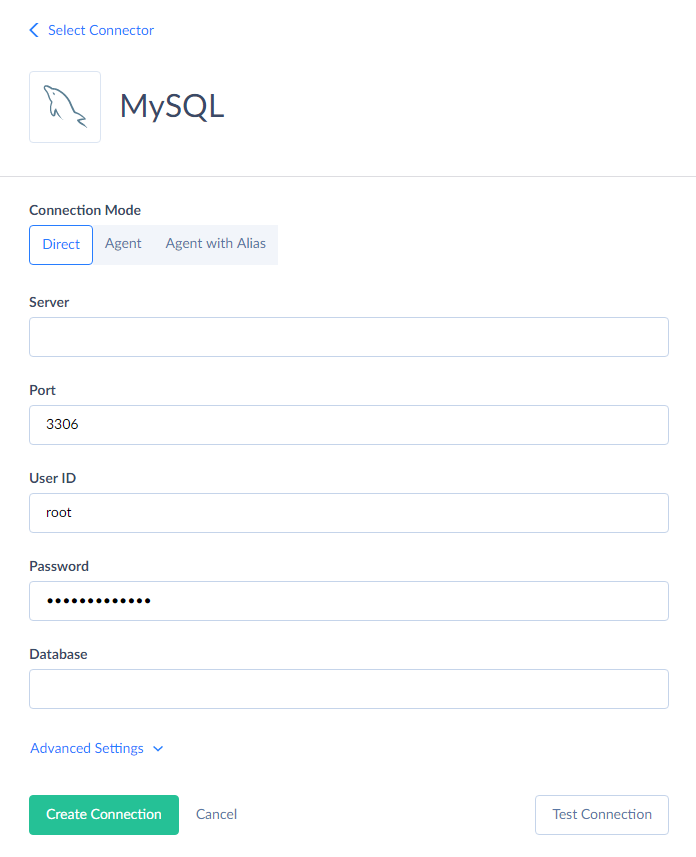
Next, click Create Connection, test it, and save. Then, return to the import setup screen and select the MySQL connection you created.
Step 4: Prepare the CSV File
In this step, you must ensure the CSV file has a header row with column names matching the MySQL table structure.
Store the CSV file in a location that is accessible for uploading or connecting to a cloud storage service like Google Drive or Dropbox.
Example CSV file preview:
id,name,email,phone
1,John Doe,john.doe@example.com,1234567890
2,Jane Smith,jane.smith@example.com,9876543210
3,David Johnson,david.johnson@example.com,5678901234
4,Lisa Brown,lisa.brown@example.com,4561237890
Step 5: Create a New Import Package
Here, click on Integration → +Create New → Import from the dashboard. Select the CSV file as the source. Upload the file or link to a cloud storage account.
Finally, preview and confirm the file structure.
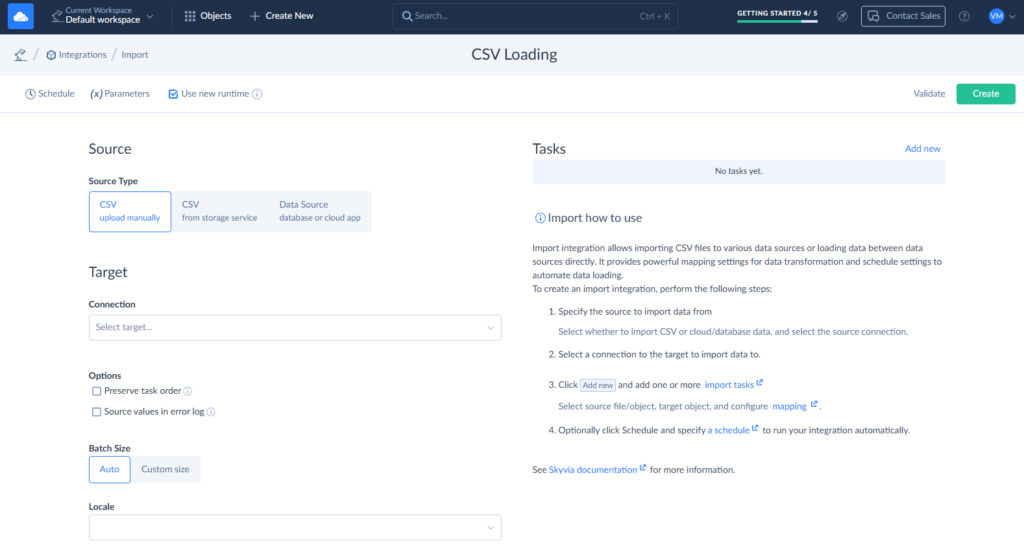
The following action is to select the MySQL connection created earlier and specify the target table where the data will be imported.
Step 6: Configure Import Settings
Now, select import mode:
- Insert: Adds new rows.
- Update: Updates existing rows based on a matching key.
- Upsert: Combines insert and update.
Enable options like error logging and duplicate record handling if needed.
Step 7: Automate the Import
To schedule CSV import to MySQL, navigate to the Schedule tab during package setup. Set a frequency (daily, weekly, monthly, or custom intervals) and specify the time and timezone. After that, enable the schedule and save.
Limitations
Skyvia is highly user-friendly and requires no coding, but it relies on a stable internet connection since it’s a cloud-based platform.
Additionally, it may not offer the same granular control or customization level as scripting solutions like Python for highly specific or complex import scenarios.
Best For
Importing CSV into MySQL automatically using Skyvia is a fine choice for businesses that value automation, ease of use, and cloud-based solutions.
This method is perfect for non-technical users or teams that need to schedule recurring imports, synchronize data from cloud storage services, or handle integrations between platforms without manual intervention.
Skyvia’s no-code interface and powerful automation features make it an excellent choice for streamlining operations like customer data updates, inventory management, or regular reporting.

Summary
We can import CSV files into MySQL tables through various methods, each tailored to different expertise levels, use cases, and business requirements.
Whether companies prefer command-line efficiency, GUI-based tools, or code-driven approaches, there’s a solution for everyone:
- Command Line Import is ideal for advanced users looking for performance, precision, and control over large-scale imports directly from the server.
- MySQL Workbench offers a user-friendly GUI option for small-to-medium data imports and visual database management.
- phpMyAdmin fits for shared hosting environments for quick and straightforward imports directly through a browser.
- Python Scripts are best for developers creating automated pipelines or handling complex data transformations.
- No-Code platforms like Skyvia are perfect for non-technical users, offering a secure, scalable, and automated solution for seamless data integration without writing code.
Choosing the proper method depends on your technical expertise, project scale, and need for automation. With the proper approach, importing CSV files into MySQL becomes a streamlined process, enabling teams to manage data efficiently and smoothly.
FAQ for CSV File into MySQL

Can I schedule automatic imports of CSV files into MySQL?
Yes, automation is possible with tools like:
Skyvia offers built-in scheduling for recurring imports.
Python Scripts can be integrated with cron jobs for automated execution.
Command Line Scripts allow using LOAD DATA INFILE in shell scripts combined with scheduling tools.
These methods enable seamless, hands-free data imports into MySQL on a schedule.
What makes Skyvia a good choice for importing CSV files into MySQL?
Skyvia is a no-code platform designed for simplicity and automation:
It supports large datasets and recurring imports with scheduling.
It integrates with cloud storage services like Google Drive.
It provides detailed logs for error tracking and monitoring.
Skyvia is perfect for non-technical users or those looking for a scalable, hands-free solution.
How do I ensure data accuracy when importing CSV files into MySQL?
To ensure data accuracy:
Validate the CSV file. Check for missing values, mismatched data types, and duplicate entries.
Match columns correctly. Ensure that the column headers in your CSV match the structure of the MySQL table.
Preview before import. Many tools like Skyvia and MySQL Workbench allow you to preview data and mappings before importing.
Use error logs. Review import logs provided by tools like Skyvia or command-line scripts to catch and resolve errors.
What are the most common errors when importing CSV files into MySQL?
Some common errors include:
Data Type Mismatches. Ensure that the data types in the CSV match the column data types in MySQL (e.g., no text in numeric fields).
Encoding Issues. Use UTF-8 encoding for the CSV file to avoid character misinterpretation.
Incorrect Delimiters. Verify that the delimiter in the CSV matches the one specified in the import settings.
Permission Denied. Ensure the MySQL user has the required permissions to import files, and the file is accessible to the MySQL server.
