

Users who work in Jira and analyze insights in Tableau have probably dreamed of bringing Jira info into Tableau for better reporting and understanding the whole picture to make decisions. At the same time, manually exporting its details into Tableau is time-consuming and error-prone and lacks real-time updates.
With the proper integration, businesses can track real-time project progress, automate info syncing, and enhance project tracking using Tableau’s advanced visualizations.
This article explores different ways to connect Jira with Tableau, including direct no-code integration, database syncing for advanced analytics, and custom API solutions for full flexibility.
Table of contents
- What Are Tableau and JIRA?
- Why Integrate Tableau with Jira?
- Methods for Integrating Tableau with Jira
- Connect Tableau with Jira using Tableau Connector for Jira (by Alpha Serve)
- Integrate Tableau with Jira using Skyvia Data Replication
- Integrate Tableau with Jira using Custom Coding
- Conclusion
What Are Tableau and JIRA?
Before starting with the integration, let’s quickly walk through Tableau and Jira to see what level they can take your business to when combined.
Tableau: Turning Data into Insights

The platform visualizes information and helps businesses transform raw data into interactive dashboards and reports. Depending on the customer’s use cases, it provides various products, including Tableau Desktop, Tableau Server, Tableau Public, Tableau Prep, etc.
Whether tracking sales performance, monitoring project progress, or analyzing trends, Tableau shows the bigger picture with clear, customizable visualizations, like:
- User-friendly. A drag-and-drop interface, no coding needed.
- Real-time insights. Instantly update dashboards with fresh ones.
- Connects to multiple sources. Databases, cloud apps, and spreadsheets.
Jira: The Ultimate Project Management Tool
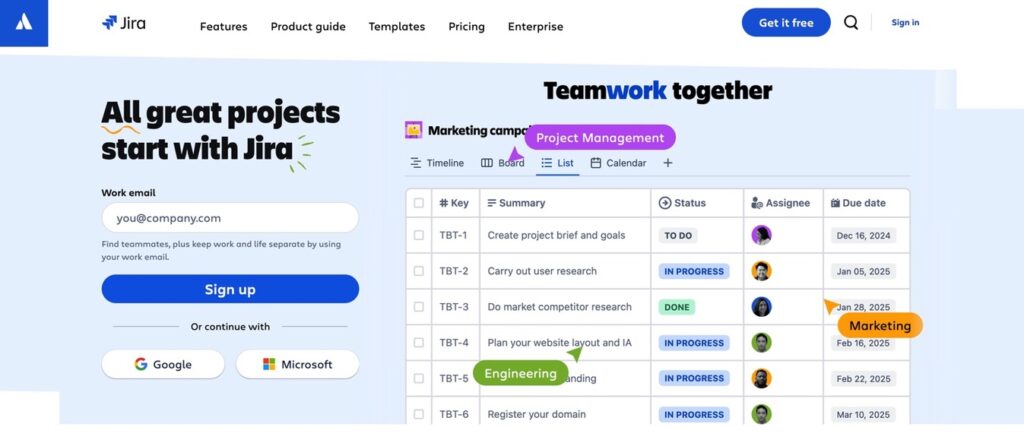
It’s a powerful project management platform for agile development, task tracking, and team collaboration. It integrates many products used in different segments and helps teams organize work, set priorities, and monitor progress efficiently. Whether you’re managing software development, IT projects, or business workflows, Jira keeps everything structured and transparent, like:
- Task and issue tracking. Manage projects with detailed workflows.
- Collaboration & automation. Keep teams aligned and automate repetitive tasks.
- Customizable dashboards. Track performance, deadlines, and bottlenecks.
Why Integrate Tableau with Jira?
Jira is great for managing projects, but its built-in reporting tools can feel limiting when it comes to in-depth analysis and real-time insights. That’s where Tableau comes in. By connecting it with Jira, companies unlock a powerful way to visualize, analyze, and optimize their project data like never before.
Project Performance Monitoring
Jira captures vast project-related information, but its built-in reporting can be limited. With Tableau, teams can:
- Visualize real-time project progress across multiple teams and sprints.
- Track task completion rates and identify bottlenecks.
- Compare planned vs. actual timelines to improve project delivery accuracy.
Sprint and Agile Metrics Analysis
For agile teams, understanding sprint progress is crucial. Integrating Jira with Tableau allows teams to:
- Analyze sprint velocity over time and predict future performance.
- Track story points, burndown rates, and backlog trends in an intuitive dashboard.
- Identify blockers and unplanned work that impact sprint goals.
Team Productivity and Workload Balancing
Overloaded teams can lead to burnout and project delays. Tableau helps by:
- Tracking workload distribution among team members.
- Identifying underutilized or overworked employees to optimize assignments.
- Analyzing resolution times for different issue types to improve efficiency.
SLA Compliance and Issue Resolution Analysis
Many companies track Service Level Agreements (SLAs) to ensure timely responses. With Tableau, teams may:
- Monitor SLA adherence and flag potential breaches.
- Analyze ticket resolution times by category, priority, or assignee.
- Improve customer support workflows by identifying recurring issues.
Resource Allocation and Budget Tracking
For managers and executives, integrating Jira with Tableau provides insights into resource allocation and financial impact, helping to:
- Measure project costs vs. budget to avoid overspending.
- Analyze time spent on different tasks for more accurate project estimations.
- Optimize resource allocation by identifying inefficiencies.
Stakeholder Reporting and Data-Driven Decision-Making
Jira info can be overwhelming for non-technical stakeholders. Tableau makes it accessible and actionable by:
- Providing interactive dashboards instead of static Jira reports.
- Automating real-time reporting for leadership teams.
- Combining Jira data with other business metrics (e.g., sales, finance, customer success).
Cross-Departmental Insights: Bridging Development and Business Teams
Jira often contains technical project details, but decision-making requires a business-wide view. With Tableau, companies can:
- Merge Jira information with CRM, finance, and sales reports to connect technical and business insights.
- Identify trends between project progress and business outcomes (e.g., how delays impact revenue).
- Support cross-functional collaboration by making project data easily accessible across departments.

Methods for Integrating Tableau with Jira
There are multiple ways to bring Jira details into Tableau, and the right choice depends on users’ technical skills, business needs, and how much control they want over the integration.
Below, we review three main integration methods, each with its advantages and trade-offs.
| Approach | Description | Pros | Cons |
|---|---|---|---|
| Direct Connectors | Plug-and-play solutions that directly pull Jira data into Tableau (e.g., Tableau Connector for Jira). | No coding required. Quick setup. Live data sync. | Limited customization. May have licensing costs. |
| Data Replication | Syncs Jira data to a database or data warehouse before connecting it to Tableau (e.g., Skyvia Data Replication). | Great for handling large datasets. Enables advanced data modeling. Works with multiple BI tools. | Not real-time (depends on sync frequency). Requires database setup. |
| Custom Coding (API-based) | Uses Jira’s REST API to pull data into Tableau with custom scripts. | Full customization and flexibility. Control over data structure. Works for complex use cases. | Requires development skills. More time-consuming to set up & maintain. |
Each approach has its strengths and weaknesses. Direct connectors offer a fast and easy solution but may have limited customization options. Data replication provides flexibility for handling large datasets but doesn’t support real-time updates. If an organization needs complete control, API-based integration is ideal, though it requires technical expertise to implement and maintain.
Now, let’s dive into each one in detail and see how to set it up.
Connect Tableau with Jira using Tableau Connector for Jira (by Alpha Serve)
As was said above, bringing Jira data into Tableau using a direct connector is fast and easy. This approach lets users extract Jira insights, apply filters, and send them straight to Tableau without coding.
You can find Tableau Connector for Jira and other direct connectors on the Atlassian Marketplace. But for this guide, we’ll focus on one of the most popular options, the Tableau connector for Jira by Alpha Serve.
Best for
No-code users who want real-time dashboards directly from Jira.
How It Works
- Extracts Jira data and formats it for Tableau.
- Applies JQL filters to refine the dataset before export.
- Generates a Tableau Data Source URL, which you can use to connect Jira data to Tableau.
Pros
- No coding is required. Beginner-friendly.
- Works directly within Jira. No need for extra software.
- Real-time filtering using JQL. Get the exact data you need.
Cons
- Paid tool. Requires a subscription.
- Limited data transformation options. Exports data as-is without advanced modeling.
Prerequisites
Before starting, ensure what to have:
- Jira admin permissions (needed to install the app).
- Tableau Connector for Jira license (subscription required).
- Tableau Desktop or Tableau Server installed.
Step-by-Step Guide to Setting It Up
Step 1: Log into Your Jira Instance
- Log into the Jira instance that you want to integrate with Tableau.
- Ensure you sign in as an administrator, as you’ll need admin rights to install and grant the plugin necessary permissions.
Step 2: Find the Plugin on the Atlassian Marketplace
- To locate the Tableau Connector for Jira plugin, go to the Administrator menu and click Manage Apps.
- In the Find new apps tab, type “Tableau Connector for Jira Alpha Serve” and hit Search.
- Then, click on the correct version of the plugin to proceed with the installation.
Step 3: Install Tableau Connector for Jira

- Click Try it free to activate a 30-day free trial, or select Buy now to purchase a full license.
- The installation process will begin automatically.
Note: You can also install the plugin directly by visiting its Atlassian Marketplace page and clicking Get it now.
Step 4: Configure the Plugin Settings
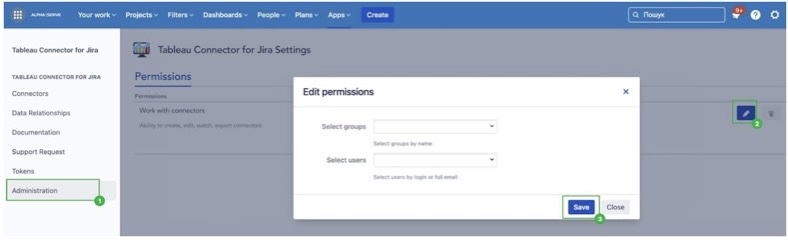
- After installation, you need to configure the connector to match your needs. To do it, go to Jira Admin > Manage Apps and find Tableau Connector for Jira in the list.
- Then, open the Administration section to adjust the necessary settings and manage permissions.
Step 5: Create and Import Jira Data into Tableau
- Navigate to the Tableau Connector for Jira app in Jira and click Connectors to start adding new data sources.
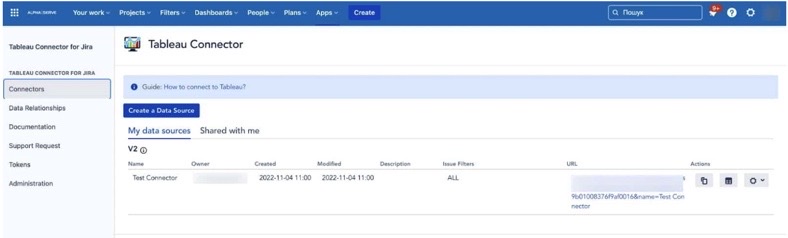
- The next step is to select Create a Data Source.
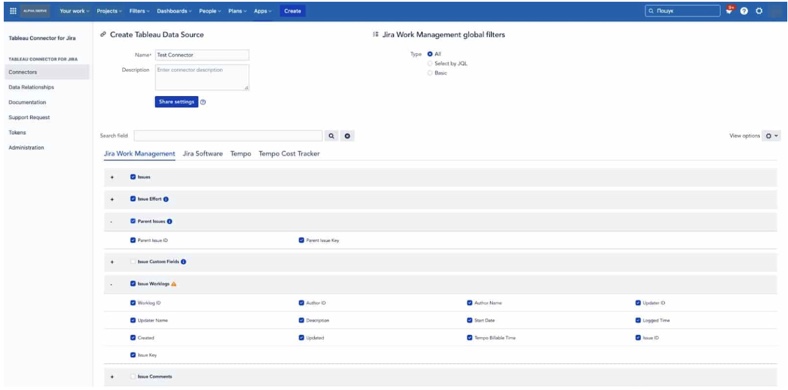
Note: This step allows you to:
- Create, view, edit, and share data sources.
- Select and filter Jira data before exporting it to Tableau.
Step 6: Load Jira Data into Tableau
- Once your data source is created, importing it into Tableau is simple. To do it, just copy the Data Source URL generated by the connector.

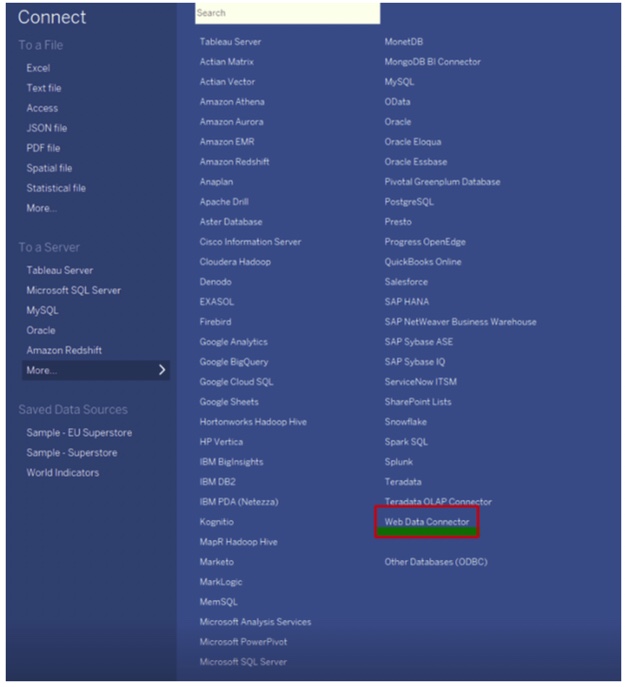
- After that, open Tableau Desktop and select Web Data Connector.
- Then, paste the Data Source URL into the Web Data Connector field.
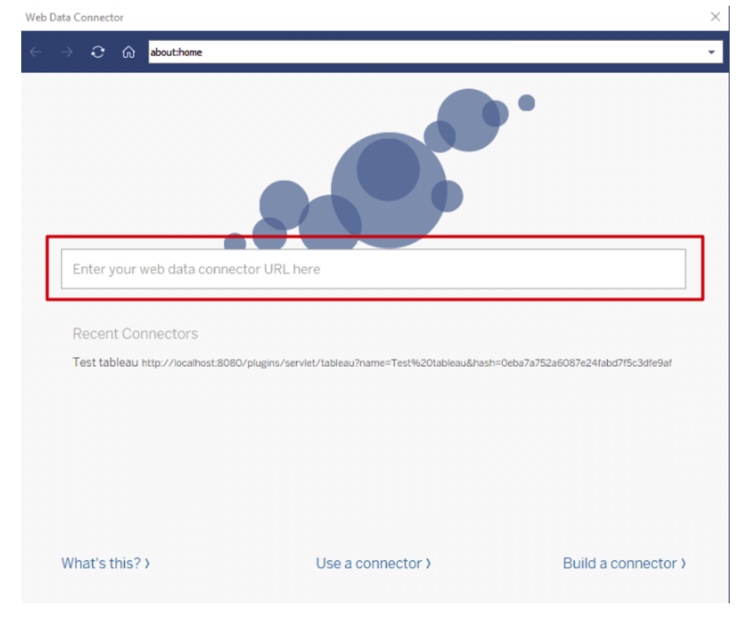
- Enter appropriate Jira credentials when prompted, then click Log in and Export. The Jira data is now successfully loaded into Tableau and ready for analysis, visualization, and reporting.
Why Needed
Companies should choose Tableau Connector for Jira if they need a fast, no-code integration, eliminating manual data exports and ensuring real-time reporting. It allows users to customize and filter Jira data directly within the tool, making analytics more flexible and insightful.
Integrate Tableau with Jira using Skyvia Data Replication
Skyvia is a leading Jira connector on the Atlassian Marketplace that enables direct Tableau analysis via secure OData endpoints or automated database replication.
Unlike single-purpose plugins, Skyvia offers two distinct ways to connect:
- Skyvia Connect (OData): A direct, real-time link available on the Atlassian Marketplace. This creates a secure API endpoint that Tableau reads as a Web Data Source — perfect for live reporting without a database.
- Skyvia Replication (ETL): The advanced approach (detailed below). It copies Jira data to a warehouse for historical analysis, cross-object reporting, and zero impact on Jira performance.
Best for
Users who want the choice between a simple no-code OData connector for live dashboards OR automated data replication for complex historical modeling and warehousing.
How It Works
Skyvia sits between Jira and Tableau, acting as a smart data access layer. Depending on how you want to work with Jira data, there are two practical ways to plug everything together.
- Mode A – Connect (Live via OData)
Skyvia exposes Jira data as a secure OData endpoint. Tableau connects to this endpoint directly and queries Jira data on demand, without copying it anywhere. This approach is ideal when you want up-to-date dashboards fast and don’t need to store historical snapshots.
- Mode B – Replicate (Historical via Database)
Skyvia continuously replicates Jira data into a database or data warehouse, such as BigQuery or Snowflake. Automated incremental syncs keep the data fresh, while Tableau connects to the database for deeper modeling, joins, and long-term historical analysis.
Pros
- No manual exports. Data is automatically replicated on a schedule.
- Works with multiple BI tools. Not limited to Tableau.
- Supports large datasets. Handles extensive Jira data efficiently.
Cons
- Not real-time. Info updates depend on the sync schedule.
- Requires a database setup. Needs a target destination like BigQuery or Redshift.
Prerequisites
Quick Option: The OData Method
Prefer a direct connection without setting up a database or data warehouse?
- Install Skyvia Data Integration for Jira from the Atlassian Marketplace.
- Open Skyvia and choose Connect.
- Create an OData endpoint and paste the generated URL into Tableau using its OData connector.
Note: This approach works well for live dashboards and quick insights. If you need historical data, joins, or heavier modelling, continue with the replication setup below.
About Skyvia Connect
Skyvia Connect is designed for teams that want fast access to Jira data without maintaining extra infrastructure. It securely exposes Jira data as an OData endpoint that Tableau can query directly, making it a solid option for operational dashboards or near-real-time reporting.
Step 1. Replicate Jira Data to a Database or Data Warehouse
For more advanced analytics, start by setting up Jira data replication to a database or data warehouse such as Snowflake, BigQuery, or PostgreSQL. This gives you a persistent, query-friendly copy of your Jira data that Tableau can work with efficiently.
Step 2. Enable Automated Incremental Sync
Configure Skyvia to run incremental updates so only new and changed Jira records are synced. This keeps your dataset fresh without reloading everything from scratch and helps control costs as data volume grows.
Step 3. Connect Tableau to the Replicated Data
Once the data is in your database, connect Tableau directly to it. From here, you can build richer data models, join Jira data with other sources, and analyze trends over time without impacting Jira performance.
Step-by-Step Guide to Setting It Up
Step 1: Sign Up for Skyvia
- Go to Skyvia’s sign-up page.
- Register with your email, Google, or Microsoft account.
- Log in to Skyvia Dashboard.
Step 2: Connect Jira to Skyvia
- In Skyvia Dashboard, click + Create New → Connection.
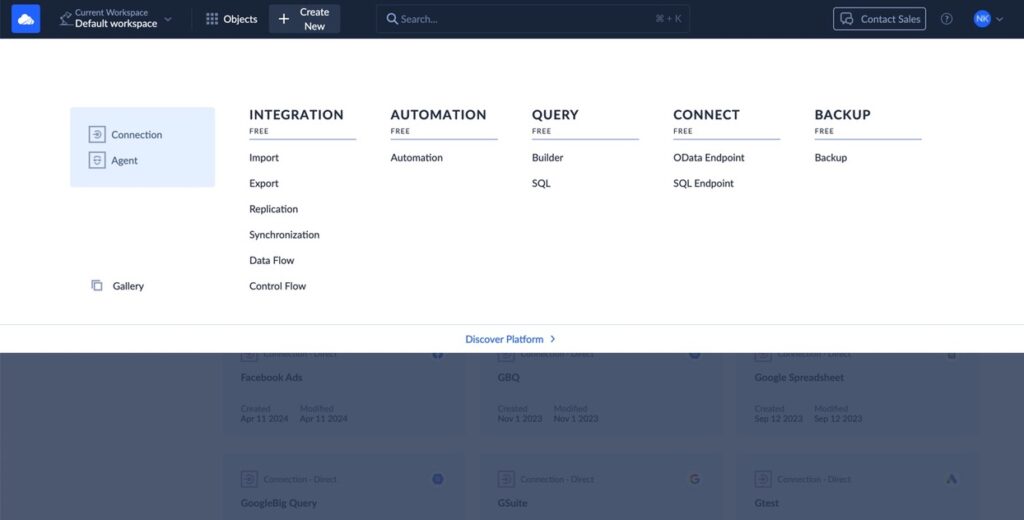
- Choose Jira from the list of connectors.

- Enter your Jira domain, email, and API token.
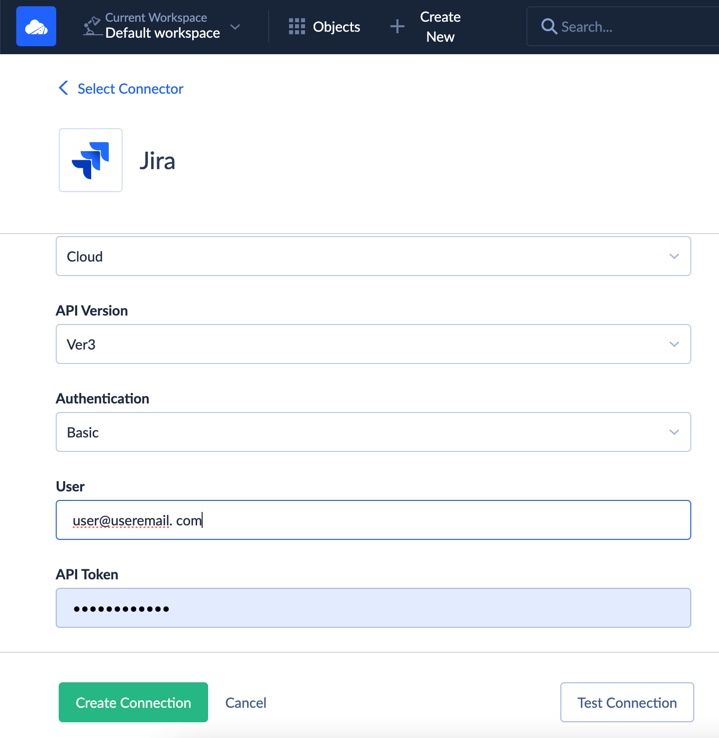
- Click Create Connection to establish it.
Note: If you need help getting your Jira API token, check Skyvia’s Jira Connection Guide.
Step 3: Connect Your Data Warehouse to Skyvia
- In Connections, click + Create New again.
- Select a data warehouse (Google BigQuery, Amazon Redshift, Snowflake, etc.).
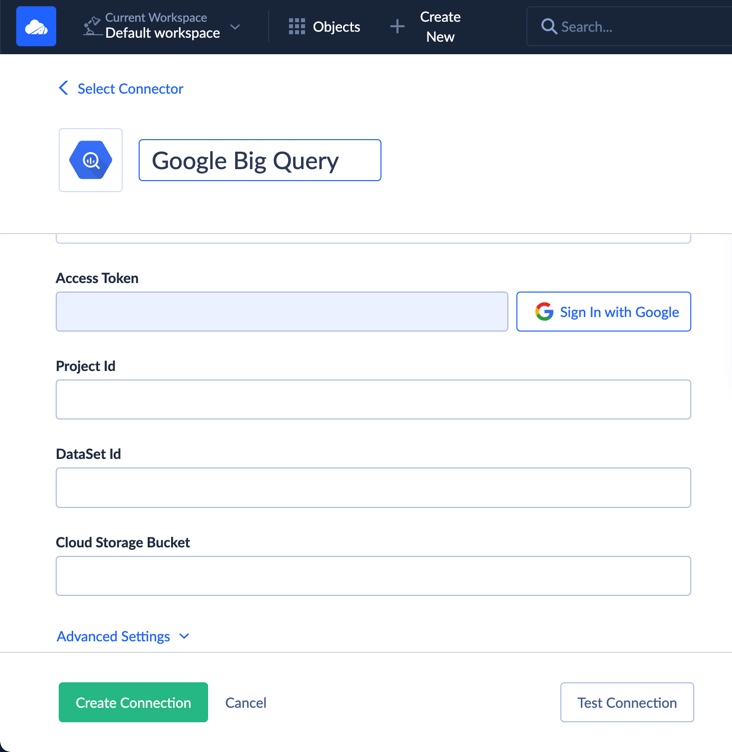
- Provide the necessary credentials and database connection details.
- Click Create Connection to confirm it.
Step 4: Set Up a Data Replication Package
- In Skyvia Dashboard, navigate to Integration.
- Click + Create New and choose Replication as the package type.
- Select the Jira connection as the source.
- Select the DWH you need as the target.
- Choose objects to replicate and click Validate.
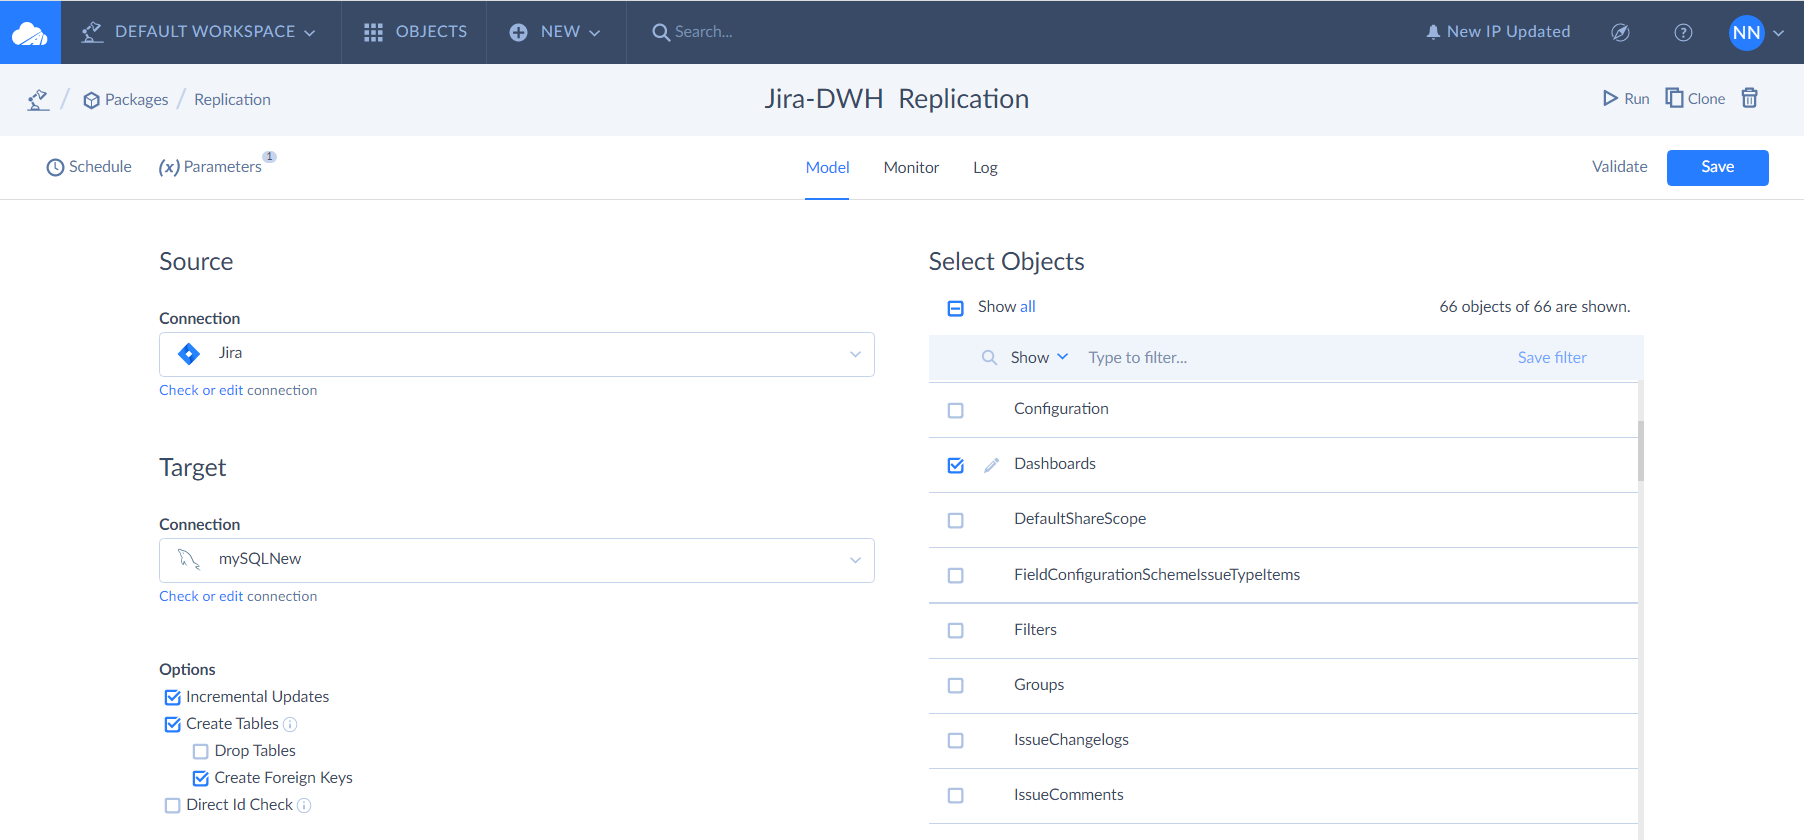
- A popup message ‘The package is valid’ will appear. Then click Create or Save.
- Once this is saved, click Run to do the first sync and ensure everything is working as expected.
Note: Go here to read more about replication.
- Set Replication Schedule to automate updates hourly, daily, or weekly.
- Click Save and then Run to initiate the first sync.
Note: Full configuration details you may find in Skyvia Replication Documentation.
Step 5: Connect Tableau to Your Data Warehouse
- Open Tableau Desktop.
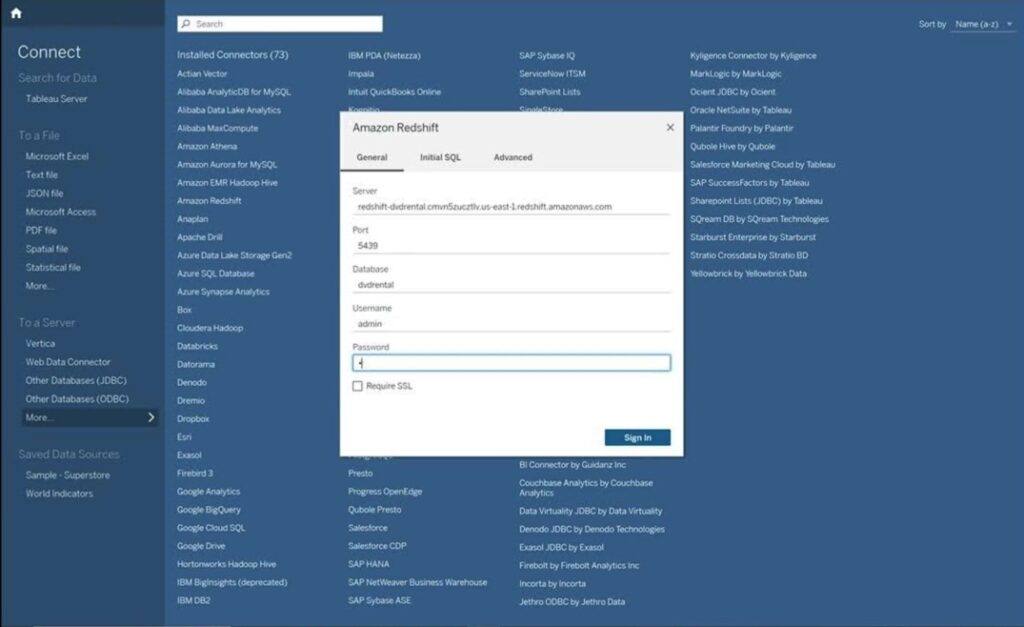
- Click Connect → Select the data warehouse type (BigQuery, Redshift, Snowflake, etc.).
- Enter the database credentials.
- Once connected, select the Jira tables replicated by Skyvia.
Step 6: Build Your Tableau Dashboards
- Drag and drop Jira fields into Tableau’s visualization workspace.
- Create project tracking dashboards to analyze issues, team performance, and workflows.
- Blend Jira data with other business metrics for deeper insights.
- Save Tableau reports and share them with the team.
Why Needed
Companies should choose Skyvia if they need a powerful, automated data replication solution that provides more flexibility than direct connectors. By syncing Jira data to a database or data warehouse, Skyvia enables advanced data modeling, historical data storage, and merging Jira data with other business sources for deeper insights.

Integrate Tableau with Jira using Custom Coding
Integrating Tableau with Jira through custom coding offers a tailored solution for organizations seeking flexibility and control over their integration process. This approach leverages Jira’s REST API to extract data and seamlessly import it into Tableau for advanced visualization and analysis.
Best For
This approach is cool for businesses needing customized data extraction and transformation, ensuring efficient integration tailored to unique user needs. It’s also a great alternative when third-party plugins aren’t an option due to security or compliance restrictions.
How It Works
- Use scripts to send requests to Jira’s REST API, retrieving data in JSON format.
- Process and structure the JSON data to fit relational database schemas or Tableau’s data requirements.
- Import the transformed data into Tableau using supported connectors or interfaces.
Pros
- Highly Customizable. Tailor the integration to meet specific data needs and business logic.
- Cost-Effective. Eliminates the need for paid third-party connectors or plugins.
- Enhanced Security. Direct control over data handling reduces reliance on external tools.
Cons
- Development Time. Requires significant time investment to develop, test, and maintain the integration.
- Complexity. Involves handling API authentication, data pagination, and error management.
- Maintenance. Ongoing updates may be necessary to accommodate changes in Jira’s API or data structures.
Prerequisites
- Access to Jira’s REST API. Ensure you have the necessary permissions to interact with Jira’s API.
- Programming Knowledge. Proficiency in languages such as Python or JavaScript to script API calls.
- Tableau Desktop or Server. Installed and ready to import external data sources.
- Intermediate SQL Skills. You need it for data manipulation and structuring within Tableau.
Step-by-Step Guide to Setting It Up
Step 1: Generate Jira API Token
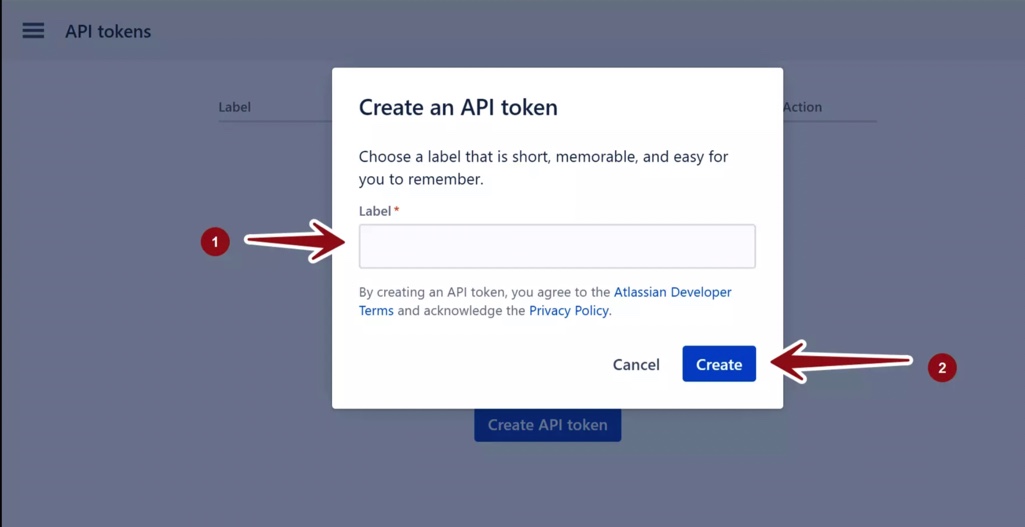
- Log in to your Jira account.
- Navigate to Account Settings > Security > API Tokens.
- Click Create API Token, provide a label, and save the token securely.
Step 2: Develop a Data Extraction Script
- Choose a programming language (e.g., Python) and install the necessary libraries (requests, Pandas).
- Write a script to authenticate with Jira’s API using your email and API token.
- Define the API endpoint and parameters to extract desired data (e.g., issues, projects).
- Handle pagination to retrieve all records.
- Convert the JSON response to a structured format (e.g., CSV).
Example in Python:
import requests
import pandas as pd

# Jira credentials
email = 'your_email@example.com'
api_token = 'your_api_token'
domain = 'your_domain.atlassian.net'

# API endpoint
url = f'https://{domain}/rest/api/3/search'

# Headers and authentication
headers = {
    'Accept': 'application/json'
}
auth = (email, api_token)

# Parameters
params = {
    'jql': 'project=YOUR_PROJECT_KEY',
    'maxResults': 100
}

# Data extraction
response = requests.get(url, headers=headers, auth=auth, params=params)
data = response.json()

# Data transformation
issues = data['issues']
df = pd.json_normalize(issues)

# Save to CSV
df.to_csv('jira_issues.csv', index=False)
Step 3: Import Data into Tableau
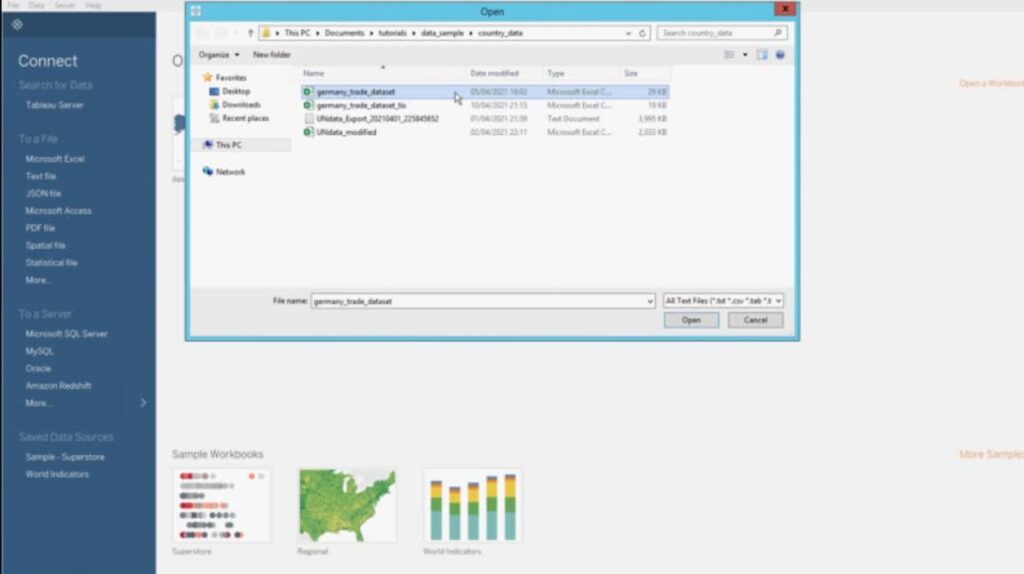
- Open Tableau and select Text File as the data source.
- Import the Jira_issues.csv file generated by your script.
- Configure data types and relationships as needed.
Step 4: Automate the Process
- Schedule the data extraction script to run at desired intervals using task schedulers (e.g., cron jobs).
- Set up Tableau to refresh data extracts automatically to reflect the latest information.
Why Needed
Businesses may choose custom coding for Jira-Tableau integration if they need full control over data extraction, transformation, and integration. This approach allows users to customize queries, structure data precisely, and merge Jira data with other sources for deeper analysis.
Conclusion
Integrating Jira with Tableau unlocks advanced analytics and reporting, helping teams understand what they do more effectively.
- Tableau Connector for Jira is the best choice for those needing a quick, no-code solution with real-time data access.
- Skyvia Data Replication offers greater flexibility, allowing businesses to store historical data, build complex models, and refine insights in a data warehouse.
- Custom coding with Jira’s REST API means full control and customization. So, such solutions are perfect for companies with specific security, compliance, or integration needs.
Each method is about different use cases, ensuring users can select the best approach based on their technical expertise, scalability needs, and reporting goals.

FAQ fo Tableau with Jira

What are the best ways to connect Jira with Tableau?
There are three main methods:
1. Direct Connectors (e.g., Tableau Connector for Jira). A no-code solution that allows direct integration.
2. Data Replication (e.g., Skyvia). Syncs Jira data with a database or warehouse for deeper analysis.
3. Custom API Integration. Jira’s REST API is used for a fully customizable solution that requires coding skills.
Can I use Tableau with Jira without coding?
Yes. If you’re not a developer, the Tableau Connector for Jira provides a no-code way to bring Jira data into Tableau. Alternatively, Skyvia allows you to automate Jira data replication without a complex setup.
How frequently can I update Jira data in Tableau?
The update frequency depends on the integration method:
– Direct Connectors provide real-time or near-real-time updates.
– Skyvia’s free plan allows two automated daily data updates, while paid plans support more frequent syncs.
– Custom API integrations allow complete control over update schedules but require scripting.
How can I choose the best method for my team?
The correct integration method depends on your needs.
– If you need a quick and easy setup,→ Use a direct connector like Tableau Connector for Jira.
– If you need advanced data modeling and cross-platform analysis,→ Use Skyvia’s Data Replication.
– If you want complete customization and full control over data handling,→ Use the Jira REST API for a custom-coded solution.
