

Have you ever felt stuck on what method to use for your SQL Server to SQL Server integration?
Perhaps you need to migrate to the latest SQL Server version. Or you just need a copy for testing or debugging purposes. But you’re new to this kind of stuff. So, you sat down to work and clicked Start from Windows. There’s SSMS and there’s Visual Studio.
Which method and tool is right for you?
Staring at your screen won’t help, but this article can. You will learn 7 methods and the scenarios that are best for each. And don’t worry. You got this. Choosing will be a piece of cake.
Here’s what we will discuss:
Table of Contents
- Why Move Data Between SQL Servers? (Common Use Cases)
- Key Considerations Before You Start a SQL Server to SQL Server Data Movement
- 7 Methods for Moving Data Between SQL Servers
- Best Practices for SQL Server Data Movement
- Conclusion
Roll your sleeves and let’s dive in.
Why Move Data Between SQL Servers? (Common Use Cases)
There’s more than one reason to shift data between SQL Servers — from keeping your setup modern to making sure your team isn’t working in production by accident. Let’s break down the most common situations where data movement makes sense.
1. Migration & Modernization
Server Upgrades:
Older versions of SQL Server eventually fall out of support, so you need a SQL Server upgrade. Moving to a newer version helps you stay secure, faster, and compatible with newer tools.
Example: Migrating from SQL Server 2016 to SQL Server 2022 to take advantage of Query Store hints.
Cloud Adoption:
Many teams are moving from on-premise to the cloud to reduce hardware costs and improve scalability. Azure SQL Managed Instance is a popular target.
Example: Moving a legacy ERP database from an on-prem server to Azure SQL MI.
Server Consolidation:
Managing too many SQL Servers can get messy. Database consolidation reduces maintenance and licensing overhead.
Example: Combining five underused SQL instances into one high-capacity SQL Server 2022 environment.
2. Development & Testing
Environment Setup:
Dev and QA teams need safe environments to test code and schema changes. Cloning data from production avoids accidents.
Example: Restoring a recent prod backup to a staging server before a major deployment.
3. Performance & Load Optimization
Offloading Reporting or Analytics:
Running heavy queries on production can slow down real-time users. Moving data to a separate reporting database helps balance the load.
Example: Copying nightly transactional data to a reporting server used by Power BI.
Load Balancing:
Distributing reads across multiple servers keeps things snappy. This setup improves user experience during high traffic.
Example: Using replication to sync product data to a read-only SQL Server for your eCommerce app.
4. Availability & Recovery
High Availability and Disaster Recovery (HA/DR):
You need a plan for when something breaks. Syncing data to a standby server gives you a quick way to recover.
Example: Using log shipping to keep a standby server ready in case the primary goes down.
Data Distribution:
Sometimes you need to send data to remote offices or partners. Replication helps push changes where they’re needed.
Example: Using transactional replication to send customer order data to a remote warehouse system.
Key Considerations Before You Start a SQL Server to SQL Server Data Movement
You can’t just dive in and move data. A little planning now can save hours of cleanup later. Here’s what you need to think through before making a move.
Planning and Scope
Planning is Crucial:
Start with a clear goal. What are you moving, and why? The method you choose depends on the answer.
Example: Backup and restore might be a good bet for your one-time migration, but go with replication for ongoing sync.
Schema vs. Data:
Sometimes you just need the table structure. Other times, it’s the actual data — or both.
Example: When setting up a dev environment, you may only copy the schema without production data.
Objects to Move:
It’s not always just tables. Think about stored procedures, views, logins, Agent jobs, and more.
Example: Migrating a reporting database might mean exporting views and linked server logins, too.
Performance and Logistics
Downtime Tolerance:
Can the app go offline during the move? If not, you’ll need a near-zero-downtime approach.
Example: Transactional replication is a good call to avoid downtime for your customer-facing apps.
Data Volume:
Are your databases too fat? Moving it might need advanced tools.
Example: A 10GB database can go via BACPAC, but a 2TB one might need SSIS or a third-party tool with chunked loads.
Network Bandwidth:
Slow or unstable networks turn data movement into slow motion – a sure headache. More so with cloud or remote servers.
Example: Syncing data to Azure over a weak VPN can crawl without proper compression or staging.
SQL Server Versions & Editions:
Some features work only on certain versions. Make sure the source and target match or are compatible.
Example: You can restore a SQL 2016 backup to SQL 2022, but not the other way around.
Data Handling and Workflow
Need for Transformation (ETL)?
Do you need to clean, reshape, or map data during the move? ETL adds complexity, but it might be necessary.
Example: You might need to convert text fields into date fields when moving old CRM data.
Ongoing Synchronization vs. One-Time Move:
Is this a one-time shift, or will you need continuous updates? Your approach depends on that.
Example: A dev server just needs a one-time restore. A BI dashboard needs nightly updates via a third-party tool like Skyvia.
Security and Reliability
Security:
Don’t forget logins, roles, and encryption. Data access needs to work on the target server too.
Example: Migrating logins with mismatched SIDs can break app authentication if you don’t fix them.
Testing and Validation:
Did the data reach the target? Well, that’s not the end of the story. Always double-check that the move worked. Run checks on row counts, referential integrity, and app behavior.
Example: After a large migration, run CHECKSUM_AGG on key tables to compare source and target.
SQL Server to SQL Server Pre-Migration Checklist
Before you hit “Go,” make sure you’ve ticked these off:
- Defined the goal: One-time move or ongoing sync?
- Chosen what to move: Schema, data, or both?
- Listed all needed objects: Tables, views, procs, logins, Agent jobs?
- Checked SQL Server version compatibility.
- Estimated the downtime and planned for it.
- Measured data volume and picked the right method.
- Verified network bandwidth, especially for remote/cloud moves.
- Identified any ETL or transformation needs.
- Reviewed security settings, permissions, and encryption.
- Planned testing and validation after the move.
7 Methods for Moving Data Between SQL Servers
Moving data between SQL Servers isn’t a one-size-fits-all deal. It’s more like picking the right tool from a toolbox. Let’s open it up and see what works best for your job.
But before that, below is a comparison table for the 7 methods:
| Method | Best For | Skill Level Required | Customizability |
|---|---|---|---|
| Backup and Restore | Full database migrations, upgrades | Beginner to Intermediate | Low |
| SQL Server Replication | Real-time sync, reporting, data distribution | Advanced | High |
| SQL Server Integration Services (SSIS) | Complex ETL, data cleansing, automation | Intermediate to Advanced | Very High |
| Import/Export Wizard in SSMS | Quick one-time moves, small datasets | Beginner | Low |
| Scripting with BCP and SQLCMD | Moving large tables, automation via scripts | Intermediate | Medium to High |
| Linked Servers | Ad hoc queries, cross-server joins, sync tasks | Intermediate | Medium |
| Third-Party Tools (Skyvia) | UI-based migration, monitoring, hybrid scenarios | Beginner to Intermediate | Medium to High |
Quick Highlights
- SSIS offers the most flexibility for complex transformations and automations. It has a Script component that allows skilled coders to embed C# code in the integration package.
- Import/Export Wizard is great for beginners, but limited in control and features.
- Replication and Linked Servers support ongoing data sync, but need deeper SQL know-how.
- Third-party tools like Skyvia, Stitch, and others offers the best options for beginners and experts alike.
Method 1: Backup and Restore
This is the old reliable. You take a snapshot of your database (backup), then bring it back to life somewhere else (restore). It works great when you’re moving everything as-is.
Best For
- Full database migrations
- Upgrading from one server version to another (e.g., SQL Server 2016 to SQL Server 2022).
Note: After restoring a database from an older version, you need to change the compatibility level to take full advantage of the new SQL Server features. - Moving databases to a new environment (like test or staging).
Step-by-Step Guide
Migration involves two parts: backup and restore. Follow the steps for each part below using SQL Server Management Studio (SSMS).
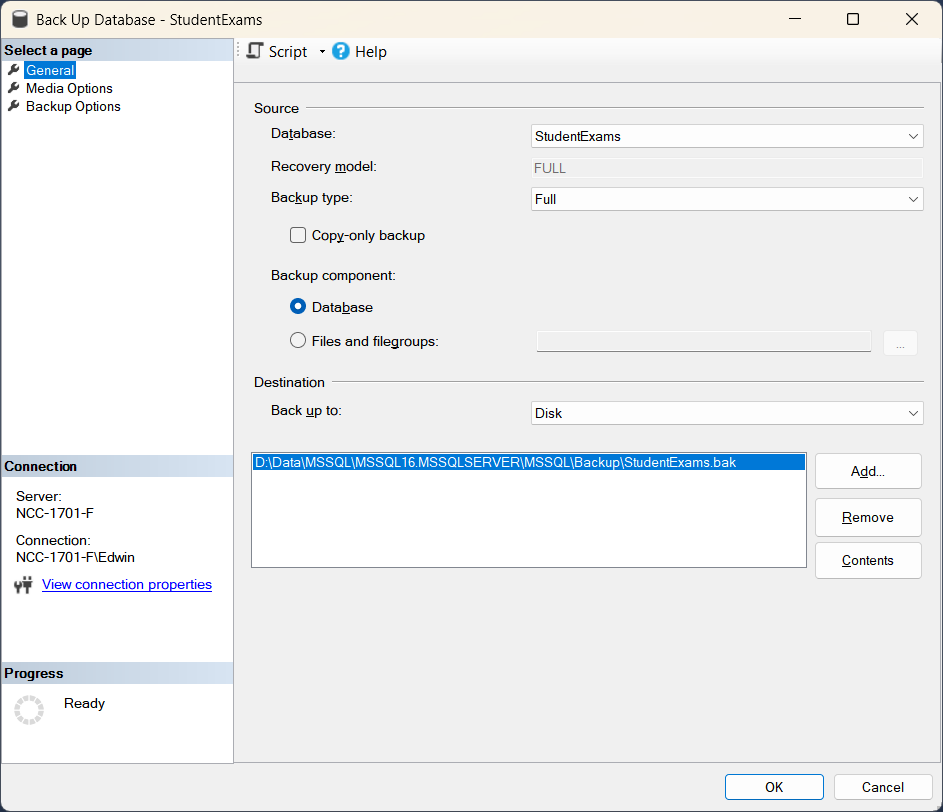
Part 1: Backup the Database
- Open SSMS.
- Right-click the source database, then select Tasks > Back Up…
- Choose Full as the backup type
- Set the destination path for the .bak file
- Click OK to start the backup.
Check out the Backup feature of SSMS below:
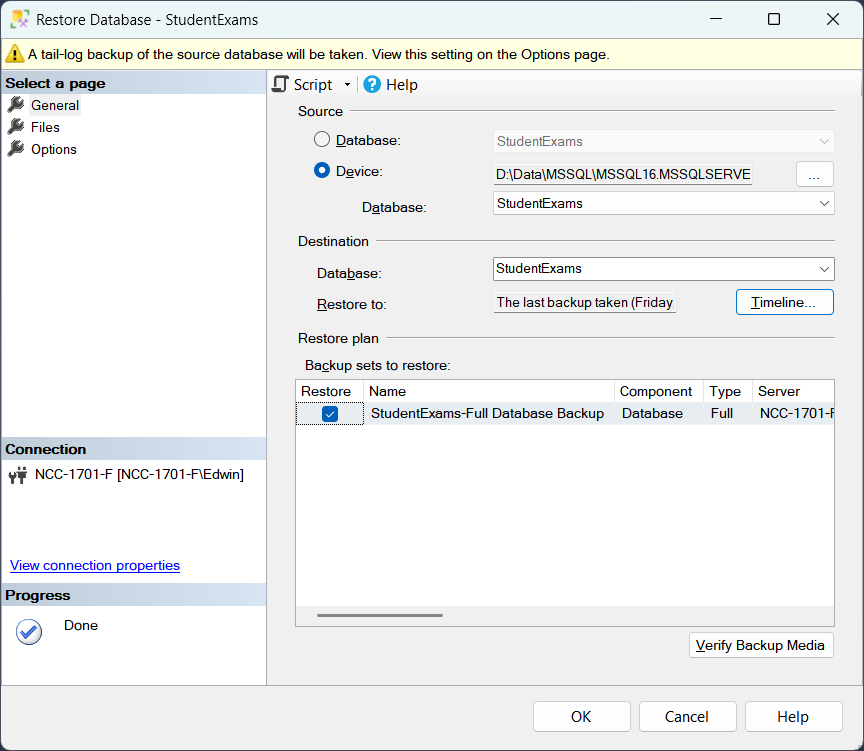
Part 2: Restore the Database
- Copy the .bak file to the target server
- Open SSMS on the target server
- Right-click the target database. Then, select Tasks > Restore > Database.
- Select Device as the source. Then, click the … button and add your .bak file.
- Choose the target database from the dropdown list and restore options.
- Click OK to complete the restore.
Check out the Restore feature of SSMS below:
Pros & Cons
Like everything else, this has advantages and disadvantages. Check it out below:
Pros:
- Simple and reliable
- Great for full migrations
- Works across versions (upgrades)
Cons:
- Not for partial moves (e.g., specific tables only)
- Downtime is needed during backup and restore
- Can be slow for large databases.
- Permissions and logins are not carried over; requires manual recreation on the target server.
Method 2: SQL Server Replication
Replication is syncing your data across multiple SQL Servers. It’s great for cloning data to different servers or maintaining copies of it. It’s always on standby for changes. You don’t need to worry about manually moving data once it’s running.
SQL Server Replication Types
Replication comes in different flavors. Check them out below:
- Transactional Replication
- This one is ideal for real-time, one-way replication of transactional data.
- Use case: When you need to replicate changes from one Publisher to multiple Subscribers without delays.
- Key feature: Data is replicated immediately as your data changes in the source database.
- Snapshot Replication
- This is best for scenarios where data doesn’t change frequently, or you can afford not-so-fresh data from time to time.
- Use case: Replicating static data or data that doesn’t change often (like reports).
- Key feature: A snapshot of the entire dataset is taken and replicated at specified intervals.
- Merge Replication
- Good for environments where data can be modified at multiple nodes.
- Use case: Ideal for mobile applications or remote offices where each node can both modify and receive data.
- Key feature: Supports bi-directional replication and allows updates to be made at both the Publisher and the Subscriber.
- Peer-to-Peer Transactional Replication
- Ideal for High Availability (HA), distributed systems, and environments where you want all nodes to have the same data.
- Use case: Perfect for geographically distributed data centers, or if you need bidirectional data flow between multiple nodes.
- Key feature: Each server (node) in the system acts as both Publisher and Subscriber, allowing changes from any node to be replicated across all nodes in the system.
Best For
- Real-time data distribution: Ideal for keeping multiple copies of your data synchronized.
- High Availability (HA): Replicating data to standby servers for failover.
- Data distribution across locations: Useful when you need to distribute data to remote locations.
- Multiple active copies: Merge replication allows multiple servers to write to the same data.
Step-by-Step Guide
Replication involves setting up and management. Each has steps of their own. Check out the following:
Part 1: Setting Up Replication
- Open SQL Server Management Studio (SSMS)
- From the Object Explorer, right-click Replication > Configure Distribution.
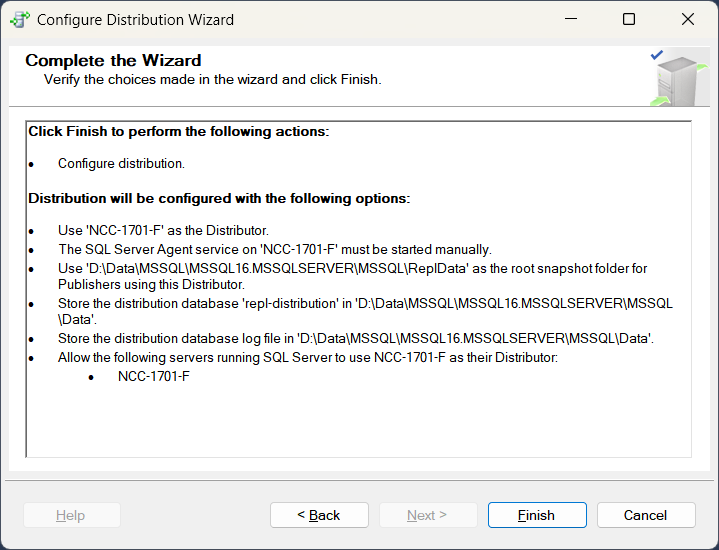
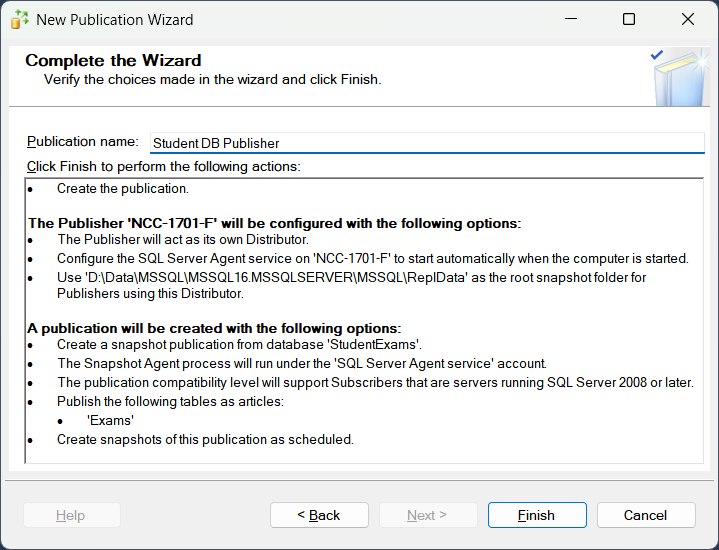
- Set up the Publisher (the source server). From the Object Explorer, navigate to the Replication folder, expand it, and right-click Local Publications and select New Publication. Follow the wizard to set up the Publisher, including setting the replication type (Snapshot, Transactional, etc.).
- Configure Subscriptions (target servers that will receive data). From the Object Explorer, navigate to the Replication folder, expand it, and right-click Local Subcriptions and select New Subscription. Follow the wizard to set up the Subscriber.
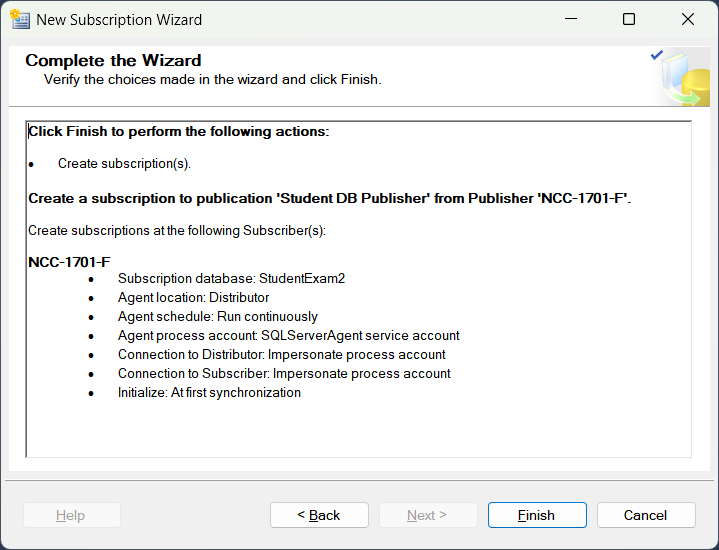
Part 2: Managing Replication
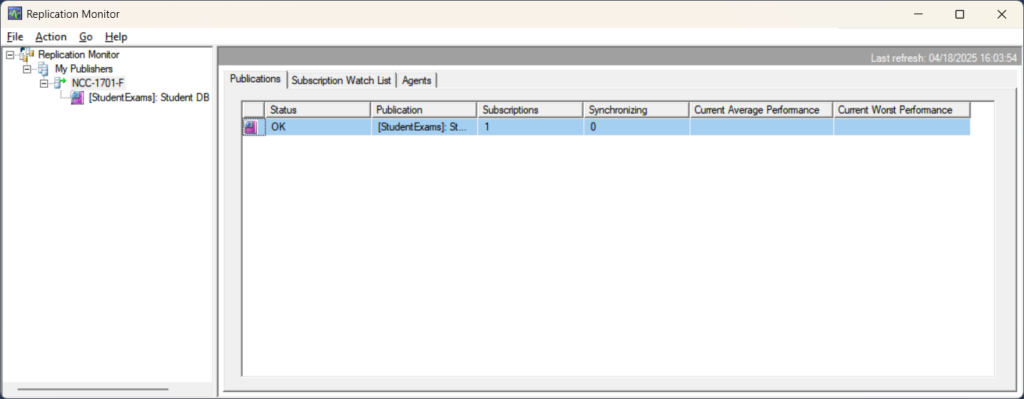
- Monitor replication status via SSMS and the Replication Monitor. From the Object Explorer, right-click Replication and select Launch Replication Monitor.
- Review the Replication Monitor to track the flow of data.
- Troubleshoot any issues with Replication Agents and logs.
Check out a sample of the Replication Monitor below:
Pros & Cons
SQL Server replication also has a good and a bad side:
Pros:
- Real-time or near-real-time data movement
- Keeps multiple servers in sync without manual intervention
- Excellent for high availability and disaster recovery
Cons:
- Complex setup, especially for Transactional and Merge replication
- Can be resource-intensive (especially with large datasets)
- Requires ongoing monitoring to ensure replication is working smoothly
- Potential for replication conflicts in Merge replication.
- Available on the Windows operating system only.
Method 3: SQL Server Integration Services (SSIS)
When you need serious control over how data moves and changes on the way, SSIS is your toolbox. It’s a full-blown ETL (Extract, Transform, Load) tool built right into SQL Server. You design packages, and it handles everything from pulling data to reshaping it before it lands on the target.
Best For
- Complex data flows with transformations
- Cleaning, merging, or splitting data mid-transfer
- One-time migrations or recurring automated moves
- Moving between different databases or servers
- Upgrading while converting schema/data to match new standards
Example: Moving customer data from multiple regional servers into one clean structure in a central database.
Step-by-step Guide
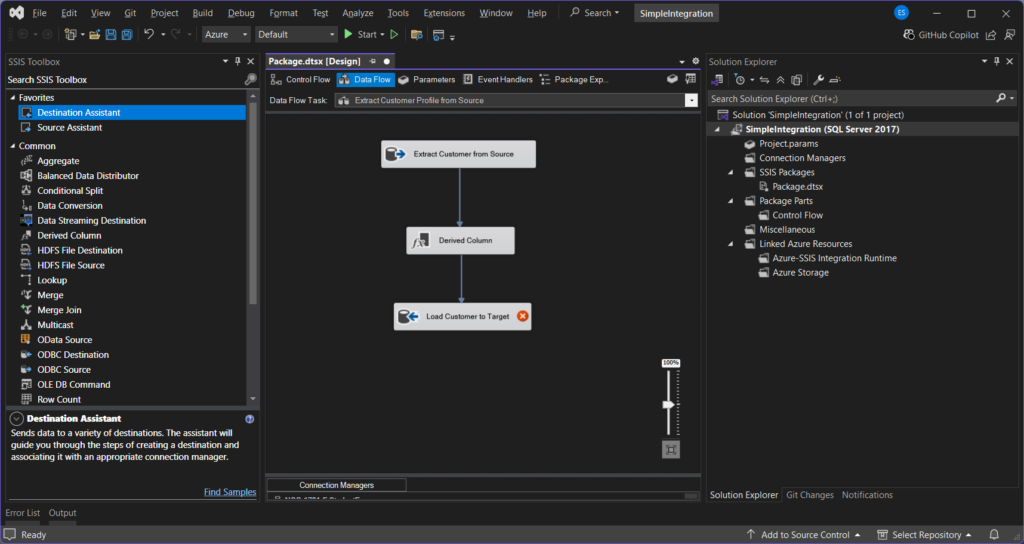
The steps below apply to simple integrations. One Data Flow task is good for one SQL Server database table. Repeat the steps for multiple tables. Then, arrange the Data Flow tasks in a Control Flow on which task(s) will run first, second, etc.
- Open SQL Server Data Tools (SSDT) or Visual Studio with the SSIS extension.
- Create a new Integration Services Project.
- Drag a Data Flow Task into the control flow.
- Double-click it, then add Source (e.g., OLE DB Source pointing to the old server).
- Add a Destination (e.g., OLE DB Destination pointing to the new server).
- Optionally insert transformations like Derived Columns, Data Conversion, or Lookups between them.
- Save and deploy the package to SSISDB or run it directly.
- Schedule the package using SQL Server Agent if needed.
The following is a simple integration in Visual Studio 2022 using SSIS:
Pros & Cons
SSIS also has advantages and disadvantages.
Pros:
- Highly customizable for complex scenarios
- Built-in support for transformations, loops, conditions, and scripting.
- It can integrate with other sources (CSV, Excel, Oracle, etc.)
- Automatable and reusable.
Cons:
- Requires Visual Studio and some development effort.
- It can get complex for large projects with many transformations.
- Limited native support for non-Microsoft cloud services (like AWS RDS or GCP SQL); requires extra setup or custom connectors.
- May run slower over long distances or if cloud firewalls/networks aren’t properly configured.
- Designing and configuring integration packages requires Windows and Visual Studio. There’s no equivalent on other platforms like Linux and Mac.
Method 4: Import and Export Wizard in SSMS
Sometimes, you just want to move data fast, without diving into code or packages. That’s where the Import/Export Wizard in SSMS comes in. It’s a simple, guided tool to copy data between SQL Servers in just a few clicks.
Best For
- Quick, one-time moves of specific tables or views.
- Moving data between different SQL Server instances, local or remote.
- Developers or DBAs who need to transfer sample data or prep a test environment.
Step-by-Step Guide (Importing or Exporting Data)
- Open SQL Server Management Studio (SSMS).
- Right-click the source database > Tasks > Export Data (or Import Data on the target).
- Choose the source and destination data sources.
- Select whether to copy data from tables/views or write a custom query.
- Choose your tables, then map columns and data types if needed.
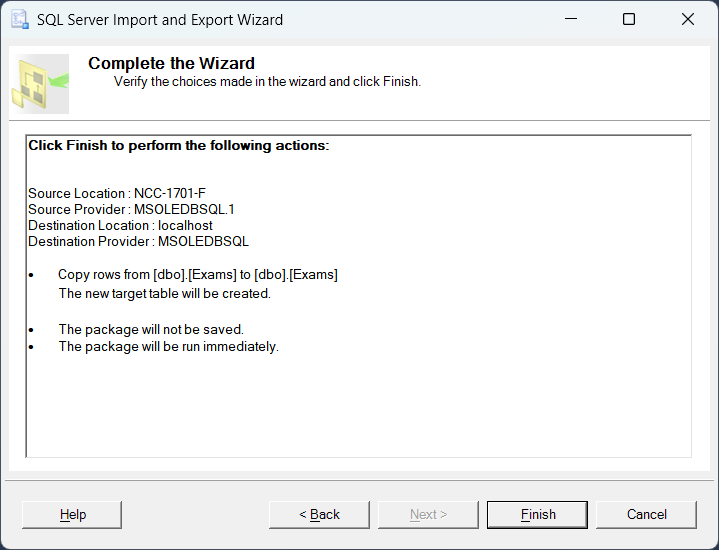
- Select whether to run immediately or save as an SSIS package.
- Review your choices, click Finish, and watch the wizard do the work.
Below is a sample summary of an Import job done using the Import and Export Wizard:
Pros & Cons
The Import and Export Wizard is a simple tool with pros and cons.
Pros:
- Built into SSMS—no extra setup needed.
- Simple, visual step-by-step process.
- Great for quick wins or testing.
Cons:
- Doesn’t move schema objects like stored procedures or triggers.
- No fine-grained control over transformations or logic.
- It can be tricky with large datasets or special data types.
- Logins and permissions not handled — must be set up manually.
- Works on Windows and SSMS only.
Method 5: Using BCP and SQLCMD
Need something lightweight and scriptable? BCP (Bulk Copy Program) and SQLCMD are command-line tools that get the job done without the bells and whistles. Perfect when you want speed, control, and automation.
Here’s a comparison between the two:
| Feature | BCP (Bulk Copy Program) | SQLCMD |
|---|---|---|
| Main Purpose | Export/import table data | Run T-SQL scripts and commands |
| Schema Support | No (data only) | Yes (can run full schema scripts) |
| Data Movement | Excellent for bulk table data | Limited to what’s in the script |
| Command Style | Command-line utility focused on data transfer | Command-line utility focused on SQL scripting |
| Transformations | Not supported | Only basic logic via T-SQL in scripts |
| Best For | Large flat table exports/imports | Schema setup, scripting logic, automation |
| Output Format | .bcp, .csv (with switches) | .sql, .txt, result sets |
| Learning Curve | Medium | Low (if familiar with T-SQL) |
| Windows/Linux Support | Yes | Yes |
Quick Highlights:
- Use BCP when moving data, especially large tables.
- Use SQLCMD when applying a schema or running SQL scripts.
- Combine both to move schema + data in scripted migrations.
Best For
- Moving large tables quickly without using SSMS or Visual Studio.
- Automating exports/imports using batch or PowerShell scripts.
- Environments where GUI tools aren’t available (e.g., servers only).
Step-by-Step Guide
We will cover the syntax for import and export.
Export & Import a Single Table Using BCP
1. Export the table to a file from the source server:
The following bcp command will create a bcp file for employee data, as indicated by out. It will connect to SourceServer (-S) using a trusted connection (-T). It will also perform bulk copy using Unicode characters (-w).
bcp SourceDB.dbo.Employees out Employees_data.bcp -S SourceServer -T -w2. Import into the target server:
Below is the bcp command that will import the employee bcp file created earlier into TargetServer (-S) using a trusted connection (-T). It will import the data to the Employees table indicated by in.
bcp TargetDB.dbo.Employees in Employees_data.bcp -S TargetServer -T -wExport Schema Using SSMS + All Data Using SQLCMD + BCP
Use a mix of BCP and SQLCMD to create a copy of the source database schema on the target server. Then, export the customers and orders table data into a bcp file. Then, run the script created by SQLCMD on the target server. Finally, import the data from the bcp file into the target server.
1. Script out schema (tables, procedures, etc.) using SSMS:
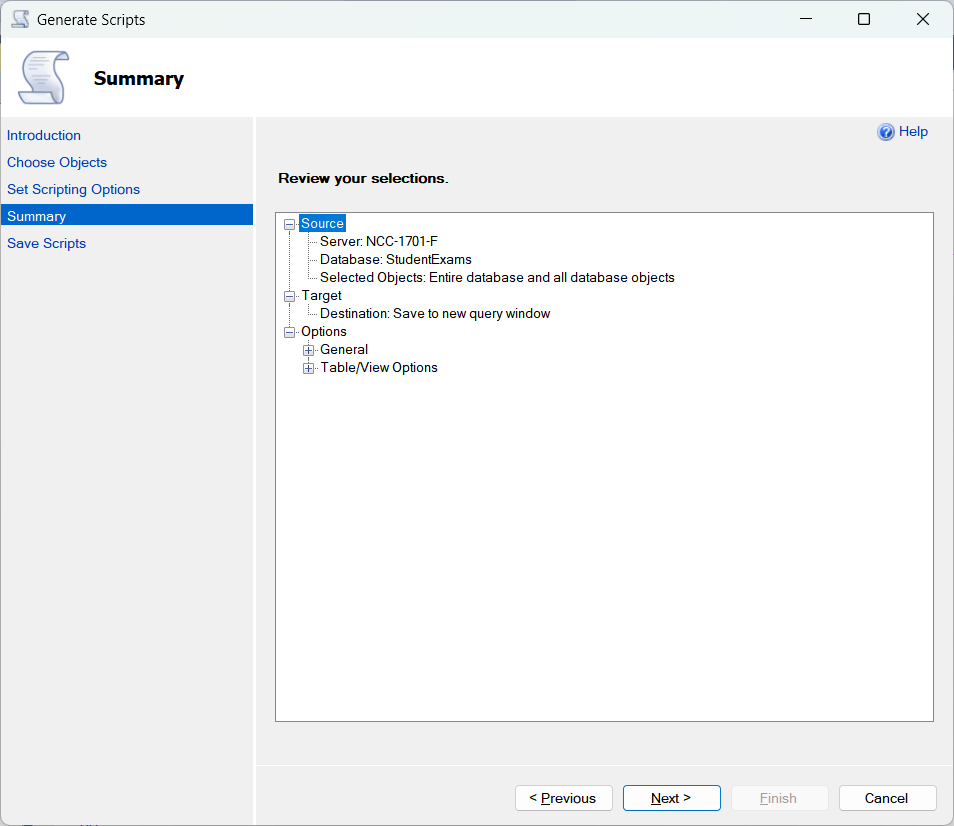
You can generate a script of the entire SQL Server database using SSMS through the Tasks > Generate Scripts. Then, let SQLCMD run it on a target server. See the sample SQLCMD command in #3 later. Below is a sample summary on what to generate using Generate Scripts:
2. Export each table’s data using BCP:
Below will export data to customers and orders bcp file using the same parameters as earlier.
bcp SourceDB.dbo.Customers out Customers_data.bcp -S SourceServer -T -w
bcp SourceDB.dbo.Orders out Orders_data.bcp -S SourceServer -T -w
3. Run the script on the target server:
This will start the migration to the target server. Run SQLCMD with the script (schema.sql) using a similar command below. The schema.sql should have been generated by SSMS in #1.
sqlcmd -S TargetServer -d TargetDB -E -i schema.sqlThis will connect to TargetServer (-S) using a trusted connection (-E), and use the TargetDB database (-d). Then, run schema.sql (-i).
4: Import table data to the target:
This is the final leg of the migration. It will import the bcp data files into the target tables.
bcp TargetDB.dbo.Customers in Customers_data.bcp -S TargetServer -T -w
bcp TargetDB.dbo.Orders in Orders_data.bcp -S TargetServer -T -w
Pros & Cons
Scripting has its place. It may not be the best for all cases.
Pros:
- Fast for bulk inserts/exports.
- Easy to script with SSMS and automate.
- Both BCP and SQLCMD work on Windows, Linux, and Mac.
- You can re-run the script on a target SQL Server the next time you need another one (like a test environment).
Cons:
- BCP Only handles data—you must script the schema separately.
- No support for complex logic or transformations. You need to script it separately.
- Manual setup of permissions and logins.
- Not ideal for non-technical users or huge numbers of tables.
Method 6: Linked Servers
Linked Servers let you connect one SQL Server instance to another. Then, run queries across them like they’re part of the same database. With the right permissions, this can work like a charm. In your queries, you need to add the server name of the linked server, like the one below:
SELECT * FROM LinkedServer.DatabaseName.dbo.TableNameNotice the LinkedServer above? That’s what you need to add when you run a query against a linked server.
Best For
- Accessing remote SQL Server data without moving it.
- Running cross-server queries (e.g., join TableA on Server1 with TableB on Server2).
- Situations where data stays in place but needs to be queried together.
- Works well for read operations or occasional updates.
Example: You have a reporting app on Server A, but the sales data sits on Server B. With linked servers, you can just SELECT * FROM ServerB.SalesDB.dbo.Orders right from Server A.
Step-by-Step Guide
- Open SSMS and connect to your source SQL Server.
- Expand Server Objects > Linked Servers.
- Right-click Linked Servers > New Linked Server.
- Set these:
- Linked Server name: Friendly name (e.g., SalesServer)
- Server type: Choose SQL Server or Other data source
- Provider: Use SQLNCLI or Microsoft OLE DB Provider for SQL Server
- Product name: SQL Server
- Data source: Server name or IP
- Go to Security tab:
- Choose how to map local logins to remote server logins.
- Test the connection and click OK.
Pros & Cons
Linked servers also have a good and a bad side:
Pros:
- Easy to set up inside SSMS.
- Lets you run cross-server queries with T-SQL.
- Good for integrating with other servers, including Oracle or Access.
- Supports stored procedures, views, and joins.
Cons:
- Performance drops on large joins or heavy cross-server queries.
- Not ideal for bulk data movement.
- Security setup can get tricky (especially with login mapping and Kerberos).
- Limited error handling when the remote server fails.
Method 7: Third-Party Tools
Think of this as hiring a moving company instead of carrying boxes yourself. Third-party tools take care of the heavy lifting—migration, sync, automation—all wrapped in a user-friendly package. They save time and reduce the chances of missing something important.
There are many third-party tools that can do SQL Server to SQL Server integration. But we will consider Skyvia – a cloud-native data platform that offers replication, data migration, import/export, automation, data and control flows, and more.
Best For
- When you want several integration options depending on your requirements.
- Simple to complex moves involving transformations, filtering, or ongoing sync.
- Scheduling and automating data movements.
- Moving between different environments, like on-prem to Azure SQL.
- Beginners and experts alike.
Step-by-step Guide
Skyvia can do simple integrations like imports and exports, replication, and complex ones like Data Flow and Control Flow. All you need are 2 SQL Server connections – one for the source and another for the target. Then, the integration package that suits your requirements best.
We will consider Import and Replication integrations in the following subsections.
Using Skyvia Import for Quick Migration Between SQL Servers
You can import one or more tables using the Skyvia Import integration. This is good for creating development and testing/debugging copies, migration for server upgrades, and more.
The steps:
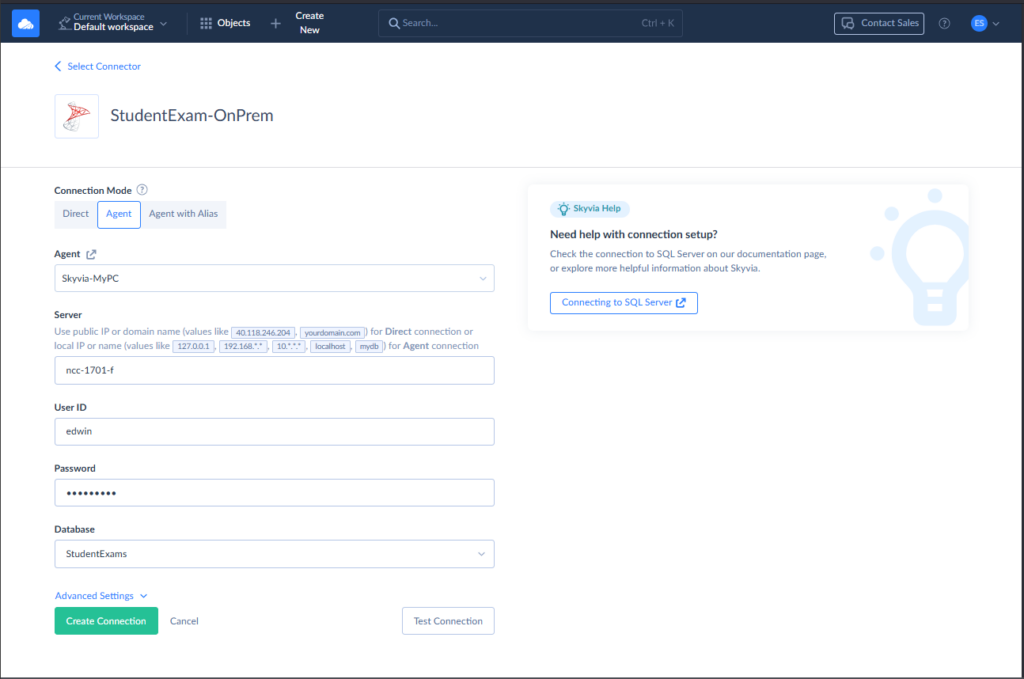
- Create 2 SQL Server connections – one for the source and another for the target. To create one connection, click + Create New and select Connection. Then, choose SQL Server as the connector and configure it. The Skyvia SQL Server connector supports SQL Server authentication and needs the following:
- Server name/IP address
- Username
- Password
- Database name
Installing and running the Skyvia Agent (needed for on-premises SQL Server only). Below is a sample connection using the Skyvia Agent:
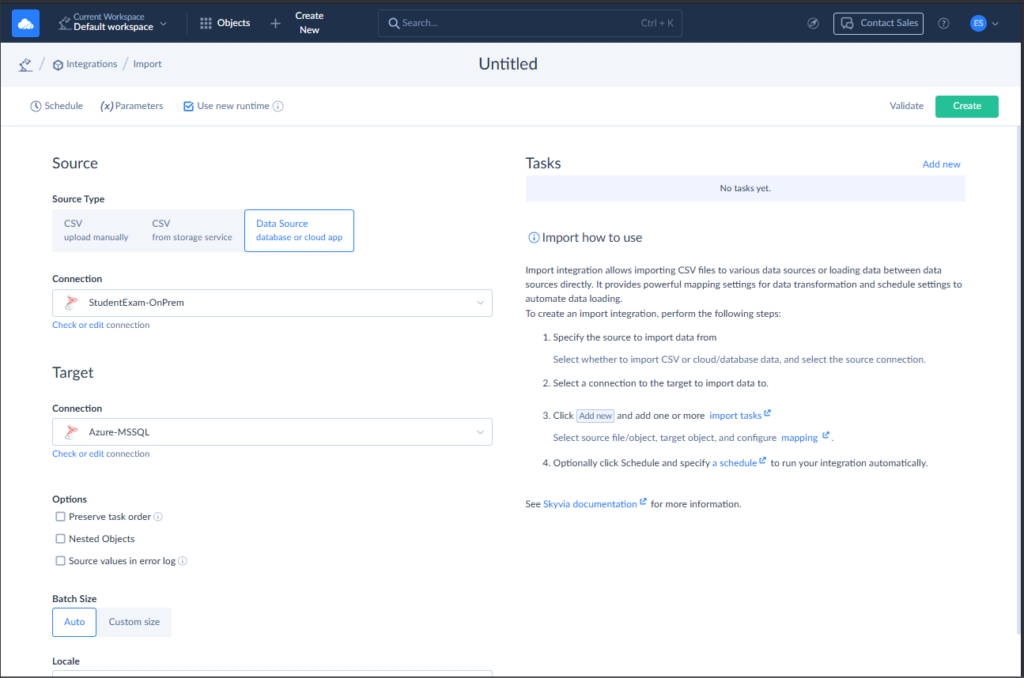
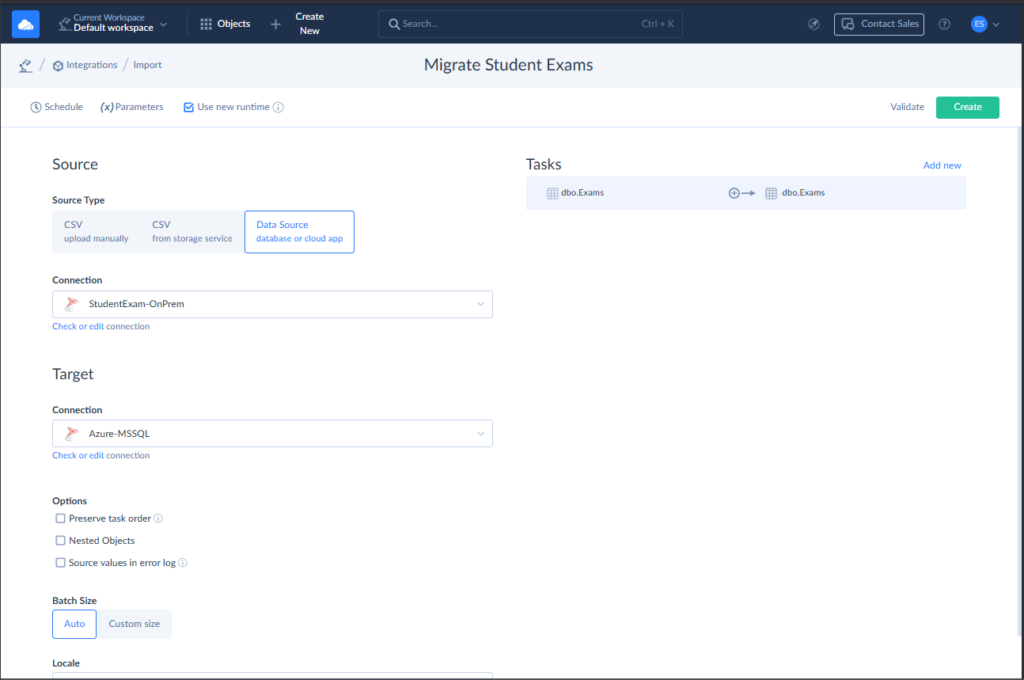
- Create an Import integration.
- Click + Create New and select Import.
- Choose Data Source as the Source Type.
- Choose one of your SQL Server connections as Source and the other as Destination, as seen below:
- Click Add New to add a new task, then choose the source table on the next page.
- Choose a State Filter. Choose between All, Inserted, and Update. All is the default, which means all rows in the source table.
- Click Next step and select the target table from the dropdown list.
- Choose the Operation (Insert, Update, Upsert, Delete).
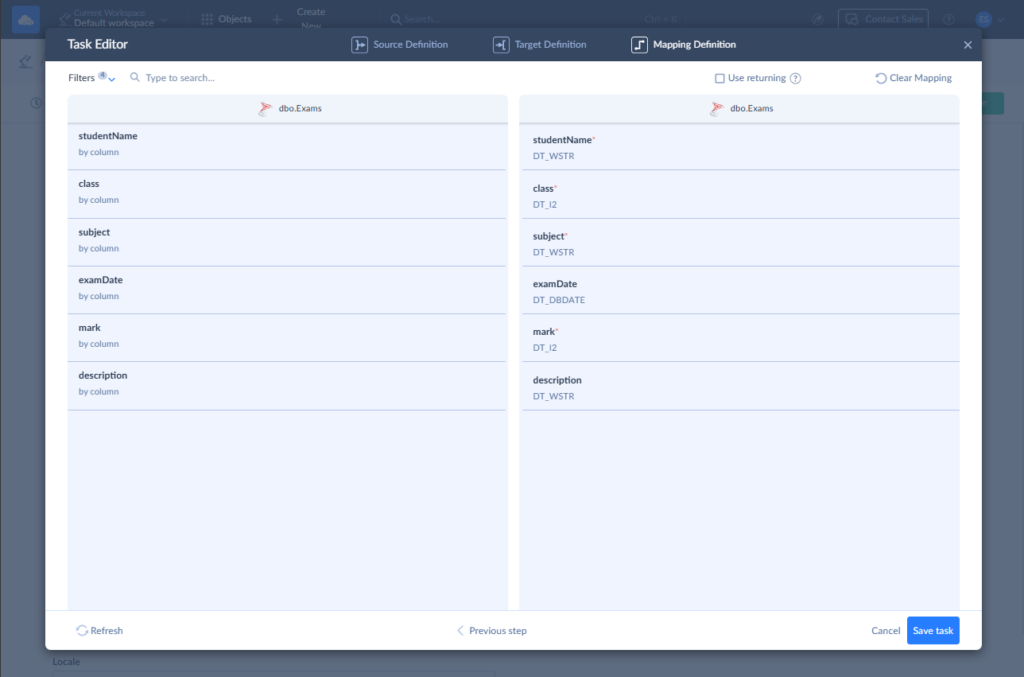
- Map the source columns (Source SQL Server) to the target columns (Target SQL Server). Source column names with the same name as Target column names will map automatically. See a sample below:
- Click Save Task.
- Add more tasks, if applicable. In our sample, we only have 1 table, so it ends after saving the first task.
- Give your Skyvia Import a name and click Create to save it. See the final setup below:
Using Skyvia Replication for SQL Server to SQL Server Replication
Replication is the process of making exact copies of databases across different servers. Skyvia offers replicating SQL Server tables to another SQL Server in an easy-to-set-up interface.
Below are the steps:
- Create the 2 SQL Server connections – one for the source and another for the target. You can reuse the same connections done in Skyvia Import, or follow those steps if you have not done it yet.
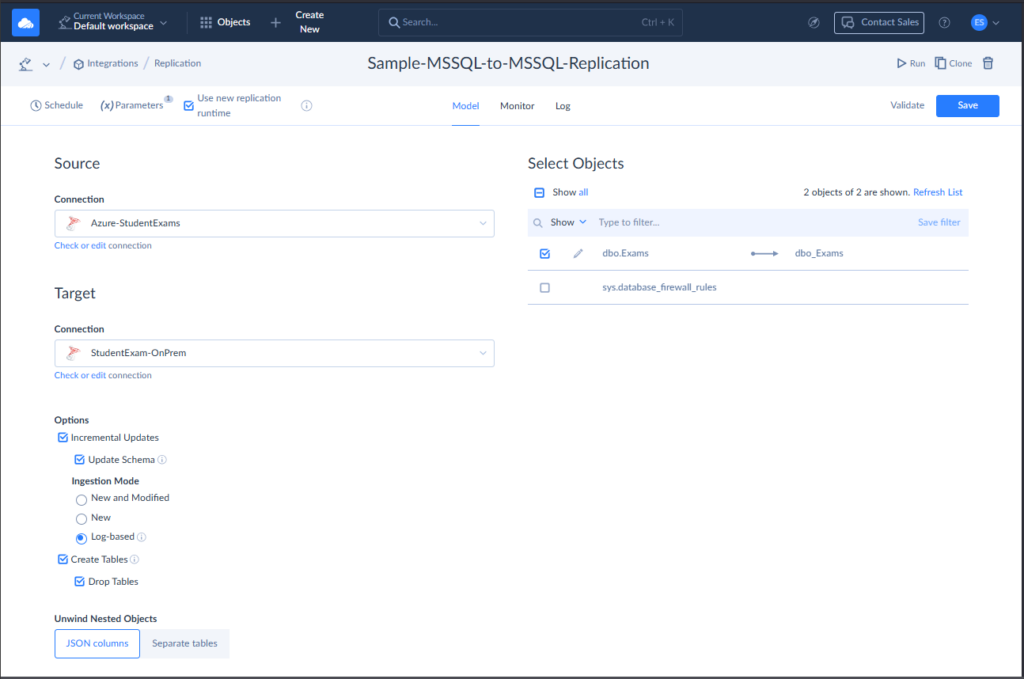
- Create the Skyvia Replication
- Click + Create New, then select Replication.
- Choose the Source and Target SQL Server connections from the dropdown lists.
- The tables will appear. Mark checked the tables that you wish to replicate.
- Optionally change the Options applicable to your requirements.
Name your replication and click Create to save it the first time. Click Save if you are modifying the replication setup. See a sample below:
Pros & Cons of Third-Party Tools
Not everything is bells and whistles in third-party tools.
Pros:
- Easier UI with powerful features.
- Handles schema, data, logins, and permissions.
- Robust error handling and logging.
- Often supports cloud platforms and older SQL versions.
- Some tools, like Skyvia, support scheduling and automation.
Cons:
- High licensing cost of some tools (some have free/trial versions).
- May require installation and setup for some.
- Features vary across tools—research is needed.
Best Practices for SQL Server Data Movement
Moving data isn’t just about hitting “copy” and “paste.” SQL Server migration best practices help keep your data moving smoothly and drama-free.
1. Plan Before You Move
Don’t wing it. Know what you’re moving, where it’s going, and how you’ll verify success. Make a checklist and map out the process.
2. Define Downtime Tolerance
Can users wait 5 minutes? Or 5 hours? Knowing your downtime window helps you pick the right method—some are fast, some aren’t.
3. Know Your Data Volume
A 50GB database moves differently than a 500GB one. Big databases need better planning, compression, or chunking. Apply performance tuning to handle big data.
4. Check Network Bandwidth
Slow network = slow transfer. Especially true for cross-location or cloud moves. Test it ahead of time if possible.
5. Match SQL Server Versions and Editions
Older to newer? You’re good. But newer to older may break things. Also, features vary across editions—watch for that.
6. Don’t Forget Logins and Permissions
Databases move. Logins don’t — at least not automatically. Script them out or sync them manually to avoid access issues. Part of security best practices is to make sure this is working after the migration.
7. Test and Validate
Move it. Then test it. Compare row counts, run queries, and check for broken procedures. Trust, but verify.
8. Monitor the Growth of Your Transaction Log
If you’re using the Full recovery model, watch out. It can quickly grow and fill the entire disk space. Consider using a fixed-size transaction log based on your average daily log accumulation.
Conclusion
Moving data between SQL Servers isn’t a one-size-fits-all task. Each method — from Backup and Restore to Third-Party Tools—has its sweet spot. Whether you’re upgrading, consolidating, or setting up a reporting environment, there’s a tool or technique built just for it. Avoid caveats by following key considerations and best practices.
Why not try Skyvia for testing your SQL Server data movement? You have nothing to install. All you need is a browser and a Skyvia account. It offers a robust, easy-to-use solution for various SQL Server data movement scenarios.
F.A.Q. for SQL Server to SQL Server

How can I migrate a SQL Server database with minimal downtime?
Use Log Shipping or Transactional Replication. Set them up ahead of time, sync the data, then do a quick final cutover. This way, users won’t feel much of a bump.
I need to keep two SQL Server databases continuously synchronized. What should I use?
Go with Transactional Replication, Peer-to-Peer Replication, or Skyvia Replication. They’re built for ongoing sync between servers and can handle changes in near real-time or on a schedule.
Which method is best for moving very large SQL Server databases (Terabytes)?
Use Backup and Restore with compression, SQL Server Integration Services (SSIS) with tuning, or a third-party tool like Skyvia. They’re better equipped to handle big data without choking your network or resources.
