

Summary
- The top three methods to connect Zendesk and Jira include the basic native plugin, trigger-based tools like Zapier for simple automation, and dedicated third-party platforms like Skyvia for true bi-directional synchronization and complex workflows.
Is this you without a Zendesk to Jira integration?
Frank from Software Engineering receives an email from Kelsey of Support. He opens it.
“Hey, Frank. Can you check this out? Salvi from Marketing says it’s urgent. I’ve attached the Zendesk details. Let me know asap.”
Frank sighs deeply. “Urgent? Let me see.”
The ticket says “Page freezing! Please fix.” It’s too vague. So, he hit reply.
“Kelsey, where’s the freezing coming from? I need details to reproduce the freezing. The system looks fine in our end here. I can’t start without that.”
So, Kelsey did her job. Frank waits and gets back to Jira for his tasks. But long story short, the back and forth is killing the flow.
Is this somewhat similar to your experience? Let’s discuss the Zendesk to Jira bridge to smooth out the flow. There are 3 ways to do it, but let’s discuss the “why?” first.
Table of Contents
- Why Connect Zendesk and Jira?
- Top 3 Methods to Integrate Zendesk with Jira
- Method 1: The Native Integration
- Method 2: Trigger-Based Automation
- Method 3: Third-Party Integration Tools
- Key Integration Scenarios
- Best Practices for a Stable Integration
- Conclusion
Why Connect Zendesk and Jira?
When Frank finally gets the clear picture of the problem, he records the issue in Jira – copy-pasting the details from the email with the Zendesk details.
With this kind of scenario, the people becomes the means for integration, not software. The disconnect is clear: Zendesk can’t talk to Jira, and Jira is the same to Zendesk. So, if you want smoother collaboration, fewer fires, and calmer days, the bridge needs to be done.
Here are the clear benefits once Zendesk and Jira become besties.
1. Automated Hand-off
Kelsey copies the Zendesk ticket info to her email message to Frank. Then, Frank copies the details in the email to a Jira issue. It’s copy-paste. It’s manual. And it’s repetitive. Put yourself in Kelsey’s shoes. By the end of the month, you might ask yourself, “What am I doing here?”
And Frank? “I’m a developer, not a copy-paster. I need a bridge to automate this thing.”
And it all starts there. When a Zendesk ticket becomes a Jira issue:
- Support doesn’t type or paste the same thing outside of Zendesk.
- Developers get the full context inside Jira instantly.
- Nothing gets lost in Slack or email.
- With a few twists, team leads and managers can track how support issues turn into product fixes or measure time-to-resolution.
That’s a win-win scenario for both support and developer teams.
Some orgs provide developers access to Zendesk. But the problem? Developers live in Jira, not Zendesk. They might miss the notification or outright dismiss it. The disconnect is still there. Building the bridge is the ultimate solution.
2. Real-Time Visibility
Would it be nice if both Kelsey and Frank see the same thing and know what’s happening without asking a lot of questions? It sure is.
- Support can see if an issue is “In Progress” or “Done.”
- Developers can see customer impact and urgency.
- No one needs to chase status updates.
Of course, integrating Zendesk and Jira is one thing. Having the policy to update both is another. Real-time visibility also means updated issues and tickets. In my experience, making sure tracking tools stays fresh until issues are done is part of my developer team’s Key Performance Indicators (KPI). The support manager does the same, so we are on the same page.
3. Unified Reporting
When Zendesk and Jira talk to each other, reporting becomes meaningful. You can answer questions like:
- Which customer issues turn into bugs most often?
- How long do fixes really take end-to-end?
- Which features generate the most support load?
Without integration, those answers live in separate tools and never line up. Each team has a separate definition of “Done,” and it becomes a source of friction.
4. Better prioritization
Is it the same in your case? Users tell you, “We needed it yesterday,” even if they just told you now. Many tickets are marked “URGENT!” even if the problem doesn’t break the system, like “Add dark mode to page.” If developers just nod on every “URGENT!” ticket, they will drown.
With Zendesk and Jira integration, Support sees the urgency, and Developers see complexity. Integration lets both views exist at once.
A ticket can be:
- High priority for the customer
- Low engineering effort — or vice versa
That shared context leads to smarter decisions instead of emotional ones.
5. Fewer Mistakes and Missed Details
Remember Kelsey and Frank manually copying things from and to their tools? If you’re like them, manual copying will lead to:
- Missing steps
- Wrong versions
- Lost screenshots
When Jira and Zendesk sync, the “telephone game” disappears or lessens. Less rework. Fewer misunderstandings.
6. Clear Ownership and Accountability
The next day, Kelsey made a follow-up to Frank by email, then by phone. “How’s Salvi’s freezing page problem, Frank?”
“Sorry, Kelsey. A CEO-level problem came, and it’s on my plate. I’ll start later this afternoon.”
“But Frank…I thought you were working on it. Salvi’s following up.”
Once a Zendesk ticket is linked to a Jira issue:
- Everyone knows who owns what.
- No more “I thought you were handling it.”
- Easier follow-ups and cleaner hand offs.
Accountability becomes visible instead of implied. Everyone can see status changes, comments, and ownership in one place.
The Big Picture
Integrating Zendesk and Jira doesn’t just save time. It reduces mistakes and frictions between teams that want to work together but are trapped in different systems.
Now you might ask, “How can we sync Zendesk and Jira?”

Top 3 Methods to Integrate Zendesk with Jira
Frank knows this can’t go on forever. So, he has 3 ways to bridge Zendesk and Jira. Let’s check them below.
Method 1: The Native Integration
Using native tools is the starting point. Zendesk has an official native tool so you can see the corresponding Jira issue for a ticket in a sidebar.
Best For
- Teams with simple needs and is just starting to link Zendesk to Jira.
Step-by-Step Guide
- Go to Admin Center and click Apps and Integrations.
- Click Integrations ->Integrations -> Jira.
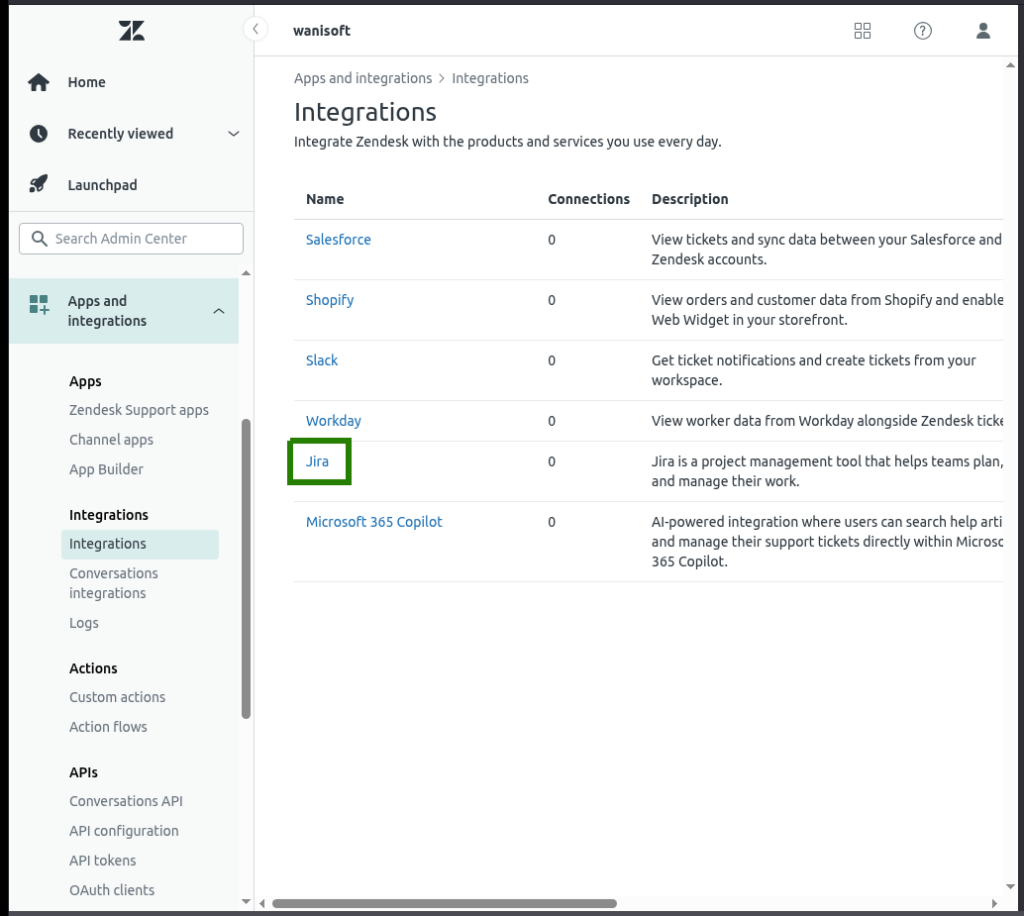
- Enter your Jira account URL in the box provided, accept the Terms of Use, then click Connect Jira.
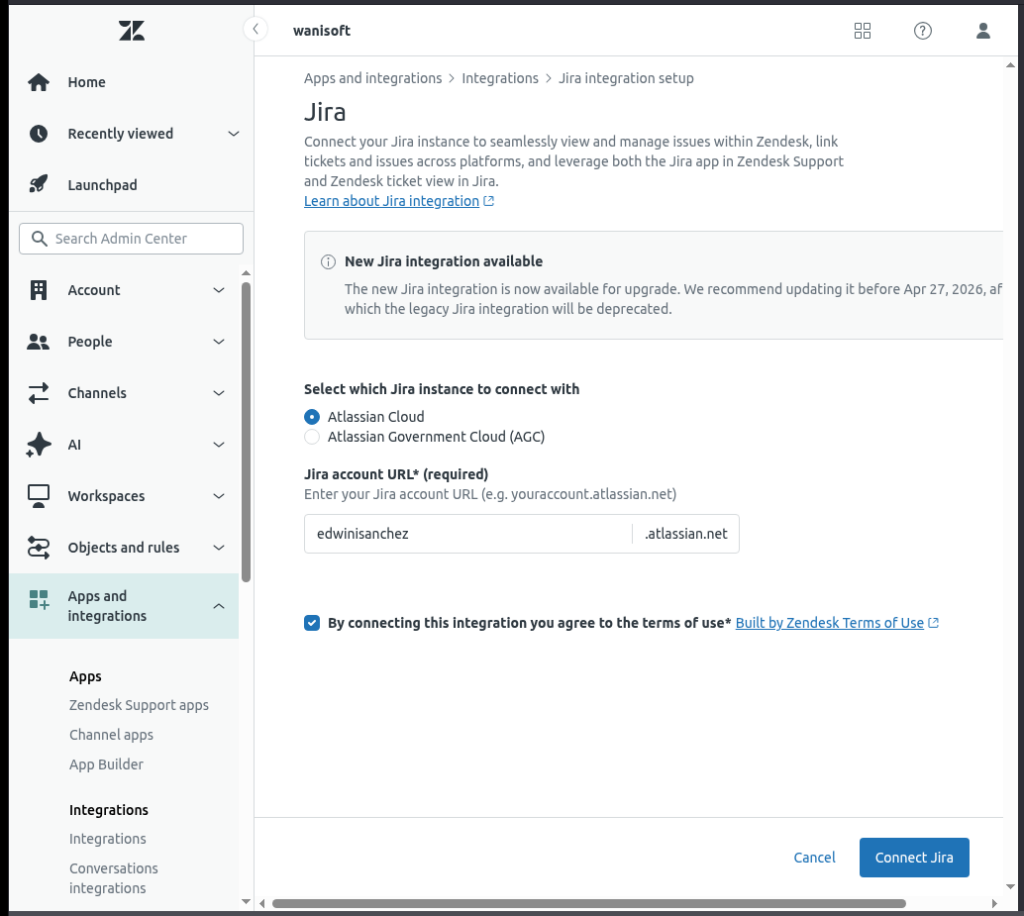
- Grant Zendesk access to your Jira account data and click Accept.
- Click the options menu icon next to the Jira instance and click Configure to set up the integration.
- Add the Jira fields you want to see in the sidebar when you open a Zendesk ticket.
- Save your configuration.
That’s the simplest implementation of the native tools. For more details, visit the Zendesk Product Guide.
Pros
- Quick setup, available on many Zendesk plans, links tickets visually.
- Easy enough for startup companies without someone technical to handle the setup.
Cons
- Rigid: Very hard to customize field mapping.
- No Historical Data: Cannot view Jira issues for the 5,000 tickets you closed last year.
- “View” Only: Often just shows a window into Jira rather than actually moving the data for reporting.
Method 2: Trigger-Based Automation
Trigger-based automation is also known as event-driven automation. Events like a new Zendesk ticket or an updated Jira issue will trigger something that will affect another data source.
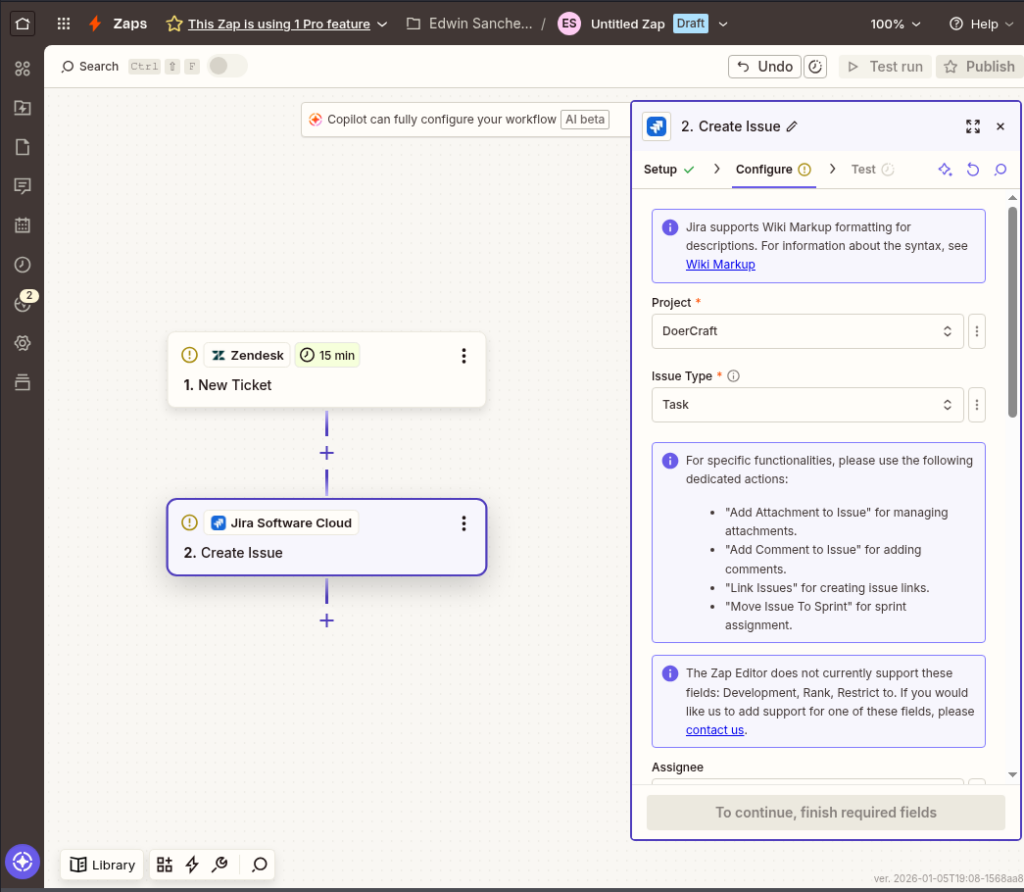
Tools like Zapier are event-driven. It’s like an efficient courier that delivers an item in a snap. Check out a sample below for a new Zap that is ready for configuration.
Best For
- Simple, one-way integration from Zendesk to Jira.
- Small teams with simple workflows and visibility speed matters more than strict governance.
- “Heads-up” automation to notify important status updates.
Step-by-Step Guide Using Zapier
The general steps below involve a one-way sync from Zendesk to Jira:
- Inside Zapier, click + Create, then choose Zaps.
- Describe the workflow you want to create in the box provided (e.g., “I would like to integrate Zendesk tickets to Jira”), then press Enter.
- Configure the Zendesk part by signing in to Zendesk and following the wizard.
- Configure the Jira part by signing in to Jira and mapping the information from Zendesk.
- Name and save your Zap, then test it. Modify as needed.
Pros
- Great for triggering notifications (e.g., if Zendesk status updates, send a Slack message to the user)
- Good for prototyping – easy to setup, easy to undo.
Cons
- Good for one-way integration only. A bi-directional flow may result in sync loops (See what sync loops are and why they are bad news in a later section)
- Cost at Scale: Pricing creates friction for high-volume support teams.
- If using Zapier to integrate, Zendesk is treated as a premium app and usually needs paid plans.
Method 3: Third-Party Integration Tools
Third-party integration tools like Skyvia offer a more flexible solution to integrate Zendesk to Jira and vice versa. If I have to decide on one, third-party tools will be my choice. In this section, I will use Skyvia because of familiarity and experience.
Best For
- Teams that want quick wins in delivering solutions, but are flexible enough to meet a more complex need.
- Bi-directional syncs without sync loops.
- Advanced workflows with error handling and additional data sources (e.g., Slack)
Step-by-Step Guide Using Skyvia
Steps may be more than Zapier or a native solution, but the room for flexibility is more. Check it out below:
Step 1: Connect Your Data Sources
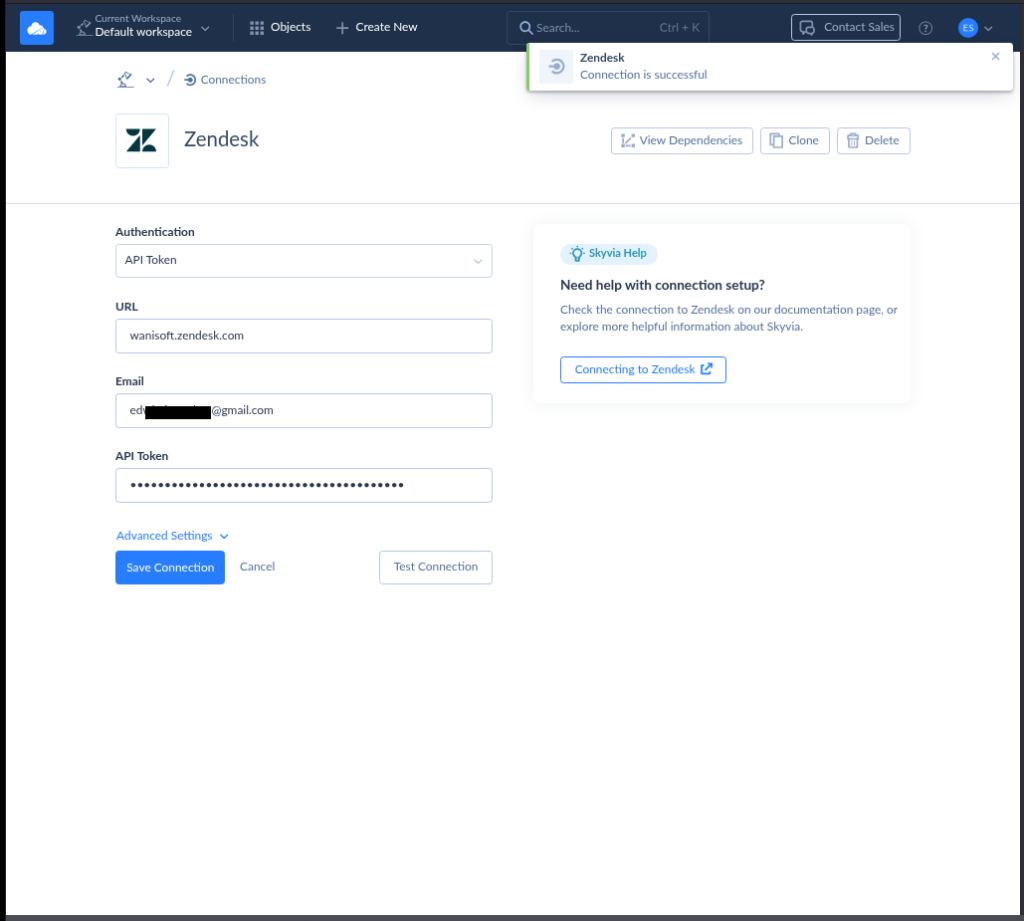
You have to connect Skyvia to your Zendesk and Jira accounts. So, you need two Skyvia connections. Don’t worry, Skyvia doesn’t need to know your credentials. Instead, a security token will be provided by both Zendesk and Jira to Skyvia.
Adding a new connection is plain and easy:
- Click + Create New from the upper portion of the Skyvia page, then click Connection.
- Search from the list of connectors by typing the name, like Jira or Zendesk.
- From the search results, choose the connector you want to configure.
- Enter the credentials to connect, then click Test Connection.
- If it succeeds, name your connection and save it.
Follow the above steps for both Zendesk and Jira.
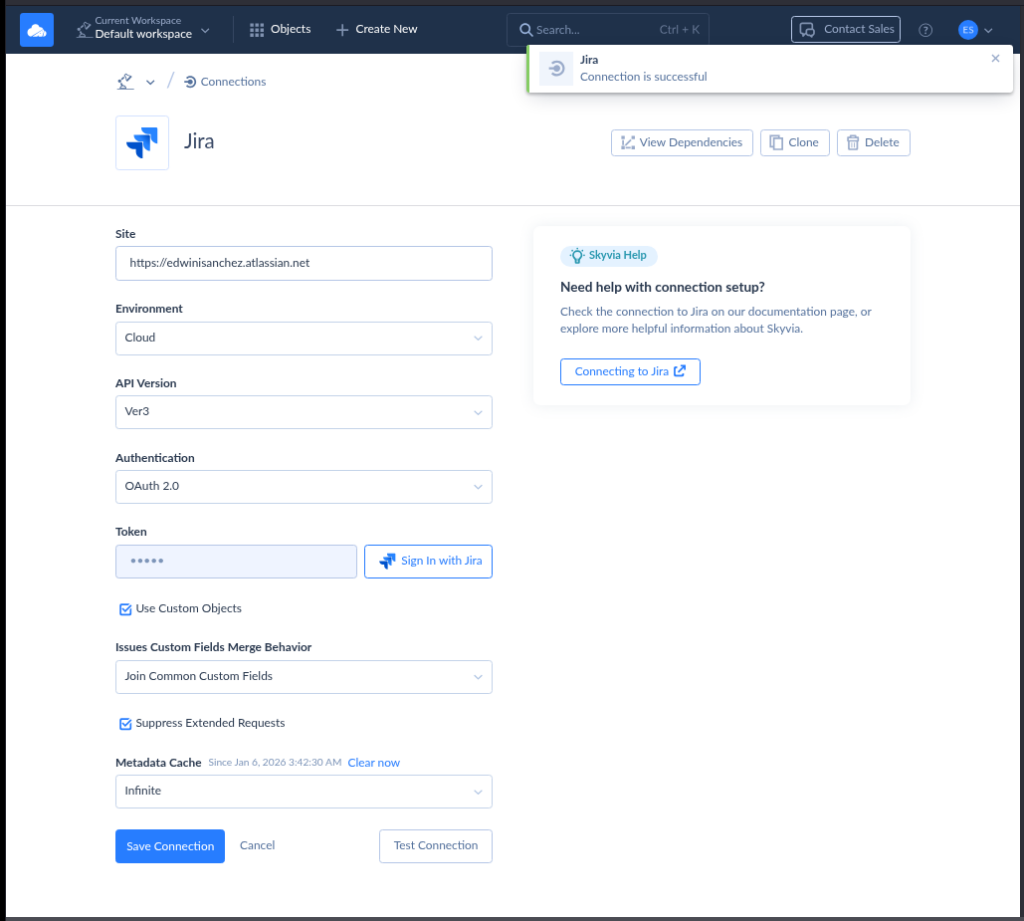
Below is my Zendesk Skyvia connection with a successful test:
And below is my successful Jira connection:
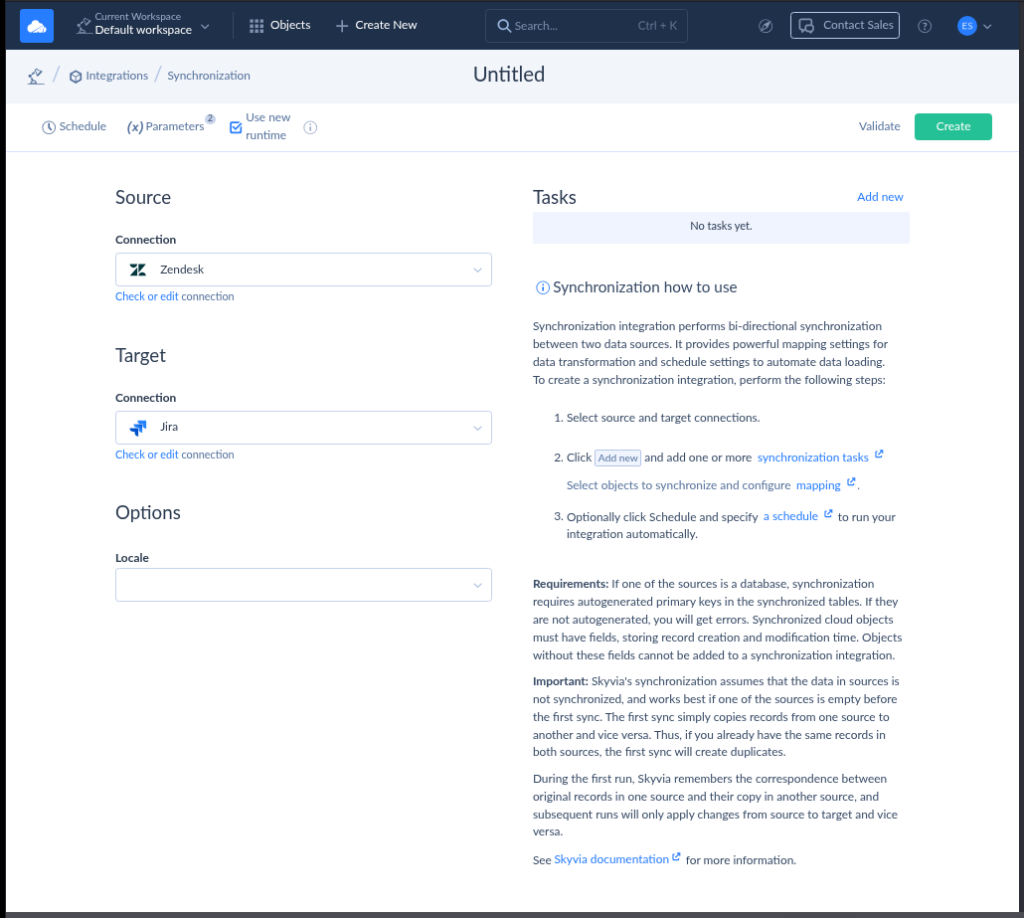
Step 2: Create a Synchronization Package and Choose Source and Target
While Skyvia has several ways to integrate two or more systems, the most applicable for the Zendesk to Jira integration is the Skyvia Synchronization for bi-directional sync.
Here’s how to do it:
- Click + Create New and select Synchronization.
- Select a Source (Try a Skyvia Zendesk connection).
- Select a Target (Try a Skyvia Jira connection).
See what happened below after I follow the steps above:
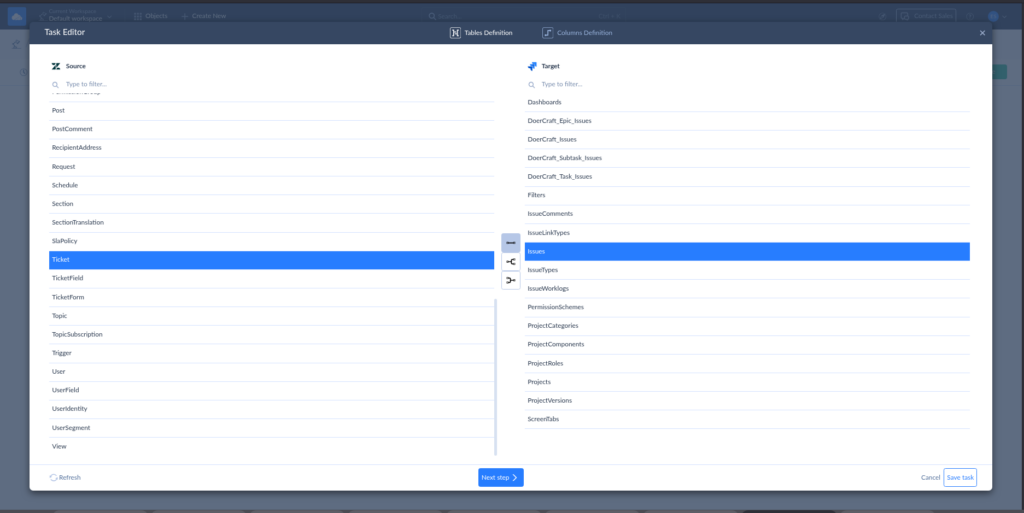
Step 3: Add New Synchronization Tasks
Synchronization tasks allow syncing of a table in Zendesk to a table in Jira. Typical setups use Zendesk Ticket table to Jira Issues table.
Adding a task starts with choosing the source and target table, like the one below:
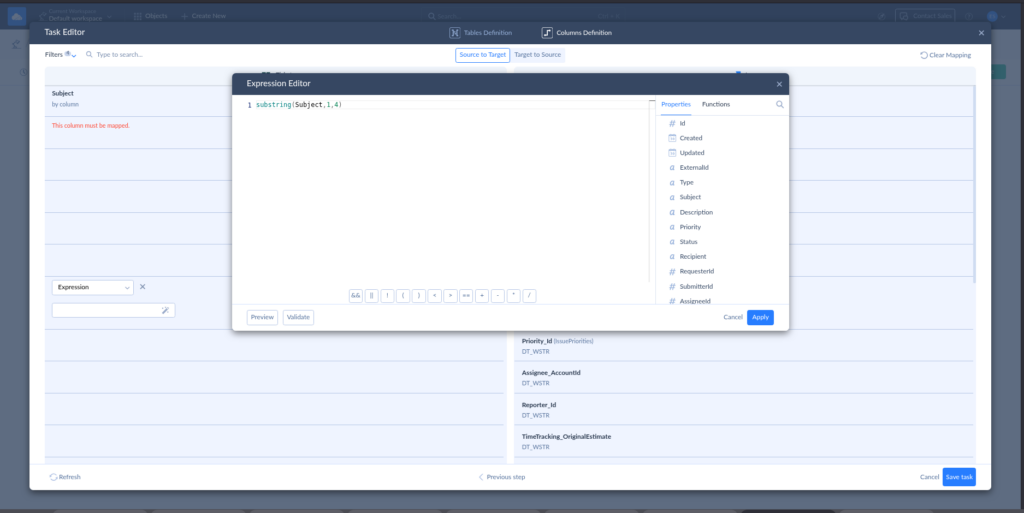
Then, you need to map the source columns to the target columns.
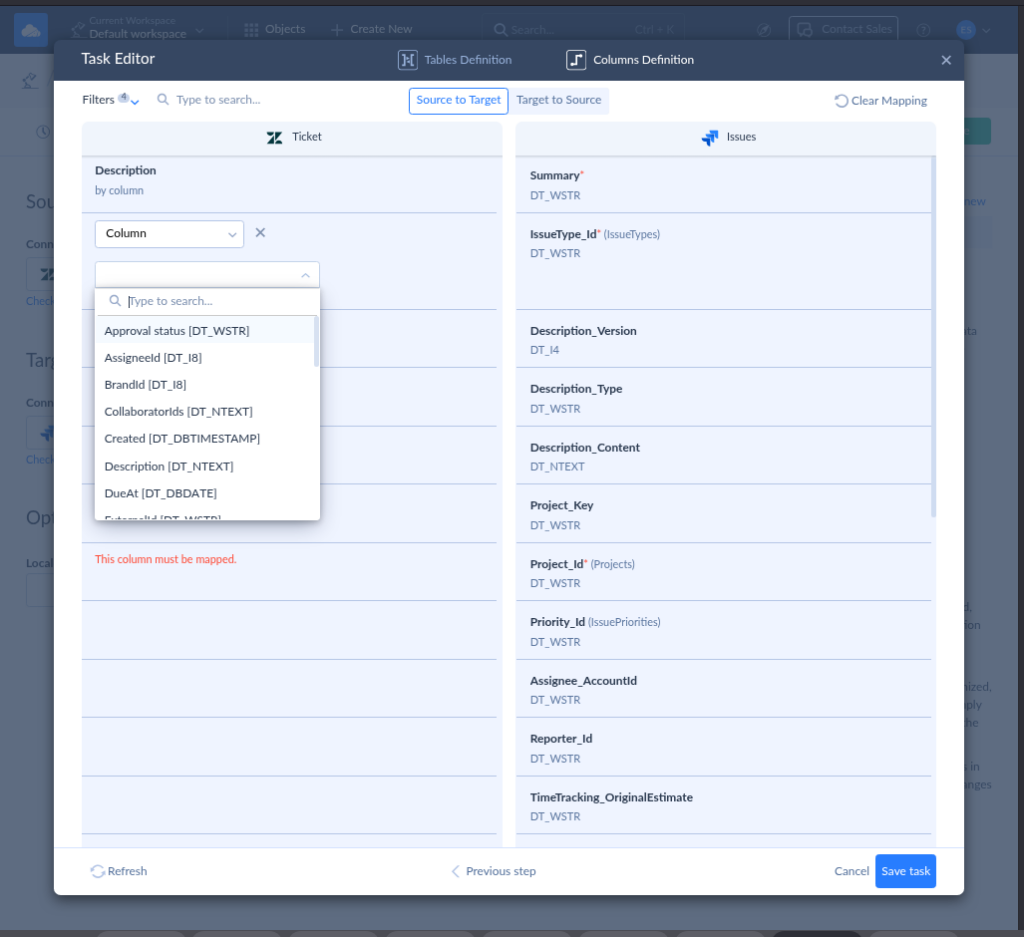
You need to choose at least one source column mapped to a target column, like the Zendesk Ticket Subject to the Jira Issues Summary. There will be columns marked “This column must be mapped,” which means they are required in the target table. You can also map an expression instead of a column. This is using data transformation techniques to arrive at a desired data format. See it below:
That’s how to add a task in Skyvia Synchronization. You can add more if you need to sync another table from Zendesk to Jira.
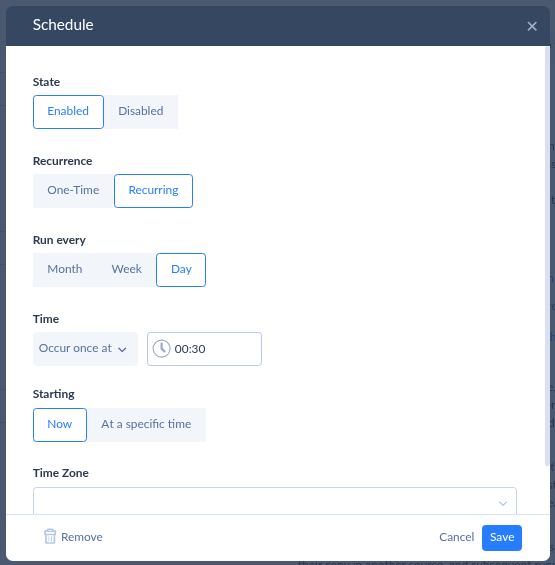
Step 4: Create a Schedule
You may choose to run this sync once or regularly using a schedule. It can be once a day, week, or month.
Pros
- Third-party tools like Skyvia offer a graphical user interface using drag-and-drop to design the pipelines or a simple fill-in-the-blanks form to setup and configure.
- Supports many other data sources like Salesforce, QuickBooks, and other apps that you can use outside of Zendesk to Jira integration – a one tool for all integration needs.
- Easy to learn. Newbies can adapt quickly.
- A no-code or low-code solution.
- True Bi-Directional Sync: Changes propagate both ways near real-time or on schedule.
- Granular Mapping: Map complex Custom Fields, Dropdowns, and Lookups with data transformations
- Mass Migration: Ability to bulk load historical data.
- Scalable: Designed for enterprise data loads, not just individual tasks.
Cons
- Third-party tools need adjustment when Zendesk and Jira APIs change. Depending on the tool, they may not adapt quickly.
- Some tools may offer limited trials with limited features. Zendesk and/or Jira may not be included.
Back to Frank, he chose Skyvia for a versatile, but easy-to-use third-party integration tool.

Key Integration Scenarios
What scenarios will fit a Zendesk to Jira integration? Check some of them below.
Syncing Zendesk Tickets to Jira Issues
This is the most common. Zendesk tickets that need engineering work are automatically created as Jira issues.
Example:
A “Bug Report” ticket in Zendesk becomes a Jira Bug or Task in the backlog.
Syncing Comments & Attachments
This captures internal notes, screenshots, and other supporting stuff from Jira to Zendesk. Support and developer conversations and files sync without exposing internal discussions to customers.
Example:
A Jira comment marked internal shows as a private note in Zendesk, not a public reply.
Status & Workflow Mapping
Issue progress in Jira updates ticket status in Zendesk so support knows what to tell customers. This is important as it provides customer expectations.
Example:
Jira In Progress updates the Zendesk ticket to Pending automatically.
Custom Field Mapping
Key metadata flows between systems so engineering has the right context.
Example:
“Product Version” in Zendesk maps to a custom field in Jira for faster debugging.
Linking Multiple Tickets to One Jira Issue
Some or many customers may report the same bug or problem. It’s recorded in Zendesk, but the same thing in Jira is just unnecessary noise to developers. The solution? Several customer tickets can point to a single underlying Jira issue.
Example:
Ten Zendesk tickets about the same login bug link to one Jira bug.
Controlled Priority & Severity Flow
Urgency from Zendesk is visible, but final priority is set in Jira.
Example:
A Zendesk Urgent ticket maps to Jira with a “Customer Impact: High” field, not automatic priority escalation. It’s support’s way to say “We hear you. We know how it feels”, and it’s recorded. Developers set the real deal.
Best Practices for a Stable Integration
A software bridge copying what’s in system A to B sounds simple, but there are quirks to watch out for.
1. Avoid Sync Loops
What’s a Sync Loop?
This means that an update in Zendesk will trigger an update to Jira. An update in Jira triggers an update in Zendesk, and it starts all over again. It’s like deja vu. Don’t let updates bounce endlessly between systems.
Best practice:
Define one system as the “source of truth” for each field, especially Status because this is where the confusion begins.
For example:
- Status flows from Jira → Zendesk. There’s only one definition of “Done.”
- Customer comments flow from Zendesk → Jira
One direction per field. No ping-pong, no deja vu.
2. Don’t Sync Everything (Filter Aggressively)
What Filtering Means:
Not every ticket deserves to become engineering work. Do not include those in the sync.
Example:
- Password reset questions? Stay in Zendesk.
- Feature requests or bugs? Sync to Jira.
Best practice:
Use rules or tags like needs-engineering before creating a Jira issue.
This keeps Jira clean and focused on real work.
3. Handle Errors and Failures Gracefully
What Error Handling Means:
The pipeline handling the sync should anticipate errors because syncs will fail. APIs time out. Empty fields may throw an error.
Example:
If a Jira field is missing, don’t silently drop the ticket. Log the error or notify someone so it can be fixed. Notification can be through email or Slack.
Best practice:
Always have:
- Error logs
- Retry logic
- A fallback manual process
Silent failures are worse than loud ones. It’s like dropping your car keys and tracking back where they fell – it’s hard.
4. Define Ownership Clearly
What it means:
Everyone knows who owns what stage of the process. More importantly (and this is where arguments may start), not everyone should be able to escalate or downgrade work.
Example:
A customer marks everything “URGENT!”
Best Practice:
- Support owns customer communication in Zendesk tickets
- Engineering decides when to ship fixes to Jira issues (e.g., “Does this go into the next sprint or later?”)
- Product decides what matters long-term, strategic prioritization (e.g., “Does it align with the roadmap?”)
- Limit who can change priority fields in Jira.
If ownership is unclear, tickets stall.
5. Standardize Fields and Naming
What it means:
Avoid mismatches like “Severity” vs “Priority” vs “Impact.”
Teams agree on definitions like:
- Severity = customer pain (how bad it feels)
- Priority = engineering order of work
- Impact = how many users or systems are affected
Once those meanings are aligned, the data stops conflicting — and so do the teams.
Example:
In Zendesk:
- Severity: High
- Reason: A single customer can’t export a report and marked it as urgent.
In Jira:
- Priority: Low
- Reason: It affects only one customer and has a simple workaround.
Impact mismatch:
- Support sees “High severity — customer blocked.”
- Engineering sees “Low priority — minor issue.”
Both are technically correct — but they’re speaking different languages.
Best Practice:
If Zendesk uses “High / Medium / Low,” Jira should match — or map cleanly. Zendesk measures how bad the problem feels. Jira measures how urgently engineering should fix it. That clears 90% of the confusion.
Consistency reduces confusion and reporting errors.
6. Review the Integration Regularly
What it means:
What worked six months ago may not fit today’s workflow.
Example:
A new product area creates new ticket types that weren’t mapped.
Without review, those tickets fall through the cracks.
Best Practice:
A quarterly check-in keeps things healthy.
Why This is a Big Deal
A stable Zendesk and Jira syncs isn’t about automation without errors alone. It’s also about clear ownership, clear rules, and predictable behavior – so Zendesk and Jira won’t feel like two different tools stitched together. But like a one system with a stable flow.
Conclusion
Handling the smooth flow between support tickets to development work needs a bridge to migrate from Zendesk to Jira or vice-versa. You learned the native way to integrate, using trigger-based automation, and third-party integration tools like Skyvia.
For simple integrations or if you’re just starting, the native solution may suffice. But scaling teams with advanced needs should opt for robust data pipelines provided by third-party tools.
If you need a fast, easy-to-prepare Zendesk to Jira integration using drag-and-drop, try Skyvia for free today. And kill the friction between support and development with a no-code integration platform.

F.A.Q. for Zendesk to Jira Integration

Can I sync comments and attachments between Zendesk and Jira?
Yes. Most setups sync comments and attachments, but you can choose what’s public, private, or one-way to avoid noise and confusion.
Is it possible to migrate historical Zendesk tickets to Jira?
Not with the native plugin. You’ll need third-party tools or scripts to migrate old tickets and preserve history.
How do I map custom fields from Zendesk to Jira?
You map them during integration setup by linking Zendesk custom fields to Jira custom fields. Both sides must use compatible field types.
Does the integration support bi-directional synchronization?
Yes, but selectively. Mature setups sync some fields both ways and keep others one-way to avoid conflicts and sync loops.
Can I connect Zendesk and Jira without writing code?
Yes. Native plugins and third-party tools offer no-code or low-code setup using rules, mappings, and UI-based configuration.
