

Summary
- Native Shopify–ShipStation Connection: Connect Shopify to ShipStation directly in a few clicks using the built-in app. Ideal for fast setup and hands-off order syncing.
- Third-Party Integration Platforms (iPaaS): Tools like Skyvia automate syncing across multiple systems, add advanced mapping, and support more complex workflows than the basic Shopify app.
- Shopify API + Custom Integration: For teams with in-house developers, Shopify and ShipStation APIs allow fully customized automation and tailored shipping workflows.
As your Shopify store starts picking up steam, shipping and fulfillment usually begin to feel like they’re getting in the way. Orders pile up, labels turn into a time sink, and what should be smooth “Shopify shipping” quickly becomes a daily bottleneck. It’s a familiar pain point for growing e-commerce teams, and it’s usually the moment when merchants go looking for a smarter way to run their ops.
That’s where a solid ShipStation Shopify integration comes in. When you hook the two platforms together, you immediately streamline the workflow: orders sync automatically, labels get processed faster, and the team stops jumping between tabs just to keep things moving.
In this guide, we’ll walk through every way you can connect ShipStation with Shopify. You’ll see how the native connector works, when it’s worth adding automation through an iPaaS like Skyvia, and why some sellers opt for a fully custom setup using APIs. Whether you’re running a small boutique shop or managing a high-volume operation, you’ll find an integration path that fits your business and doesn’t slow you down.
Ready? Let’s break it all down.
Table of Contents
- Why Integrate ShipStation with Shopify?
- 3 Ways to Connect Shopify and ShipStation
- Key Features to Leverage for E-commerce Growth
- Advanced Tips and Best Practices
- Conclusion
Why Integrate ShipStation with Shopify?
Streamlined Order Management
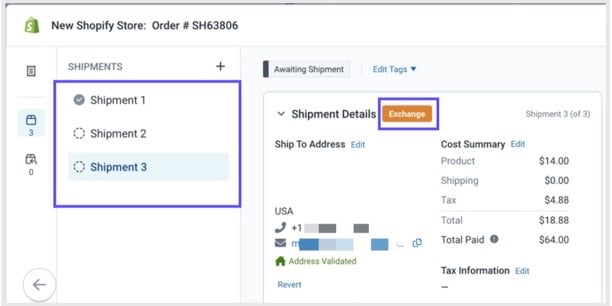
When you plug ShipStation into Shopify, all your orders (whether they come from the store, marketplaces, or additional sales channels) land in one clean dashboard. No more hopping from tab to tab or exporting CSVs just to figure out what needs to ship next.
Shipping Automation
ShipStation is packed with rules, saving hours off users’ workflow. Think, “If the order is international, apply this service,” or “If the item is fragile, add insurance.” Once you set them up, they quietly run in the background so the team doesn’t have to chase manual tasks all day.
Discounted Shipping Rates
Another perk: you get access to pre-negotiated discounts from major carriers. It’s an easy way to cut down fulfillment costs without extra negotiation or volume commitments.
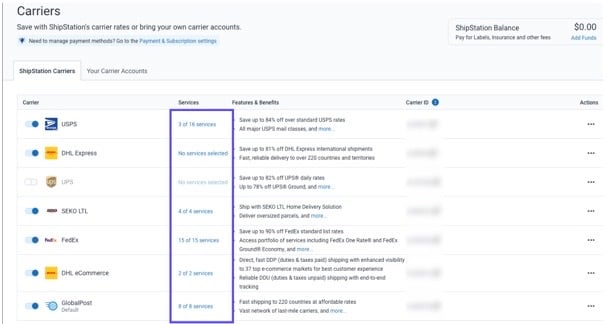
Multi-Carrier Support
If your business ships globally or deals with mixed carrier preferences, this integration is a lifesaver. You can connect USPS, UPS, FedEx, DHL, and switch between them depending on cost, delivery speed, or customer preference.
Branded Customer Experience
ShipStation allows users keep things on-brand even after checkout.
You can:
- Customize the shipping notifications.
- Build branded tracking pages.
- Set up a polished returns portal.
It’s a small touch, but it makes your store feel a lot more premium.
3 Ways to Connect Shopify and ShipStation
Before diving into the setup steps, it helps to know that you may connect Shopify and ShipStation in a few different ways, depending on how complex the operations are. Some merchants just want a quick plug-and-play setup to start printing labels. Others need more control:
- Cleaner data.
- Automated workflows.
- The ability to sync more than just orders.
To make the choice easier, here are the three most common connection methods, when to use each one, and what to expect before you hit “Connect.”
Method 1: The Native Integration
If you want the fastest way to sync Shopify orders into ShipStation, the native connector is your best friend. It lives inside ShipStation, takes only a couple of minutes to set up, and handles the basics well. Newer stores love it because it gets them shipping quickly without touching anything technical.
Best for
New and small businesses that just want a simple, straightforward connection without extra configuration or workflow customization.
Step-by-Step Guide
Follow these steps to connect Shopify to ShipStation using the built-in integration:
- Login to ShipStation and open the main dashboard.
- Go to Selling Channels and Store Setup.
- Choose Shopify from the list of supported platforms.
- Click Connect a Store or Marketplace.
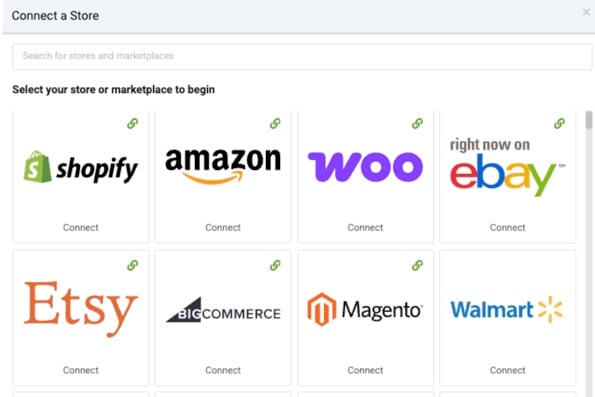
- Enter your Shopify store URL (e.g., yourshop.myshopify.com).
- ShipStation will redirect you to Shopify: click Install or Authorize to grant permissions.
- Back in ShipStation, configure your initial settings, including:
- Whether to import open orders automatically.

Note: This is where you set the ground rules for how orders flow in and how shipments behave by default.
- Default shipping origin.
- Branded tracking settings.
- Carrier defaults.
- Automation rules.

- Save the settings and click the Sync Orders to bring in the first batch of Shopify orders.
- Optional: create a test shipment to confirm that rates, carriers, and tracking updates flow back to Shopify correctly.
Advantages
You may use the native integration for something quick and dependable.
It’s usefull for:
- Pulling Shopify orders straight into ShipStation without any manual setup.
- Handling tracking updates automatically.
- Keeping the fulfillment queue moving with almost no maintenance.
For small teams, it’s a simple way to get shipping under control without extra tools or overhead.
Limitations
The native connector does the basics, but that’s where it stops.
The users can’t:
- Customize data mapping.
- Build multi-step fulfillment workflows.
- Sync additional objects beyond orders and basic customer info.
As your operation grows and needs more automation, it’s easy to outgrow this setup.
Method 2: Using a Third-Party Integration Tool
Third-party integration platforms sit between Shopify and ShipStation and handle the data flow for their users. You don’t need to rely on fixed connectors or writing custom code. Just get a visual setup where you decide:
- What syncs.
- When it syncs.
- How data is transformed along the way.
This approach is a common next step for stores that have outgrown the native connector but don’t want to build everything from scratch.
Platforms like Skyvia work especially well here because they combine no-code setup with the flexibility to handle more advanced scenarios as your operations grow.
Best for
Growing businesses with custom fulfillment needs, multiple Shopify stores, or teams that want to sync more than just basic order data without hiring developers.
Step-by-Step Guide (Using Skyvia)
Here’s how a typical Shopify–ShipStation connection looks using Skyvia:
- Create a Skyvia account and sign in to the platform.
- Click + Create New and go to the Connection section.
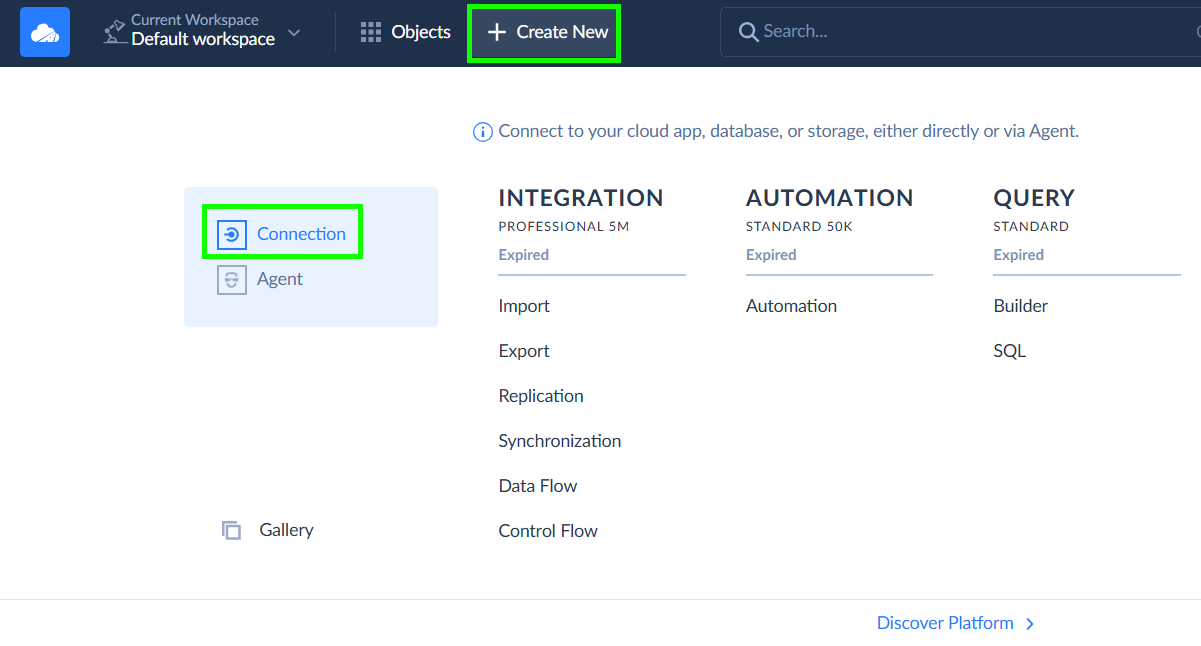
- Set up the connection for Shopify.
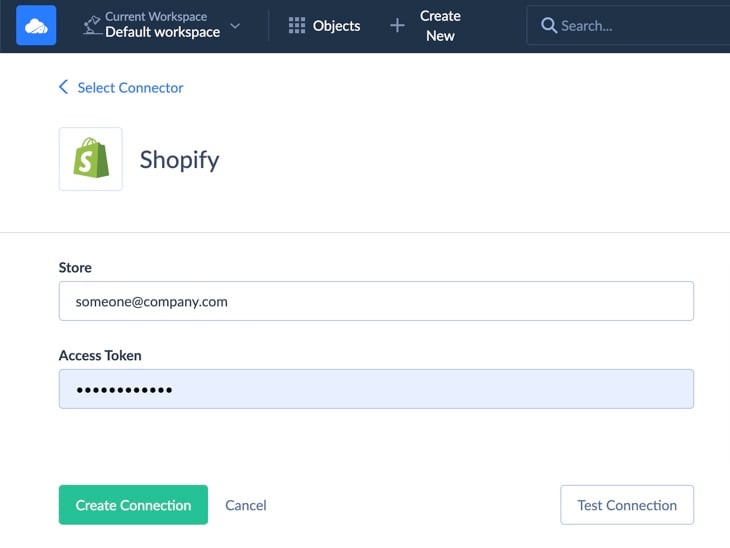
- Do the same for ShipStation.

- Click +Create New → Integration, then choose the appropriate scenario (Import or Data Flow).
- Select Shopify as the source and ShipStation as the target.

- Map fields visually, deciding exactly how orders, customers, shipping details, and statuses should sync.
- Add filters or conditions if needed (for example, sync only paid or fulfilled orders).
- Configure insert and update logic so existing records aren’t duplicated.
- Set a Schedule as you wish, or you may also run the integration on demand.
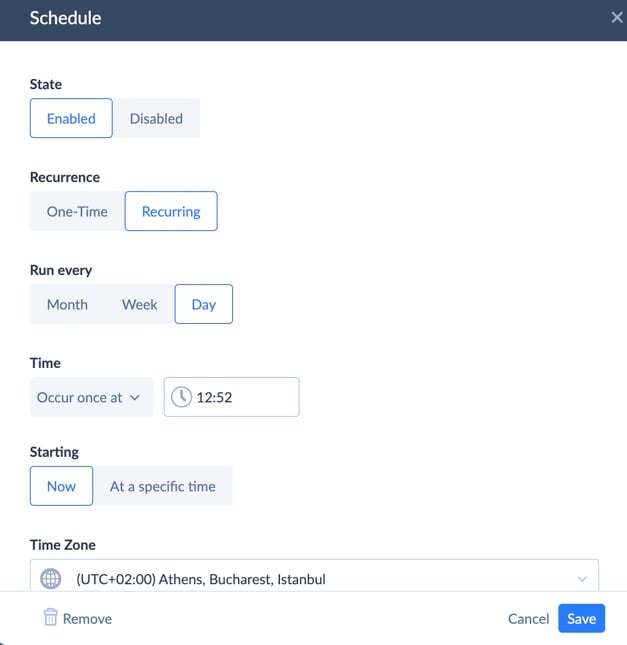
Note: Everything runs in the cloud, so once it’s set, you can forget about manual intervention.
Advantages
This approach gives you far more control than the native connector. You can sync additional data, adjust field mappings, automate updates, and scale the workflow as your store evolves.
Tools like Skyvia also give you:
- Logs.
- Error handling.
- Easy replay if something goes on the wrong scenario.

Limitations
Such solutions are no-code, but it doesn’t mean just to click “Connect.” You’ll need to spend some time defining mappings and rules, especially if the workflows are complex.
Method 3: Custom API Development
If you need absolute control over how Shopify and ShipStation talk to each other, building your own integration through their APIs is the most flexible option. With the right engineering resources, you can craft a connection that supports any logic, custom objects, or edge cases the workflow demands.
It’s the kind of setup teams choose when “off-the-shelf” isn’t enough.
Best for
Large enterprises with proprietary fulfillment rules, complex data flows, or an in-house development team that can build and maintain a fully custom solution long-term.
Advantages
Custom API integrations give users freedom that no app or connector matches.
You can define exactly how:
- Orders move.
- Transform data on the fly.
- Sync additional objects beyond what native tools support.
- Merge multiple systems into one unified process.
If you have niche requirements or enterprise-grade workflows, this route lets you tailor everything down to the last detail.
Limitations
The trade-off is complexity. API builds take time, require ongoing maintenance, and depend on engineering bandwidth.
Something many e-commerce teams don’t have.
Whenever Shopify or ShipStation change their API versions, users are also responsible for handling:
- Authentication.
- Retries.
- Rate limits.
- Error logs.
- Updates.
It’s powerful, but it’s rarely the fastest or most cost-effective way to get the two platforms working together.
Key Features to Leverage for E-commerce Growth
Advanced Automation Rules in ShipStation
This is the kind of feature that turns routine into rhythm. With automation rules, you stop micromanaging each order and let ShipStation sort out the details. Carrier selection, package type, shipping method. All of that get handled automatically based on rules you set once (think order size, shipping destination, customer type, etc.).
Once it’s dialed in, orders move through like clockwork, no second-guessing, no manual tweaks, even when things go nuts during peak season. That consistency makes growth feel natural rather than chaotic.
Batch Printing Shipping Labels
You may think about batch printing like, ah it’s a small thing, but it often becomes a secret weapon on busy days. Instead of printing label after label, you load up a batch and print dozens (or hundreds) in one go.
The packing line hums along, pauses are rare, and you avoid those annoying little mistakes that slip in when you’re hopping between orders. It’s not flashy, but it keeps the fulfillment engine running just smooth.
Inventory Management Across Channels
Selling across multiple marketplaces is great… until inventory gets messy. A central inventory feed keeps all your channels in sync. Stock adjusts automatically everywhere when a sale happens or when you restock. That prevents overselling, awkward cancellations, and manual inventory spreadsheets that no one updates on time. And when you tie it all together with a data integration tool like Skyvia, clean inventory data becomes the backbone of the reporting and decision-making. Suddenly you know what the company really has, and what you should reorder. No guesswork.
Streamlining the Returns Process
Returns aren’t glamorous, but they’re part of the game. If you build a clear, repeatable returns flow, it stops being a headache and starts working as feedback.
Automate return approvals, status updates, and restocking. Let customers know what’s happening. And when returns get logged properly, you actually learn which products come back more, why, and whether there’s something to fix. Returns stop being damage control and instead become a valuable source of insight.
Advanced Tips and Best Practices
Handling Custom Data
This is where a lot of integrations quietly fall apart. Shopify custom fields are great, but only if that data actually makes it downstream instead of getting dropped along the way.
You need full control over how that data is mapped in case of using custom fields for order notes, delivery preferences, internal flags, or anything fulfillment-related.
Tools like Skyvia is essential to ensure that data is accurately mapped and synced to ShipStation, without hacks or half-working workarounds. Set it up properly once, and forget about mooving the custom fields that will move the way they should.
Managing International Shipping and Customs
International orders add a whole extra layer of complexity, even when volumes are still manageable. Customs forms, HS codes, declared values, country-specific rules… it’s easy to miss a detail and end up with delays or returns.
The main task here is to standardize as much as you may.
Ensure:
- Product data is consistent.
- Required fields are always populated.
- Shipping rules are predictable.
When that foundation is solid, international shipping stops feeling like a gamble and starts behaving like a repeatable process.
Leveraging In-Cart Delivery Rates
Showing delivery rates at checkout isn’t just a nice touch; it directly affects conversion. When customers see accurate shipping costs early, they’re less likely to bail at the last step. The key point here is to ensure rates coming from carriers actually reflect how you ship in real life:
- Packaging.
- Zones.
- Surcharges.
Users may avoid margin surprises and awkward customer conversations later on in case in-cart rates mirror what happens in fulfillment. It’s one of those behind-the-scenes fixes that quietly improves both revenue and trust.
Data Consistency
If there’s one thing that makes integrations fragile, it’s mismatched data.
- Different IDs.
- Outdated inventory numbers.
- Duplicate customers.
It all compounds over time. For businesses that require perfect sync between platforms, especially with inventory or customer data, a bi-directional sync solution like Skyvia is the gold standard.
- Changes flow both ways.
- Conflicts are handled cleanly.
- Everyone works off the same source of truth.
Once data stays consistent across systems, a lot of “mystery issues” simply stop showing up.
Conclusion
Connecting Shopify and ShipStation is always about choosing what actually fits where your business is right now.
Native integrations are fine when you’re just getting started and need something quick and low-effort. Using a tool like Skyvia gives you more control over data, better reliability, and room to grow without constantly reworking the setup. And if you have very specific requirements or a complex tech stack, a custom API approach can make sense as long as you’re ready to own the maintenance.
The main takeaway is simple. The way you connect the systems directly affects how well you scale. A lightweight setup gets you moving, but once order volume, data complexity, and reporting needs increase, you need an integration that won’t buckle under pressure.
If you’re planning for growth and want the own Shopify–ShipStation connection to stay solid as things ramp up, take a closer look at Skyvia. It gives you the flexibility to start simple, then layer in more control as your operations evolve, without rebuilding everything from scratch.

F.A.Q. for ShipStation Shopify Integration

Can I connect multiple Shopify stores to one ShipStation account?
Yes. ShipStation lets you connect multiple Shopify stores to a single account, which is handy if you run several brands or regional storefronts.
What data is synced between Shopify and ShipStation with the native integration?
Orders, customer details, shipping addresses, line items, and basic order metadata. Custom fields and advanced data usually need extra handling.
How quickly do my Shopify orders appear in ShipStation?
New orders typically sync automatically every few minutes. You can also trigger a manual refresh if you need orders to pull in right away.
Does this integration work with Shopify Plus?
Yes. ShipStation works with Shopify Plus the same way it does with standard Shopify plans, with no special setup required.
What is the advantage of using a tool like Skyvia over the native integration?
Skyvia gives you full control over data mapping, custom fields, and sync logic, including bi-directional sync. It’s a better fit once your setup goes beyond basics.
