Processing huge volumes of information while supporting the different systems is boring and takes time, especially when companies deal with CRM info in Salesforce and storage-heavy files in AWS S3. Manually transferring records and ensuring that everything is consistent and synchronized is inefficient and causes errors.
In this scenario, the AWS-Salesforce connector says, “We’re here to help you.”
By connecting these two platforms, companies can store, support, and analyze insights perfectly while eliminating manual exports and storage limitations. Whether the organization is seeking to offload CRM attachments to S3, backup Salesforce records, or analyze customer information at scale, such an integration can optimize workflows, cut costs, and enhance accessibility.
This guide covers why businesses need Salesforce-AWS S3 integration, the key benefits, and step-by-step methods to set it up. We’ll also explore different approaches, best practices, and common use cases to help you choose the right solution.
Table of contents
- What is Salesforce?
- What is Amazon S3?
- The Benefits of Salesforce to Amazon S3 Integration
- How to Set Up Salesforce to AWS S3 Integration
- Use Cases for AWS Salesforce Connector with Amazon S3
- Conclusion
What is Salesforce?
Salesforce is a popular cloud-based Customer Relationship Management (CRM ) platform that helps businesses manage customer interactions, track sales, and automate workflows all in one place. It doesn’t depend on the company size ( a small startup or a global enterprise); Salesforce makes it easy to store customer insights, analyze them, and improve team collaboration.
With its customizable dashboards, automation tools, and AI-powered analytics, organizations can streamline sales, marketing, and customer service processes, boosting efficiency and customer satisfaction. Since everything is cloud-based, teams can access critical information anytime, anywhere, ensuring seamless collaboration. The pricing here is tailored to different business needs.
What is Amazon S3?
Amazon S3 is a scalable, cloud-based platform where we easily store, manage, and retrieve large amounts of information. It provides secure, reliable, cost-effective storage for all digital assets, like keeping backup files and documents or handling big data analytics.
With its pay-as-you-go pricing, businesses only pay for the storage they use. So, it’s flexible and allows to save costs.
People use this system for info archiving, content distribution, and as a centralized repository for structured and unstructured information.
Companies rely on Amazon S3 because it integrates seamlessly with other AWS services, ensures high durability and security, and allows insights to be accessed anywhere.
S3 simplifies storage management while keeping the information secure and accessible, not thinking about the organization’s size, whether you’re a small startup or a real enterprise.
The Benefits of Salesforce to Amazon S3 Integration
Salesforce – AWS S3 integration is a magic stick for businesses handling large amounts of CRM data, files, and attachments. We don’t need to overload Salesforce storage or deal with manual data exports. Just seamlessly transfer and manage records in S3 while keeping everything accessible when required. This integration is about:
- Enhancing scalability.
- Ensuring compliance.
- Optimizing costs.
So, it’s the perfect choice for businesses looking to improve information handling and operational performance.
Below are some of the key benefits of connecting Salesforce with Amazon S3.
Scalability and Integration
Salesforce is limited in its storage. Upgrades are as expensive as data volume grows. Businesses can integrate it with Amazon S3 to avoid this bottleneck and offload large files, attachments, and historical info. This ensures that Salesforce stays lightweight and fast while maintaining seamless access to essential records.
S3 is designed for unlimited storage and scalability, meaning companies never need to think about running out of space or hitting limits as their data expands. This integration also ensures smooth connectivity with other AWS services. So, it’s easy to extend data workflows and analytics beyond Salesforce.
Compliance and Data Retention
Industries like finance, healthcare, and legal sectors must meet data retention and compliance regulations. They may keep all historical records in Salesforce, but it’s costly and inefficient. So, moving them to S3 ensures long-term storage that meets regulatory requirements.
Amazon S3 offers encryption, access controls, and versioning, making protecting sensitive data easier and maintaining compliance. Businesses can also set automated lifecycle policies, ensuring old or unnecessary info is archived or deleted based on retention rules.
Cost Optimization and Storage Efficiency
As data grows, we pay more. In this case, Salesforce charges high fees for additional storage. Keeping files and records in Amazon S3 instead of Salesforce helps reduce storage fees significantly while still having data accessible when needed.
We may decrease payments by moving less frequently accessed data to lower-cost storage classes, like S3 Glacier, for long-term archiving and optimizing costs with S3’s tiered storage options.
So, organizations only pay for the storage they actually use, and data management has become more efficient and budget-friendly.
By integrating Salesforce with Amazon S3, users can improve scalability, reduce costs, and maintain compliance without compromising data accessibility.
How to Set Up Salesforce to AWS S3 Integration
This section will consider two popular options for connecting Salesforce with Amazon S3.
- Amazon AppFlow easily automates data transfers without writing code.
- Skyvia’s Cloud Data Import Tool provides data migration, transformation, and scheduling flexibility.
Each approach has benefits, depending on your need for automation, customization, or real-time syncing.
In this guide, we’ll break down both methods so organizations can choose the best solution for their business and start syncing Salesforce with S3 in no time.
Using Amazon AppFlow
Amazon Web Services’ native method of transferring data from Salesforce to S3 is Amazon AppFlow. It offers users an integration platform to transfer data from 3rd party applications to Amazon S3.
Note: To perform a transfer using AppFlow, create a Salesforce developer account connected to the organization in which you want to transfer the data.
Then, perform the following steps.
- Create an S3 bucket to hold the data from Salesforce.
- Open the Amazon AppFlow from the AWS console and create a new flow.
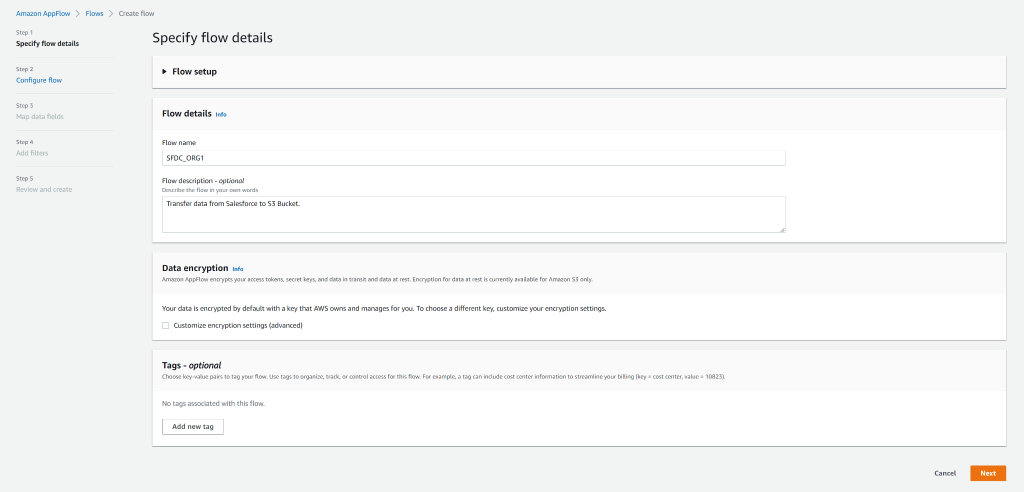
- Provide the flow details and select the data encryption options and flow tags.
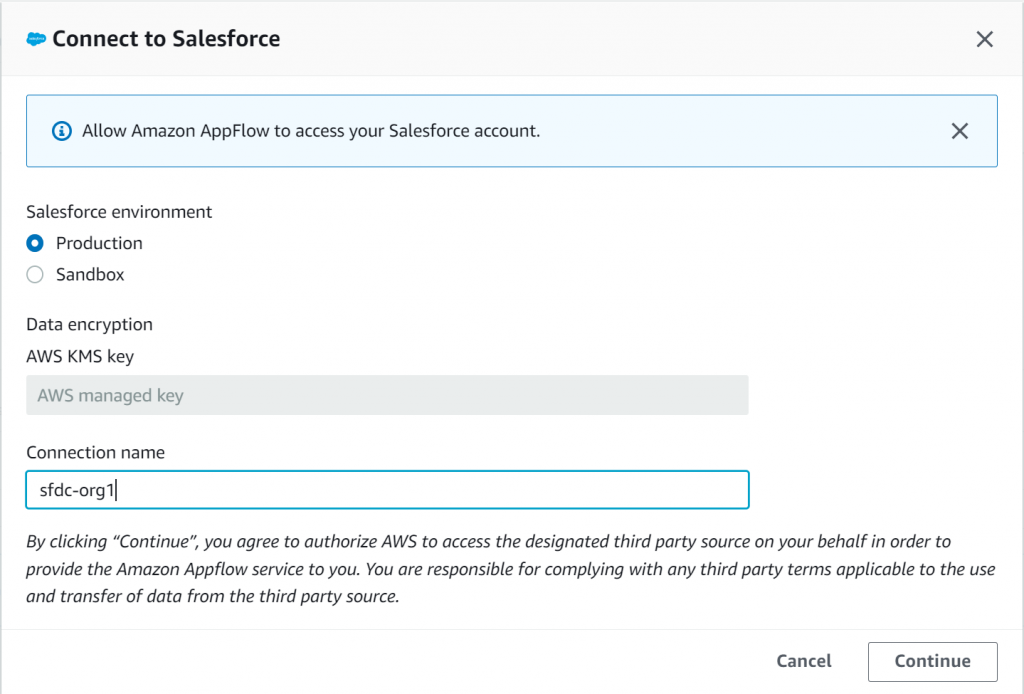
- Select Salesforce as the data source, click Connect, specify the Salesforce environment type and connection name, and log into the Salesforce developer account.

- Choose either Salesforce objects or events and select the desired option from the list.

- Select the destination as Amazon S3, specify the destination bucket, and configure additional settings as required.

- Choose the flow trigger, either manual or based on a schedule, then go to the next page.

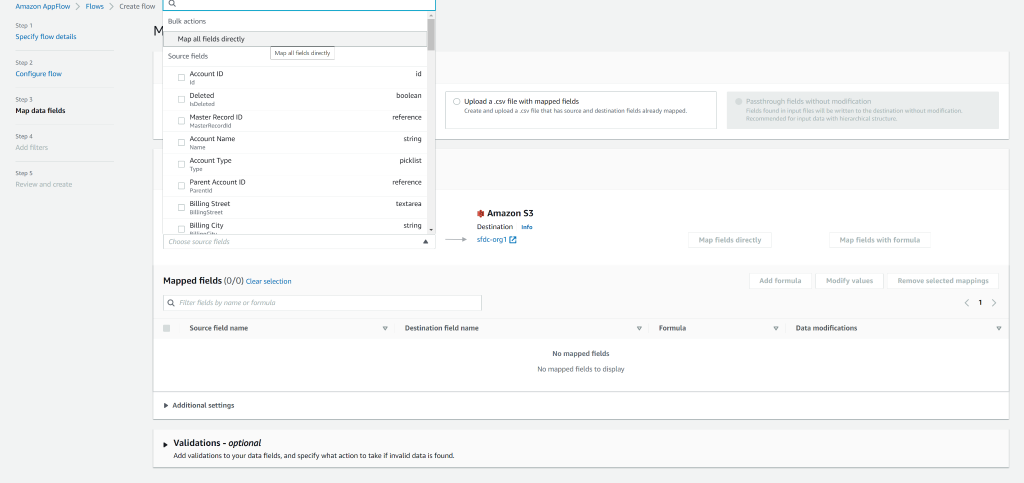
- Configure the mapped data fields by selecting Map all fields directly or by choosing source fields manually in the Choose source fields drop-down menu.
- Specify any data validations and then continue to the next page.
- Finally, create any necessary filters, then continue to review and create the flow.

Note: Read more in the AWS documentation on transferring data from Salesforce to Amazon S3 using Amazon AppFlow.
Using Cloud Data Import Tool: Skyvia
Another popular approach to moving data from Salesforce to S3 is using a convenient, no-code, and user-friendly cloud data integration tool like Skyvia.
Beyond working with cloud platforms, it supports hybrid environments and legacy systems, offering flexibility for businesses with complex infrastructures. The platform provides 200+ pre-built connectors for popular cloud services, APIs, endpoints, ODBC, and other integration methods, ensuring seamless data exchange across different systems.
The platform integrates with modern cloud applications, on-premises databases, and custom-built systems.
Skyvia offers ETL, ELT, reverse ETL, replication, data warehousing, synchronization, and complex data flows, including more than two data sources. Automated data pipelines, transformations, and scheduling simplify data migration while maintaining security and reliability.
Let’s review the common scenario of data export from Salesforce to AWS S3 using Skyvia:
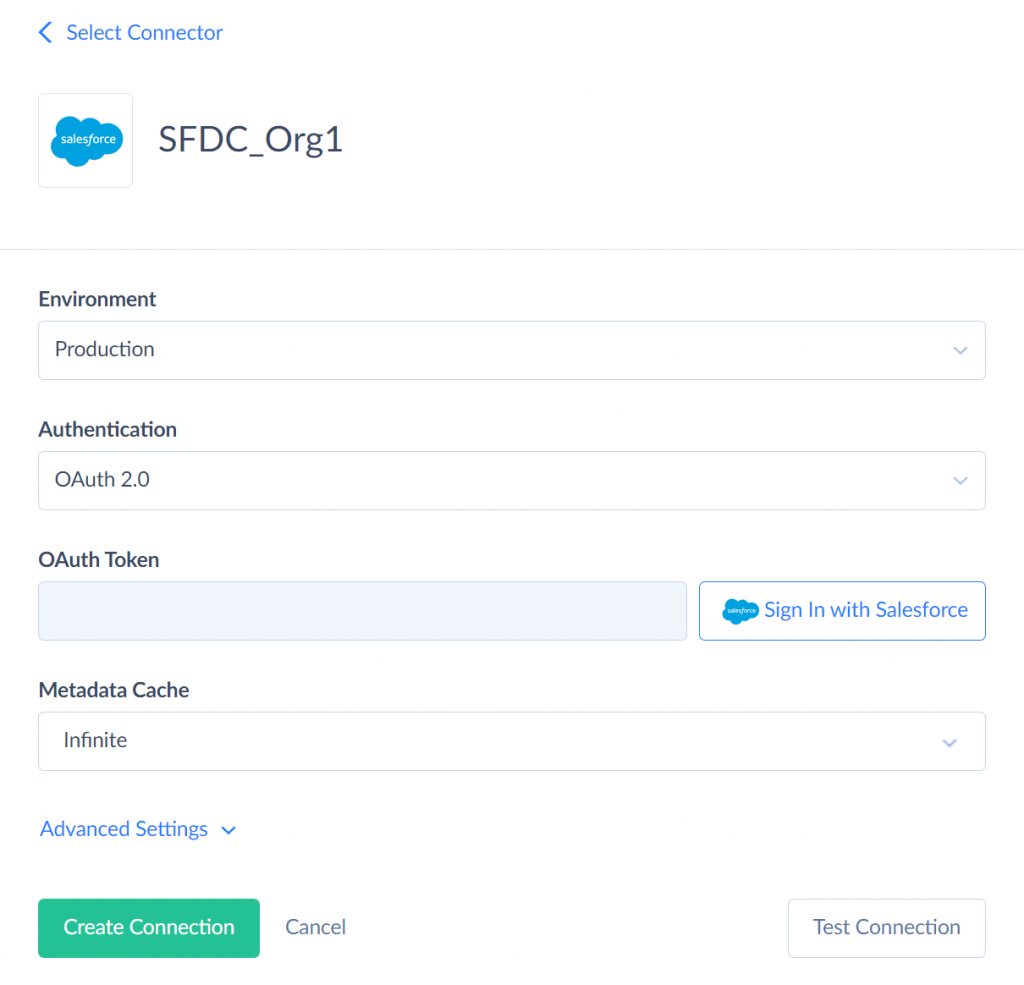
- Go to the Skyvia sign-up and create a new Salesforce connection, specifying the environment, choosing OAuth 2.0 as authentication, and cache settings, then click Sign In with Salesforce and click Create Connection.
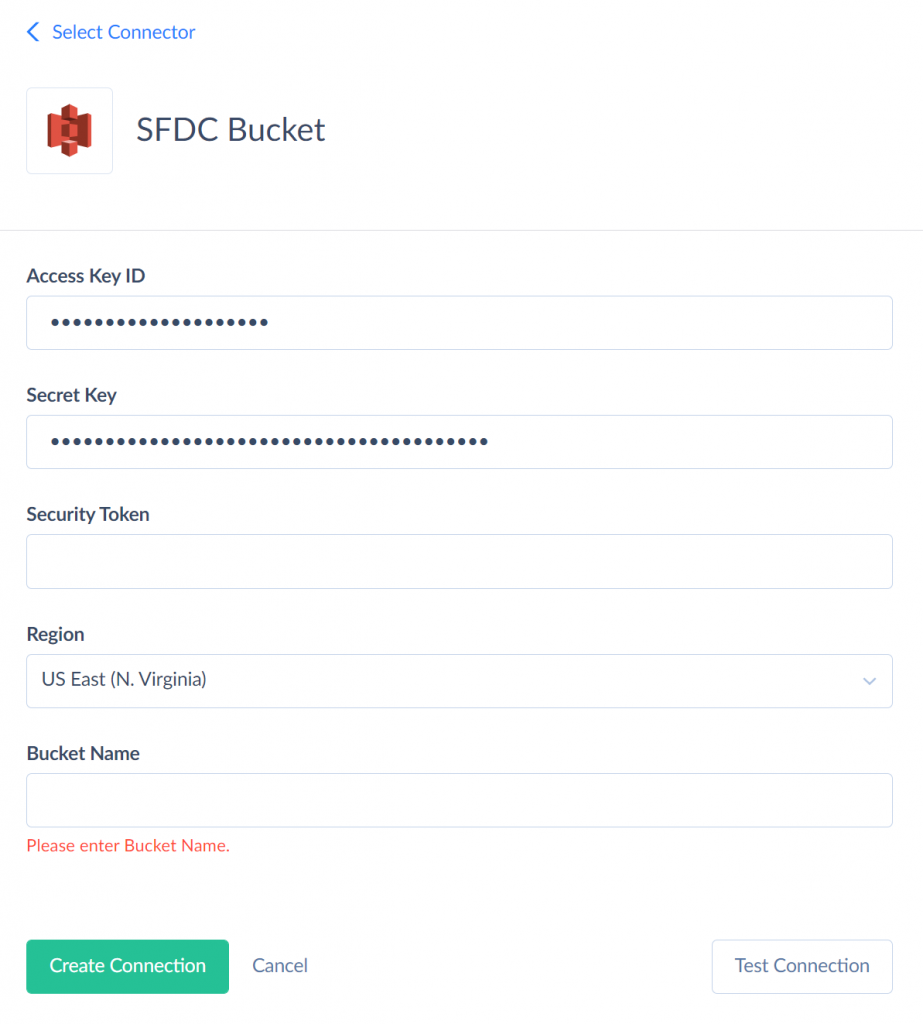
- Create a new Amazon S3 connection providing your IAM Access keys, which can be found under the IAM Management Console within the AWS Console.
- Choose the correct region, type in the name of the destination bucket, and click Create Connection again.
- Create a new export integration package.
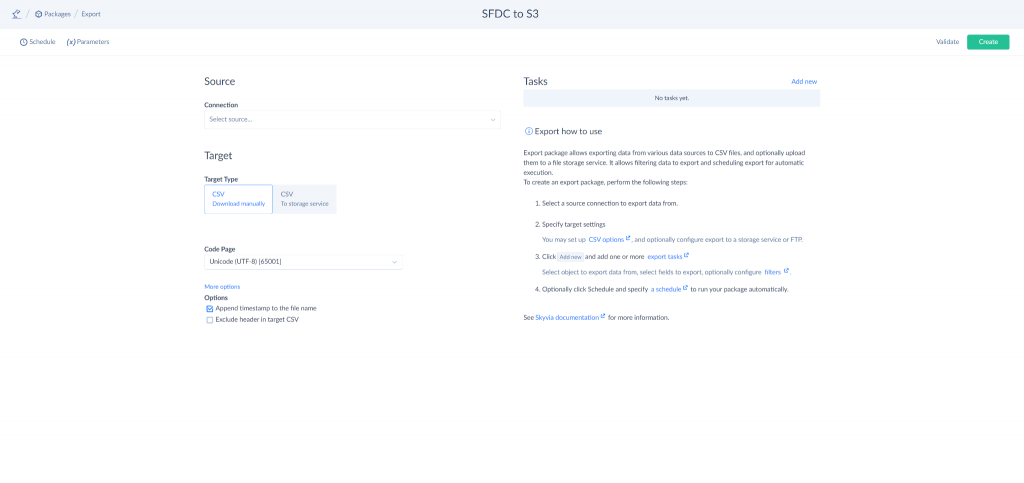
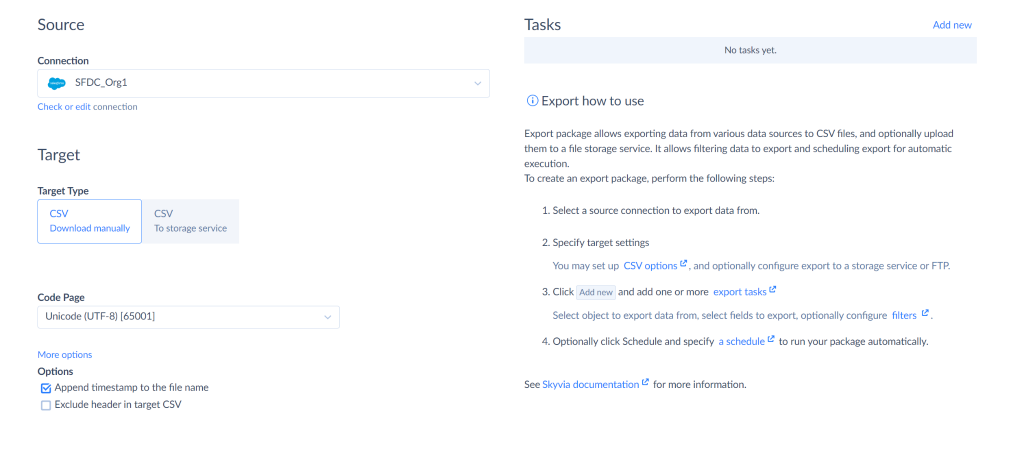
- Select the Salesforce connector from the connection list.
- Change the target type to CSV To storage service, then select the Amazon S3 connector created earlier.
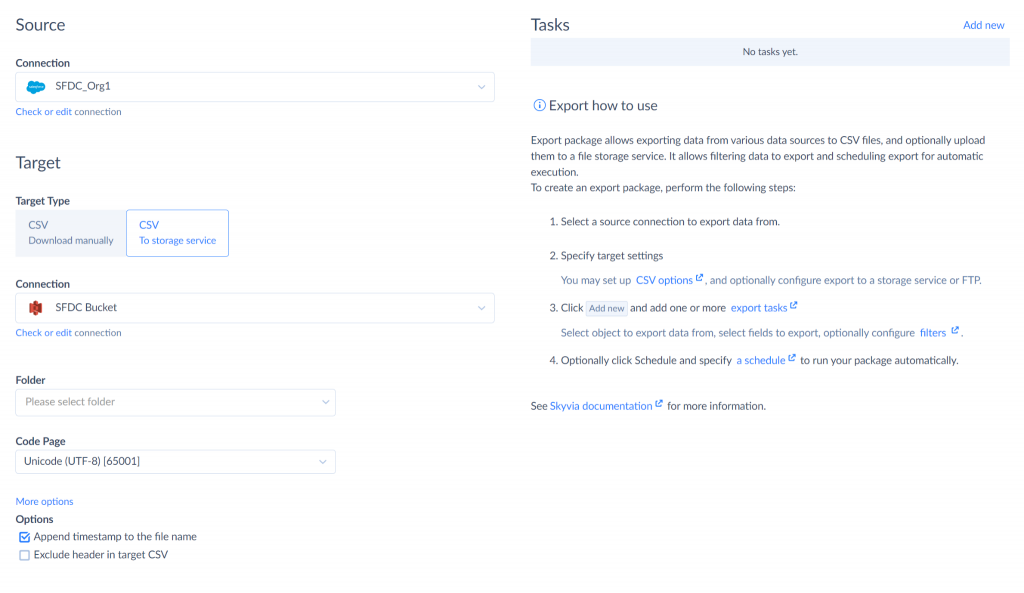
- Specify the desired folder, code page, and options if required, then add a new task.
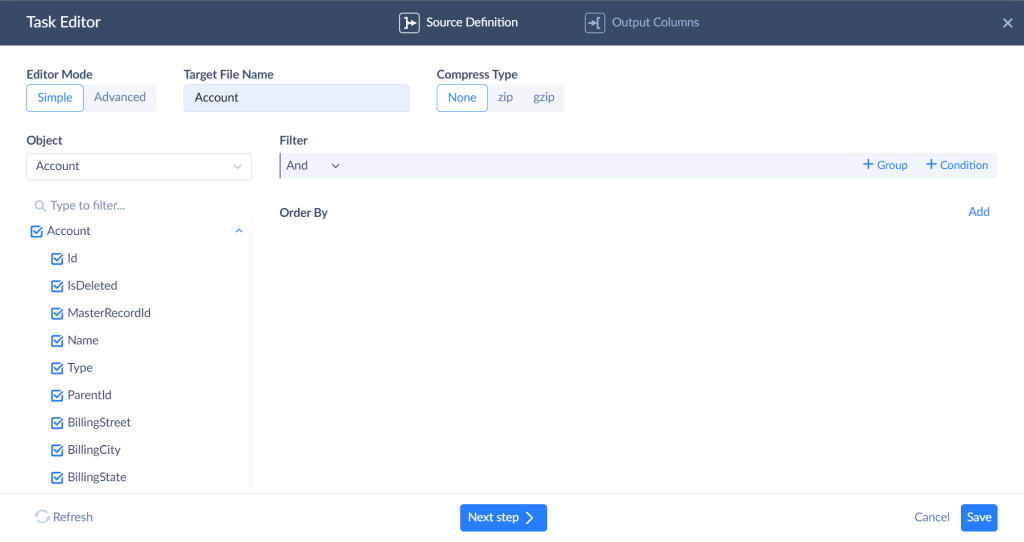
- In the Task Editor menu, select the desired object and properties from Salesforce, define a file name, filters, order by rules, and compression settings, and then save the task.
- Finally, save the export packages and run the export as desired, or schedule the run times via the package schedule menu.

Why Choose Skyvia Over Amazon AppFlow?
If we compare Skyvia’s ability for cloud data integration and Amazon AppFlow, the first one is more flexible and powerful for integrating Salesforce with Amazon S3.
It’s one of the most popular no-code ETL tools because of its usability and simplicity, even for users without technical skills.
The platform:
- Allows customized data transfers.
- Supports multiple Salesforce objects in a single export.
- Provides advanced filtering, SQL-based queries, built-in file compression, and reusable connections.
These capabilities make Skyvia the better choice for businesses needing more control, efficiency, and customization in their data integration.
Use Cases for AWS Salesforce Connector with Amazon S3
- Offloading attachments and large files from Salesforce. Salesforce storage costs can rise quickly, especially when talking about large attachments, contracts, and media files. However, companies may reduce storage expenses by offloading these files to Amazon S3 while keeping the data accessible through Salesforce when needed.
- Automated Backups and Data Archiving. Companies need to regularly back up Salesforce information to prevent its loss and meet compliance requirements. With Amazon S3, businesses can automate backups, store historical records securely, and ensure long-term data retention without Salesforce’s storage limits.
- Analytics and Business Intelligence. Salesforce’s built-in reporting works well for basic insights, but businesses often need deeper analysis and large-scale data processing. By syncing Salesforce data to Amazon S3, companies can use AWS analytics tools like Athena, Redshift, and QuickSight to uncover trends, predict outcomes, and gain more advanced business insights.
- Customer Data Synchronization Across Platforms. For companies using multiple cloud applications, syncing Salesforce data to S3 enables centralized data storage. This integration helps businesses merge Salesforce data with ERP, finance, or marketing platforms, ensuring a single source of truth across all departments.
- Compliance and Regulatory Data Storage. Finance, Healthcare, Legal services, etc., require strict data retention policies. Keeping Salesforce records in Amazon S3 ensures secure, long-term storage, supports audit trails, and helps businesses comply with GDPR, HIPAA, and other regulations.
Conclusion
If you’re looking to optimize storage, automate data management, and improve scalability, integrating Salesforce with Amazon S3 is a smart deal. People may need to offload attachments, back up critical records, or enhance analytics; in any case, this integration ensures cost-effective and secure data handling. Tools like Amazon AppFlow offer a quick, no-code setup, while Skyvia’s cloud data integration capabilities may additionally provide greater flexibility and customization for complex data needs. By syncing Salesforce data with S3, companies can:
- Reduce storage costs.
- Improve accessibility.
- Maintain compliance with industry regulations.
No matter the approach, this integration helps businesses streamline workflows, ensure data consistency, and unlock deeper insights.
FAQ for Salesforce and Amazon S3
What are the best methods for integrating Salesforce with Amazon S3?
Two common approaches are Amazon AppFlow, a no-code automation tool, and Skyvia’s Cloud Data Import Tool, which offers more customization, transformation options, and scheduling flexibility.
Can I automate data transfers between Salesforce and Amazon S3?
Yes. Amazon AppFlow and Skyvia allow for scheduled or event-triggered data transfers, ensuring data moves automatically without manual intervention.
How does this integration help with compliance and data retention?
Amazon S3 provides secure, long-term storage with encryption, audit trails, and lifecycle policies, helping businesses meet GDPR, HIPAA, and other regulatory requirements while keeping historical Salesforce data accessible.
Will this integration impact Salesforce performance?
Yes, in a positive way. Businesses can free up Salesforce storage by offloading large files and historical data to S3, improving system performance and cost efficiency.
Can I use this integration for analytics and reporting?
Absolutely. Storing Salesforce data in Amazon S3 allows integration with AWS analytics tools like Athena, Redshift, and QuickSight, enabling advanced reporting, trend analysis, and forecasting.
How do I choose the right integration method?
If you need a simple, no-code solution, Amazon AppFlow is a great choice. If you require more flexibility, customization, and control over data transformation, Skyvia’s Cloud Data Import Tool is a better option.


