

There’s a trick in extending HubSpot’s reporting and automation capabilities beyond what’s available. It can be extended even beyond HubSpot’s highest pricing tier. The trick? Linking HubSpot to MySQL!
It could be the game-changer you’ve been looking for to manage customers, sales, and marketing. This article will teach you the basics of integrating HubSpot with MySQL.
Table of Contents
- What is HubSpot?
- What is MySQL?
- What is HubSpot to MySQL Integration, and How Does it Benefit Businesses?
- Use Cases for HubSpot Integration with MySQL
- Methods to Connect HubSpot and MySQL
- Conclusion
Let’s dive in.
What is HubSpot?
HubSpot positions itself as an AI-powered customer platform with all the software needed to connect marketing, sales, and customer service. Its features include automating marketing, managing content, closing deals, scaling support, automating billing, and more.
Businesses new to HubSpot can start quickly and easily because of its clean and simple interface and fast setup. If you are still skeptical, you can try the free tier first. It’s a free CRM with email tracking, deal tracking, reporting, and live chat. These are available without forcing you to upgrade.
Since we are on the topic of integrating HubSpot to MySQL, it has native import and export tools, too. It is also developer-friendly as it offers you a developer account.
What is MySQL?
MySQL is a popular open-source relational database that powers many websites and systems. It is part of the top 5 in databases based on the rankings in StackOverflow and DB-Engines. MySQL is best for structured data and complex queries.
Your business can benefit by using MySQL as a data warehouse or data store for your operational system. Its large community is already an assurance that you will have the support you need to use MySQL to the fullest.
What is HubSpot to MySQL Integration, and How Does it Benefit Businesses?
Integrating your customer data in HubSpot to a relational database like MySQL means you will link the two to drive your business further with new features. If you’re integrating into an operational system powered by MySQL, you can streamline some of your operational procedures and save on costs.
What can you get out of this integration?
- Unified view of customer data.
- Improved marketing automation.
- Enhanced data management for better decision-making.
The following features are not available at the time of writing, even if you’re in the highest pricing tier in HubSpot:
- Deep Customer Segmentation & Lifetime Value (CLV) Analysis: HubSpot lets you segment customers, but not at a granular level across multiple data sources. MySQL allows complex joins across sales, marketing, support, and finance data for real CLV analysis.
- Real-Time Alerts & Automation Based on SQL Queries: HubSpot has workflow automation, but you can’t trigger alerts based on complex SQL conditions. MySQL allows real-time alerts (e.g., if lead engagement drops suddenly).
- Churn Prediction & AI-Based Analysis: There’s no built-in AI churn prediction in HubSpot. MySQL enables machine learning models to analyze churn risk based on behavior and sentiment data.
The above should give you an idea of why integrating the two systems can level up your business with more features for decision-making.

Use Cases for HubSpot Integration with MySQL
You might be wondering what more useful stuff you can do with integrating MySQL with HubSpot. From application integration to process automation to business intelligence, you will find this treasure nugget worth the effort for your business.
Below are some of them:
Enhanced Data Synchronization
You might be using HubSpot and another system using MySQL to run your day-to-day business. If they have copies of the same customer information, it’s a good idea to sync them and avoid inconsistent copies.
Data synchronization will make sure both have the same copies of customer records. This is also automated to avoid discrepancies and human errors. This will ensure both systems have up-to-date customer information. It can be done with regular or real-time syncs, depending on your requirements.
Example: Real-time updates of customer profiles between HubSpot and a legacy, custom-built system.
Advanced Reporting and Analytics
MySQL can host a data warehouse or data marts for customer data, sales, marketing, and more. You can periodically update them from HubSpot using your tool of choice. From there, you can create a dashboard and other analytical reports.
Example: Monitor customer loyalty and churn through a Power BI dashboard that connects to a MySQL data warehouse. A daily integration job runs to update the data warehouse from HubSpot.
Streamlined Sales Processes
Sync HubSpot sales data to MySQL using an integration tool. Then, using MySQL queries, you can automate processes that will handle custom customer alerts and communication.
Example: Automated lead scoring and follow-up reminders based on synchronized data.
Methods to Connect HubSpot and MySQL
Next, we’ll discuss the tools you can use to connect HubSpot to MySQL. There are tools built within HubSpot and APIs are available for extra flexibility. Third-party tools, on the other hand, can offer easy but flexible integrations.
Below is a comparison table for the different methods we’re going to discuss:
| Method Group | Method | Best For | Skill Level | Customizability |
|---|---|---|---|---|
| Native | HubSpot Manual Import/Export | Simple, occasional data transfers | Beginner | Low |
| Operations Hub | Syncing with supported cloud apps and services | Beginner | Low | |
| Custom Coding | API-Based | Full control over data transformation and flow | Advanced | Very High |
| Third-Party | No-Code (e.g., Skyvia, Talend, Apache Nifi) | Quick implementation and companies without dedicated developers. | Intermediate | Medium to High |
Let’s discuss each below.
Method 1. HubSpot Manual Import & Export
These are native methods to move data in and out of HubSpot. It will help you populate data manually from flat files like CSV. You can also make a quick backup of contacts, deals, and more or share them with another application for reporting and analysis.
You can share flat files from and to MySQL by using an external tool to import and export.
Pros
- Ease of Use: It’s plain and simple. You just upload or download a file. No heavy coding is required.
- Quick Data Migration: If you’re switching systems or want a quick backup, it works fast.
- Control Over Data: You decide what to import or export. It’s like choosing which files to keep or share.
- Flexibility: You can use exported data in any tool that supports CSV, Excel, or similar formats.
Cons
- Manual Process: It’s not automated by default. You often have to run imports or exports manually, which can be time-consuming if done frequently. Since HubSpot Export produces flat files, you need an external tool to import these files to MySQL. Importing to HubSpot requires the external tool to export the records to flat files first. You also can’t operate on contacts, deals, and other records at once. You have to do it one by one.
- Data Mapping Challenges: The fields in your file need to match HubSpot’s fields. If they don’t line up, you might see errors or missing info.
- Limited Real-Time Sync: Since you’re manually handling the files, it doesn’t provide real-time updates between systems.
- Data Size Constraints: Very large datasets might require extra care or chunking to avoid errors.
Best For
The HubSpot Import and Export is best for ad hoc import and export requirements. For more details, check out HubSpot’s documentation for Import and Export.
How to Manually Import Data to HubSpot
Importing records from MySQL to HubSpot using the manual HubSpot Import needs two stages:
- Export records from MySQL to a flat file like CSV.
- Import the files to HubSpot.
There’s no direct import.
Let’s say you want to import a list of new contacts. The following are the steps to do it:
- Open your MySQL tool (e.g., dbForge Studio for MySQL) or an operational system using MySQL that will export to a CSV file. Note the location of the CSV file.
- Sign in to HubSpot and point your mouse to CRM in the Navigation pane.
- Click Contacts, then click Add Data from the upper right corner of the page.
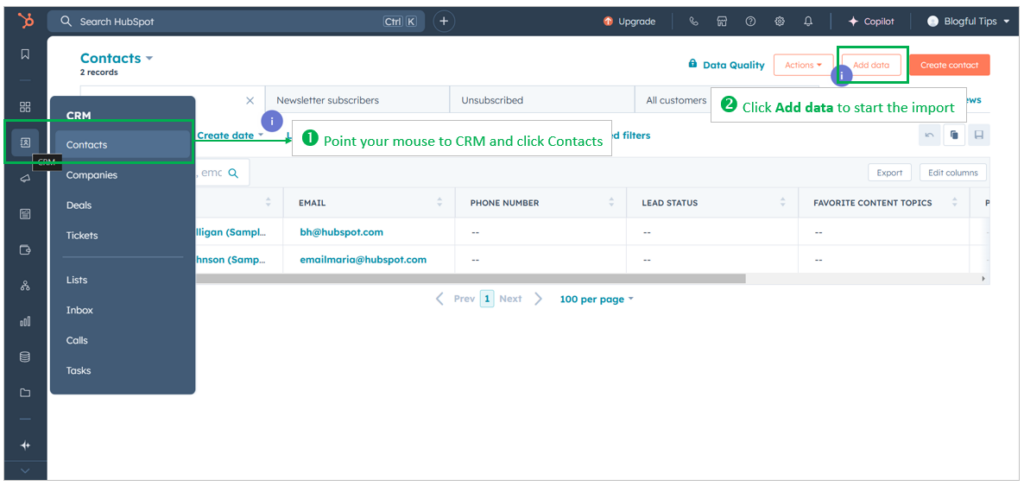
- On the next page, click Import a File.
- Click Start Import on the next page.
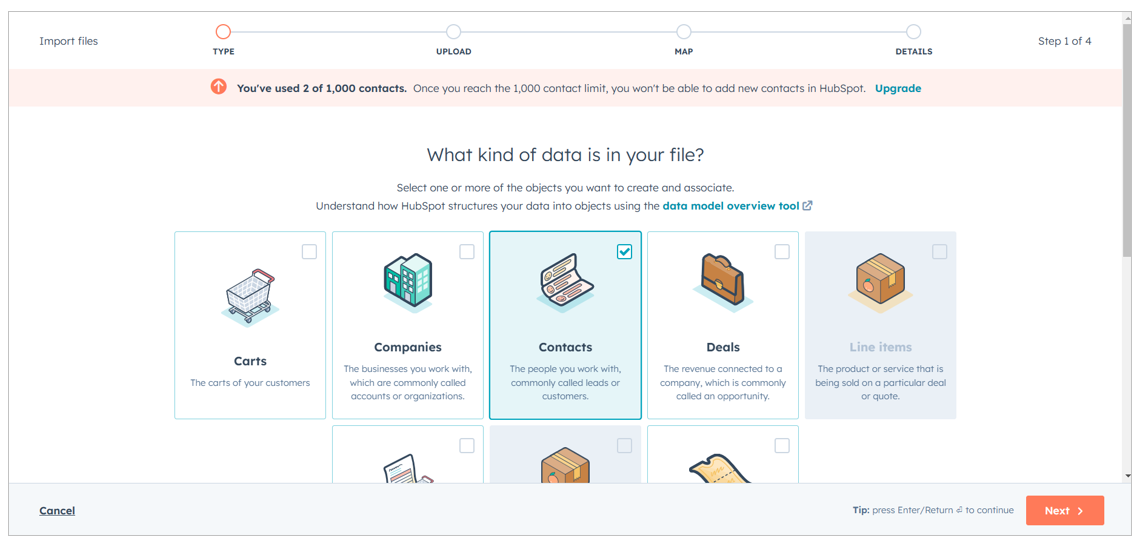
- The next page will ask you what kind of data is in your file. Mark checked the Contacts box, then click Next.
- Click Choose a File, locate your CSV file, and click Open.
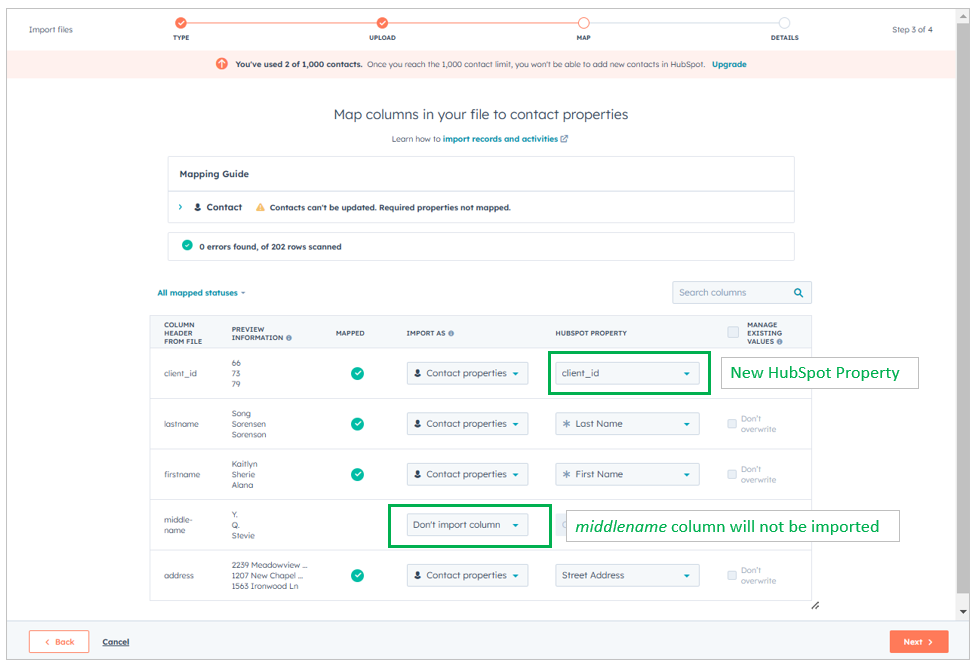
- Map the CSV columns to HubSpot contacts columns. Specify Don’t import column if you don’t want to import one or more columns. The rest should map to the correct HubSpot column or create a new HubSpot property. Click Next to proceed.
- Mark checked the Create a contacts list for this import, and the I agree that all contacts in this import are expecting to hear from my organization…
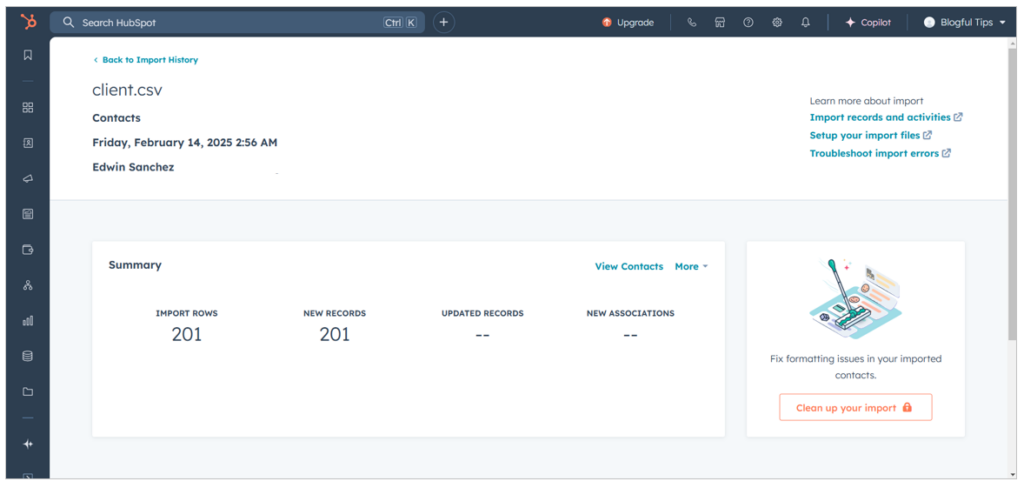
- Click Finish Import. Once the import is done, you will see how many rows were imported.
How to Manually Export Data from HubSpot
Exporting HubSpot data to MySQL also needs two stages, such as manual import. First, export the data from HubSpot, then import the flat file in MySQL using a tool. Follow the steps below:
- Sign in to your HubSpot account and navigate to CRM -> Contacts.
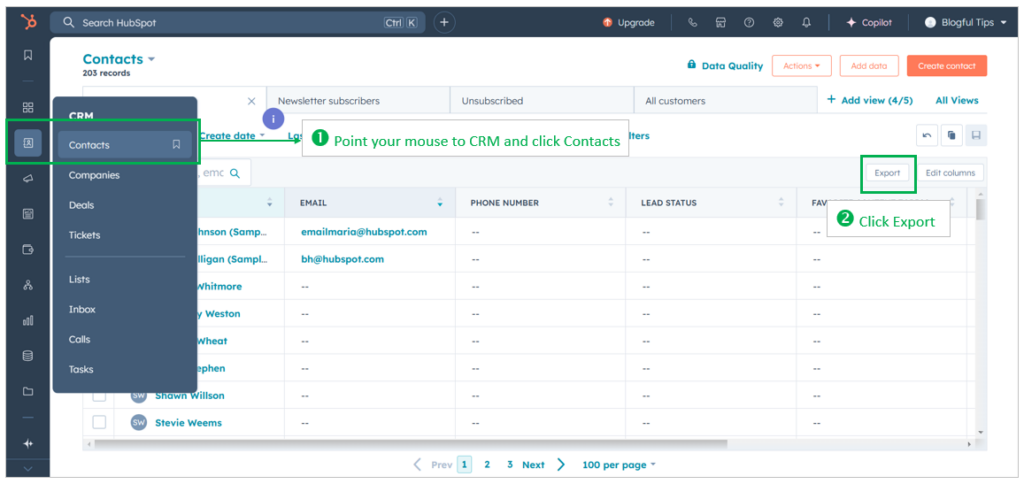
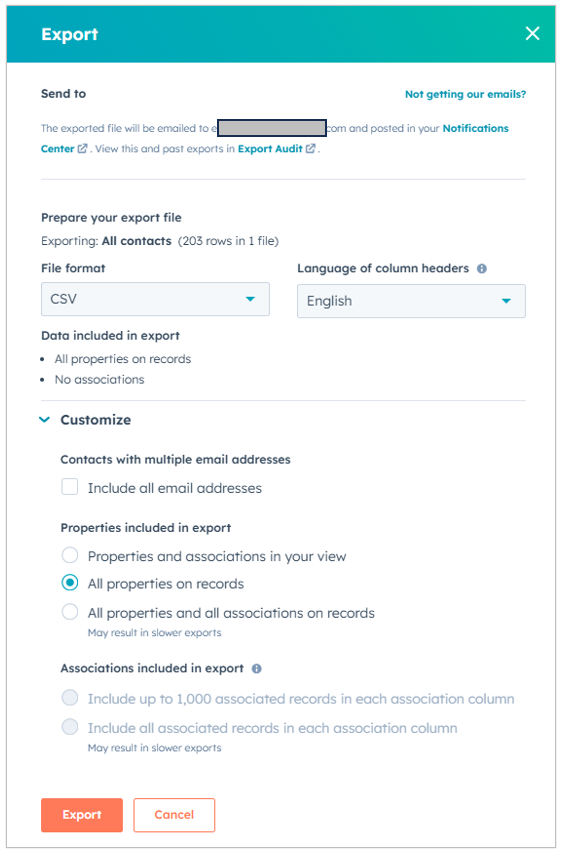
- Click Export, and in the pop-up window, click Customize.
- Mark checked All properties on records. This will avoid associated columns outside of Contacts.
- Click Export. An email will be sent to your HubSpot registered email address.
- Download the CSV file from your email client and using a MySQL tool, import the CSV file to your MySQL table. Use a tool with powerful column mappings like dbForge Studio for MySQL.

Method 2. Native HubSpot Tools (Operations Hub Data Sync)
Data Sync from HubSpot’s Operations Hub is an out-of-the-box, code-free integration package that allows two-way and historical syncing. HubSpot realizes that teams can use different tools, and to avoid silos, they need to sync. So, this tool emerged as a better option for the manual import and export tool.
Data Sync keeps HubSpot and external systems up to date in auto-pilot.
Pros
- Ease of Use: It’s built right into HubSpot. There’s no need for heavy coding or installation of another app.
- Time Saver: Unlike HubSpot’s Import and Export, this automates the sync process, so you don’t spend hours on manual updates.
- Reliability: Being a native feature, it’s designed to work smoothly with HubSpot.
- Security: Data Sync sits in HubSpot’s strong security standards to keep your data safe.
Cons
- Limited Customization: It might not let you tweak every little detail. For highly specific needs, you might need an API-based solution or a third-party tool (discussed later).
- Plan Restrictions: The full range of features may only be available on paid tiers. The free version might give you only the basics.
- Complex Setups: While basic sync is simple, setting up advanced scenarios can be a bit tricky.
Best For
HubSpot’s Data Sync is best for basic syncing requirements with supported apps and services. For complex scenarios, you may need an efficient third-party ETL tool like Skyvia that allows automated syncs to MySQL.
For more information, check out HubSpot’s Operations Hub Data Sync documentation.
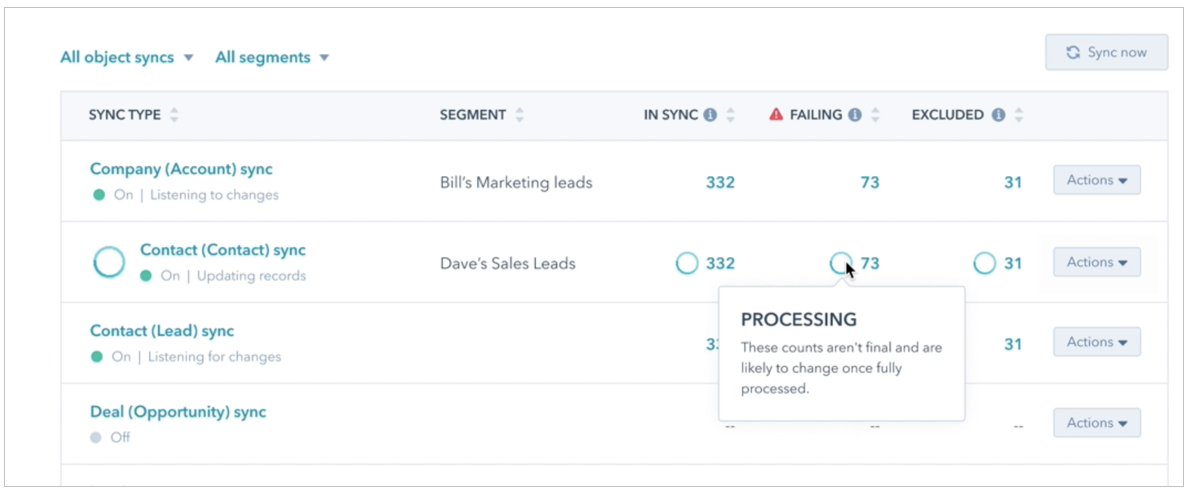
How to Create a Sync in HubSpot
Using HubSpot Data Sync requires an app from the HubSpot Marketplace. It depends on your selected app if it will support which data source, including MySQL. HubSpot can do one-way or two-way syncs.
Follow the steps below:
- Install the app in HubSpot. You can get the app from the HubSpot Marketplace or from Data Management ->Import & Export.
- In your HubSpot account, navigate to Data Management > Integrations.
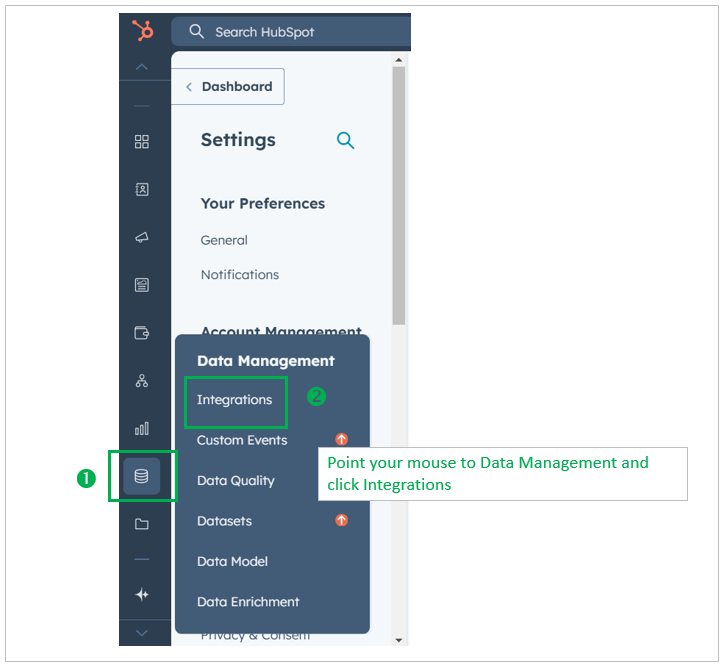
- Click the app you installed. The app should be capable of connecting to your MySQL database.
- Click Set up your sync.
- On the Select the data you want to sync page, choose the object to sync to or from in the app and the HubSpot object you want to sync to or from in HubSpot (e.g., Contacts, etc.).
- Select whether the sync is bi-directional or one-way between the app and HubSpot or vice versa.
- Map the HubSpot columns to your MySQL database.
- Set up the sync rules. By default, only records with a valid email address will sync. You have the option to sync even those without an email address. You can also limit the sync if you want to update only the existing contacts in HubSpot or add new ones.
- Review the rules you configured, then click Save and Sync. The initial sync will begin.
Method 3. API-based Integration
Integration using HubSpot APIs uses a programming language like Python or TypeScript to call HubSpot APIs and MySQL data access libraries to sync data. This allows full flexibility in syncing HubSpot to MySQL but requires coding skills from your team. You can build tailored solutions that native and third-party tools cannot provide.
Pros
- Flexibility: You can fully customize what data to move and when.
- Automation: Reduce manual work by scheduling regular API calls.
- Scalability: Handle large datasets with a flexible programming solution.
Cons
- Complexity: Requires coding, proper error handling, and best practices. If you don’t have someone in your team with these skills, you’re better off using native or third-party tools.
- API Rate Limits: You need to design around HubSpot’s call limits.
- Maintenance: Code needs updates if APIs change or if there’s a new requirement.
Best For
Using coding methods and API-based integration is best for requirements tailored to your organization.
How to Import Data to HubSpot from MySQL Using API-based Integration
Below is a sample code for importing HubSpot customer data to MySQL. Let’s say you have a MySQL table for customer profiles with a structure like this:
CREATE TABLE customers (
    id INT AUTO_INCREMENT PRIMARY KEY,
    hubspot_id VARCHAR(50) NOT NULL,
    email VARCHAR(255),
    firstname VARCHAR(50),
    lastname VARCHAR(50),
    created_at TIMESTAMP DEFAULT CURRENT_TIMESTAMP
);
The above table already uses a primary key and a HubSpot ID that connects each table row to a HubSpot customer record.
The following is a Python code for the import process:
import requests
import mysql.connector

# HubSpot API key
HUBSPOT_API_KEY = 'your_hubspot_api_key_here'

# MySQL connection details
MYSQL_CONFIG = {
    'user': 'your_mysql_username',
    'password': 'your_mysql_password',
    'host': 'localhost',
    'database': 'your_database'
}

def fetch_customers_from_mysql(cursor):
    cursor.execute("SELECT hubspot_id, email, firstname, lastname FROM customers")
    return cursor.fetchall()

def update_customer_in_hubspot(customer):
    hubspot_id, email, firstname, lastname = customer

    # Access HubSpot API for Contacts
    url = f"https://api.hubapi.com/crm/v3/objects/contacts/{hubspot_id}?hapikey={HUBSPOT_API_KEY}"
    payload = {
        "properties": {
            "email": email,
            "firstname": firstname,
            "lastname": lastname
        }
    }
    headers = {"Content-Type": "application/json"}
    response = requests.patch(url, json=payload, headers=headers)
    if response.status_code == 200:
        print(f"Updated customer {hubspot_id} successfully.")
    else:
        print(f"Failed to update customer {hubspot_id}. Status code: {response.status_code}")

def main():
    # Connect to MySQL
    cnx = mysql.connector.connect(**MYSQL_CONFIG)
    cursor = cnx.cursor()

    customers = fetch_customers_from_mysql(cursor)

    for customer in customers:
        update_customer_in_hubspot(customer)

    cursor.close()
    cnx.close()

if __name__ == '__main__':
    main()
The code above is a simple example of an import from MySQL to HubSpot.
The code uses the requests and mysql.connector libraries to interact with HubSpot and your MySQL database. You must replace the HUBSPOT_API_KEY with yours and the MYSQL_CONFIG with your MySQL database credentials and configuration.
The function fetch_customers_from_mysql uses a SELECT statement from your MySQL customer table using the table structure earlier. You may need to modify this statement, like adding a WHERE clause to filter rows. Or an ORDER BY clause to sort. Note that the sample above will update HubSpot customer records. You need to code further to update the hubspot_id column in MySQL after inserting new customer records into HubSpot.
The update_customer_in_hubspot function will call the HubSpot API to update customer records.
The main function will call the fetch_customers_from_mysql to query your customer records from MySQL, loop through the rows, and call update_customer_in_hubspot for each row. Note that this does not handle API limits yet.
How to Export Data from HubSpot to MySQL Using API-based Integration
The next code sample will export data from HubSpot to MySQL. It will use the same MySQL table structure sample earlier.
import requests
import mysql.connector

# HubSpot API key
HUBSPOT_API_KEY = 'your_hubspot_api_key_here'

# MySQL connection details
MYSQL_CONFIG = {
    'user': 'your_mysql_username',
    'password': 'your_mysql_password',
    'host': 'localhost',
    'database': 'your_database'
}

def fetch_customers_from_hubspot():
    # Access HubSpot API for Contacts
    url = f'https://api.hubapi.com/crm/v3/objects/contacts?hapikey={HUBSPOT_API_KEY}'
    response = requests.get(url)
    if response.status_code == 200:
        data = response.json()
        return data.get('results', [])
    else:
        print("Failed to fetch data:", response.status_code)
        return []

def insert_customer_into_mysql(cursor, customer):
    # Extract sample customer fields
    customer_id = customer.get('id')
    properties = customer.get('properties', {})
    email = properties.get('email')
    firstname = properties.get('firstname')
    lastname = properties.get('lastname')
    sql = """
        INSERT INTO customers (hubspot_id, email, firstname, lastname)
        VALUES (%s, %s, %s, %s)
    """
    cursor.execute(sql, (customer_id, email, firstname, lastname))

def main():
    # Fetch customer data from HubSpot
    customers = fetch_customers_from_hubspot()

    # Connect to MySQL
    cnx = mysql.connector.connect(**MYSQL_CONFIG)
    cursor = cnx.cursor()

    for customer in customers:
        insert_customer_into_mysql(cursor, customer)

    cnx.commit()
    cursor.close()
    cnx.close()

if __name__ == '__main__':
    main()
The code above uses the same Python libraries. It also uses the same HubSpot API key and MySQL configuration that you need to replace.
The fetch_customers_from_hubspot function will fetch HubSpot customers and return them in JSON format. Meanwhile, the insert_customer_into_mysql will insert a row in the MySQL table using an INSERT statement. The main function will handle the call to fetch_customers_from_hubspot, loop through each customer, and call insert_customer_into_mysql.
Method 4. No-Code Integration
No-code integration uses third-party tools with a graphical user interface. Some tools have a drag-and-drop builder for your data — no deep coding is required. It lets you connect HubSpot to MySQL with a few clicks and minimal fuss. It usually follows an ETL process where you extract, transform, and load records to your target.
If you don’t have a developer team, this will be your go-to solution if the native tools don’t fit your requirements.
Many tools offer an intuitive interface where you can map HubSpot fields (like email, firstname, lastname) to your MySQL columns with a simple drag-and-drop or dropdown lists. It will also let you schedule the integration runtime so you can sit tight and have the integration package do its thing. The next morning, you can check the logs and see if things went well or not.
Popular tools include:
- Skyvia: A 100% cloud data integration platform that offers simple to complex integrations using a graphical, drag-and-drop interface. Integrations include HubSpot and MySQL.
- Apache Nifi: An open-source data integration tool that offers a client app with a graphical interface to design data pipelines.
- Talend: Another cloud integration platform with various commercial offerings for different data management tasks.
Some use case examples include marketing teams needing custom segmentation and targeted campaigns. To do this, the setup should include a MySQL data warehouse. Sales teams, on the other hand, can use it to monitor pipeline performance and forecast sales.
Pros
- Ease of Use: No coding required. Perfect for non-techies.
- Quick Setup: Get your integration running in minutes with guided, visual workflows.
- Reduced Manual Errors: Automated syncs cut down on human mistakes from manual imports/exports.
- Lower Maintenance: Once configured, the system runs on its own without constant developer intervention.
Cons
- Limited Customization: Depending on the tool, advanced, complex workflows may be hard to configure compared to custom API integrations.
- Scalability Concerns: Some no-code tools might struggle with very large datasets or highly intricate data structures.
- Third-Party Dependency: You rely on the no-code platform’s uptime and features. If they change or go down, your integration could be affected.
- Potential Additional Costs: Many no-code platforms work on a subscription model. Costs might add up as your needs grow.
Best For
No-code integration is best for quick implementation and companies without dedicated developers.

How to Integrate HubSpot to MySQL Using Skyvia
Skyvia is a no-code data platform that offers data syncs, import, export, backup, and more. You can make your integrations in Skyvia conveniently and easily with its graphical user interface with drag-and-drop. It can connect to hundreds of data sources, including HubSpot and MySQL. It also doesn’t matter if your MySQL database is hosted in the cloud or on-premises.
Skyvia can handle simple imports and exports with flat files like CSV. Meanwhile, Skyvia has Data Flow and Control Flow to handle complex integrations. This section will present Skyvia Data Flow to connect your HubSpot to MySQL.
This integration task only needs two Skyvia Connections and one Data Flow.
Let’s begin.
STEP 1: Create a HubSpot Connection
The first connection is for HubSpot. Creating it in Skyvia is easy with the simple steps below:
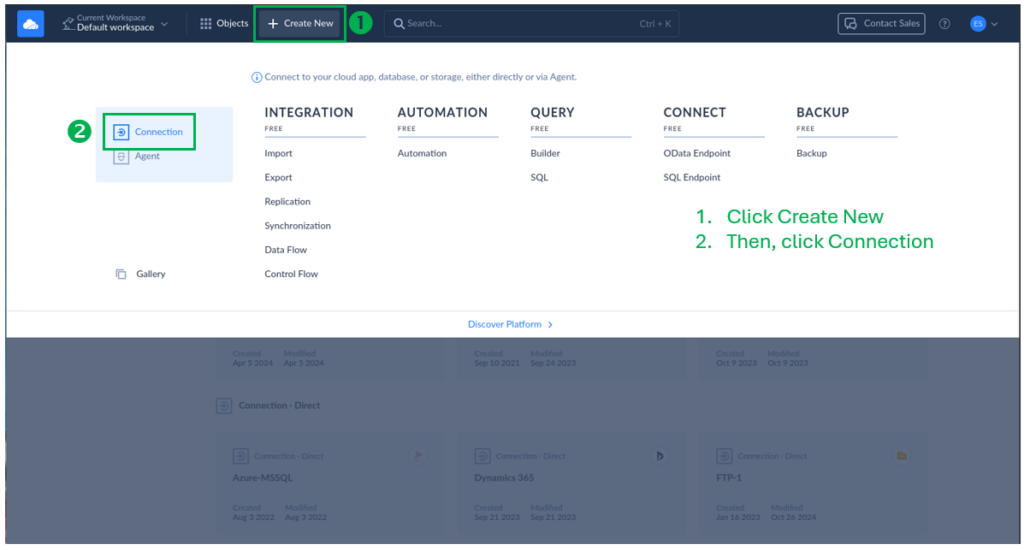
- From the upper left of your current Skyvia workspace, click + Create New, then click Connection.
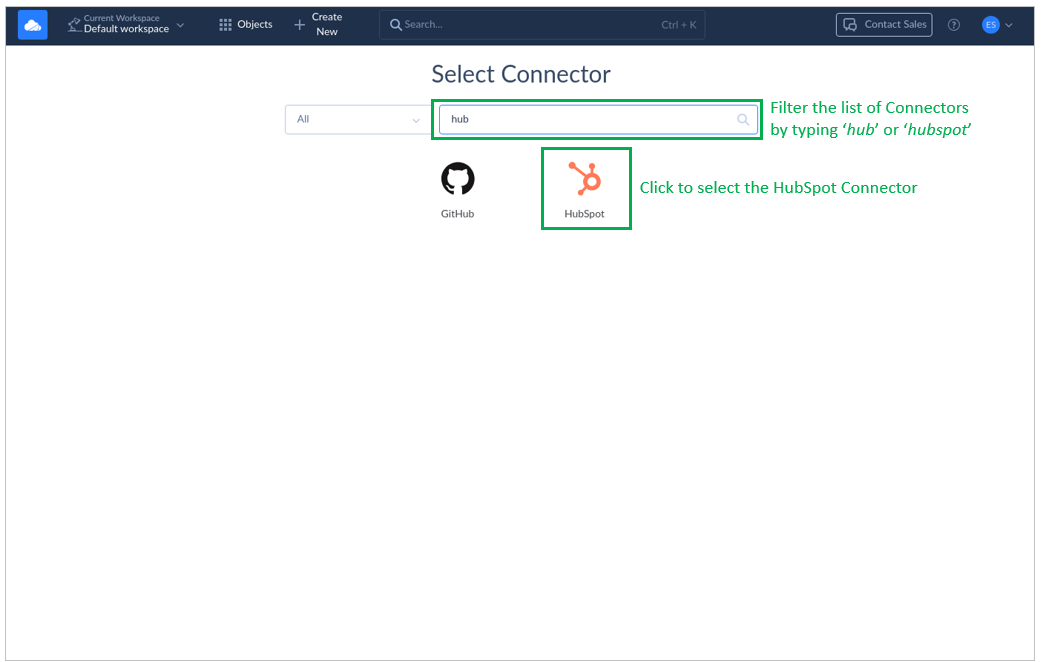
- From the list of Connectors, type hub or hubspot in the Filter box, then select HubSpot.
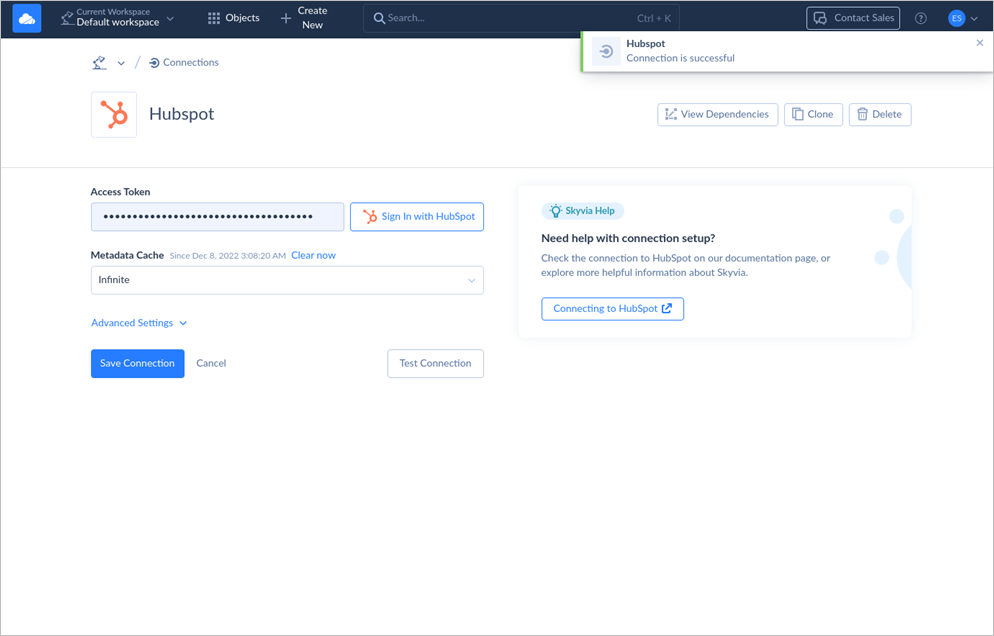
- Configure the connection on the next page by signing in to HubSpot.
- Click Test Connection to check if Skyvia can connect to your HubSpot. See a successful connection below:
- Rename the connection from Untitled to HubSpot or any name you like, then click Create Connection (for a new connection) or Save Connection (for changing an existing connection).
Note the name of this HubSpot connection because you’re going to need it later.
STEP 2: Create a MySQL Connection
Creating a Skyvia MySQL connection is easy as well. Follow the steps below:
- Again, from the upper left of your current Skyvia workspace, click + Create New, then click Connection.
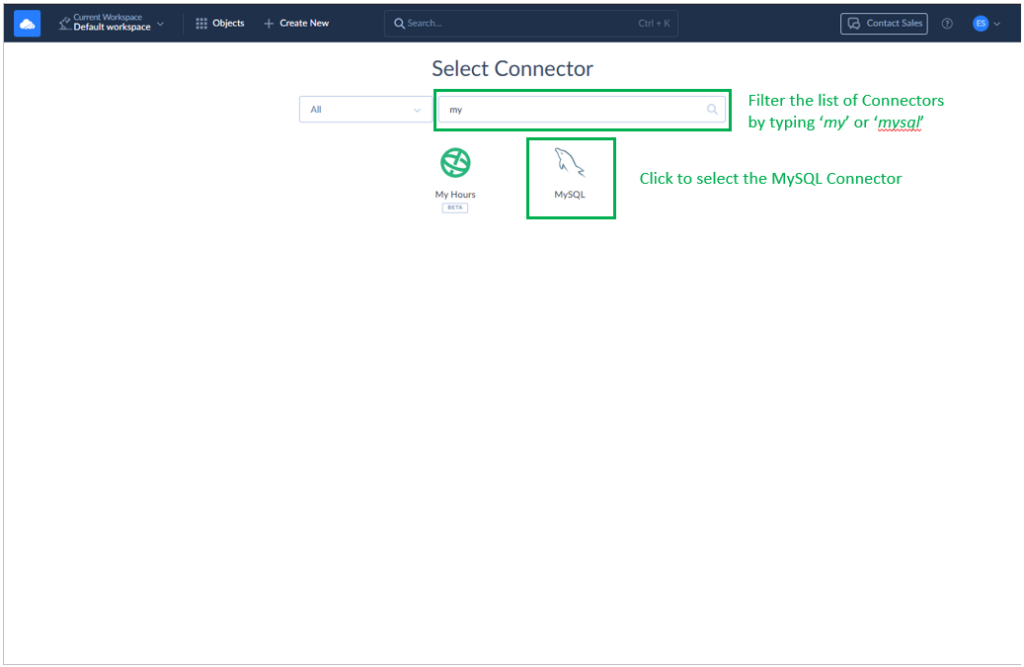
- From the list of Connectors, type my or mysql in the Filter box, then select MySQL.
- Configure the connection on the next page by entering your MySQL server credentials.
- Click Test Connection. Below is a successful connection I made:
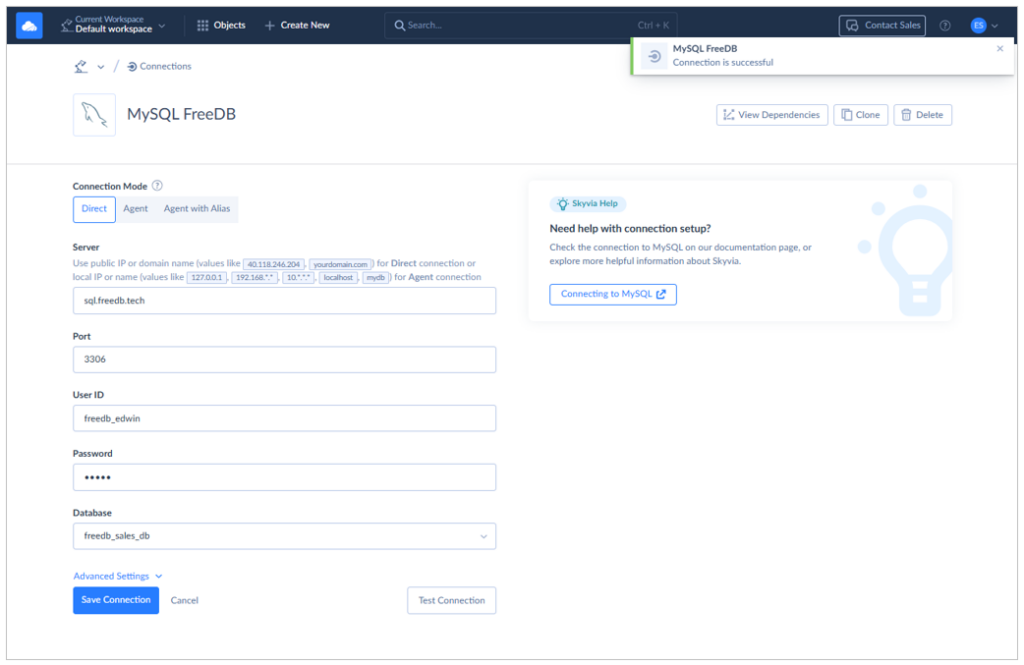
- Rename the connection from Untitled to MySQL or any name you like. Then, click Create Connection (for a new connection) or Save Connection (for changing an existing connection).
The configuration above is a cloud MySQL database from FreeDB, so I named it MySQL FreeDB. Note the name of this MySQL connection because you’re going to need this too later.
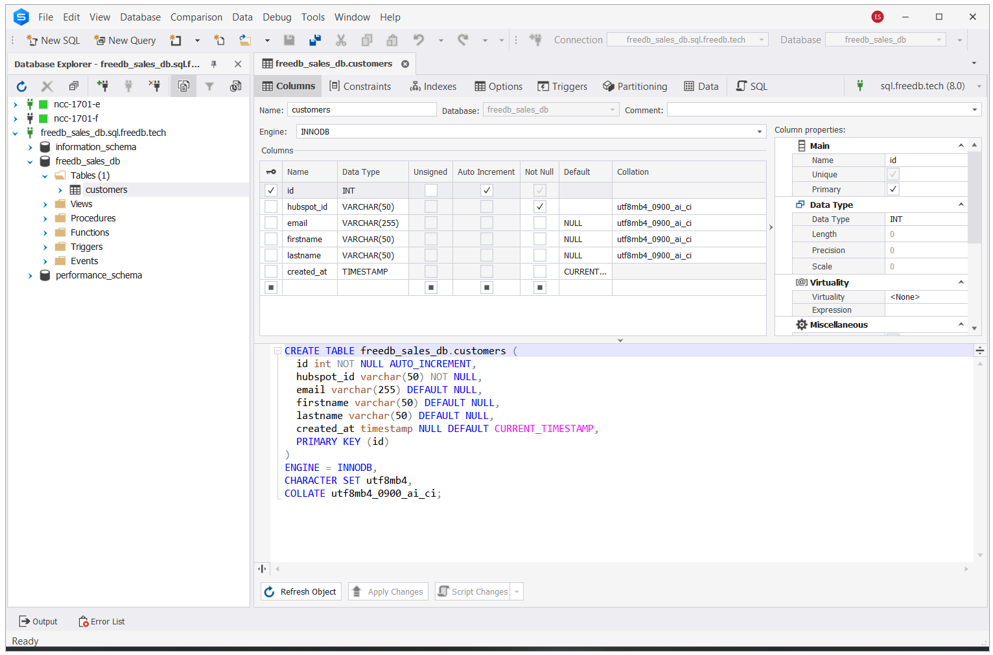
From this server, I have the same customer table we used earlier, as seen below:
STEP 3: Setup Data Flow Integration
A Skyvia Data Flow allows you to link two or more data sources. In this case, our source is HubSpot, and our target is MySQL (export). If we want to import, we can reverse the order.
In the following steps, we will export HubSpot contacts to our sample MySQL customer table.
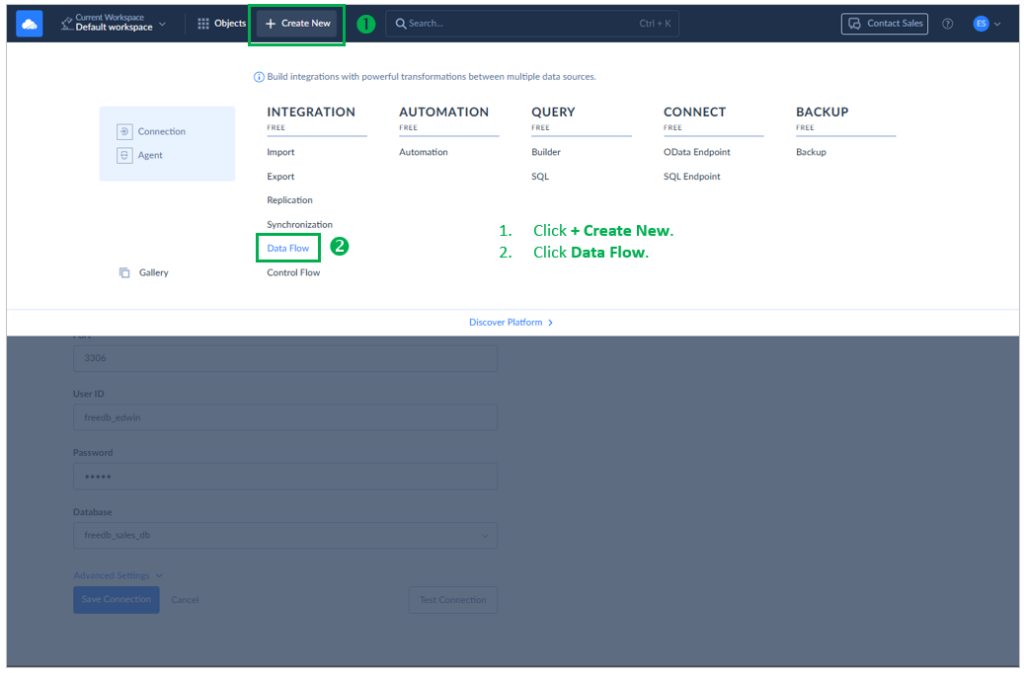
- From the upper left of your current Skyvia workspace, click + Create New, then click Data Flow.
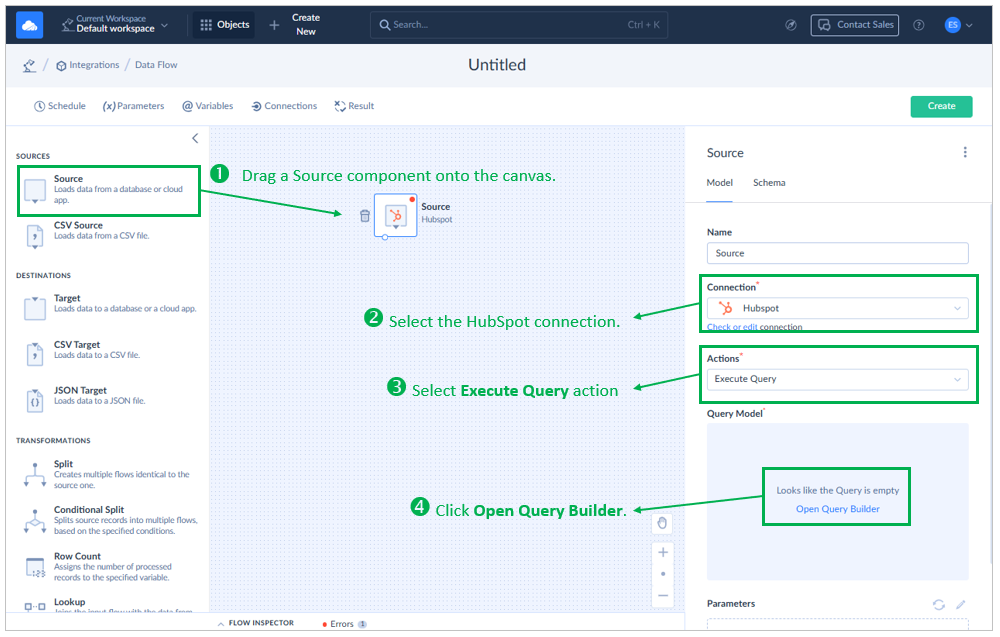
- Drag a Source component into the Data Flow canvas and configure it as a HubSpot source.
- Use the HubSpot connection created earlier.
- Choose Execute Query action.
- Click Open Query Builder.
- Double-click the Contacts table and drag the Id, Email, Last Name, First Name, and Last Modified Date fields to the Result Fields box.
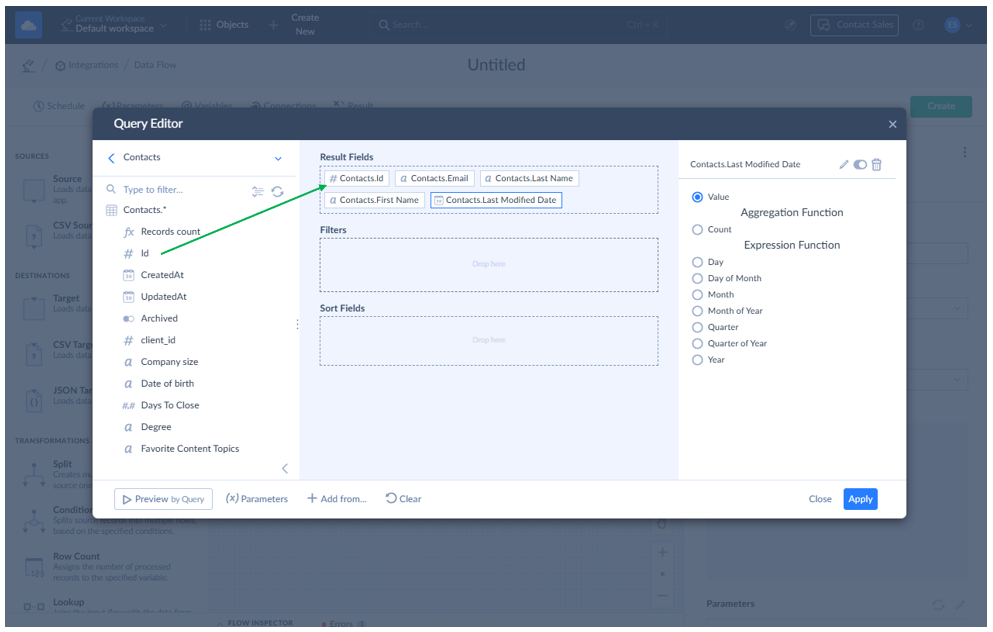
- Click Apply.
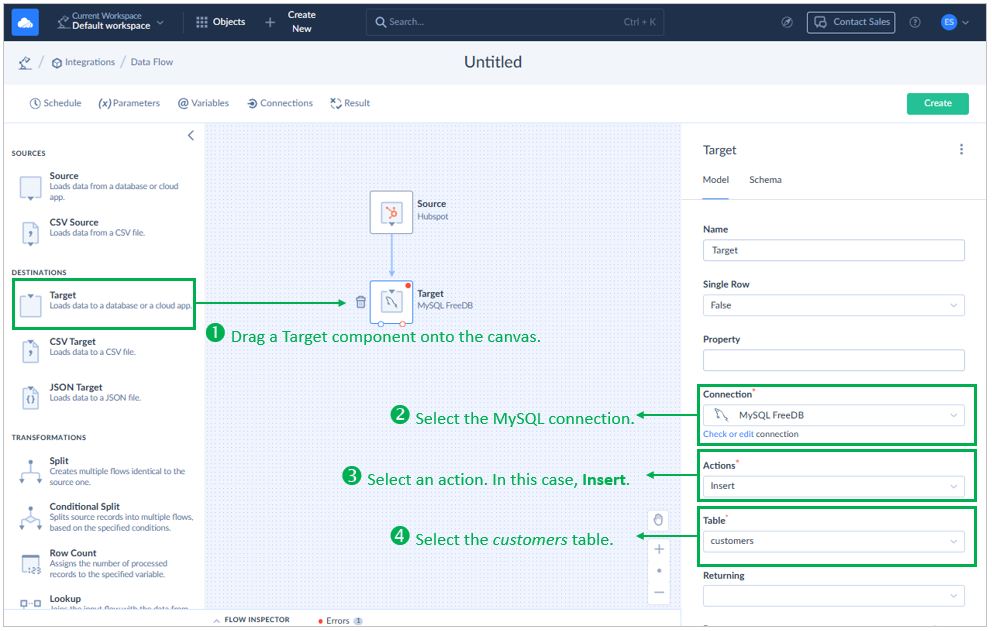
- Drag a Target Component onto the canvas and configure it as a MySQL target.
- Connect the Source to the Target by dragging the small circle under the Source component into the Target. An arrow should now point from the Source to the Target.
- Use the MySQL FreeDB connection created earlier for the Connection box.
- Choose an action to perform. For this example, we will use Insert.
- Select a MySQL table. In this case, the customers table.
- Scroll down further in the configuration pane until you see the Parameters section. Click the pencil icon to start mapping the source to target columns. Click the Auto Mapping button to map the same name columns. Otherwise, map the columns manually. To do that, click the MySQL column. Then, on the Value box, type the corresponding HubSpot column. Optionally, you can do minor transformations by using a function like upper(). Do that until all columns are mapped.
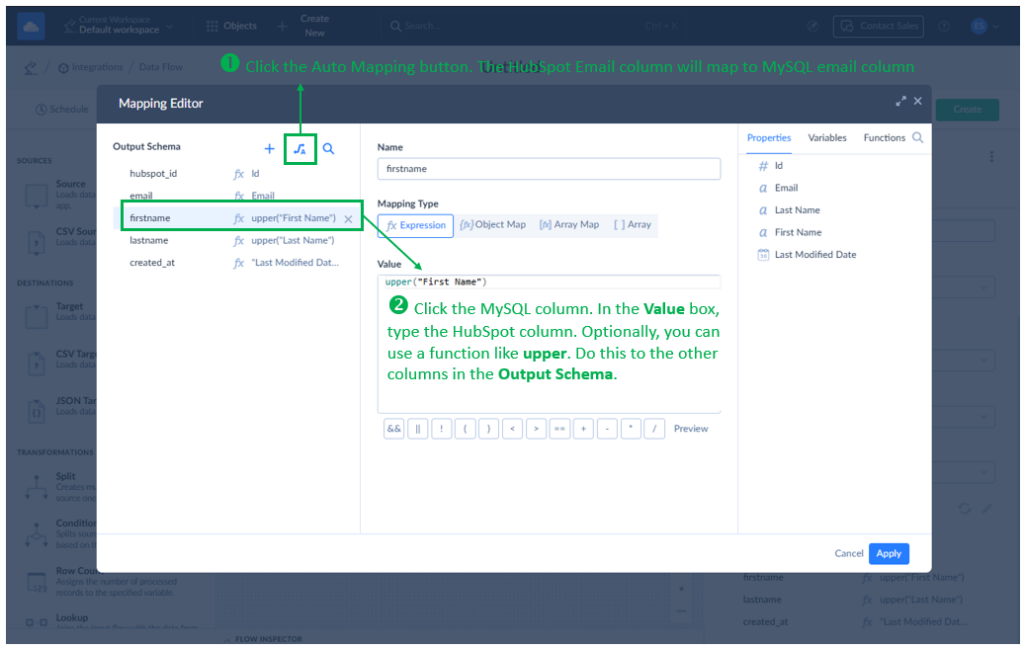
- Click Apply.
- Rename your Data Flow from Untitled to something descriptive of your purpose. For example, Hubspot-to-MySQL.
- Click Create to save your Data Flow.
STEP 4: Create a Schedule
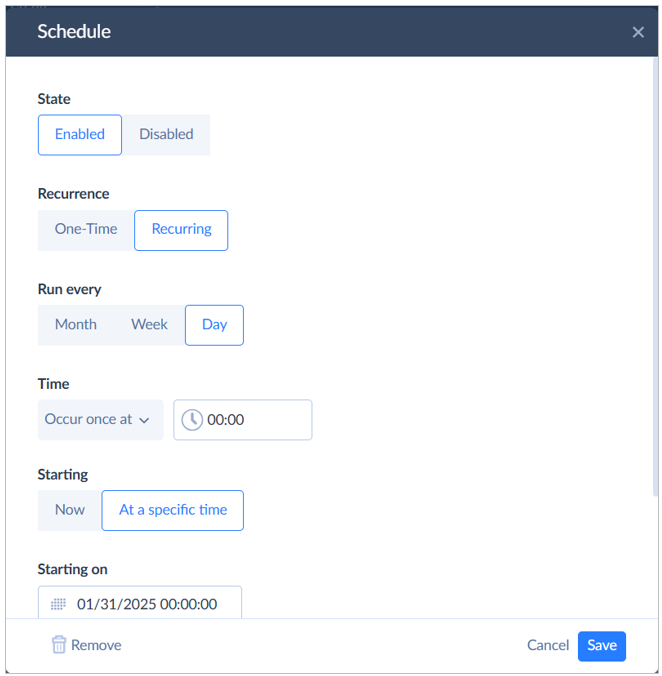
You can run your Data Flow manually. But if you want to run it on autopilot, you need to create a schedule. Follow the steps below to create one:
- In your new Data Flow, click Schedule in the upper left corner of the Skyvia workspace.
- Set your preferred schedule, then save it. Below is a daily schedule that will run at midnight:
STEP 5: Run and Monitor Integration
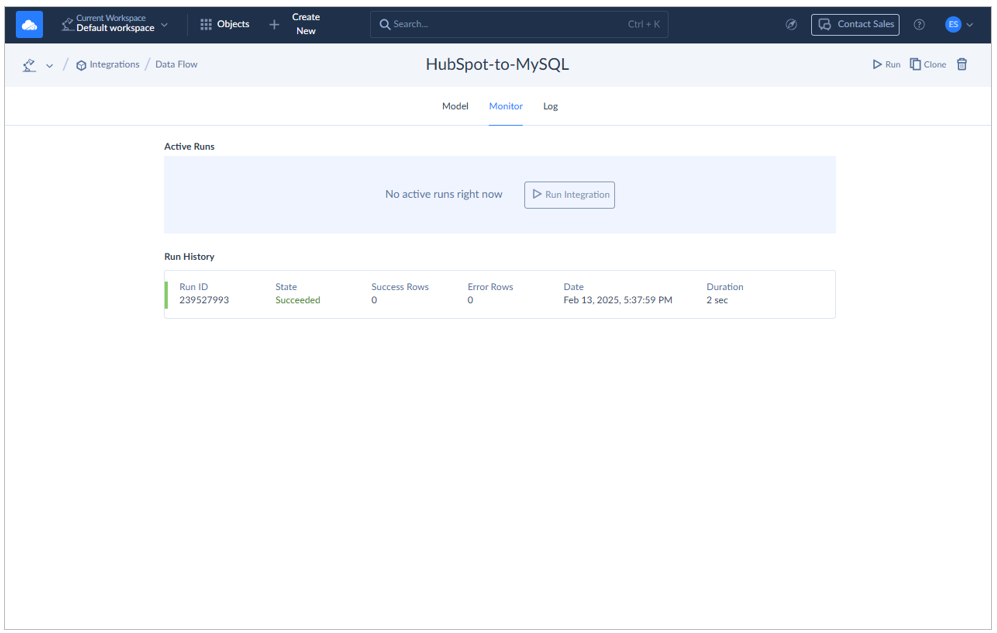
Let’s try to run it manually. Click Run from the upper right corner of the Skyvia workspace. Then, click Monitor in the upper center of the page and wait until it’s done. You will see the following similar results once it’s successful:
But let’s check by comparing the records from HubSpot and MySQL. Here are 201 records in HubSpot, as seen below:
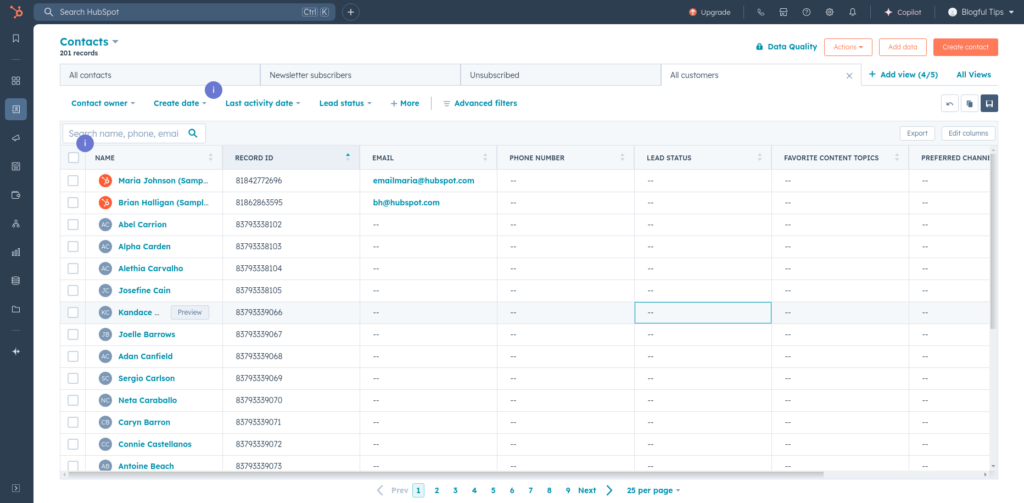
Now, using dbForge Studio for MySQL, used a SELECT statement and confirmed the 201 records, as seen below:

The first visible records are also the same compared to the one in HubSpot.
If you need another HubSpot object like Companies to integrate to MySQL, you need another Data Flow. Then, if you want them to run in sequence or parallel, you need to include each of the Data Flows in a Skyvia Control Flow.
The above integration is one-way (from HubSpot to MySQL). If you need the reverse, create another Data Flow and simply switch the source and target.
There’s no code involved in the Data Flow package, just a few clicks and a little typing. That’s how simple it is when using a no-code integration.
Conclusion
To recap, we discussed what is HubSpot and MySQL. Integrating the two will extend reporting and analysis for data-driven decisions. You saw how it is done using HubSpot’s own import and export tools and its Operations Hub Data Sync. We also utilized HubSpot APIs using Python code and used a no-code tool like Skyvia.
You have several options to choose from. Study them carefully and see which of the methods are perfect for your requirements.

FAQ for HubSpot to MySQL

Why should I choose HubSpot MySQL integration over manual data management?
Integration automates data flow, reduces errors, and saves time.
What are the key features of HubSpot MySQL integration platforms?
Real-time data syncing, customizable reporting, and automation capabilities.
What are the potential challenges of integrating HubSpot with MySQL?
Data mapping complexities, maintenance of integrations, and potential technical skill requirements.
Can I integrate HubSpot with MySQL if I have limited technical expertise?
Yes, using no-code integration tools like ETL platforms can simplify the process.
