According to Statista, Oracle is the most popular DBMS solution in the world in 2024. Oracle databases have remained a top choice for enterprises and SMBs for decades due to their excellent performance, ease of administration, and security.
Oracle databases are usually not standalone solutions but serve as a foundation for multiple apps. So, companies use Oracle REST API to connect apps with a database for data exchange. In this article, we provide an Oracle REST API tutorial on integrating a database with other apps.
Given that the REST API method requires strong technical expertise and programming skills, its implementation might be challenging and time-consuming. Meanwhile, Skyvia adds ease to the integration process by offering solutions for data exchange. In this article, we’ll also discover Skyvia for connecting Oracle to 200+ other data sources with no coding.
Table of Contents
- What Is a REST API?
- Setting Up Oracle REST APIs
- Integrating Oracle REST APIs with Applications
- Benefits of Using Oracle REST APIs
- Skyvia’s Integration with Oracle REST APIs
- Conclusion
What Is a REST API?
Representational State Transfer Application Programming Interface, better known as REST API, is a set of rules and guidelines for interaction between web services. REST APIs conform to the following standards:
- A client-server architecture with clients, servers, and resources.
- HTTP protocol is used for managing requests.
- Stateless communication doesn’t preserve client information between GET requests; each request is an independent process.
- Cacheable data for streamlined interactions.
- Unified interface for standardization of the data exchange between clients and servers.
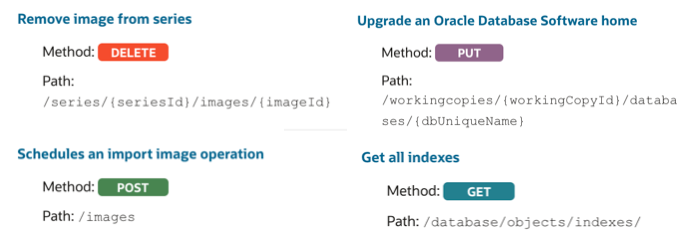
REST uses the HTTP methods for communication:
- GET – to retrieve data from a server.
- POST – to send data to a server to create/update a resource.
- PUT – to update or replace existing data on a server.
- DELETE – asks a server to remove a specified resource.
Exchanging information between client and server via API implies that data is encapsulated in a file. JSON is the most commonly used format since it’s readable by humans and computers, lightweight, and suitable for speedy data transfer. Sometimes, XML files are also used to exchange data.
Overview of Oracle REST APIs
Oracle REST APIs have characteristics similar to those of all REST APIs. Let’s have a look at them in detail:
- Stateless communication provides a possibility to scale without considering the previous interactions. Each API call is independent and doesn’t store any session state on a server.
- OAuth 2.0 and API keys are used for authentication by Oracle REST APIs.
- JSON file format is common for request and response bodies in the data exchange process, though XML is also supported.
- Standard HTTP methods for communication are used: GET, PUT, POST, and DELETE.
- Data and services come as resources, each coming with a unique resource identifier (URI).
The URIs or URLs within API are endpoints that specify where a client can access a particular resource. Endpoints often correspond to actions like retrieving, creating, updating, or deleting resources, and they typically work with HTTP methods such as GET, POST, PUT, or DELETE. See the list of all REST endpoints for Oracle databases.
Setting Up Oracle REST APIs
To use Oracle REST APIs, follow the detailed step-by-step instructions provided below.
Prerequisites:
Before installation, make sure you have the following tools at your disposal.
- Oracle Database (Enterprise Edition, Standard Edition, or Standard Edition One) release 11g Release 2 or later, or Oracle Database 11g Release 2 Express Edition.
- Oracle Java 8 or later.
- Web browser:
- Microsoft Internet Explorer 8.0 or later.
- Mozilla Firefox 3.0 or later.
- Google Chrome 2.0 or later.
Step 1. Install and Configure Oracle REST Data Service (ORDS)
ORDS is a Java-based service used to expose data from an Oracle database via RESTful endpoints.
NOTE: Install ORDS on the service with access to your Oracle database.
- Download the file ords.version.number.zip from the ORDS official website.
- Extract data from the downloaded zip file into a chosen directory.
- Select the installation option:
- An advanced mode requires a user to enter CLI prompts manually.
- A silent mode doesn’t require a user intervention. The installation is done using the parameter specified in the <path-to-params-file>/ords_params.properties file under the location where ORDS is downloaded and extracted.
- To perform installation in the advanced mode, execute the command:
java -jar ords.war install advanced- To verify the ORDS installation is successful, go to the directory with the ords.war file and enter the following command:
java -jar ords.war validate [--database <dbname>]- Enable ORDS Database API since this feature is disabled when installing ORDS for the first time.
- Run ORDS in a Standalone Mode.
- REST-enable the Oracle database SCHEMA and grant the DBA and PDB_DBA roles to the schema user.
Step 2. Deploy ORDS on a Web Server
Oracle REST Data Services supports the following Java EE application servers:
| Application Server | Supported Release |
|---|---|
| Oracle WebLogic Server | 12g Release 2 (12.2.1.3) or later |
| Apache Tomcat | Release 8.5 or later |
In this example, we show how to deploy ORDS as a web application on the Apache Tomcat web server.
- If not yet installed, download Apache Tomcat.
- Copy the ords.war file into the webapps directory where Apache Tomcat is installed.
- Access Oracle Application Express by typing the following URL in your web browser:
http://<hostname>:<port>/ords/<hostname> is the name of the server where Apache Tomcat is running.
<port> is the port number configured for the Apache Tomcat application server.
Step 3. Define Oracle REST APIs
Create REST APIs and expose them from your Oracle database. This is possible with SQL Developer or by simply using PL/SQL. In this example, we use SQL Developer since it offers a graphical UI for administering Oracle REST APIs.
- Configure administrator user.
java -jar ords.war user adminlistener "Listener Administrator"- Enter the password for the adminlistener user.
- Confirm the password for the adminlistener user.
- In the SQL Developer, connect to your Oracle database and navigate to REST Data Services under the Connection tab.
- Right-click on the RESTful Services and select New RESTful Service.
- Define the REST API endpoint, HTTP method (GET, POST, PUT, DELETE), and SQL query or PL/SQL logic.
Step 4. Test APIs
To test the recently created REST API endpoint, try accessing it via a web browser.
Check Oracle’s official documentation website for more detailed information on ORDS deployment and API endpoint creation.
Integrating Oracle REST APIs with Applications
REST APIs allow you to access and manipulate data in the Oracle database from an app. To integrate Oracle REST APIs with your application, follow the detailed step-by-step instructions.
Step 1. Install cURL
To access Oracle Database REST API, install and download the cURL command-line tool. Make sure that the selected version supports SSL to establish a secure connection to the server. Once the zip package with cURL is downloaded, extract its contents and put them in the preferred folder.
Step 2. Authentication
To access Oracle Database REST API resources, you need to authenticate.
- Provide an SSL certificate authority (CA) certificate file. You can download an SSL CA certificate bundle or provide your own.
- Verify the SSL CA certificate using the cURL tool.
- Provide name and password credentials for your Database REST API account. For that, use the -u command in cURL to pass the username and password.
Specify the custom header X-ID-TENANT-NAME to identify the identity domain ID. Use the -H command in cURL to pass X-ID-TENANT-NAME.
Example:
curl -i -X GET -u <username>:<password>
-H <request-header>:<value> https://<subdomain>.<domain>.com/<path>/<resource-path>
Step 3. Make API Calls
Start sending HTTP requests to Oracle Database API endpoints. You can also do this with the cURL tool.
Example:
curl -X POST https://<db_rest_api_url>/ords/schema/table/ \
-H "Authorization: Bearer <access_token>" \
-H "Content-Type: application/json" \
-d '{ "column1": "value1", "column2": "value2" }'
Step 4. Handle API Responses
After calling Oracle Database REST API endpoints, the Response header returns standard HTTP status codes in JSON format. Write programming code within your application to handle these responses properly. Parse JSON and implement business logic that would handle each response appropriately.
Step 5. Error Handling
In case the status code returned signals an issue, you need to implement an error-handling mechanism.
Here are some HTTP status codes that report a problem:
- Unauthorized access (HTTP 401)
- Forbidden access (HTTP 403)
- Not Found (HTTP 404)
- Internal server error (HTTP 500)
Benefits of Using Oracle REST APIs
No doubt, REST APIs facilitate integration with Oracle databases and other applications. Here are some of the notable advantages of using Oracle Database REST APIs:
- Scalability. ORDS is designed to handle large volumes of requests. Even with the increasing number of API calls, the performance remains stable and optimal.
- Customization. You can create custom queries with Oracle REST APIs to fetch only the data you need. This positively impacts performance since no useless data is retrieved.
- Security. ORDS grants secure access and manipulation of data since it supports OAuth 2 for authentication, role-based access control (RBAC), and data encryption. This helps companies to secure their sensitive data.
- Versatility. REST APIs are platform-independent, allowing developers to integrate Oracle services into applications running on any mobile, web, or desktop platform.
- Documentation. Oracle provides comprehensive documentation on REST APIs, which makes the lives of developers easier.
Skyvia’s Integration with Oracle REST APIs
Skyvia provides a pre-built connector for the Oracle database. You can configure it by providing the necessary details in the visual wizard. Then, use the Oracle connector to build zero-code integration scenarios with Skyvia to transfer data to and from your database.
Skyvia is a universal cloud platform for various data-related tasks. It connects to 200+ sources, including Oracle services, and allows you to perform various operations on data, starting from integration to OData endpoint creation. All this is done within an intuitive graphic user interface with no programming language requirements.
How Skyvia Enhances Oracle REST APIs
Skyvia has five core products, four of which can work with Oracle databases:
- Data Integration. Use a set of tools to transfer data to/from the Oracle database with ETL, ELT, and Reverse ETL pipelines.
- Automation. Reduce manual work on repetitive tasks and streamline workflows with event-based integrations.
- Query. Use a visual SQL query builder or write SQL queries to retrieve data from an Oracle database.
- Connect. Create OData and SQL endpoints without coding and obtain ready-to-use endpoint URLs with no need to manage hosting and administration.
Before using Skyvia products on Oracle data, connect to your database. Skyvia supports both on-premise servers and Oracle Cloud.
- Log into your Skyvia account or create a new one.
- Click + Create New in the top menu and select Connection.
- Select Oracle from the list of available data sources and click on it.
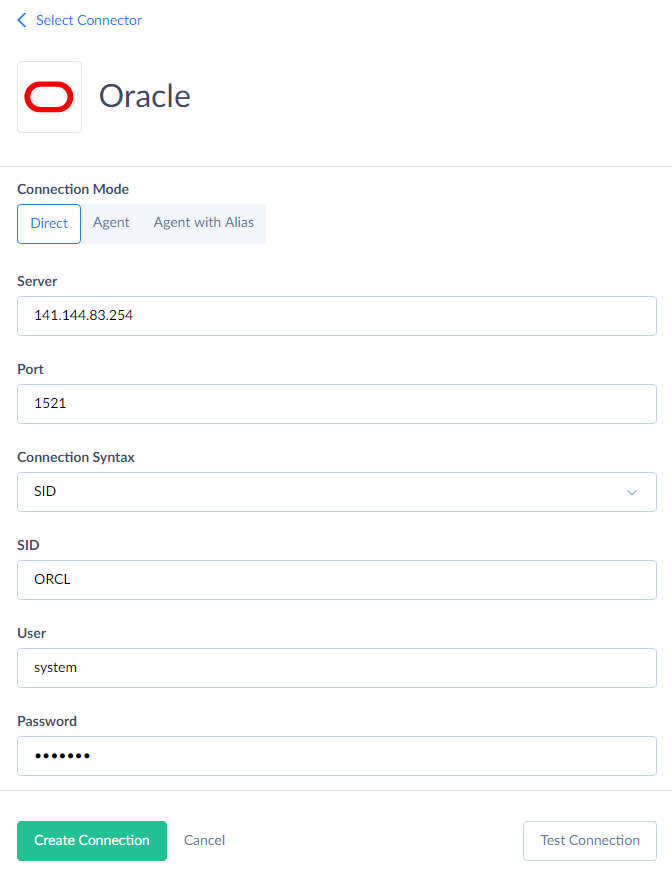
- Provide all the requested information in the window.
- Server – name or IP address of the Oracle server host.
- Port – Oracle server connection port; the default value is 1521.
- Connection Syntax – this parameter determines whether to use Service Name or SID to connect.
- Service Name – alias to an Oracle database instance (or many instances).
- SID – a unique name for an Oracle database instance.
- User – user name to log in with.
- Password – password to log in with.
- Connect as – this parameter specifies how you want to connect to the Oracle server. This parameter is set to ‘Normal’ by default. Alternatively, you can select administrative privileges, such as SYSDBA, SYSOPER, SYSASM, SYSBACKUP, SYSDG, and SYSKM.
Learn other details on how to create an Oracle connection in Skyvia.
Business Benefits with Skyvia Integration
Skyvia has enormous potential when it comes to various data integration scenarios and operations. This tool greatly facilitates data retrieval from your database, transfer of new or updated information, and even deleting unnecessary instances. Overall, using Skyvia is associated with such tangible advantages for your business:
- Simplicity. Connect to Oracle service with no coding, which is much faster and simpler than API integration.
- Connectivity. Set up data integration between Oracle and 200+ sources, including cloud applications, databases, data warehouses, legacy systems, storage services, and flat files in a standardized format.
- Data transformation. Cleanse and organize data with Skyvia’s powerful data transformation capabilities.
- Affordability. Skyvia is suitable for businesses with any workload, from startups to enterprises. There are several pricing plans at reasonable prices.
Conclusion
Both Oracle REST APIs and Skyvia aim to integrate Oracle databases with other tools. However, each does it in its own way, which makes each method suitable for a different scope of tasks.
Oracle REST APIs would be an excellent option for enabling database interactions within your custom app. If you need to send data from other corporate apps, such as HubSpot, Dynamics CRM, QuickBooks, etc., to your Oracle database, then Skyvia would definitely be a better choice.
