

You shouldn’t need a PhD — or a caffeine IV — to get files from SQL Server to SFTP.
But here you are, clicking export, renaming files, uploading them manually, and hoping you didn’t miss a step.
Again.
There’s a better way. Actually, five.
In this guide, you’ll find five simple ways to send SQL Server data to SFTP safely, without the headaches. Some use built-in tools. Some use a little scripting. But all of them are way less painful than what you’re doing now.
No drama. No chaos. Just results.
Let’s begin.
Table of Contents
- Why Integrate SQL Server with SFTP?
- Methods for SQL Server to SFTP Integration
- Method 1: Manual SQL Server Export + SFTP Upload
- Method 2: Scripting (PowerShell Example)
- Method 3: SQL Server Integration Services (SSIS)
- Method 4: Linked Servers
- Method 5: Cloud-Based Integration Platforms
- Key Considerations & Best Practices for SQL Server SFTP Integration
- Conclusion
Why Integrate SQL Server with SFTP?
Let’s be real — if you’re reading this, you’re probably not a full-time developer.
You’re someone who needs the data to move from SQL Server to SFTP, without drama.
Maybe you’re in operations, analytics, or project management. Either way, you just want things to work without babysitting exports or fixing someone else’s mess.
Let’s break down why setting up this integration is actually worth it.
Share Data Automatically (No More Manual Uploads)
You’ve got partners, vendors, clients — or maybe another system — waiting for data.
Instead of dragging files into an SFTP client every day, you can automate the whole thing. Files show up like clockwork. Everyone’s happy. You sleep better.
Use case:
An operations team sends a daily CSV of inventory updates from SQL Server to a warehouse partner via SFTP. Before automation, someone had to do it at 8 a.m. sharp. Now it runs while they sip coffee.
Backup & Archive Without Lifting a Finger
Some companies still manually back up reports or data exports. But with an integration, your files can land in SFTP folders automatically — great for recordkeeping, audits, or just saving your skin when someone asks, “Do we have last month’s report?”
Use case:
A project manager schedules a weekly export of client billing data from SQL Server. The file is archived in SFTP for accounting. No more digging through folders.
Feed Downstream Systems
Need to push data to a financial system? A cloud dashboard? A partner’s data warehouse?
SFTP is like a safe, universal drop-off zone. Once the file’s there, other tools can pick it up and process it. Integration ensures it always gets delivered on time, every time.
Use case:
A marketing team uses SQL Server to store lead data. Every night, it’s pushed via SFTP to a third-party CRM tool that doesn’t support direct database connections.
Boost Efficiency (and Free Up Your Brain)
Manual steps = mental clutter.
Automation = breathing room.
Setting up this integration means one less thing to remember, check, or fix. That gives you time for actual work, not clicking through export dialogs or digging through folders.
Use case:
An analyst automates a weekly export of sales data that used to take 20 minutes each time. Over a year, that’s almost 18 hours saved. They used it to finally finish that dashboard.
Stay Compliant and Secure
SFTP is secure by design. Unlike FTP, it encrypts everything — from your login to your file contents.
If your company deals with sensitive data or follows strict regulations (hello HIPAA, GDPR, or just your boss’s paranoia), this integration checks the security box without extra hassle.
Use case:
A healthcare provider sends patient data extracts to an external analytics vendor. Because they use SFTP and automated exports, they stay HIPAA-compliant without adding manual security checks.
Avoid Human Error
We’ve all misnamed a file or uploaded the wrong version. With automation, the system handles naming, versioning, and timing — so you’re not playing “Where’s that file?” at 4:58 p.m.
Use case:
An ops guy used to send a CSV file for remittance to Social Security’s SFTP – made manually. He sometimes misnames the file. His boss? Not happy. But after automating the whole thing, he can now go home at 5:00 p.m. – with peace of mind.
Set the Stage for Bigger Automation Later
Think of this as the first domino. Once SQL Server and SFTP are connected, you can build on it: trigger reports, start workflows, or sync with other systems — without ever touching the database again.
Use case:
An analyst automates SQL Server to SFTP exports for a client’s financial system. Then came a light bulb moment for another integration. So, she also built a Power BI dashboard that updates from those files — no manual uploads, just fresh data every morning.
Bottom Line?
Integrating SQL Server with SFTP is like upgrading from a flip phone to a smartphone.
Once you set it up, you’ll wonder why you ever did it the hard way.
And hey — it saves you from another “Why didn’t the file send?” email at 5 PM on a Friday…
totally worth it.
Next up: How exactly can you make this work?
Let’s look at five methods — some simple, some flexible, all doable.
Methods for SQL Server to SFTP Integration
There’s no one-size-fits-all here. Some folks just want to get a file out fast. Others need something repeatable, automated, or boss-approved.
So, we’re covering five ways to move your data from SQL Server to SFTP.
From manual to magical—pick the one that fits your comfort level (and your schedule).
Heads-up: You don’t need to try them all. The best method depends on what you need, how often you need it, and whether you’re up for writing a script… or running from one.
Before you dig into the details, let’s have a comparison summary of each of the methods.
Side-by-Side Comparison: SQL Server to SFTP Methods
So, here’s a simple side-by-side comparison to help you quickly see which option fits your situation best.
| Method | Main Export Features | Best For | Pros | Cons |
|---|---|---|---|---|
| Manual Export + SFTP Client | Export with SSMS; upload with tools like WinSCP or FileZilla | One-time jobs, quick fixes | No setup; no coding | Fully manual; easy to forget; not scalable |
| Scripting (PowerShell, Python) | Code pulls data and uploads to SFTP | Tech teams or helpful IT friends | Fully automated; flexible; reusable | Needs scripting skills; can break if not maintained |
| SSIS (SQL Server Integration Services) | ETL tool inside SQL Server; requires Visual Studio | Larger companies with IT support | Handles complex jobs; runs inside SQL Server | Requires setup, skills, and third-party plugins for SFTP |
| Linked Servers (with ODBC drivers) | Treats SFTP like a remote database using third-party drivers | Advanced IT teams; niche cases | Fully integrated; can run inside SQL | Expensive drivers; fragile; very technical |
| Cloud Integration Platforms (Skyvia) | Fully cloud-based; no coding; web interface | Non-tech users, PMs, analysts | Easy setup; built-in scheduling; simple interface | Limited free tier; may need IT help for initial access |
So, how about that? Ready to dig for more details?
First up? The old-school way.
Method 1: Manual SQL Server Export + SFTP Upload
Yep, we’re starting with the most basic option. This one’s all click-and-drag. No setup, no code, no wizardry.
You’ll use SQL Server Management Studio (SSMS) to export the data. Then, use a popular SFTP client like WinSCP, FileZilla, or even Cyberduck to upload the file.
Best For
- One-time or occasional transfers
- Quick fixes
- When you’re not allowed to install new tools or scripts
- People who like doing things “the way we’ve always done it”
Step-by-Step Guide
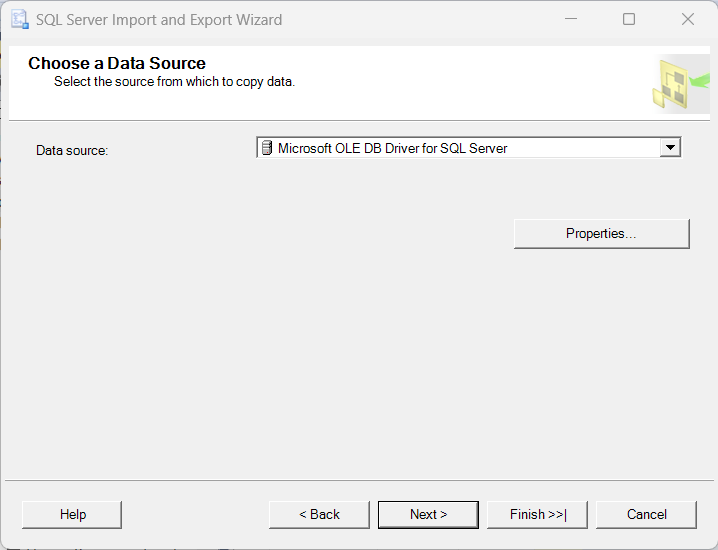
- Open SSMS, connect to your SQL Server instance, and expand the server you’ll be working with.
- Right-click the database name, select Tasks, and click Export Data…
- Follow the export wizard:
- Choose Microsoft OLE DB Driver for SQL Server as your data source.
- Click Properties, and give your SQL Server credentials (your administrator should have it). It should look like this:
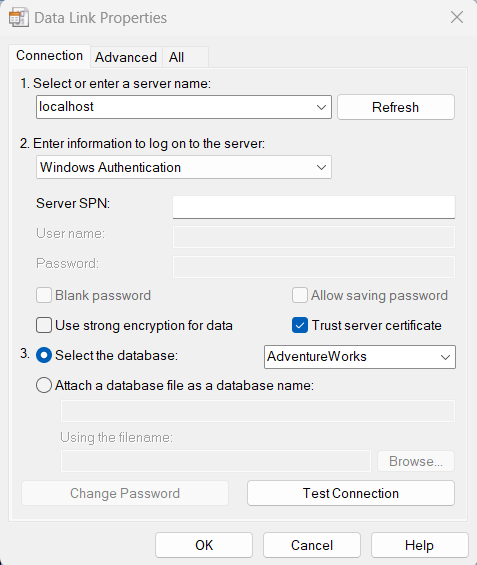
- Test the connection, and once good, click OK.
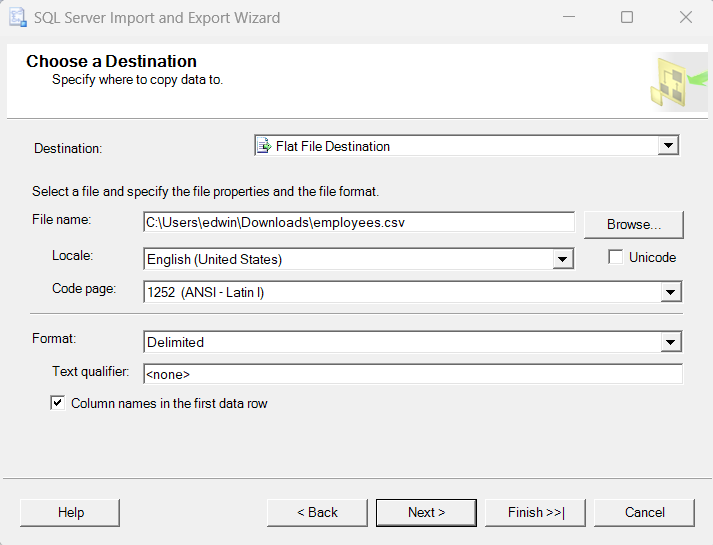
- Click Next, and choose a Flat File Destination.
- Tell SSMS where your CSV file will go. Give it a file name and folder.
- Click Next, and choose Copy data from one or more tables or views.
- Click Next, and choose a table or view from the drop-down list.
If you want to select just the columns you need, click Edit Mappings and mark <ignore> the columns you don’t want. See below:
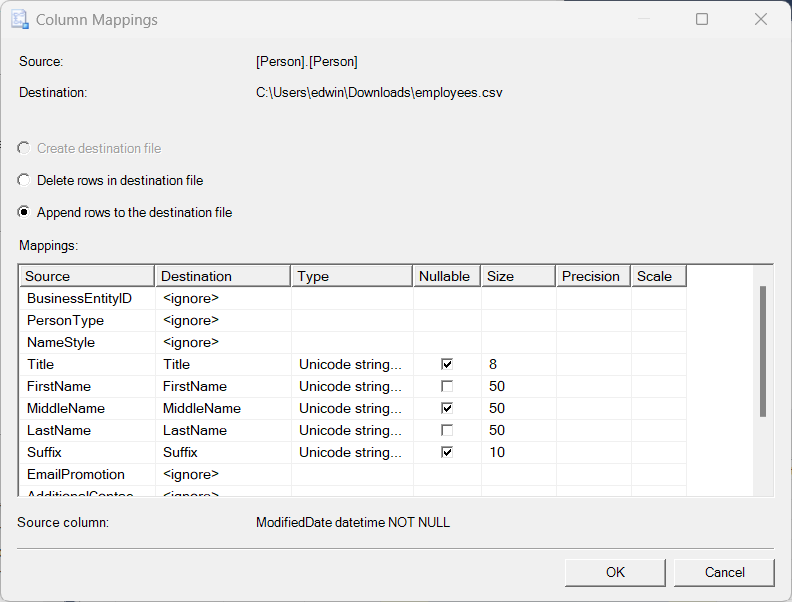
- Click OK, then click Finish.
- Open WinSCP (or your SFTP client of choice).
- Connect to the SFTP server using your login credentials.
- Drag and drop the exported file into the target folder on the server.
Done. File sent. Now reward yourself with coffee.
Pros
- No setup required
- No scripting needed
- Great for simple or one-time jobs
- Works on almost any machine
Cons
- Entirely manual — easy to forget or mess up
- No automation or scheduling
- Risk of sending the wrong file (we’ve all done it)
- Not scalable for daily/weekly workflows
Pro Tip:
Rename your files with clear timestamps like sales_report_2025-06-06.csv. It helps avoid that awkward “wait, which one’s the latest?” moment.
Next up, we’ll look at a method with more power under the hood — scripts.
If you’re thinking “Yikes, code,” don’t worry. We’ll keep it simple.
Ready? Let’s roll into Method 2.
Method 2: Scripting (PowerShell Example)
Okay, so this one involves a little code. But hang on — you don’t need to be a full-blown developer to use it.
This method is for those moments when you need more control, some automation… and maybe a tech-savvy teammate to help set it up.
You can hand this off to your IT buddy or reuse it like a recipe later.
Here’s a real-world PowerShell script that connects to SQL Server, exports data to a CSV, and uploads it to an SFTP server.
# Load the WinSCP assembly. Change the path to where you installed the WinSCP .Net assembly
Add-Type -Path "C:\Path\To\WinSCPnet.dll"

# 1. Query data from SQL Server. Assumes an on-premises SQL Server using Windows Authentication
Invoke-Sqlcmd -Query "SELECT * FROM SalesReport" `
              -ServerInstance "YOUR_SQL_SERVER_INSTANCE" `
              -Database "YOUR_DATABASE" `
              | Export-Csv -Path "C:\Exports\sales.csv" -NoTypeInformation

# 2. Connect to SFTP and upload file
# Requires WinSCP and its .NET assembly
$sessionOptions = New-Object WinSCP.SessionOptions -Property @{
    Protocol = [WinSCP.Protocol]::Sftp
    HostName = "sftp.yourserver.com"
    UserName = "sftp_username"
    Password = "sftp_password"
    SshHostKeyFingerprint = "ssh-rsa 2048 xx:xx:xx:xx:xx"
}

$session = New-Object WinSCP.Session
$session.Open($sessionOptions)
$transferOptions = New-Object WinSCP.TransferOptions
$session.PutFiles("C:\Exports\sales.csv", "/inbox/", $False, $transferOptions)
$session.Dispose()
Note: You’ll need to install WinSCP and load its .NET assembly to make this work. Then, change the file paths, SQL Server credentials, and add it to a scheduler. But once set up, it runs like clockwork.
Best For
- Teams with someone comfortable writing or editing scripts
- Regular, scheduled exports that need to run quietly in the background
- People who want control over file naming, formats, and timing
- Power users who say “I’ve got this” when things break
Pros
- Fully automatable — set it and forget it
- No manual clicking
- Works great with Windows Task Scheduler or cron jobs
- Can be customized endlessly (file formats, destinations, filtering, etc.)
Cons
- Setup takes time and technical know-how
- Needs someone to maintain it (scripts age like milk, not wine)
- Error handling and logging need to be added manually
- Not super beginner-friendly if you’re allergic to code
Shortcut tip for non-tech folks:
Send the script earlier to your IT person and let him tweak it to your needs.
Next, we’ll look at SSIS, Microsoft’s visual way of automating data movement—less code, more clicky boxes.
Method 3: SQL Server Integration Services (SSIS)
Now we’re stepping into pro-level automation. This method uses Microsoft’s own tool called SQL Server Integration Services (SSIS) — basically, a fancy way to move data around automatically.
SSIS can handle big jobs: extracting data from SQL Server, transforming it if needed, and dropping the final file onto your SFTP server.
But here’s the thing — setting it up involves Visual Studio, special add-ons, and some heavy clicking.
Note: If you’re not comfy with Visual Studio (or even know what that is), don’t worry.
This is where your tech teammate, IT department, or friendly consultant comes in.
You just need to know what it does, not how to build it.
Best For
- Companies doing regular, complex, or large data transfers
- Teams that already use SQL Server tools
- Environments where IT owns the process
- Workflows that need to combine, filter, or format data before sending
- “One-and-done” setups that run for years (when done right)
Here’s a typical SSIS package you may see in your tech guy’s screen:
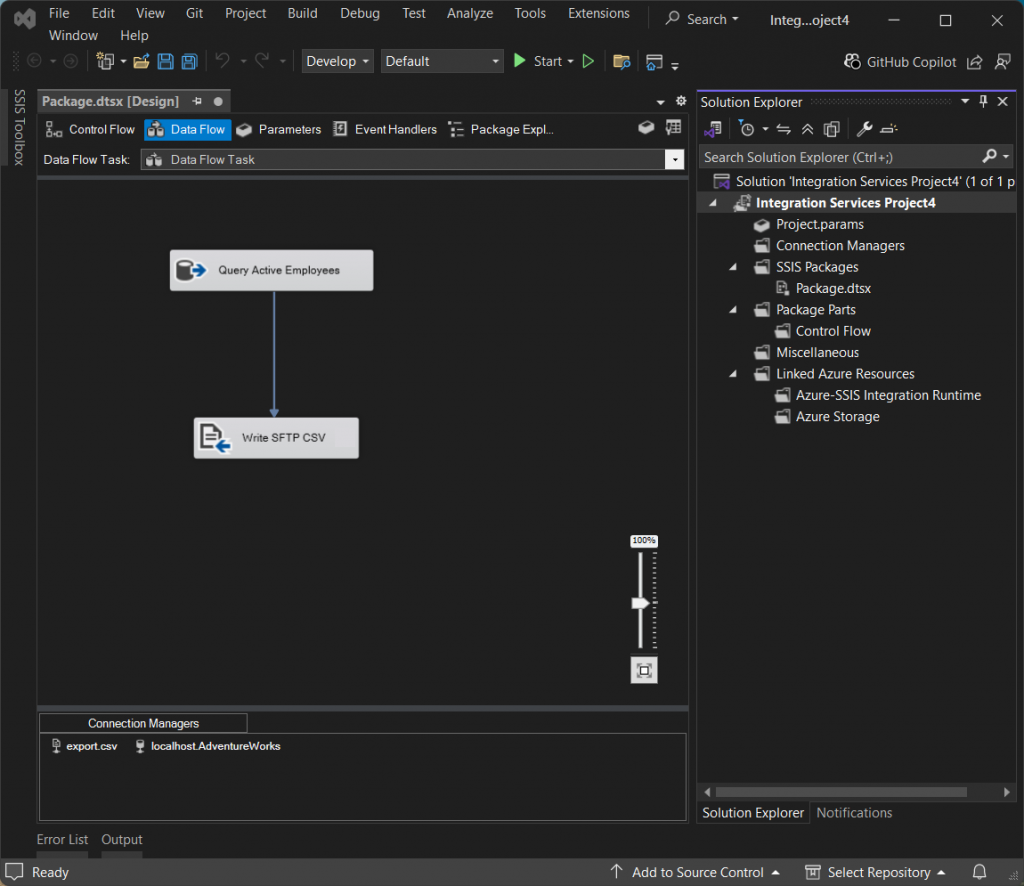
Step-by-Step Guide (high-level version for you)
- Your IT teammate installs SQL Server Data Tools (SSDT) — an add-on for Visual Studio.
- He creates an SSIS package to pull data from SQL Server.
- Inside SSIS, he adds steps to convert the data into a file (usually CSV).
- He configures an SFTP task — using a third-party SSIS component (like KingswaySoft, COZYROC, or ZappySys).
- He schedules the package to run automatically using SQL Server Agent.
Then, data flows quietly to SFTP on schedule. You enjoy your coffee.
Pros
- Fully automated
- Can handle complex data flows (joins, filters, transforms, etc.)
- Once set up, runs for years with little intervention
- Built for big, repeatable jobs
Cons
- Requires technical skills (Visual Studio + SSIS experience)
- Third-party components are often needed for SFTP support (not free). Or use a workaround like this.
- Takes time to set up and test
- Hard to maintain if your IT expert leaves (you know how that goes)
Shortcut tip for non-tech folks:
You don’t need to build SSIS packages yourself. Just ask your tech guy to do it for you.
Pro tip:
If your company already uses SSIS for other jobs, adding an SFTP export may only take a few extra steps. Sometimes IT loves adding “just one more” to an existing package.
Next up: Let’s talk about a slightly weird but sometimes handy option — Linked Servers.
Ready?
Method 4: Linked Servers
Okay — time for one of the strangest ways to move data from SQL Server to SFTP. This one’s called Linked Servers.
At its core, Linked Servers let SQL Server talk to other databases. You can query Oracle, MySQL, Excel files, or even other SQL Servers — all without leaving your comfy SQL Server Management Studio window.
But—and this is important — Linked Servers don’t know how to talk to SFTP on their own. They can’t magically drop CSV files into your SFTP folder.
There’s no “Save as SFTP” button (sadly).
So why are we even talking about this?
Because there’s a workaround some tech folks love to tinker with:
- You add a third-party ODBC driver that pretends your SFTP folder is just another database.
- SQL Server links to that driver using Linked Servers.
- You write a query, and behind the scenes, files get pushed to SFTP.
Basically, you’re tricking SQL Server into thinking your SFTP folder is a table.
It works… but let’s be real — this is 100% a job for your IT teammate who enjoys reading long driver documentation on weekends.
Best For
- Highly technical teams who love saying, “I can make that work.”
- Companies already using Linked Servers for other integrations.
- Environments where direct-to-SFTP scripting isn’t allowed, but database drivers are.
Step-by-Step Guide (High Level)
- IT installs an SFTP ODBC driver (like CData SFTP, Progress, or similar) on the SQL Server machine.
- They configure the ODBC driver with the SFTP credentials.
- In SQL Server, they set up a Linked Server that points to this ODBC connection.
- They write queries that insert or select data — but instead of targeting a real table, you’re hitting the SFTP folder.
- Data gets “written” into SFTP automatically (though technically it’s the driver doing the magic).
Pros
- Fully automated once set up.
- No separate scripting or ETL tools required.
- Can run inside SQL Server jobs and scheduled tasks.
- Might fit strict IT policies where only database tools are allowed.
Cons
- Very technical setup.
- ODBC drivers often require extra licenses.
- Can be fragile if drivers get updated or break.
- Extremely confusing if you’re not deeply technical.
Pro tip:
In most real-world cases, companies skip this option unless they already have Linked Servers running for other reasons. It’s cool but a bit… extra.
Next up: The most beginner-friendly option is coming — Cloud Integration Platforms (like Skyvia 👋).
No scripts. No weird drivers. And no “just one more Linked Server.”
Let’s make life easier.
Method 5: Cloud-Based Integration Platforms
And here we are.
The option you’ve probably been waiting for.
No scripts.
No Visual Studio.
And no Linked Server voodoo.
Just clicks, connections, and done.
Cloud-based integration platforms (like Skyvia) handle the heavy lifting for you. You log in, set it up once, and your data moves from SQL Server to SFTP like clockwork.
No babysitting required.
If you can fill out a form, you can set this up. And yes, your IT teammate might still help with credentials — but you won’t need them for hours this time.
Best For
- Non-technical users who want automation without writing code
- Small to medium businesses without full-time IT staff
- Operations, analysts, project managers, or anyone tired of manual exports
- Companies that want a quick setup and simple maintenance
Step-by-Step Guide (Skyvia Example)
Don’t worry if you don’t have a Skyvia account now. You can have it for free and start SQL Server to SFTP integration immediately.
Create Your Skyvia Account
- Go to Skyvia.com.
- Sign up (or log in if you already have an account).
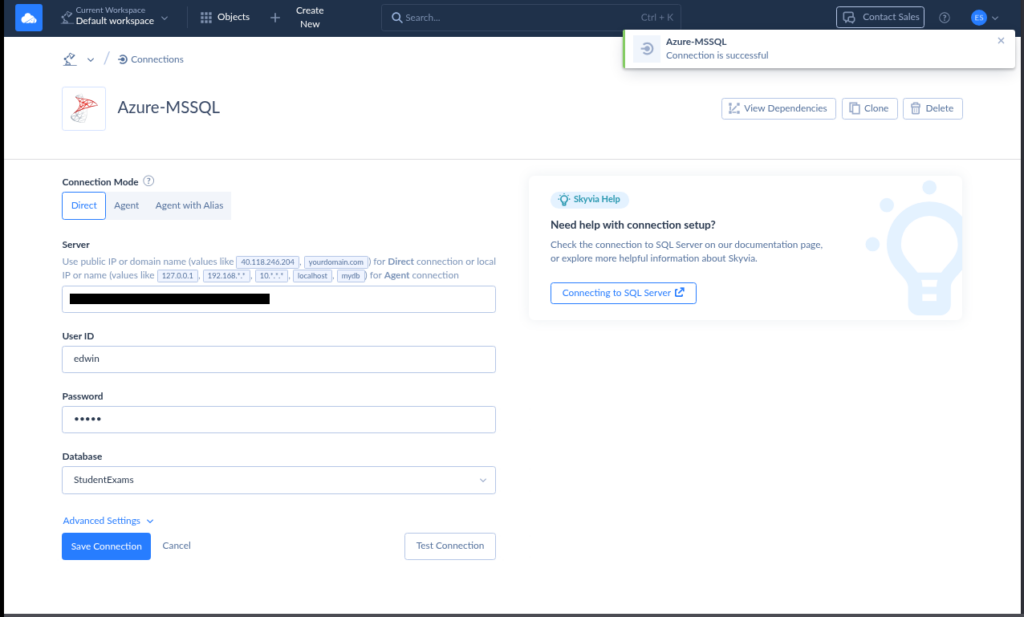
Set Up SQL Server Connection
- In Skyvia, click + Create New → Connection.
- Search for the SQL Server connector and choose it.
- Enter your:
- Server name (or cloud server URL if you’re using a cloud SQL Server, like Azure SQL)
- Database name
- Authentication details (SQL username + password or Windows auth)
- (Optional) Allow Skyvia’s IP addresses through your SQL Server firewall if needed.
- (Optional) Install the Skyvia Agent in your SQL Server instance if your database is on-premises.
Test the connection. If it says Connection is successful, you’re golden. Check out a sample below:
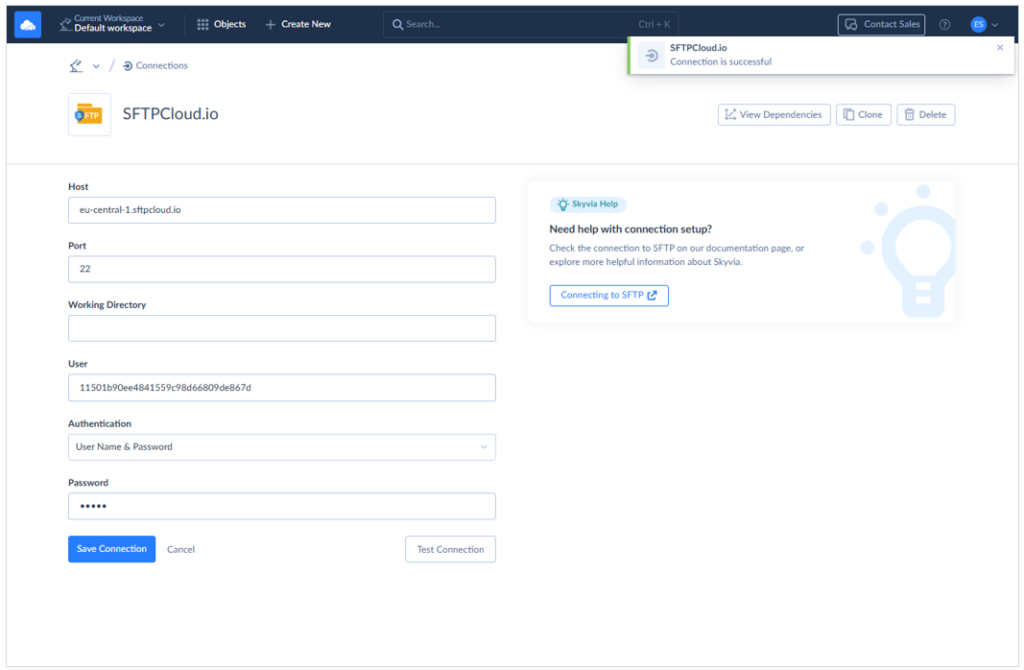
Set Up SFTP Connection
- Again, click + Create New → Connection.
- Choose SFTP.
- Enter your:
- SFTP host
- Port (usually 22)
- Username and password or SSH key
- Target folder where files should land.
- Test this one too. Again, green means happy face. Check out a sample below:
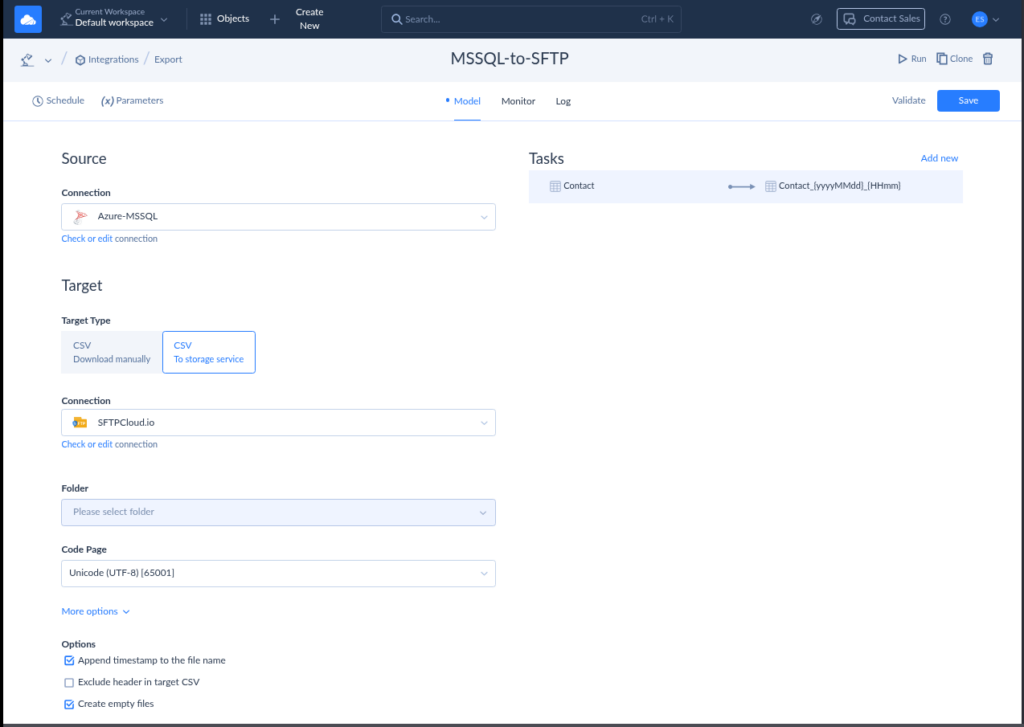
Build the Export Integration
- In Skyvia, click + Create New → Export.
- Select your SQL Server connection as the source.
- Choose CSV to Storage Service as the Target Type.
- Choose your SFTP connection as the target.
- Pick the SFTP folder where you want the file to go.
- Create a Task where you will choose a SQL Server table and columns.
- Name your export task something simple you can remember. The sample below shows how simple it is with a few boxes:
Schedule It (The Magic Part)
- From the top left corner of the page, click Schedule.
- Set up a schedule: daily, weekly, hourly — whatever you need. Then, click Save.
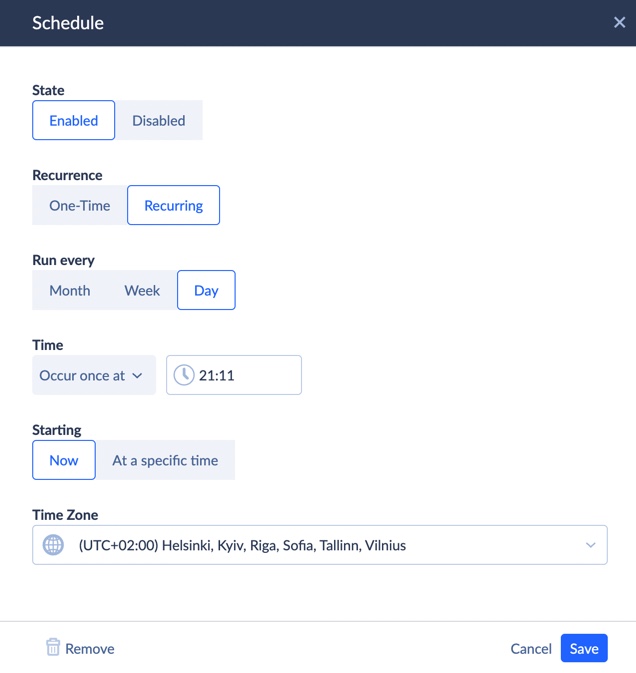
Skyvia will run it automatically based on your schedule. So, go make coffee while Skyvia moves your files.
Pros
- No coding or scripting
- Web-based, so nothing to install
- Built-in scheduler
- Clean interface (actually nice to use)
- Error handling, logs, and notifications included
- Scales easily as your needs grow.
- BONUS: Includes a free tier so you can test it out immediately.
Cons
- Limited features for the free tier.
- May still need IT help for initial firewall access or credentials
- Requires internet access (cloud-based service)
Shortcut tip for non-tech folks:
If you ever felt “I wish there was just a website where I click buttons to move data” — this is it.
Pro tip:
Skyvia also supports reverse flows (sync data from SFTP to SQL Server) and more complex workflows — handy for future projects as your automation needs grow.
Next up:
Before we wrap it all up, let’s talk about a few key things to keep in mind before choosing any method.
You’ve come this far — almost there!

Key Considerations & Best Practices for SQL Server SFTP Integration
Alright.
Before you pick one and dive in, let’s cover some real-world stuff you should know — so your integration doesn’t turn into a “why is it broken again?” problem down the road.
Data Security
Moving data is easy. Keeping it safe is where people mess up.
Make sure:
- You’re using SFTP (not plain FTP)
- Passwords and keys are kept secure
- Your SQL Server only allows trusted IPs (yes, Skyvia gives you those)
- The files you send don’t include stuff they shouldn’t (personal data, secrets, etc.)
Example:
A healthcare team exports patient reports. By using SFTP, encryption keeps private info safe in transit, and keeps it on the right side of HIPAA.
Because nobody wants that phone call from compliance.
Data Format & Consistency
SFTP moves files. But what’s inside the file matters too.
Stick to:
- Clean, consistent CSV files
- Standard date formats (e.g., YYYY-MM-DD)
- Clear column headers
Example:
An accounting team sends weekly sales data to a partner.
They agreed on CSV with 4 columns: date, store ID, product ID, sales amount.
No surprises = happy partner = fewer angry emails.
Error Handling & Logging
Stuff will fail sometimes. That’s just life.
Set up:
- Error alerts
- Logs that show what ran (or didn’t)
- Notifications when something breaks
Example:
An analyst sets up Skyvia exports. One day, the SFTP server is down. Instead of quietly failing, Skyvia emails them:
“Hey, your job failed at 2:05 AM. Here’s why.”
They fix it before anyone notices.
Performance & Scalability
Moving 500 rows? Easy.
Moving 50 million? Whole different game.
Plan for:
- Incremental exports (don’t move everything every time)
- Compressed files, if needed
- Network bandwidth
Example:
A logistics company exports shipment data daily. Instead of re-exporting 12 months of history, they only send new rows since yesterday.
Saves time. Saves bandwidth. And saves sanity.
Automation & Scheduling
Manual = painful.
Automation = freedom.
Whatever tool you use, make sure:
- It runs automatically
- It runs on the right schedule
- You get alerts if something fails
Example:
A PM sets up a daily export with Skyvia at 3 AM.
They don’t touch it for months. The data just shows up.
Every day feels like magic.
Change Management
At some point, stuff will change:
- New data columns
- New file formats
- Different SFTP folders
- Personnel changes
Document:
- Where your jobs run
- Who maintains them
- Credentials and configurations
Example:
When the lead analyst leaves, their handoff doc explains where the Skyvia jobs live, what folders are used, and who to call for help.
The new guy doesn’t panic.
Testing Before You Go Live
Never launch blind. Test your integration with:
- Sample data
- Test SFTP credentials (if possible)
- Dummy files
Example:
A sales ops team tested their SSIS export using fake customer records first.
Once the files landed correctly, they flipped the switch for live data — confident nothing would break.
Backup Your Backups
You’re moving files to SFTP — great. But where’s your backup of the backup?
Have:
- Retention policies
- Secondary copies if files are critical
- Backup versions kept locally or in cloud storage
Example:
A finance team archives each week’s exported CSVs into both SFTP and a local NAS drive.
When the SFTP server crashed one day, they still had last week’s file ready to go.
Bottom Line?
Set it up right the first time.
Document it.
Test it.
Back it up.
That way, your data transfers run quietly in the background, while you sip coffee and impress your boss with how “smooth” everything works.
Next up:
Let’s wrap this up with a quick summary, some final advice, and the FAQ that answers questions you know your coworkers will ask.
Conclusion
Moving data from SQL Server to SFTP used to feel like pulling teeth.
Manual exports. File renaming. Upload drama. Late-night “Oops, I forgot” moments.
But now?
You’ve got options.
From simple one-time exports to tech-powered scripts to fully automated cloud platforms like Skyvia, there’s a solution for every team, every skill level, and every budget.
The sweet spot for most non-tech folks?
Cloud integration platforms.
They take care of the tricky stuff while you focus on work that actually matters.
No more guessing. No more babysitting file transfers. Just clean, automated data flows — every time.
Final thought:
Pick the option that fits your team today — and leaves room to grow tomorrow.
Because once you automate this one thing… you’ll want to automate everything else too.So, why not try Skyvia and start doing this today?

F.A.Q. for SQL Server to SFTP Integration

Can I automate the process of exporting data from SQL Server to SFTP on a regular schedule?
Yes! Use scripts, SSIS, or cloud tools like Skyvia to run jobs for you on any schedule you want.
Do I need to be a programmer to integrate SQL Server with SFTP?
Nope. Some options need coding, but cloud tools like Skyvia let you do it with forms, diagrams, and clicks – very simple.
What common file formats are used when exporting data from SQL Server to an SFTP server?
CSV is the most common. It’s simple, easy to share, and works with most systems.
What are some typical use cases for integrating SQL Server with SFTP?
Sharing reports, backups, data feeds for partners, syncing with external systems, or archiving files for compliance.
