

Imagine a growing company where sales teams rely on Salesforce to manage customer relationships, while analysts dig through Snowflake’s data warehouse to generate reports and forecasts. Yet, without a smooth connection between these systems, teams often face duplicated efforts — manual exports, inconsistent data, and delayed insights. This disconnect slows decision-making and frustrates everyone involved.
In this guide, you’ll discover practical, code-free methods and native options to connect Salesforce and Snowflake efficiently. Whether you want the speed and scale of BYOL Data Sharing, the simplicity of manual imports, or the flexibility of a no-code platform like Skyvia, we’ll walk you through step-by-step approaches to help you simplify workflows, save time, and enhance your business intelligence.
Table of contents
- What Is Snowflake?
- Why Connect Salesforce and Snowflake?
- How to Connect Salesforce and Snowflake?
- Summary
What Is Snowflake?

Snowflake isn’t just another database sitting in the cloud — as the screenshot boldly puts it, it’s a “Platform like no other.” And that’s not marketing fluff. Snowflake pulls together capabilities that most teams try to stitch across three or four different tools, then hopes everything plays nicely. Here, it all hangs together by design.
If you look closely at the components shown, you’ll see why Snowflake has become the backbone of so many modern analytics stacks. Its Interoperable Storage lets you land and access data at near-infinite scale, whether it comes from SaaS apps, on-prem systems, or raw files. Elastic Compute gives you the horsepower to spin up separate compute clusters for different teams without stepping on each other’s toes — perfect when finance, marketing, and data science all want to run heavy workloads at the same time. And with Cortex AI, Snowflake now brings secure AI workloads and LLM-powered analytics straight to your data, without the messy movement usually required to make AI useful.
This is exactly why businesses pair Snowflake with Salesforce: Snowflake handles massive-scale analytics, AI models, and cross-system datasets. The kind of work Salesforce simply isn’t designed to do inside the CRM. When you blend the two, Salesforce becomes the real-time operational layer, and Snowflake becomes the intelligence layer powering insights Salesforce alone could never produce.
Key Features of Snowflake
- Separation of Compute and Storage: Independently scale compute power and storage capacity, so you only pay for what you actually use — maximizing performance and trimming costs.
- Multi-Cloud Support: Run your workloads smoothly across AWS, Azure, and Google Cloud without being locked into a single vendor.
- Elastic Scalability: Handle virtually unlimited concurrent users and workloads with a multi-cluster shared architecture that keeps queries lightning-fast.
- Advanced Data Types: Natively support structured data alongside semi-structured formats like JSON, Avro, and Parquet — plus handle unstructured data flexibly.
- Secure Data Sharing: Share securely and in real time across departments and partner organizations — all without creating copies or compromising governance.
- Fully Managed Service: Forget about infrastructure headaches — Snowflake automates everything from performance tuning to data compression and micro-partitioning.
- Integration Friendly: Connect effortlessly with popular BI tools such as Tableau and Power BI, and leverage developer frameworks like Snowpark for custom analytics.
- Robust Security and Compliance: Built-in encryption, multi-factor authentication, and certifications like GDPR, HIPAA, and PCI DSS ensure your information stays protected and compliant.
Why Connect Salesforce and Snowflake?
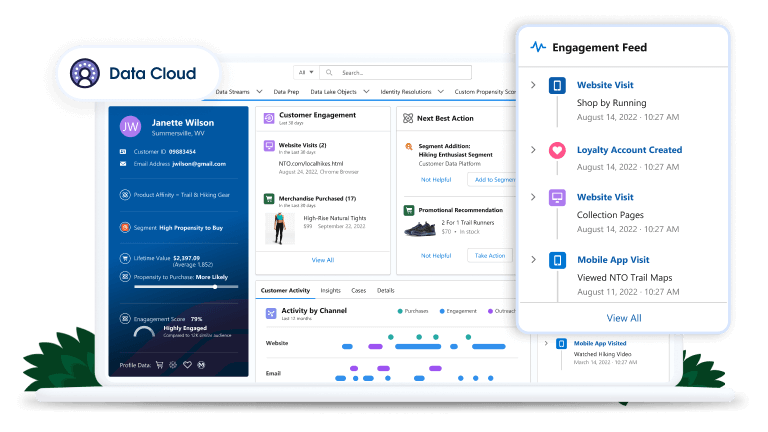
Imagine harnessing the full power of your customer data by bridging Salesforce’s rich CRM ecosystem with Snowflake’s cutting-edge cloud analytics platform. This integration pulls together your fragmented data sources into a single, unified ecosystem — tearing down silos and unlocking a panoramic, 360-degree customer view that drives smarter sales, marketing, and service strategies.
By syncing information, businesses can zero in on personalized marketing, sharpen customer segmentation, and execute campaigns that hit the mark every time. For instance, retailers can blend Commerce Cloud data with Snowflake’s inventory and sales analytics to fine-tune product availability and promotional efforts dynamically.
Key Benefits of Salesforce to Snowflake Integration:
- Unified Customer Profiles: From point-of-sale systems to supply chain logistics and third-party marketplaces — creating rich, actionable customer insights.
- Advanced Analytics and AI: Leverage Snowflake’s scalable architecture to power predictive models, sales forecasting, and customer propensity scoring, fueling precision-targeted campaigns and sharper segmentation.
- Real-Time Data Sharing: Take advantage of Salesforce’s Bring Your Own Lake (BYOL) feature for zero-ETL, real-time syncing between Salesforce Data Cloud and Snowflake, wiping out latency and redundant data copies.
- Improved Decision-Making: Fuse historical Salesforce records with up-to-the-minute market trends and web analytics inside Snowflake to optimize inventory management, marketing budgets, and sales strategies.
- Cost Efficiency: Pay strictly for what you consume, while integration tools like Skyvia, Fivetran, and Estuary Flow take the manual toil out of pipeline management.
- Enhanced Customer Experiences: Real-time analytics empower teams to craft personalized customer journeys and speed up issue resolution, boosting satisfaction and loyalty.
- Flexible Integration Options: Choose from native methods or tap third-party solutions for scheduled or streaming data syncs tailored to your needs.

How to Connect Salesforce and Snowflake?
Choosing the right way hinges on your business needs, technical resources, and budget. Whether you want to manually push small batches occasionally, leverage Salesforce’s latest zero-ETL BYOL Data Sharing for real-time analytics, or set up fully automated, no-code pipelines with Skyvia, each method comes with its own strengths and trade-offs.
This table breaks down these key options by who they’re best suited for, the technical expertise required, their automation capabilities, and pricing considerations, helping you zero in on the best fit for your goals.
| Method | Salesforce Data Import Wizard | Salesforce Data Cloud BYOL Data Sharing | No-Code Integration: Skyvia |
|---|---|---|---|
| Best For | Small to medium data volumes (up to 50,000 records); one-time or infrequent batch imports; non-technical users | Enterprises needing real-time, zero-ETL, bidirectional sync; Salesforce-centric organizations with Data Cloud licenses; AI/ML use cases | Businesses of all sizes wanting scalable, automated, no-code Salesforce–Snowflake syncs; complex data mapping and Reverse ETL |
| Technical Skill Required | Low. No coding, browser-based wizard | Medium to High. Requires Salesforce admin and Snowflake setup knowledge | Low to Medium. Intuitive GUI, minimal coding needed |
| Automation & Real-Time Support | Manual process; no automation or real-time syncing | Real-time, zero-copy, bidirectional syncing via Salesforce Data Cloud | Supports scheduled and near real-time syncs with incremental updates |
| Pricing Considerations | Included in most Salesforce editions; no extra cost | Requires Salesforce Data Cloud subscription; consumption-based pricing | Freemium tier available; paid plans for higher volumes/features |
Method 1: Salesforce Data Import Wizard
The Salesforce Data Import Wizard is a built-in, browser-based tool designed to simplify the process of importing information from external sources. It’s particularly useful for businesses that need to move files occasionally or in smaller batches without setting up complex pipelines or requiring coding skills. Using this wizard, you can upload CSV files and map their fields to Salesforce objects in a guided, step-by-step manner.
While this method offers an accessible and straightforward way, it’s best suited for one-off or infrequent imports rather than ongoing synchronization. It lacks automation and has limitations on data volume and object types it supports, but its ease of use makes it a valuable option for non-technical users and small datasets.
Best for
- Small to Medium Data Volumes: Ideal for importing up to 50,000 records, perfect for initial migrations or occasional updates.
- Non-Technical Users: Suitable for Salesforce admins or business users without coding experience, requiring no additional software.
- One-Time or Infrequent Imports: Great for importing campaign leads, historical data, or batch uploads without automation.
- Standard and Custom Objects: Supports importing to common Salesforce objects like Accounts, Contacts, Leads, and custom objects.
Pros
- User-Friendly Interface: Step-by-step wizard guides you through object selection, field mapping, and file upload, minimizing errors.
- No Extra Cost: Included in all Salesforce editions except Database.com, no additional licensing needed.
- Flexible Field Mapping: Automatically maps common CSV columns, with manual overrides for unmapped or custom fields.
- Data Integrity Features: Supports deduplication and can trigger Salesforce automation rules during import.
- Error Reporting: Detailed import status and error logs help troubleshoot failed records efficiently.
Cons
- Record Limitations: Only supports up to 50,000 records per import, limiting large-scale data transfers.
- No Automation: Requires manual CSV exports and imports, not suitable for frequent or real-time syncing.
- Object Restrictions: Does not support all standard Salesforce objects (e.g., Opportunities, Cases, Campaigns).
- Manual Mapping Required: Complex datasets require time-consuming manual field mapping.
- File Size Limits: Maximum 100 MB file size (32 MB zipped) and 90 fields per file may restrict large datasets.
Step-by-Step Guide
Step 1: Launching the Salesforce Data Import Wizard
- When you open the Data Import Wizard, Salesforce immediately sets the stage with the screen shown above. You’ll notice it frames the whole process as “3 easy steps!” and that’s a fair description of how the tool works when everything is prepped correctly.

- Right at the top, Salesforce gives you a quick reminder to clean up your file and make sure field names match. But the real action is in the center panel, where Salesforce lays out the core workflow:
- Choose data to import
- Edit field mapping
- Review and start import
This visual roadmap is exactly what the Wizard will walk you through once you begin.
- To get started, simply click the big green “Launch Wizard!” button shown in the image. That button kicks off the import flow and takes you to the object selection step, where you’ll decide whether you’re importing Contacts, Accounts, Leads, or other supported objects.
Step 2: Defining Your Data and Action
- Once the Wizard launches, Salesforce walks you into the next decision point: telling the system what you’re actually importing and what you want it to do with that data. The screen above lays it out cleanly.

- On the left, under “What kind of data are you importing?”, you’ll choose the object you want to load. In this example, Leads is selected under Standard objects, which is exactly what you’d do if you were following a “how to import leads” workflow.
- In the middle column, Salesforce asks “What do you want to do?”. For most first-time imports, you’ll choose Add new records. It’s the straightforward option when you’re bringing in brand-new leads or accounts without needing updates or upserts. You can also match on fields like Name if Salesforce should link new data to existing records, but new imports usually keep things simple.
- On the right, under “Where is your data located?”, you’ll upload your file. Click the Choose File button, browse to the CSV you prepared, and attach it. This is the heart of the “CSV file import” step: Salesforce can only proceed once it has the file, character encoding, and format ready to go.
- When everything looks right: object selected, action chosen, file attached, click Next in the bottom-right corner, just as highlighted in the image. That moves you into field mapping, where Salesforce starts matching your CSV columns to its own fields.
Step 3: How to Map Your CSV Fields in Salesforce
- Now you’ve arrived at the Edit Field Mapping screen. Arguably, the most important step in the entire import process. This is where Salesforce takes the columns from your CSV file and asks you to match them to the correct Salesforce fields.

- In the image above, you’ll see two key columns:
- CSV Header: the columns exactly as they appear in your uploaded file
- Mapped Salesforce Object: the Salesforce fields your data should flow into
Note: Salesforce will try to auto-map fields where names are obvious (like Name or Email), but anything it can’t interpret shows up as Unmapped, which means the data in that column will not be imported unless you map it manually.
- To fix or review mappings, click Change (for fields Salesforce thinks it mapped correctly) or Map (for unmapped fields). Salesforce will open a list of all available fields for the object you’re importing. In this case, Leads. Choose the correct destination field so your data lands exactly where you want it.
Note: This step directly solves the problem behind common searches like “How to map fields in Salesforce?” and “CSV header mapping,” because you’re telling Salesforce precisely how to translate your spreadsheet into CRM-ready data.
- Once every required field is mapped and you’re confident your import will land cleanly, click Next in the bottom-right corner to move to the final review screen.
Method 2: Salesforce Data Cloud’s Bring Your Own Lake (BYOL) Data Sharing
The native integration between Salesforce and Snowflake, specifically through Salesforce Data Cloud’s Bring Your Own Lake (BYOL) Data Sharing, eliminates the need for third-party tools or manual exports. Launched in 2023, this solution enables zero-ETL, bidirectional, real-time data sharing.
Best For
- Enterprises with Real-Time Data Needs: Ideal for companies looking to leverage real-time data analytics and AI-driven insights without the complexity of traditional ETL pipelines.
- Salesforce-Centric Organizations: Best for businesses already using Salesforce Data Cloud and looking to unify CRM data with external enterprise data.
- AI/ML Applications: Organizations aiming to use predictive modeling, machine learning, or advanced analytics.
- Large-Scale Cross-Cloud Analytics: Perfect for industries like retail, healthcare, and finance that need scalable, real-time data access for customer segmentation or operational reporting.
Pros
- Zero-ETL Data Sharing: Eliminates the need for traditional ETL processes, reducing duplication and simplifying the integration workflow.
- Real-Time Data Access: Ensures up-to-date information is available without delay, enhancing decision-making with live data.
- Bidirectional Data Sync: Supports both ways, allowing for comprehensive integration.
- Simplified Setup: Easy to enable with a point-and-click interface, and no third-party middleware required.
- Scalable and Cost-Efficient: Ensures performance at scale, with pricing based on consumption, which can be more cost-effective than traditional methods.
Cons
- Cost Considerations: While providing powerful capabilities, it requires a Salesforce Data Cloud subscription, which may be expensive for smaller businesses or startups.
- Latency in Bidirectional Sync (for Sync Out Connector): Although it allows real-time access, certain aspects like the Sync Out Connector may introduce delays (10-15 minutes for syncs).
- Setup Complexity for Smaller Teams: Requires some level of Salesforce admin expertise and Snowflake knowledge to set up databases, schemas, and permissions, which might be challenging for non-technical teams.
- Limited for Advanced Analytics (Sync Out Connector): The Sync Out connector offers scheduled syncs and lacks the real-time syncing functionality needed for operational use cases or instant updates.
Step-by-step Guide
Step 1: Set Up Snowflake Environment
- Create Database, Schema, and Warehouse: In Snowflake, create a database and schema that will hold your Salesforce data. Example command:
CREATE DATABASE salesforce_data; CREATE SCHEMA salesforce_data.public;
CREATE WAREHOUSE salesforce_wh WITH WAREHOUSE_SIZE = 'XSMALL'; - Grant the necessary role permissions to ensure secure access.
GRANT USAGE ON WAREHOUSE salesforce_wh TO ROLE salesforce_role; GRANT CREATE, INSERT, UPDATE ON SCHEMA salesforce_data.public TO ROLE salesforce_role;Step 2: Configure Salesforce Data Cloud
- Enable Data Sharing: In Salesforce Data Cloud, go to Data Shares > Create New, and choose Snowflake as your target.
- Setup Authentication: Ensure that you have Salesforce API access and configure authentication via OAuth or Password for secure integration.
Step 3: Create Data Share in Salesforce
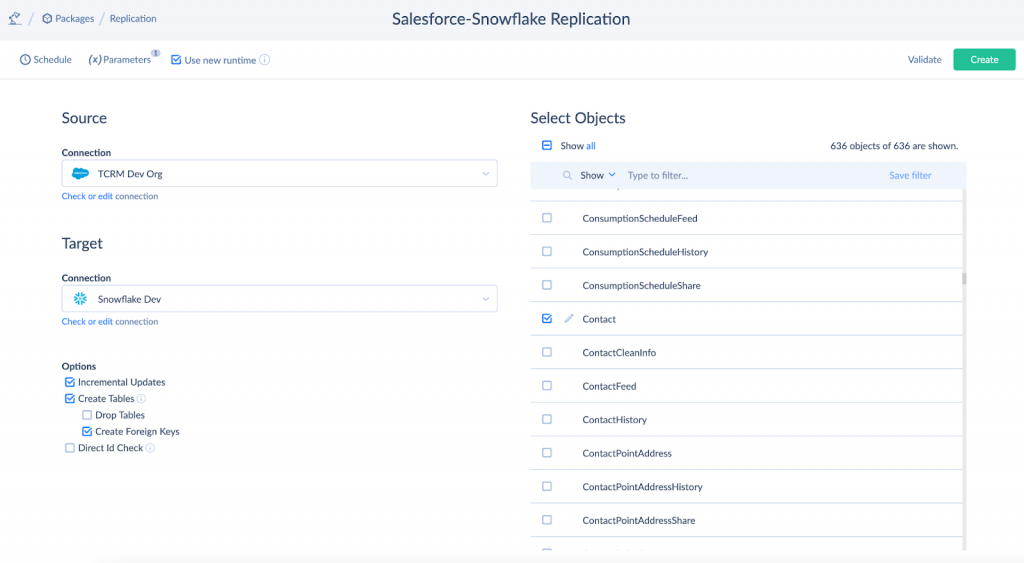
- Set Up Data Share: Select the objects (e.g., Accounts, Opportunities) you want to share with Snowflake. Choose the necessary fields and configure the data share settings. Use Data Shares to link your data to Snowflake. Example:
CREATE DATA SHARE salesforce_share
ADD ACCOUNT, OPPORTUNITY, CONTACT;
Step 4: Configure Data Access
- Connect Salesforce Data to Snowflake: Ensure Snowflake has permissions to access shared data. Use its secure data sharing functionality:
CREATE DATABASE salesforce_share FROM SHARE salesforce_share; Step 5: Enable Real-Time Data Sharing
- Activate Bidirectional Sync (Optional): Salesforce Data Cloud’s BYOL Data Sharing feature allows bidirectional sync, so you can push Salesforce data to Snowflake and bring Snowflake data back into Salesforce. Set up data flows that suit your real-time analytics or AI models.
Step 6: Verify the Integration
- Test Data Sync: Run a test to ensure information is syncing correctly. Verify the shared data in Snowflake:
SELECT * FROM salesforce_data.public.account; - In Salesforce, ensure that the data from the storage is visible as expected.
Step 7: Monitor and Optimize
- Keep an eye on the pipelines to ensure performance and accuracy.
- Use Salesforce Data Cloud’s governance tools to track and manage data access and ensure compliance.
- Snowflake provides detailed usage statistics and performance metrics that help optimize costs and performance.
Method 3: Code-Free Data Integration with Skyvia
Skyvia is a cloud-based, no-code data integration platform that makes connecting Salesforce and Snowflake simple and accessible, even without technical skills.

Supporting ETL, ELT, and Reverse ETL workflows, Skyvia allows you to replicate, import, and sync data bidirectionally with just a few clicks. With over 200 native connectors, an intuitive visual interface, and flexible scheduling, Skyvia streamlines complex data pipelines and eliminates the need for manual coding or maintenance. This makes it an ideal choice for businesses looking to automate Salesforce-Snowflake integration while reducing reliance on IT resources.
Skyvia offers powerful automation features such as incremental syncing and error notifications, ensuring your data stays fresh and accurate. Whether you want continuous data replication for real-time analytics or batch imports for one-time migrations, Skyvia’s flexible tools adapt to your business needs.
Best for
- Business Users & Admins: Those who prefer a no-code solution to build and maintain pipelines without writing any code.
- Small to Large Organizations: Companies needing scalable, automated integration that grows with their volumes.
- Real-Time and Scheduled Syncing: Teams requiring near-real-time data replication or scheduled batch imports.
- Complex Data Mapping: Users who need advanced field mapping, including lookups, expressions, and transformations.
- Reverse ETL Use Cases: Organizations that want to load enriched data from Snowflake back into Salesforce for actionable insights.
Pros
- No Coding Required: Easy to use with a drag-and-drop interface and minimal technical expertise needed.
- Flexible Integration Options: Supports ETL, ELT, and Reverse ETL workflows in one platform.
- Incremental Syncing: Efficiently syncs only changed records, saving API calls and costs.
- Automated Schema Handling: Automatically creates and updates Snowflake tables based on Salesforce objects.
- Advanced Scheduling & Error Handling: Offers customizable schedules and sends notifications for sync issues.
- Wide Connector Support: Over 200 pre-built connectors, including all most popular services.
- Free Tier Available: Allows testing with all features before committing to paid plans.
Cons
- Subscription Cost: Full-featured capabilities require paid plans, which might be costly for very small teams or low-volume use.
- Initial Setup Time: Complex mappings or large schemas may require some setup and testing to perfect.
- Limitations on Extremely Large Data Volumes: For massive enterprise data lakes, more specialized tools might be required.
Step-by-Step Guide: Data Replication
Skyvia’s Data Replication feature automates continuous syncing of Salesforce data to Snowflake (and vice versa), creating a reliable and up-to-date single source of truth for analytics. Unlike one-time data imports, replication maintains exact copies of selected objects, such as Contacts, Leads, Opportunities, and custom objects, automatically generating the necessary tables and schemas.
By leveraging incremental syncing, it only transfers new or changed records, reducing API usage and processing costs, which is ideal for organizations needing real-time or near-real-time insights.
How It Works:
- Automated Schema Creation: Skyvia automatically creates and updates Snowflake tables that correspond to Salesforce objects, including adapting to schema changes when new fields are added.
- Incremental Updates: Using Change Data Capture (CDC), only new or modified records are synced. For example, if a Contact’s email changes, only that specific record is updated.
- Flexible Scheduling: Set your sync frequency from every minute to monthly, depending on your business requirements, enabling either near-real-time or batch updates.
- Filtering & Customization: Configure filters (e.g., sync only “Closed Won” Opportunities) or exclude certain fields to optimize data flow and minimize unnecessary processing.
- Reverse ETL: Sync enriched data, enabling sales teams to access actionable insights such as updated customer segments directly within their CRM interface.

Benefits of Real-Time Syncing
- Ensures your analytics dashboards are always fresh with the latest data (e.g., real-time sales performance reports).
- Minimizes manual tasks, freeing teams from repetitive syncing processes.
- Supports advanced analytics and predictive modeling by keeping your warehouse current.
- Reduces errors with detailed logging and automated email notifications on sync failures.
Step-by-Step Guide: Data Import
Skyvia’s Data Import feature is designed for one-time or batch data transfers, making it ideal for scenarios such as migrating historical data, refreshing specific datasets, or targeted updates without maintaining continuous syncing. Unlike replication, which focuses on ongoing, incremental synchronization, Data Import supports flexible data manipulation operations — Insert, Update, and Delete — allowing for more granular control. It also enables advanced mapping capabilities, transforming and aligning mismatched schemas to ensure your information fits seamlessly in the target system.
How Data Import Differs from Replication:
- One-Time or Ad-Hoc Transfers: Best suited for specific, non-recurring data loads rather than ongoing syncs.
- Complex Mappings: Supports lookups, expressions, and constants to handle schema differences, such as filling Salesforce fields with static values when no direct Snowflake equivalent exists.
- DML Flexibility: Allows selective Insert, Update, or Delete operations on records, unlike replication, which copies entire objects.
- No Schema Creation Needed: Imports data into existing tables, giving you control over table structure.
Setup Steps for Data Import:
- Create Import Integration: In Skyvia, click Create New+ > Integration > Import, name your integration (e.g., “Salesforce_to_Snowflake_Import”), and select Salesforce as Source and Snowflake as Target (or vice versa for reverse ETL). Choose the objects or fields to import.
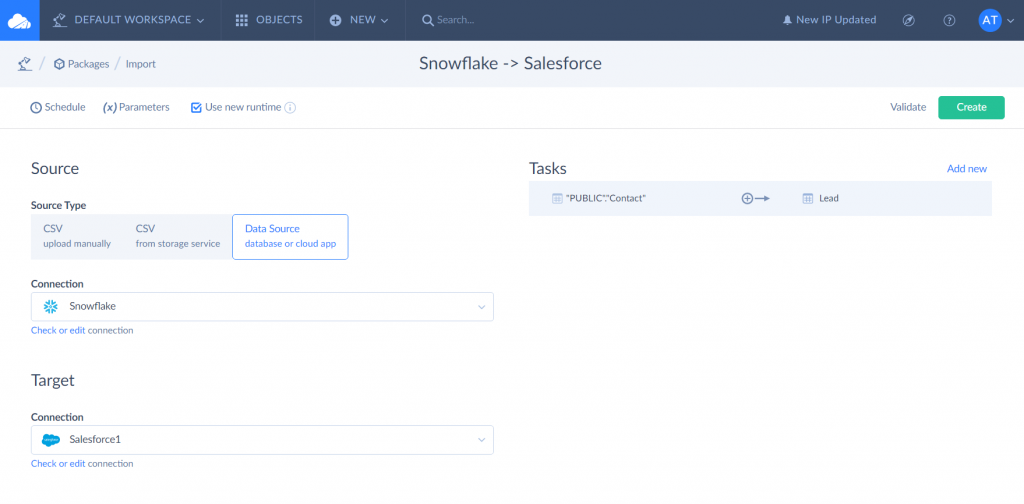
- Configure Mappings: Use Skyvia’s intuitive GUI to map Salesforce fields to Snowflake columns. Apply lookups for matching records, expressions for data transformation (e.g., concatenation), and constants for missing values. Optionally set filters (e.g., import only Contacts with status “Active”).
- Set Scheduling: Choose manual run or automate by scheduling imports (from once per minute to monthly). This allows regular refreshes of data without manual intervention.
- Run and Monitor: Validate the mappings and execute the import. Monitor progress and troubleshoot using detailed logs in Skyvia’s Run History.
- Verify Data: Confirm imported data accuracy by querying Snowflake or checking Salesforce objects for reverse ETL results.
Use Cases:
- Historical Data Migration: Transfer legacy Salesforce data (e.g., Opportunities) into Snowflake for archival and long-term analysis without ongoing sync requirements.
- Targeted Data Refresh: Import enriched customer data from Snowflake back to Salesforce to enhance sales outreach and segmentation.
- Batch Updates: Apply specific updates to Snowflake tables with Salesforce data for ad-hoc reporting or compliance needs.
Benefits of Data Import
- Simplifies complex one-time data migrations with a no-code interface, reducing reliance on developers.
- Supports advanced data transformation and mapping for seamless integration across different schemas.
- Complements replication workflows by handling non-continuous, ad-hoc data loads.
- Boosts efficiency with automated scheduling and error notifications to keep imports running smoothly.
Summary
Integrating Salesforce with Snowflake opens doors to sharper analytics and smarter business decisions. We covered three main ways to connect them:
- The Salesforce Data Import Wizard offers a simple, manual option for small or occasional imports but lacks automation.
- Salesforce’s native Bring Your Own Lake (BYOL) Data Sharing provides real-time, zero-ETL syncing ideal for enterprises invested in Salesforce and Tableau, though it requires licensing and setup.
- Skyvia’s no-code integration stands out for its ease, flexibility, and automated real-time syncing — perfect for businesses seeking hassle-free, scalable data flows without coding.
Choosing the right method depends on your needs and resources, but for non-technical users looking for powerful automation, Skyvia is the best fit. Connecting these platforms breaks down silos, unifies customer data, and powers better insights.
Ready to simplify your Salesforce-Snowflake integration? Try Skyvia’s free plan and start unlocking your data’s full potential today.

F.A.Q. for Snowflake and Salesforce

How often can data be synced automatically?
The frequency of automatic syncing depends on the integration method. Manual methods require manual uploads, while no-code platforms like Skyvia allow flexible scheduling ranging from near real-time (every minute) to daily or weekly intervals.
Is Skyvia compatible with Salesforce custom objects?
Yes, Skyvia fully supports syncing both standard and custom Salesforce objects. It allows flexible field mapping and can handle schema changes, making it a robust choice for complex Salesforce environments with custom data models.
Can I secure data transfers between Salesforce and Snowflake?
Absolutely. Most integration tools, including Skyvia, use encrypted connections such as OAuth 2.0 for authentication and support SSL/TLS encryption for data transfers. Additionally, Snowflake offers advanced security features like role-based access control, data masking, and compliance with GDPR, HIPAA, and other standards to ensure your data remains protected.
What are the main challenges in integrating Salesforce with Snowflake?
Common challenges include handling large data volumes, managing schema changes, ensuring data consistency, and scheduling syncs without impacting system performance. Choosing the right integration tool that supports automation and incremental updates can significantly reduce these challenges.
Can I sync data bidirectionally between Salesforce and Snowflake?
Yes, some platforms like Skyvia support bidirectional syncing, allowing you to replicate data from Salesforce to Snowflake and also import enriched Snowflake data back into Salesforce for actionable insights.
Do I need technical expertise to integrate Salesforce and Snowflake?
It depends on the method. Manual imports require basic knowledge of CSV exports and imports, while native connectors may require some admin skills. No-code platforms like Skyvia simplify the process and require minimal technical expertise, making integration accessible for business users.
