

Ever feel like your Excel files are getting bigger… and slower? You’re not imagining it. Snowflake SQL is getting more popular because data is growing like crazy — something like 90% of the world’s data was created in just the last few years. No wonder your dashboards feel stuck in traffic.
If you’ve been wondering, does Snowflake use SQL? Yep, it does — and it’s surprisingly easy to pick up. In this guide, I’ll walk you through your first steps: loading some data, running simple queries, and ditching the usual headaches. Think of it like upgrading from Excel to cloud power tools.
But here’s one more thing: These days, analysts don’t just analyze — they troubleshoot, write SQL, and sometimes wear the dev hat too. This guide gets you up to speed whether you’re just starting or already juggling multiple roles.
Let’s dive in.
Table of Contents
- What is Snowflake SQL? (Simple Definition for New Analysts)
- Why Snowflake SQL Makes Reporting Easier (and Faster)
- Your First Snowflake SQL Commands (From Adding to Querying and Fixing Data)
- Next Steps After Your First Query (Easy Wins to Level Up)
- How to Get Your Data into Snowflake Using Skyvia (Without Coding)
- Conclusion: You’re Already Ahead of Most Analysts
What is Snowflake SQL? (Simple Definition for New Analysts)
So, what exactly is Snowflake SQL? In plain English, it’s just SQL (Structured Query Language) you use inside Snowflake — nothing fancy, no weird new language to learn.
It’s built on standard ANSI SQL for querying data. So, if you’ve used SQL before, you’ll recognize a lot of it. Sure, Snowflake adds a few extra functions, but nothing too crazy.
I’ve worked with SQL Server, MySQL, PostgreSQL, and yep, even good ol’ Excel formulas. Switching to SQL in Snowflake wasn’t a massive jump. Honestly, it felt smoother than moving from Excel to SQL Server for the first time.
And if this is your first time writing SQL queries in Snowflake, don’t stress — it’s worth it. You’ll see why in just a bit.
Oh, and you won’t be stuck in a browser if you don’t want to. Snowflake comes with a web interface where you can run queries straight away. But you’ve also got SQLGate Snowflake, Aginity Pro, or DBeaver (which I’ve used) if you prefer desktop tools. You can even pull data directly from cloud tools using Skyvia, which can run queries too — no coding, just clicks.
How Snowflake SQL Works Behind the Scenes
Alright, quick behind-the-scenes peek before we dive into writing queries — this actually helps you avoid silly mistakes later.
Snowflake is built around three simple parts:
- Storage → This is where your data actually lives, in cloud storage (AWS S3, Azure Blob, or Google Cloud). You don’t deal with file paths or backups — Snowflake handles all of it.
- Compute (Virtual Warehouses) → This is the power behind your queries. You can turn it on when you need it, size it up or down, and turn it off when done. Like flipping a switch.
- Cloud Services → This part does the heavy lifting: running your queries, keeping metadata, security, and making sure everything’s optimized behind the scenes.
Here’s how it plays out:
- You send a SQL query (from the web interface or your favorite SQL tool).
- Cloud Services figures out the best way to run it.
- Compute (the warehouse you choose) processes it.
- Storage sends back the data.
- Boom — results on your screen.
Knowing this makes your life easier. You’ll avoid spinning up oversized warehouses when you don’t need to, which means you don’t pay extra just because a query ran sloppy. Trust me, learning this saved me from a couple of billing headaches.

Why Your Queries Cost Money (and How to Stop Burning Credits)
And here’s the thing most beginners miss:
Every query cost money. Not a ton at first, but if you’re refreshing dashboards, testing joins, or forgot to turn something off? That cost snowballs.
In Excel, a heavy formula just slows things down.
In Snowflake, it burns compute credits.
So, what’s the shift?
You’re not just writing SQL — you’re spinning up a mini cloud engine behind the scenes. If you don’t tell it to pause, it keeps running.
If your query scans millions of rows just to filter one region? That engine grinds hard and charges you for it.
I didn’t get this at first. But after one too many “why is this so high?” usage reports… I learned.
The good news?
You don’t need to learn DevOps. You just need a few simple settings and smarter habits.
👇 Up next, I’ll show you a quick table that maps everyday tactics to the Snowflake engine — and how each one helps you spend less without doing less.
Smart Snowflake Tactics That Save You Money
Here’s a cheat sheet of things you can do in Snowflake that hit different parts of the system — and more importantly, help you not light your budget on fire.
| Tactic | What It Does | Where It Happens | Best Practice Tip | Why It Saves You Money |
|---|---|---|---|---|
| Auto-Suspend | Pauses the warehouse if you leave it idle too long. | Compute (Virtual Warehouse) | Set suspend to 1–5 min for dashboards or light ad-hoc work. | You’re not paying when no one’s using it. Like turning off the lights. |
| Warehouse Sizing | Picks how “big” your compute engine is. | Compute | Start small (X-Small or Small) and scale up only when needed. | Don’t pay for more horsepower than you actually use. |
| Multi-Cluster Setup | Adds parallel clusters when too many users are querying at once. | Compute | Only use if you’re hitting queuing — and cap the max cluster count. | Prevents surprise charges when everyone logs in at 9 AM. |
| Query Optimization | Makes SQL run smarter (less scanned data, faster output). | Compute + Cloud Services | Avoid SELECT *, filter early, use joins properly. | Less work = faster query = cheaper run. |
| Workload Consolidation | Groups queries or processes so they run together. | Compute | Schedule dashboards close together. Avoid spinning up compute too often. | Fewer “wake-ups” of the engine means fewer charges. |
| Incremental Processing | Only loads or processes data that changed. | Compute + Storage | Use timestamps or MERGE to process only what’s new. | Smaller data = faster jobs = lower compute cost. |
| Transient Tables | Temporary tables that skip backup fail-safes. | Storage | Use for staging or temp data — not long-term stuff. | Cheaper storage, no fail-safe fees. |
| Time Travel Settings | Keeps past versions of your data for a set number of days. | Storage | Drop to 1-day retention for stuff you don’t need to “undo.” | Less historical data = smaller bill over time. |
TL;DR?
You don’t need to master infrastructure — just know when to pause, shrink, or filter. These tiny habits can save a ton once you start running queries regularly.
Why It’s Worth It (Simple Reasons Snowflake is Popular)
If you’ve ever wanted to throw your laptop because of a slow Excel file, this is where Snowflake starts to feel like magic.
- ✅ No servers to babysit — you just log in and run queries. That’s it.
- ✅ Pay only when you query — no more paying just because something is “on.”
- ✅ Fast even with massive data — millions of rows? Easy. No crashing.
And that’s just the quick list. Next, I’ll show you how this translates into faster reports and dashboards without the usual spreadsheet mess.
Why Snowflake SQL Makes Reporting Easier (and Faster)
If you’ve ever lost hours to manual exports, broken dashboards, or Excel crashing at the worst possible time… yeah, you’re not alone.
I’ve been there too. Snowflake SQL fixes a lot of those headaches by letting you query data straight from the cloud, no messy steps in between. Let’s break it down with some real-world stuff you’ll probably recognize.
Ditch Manual Exports: Run Queries Like a Pro
Sure, Snowflake lets you export data to CSV if you really want to. But here’s the kicker — you don’t have to.
Instead of downloading files every time something changes, you can write one simple query that grabs fresh data whenever you need it. No more folders full of “final_report_v3-revised-FINAL” files. Just clean, up-to-date numbers when you hit “Run.”
Scenario: Peter works on a weekly sales report where he downloads CSVs from multiple systems, mashes them together, and prays it doesn’t break. Then, he moved things to Snowflake. With SQL in Snowflake, he swapped all that for one query pulling straight from live data. Took five minutes to run, not five hours to clean up.
Fresh Data, Live Dashboards, Less Hassle
Snowflake plays nicely with Tableau, Power BI, and other BI tools. Once connected, you’re not dragging and dropping stale files — you’re querying live data.
Compare that to the old way: exporting from Excel, refreshing data sources manually, emailing the “latest dashboard” to the team… only to find out it’s already outdated.
Real-life? A project I was on used Power BI hooked to Excel files. Every refresh was manual, and dashboards were always “kind of up-to-date.” When we flipped to Snowflake SQL queries feeding Power BI, reports stayed fresh, no extra clicks, no missed numbers.
No More Excel Crashes with Large Datasets
If your spreadsheet groans when you hit 100,000 rows, Snowflake eats millions of rows for breakfast. Your queries stay fast because Snowflake SQL handles data in the cloud, not on your local machine. No more freezing up your laptop.
Scenario: Sonja helped her colleague build a regional sales dashboard in Excel. Anything over 200,000 rows? Crash city. They moved the data to Snowflake, used SQL queries, and ran instant reports on 10 million rows — no crashes, no waiting.
Query Semi-Structured Data Without ETL Pain
Snowflake SQL handles JSON, Parquet, Avro without you needing to clean it up first. You can query messy data directly, no ETL pipelines, no scripting, no data dumps.
Scenario: Alex used to spend days converting messy JSON files from a CRM into Excel-friendly formats. With Snowflake, he just wrote a SELECT with FLATTEN — got usable data in 10 minutes. No pipeline drama, no third-party tools.
Keep Everyone on the Same Page (Literally)
Snowflake lets your whole team access the same clean, live dataset — no more “which version is right?” debates. You can run queries at the same time without slowing anyone else down.
Scenario: A team of three analysts pulled similar reports, but with slightly different CSV exports. Cue the inconsistent reports nightmare. They moved to Snowflake, used the same SQL queries, and suddenly everyone was aligned — same numbers, same logic, no confusion.
And that’s honestly just scratching the surface. In the next section, I’ll show you exactly how to load your first data and write your first Snowflake SQL query — it’s way easier than it sounds, and yes, we’ll keep it beginner-friendly.
Your First Snowflake SQL Commands (From Adding to Querying and Fixing Data)
| Good to know before you continue: If your team has already set up the tables for you, great — you can start querying right away. Or maybe you’re just importing CSVs here and there. Skip this part and proceed to How to Read Your Data (SELECT Basics). But if you’re in a small team and your boss expects you to “switch hats” from analyst to SQL dev, read on. You are not alone. I’ve been there too — juggling both roles like it’s normal. |
Alright, time to get your hands dirty — but in a good way. Before we can run cool reports or slice and dice data, we need something in Snowflake to work with. Think of this as Step 1: creating a place to hold your data and then loading it in.
If you’ve ever worked with Excel, this is going to feel familiar. You’ve got rows and columns in Excel sheets, right? Snowflake’s kind of like that — but in the cloud, much faster, and way more powerful.
Let’s start from the top. Links are provided for each command to take you to the official Snowflake documentation for more details.
How to Create a Database and a Table, Then Add Data
You can’t run queries on thin air — you need data in something. In Snowflake SQL, we set up a container for your data just like you’d open a new workbook in Excel with sheets inside.
CREATE DATABASE
A database in Snowflake is like an Excel workbook. It holds your related tables (like different sheets).
Basic Syntax:
CREATE DATABASE your_database_name;Quick Breakdown:
- CREATE DATABASE → tells Snowflake to make a new container for your data.
- your_database_name → name it something that makes sense, like giving a filename for your Excel workbook.
Example:
CREATE DATABASE customer_sales_db;Explanation:
- ✅ customer_sales_db → easy to remember, keeps your customer and sales data together.
- ✅ You can make more databases later, like inventory_db, finance_db, whatever you need.
Here’s what happened in Snowflake after I ran the command above:
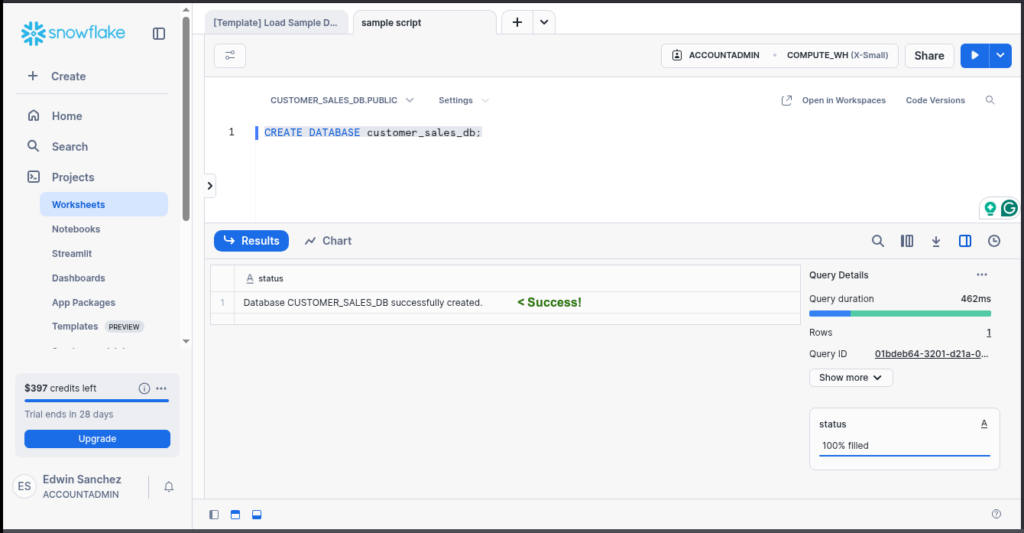
So you know that the sample code works.
CREATE TABLE
A table is like a sheet inside your workbook. A database holds one or more tables.
Basic Syntax:
CREATE TABLE your_table_name (
   column_name data_type,
   column_name data_type
);
Quick Breakdown:
- CREATE TABLE → Tells Snowflake to create a table for your data, much like telling Excel to add sheets.
- your_table_name → give it a name that makes sense, like naming your Excel sheets instead of Sheet1 or Sheet2.
Example 1 — Customer Table:
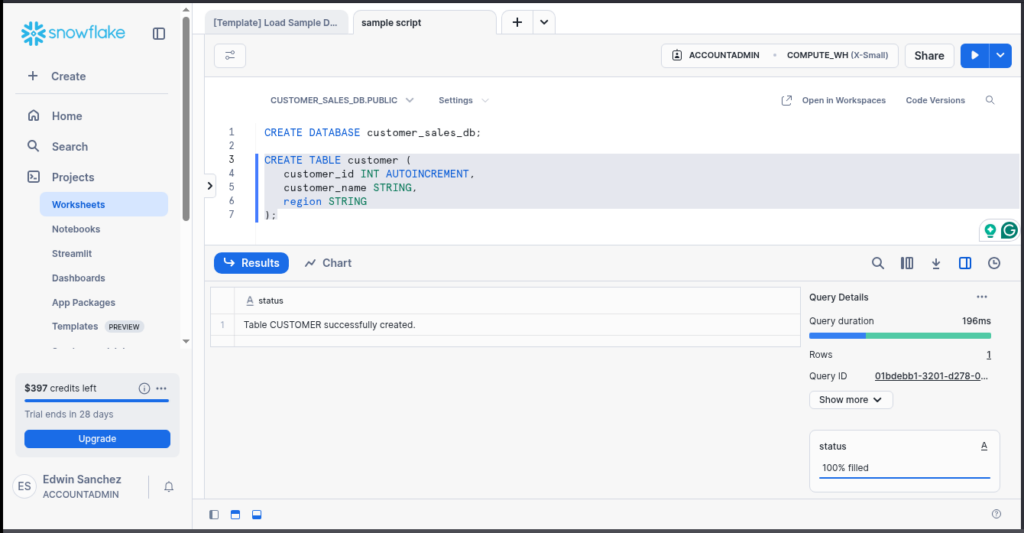
CREATE TABLE customer (
   customer_id INT AUTOINCREMENT,
   customer_name STRING,
   region STRING
);
Breakdown:
- customer_id → unique ID per customer. You need this for relating the sales table later. INT means integer, or whole numbers – great for id columns like this. Adding AUTOINCREMENT will make Snowflake handle the numbering of the unique IDs, so you don’t have to worry about it when inserting new rows. It starts from 1 and adds 1 every time you add a row. Quite handy, isn’t it?
- customer_name → customer’s name. STRING means text data.
- region → where they’re from.
Below is another successful result of the sample above:
Example 2 — Sales Table (linked to Customer):
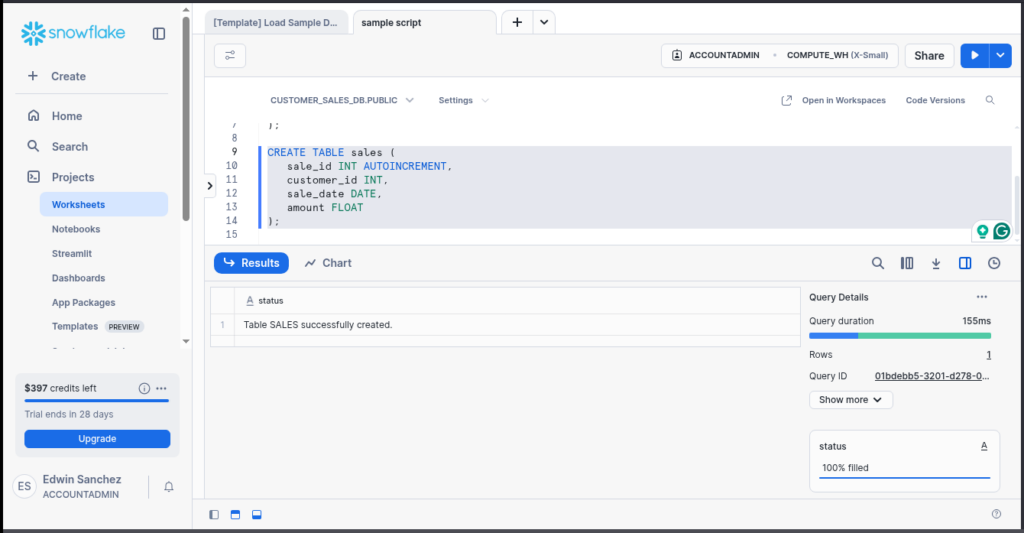
CREATE TABLE sales (
   sale_id INT AUTOINCREMENT,
   customer_id INT,
   sale_date DATE,
   amount FLOAT
);
Breakdown:
- Links to customer_id → ties each sale to a customer.
- DATE and FLOAT → Two other data types to handle dates and numbers with decimal values (not whole numbers like INT).
- Easy to JOIN later to get customer names with sales.
Again, a working sample. See below:
INSERT
Once the tables are ready, let’s put data into them.
Basic Syntax:
INSERT INTO your_table_name (columns) VALUES (values);
Quick Breakdown:
- INSERT INTO → tells Snowflake you want to add some data.
- your_table_name → tells Snowflake that the data you want to INSERT is for a specific table.
- (columns) → list the table columns you want to fill with data. This is comma-separated. Sometimes you can omit this, but you have to follow the column order used in CREATE TABLE.
- VALUES (values) → tells Snowflake of the values you want for each column. This is also comma-separated. Make sure the sequence of values align with the sequence of columns in (columns).
Example — Insert into Customer:
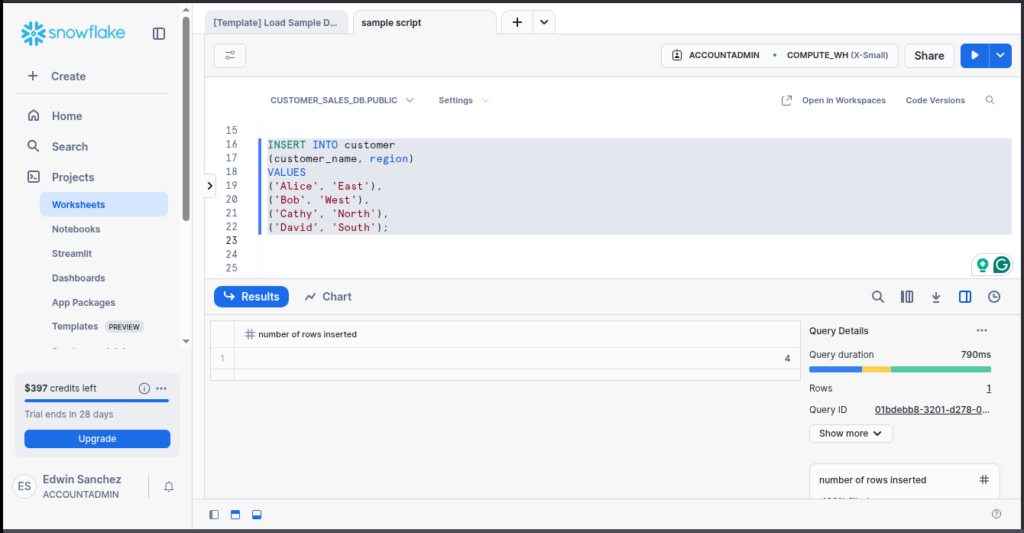
INSERT INTO customer (customer_name, region) VALUES ('Alice', 'East'),
('Bob', 'West'),
('Cathy', 'North'),
('David', 'South');
Why This Works:
- Insert multiple rows at once → no need for row-by-row hassle. It creates customer IDs 1 to 4 automatically.
- Clear, readable data.
It’s getting better. We now have 4 customers. See below:
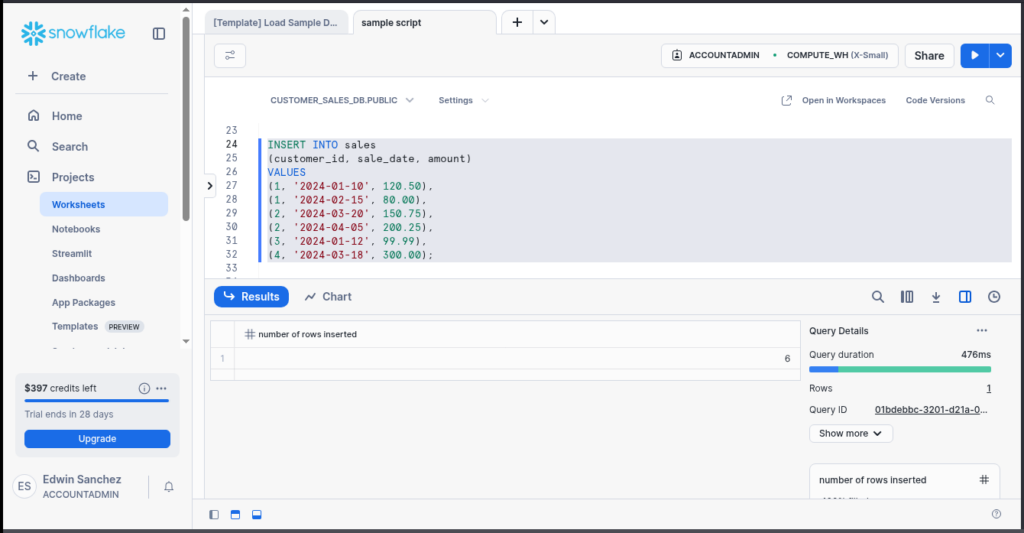
Example — Insert Sales:
INSERT INTO sales
(customer_id, sale_date, amount)
VALUES
(1, '2024-01-10', 120.50),
(1, '2024-02-15', 80.00),
(2, '2024-03-20', 150.75),
(2, '2024-04-05', 200.25),
(3, '2024-01-12', 99.99),
(4, '2024-03-18', 300.00);
What’s Happening:
- Alice (customer_id 1) has two sales, Bob has two, Cathy and David one each — mix it up like real data.
- sale_id 1 to 6 created automatically.
And here’s the successful run in Snowflake:
How to Read Your Data (SELECT Basics)
Here’s where the fun starts. Now we can query the data, like filters or lookups in Excel — but smoother.
Simple SELECT without JOIN
This will let you query data from one table.
Basic Syntax:
SELECT columns FROM table_name;Quick Breakdown:
- SELECT → tells Snowflake you want to read from a table.
- columns → let you list down the columns you need to show. Use an asterisk (*) to tell Snowflake you want all columns.
- FROM table_name → tells Snowflake what table you want to query.
Example 1 – Reading Everything in a Table:
SELECT * FROM customer;Why It’s Handy:
- ✅ * grabs everything from the table.
- ✅ You’ll see all your customer data in one go.
Here’s the result in Snowflake:
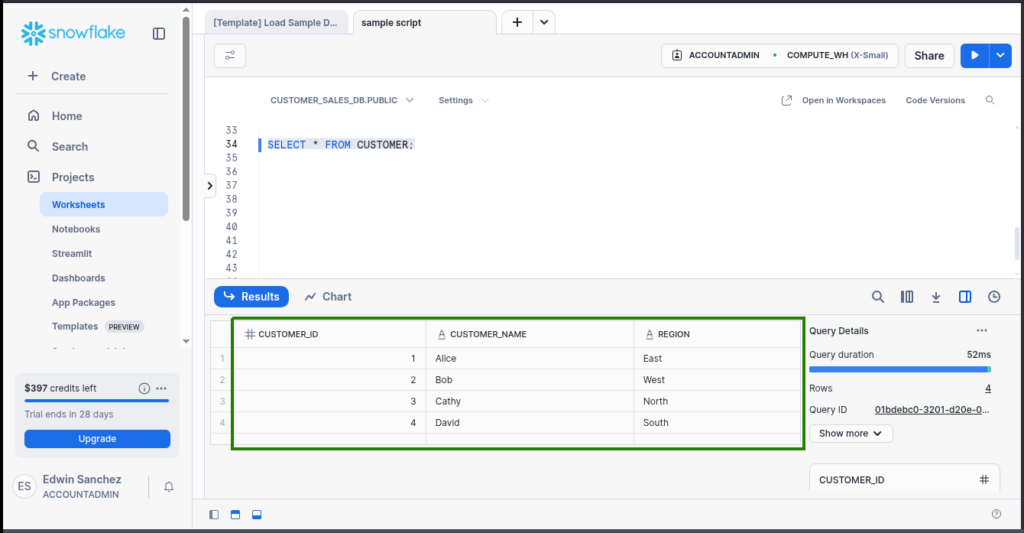
See the customer ID? You didn’t INSERT it. It’s the AUTOINCREMENT magic in Snowflake SQL.
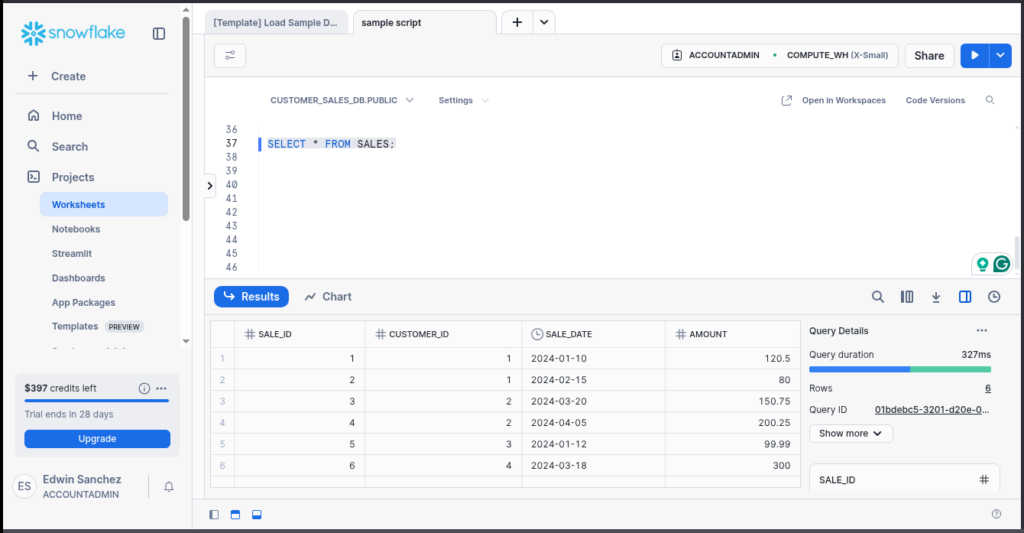
Tip: same applies to sales:
SELECT * FROM sales;Same here:
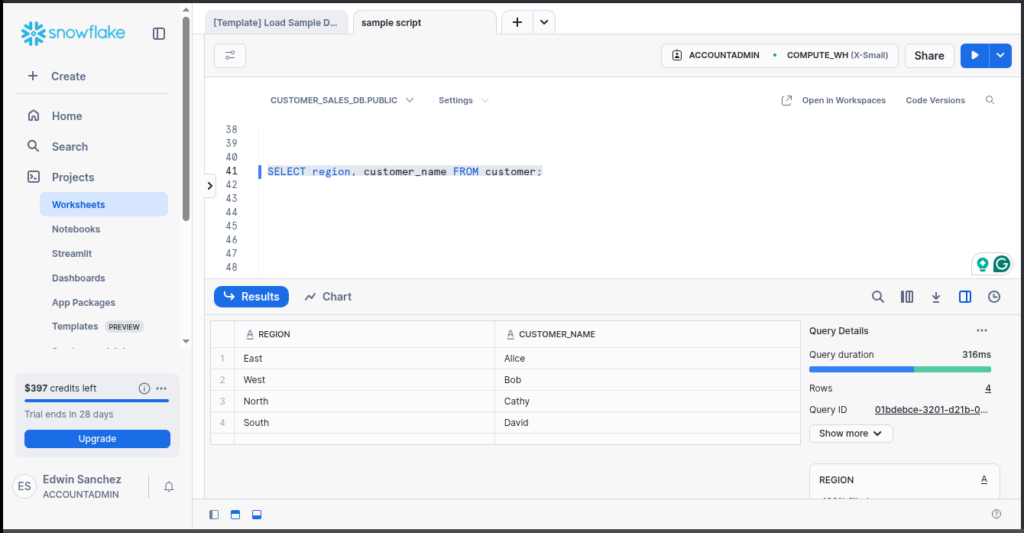
Example 2 – Reading by Column
SELECT region, customer_name FROM customer;What’s Happening
- Only the region and customer name will appear in the result set.
Check out the result below:
SELECT with JOIN
If you’re starting out from Excel to Snowflake, you may prefer flat tables or simple views. But learning about JOINs is still super useful. It lets you combine tables, like customer details with sales records – all without waiting for someone else to build it for you.
Think of JOINs like VLOOKUPs on steroids. You can match and pull data from different places, all inside a single query.
Basic Syntax:
SELECT columns FROM table1
JOIN table2 ON join_condition;
Breakdown:
- SELECT columns FROM table1 → same as a simple SELECT above.
- JOIN → the keyword to link table1 to another table. You can use one or more tables with a separate JOIN clause.
- table2 → the second table you want to link to the first table.
- join_condition → tells Snowflake how to link table1 to table2.
Example — Join Customer with Sales:
SELECT customer.customer_name, sales.sale_date, sales.amount
FROM customer
JOIN sales ON customer.customer_id = sales.customer_id;
Why It’s Useful:
- ✅ You get both customer names and their sales without flipping between tables.
- ✅ Links customer table to sales through the customer_id column present in both tables.
- ✅ No WHERE, no ORDER BY yet — we’ll get there.
Yay! It’s joined:
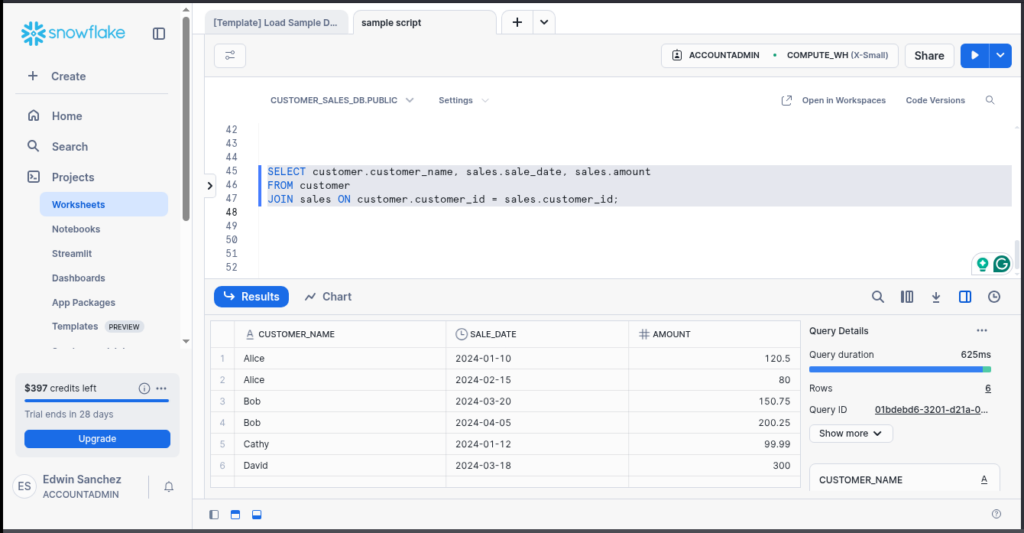
Customer name is from the Customer table. Sale date and amount are from the Sales table. But they show as one, like they’re in the same table – that’s the power of JOIN.
How to Fix Mistakes (UPDATE and DELETE Made Simple)
Mistakes happen — wrong amount, typo, or just test data you want gone. UPDATE and DELETE are your quick fixes.
UPDATE
The UPDATE command will edit one or more columns in a table.
Basic Syntax:
UPDATE table_name
SET column = value
WHERE condition;
Breakdown:
- UPDATE → tells Snowflake you want to edit one or more rows in a table.
- table_name → the table you want to update.
- SET column = value → sets the value of the column you specify. You can set more column = value separated by commas.
- WHERE condition → lets the command focus on specific rows based on condition. If you skip this, UPDATE will edit ALL rows in the table. Note that.
Example — Fix a Sale Amount:
UPDATE sales
SET amount = 500.00
WHERE sale_id = 5;
Why Use It:
✅ Fixes specific rows without touching everything else. Before the UPDATE, the amount was 99.99. See the INSERT statement or the image earlier. Refer to sale_id = 5. See the result boxed in green below:
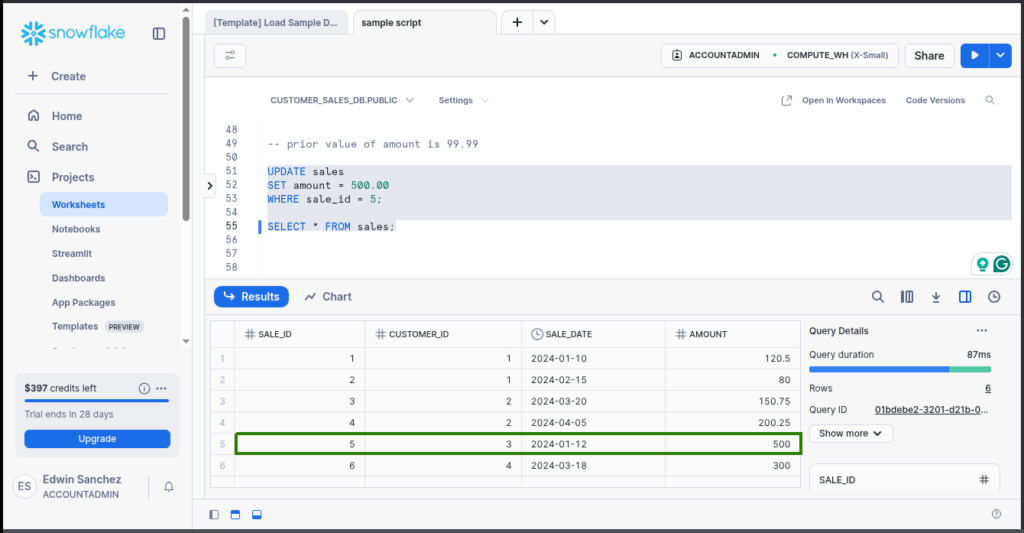
See? Amount of sale_id 5 is now 500.
DELETE
The command says what it does. DELETE removes a record, so you won’t see it again.
Basic Syntax:
DELETE FROM table_name
WHERE condition;
Quick Breakdown:
- DELETE FROM table_name → tells Snowflake which table you want to delete a record from.
- WHERE condition → limits what rows are deleted. Omit this, and you delete everything in the table. One time, I was sleepy and forgot to include the WHERE clause. Guess what? Not sleepy anymore, but all rows gone. Good thing I have a backup.
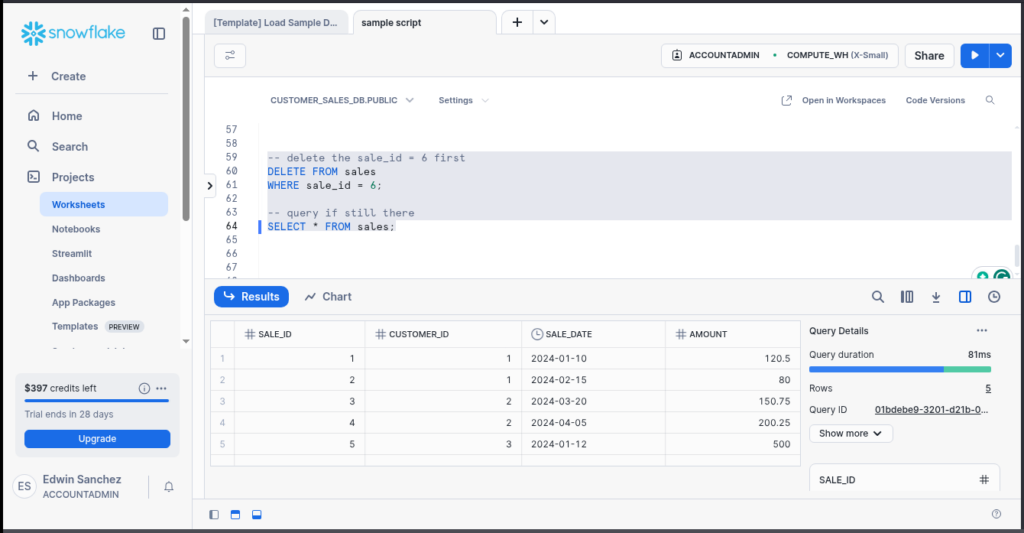
Example — Delete a Sale Row:
DELETE FROM sales
WHERE sale_id = 6;
Why It’s Handy:
✅ Quickly remove one row without rebuilding your table.
Below is what happened in Snowflake. I used the DELETE statement above, then SELECT it to check if it’s gone. Do you still see it?
How to Filter, Sort, and Summarize Data (Just Like in Excel)
Here’s where Snowflake SQL feels like an Excel upgrade:
- ✅ WHERE filters the table rows you want to see or will be affected by changes. You saw examples earlier.
- ✅ ORDER BY sorts your data by the columns you want. Make it DESCENDING or ASCENDING (the default in SQL).
- ✅ GROUP BY and SUM let you summarize.
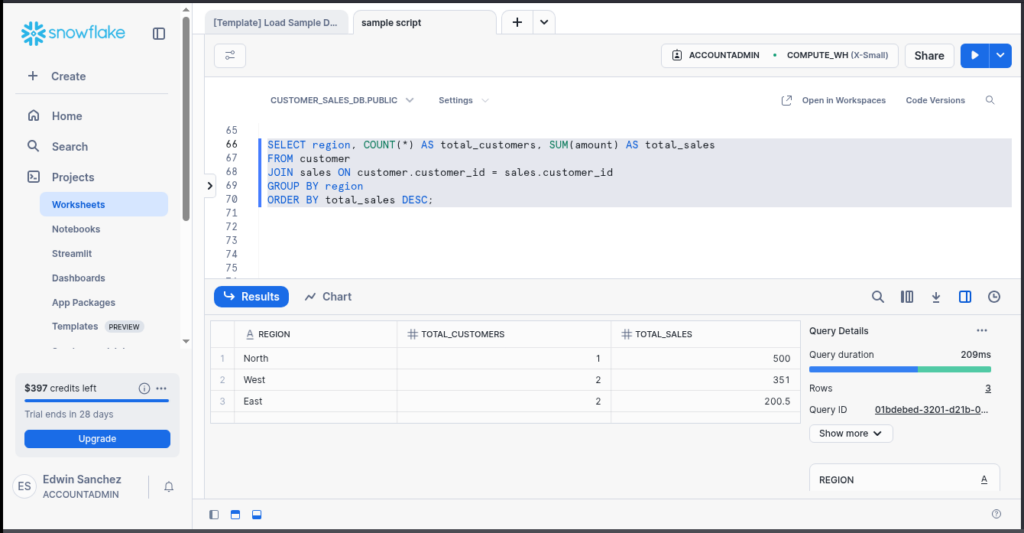
Example:
SELECT region, COUNT(*) AS total_customers, SUM(amount) AS total_sales
FROM customer
JOIN sales ON customer.customer_id = sales.customer_id
GROUP BY region
ORDER BY total_sales DESC;
Why It Rocks:
✅ One query = counts, totals, sorted list — just like pivot tables, but faster.
See the result below:
This section’s all about getting your feet wet with the basics. Next, we’ll level you up a bit with some easy advanced tricks — stuff like handling JSON without a single ETL pipeline and avoiding those annoying slow queries. Trust me, you’ll want these up your sleeve.
Next Steps After Your First Query (Easy Wins to Level Up)
You made it through the basics — awesome. At this point, you’ve created a database and tables, inserted data, and written your first SELECT queries. You even know how to fix mistakes. That already puts you ahead of most analysts just dipping their toes into Snowflake.
Now let’s take it one step further. These next few wins aren’t just “advanced for the sake of it.” They’re practical — the kind of things that help you answer tougher questions, handle weird data, and avoid getting yelled at for burning through credits too fast.
How to Query JSON Without Any ETL Drama
JSON? Who’s that?
JSON is a type of semistructured data. You already know about STRING, INT, DATE, and FLOAT. They’re flat. But JSON is kind of messy if you see it the first time – all the curly brackets, double quotes, and colons come with it.
Okay, you might not deal with JSON right away — especially if you’re still uploading clean CSVs or querying prebuilt views. But trust me, once you connect Snowflake to stuff like Salesforce, webhooks, or survey platforms, you’ll bump into JSON fast.
Most tools choke on it. Snowflake? It just shrugs and says, “Bring it on.”
Let’s say you’ve got a customer_feedback table with a feedback_data column. Inside that column, every row looks something like this:
{
  "rating":5,
  "comments":"Fast delivery and amazing service!",
  "topics":["service","delivery"],
  "recommend":true
}
Not pretty. But a JSON data is structured with an element name (like rating) and a value (5 for rating). Sometimes an element still contains a list or array, like the topics above.
Creating the Customer Feedback Table and Adding Data
Here’s the entire CREATE TABLE for the customer_feedback table and INSERT statement:

Breakdown:
- customer_id → this will link it back to the customer table earlier.
- VARIANT → the type of data in Snowflake where you can put JSON data.
- TIMESTAMP → a date and time data type in Snowflake with time zone info.
- SELECT FROM VALUES → another form of SELECT statement through a VALUES clause. This baffled me at first. But PARSE_JSON only works if I use this instead of a simple VALUES clause. This is different from SQL Server or PostgreSQL, where I came from.
- column1, column2, and column3 → work as placeholders for literal values, like 1 or 2.
- CURRENT_TIMESTAMP → returns the timestamp for the system in the local time zone.
- PARSE_JSON → converts your JSON string to a VARIANT in Snowflake.
How to Extract JSON Data in Snowflake SQL
You can extract data using dot notation. That means you type the column name (feedback_data), add a colon, and the element (like rating or comments).
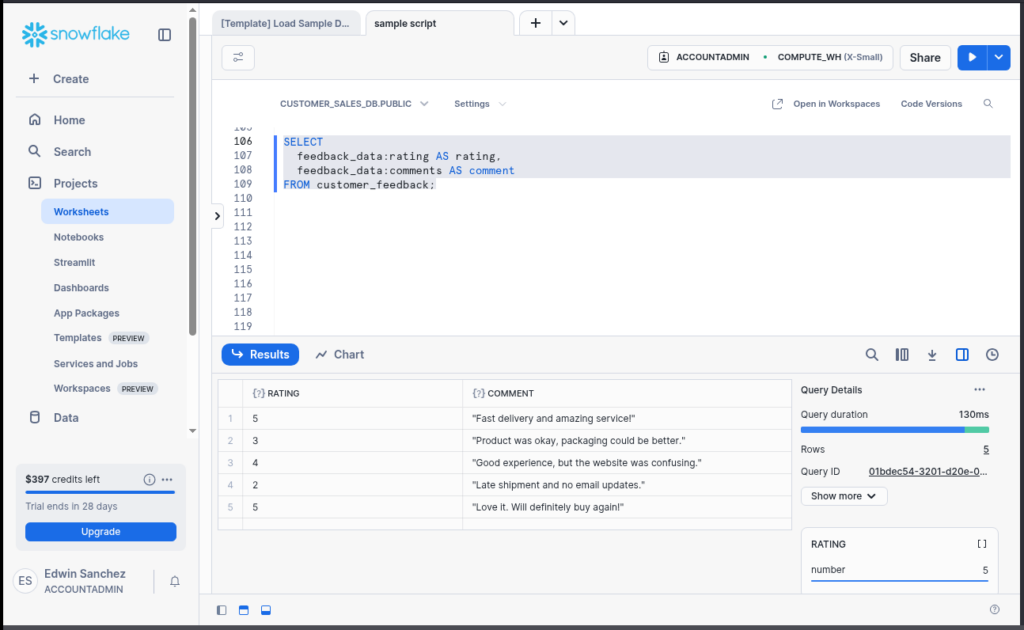
SELECT
  feedback_data:rating AS rating,
  feedback_data:comments AS comment
FROM customer_feedback;
Breakdown:
- feedback_data → the JSON column we are referring to.
- rating and comments → elements inside the JSON data. We want to get the values from these.
Here’s proof that it’s working:
But what if that topics array holds multiple items per customer? That’s where LATERAL FLATTEN comes in — in plain English, it says:
“Take this list inside one row, and split it into multiple rows.”
Example:
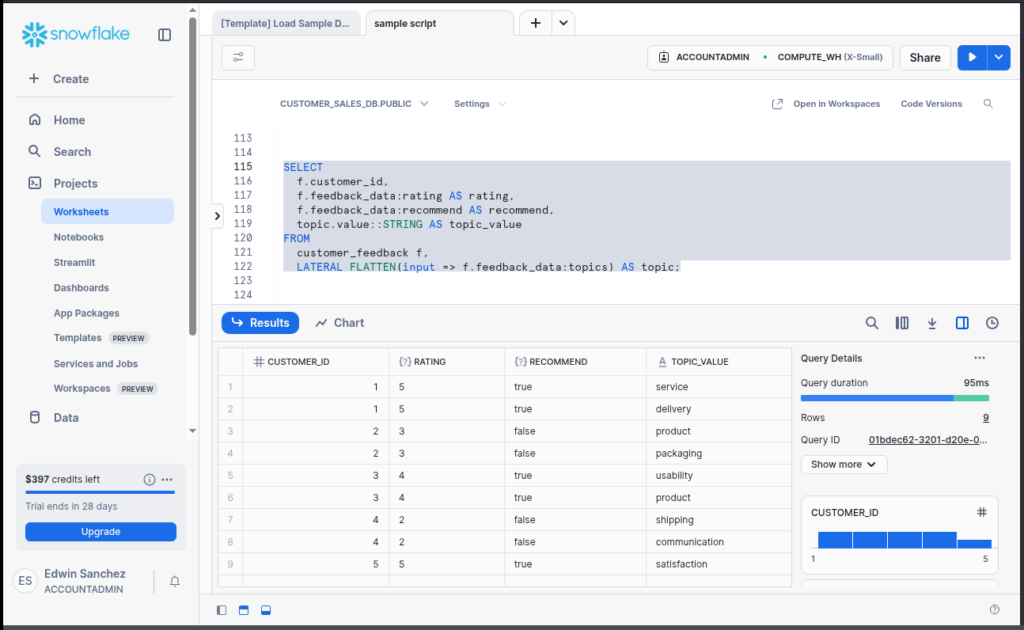
SELECT
  f.customer_id,
  f.feedback_data:rating AS rating,
  f.feedback_data:recommend AS recommend,
  topic.value::STRING AS topic_value
FROM
  customer_feedback f,
  LATERAL FLATTEN(input => f.feedback_data:topics) AS topic;
Breakdown:
- f.<column name> → “f” is used as an alias for customer_feedback table, so you type less. “f” is for feedback. Using this alias + dot + column name is a SQL standard to refer to a column with an alias.
- topic → another alias for the list result of the LATERAL FLATTEN.
- Using dot notation, it gets the rating, recommendation, and the topics list array.
You might wonder what the result looks like:
That’s it. No Python scripts. No data prep hell. Just SQL that handles weird nested data like it’s nothing. It’s kind of magic once you see it work.
Basic Window Functions You’ll Actually Use
Let’s be real: writing GROUP BY, SUM, and COUNT is cool, but sometimes you need running totals, rankings, or comparisons. That’s where window functions shine. SUM and COUNT are some of them.
They’re like Excel formulas, but smarter — because they work on entire result sets, not just rows.
Take this:
“Give me the latest sale per customer.”Here’s a simple way to do that with ROW_NUMBER():
SELECT *
FROM (
  SELECT *,
    ROW_NUMBER() OVER (PARTITION BY customer_id ORDER BY sale_date DESC) AS rn
  FROM sales
) t
WHERE rn = 1;
✅ PARTITION BY → like saying “group this by customer.”
✅ ORDER BY → sort within each group.
✅ ROW_NUMBER() → gives each row a ranking.
Real-life use? I used this to flag first purchases, get top sales managers, and find year-over-year comparisons — all without messy subqueries or loops.
Once you get the hang of it, it’s like unlocking cheat codes for your data.
The Simple Ways to Avoid Slow, Costly Queries
Have you checked the table earlier where you save money? Again: every time you run a query, Snowflake spins up compute power — and yes, that costs credits.
Not much at first. But enough to make your boss ask, “Why did we spend $300 running five reports?”
So, here’s how to avoid rookie mistakes:
- ❌ Avoid SELECT * unless you need every column. It’s lazy and costly. You don’t need all columns most of the time, trust me.
- ✅ Use WHERE filters early, especially with JOINs. It limits how much data gets processed.
- ✅ If you’re going to combine data, use UNION ALL instead of UNION unless you’re actually deduplicating — UNION has to scan for duplicates, which burns more compute.
And if your query ever feels slow (or pricey), open the Query Profile in Snowflake’s UI. It’s like a flight recorder for your query — shows where time and resources are going. I once forgot a WHERE clause and ended up scanning 10 million rows. Snowflake handled it like a champ… but the billing alert did not go unnoticed. Lesson learned.
These aren’t “expert-level” things — they’re just the next layer. You’ll hit them sooner than you think, and knowing them now saves you from stress later.
Next up, let’s talk about how to actually get your data into Snowflake — without writing a single line of code. It’s easier than it sounds, and yes, it works even for messy Excel exports.
How to Get Your Data into Snowflake Using Skyvia (Without Coding)
So, you’ve written your first Snowflake SQL query — cool. But now comes the next big question:
How do you actually get data into Snowflake from real-world sources like Salesforce, APIs, or old databases?
If you’re not a developer, building a full-blown data pipeline sounds… exhausting. Scripts, connectors, error handling, scheduling — it’s a lot. And maintaining those pipelines? Even worse.
Let me show you a no-code way that works — and keeps working — without needing to become a backend engineer.
Skip the Scripts: No-Code Data Integration with Skyvia
Skyvia is a cloud-based, no-code data integration platform — and honestly, it’s built for folks like us: analysts who want data to just move from one place to another, without wrestling code into submission.
Skyvia connects Snowflake to all sorts of data sources — SaaS apps like Salesforce, Google Sheets, HubSpot, as well as databases and file storage. You just click, connect, and map fields. That’s it.
Here’s what you can do with it:
✅ Import & Export: Move data into or out of Snowflake.
✅ Data Flow & Control Flow: Build multi-step logic flows, including filters, lookups, and conditional steps.
✅ Scheduling: Run your integration every hour, every morning, every 10 minutes — you decide.
✅ Transformations: Clean and shape data as it moves.
✅ Error Handling: Get alerts when something breaks (because yeah, things break).
✅ and more.
It’s like having a personal ETL assistant — but it doesn’t call in sick or need code reviews.
Import Salesforce Contacts to Snowflake
Let’s walk through a real-world use case: importing contacts from Salesforce to a customer table in Snowflake using Skyvia’s Import integration. No code. No scripts.
A. Create Two Skyvia Connections
- In Skyvia, click + Create New → Connection.
- Search for the Snowflake connector and click it.
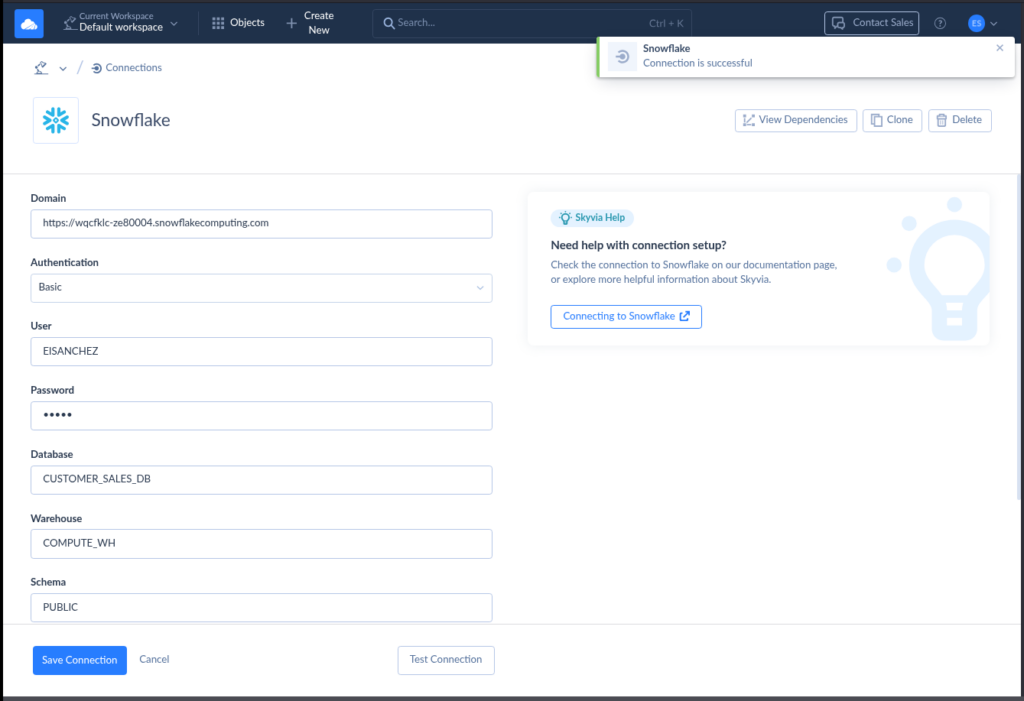
- Enter your Snowflake connection info — Snowflake domain, username, warehouse, etc. (Ask your Snowflake admin if you’re not sure.)
- Name and save the connection.
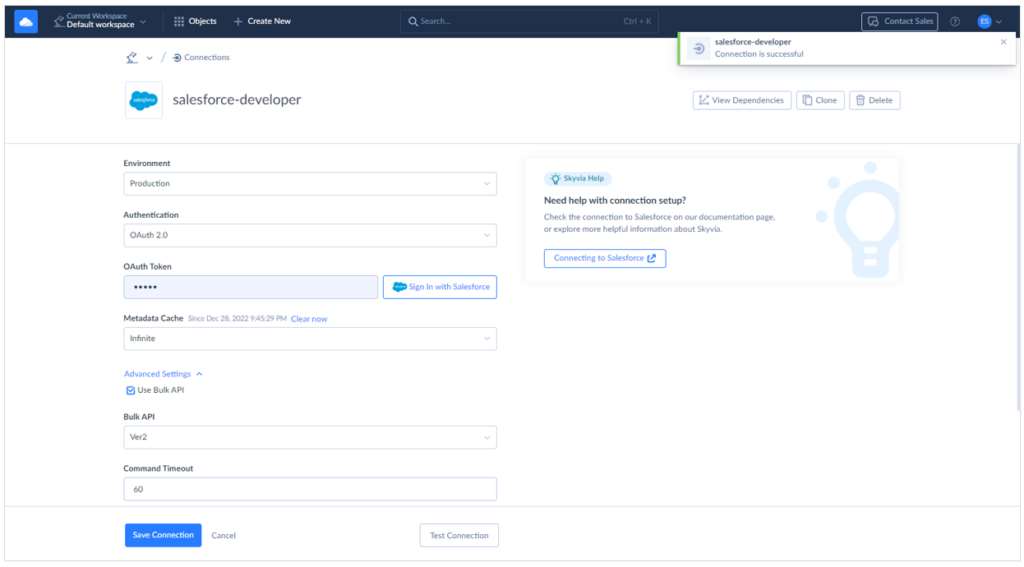
✅ Done! Now repeat those same steps — but this time, search for and connect to Salesforce.
Here’s my successful Skyvia connection to Snowflake:
And here’s the one for Salesforce:
B. Set Up the Import Integration
- Click + Create New → Import.
- Choose your Salesforce connection as the Source.
- Choose your Snowflake connection as the Target.
- Add an import task:
- Select Salesforce Contacts.
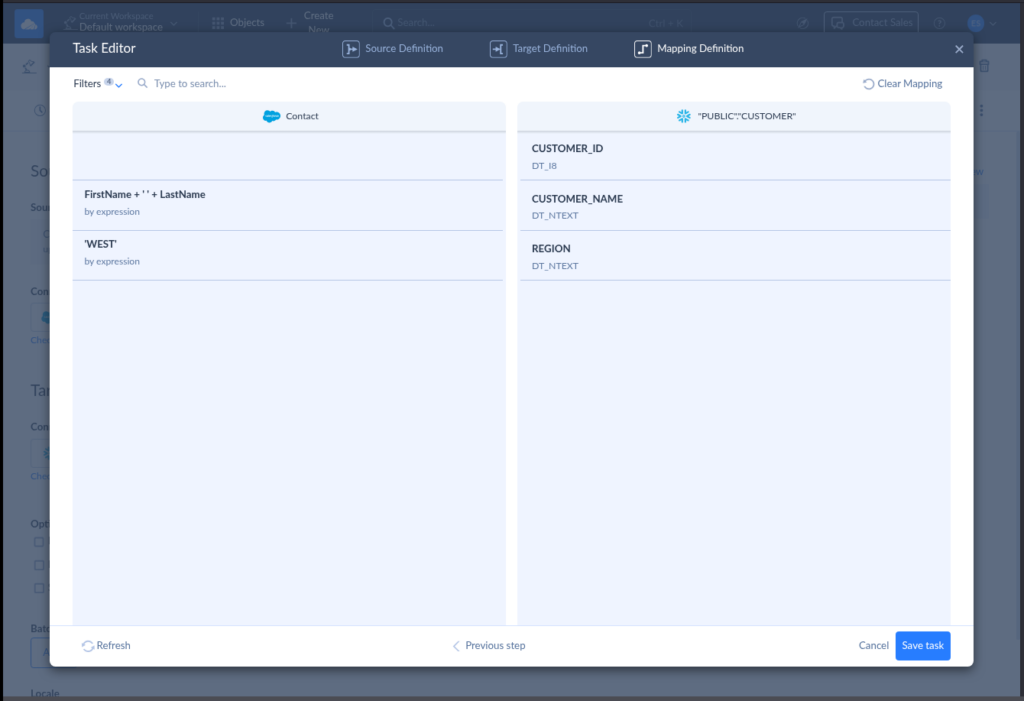
- Map the fields to your customer table in Snowflake.
Match to columns like customer_name and region. See what I did below:
- Name your import job (e.g., “Salesforce Contacts to Snowflake”) and save it.
- Hit Run to test it out.
- Once it works, set up a schedule to run automatically — daily, hourly, whatever fits.
Boom. Data’s flowing. No scripts touched.
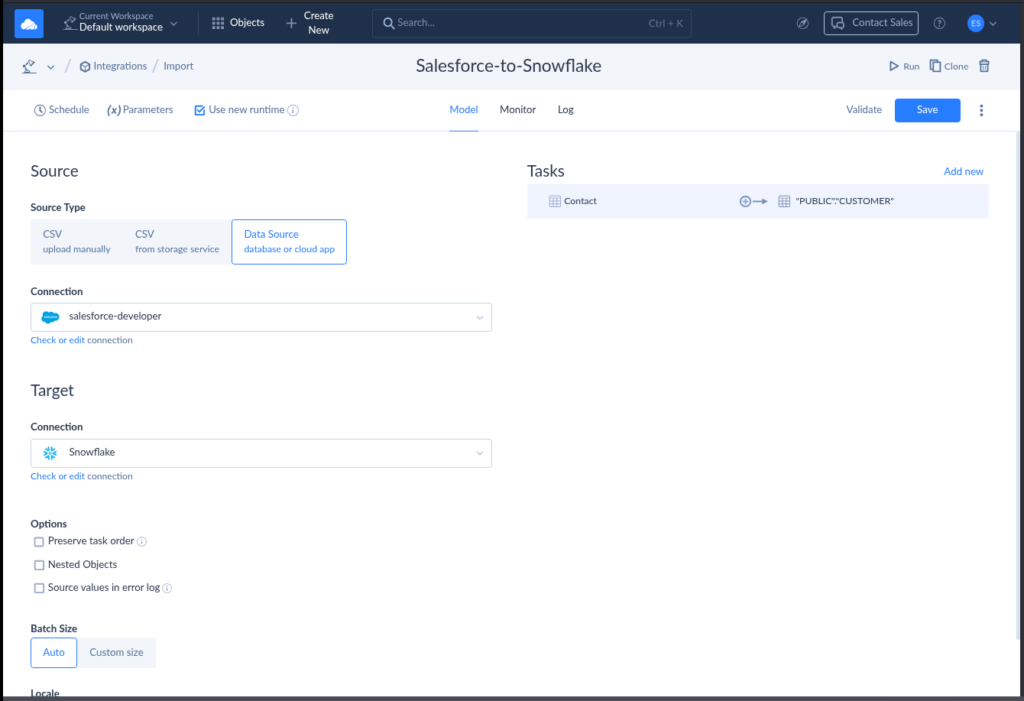
Check out my setup below – the source, target, and task.
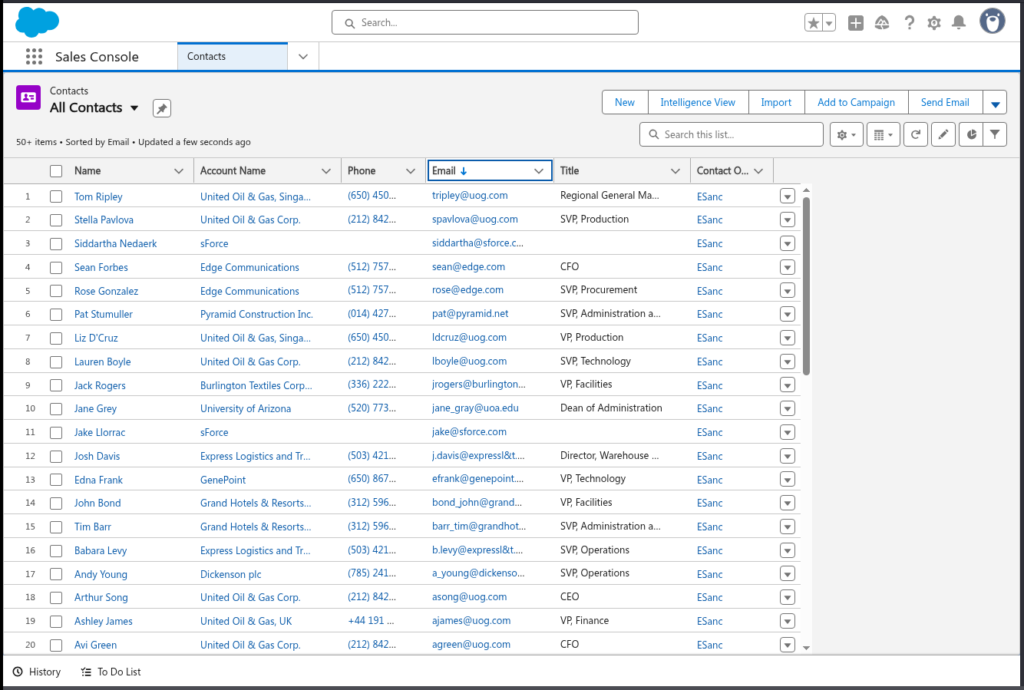
Below are the names in Salesforce prior to import:
And below is the result of the query after import:
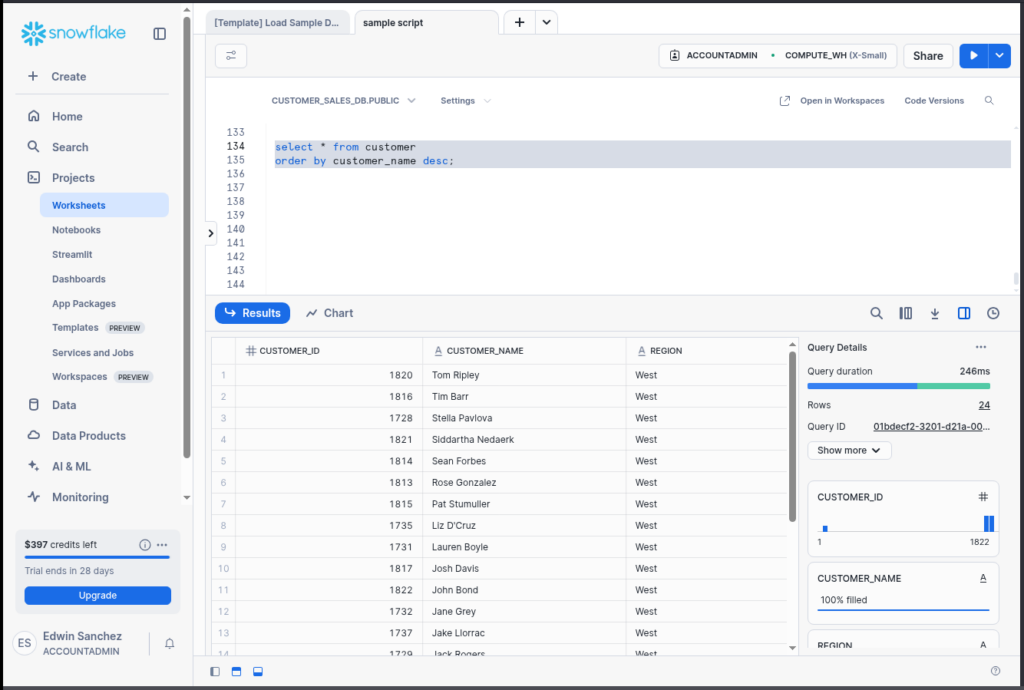
They are not arranged exactly as in Salesforce, but yes, the names are there.
Now that you’ve got your data into Snowflake — and it’s syncing automatically — you’re ready to start building reports, dashboards, and insights on top of it. That’s where SQL really shines.
Let’s wrap this up with a few final thoughts and FAQs — so you walk away ready to use Snowflake SQL like a pro.
Conclusion: You’re Already Ahead of Most Analysts
Let’s take a moment.
You didn’t just dip your toes in — you created data in Snowflake, wrote real SQL, fixed mistakes, and even learned how to handle JSON. That’s more than most analysts ever do when they’re starting with Snowflake. And you did it without begging a developer for help.
So, if this was your first dive into Snowflake SQL, you’re already ahead of the game.
Ready to go further without writing code?
👉 Try Skyvia’s Snowflake Integration — it’s free to start and makes data flow from your apps to Snowflake stupid simple.
You’ve got this.

F.A.Q. for Snowflake SQL

Can I use Snowflake SQL to query JSON data without transforming it first?
Yes! You can access JSON directly using dot notation or flatten arrays — no ETL required. It’s one of Snowflake’s coolest tricks.
What is Time Travel in Snowflake, and how do I use it with SQL?
Time Travel lets you query or restore past versions of your data using simple SQL. It’s like an undo button for your tables.
How can I make my Snowflake SQL queries run faster and be more cost-effective?
Filter early, avoid SELECT *, use the Query Profile to debug, and only run queries when needed — compute = money!
Do I need to write complex scripts to load data from different applications into Snowflake?
Nope. Tools like Skyvia let you connect apps and move data into Snowflake with just clicks — no coding needed.
