

Data is the digital gold of today. But like gold, it only becomes valuable when properly stored and refined. In the world of cloud computing, that means two things: efficient storage and powerful analytics.
Amazon S3 and Snowflake, two giants of the modern data ecosystem, offer precisely that. When integrated, they provide a seamless pipeline from raw data ingestion to high-performance analytics.
In this article, we’ll focus on key benefits of Snowflake S3 integration and examine main connection methods, with their pros and cons to help you choose the best approach for your use case.
Table of Contents
- Why Integrate Snowflake with Amazon S3?
- Key Benefits of S3-Snowflake Integration
- Choosing the Right Way to Connect Snowflake and Amazon S3
- Method 1: Manual Amazon S3 to Snowflake Integration (Native Setup)
- Method 2: Automated S3 to Snowflake Integration
- Troubleshooting S3–Snowflake Integration: Common Errors and Fixes
- Conclusion
Why Integrate Snowflake with Amazon S3?
What is Amazon S3?
Amazon S3 (Simple Storage Service) is a highly scalable, secure, and resilient object storage service from AWS. One of its strengths is the flexibility and versatility of supported data types: from neatly organized CSV files to images and logs, from HTML pages to application backups and binary blobs – you name it. In S3, you can store virtually anything and scale it up indefinitely.
The service also earned its popularity thanks to exceptional availability. With the ability to store objects across multiple AWS Availability Zones, S3 offers an SLA of up to 99.999999999% (11 nines!) durability. Its tiered pricing model for hot and cold data makes it extremely cost-effective, with different storage classes based on access frequency and retrieval needs.
What is Snowflake?
The first thing that sets this platform apart is certainly its name. Among the practical, business-smart branding of its competitors, “Snowflake” feels almost poetic. And that’s not by chance: the name alludes to its cloud-native nature, symbolizes the data warehouse schema, and highlights the uniqueness of each warehouse – just like real snowflakes.
Like all data warehouses, Snowflake collects and aggregates data for analytical purposes. But unlike other solutions in this space, it offers a few truly distinctive features:
- Multi-cluster architecture: with storage and compute separated you can scale each up or down without affecting another; also, effortlessly run concurrent queries.
- Native support for semi-structured data: there is no need to transform data in formats like JSON, Parquet, Avro, and XML before loading, as Snowflake can query it directly with SQL.
- Zero-copy cloning: this innovative and extremely useful in testing and development feature lets you instantly create a clone of a database, schema, or table without duplicating data.
- Time travel: Snowflake allows you to query historical versions of data – up to 90 days in enterprise editions.
Importance of Snowflake S3 Integration
In cloud analytics workflows, this integration isn’t just convenient – it’s a core building block for anyone working with cloud-scale data. Its importance is proven by the reality of today: businesses having to deal with ever-growing volumes of data that come from countless sources. The S3 – Snowflake integration enables you to:
- Effectively collect and store diverse data types: S3 can absorb huge volumes of input from various services, apps, and systems.
- Transform that chaotic data stream into clean, query-ready insights: Snowflake is purpose-built for analytics at scale.
- Deliver insights with minimal lag: This integration supports near real-time access and processing.
This pattern underpins use cases like:
- Real-time dashboards and alerts
- Business intelligence and reporting
- Machine learning feature pipelines
- Data sharing between teams or partners.
It also aligns perfectly with modern data architectures like data lakes and lakehouses, where the goal is to combine flexibility, performance, and governance in one stack.

Key Benefits of S3-Snowflake Integration
Combining high-quality components is a sure way to success. It’s true in art, in cooking – and certainly in technology. Connecting Amazon S3 with Snowflake creates a unified architecture that’s not only powerful but also flexible and cost-effective.
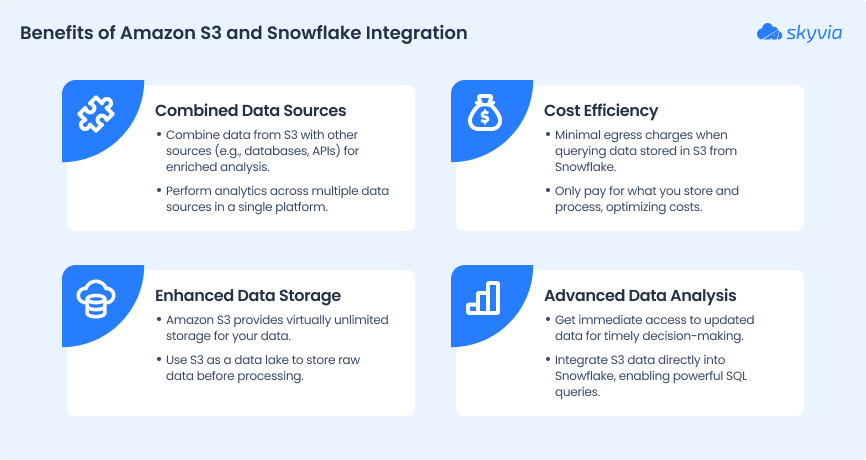
Read on to explore the key advantages of this integration.
Unified data storage and analytics
Traditionally, raw data lived in one system and analytics happened in another – often requiring complex ETL pipelines to move data back and forth. S3 to Snowflake integration eliminates this data shuttling redundancy from your workflow, directly connecting the two platforms.
With this setup, you have a storage that handles all types of data, and an analytical engine to query, transform, and analyze the data in place, without relocating it.
And the best part? It is natively supported by Snowflake. There is no need for extra tools, connectors, or infrastructure to make it work.
Scalability and performance
Both platforms are built to efficiently handle massive volumes of data and scale seamlessly without deteriorating performance. Need to store petabytes of data? S3 has you covered. Need to run complex analytics on those datasets? No problem with Snowflake’s multi-cluster compute engine.
Thanks to the separation of responsibilities – S3 managing storage and Snowflake delivering compute – you can scale each layer independently. That flexibility is a real advantage when you’re working with large and constantly growing data workloads.
Security and compliance alignment
Both S3 and Snowflake are built to handle sensitive or regulated data, with all the essential protection mechanisms in place. Top-tier security features like fine-grained access control, encryption at rest and in transit, and the combination of AWS IAM with Snowflake’s RBAC allow you to build if not an impregnable data fortress, then certainly a setup that aligns well with most major compliance standards.
Automation and cost-efficiency
Platforms like S3 and Snowflake that are built for large-scale data workloads, come with automation features by default. For example, take Snowpipe, a Snowflake’s continuous data ingestion service that automatically initiates a data ingestion pipeline the moment new data arrives into storage. It works reliably, faultlessly, and with no human intervention.
And it’s not just efficient – it’s cost-effective too. Combining S3’s low-cost storage tiers with Snowflake’s pay-per-use compute model creates a really exciting budget-friendly duo.
Choosing the Right Way to Connect Snowflake and Amazon S3
The table below compares the two most common integration methods, highlighting the required skills, level of automation, and associated costs. It might not be enough to make a final decision on its own, but it can certainly guide you in the right direction.
| Criteria | Manual Integration | Skyvia (No-code) |
|---|---|---|
| Setup complexity | Requires IAM policies, external stages, SQL scripting. | Configured through a visual wizard in minutes. |
| Required skills | Cloud admin + Snowflake SQL knowledge. | No technical skills required. |
| Data formats supported | CSV, JSON, Parquet, Avro (native support). | CSV by default; JSON and other formats require preprocessing. |
| Best for | Technical teams needing fine control and one-off pipelines. | Business users or teams needing automated syncs. |
| Automation & scheduling | Requires Snowpipe or external orchestration. | Built-in scheduling, no extra setup. |
| Real-time support | Yes, via Snowpipe. | Near real-time via scheduled syncs. |
| Error monitoring | Manual via logs, cloud monitoring setup needed. | Automatic alerts and error logs built-in. |
| Cost management | Optimized for volume; low cost but higher engineering time. | Usage-based pricing with free tier for small projects. |
Method 1: Manual Amazon S3 to Snowflake Integration (Native Setup)
This method is native – it doesn’t require any third-party tools and is implemented using S3 and Snowflake’s built-in resources. It’s also recommended by both platforms as the most secure and highly customizable integration option. The process involves creating a policy and a role for Snowflake to access S3 and perform required actions.
It is worth noting that this method is primarily one-way and is typically used for loading data from S3 into Snowflake. The outbound data export is possible but requires extra setup using a command.
COPY INTO <S3 URL> Best for
- Teams with strong AWS and Snowflake expertise.
- Integration scenarios with strict security or compliance requirements.
- Organizations with dedicated DevOps teams to manage and maintain the integration.
Pros
- Full control: you manage every aspect of the connection, from IAM policies to trust relationships.
- Highly secure: allows to tailor permissions and access control exactly to your organization’s requirements.
- Customizable: flexibly configure data access, transformations, and pipelines as needed.
- No vendor lock-in: everything is handled natively within AWS and Snowflake.
Cons
- Complex setup: requires detailed knowledge of both AWS IAM and Snowflake integrations.
- More maintenance: any changes to roles or policies must be managed manually.
- Steep learning curve: teams need to be comfortable with cloud permissions, JSON policy editing, and cross-account trust relationships.
- Error-prone: misconfigurations can lead to security risks or failed integrations.
Step-by-step Guide
Let’s get practical and try the manual connection method. The process involves 6 steps, each outlined below in detail. But before you begin, make sure that the following prerequisites are met:
- You have account-level access in AWS and Snowflake with administrator permissions.
- The data format intended for integration is supported by Snowflake.
- Your S3 bucket configuration follows AWS best practices.
- Snowflake supports the AWS region where your storage is hosted.
Step 1. Create IAM policy
Snowflake needs the following permissions on an S3 bucket to access files in the folder (and sub-folders):
s3:GetBucketLocation
s3:GetObject
s3:GetObjectVersion
s3:ListBucket
As the best practice for this, Snowflake suggests creating an IAM policy. Afterward, you can attach a policy to a certain role and use credentials generated by AWS.
- Log into the AWS Management Console.
- Go to Dashboard > Identity & Access Management.
- Open Account settings on the left.
- Activate your AWS region by expanding the Security Token Service Regions list and choosing Activate next to your region.
- Open Policies on the left.
- Click Create Policy.
- Click the JSON tab.
Add a policy document that allows Snowflake to access the S3 bucket and folder.
Copy and paste the text into the policy editor:
Note! Make sure to replace bucket and prefix with actual names.
 "Version": "2012-10-17",
    "Statement": [
        {
            "Effect": "Allow",
            "Action": [
              "s3:PutObject",
              "s3:GetObject",
              "s3:GetObjectVersion",
              "s3:DeleteObject",
              "s3:DeleteObjectVersion"
            ],
            "Resource": "arn:aws:s3:::<bucket>/<prefix>/*"
        },
        {
            "Effect": "Allow",
            "Action": [
                "s3:ListBucket",
                "s3:GetBucketLocation"
            ],
            "Resource": "arn:aws:s3:::<bucket>",
            "Condition": {
                "StringLike": {
                    "s3:prefix": [
                        "<prefix>/*"
                    ]
                }
            }
        }
    ]
}
Step 2. Create the IAM Role in AWS
While in the AWS Management Console, choose Identity & Access Management (IAM):
- Choose Roles on the left.
- Click Create Role.
- Select Another AWS Account as the trusted entity type.
- In the Account ID field, enter your own AWS account ID. At this stage, this is a placeholder that should be updated with a real value after Snowflake generates the integration (step 4).
- Select Require External ID. Again, a placeholder here.
- Click Next.
- Select the policy you created in Step 1.
- Click Next.
- Enter a name and description for the role, and click Create Role.
- Save the Role ARN value from the role summary page. In the next step, you will create a Snowflake integration that references this role.
Step 3. Create a Cloud Storage Integration in Snowflake
Create a storage integration using the CREATE STORAGE INTEGRATION command.
CREATE STORAGE INTEGRATION <integration_name>
  TYPE = EXTERNAL_STAGE
  STORAGE_PROVIDER = 'S3'
  ENABLED = TRUE
  STORAGE_AWS_ROLE_ARN = '<iam_role>'
  STORAGE_ALLOWED_LOCATIONS = ('s3://<bucket>/<path>/', 's3://<bucket>/<path>/')
  [ STORAGE_BLOCKED_LOCATIONS = ('s3://<bucket>/<path>/', 's3://<bucket>/<path>/') ]
Replace the following placeholders with your own values:
- integration_name – name of your integration.
- iam_role – the IAM Role ARN you saved in Step 2.
- bucket – name of your S3 bucket.
- path – path or prefix in the bucket you want Snowflake to access.
Step 4. Retrieve the AWS IAM User for your Snowflake Account
Execute the DESCRIBE INTEGRATION command to retrieve the ARN for the AWS IAM user that Snowflake automatically created for your account:
DESC INTEGRATION <integration_name>; Replace integration_name with the name of the integration you created in Step 3.
The values generated at this step are the actual parameters that you’ll need to update in Step 2:
STORAGE_AWS_IAM_USER_ARN – replaces the placeholder Account ID.
STORAGE_AWS_EXTERNAL_ID – replaces the placeholder External ID.
Step 5. Grant the IAM User Permissions to Access Bucket Objects
- Log in to the AWS Management Console.
- Choose Identity & Access Management (IAM).
- Select Roles from the left-hand navigation pane.
- Click the role you created in Step 2.
- Navigate to the Trust Relationships tab.
- Click Edit Trust Relationship.
- Replace the existing trust policy with the following JSON, using the values from the DESC INTEGRATION output you recorded in Step 4:
{
  "Version": "2012-10-17",
  "Statement": [
    {
      "Sid": "",
      "Effect": "Allow",
      "Principal": {
        "AWS": "<snowflake_user_arn>"
      },
      "Action": "sts:AssumeRole",
      "Condition": {
        "StringEquals": {
          "sts:ExternalId": "<snowflake_external_id>"
        }
      }
    }
  ]
}- Click Update Trust Policy.
Step 6. Create an External Stage
Create the stage using the CREATE STAGE command:
create stage my_s3_stage
  storage_integration = s3_int
  url = 's3://bucket1/path1'
  file_format = my_csv_format;
Replace:
- my_s3_stage with the name of your stage.
- s3_int with the name of the storage integration you created in Step 3.
- bucket1/path1 with your actual S3 bucket name and prefix.
- my_csv_format with the name of the file format object you defined.
Once the stage is created, you can view the files available in your S3 bucket with the command:
LIST @my_s3_stage; Method 2: Automated S3 to Snowflake Integration
This method involves integrating Amazon S3 and Snowflake by means of dedicated no-code tools like Skyvia. Although it may lack the control and flexibility of the first method, it brings undeniable advantages of simplicity and automation by abstracting away the complexities of manual setup. In most cases, it allows you to achieve the same results, but with less effort and overhead. Unlike the manual method, it effortlessly manages bidirectional sync between the two systems.
Best for
- Users who prefer graphical interfaces over coding.
- Organizations that rely on regular data syncs.
- Businesses with limited engineering resources.
- Projects requiring quick deployment and easy maintenance.
Pros
- Ease of use: drag-and-drop interfaces and pre-built connectors.
- Fully managed service: no need to provision or maintain servers or clusters.
- Quick deployment: immediate start without complex configuration.
- Broad connectivity: many iPaaS platforms integrate with numerous data sources and destinations.
- Cost-effective for smaller workloads: pricing is often based on the number of records or data volume processed.
Cons
- Limited customization: advanced transformations, complex logic, or real-time streaming may be harder to implement.
- Potential performance limitations: very large or high-frequency workloads may hit scalability ceilings.
- Less granular control: fine-tuning performance or security settings might require additional configurations.
Step-by-step Guide
In this hands-on example, we’ll use Skyvia to import data from Amazon S3 into Snowflake. To do so, you’ll need to follow three simple steps:
- Create S3 connection
- Create Snowflake connection
- Design integration flow
This scenario assumes that you already have a Skyvia account. If not, you can create it for free on the Skyvia sign-in page.
Step 1. Create S3 Connection
- Log in to your Skyvia account.
- Click + Create New and choose Connection. Choose Amazon S3 from the list of connectors.
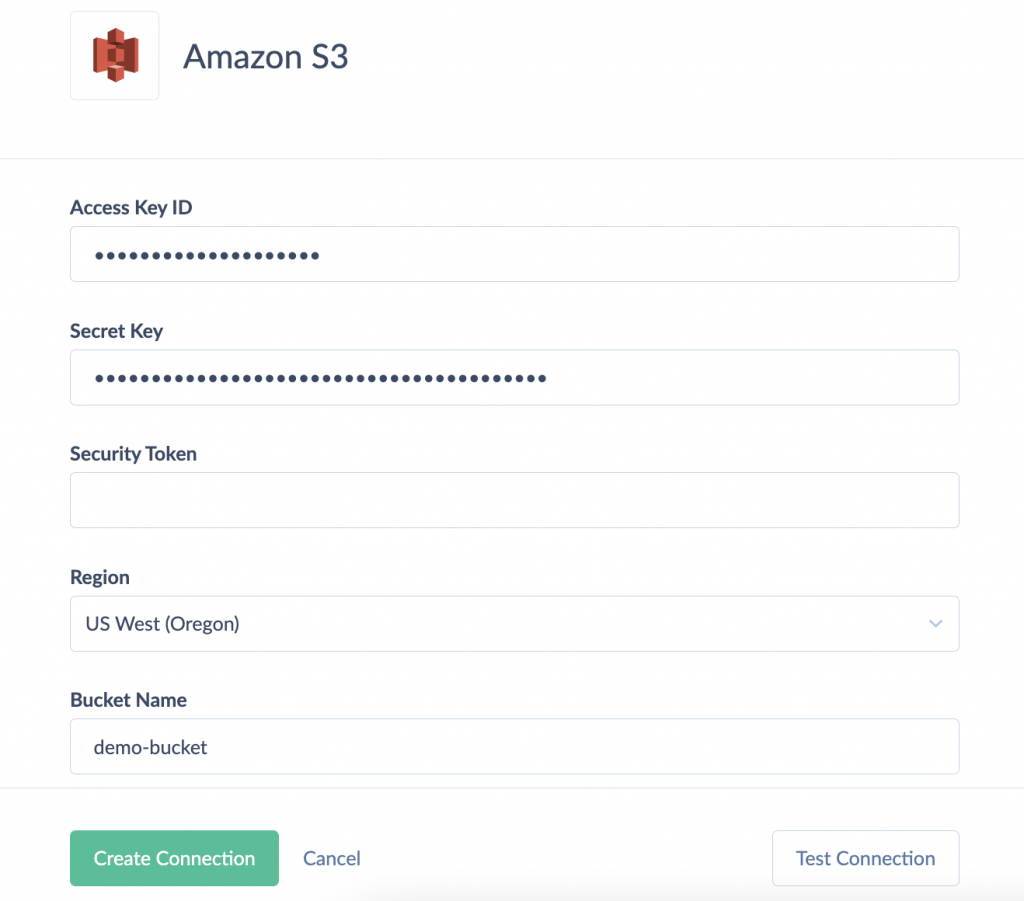
- Specify the required parameters:
- Access Key ID – the first part of your Amazon Web Services access key.
- Secret Key – the second part of your Amazon Web Services access key.
- Security Token (optional) – required when using temporary security credentials.
- Region – an AWS region, where your S3 storage is hosted.
- Bucket Name – the name of your S3 bucket to load CSV files from or to.
- Click Create Connection.
Step 2. Create Snowflake Connection
- In your Skyvia account, choose Snowflake from the list of connectors.
- Fill in the following fields:
- Domain – your account identifier on the snowflakecomputing.com domain.
- Authentication – choose the authentication method and enter required credentials.
- Note: Skyvia supports 3 authentication methods for Snowflake, including basic, key-pair and OAuth. For this example, we choose Basic authentication that requires entering a username and password.
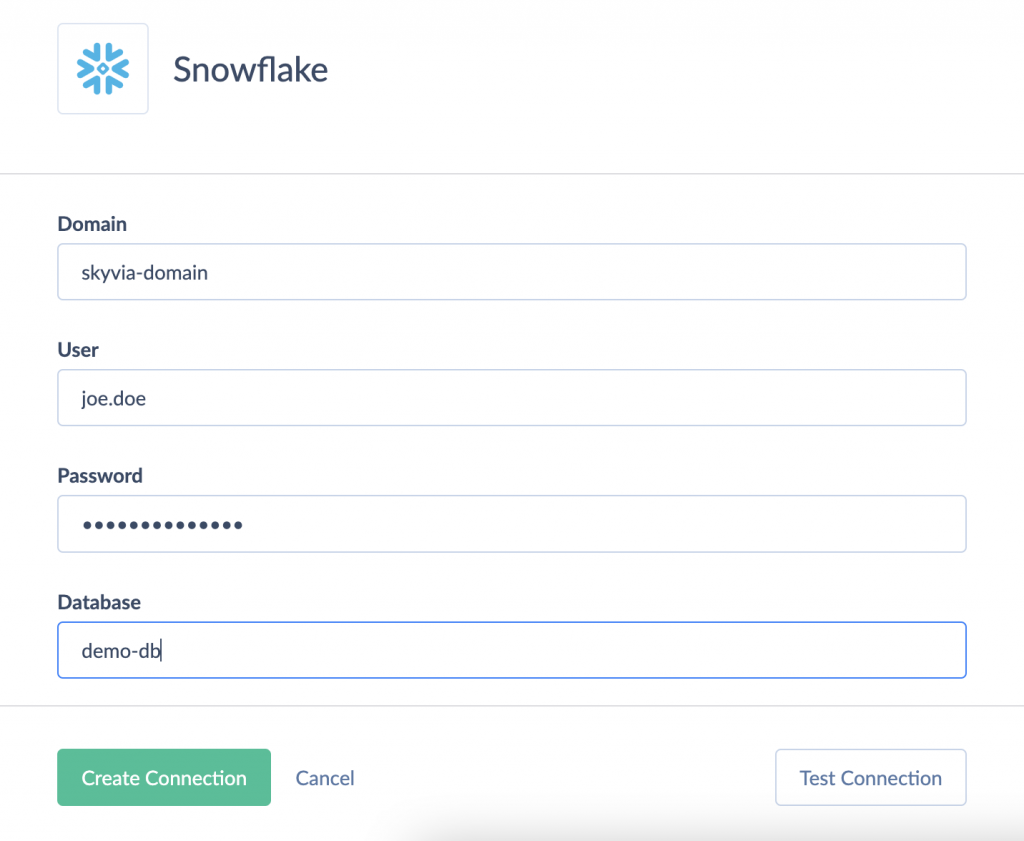
- Enter the database name.
- Click Create Connection.
Step 3. Design Integration Flow
Once both connections are ready, let’s create an import integration.
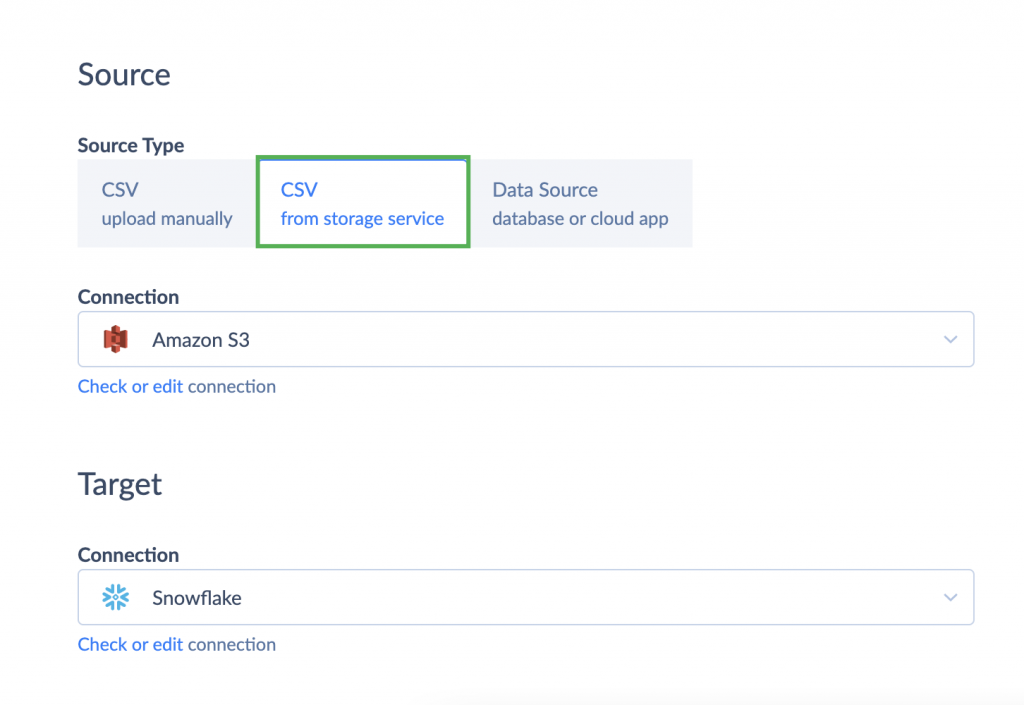
- Click + Create New > Integration > Import.
- Under the source type, choose CSV from storage service option.
- Choose Amazon S3 as Source and Snowflake as Target.
- Click Add New to create an import task.
- On the Source Definition tab of the task editor select your CSV file and click Next Step.
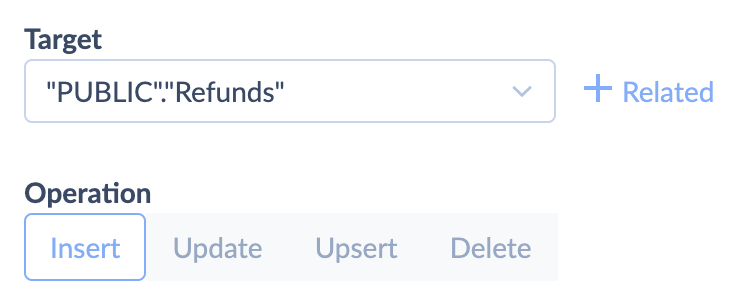
- On the Target Definition tab, choose the table you want to import data to and the type of import action.
- On the Mapping Definition tab, map columns if needed and click Save.
Your import integration is ready to go. You can run it manually or on schedule.
Scheduling and Monitoring Sync Jobs
For organizations that handle recurring data integration tasks, scheduling is the backbone of most workflows. It lets you automate operations on a set schedule – precisely, with no delays and human error. With Skyvia, you can achieve near real-time integration by setting time intervals as frequent as every minute. Watch below how to configure this option:

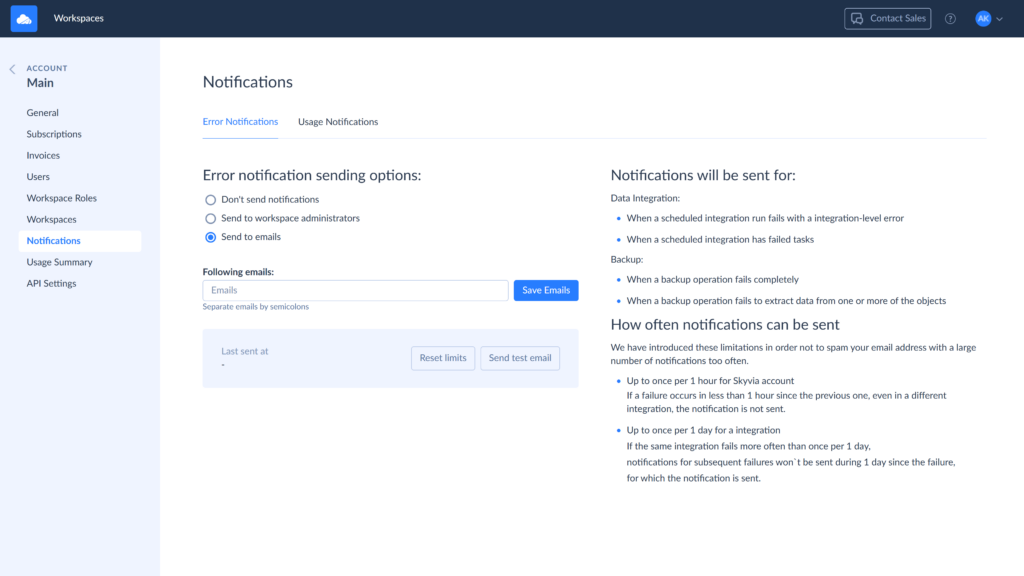
You can check the integration results on the Monitor and Logs tabs. To stay informed about any integration failures, you can enable notifications in your account settings:
Troubleshooting S3–Snowflake Integration: Common Errors and Fixes
Of course, the best advice in troubleshooting is to configure everything correctly right from the start. But with so many nuances in the manual configuration, it’s easy for something to slip through the cracks. Below, we’ll look at common issues that can hinder your integration – and the best ways to resolve them.
| Issue | Symptoms | Causes | Fix |
|---|---|---|---|
| Permission errors | Errors like: AccessDeniedException “Access Denied to S3 bucket” “403 Forbidden” | IAM policy missing required permissions. Trust relationship misconfigured or missing External ID. Incorrect role ARN or region settings. | Double-check the IAM policy attached to your role (Step 1) and ensure it includes all necessary permissions. Verify the trust relationship in your IAM role (Step 5) has the correct Snowflake IAM User ARN and External ID. Confirm that your AWS region is activated and matches the S3 bucket’s region. |
| Stage misconfigurations | Errors like: “Stage not found” “Invalid stage location” “External stage not configured” | Storage integration not linked correctly to the stage. Incorrect bucket path or prefix in the CREATE STAGE command. Typos in the URL (e.g., missing trailing slash /). | Check that your stage references the correct storage integration created in Step 3. Verify that the S3 bucket path in the CREATE STAGE command matches the actual bucket and folder structure in AWS. Always include a trailing slash / after the prefix to avoid confusion. |
| File format mismatches | Errors like: “Unsupported file format” “Invalid record delimiter” Data loads with missing columns or null values. | Missing or incorrect file format defined in Snowflake. Data format in S3 doesn’t match the expected structure. Compression or encoding mismatches. | Define a proper FILE FORMAT in Snowflake that matches the structure of your files (e.g., CSV, JSON, Parquet). Double-check file delimiters, headers, and encoding settings. Test data loads with a small sample file to validate configuration before loading large volumes. |
Conclusion
In this article, we explored two ways to integrate S3 and Snowflake: the native method and using third-party tools. Each comes with its own strengths and drawbacks: security and control of the native method versus painstaking configuration, or automation and simplicity of third-party tools at the cost of flexibility and customization.
When choosing an approach, consider your data volumes, the technical level of your team, and your budget.
Remember, to start with Skyvia, you only need to know your credentials. It’s fast, reliable, and budget-friendly, especially for smaller projects.

F.A.Q. for Snowflake and AWS S3 Integration

What permissions are required for S3–Snowflake integration?
You’ll need to configure IAM roles or users in AWS with specific permissions, such as s3:GetObject, s3:ListBucket, and optionally s3:PutObject for certain use cases. These roles are linked to Snowflake via Storage Integrations for secure access.
How does file compression impact Snowflake load performance?
Snowflake supports loading compressed files (e.g., GZIP, BZIP2, Snappy), which can significantly reduce S3 storage and network transfer costs. Compressed files load efficiently, but splittable formats like BZIP2 are generally preferred for parallel loading performance.
Can Snowflake stream data directly from Amazon S3?
Not in real time. Snowflake supports batch ingestion from S3 using stages and COPY INTO commands. For near real-time needs, use Snowpipe, which monitors S3 for new files and ingests them automatically, offering a quasi-streaming solution without full real-time latency.
