

Sales and marketing collaboration looks like a usual process. Both teams use separate platforms like HubSpot and Salesforce and constantly exchange data. However, if you look better, you’ll notice it is a Pandora’s box. You’ll see endless manual updates, inconsistent records, mismatched data, and reporting headaches. Sales end up working with partial information or chasing leads that have already gone cold. Looks hopeless, isn’t it?
Integrating Salesforce and HubSpot isn’t just about syncing contact records — it’s about aligning your growth engine. When both platforms intertwine, you have a complete picture. Your teams work faster, your reports reflect reality, and there are fewer human mistakes.
This article helps to prepare users for HubSpot Salesforce integration and demonstrates how to set it up using native connectors and third-party tools.
Table of contents
- What is Salesforce?
- What is Hubspot?
- Why Integrate HubSpot and Salesforce
- How to prepare for HubSpot and Salesforce Integration
- Best Methods for HubSpot Salesforce Integration
- How to Integrate Salesforce and HubSpot Using Native Connector
- How to Integrate Salesforce and HubSpot with Skyvia
- Best Practices for Salesforce HubSpot Integration
- Summary
What is Salesforce?
Salesforce is one of the most popular management platforms. Support, sales, and marketing teams utilize it worldwide to better connect with partners, customers, and leads. Let’s check some general features that stand behind its popularity.

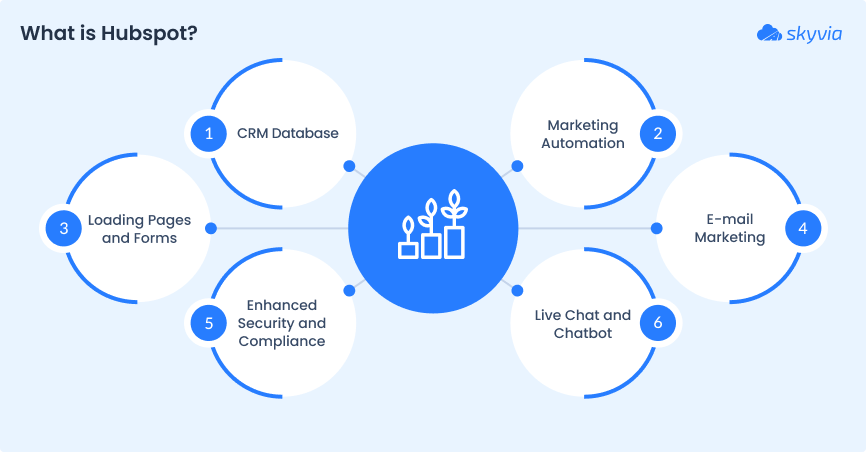
What is Hubspot?
HubSpot is also a big player in the market. It provides user-friendly tools for the marketing team to attract people, the sales team to engage those people, and the service team to delight clients so they will attract even more customers. Let’s check what Hubspot brings for each of those categories.
Why Integrate HubSpot and Salesforce
Proper data sync is a way to fix broken handoffs, clean up messy process flows, and give teams an overall perspective on real situations. Below are the key reasons why businesses decide to integrate these platforms.
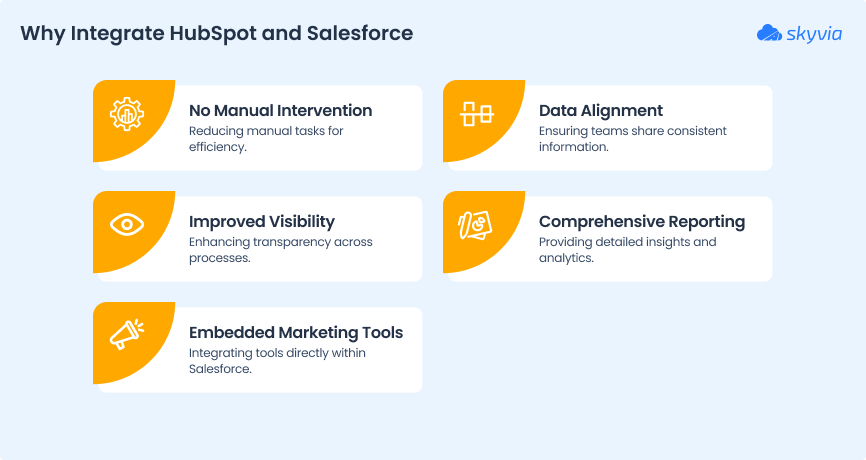
- Less Manual Intervention
Integration automates data transfer between systems, so teams sync without spreadsheets or double entries, saving time and avoiding human mistakes. For example, HubSpot’s lead scoring can automatically update lead information in Salesforce. Similarly, activities logged in HubSpot, like form submissions and marketing emails, can be synced with Salesforce as tasks.
- Data Alignment Between Teams
You get a much clearer picture of your leads, contacts, companies, and deals because the information is shared between HubSpot and Salesforce. This alignment means your marketing team in HubSpot and your sales team in Salesforce are operating with the same information, reducing the chances of miscommunication and ensuring everyone has the most up-to-date details.
- Improved Visibility
By integrating these platforms, marketing and sales teams gain better insight into the customer journey. Marketers in HubSpot can see which of their efforts are leading to closed deals in Salesforce, helping them to optimize their campaigns. Sales teams in Salesforce can view HubSpot’s marketing activity for their leads and customers, providing valuable context for their outreach.
- Comprehensive Reporting
Salesforce excels at tracking sales processes and outcomes, while HubSpot provides deep insights into marketing activities and engagement. By syncing data like contacts, deals (opportunities), accounts (companies), and activities (events/tasks), you can start to create reports that unite marketing efforts and sales results. For instance, you can analyze which marketing campaigns in HubSpot are generating the most qualified leads that eventually convert into opportunities and closed deals in Salesforce.
- Embedded Marketing Tools for Salesforce Teams
If your sales team is deeply embedded in Salesforce and resistant to switching systems, integrating with HubSpot allows your marketing team to utilize a robust marketing automation platform without requiring the sales team to leave their familiar environment.

How to prepare for HubSpot and Salesforce Integration
So, your company has finally decided to connect both platforms. It’s great, but what’s next? The answer is preparation. Before you start making practical implementation steps, you must think of a solid foundation. Here are five crucial steps that may help you set up smooth integration:
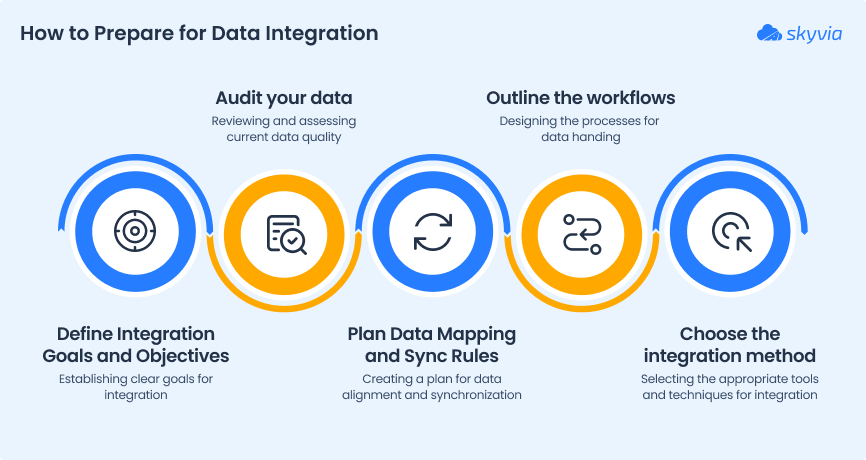
- Define Integration Goals and Objectives.
Think of what you want to achieve with this integration. What exact problems does it have to solve for your business, and what results do you expect from it?
- Audit your data.
Each minor inconsistency may lead to unexpected consequences. If you don’t detect and clean up the mess, you will have it multiplied by the future integration. To avoid syncing outdated contacts, mismatched fields, and duplicates across both systems, consider performing data cleanup. Evaluate data volumes to understand what capacity your business will require.
- Plan Data Mapping and Sync Rules.
Both platforms have completely different data structures. Before implementing your integration use case, think about how to match the data across platforms. Define the mapping for the key objects: contacts, companies, deals, and lifecycle stages. Agree on naming and structure, and align field types across both systems.
- Outline the workflows.
Evaluate the existing workflows across systems and plan what exact workflows you will automate. Check whether it is enough to integrate standard objects or if you also require custom objects or fields. Outline all the processes.
- Choose the integration method.
Now, you can decide which method to use for Salesforce and HubSpot collaboration. This decision is not an easy one. It depends on integration objectives, business size, data volume, customization requirements, and other factors. We explored and compared the existing methods below.
Best Methods for HubSpot Salesforce Integration
Data integration tasks vary from team to team. Companies may have completely different business goals, even operating in the same industry. Thus, there is no standard approach. Each company makes decisions for itself. We compared several data integration solutions to help you decide for your business.
| Method | Ease of setup | Flexibility | Cost | Maintenance | Best For |
|---|---|---|---|---|---|
| Native Connector | Easy | Low | Low | Low | Small/standard setups |
| Third-Party Tools | Easy | Medium | Low to Medium | Low | Mid-size/advanced use cases |
| Custom API Integration | Hard | Very High | High | High | Enterprises or unique business requirements |
Let’s look at each method in detail below.
Native HubSpot Connector
HubSpot offers a built-in connector for Salesforce, available for all HubSpot plans except the free tier. It connects standard objects like contacts, companies, and deals. This method is suitable for getting started, but can become restrictive for growing companies or those with non-standard data models.
Best for
Automating simple marketing-to-sales handoffs in small to mid-sized teams with standard workflows that want fast integration with minimal setup.
Pros
- Easy to set up.
- Supports bidirectional sync for standard objects.
- Built and supported directly by HubSpot
Cons
- Available only for Professional or Enterprise subscriptions.
- Limited customization – custom objects and fields integration is not supported.
- No advanced scheduling or sync logic
Third-Party Integration Tools like Skyvia, Zapier, Workato, or others
Although the native connector offers two-way integration, it only allows you to import and synchronize standard objects and is available for specific subscriptions only. Third-party solutions instead provide more capabilities for a broader range of data-related tasks.
This method involves cloud-based data integration solutions that connect Salesforce, HubSpot, and other tools with advanced data sync logic, transformations, and monitoring features. Third-party tools can connect multiple data sources, support complex workflows, and offer more customization features than native HubSpot connectors. It is ideal for teams who need more control than the native connector allows, without going full custom.
Best for
Teams that need more control over integration rules for non-trivial data architecture and complex workflows.
Pros
- Easy to set up.
- High flexibility with field mapping, filters, scheduling, and automation.
- Custom objects support.
- Monitoring features and error handling.
- No coding
Cons
- Additional cost compared to native HubSpot connector
- Available capabilities depend on the subscription.
- Requires more setup and configuration than the native connector.
Skyvia-specific bonus
Skyvia stands out for no-code configuration, support for bulk data sync, custom scheduling, and a strong balance of power and usability — making it a solid choice for teams that outgrow the native connector but don’t want to build from scratch.
Custom API Integration
The alternative method involves fully custom integration built using the Salesforce and HubSpot APIs, which are often developed in-house or by an outsourced partner. Allows total control over implementation, logic, data flows, security, and error handling. This method is excellent for complex data models that third-party tools can’t handle.
Best for
Enterprises with integration objectives that other methods cannot satisfy and with internal development teams who can afford to outsource development partners.
Pros
- Total control over the integration.
- Full customization capabilities.
- It can accommodate any logic, volume, and workflow.
- Flexible security and error handling.
Cons
- High upfront cost (dev time, testing, maintenance)
- Requires ongoing internal ownership and maintenance.
- Implementation complexity.
How to Integrate Salesforce and HubSpot Using Native Connector
This method is available for users with Professional or Enterprise subscriptions on both platforms.
STEP 1: Install Native HubSpot connector for Salesforce
- Go to HubSpot, click the marketplace button in the top right corner, and Apps.
- Type Salesforce in the search bar and select Salesforce.
- On the Salesforce native connector page, click Install App and sign in with Salesforce.
STEP 2: Install HubSpot in Salesforce
- Click Start the Salesforce package installation to begin. You’ll be redirected to Salesforce.
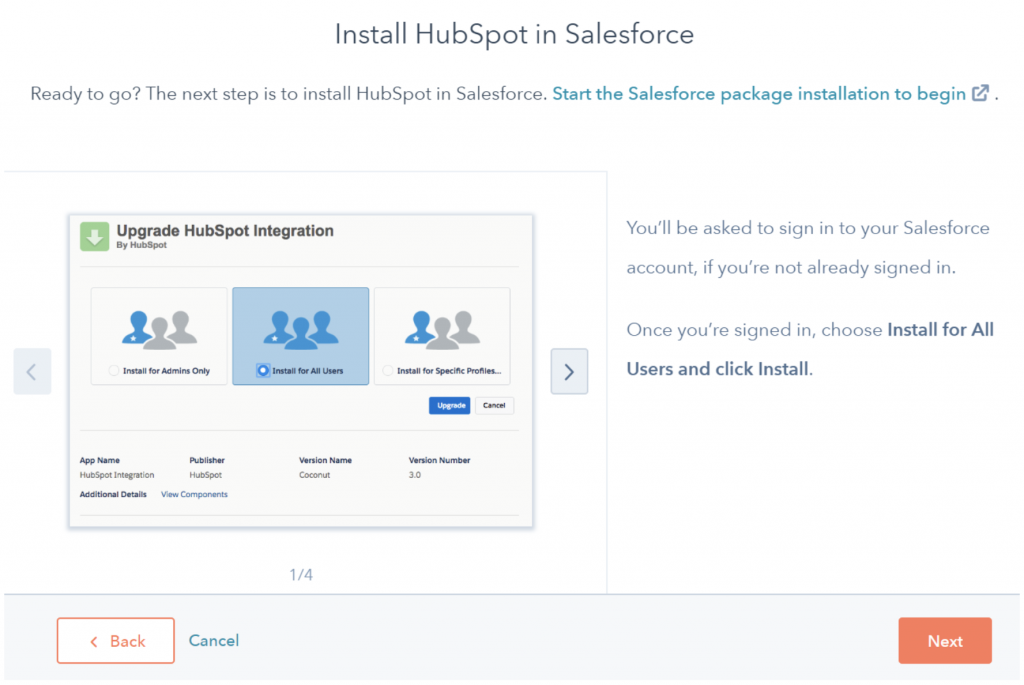
- Select Install for All Users -> Install.
- Select Yes, grant access to these third-party websites, click Continue, and wait while Salesforce installs the HubSpot integration package after the package has been installed in Salesforce.
- Get back to HubSpot and click Next.
NOTE: You can optionally install the HubSpot Visualforce module on Salesforce. This module shows the contact’s likelihood to close and allows you to view and filter contact activity and enroll contacts in HubSpot workflows. Click Add HubSpot to Salesforce to install or skip this step to proceed to the next step.
STEP 3: Configure Integration Settings
- Choose the preferred sync setup method.
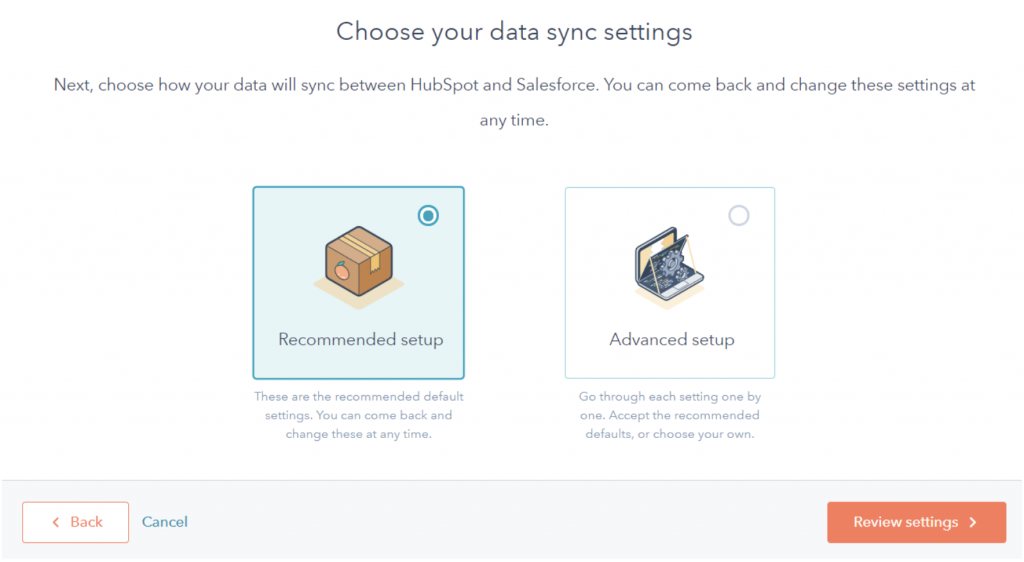
- If you select Recommended setup, click Review settings.
Note: If you select Recommended setup, HubSpot will create mappings between HubSpot properties and Salesforce fields. If the Salesforce field does not have a matching HubSpot property, a new property will be made in HubSpot by an Unknown user.
- If you select Advanced setup, click Next, and manually set up your contact, activity, task, object, and property sync settings.
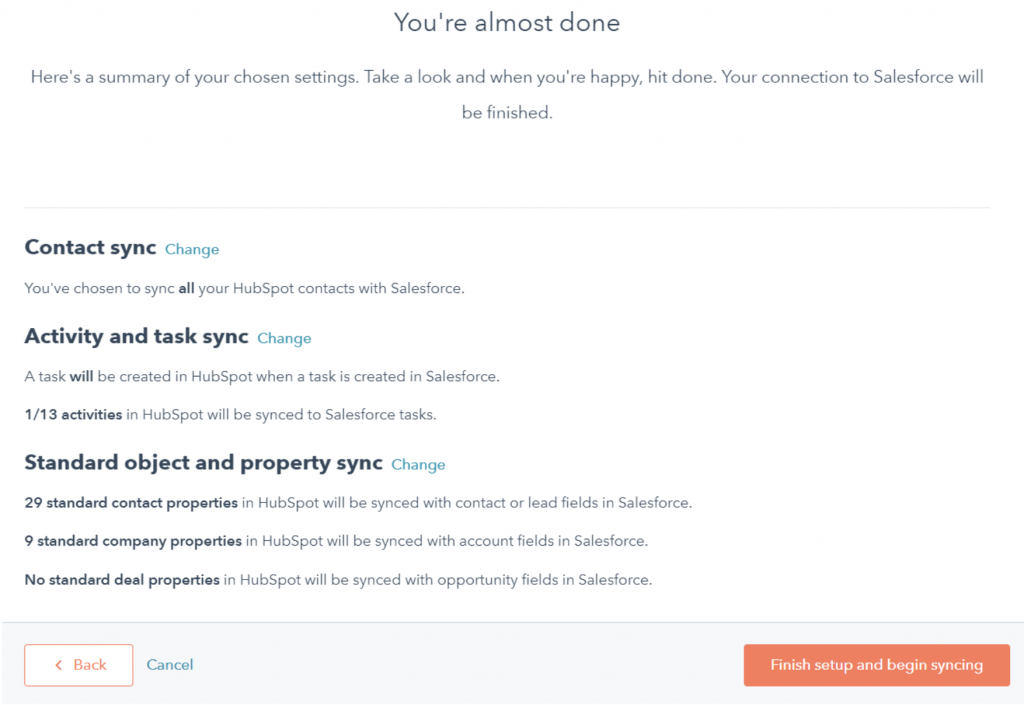
- Click Change to modify the sync settings. When you’re ready, click Finish setup and begin syncing.
That’s it. Now, you can manually import your records between systems or create triggers that will launch the import process.
STEP 4: Import Data Between Salesforce and Hubspot
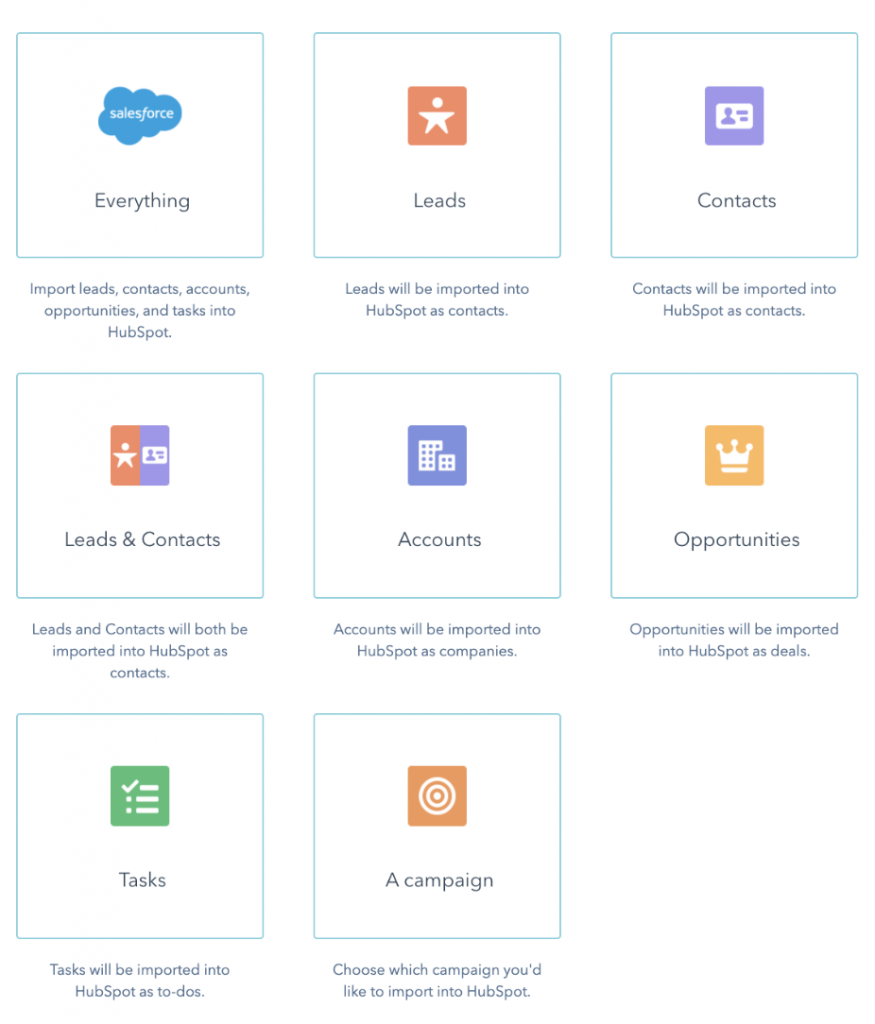
If you have the HubSpot Salesforce integration enabled, you can import Salesforce leads, contacts, accounts, opportunities, tasks, and campaigns into HubSpot.
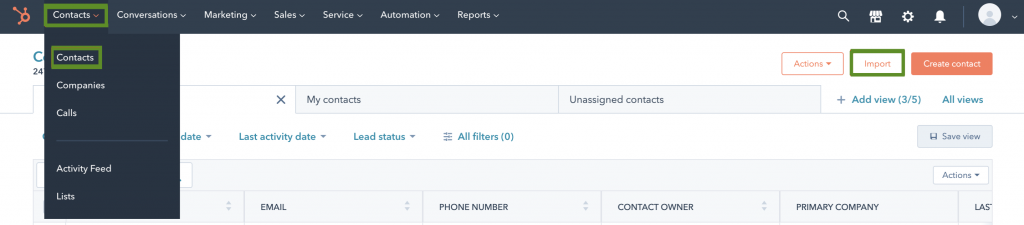
- Open Hubspot and go to Contacts > Contacts.
- Click Import on the upper right, and choose Start an Import.
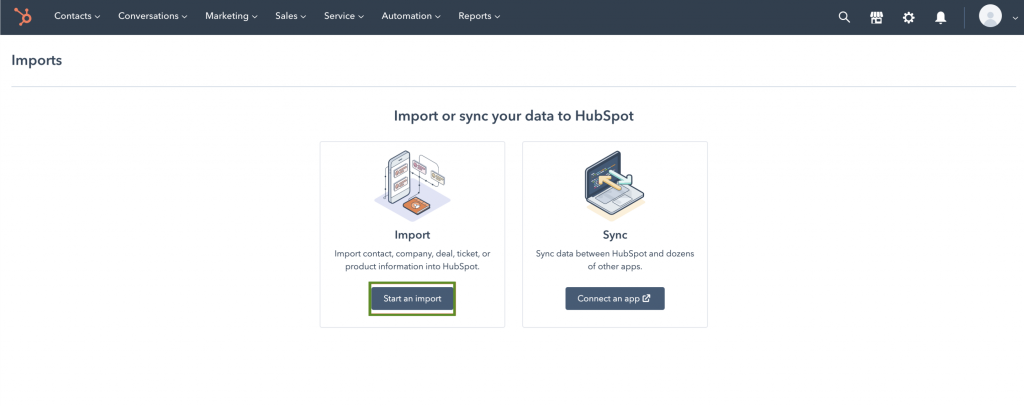
- Select Integrations > Salesforce records, then click Next.
- Select the Salesforce object you want to import and click Begin import.
- When your import is complete, it will appear in the import table. Click View import errors to view any errors for your Salesforce import.
How to Integrate Salesforce and HubSpot with Skyvia
Let’s look at the integration example using a third-party tool. In the example below, we show you how to import Salesforce contacts to HubSpot using Skyvia in several simple steps.
Skyvia is a universal no-code cloud platform that helps non-tech users solve various data-related tasks with no coding: ETL, ELT, Reverse ETL, data migration, one-way and bi-directional data sync, workflow automation, real-time connectivity, and others. Skyvia helps to connect 200+ cloud apps, databases, and storage services.
To implement your integration scenarios, you need an active Skyvia account.
No account yet? Get a trial and hop on the data integration race now.

STEP 1: Create Connections to Salesforce and HubSpot
- Click +Create New -> Connection and select Hubspot.
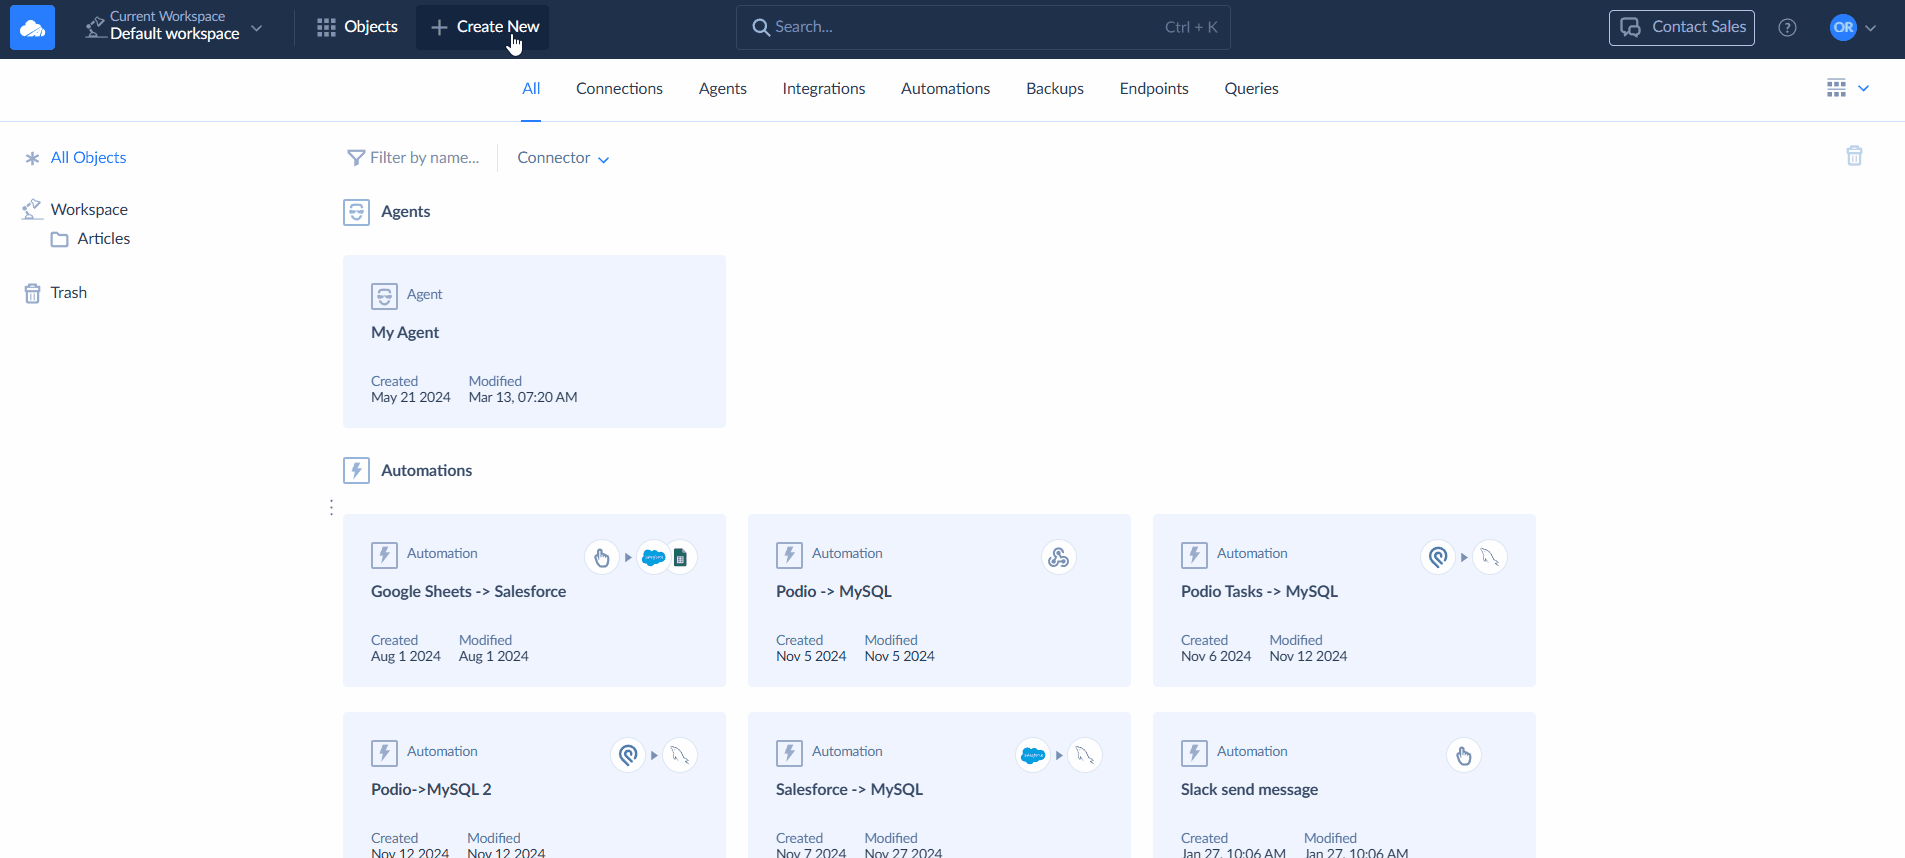
- Click Sign in with HubSpot and use your credentials to log in.
- To connect to Salesforce, click +Create New -> Connection and select Salesforce.
- Sign in with Salesforce and save the connection.
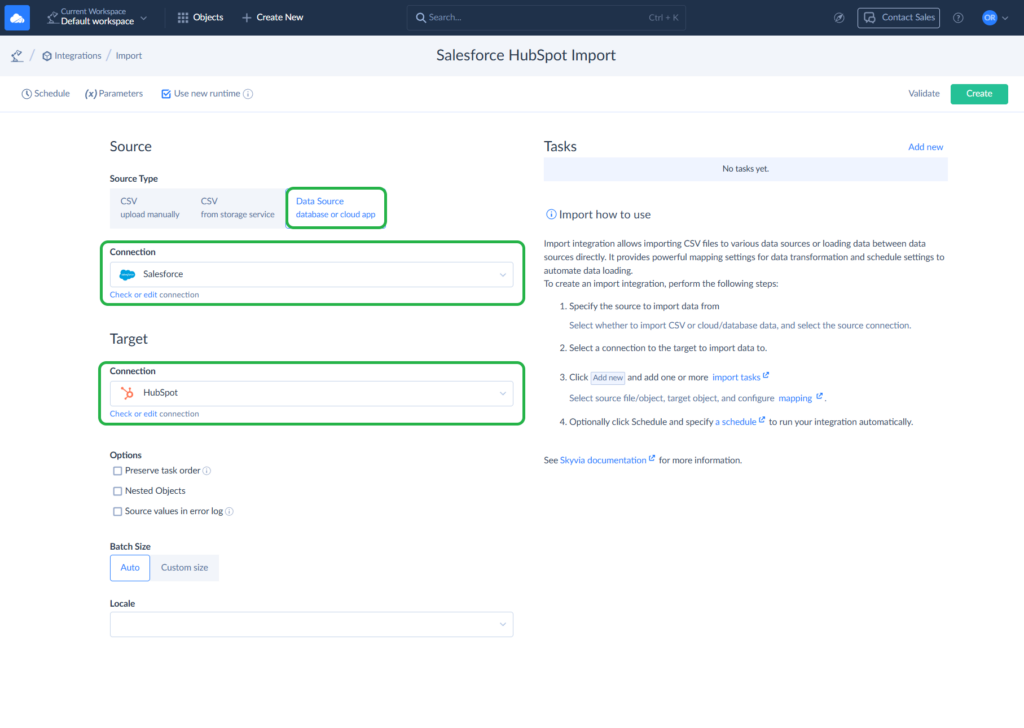
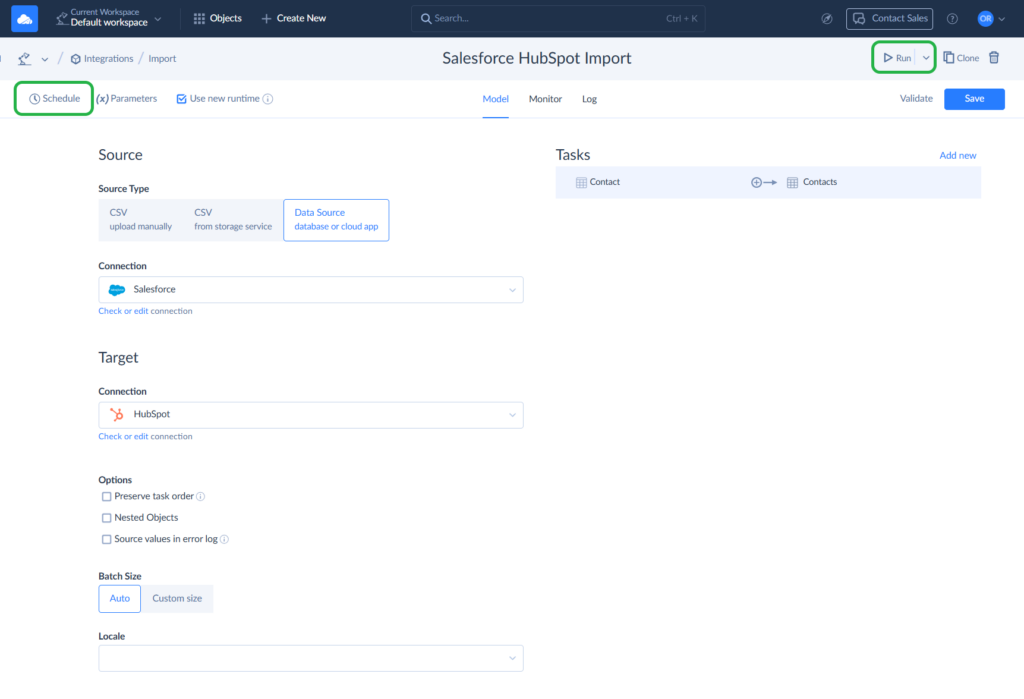
STEP 2: Create Integration
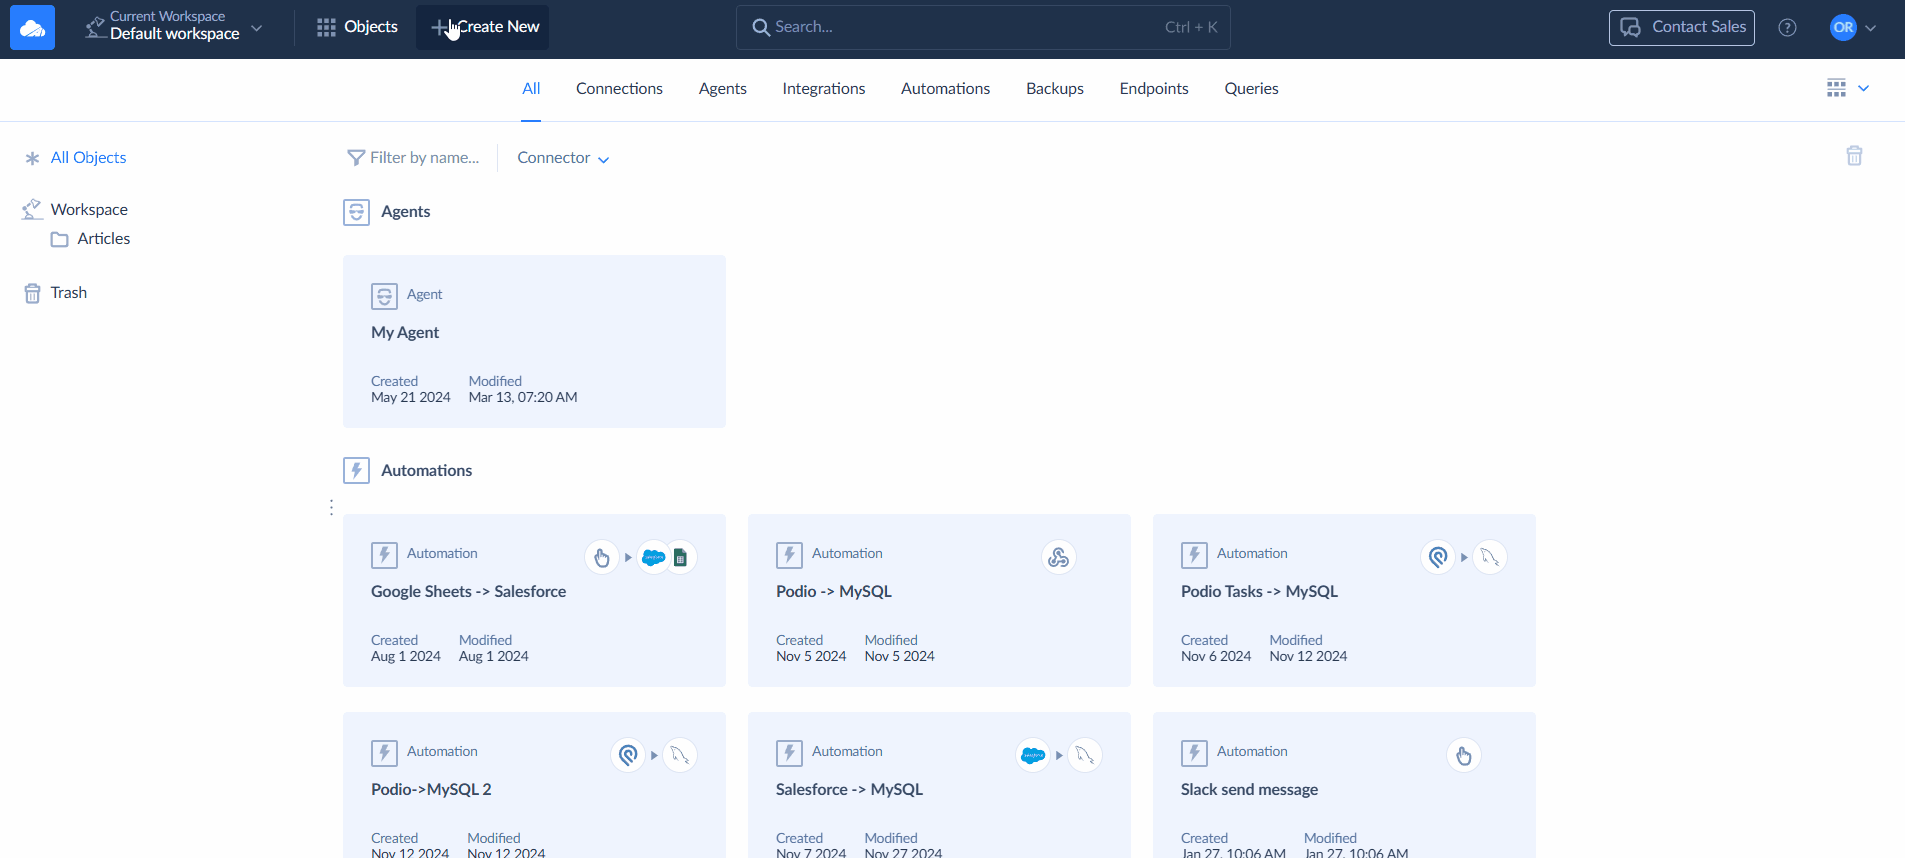
- Click +Create New -> Import.

- Set the Source type to Data Source and choose Salesforce as Source and HubSpot as Target.
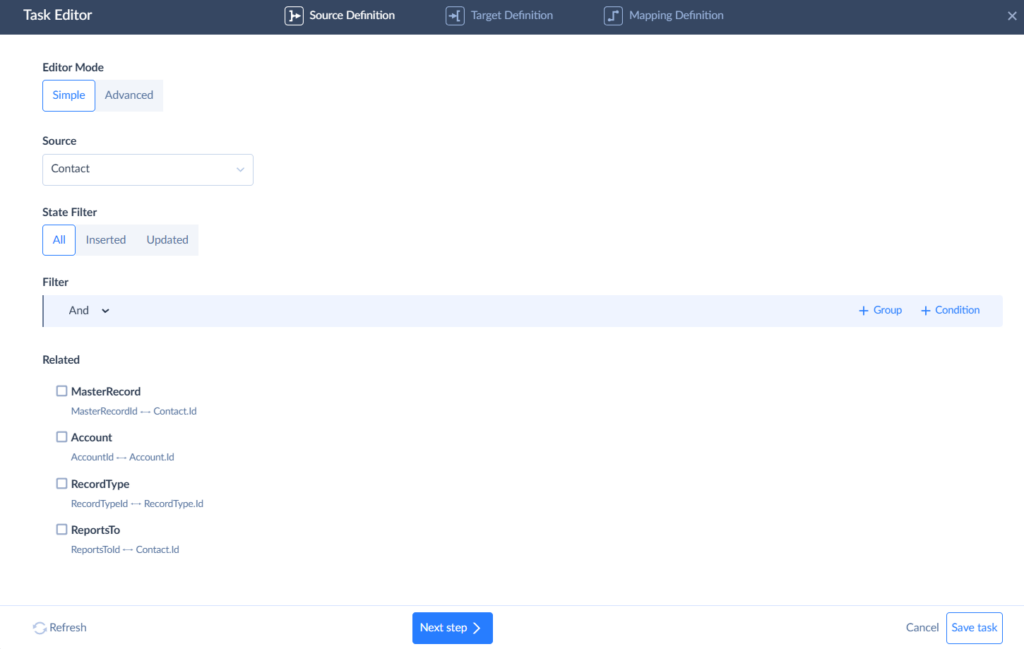
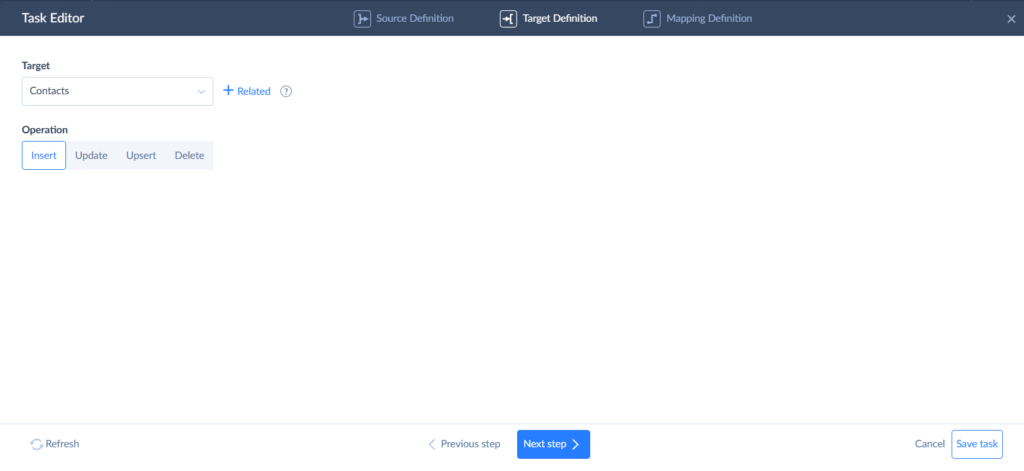
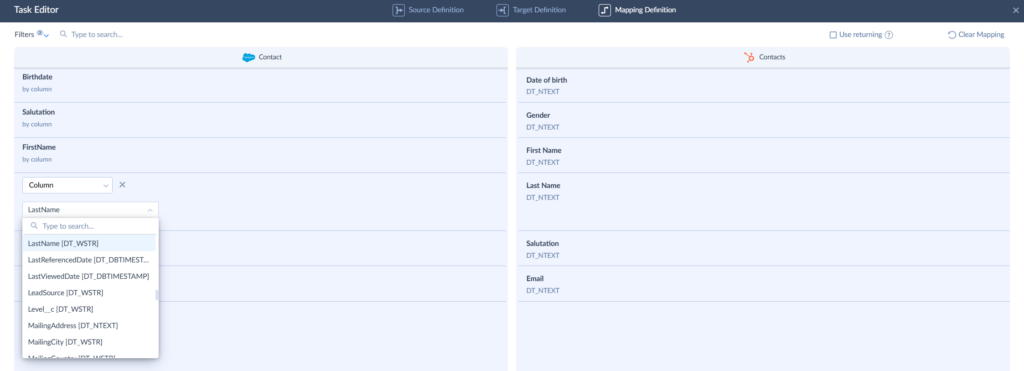
STEP 3: Create Import Task
- Click Add New on the upper right to add an import task.
- Select the source object you want to import. Here, you can select objects, set filters, or write a custom command to select specific data with advanced conditions.
- Select the object you want to import data to and choose what action to perform.
- Map the source object fields to target object fields using available mapping types. Skyvia offers several mapping types that help transform source data to fit the target data structure.
- Save the task and the integration.
NOTE: Add more tasks to import multiple objects in a single integration.
STEP 4: Run the Integration and Check Results
- Launch the integration manually by clicking the corresponding button. Or set up a schedule to automate integration runs.
The schedule can automatically run integration on specific dates or weekdays every few hours or minutes.
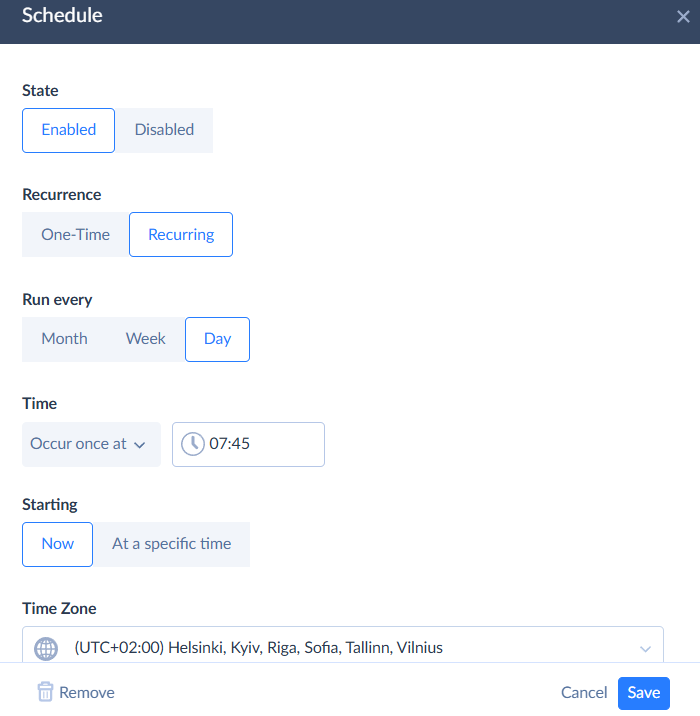
- Check the integration results on the Monitor or Logs tabs.
That’s it, now your data is loaded from Salesforce to HubSpot. You can load more objects or integrate other supported data sources.
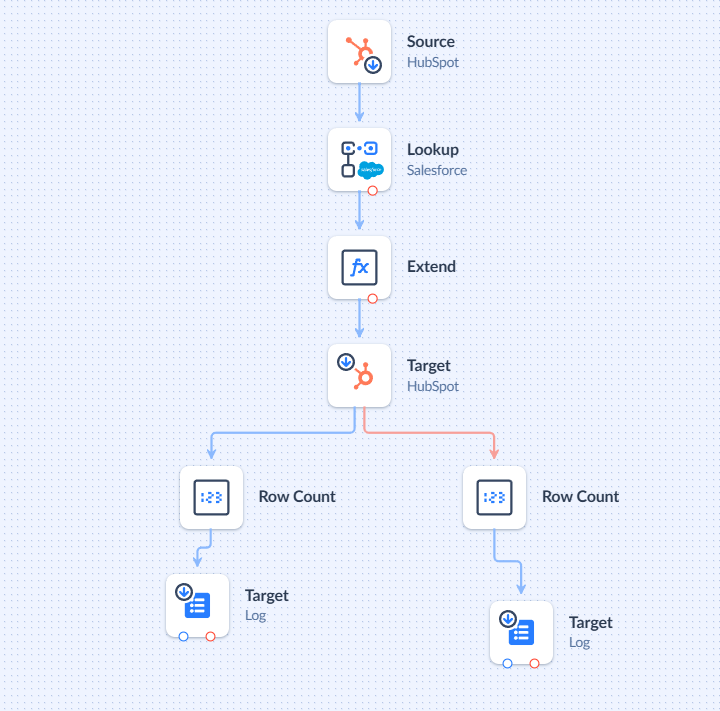
Advanced Use Cases
The example above shows a simple use case of importing a single object. However, with Skyvia, you can implement more advanced scenarios involving more transformations and customization capabilities. This is possible with our designer-based tools Data Flow and Control Flow. For example, you can build custom data flows and tailor the integration to your business-specific requirements and architecture. Follow the link above and learn more about advanced Skyvia solutions.
Best Practices for Salesforce HubSpot Integration
We’ve consolidated several points that can soften your company’s data integration journey. These steps help to reduce the risk of common issues.
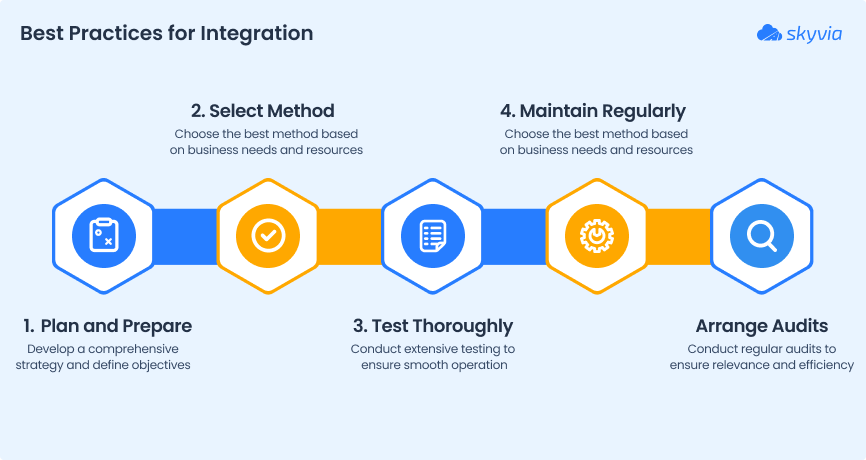
- Plan and prepare.
Take your time to prepare for the integration, and don’t underestimate building a strategy. The more you plan and predict, the fewer problems wait for you later. Before jumping into the technical setup, define the objectives clearly. List all processes it should automate and forecast potential issues. Plan the flow of data between HubSpot and Salesforce and identify possible bottlenecks. - Select the appropriate integration method.
Not every integration method suits your business needs. Take time to review the available options — whether it’s the built-in native connectors, flexible third-party tools like Skyvia, or others, or custom API-based solutions. The right method should align with your business objectives and your project specifics. Consider integration complexity, flexibility, budget, and available resources. - Test before going live.
Once your plan is ready, the method is chosen, and the data mapping is completed, proceed to testing. Carefully test all the possible scenarios, objects, and workflows. Recreate actual business conditions and check the integration behavior in various cases. Goof testing ensures you’ll catch issues early and makes the implementation smoother for everyone involved.
- Take care of maintenance.
Think about how to track the integration performance and efficiency. You may need backups to avoid data loss in case of failures. You also have to think about how to maintain and monitor the integration. The amount of required resources partially depends on the chosen method. Third-party tools usually offer built-in monitoring features and support services. You should assign monitoring, maintenance, and support resources using custom API development.
- Arrange regular audits.
Everything changes fast, and technologies develop each day. Your integration must be flexible. Even if it went live smoothly, you must perform regular audits. Keep track of the last updates and changes on both platforms and your business processes. Check the integration for relevance. Regularly monitor the data structures.
Summary
HubSpot Salesforce integration benefits businesses by:
- Reducing manual data entry
- Aligning team efforts
- Improving visibility into customer interactions
- More accurate reporting
- Process automation flexibility
- Customer experience improvement
If you’re just starting or have a small to mid-sized team with standard workflows, native solutions or third-party tools may be the best fit. However, custom API integration might be worth considering if your business has complex needs or you want complete control over your data and processes. Each method offers different levels of flexibility, complexity, and cost.
By carefully planning your integration, choosing the right approach, and conducting thorough testing, you can avoid common issues and succeed.
Ready to connect HubSpot and Salesforce? Choose the proper method for your business and take your sales and marketing alignment to the next level. If you’re unsure which method is best for your needs, explore Skyvia for a no-code solution that balances ease of use with powerful customization. Get started today!

F.A.Q. for HubSpot Salesforce Integration

