Does moving data from Airtable to Google Sheets and backwards make you feel like Sisyphus, or have you reached the Tantalus point yet? One careless move and your entire spreadsheet looks like a crime scene. Recognize yourself in that? Welcome to the support group.
Thankfully, there’s a better way: simply sync Airtable to Google Sheets, and your data flows between these two on its own. The next midnight copy-paste session is officially canceled. Real-time updates, consistent data everywhere, automations handling the boring stuff, and spreadsheets finally earn their keep.
Today, we will take you from basic connections to civilized but not overly complicated Skyvia configurations, converting your current Airtable-Sheets disaster into something surprisingly elegant. Ready for less time fixing things, more time using them?
Table of Contents
- Why Sync Airtable to Google Sheets?
- How to Sync Airtable to Google Sheets: 3 Methods Explained
- Step-by-Step Guide: Sync Airtable to Google Sheets with Skyvia
- Pro-Tips for a Seamless Airtable-Google Sheets Integration
- Conclusion
Why Sync Airtable to Google Sheets?
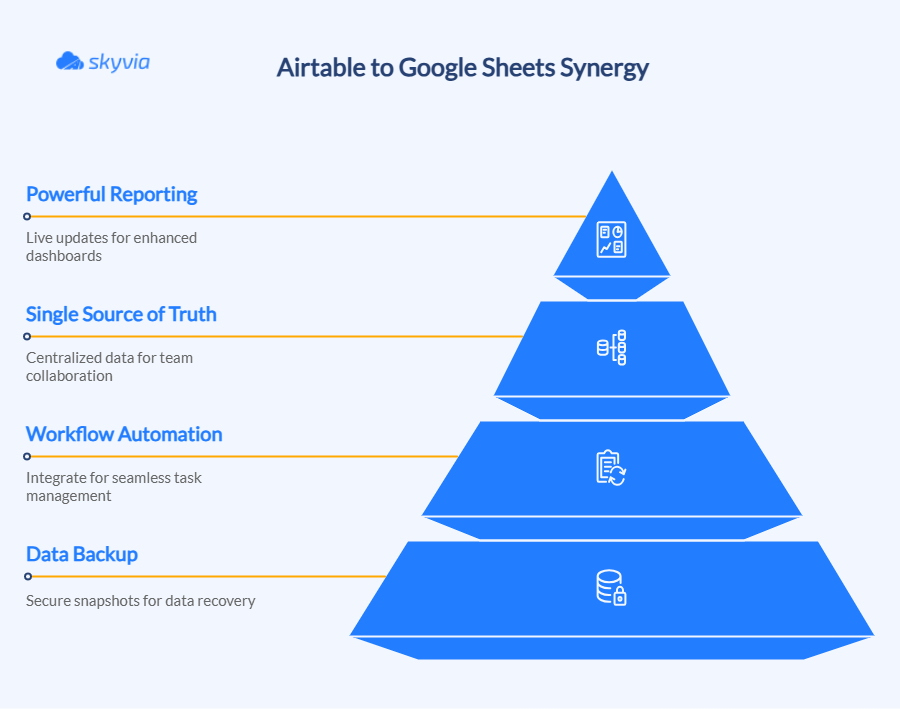
Keeping Airtable and Google Sheets synced sounds like icing on the cake until you’re actually working with both daily. Then it becomes the cake itself.
Reports improve without you lifting a finger. Workflows handle their own business. All those hours wasted moving data around? Gone. The frustration? History. Those spreadsheet meltdowns where you contemplate new careers? Yes, those stop happening, either.
For Powerful Reporting and Dashboards
People live in Google Sheets for a reason. Pivots, charts, formulas complex enough to confuse a mathematician, the works.
When you sync Airtable, live data starts flowing directly into your spreadsheets, breathing life into dashboards that previously sat idle. Mix in Data Studio or a few add-ons? Your reporting now feels like it’s had a serious upgrade.
To Create a Single Source of Truth
Spreadsheet version wars are exhausting – someone has V3, someone else has V3_final, and another person is working from V3_final_ACTUAL. Syncing Airtable with Sheets puts an end to that circus. Centralizes everything so there’s no confusion about what’s current.
Airtable users maintain their relational database workflow, Sheets users stick with what they know, and nobody has to second-guess whether they have the right data anymore.
To Automate Your Workflows
Nobody likes manual exports. They’re tedious, they’re annoying, and they eat up time no one has.
Automate your Airtable syncing and watch project timelines, campaign data, and client information update on its own. Suddenly, you’ve got room to breathe and do real work.
For Data Backup and Archiving
Murphy’s Law applies to databases as well. Someone will accidentally nuke essential data, make unauthorized changes, or something will just break. Google Sheets is your parachute.
Sync on a schedule, and you’re building a historical record of your Airtable info. When disaster strikes and you need to check what changed or restore something, it’s all sitting there in spreadsheet form, accessible, simple, and safe.
How to Sync Airtable to Google Sheets: 3 Methods Explained
| Method | Pros | Cons | When to Use |
|---|---|---|---|
| Manual CSV Export/Import | Simple and free; captures a snapshot of data; works with any CSV-compatible tool | Fully manual, time-consuming, error-prone; one table/view at a time; no automatic updates; may need post-import cleanup | One-time or infrequent transfers; quick snapshot without automation; budget constraints |
| Airtable Native Automations | Automated workflows; scheduled/event-based updates; no coding needed; reduces repetitive tasks | Set up complexity for non-technical users; limited transformation/filtering; usage limits on Airtable plans; simpler flows may require third-party tools | Partial automation without external tools; moderate data volumes; periodic updates without manual intervention |
| Skyvia Integration Platform | Full-featured SaaS with filtering, transformation, upsert; scheduled or near real-time sync; handles complex scenarios; user-friendly; two-way sync, and deduplication | Paid service; learning curve for advanced features; reliance on external SaaS provider | Robust, automated, scalable sync; multi-table/multi-view data; enterprises or power users needing reliable, repeatable integration |
As you can see, you have plenty to choose from. We created detailed guides for each of these methods, but before we start the party, let’s discuss one significant limitation that will impact how you connect Airtable to Google Sheets.
Sheets can do a lot, but it isn’t a full-fledged database. Unlike transactional systems like MySQL or Oracle, it can’t handle multiple simultaneous edits without tripping over itself. No rollback capabilities, no conflict management – just crossed fingers and hope.
The API gives you basic read/write access, but that’s about it. Missing all the transaction control that databases rely on to keep syncs clean and consistent. Every integration platform hits this same wall (however, Skyvia provides a little shortcut through its Data Flow feature; more on it below) because the limitation is baked into Sheets itself.
And now, it’s time to integrate!
Method 1: The Manual CSV Export/Import
The first approach we’re about to introduce is straightforward to understand, but it’s clunky, slow, and prone to errors.
This dinosaur method goes like this:
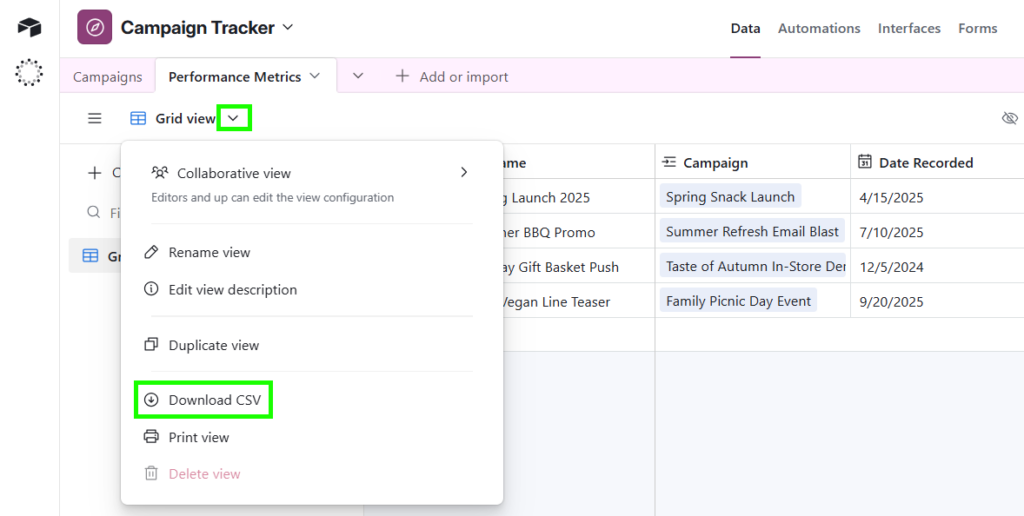
- Pull a CSV out of Airtable. Click on the dropdown arrow to the right to Grid view. Then, choose Download CSV.
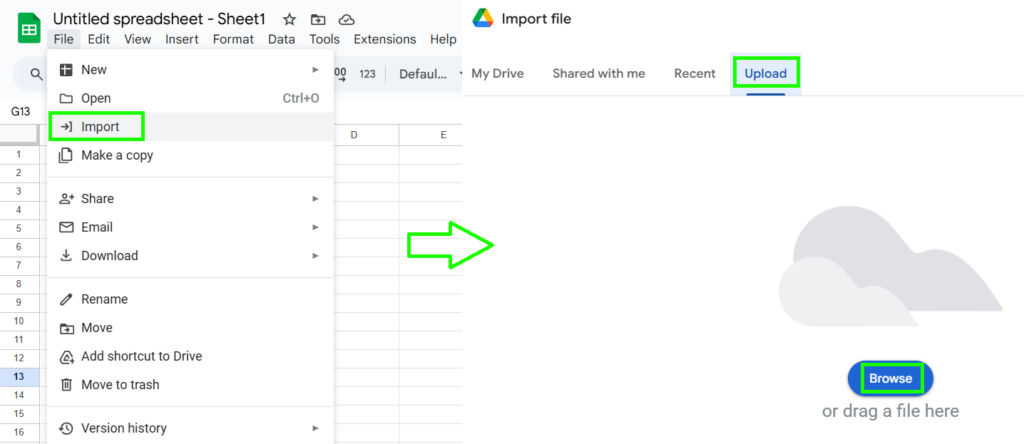
- Hop over to Google Sheets and use File > Import to add it. You’ll need to choose between nuking the existing spreadsheet, adding rows at the end, or inserting them in the middle.
Works great if your dataset is the size of a grocery list and you update it less often than you change your oil. For anything else? Good luck.
The drawbacks:
- You’re always one accidental click away from columns that don’t line up, dates that turn into gibberish, or rows that just vanish. It’s like playing Jenga with your data.
- What you import is a snapshot frozen in time. By the next day, your Google Sheet could already be behind the curve.
- Complex Airtable fields (attachments, links, checkboxes) often don’t survive the CSV journey intact.
- Any update requires repeating the whole manual ritual.
If your project relies on fresh, accurate data, it may be beneficial to think about automation.
Method 2: Using Airtable’s Native Automations
For those who seek basic integration capabilities and don’t want to leave cozy Airtable space, there are native automations that work on triggers. You can bombard data to Google Sheets whenever something happens.
- Create a Google Sheet with column names that respond to Airtable’s base.
- Open the base and click on Automations, and then press Create new.
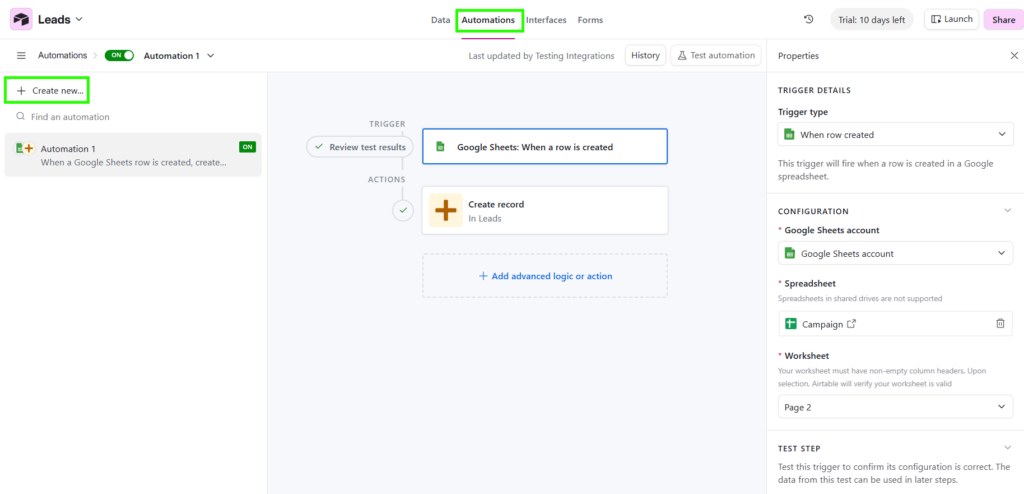
- Choose the trigger. Airtable offers different options, but in this case, we need “Google Sheets: When a row is created.”
- On the properties menu on the right, point to your Google Sheets file and match up which Airtable fields dump into which Google columns.
- Select the necessary action – create a record, so that everything you enter into the Airtable base is reflected in the Google Spreadsheet.
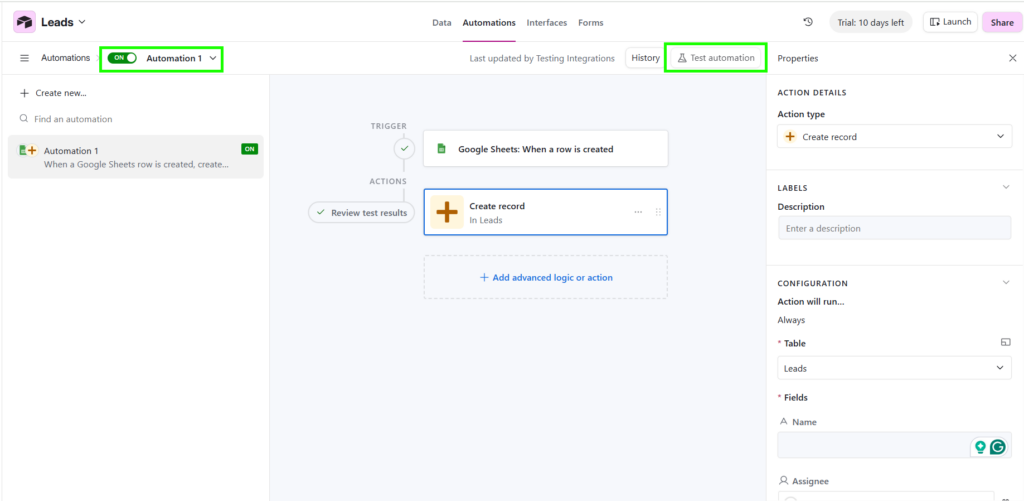
- You can test the automation to ensure everything is appropriately mapped, and then don’t forget to switch it on.
- It runs on its own after that, either when the trigger fires or based on a schedule you control.
Limitations to keep in mind:
- No return trip: Data travels Airtable → Sheets. That’s it. Edit your spreadsheet all you want – Airtable’s not listening.
- Struggles at scale: Works great for small projects. Starts gasping for air when you’re moving tons of data or syncing every five minutes.
- Complicated mapping is rough: If your data structure involves multiple tables, linked records, or anything beyond basic columns, setting this up feels like doing taxes.
Method 3: The Skyvia Solution
Suppose you’ve had enough of button-click marathons and CSV juggling, Skyvia can swoop in.
This no-code cloud platform takes Airtable and Google Sheets by the hand and keeps them talking automatically, so you don’t have to keep tabs on every export/import cycle.
- Approachable for everyone: The interface is designed for people who don’t live in terminals. Marketing, ops, finance – anyone can set up syncs. Developers can still use SQL for complex queries.
- Runs on schedule: Automated refreshes keep Google Sheets current with Airtable. Daily, hourly, whatever rhythm works. No manual exports cluttering your workflow.
- Only moves what matters: Filters and field mapping mean you’re not dumping entire tables if you don’t need them. Data lands clean in Sheets, no scrambling with formulas or spending an hour deleting rows afterward.
- Scales without fuss: Cloud-hosted infrastructure handles increasing data volumes without you thinking about it. Focus on insights instead of whether the sync can handle another thousand rows.
- Data integrity: Upsert logic prevents duplicates and ensures clean, consistent data across both platforms.
- No CSVs required if you don’t want them: Forget exporting, importing, and filing spreadsheets. Skyvia “talks” directly to Airtable and Google Sheets via API, cutting out human errors and the main reason for them – tedious manual steps.
- Connect everything to everything: Skyvia offers 200+ pre-built connectors, so your pipelines stretch out in numerous directions.
Skyvia makes syncing Airtable to Google Sheets feel effortless instead of like a second job. Flexibility meets transformation meets reliable cloud hosting.
Your data lands accurately and stays current without anyone manually shepherding it through. Teams stop wrestling with spreadsheets and start making calls based on what’s actually happening.
Step-by-Step Guide: Sync Airtable to Google Sheets with Skyvia
Skyvia offers multiple options for connecting Airtable to Google Sheets:
- You can use an Export scenario to retrieve CSVs and then upload them to Google Drive.
- You can set up an Import scenario that will update the spreadsheet on schedule.
- Skyvia Add-on will help you easily connect these two.
- Finally, there’s Data Flow for advanced integration that flows in both directions.
Which one to choose?
| Scenario | Pros | Cons | When to Use |
|---|---|---|---|
| Export CSV Files | Simple export pipeline; useful for archival/offline processing; schedulable; compatible with CSV-based systems | Requires manual or scheduled import into Sheets; data is static unless re-exported; no direct live sync; limited transformations | Offline or backup use; low-cost, lightweight solution; low-frequency or batch-oriented data refresh |
| Import for Scheduling Updates | Direct import into Sheets; supports incremental updates, filtering, field mapping; eliminates manual copy-paste; keeps data relatively fresh | Fine-tuning may be needed for large datasets; not real-time | Automated scheduled updates; dashboards or reports needing near-live data without manual work |
| Skyvia Add-on | Query Airtable directly inside Sheets; supports SQL or visual queries; refreshable on demand; no separate setup; convenient for business users | Limited to add-on query capabilities; performance affected by query complexity/data size; usage limits; less suited for continuous sync | On-demand pulls of specific data segments; dynamic reporting; interactive data exploration; SQL-savvy users |
| Data Flow (Visual Pipeline) | No-code visual builder; supports complex workflows, multi-source joins, transformations; bi-directional sync; automated with triggers/schedules; upserts reduce duplicates | Steeper learning curve; paid feature; setup can be time-consuming for complex pipelines; overhead for very small/simple use cases | Enterprise-grade integration; automation with complex transformations; multiple tables/views with dependencies; robust bi-directional workflows with deduplication |
Before You Begin: Prerequisites
Round up these three things first:
- A Skyvia account – start free, upgrade if you want
- An Airtable account with actual access to the base you’re syncing from
- A Google Sheets account and a prepared spreadsheet ready to fill.
Consider it your starter pack.
Step 1: Connect Your Airtable Account to Skyvia
Let’s connect Airtable:
- Click +Create New and choose Connection.
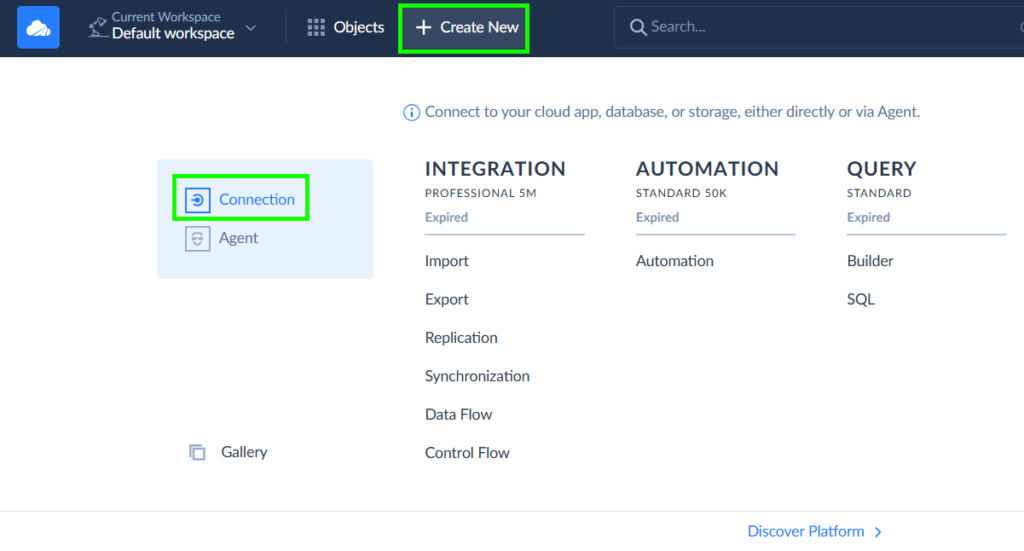
- Select the Airtable connector from the list.
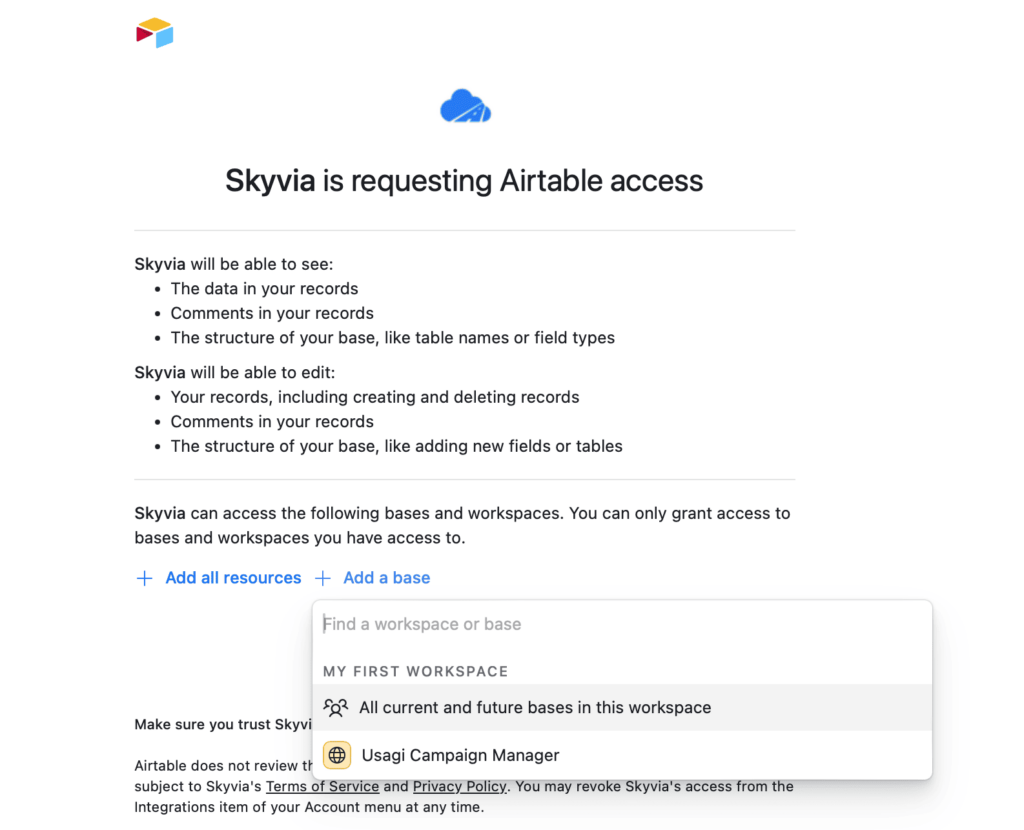
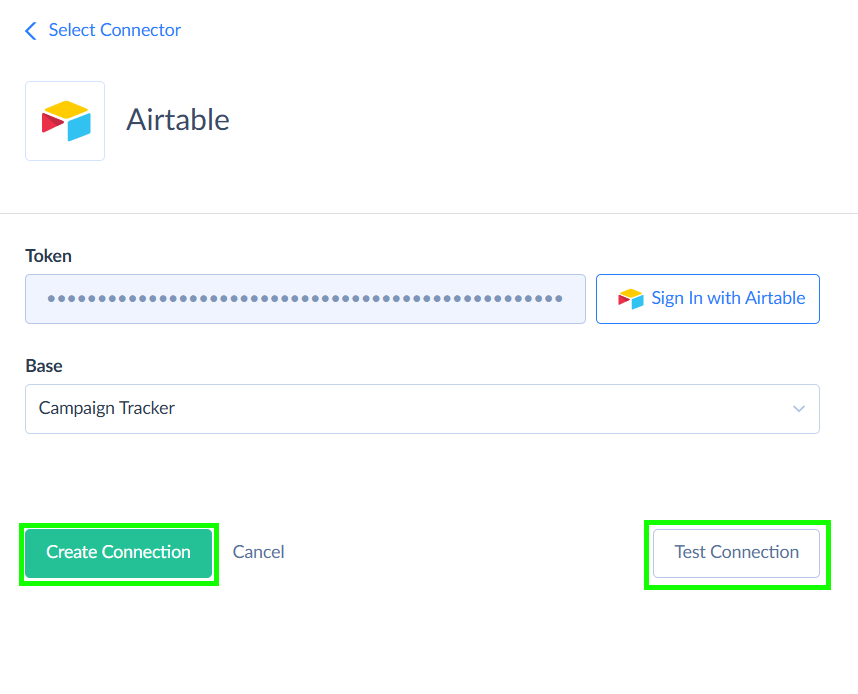
- Fill in all the needed credentials and choose the base to work with.
Note: By default, all new connections in Skyvia are Untitled. For easier search later, assign meaningful names.
- Then, you can test the new connection, create it, and finally save it.
Step 2: Connect Your Google Sheets Account to Skyvia
Now, the second puzzle piece – let’s connect your Google Sheets account.
- Once more, click on +Create New and choose Connection.
- Choose the needed connector from the list and provide credentials.
Note: You won’t be able to start a new connection creation if the previous one isn’t saved.
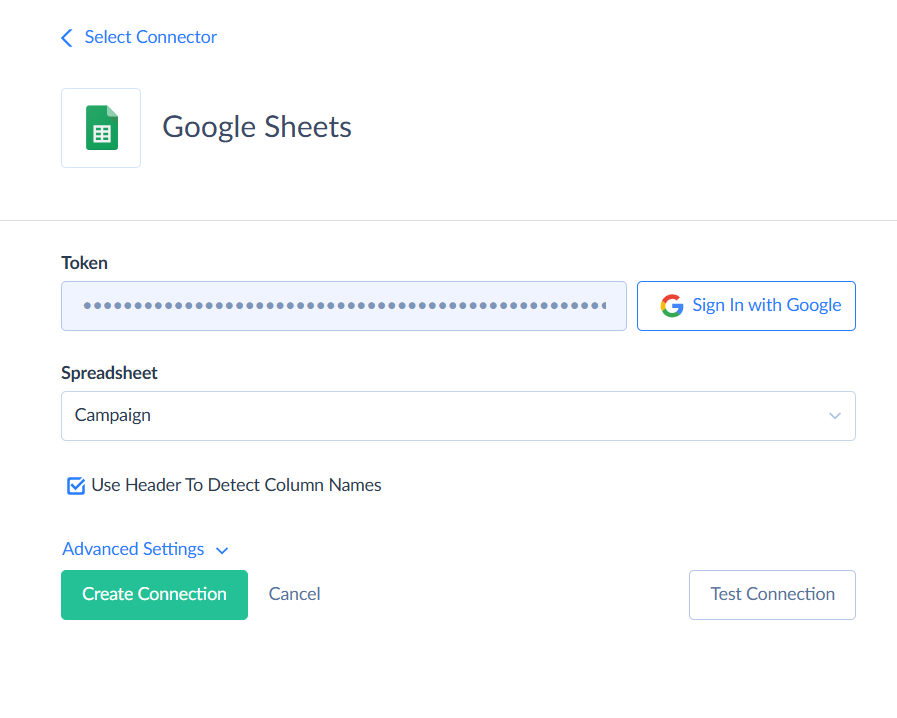
- Choose the spreadsheet you’re going to connect to.
- Repeat the test-create-save action.
Note: Your spreadsheet must be prepared for the integration. An empty file will be impossible to map, so assign column names, the same ones you have in Airtable, or only those you need.
Step 3: Create Your Import Package in Skyvia
And once again, we return to the +Create New menu, but this time we need Import.
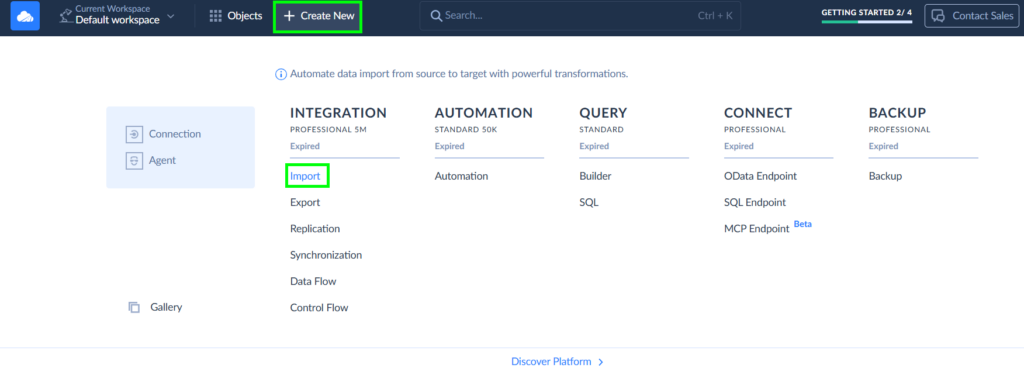
- Choose your source – Airtable and a target – Google Sheets.
- Choose the source type – Database Source.

- Assign an eloquent name to the integration.
Step 4: Map Your Airtable and Google Sheets Fields
Now, we need to map fields so that everything goes to the right destination.
- On the right, click “Add new task.”

- Skyvia gives you two ways to build imports: Simple and Advanced:
- Simple mode is straightforward – point, click, import. Today, we’re going to use this one.
- Advanced mode lets you get granular with SQL or a visual query builder to slice and transform data before it lands.
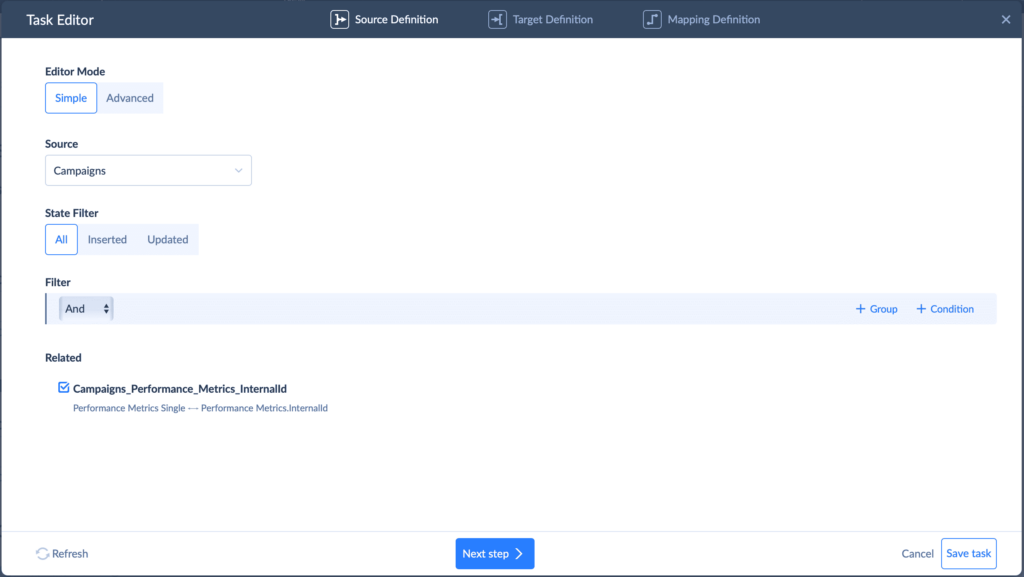
- Specify the target – choose the sheet you want to populate with Airtable data.
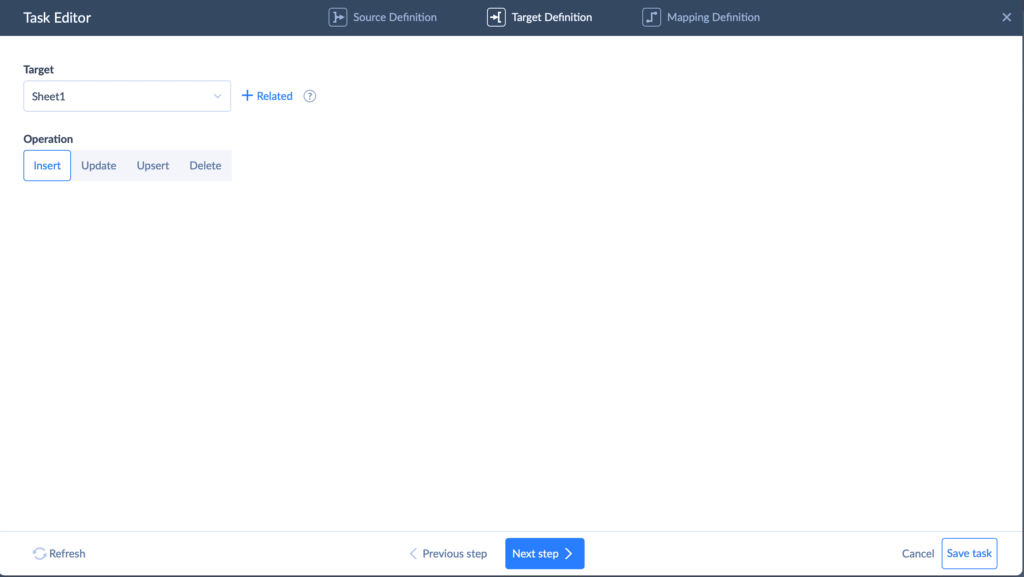
- Map the fields. If the spreadsheet has the same column names as the Airtable base, this will take a few seconds at most, and then press Save task.
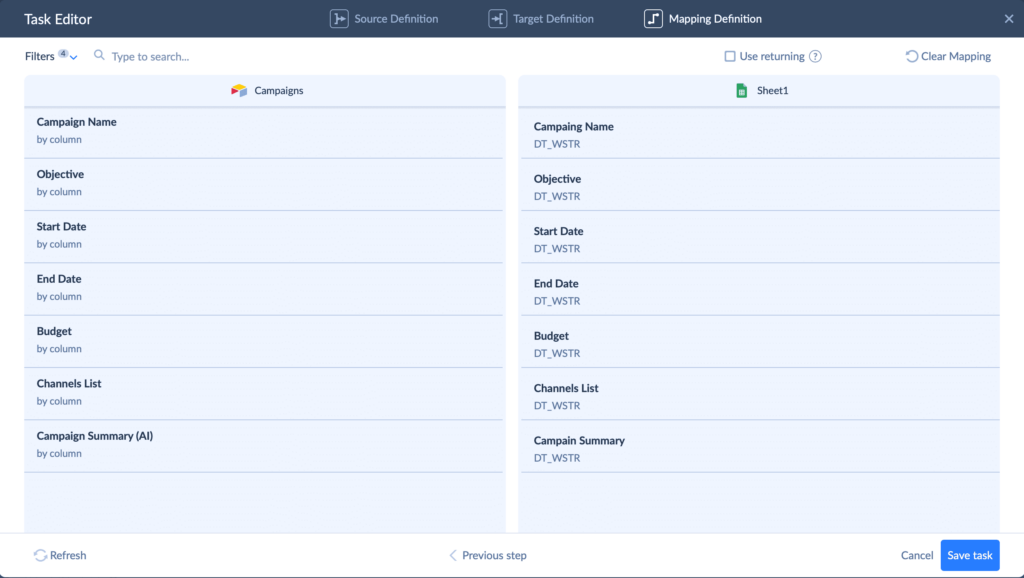
Step 5: Schedule Your Sync and Run It!
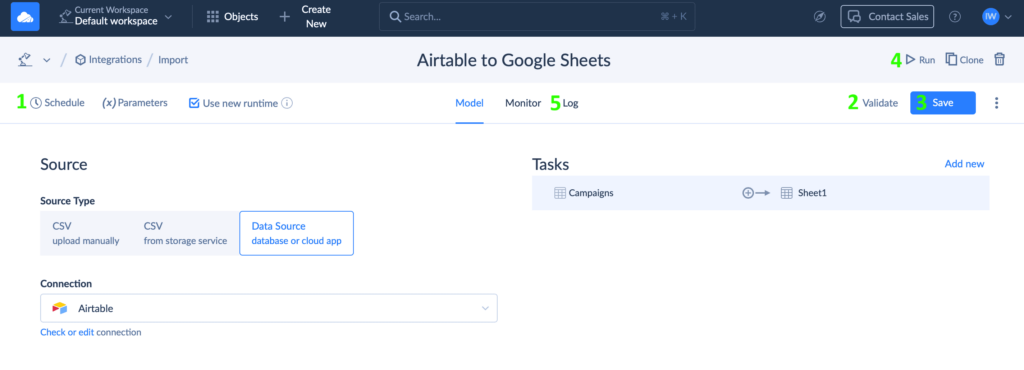
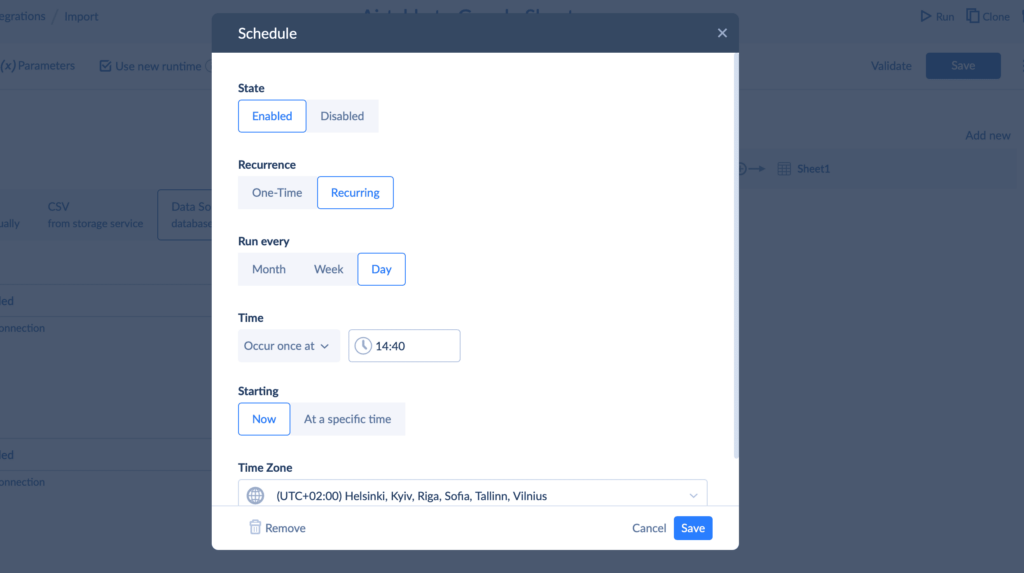
- Click Schedule and choose your interval: every 5 minutes, hourly, or daily.
- After you save the schedule, on the Import main page, click Validate to ensure your integration is set correctly.
- Press Save so that the integration won’t get lost.
- Finally, hit the Run button and let the magic happen. Depending on how much data is in the Airtable base, the process may take some time.
- Go to the Log tab to watch how it’s going.
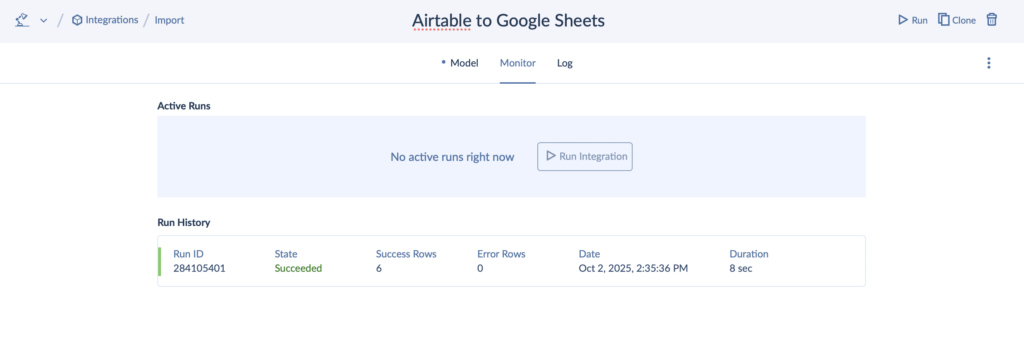
- And here’s the result.
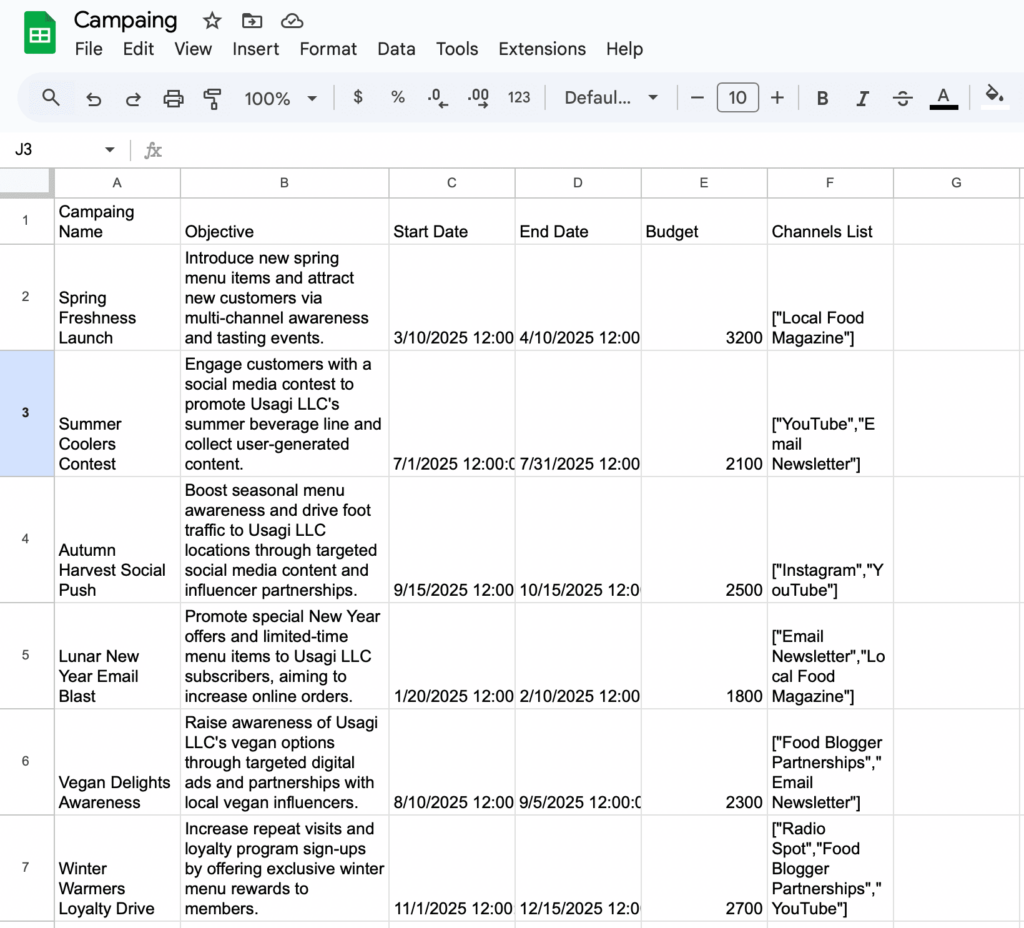
Skyvia Alternative Integration Methods to Sync Airtable to Google Sheets
Now, let’s have a quick stop at the easier scenarios – Export and Add-on before we encounter a serious player.
Skyvia Export Step-by-step Guide
- Click +Create New and choose Export.
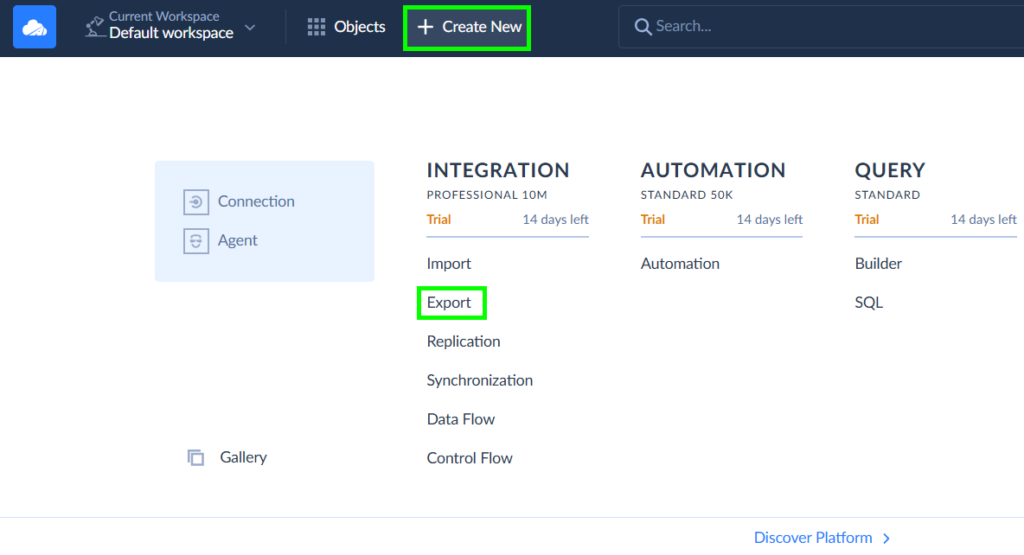
- You can upload the CSV file to your Drive on your own, but why not let Skyvia do it instead? Add a source – Airtable, and a target – Google Drive (for this one, you will need to create one more connection through +Create New). And specify the folder.
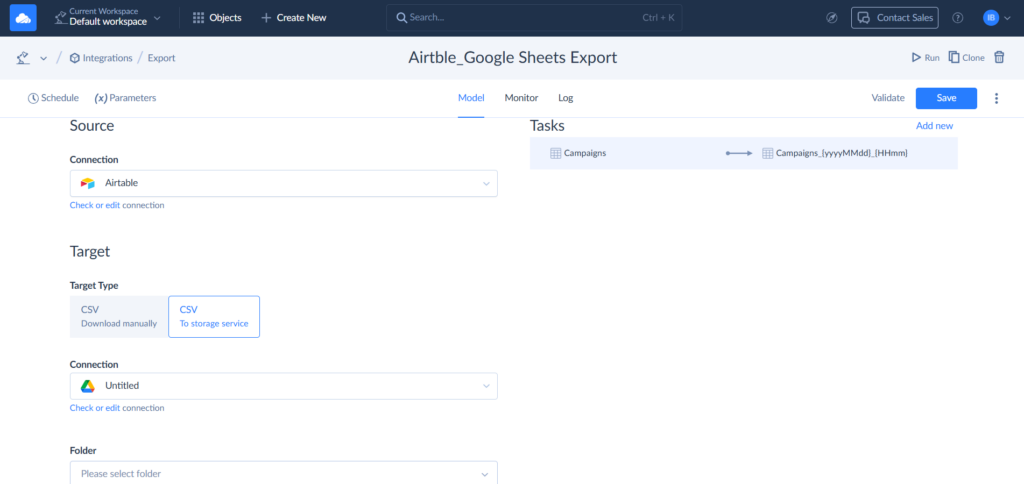
- Add a new task.
- In the Task Editor, define what should end up on the Drive.
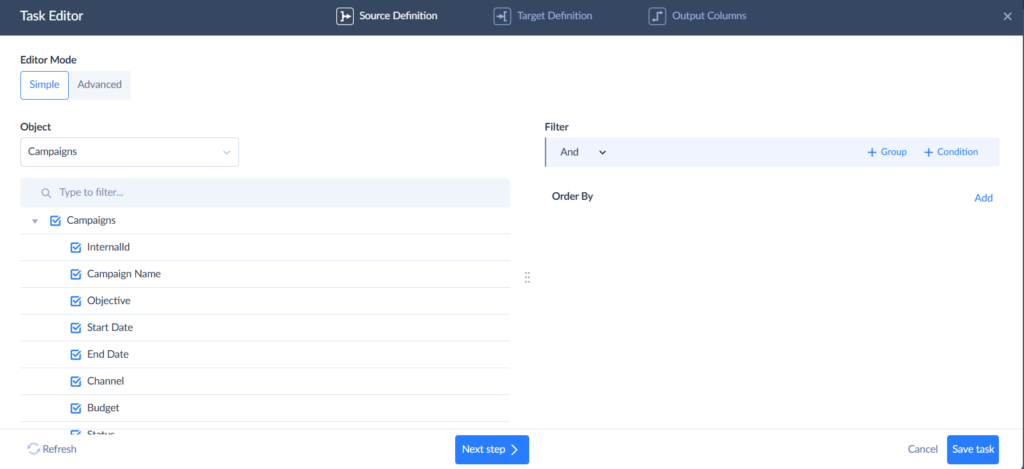
- Next, decide if you want the CSV file to be uploaded zipped or not.
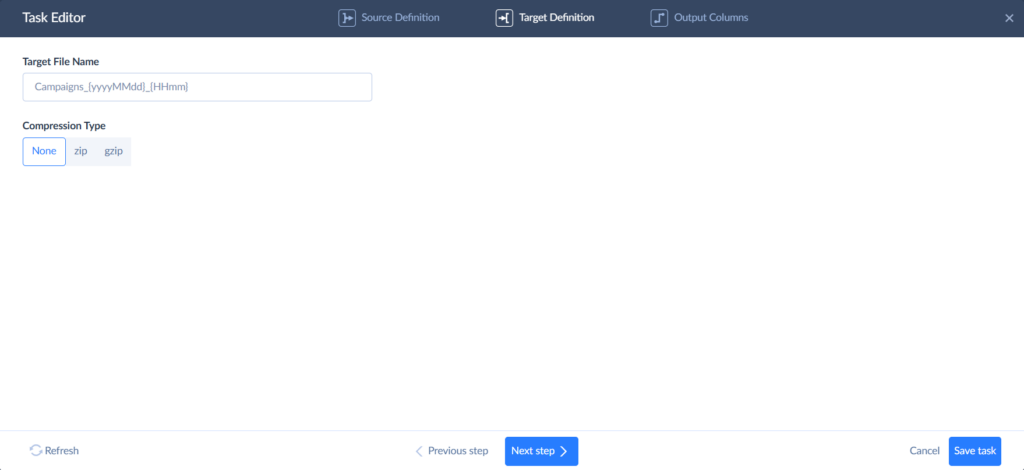
- Finally, decide on names and hit Save task.
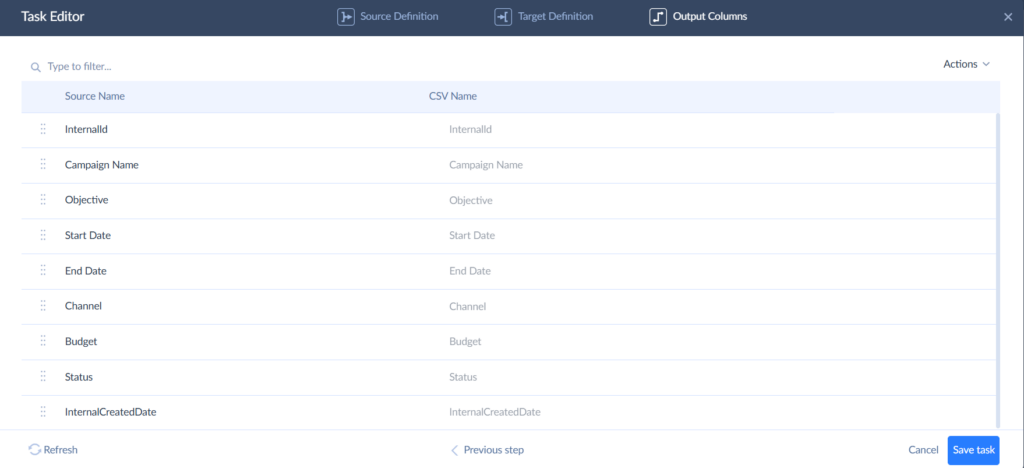
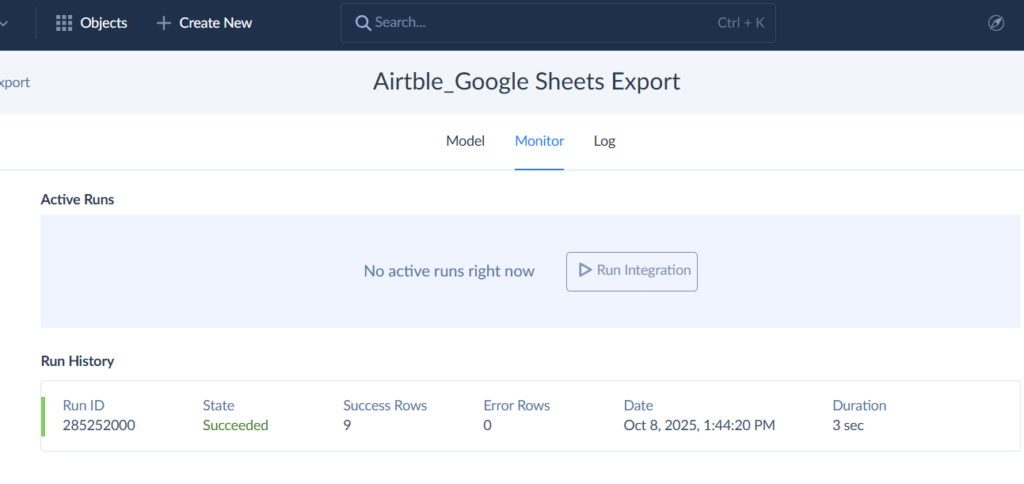
- Now, you can run it and see whether it was successful on the Monitor tab.
Skyvia Add-on Step-by-step Guide
Skyvia has another trick specifically for Google Sheets users. You can query and refresh Airtable data right inside your spreadsheet without leaving it.
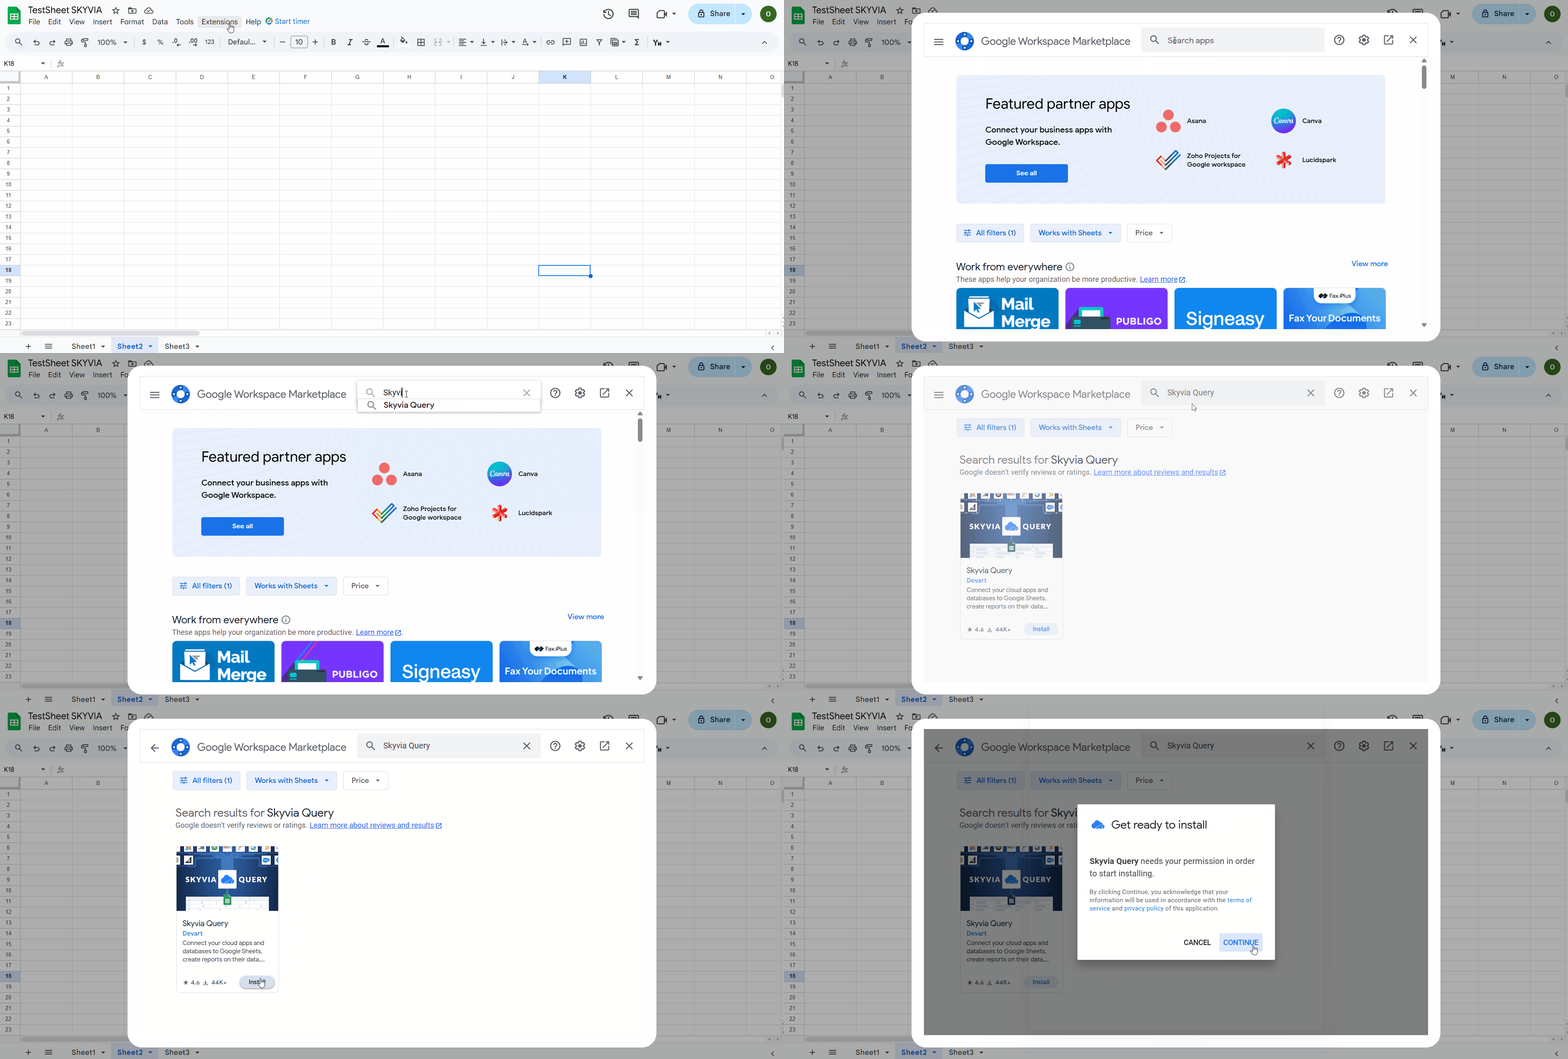
- Launch Sheets, then click through Extensions -> Add-ons -> Get add-ons.
- Type Skyvia, find Skyvia Query in the list.
- Hit Install -> Continue and let it install.
- Sign in through Google and authorize Skyvia to handle your data.
- Return to the Extensions menu, click Skyvia Query, then Login.
- Log in to your Skyvia account.
- Go Extensions -> Skyvia Query -> Query.
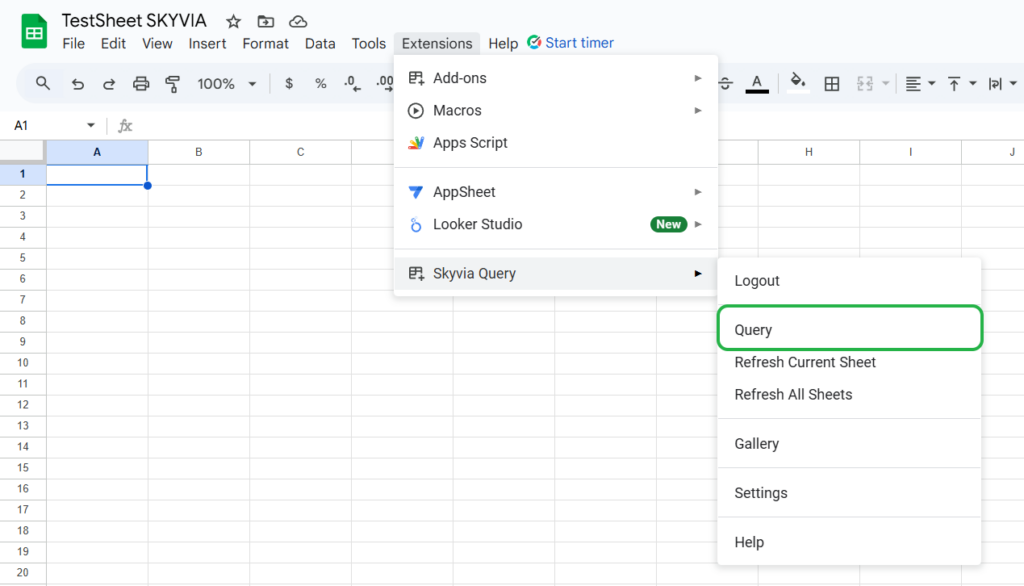
- Select which workspace and source connection to use.
- Define your query object and toss in filters if that matters.
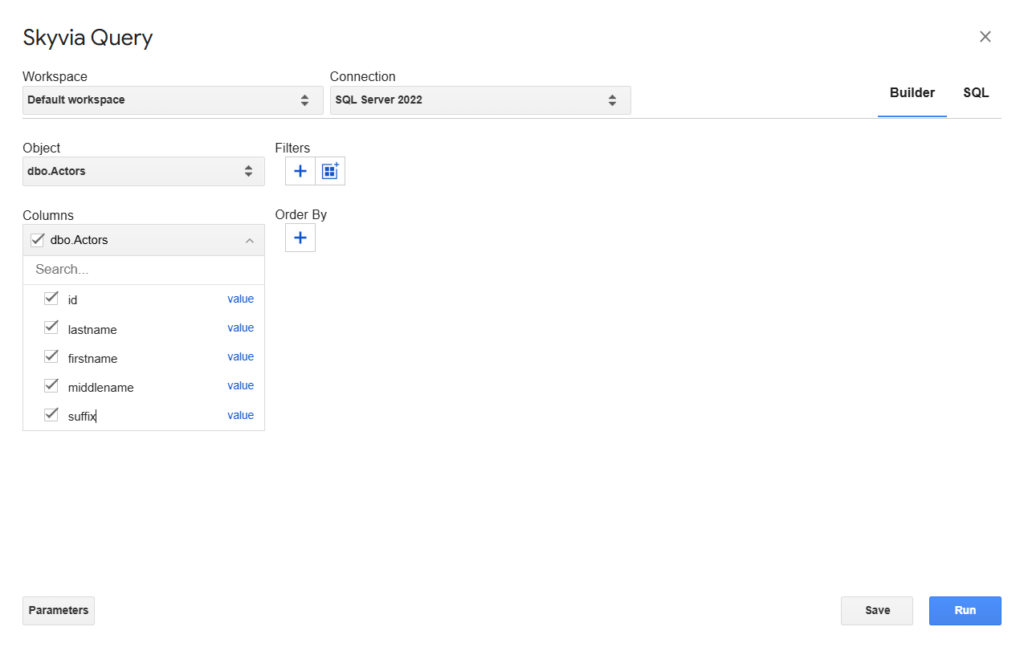
- Click Run. Results land right in your spreadsheet.
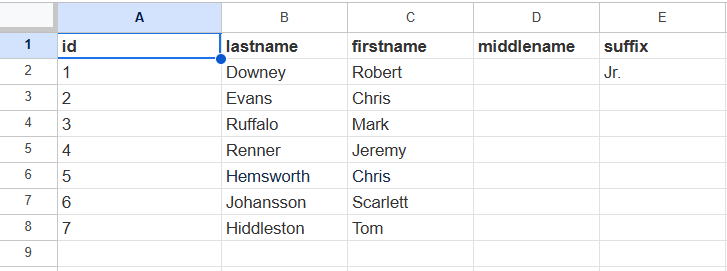
Note: You can refresh the results without rebuilding the whole query. Simply use the add-on menu.
Skyvia’s Data Flow for Advanced Airtable to Google Sheet Integration
Sometimes a simple one-way sync isn’t enough. You want changes in Airtable to reflect in Google Sheets (and maybe the other way around) without manually copying rows back and forth.
Skyvia’s Data Flow allows you to build custom pipelines, multi-step workflows, and transformations, and you can technically mimic two-way syncing, even if Google Sheets isn’t a perfect transactional partner.
Data Flow lets you:
- Map fields and apply transformations before data reaches its destination.
- Cut out records based on timestamps, flags, or your own rules.
- Build workflows that combine data from multiple tables or sources in one go.
- Set up targeted updates so you’re not reprocessing your whole database every time.
Let’s have it done, and you will see that it is easier than it might seem.
- You will need the Airtable and Google Sheet connection we made earlier.
- Click +Create New and choose Data Flow.
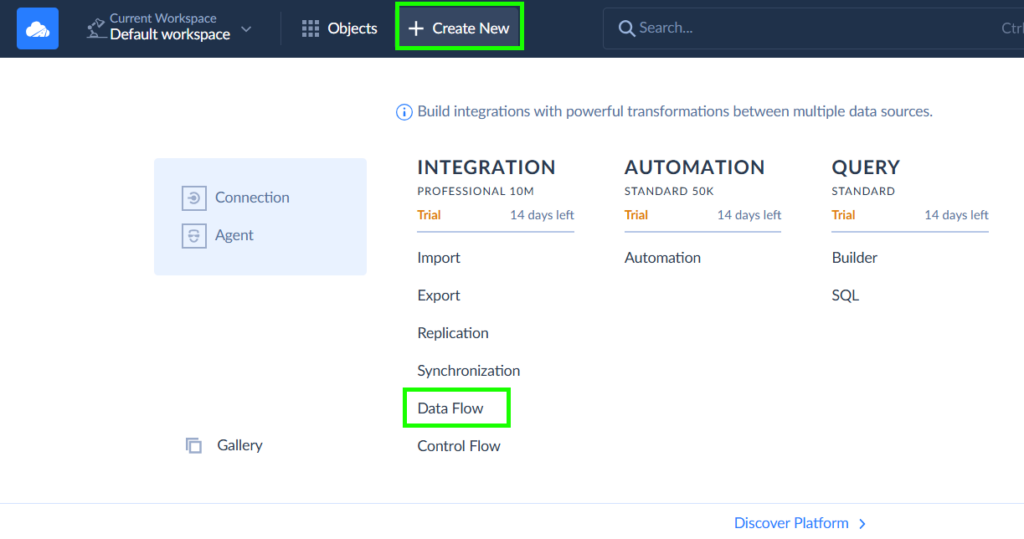
- Add a source – Airtable. The action for today is Execute Query. And in the Query Model field, choose the needed base.
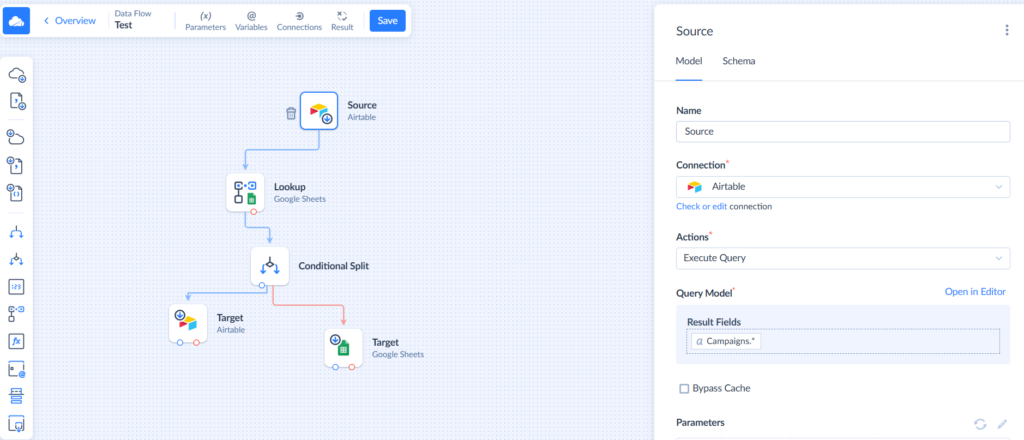
- Drag-and-drop the Lookup component to the canvas. Specify the connection – Google Sheet- and select the desired sheet.
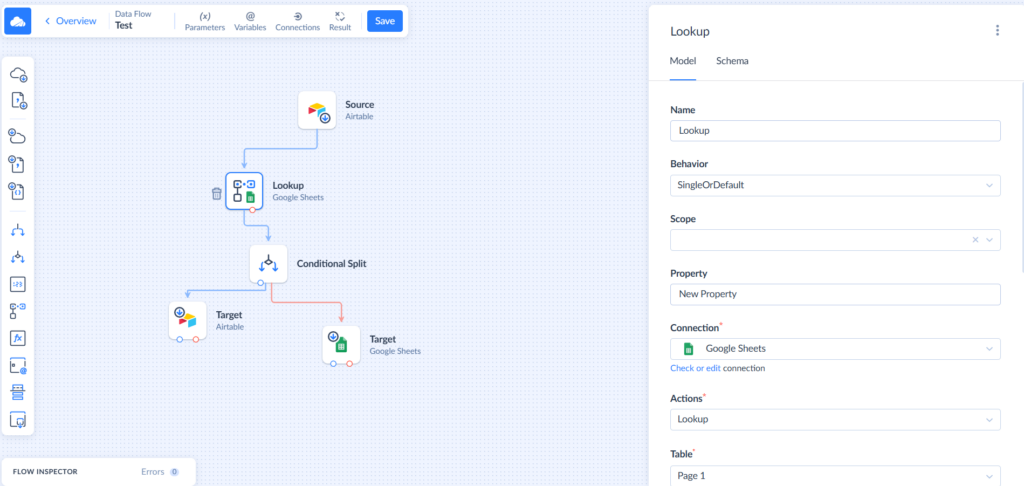
Note: In the lower left corner, you have Flow Inspector. It will notify you if something goes wrong.
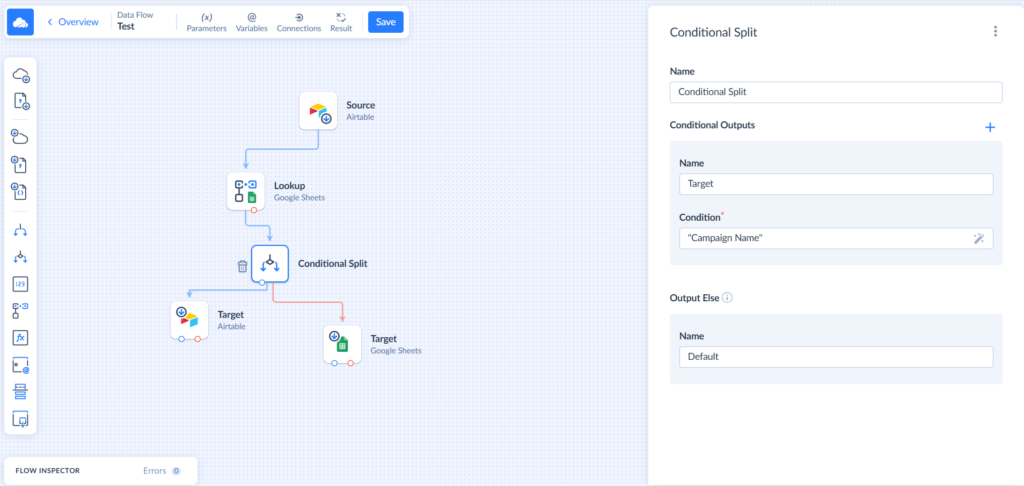
- Now, drag the Conditional Split component. Specify its outputs – target and choose the property – in our case, it’s Campaign Name because that’s what we’re syncing.
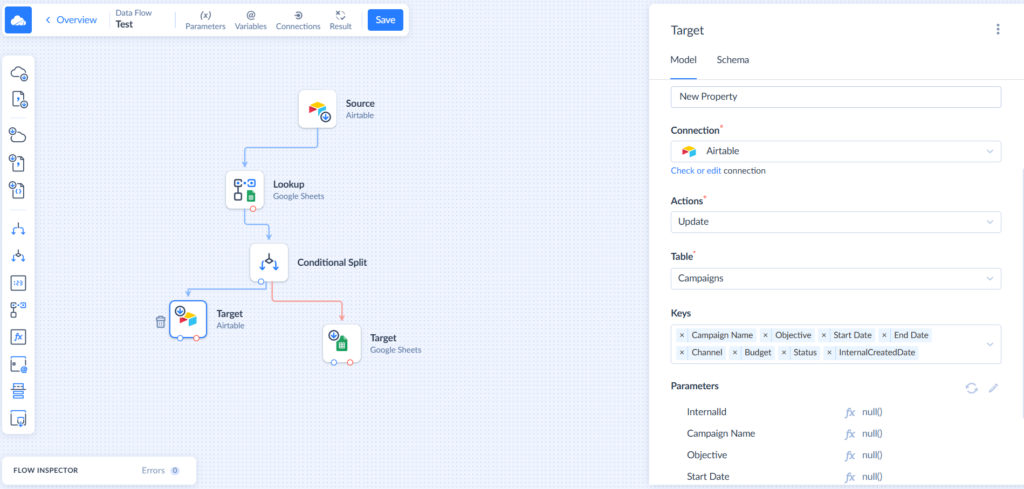
- Add a target – Airtable. For this component, you need to define the exact action (update), the table you’re working with, and the keys that will be synced. Also, map the parameters using the Mapping Editor.
- And one more target – Google Sheets, so the data goes in two directions. Repeat the same setting actions you took when the Airtable was a target.
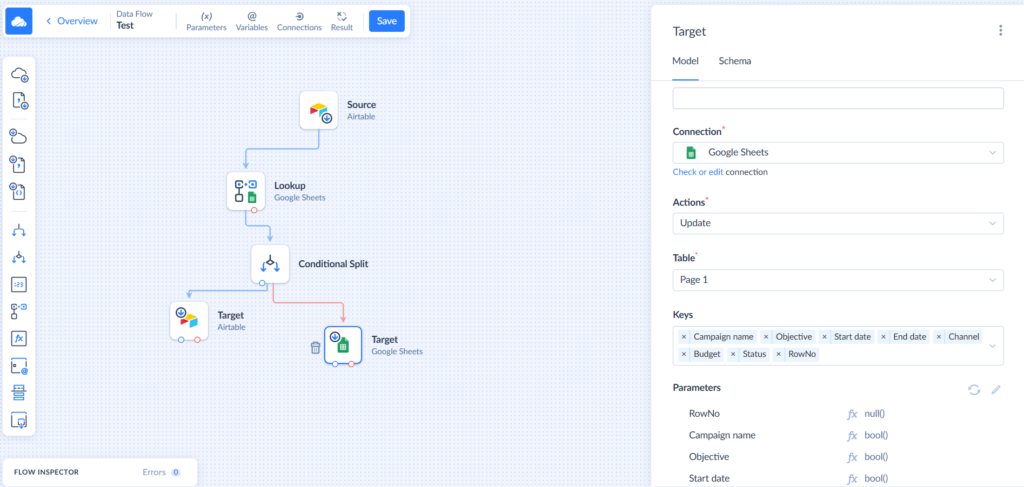
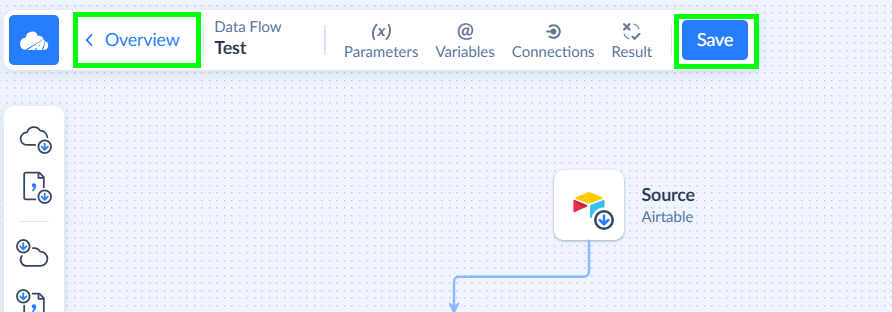
- Click on Save and go to Overview, where you can schedule, run, and edit it.
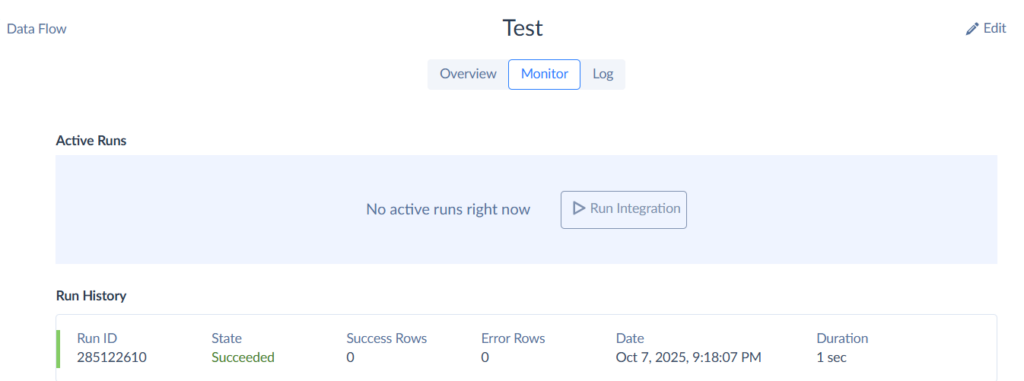
- Hit Run and watch how it’s going in the Monitor.
Important Considerations
Data Flow lets Google Sheets join the party, but it requires planning and logic for conflict handling; for advanced users craving complete control over their integration universe, it’s a powerful solution.
- Handling collisions: Data Flow is powerful, but power comes with responsibility. When edits happen in both places simultaneously, you need to manually decide which version wins, Sheets or Airtable.
- Learning curve exists: It involves ETL/ELT concepts and understanding how transformations work. However, most of it takes place in a drag-and-drop canvas, and query builders, mapping editors, etc., offer clues when you’re stuck and show errors in the process, not when everything is created and you forgot what you were setting up.
- Sheets constraints: Hit API limits (300 read requests and 300 write requests per minute per project, and 60 requests per minute per user per project (read and write) max out on records, or have too many concurrent users, and reliability might start crumbling.
Pro-Tips for a Seamless Airtable-Google Sheets Integration
You need the right sync strategy, no question. But that alone won’t guarantee success. These tricks help you dodge typical pitfalls so the whole setup runs without drama.
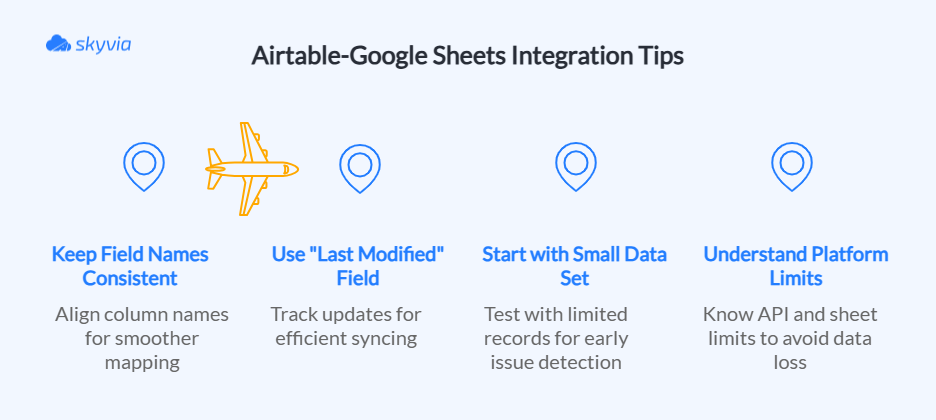
Tip 1: Keep Your Field Names Consistent
Mapping Airtable data into Google Sheets ranges from “that was easy” to “why is this column showing dates as text?” Your approach decides which one you get.
Avoid spaces and funky characters to keep APIs happy and enjoy column names aligned, mapping becomes straightforward, automation tools cooperate nicely, and you avoid mysterious mismatches.
Tip 2: Use a “Last Modified” Field
Give your Airtable records a “Last Modified” badge. Now your sync only grabs what’s new or edited, not the whole group chat history.
You’ll slim down resource use, speed things up, and keep your dataset from turning into that overstuffed group text nobody reads.
Tip 3: Start with a Small Data Set
Begin testing your sync with a subset of records. It’s easier to catch mapping issues, performance quirks, or workflow mistakes without risking the entire database. Once confident, scale gradually.
Tip 4: Understand the Limitations of Each Platform
Airtable marches to its own drum and Google Sheets to its own. Your task is to know what they can and what can’t to make the rhythm steady.
- Airtable enforces API rate limits, record counts, and automation quotas.
- Google Sheets caps files at 10 million cells.
Knowing these limits ahead of time helps avoid truncated data, failed syncs, or headaches. Some field types may need tweaks, like attachments or linked records.
Conclusion
Done with CSV battles, column mix-ups, and spreadsheet carnage? Sync Airtable to Google Sheets using Skyvia and automate the whole thing. Your dashboards stay live, reports stay relevant, and your team actually works instead of fixing data problems. Surprisingly, syncing might actually stop being the worst part of your day.
Skyvia runs it: simple setup without code, scheduled or on-demand syncs, intelligent upsert logic, handles messy Airtable fields, and your Sheets reflect reality accurately and consistently. Campaign data, project pipelines, backup systems – it all moves smoothly without anyone micromanaging from the sidelines.
Test it out. Sign up for free, connect both platforms, and watch data go from messy and fragile to streamlined and reliable. Manual exports are dead; long live effortless, no-code syncing!
F.A.Q. for Airtable to Google Sheets
Is Skyvia’s Airtable to Google Sheets sync free?
Skyvia offers a free tier for light usage (10K records/month, daily scheduling). Paid plans unlock more frequent syncs, larger datasets, and advanced features.
How is Skyvia different from Zapier or Unito?
Unlike Zapier or Unito, Skyvia is built for database-like syncing with advanced filtering, transformations, upserts, and scalable two-way integration options.
Can I sync data from Google Sheets back to Airtable?
Technically, yes, via Skyvia Data Flow, but Sheets isn’t transactional. Accurate two-way sync requires custom logic and careful conflict handling.
Is the sync in real-time?
It depends on your plan and setup. Skyvia supports near real-time updates with frequent schedules, but the Sheets API limits mean “instant” has practical limits.


