

Moving data from MySQL to an FTP server doesn’t have to be a clunky, manual mess. If you’ve been stuck exporting CSVs, renaming files, and dragging them into FTP folders every week, or worse, every day, this guide’s for you.
Whether syncing reports to clients, backing up data off-site, or feeding files into another system, automating the MySQL-to-FTP flow can save you time, reduce human error, and keep things running like clockwork.
In this guide, we’ll walk through four simple methods to make it happen:
- Using scripts (hello, cron jobs, and bash!).
- Setting up automation tools like Skyvia.
- Writing your own custom integration.
- Leveraging middleware platforms.
You’ll learn what works best for your team, whether you’re a solo dev, part of a data team, or just want to “set it and forget it.”
Table of Contents
- Why Connect MySQL Database to FTP Server?
- Overview of FTP Server and MySQL Database
- 4 Proven Methods to Connect MySQL to FTP Server Efficiently
- Method 1: Connecting MySQL to FTP via phpMyAdmin
- Method 2: Connect MySQL to FTP via the Command Line
- Method 3: Connect MySQL to FTP Using MySQL Workbench
- Method 4: No-Code Connect MySQL to FTP
- Troubleshooting MySQL to FTP Integration
- Conclusion
Why Connect MySQL Database to FTP Server?
Let’s face it: manually exporting data from MySQL and uploading it to an FTP server gets old fast. It’s slow, repetitive, and one mistyped filename or missed step can throw the whole process off. If your team’s still dragging files around every week, it’s time for a smarter way.
Connecting the MySQL database directly to an FTP server opens the door to easy automation. You can schedule exports, push files to remote servers without lifting a finger, and create a hands-off workflow that just runs.
Common Use Cases
- Automated backups. Push daily or weekly data dumps to an FTP server for safe storage or compliance.
- Sharing data with clients or partners. Keep them in the loop without needing to manually send files.
- Feeding downstream systems. Transfer files to FTP so other platforms can pick them up and process them.
Why Manual Transfers Don’t Cut It
- They’re time-consuming. Even quick exports and uploads add up.
- They’re error-prone. One wrong click or missed file, and your data flow breaks.
- They don’t scale. As data volume grows, so does the chaos of managing it manually.
When you connect MySQL to FTP with automation in mind, you turn a recurring pain into a seamless process. No more babysitting; data transfers just result on schedule.
Overview of FTP Server and MySQL Database
Understanding what each tool does on its own makes it easier to see why connecting them can be such a win for your data workflows. So, before stepping into “how,” let’s quickly cover the “what.”
What is FTP?
FTP (File Transfer Protocol) is one of the old-school champs for moving files between systems. It’s been around forever, and for good reason. It’s simple, widely supported, and perfect for automating routine file transfers between servers, apps, or clients.
People use FTP to:
- Store backups offsite.
- Share reports or datasets with partners.
- Feed files into other systems for processing.

What is MySQL Database?
MySQL is a powerhouse when it comes to managing structured data. It’s one of the most popular relational database systems out there, used everywhere, from small websites to enterprise-level apps. Think of it as your central hub for storing and organizing data, with fast querying, transactional integrity, and scalability built-in.
Why Use Them Together?
When you combine MySQL with FTP, you automatically create a clean pipeline for getting structured data out of the database and into the hands (or systems) that need it. This integration plugs a real-world gap, whether it’s for backups, reporting, or syncing systems that don’t play nicely with APIs.
Put simply, MySQL holds the data. FTP moves it. Together, they make a solid pair for getting data from point A to point B without the manual grunt work.

4 Proven Methods to Connect MySQL to FTP Server Efficiently
There’s more than one way to get your MySQL data onto an FTP server, and which one you choose depends on how hands-on you want to get, how often you need the data moved, and what kind of setup you’re working with.
Some methods are dead simple but manual. Others can run themselves like clockwork but take a bit more technical muscle to get off the ground.
- Method 1: phpMyAdmin + FTP. Easy and visual. Great for beginners who want to manually export and upload without touching a terminal.
- Method 2: Command Line (mysqldump + FTP). This approach is for those who like scripting and want to automate with cron. It’s free, fast, and flexible if you know your way around bash.
- Method 3: MySQL Workbench + FTP. A GUI-based approach that adds more control over what and how you export. Still somewhat manual, but great for one-time or small batch jobs.
- Method 4: No-Code Tool (Skyvia). Ideal for scheduled, recurring data exports with a visual UI and minimal setup.
The comparison table below puts it all in perspective: how automated each method is, how technical you’ll need to get, and what trade-offs come with each path.
The comparison table below puts it all in perspective: how automated each method is, how technical you’ll need to get, and what trade-offs come with each path.
| Method | phpMyAdmin + FTP | Command Line (mysqldump + FTP) | MySQL Workbench + FTP | No-Code Tool (Skyvia) |
|---|---|---|---|---|
| Automation Level | Low (Manual) | High (Fully scriptable) | Medium (Partly manual) | High (Scheduled automation) |
| Pricing Overview | Free (with hosting) | Free | Free | Freemium (paid plans for higher usage or features) |
| Technical Skills Needed | Low | High | Medium | Low |
| Pros | – Easy visual interface – No coding needed | – Fast and flexible – Fully automatable with cron – Open-source | – GUI control over export – Good for ad-hoc tasks | – Fully visual – Set-and-forget scheduling – Easy setup |
| Cons | – Manual process – Not suitable for automation | – Requires scripting skills – No GUI | – Still manual – Not built for automation | – Limited flexibility – Costs can grow with data volume |
| Real-World Use Cases | Beginners doing occasional exports; small-scale data backups. | Automating nightly database backups; devs managing multiple environments. | Analysts needing fine-tuned exports; one-off migrations. | SMBs needing daily exports; non-tech users handling regular reporting workflows. |
Method 1: Connecting MySQL to FTP via phpMyAdmin
This is the most straightforward no-code way to move data from MySQL to an FTP server. People use phpMyAdmin to:
- Export the data.
- Manually upload the file to the FTP server using a client like FileZilla.
It’s simple, visual, and perfect if you need to finish the job occasionally without setting up anything complex.
Best For
- Beginners or non-technical users.
- One-off data exports and backups.
- Quick troubleshooting or data migrations.
- Small databases that don’t require automation.
Pros
- It’s simple, visual, and perfect if you need to finish the job occasionally without setting up anything complex.
- No coding or scripting needed.
- Built into most web hosting panels.
- Easy-to-use interface.
- Let’s you choose specific tables or full DB exports.
- Multiple export formats are supported.
Cons
- Manual steps are required every time.
- No scheduling or automation, 100% hands-on.
- File size and timeout limits, especially on shared hosting.
- It’s easy to forget a step if doing it regularly.
Step-by-step Guide
Step 1: Exporting data from MySQL using phpMyAdmin
phpMyAdmin allows transferring the MySQL database through FTP using its user interface. To export the data from MySQL, follow these steps:
- Log in to phpMyAdmin via your hosting control panel.
- Select the database you want to export from the left sidebar.
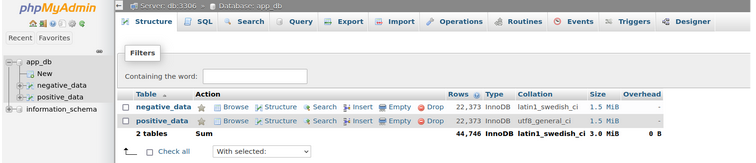
- Click on the Export tab at the top.
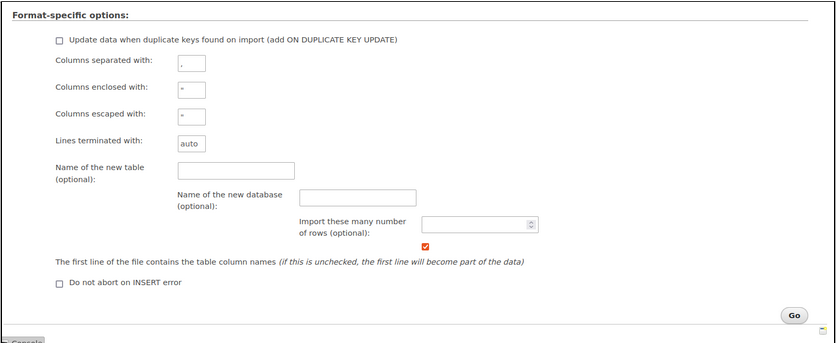
- Choose your preferred format:
- SQL – for full structural + data backup.
- CSV – for spreadsheets or analytics tools.
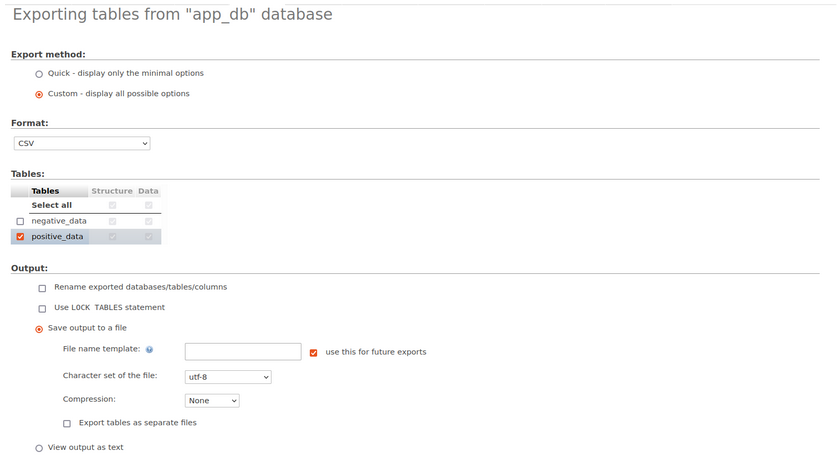
- Use Custom export mode to fine-tune which tables or rows you want.
Step 2: Upload Data to FTP Server
Now that you’ve got your .sql or .csv file, it’s time to move it to your FTP server.
- Open a third-party FTP client like FileZilla, Cyberduck, or even your hosting provider’ built-in file manager.
- Enter your FTP credentials (host, username, password).
- Navigate to the target directory.
- Drag and drop your export file into the server.
Pro move: If you’re doing this regularly, save your FTP credentials for faster access.
Step 3: Import Data Back to MySQL
- Log in to phpMyAdmin on the destination server.
- Create a new database or select an existing one.
- Click on the Import tab.

- Browse for your file from the FTP directory (download it first unless your host supports direct import).

- Choose the format (SQL, CSV, etc.), and click Go.
- Ensure the file size doesn’t exceed your host’s upload limit. If it does, consider splitting it or switching to a script-based method.
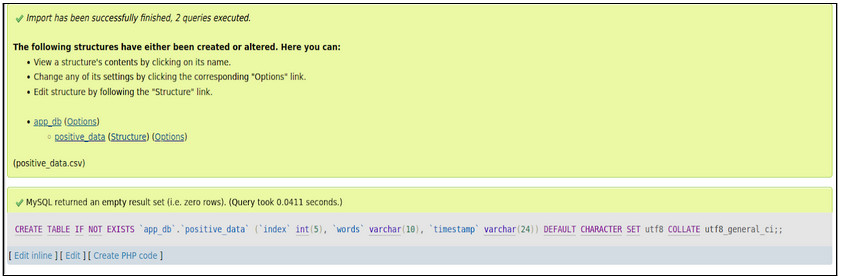
- The data import has been successfully executed. You will be able to see that the table has been created in the database, which contains the data to be imported.
Method 2: Connect MySQL to FTP via the Command Line
This one’s for the script-savvy. Going command line is your power move if you’re comfortable with a terminal and want total control over the process. You can automate MySQL exports, upload them to an FTP server, and even schedule the whole thing with cron. It’s fast, flexible, and doesn’t need any fancy tools, just a little shell scripting know-how.
Best For
- Developers and sysadmins who love automation.
- Scheduled database backups or regular syncs.
- Environments where GUI tools aren’t available or practical.
- Teams that need tight integration with other scripts or systems.
Pros
- Fully automatable with cron or other schedulers.
- Zero UI dependencies; it works on any system with shell access.
- Fast and efficient for large datasets.
- More flexibility in how and what you export.
Cons
- Requires scripting knowledge.
- Easy to mess up if the script isn’t carefully written.
- No visual feedback; you’ll need to check logs for errors.
- Might need to secure credentials or use key-based authentication for FTP/SFTP.
Step-by-Step Guide
Step 1: Export Data from MySQL CL
Use mysqldump for full database or table-level backups:
mysqldump -u [user] -p[password] [database_name] > backup.sqlOr export a specific table to a CSV using SELECT INTO OUTFILE (note: requires file permissions on server):
SELECT * FROM your_table
INTO OUTFILE '/tmp/your_table.csv'
FIELDS TERMINATED BY ','
ENCLOSED BY '"'
LINES TERMINATED BY '\n';
Pro tip: Use a timestamp in your filename to avoid overwriting backups.
Step 2: Transfer Files Using FTP Commands
You can push the exported file to your FTP server using a shell script. Here’s an example using ftp:
ftp -inv $HOST <<EOF
user $USER $PASS
put backup.sql
bye
EOF
Or go the secure route with sftp:
sftp $USER@$HOST <<EOF
put backup.sql
bye
EOF
Automate this script with cron to run nightly, weekly, or whenever you need it.
Step 3: Import Data Using CLI
To restore or use the data elsewhere:
mysql -u [user] -p[password] [database_name] < backup.sqlBe careful when importing: always check if you need to drop existing tables first or adjust constraints.
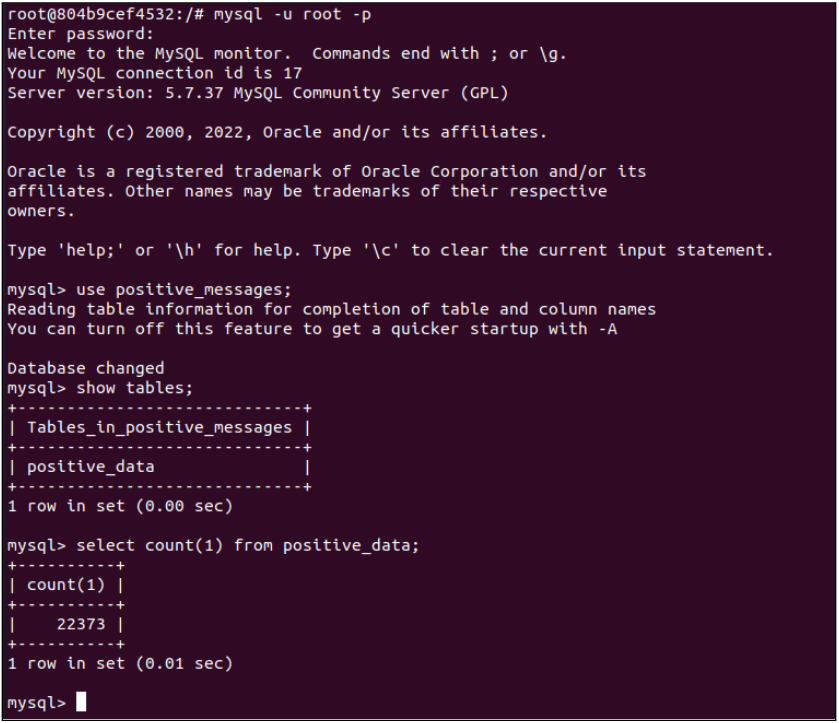
When the data has been successfully imported into the MySQL database, verify it by logging in to the MySQL shell using the credentials and checking the count of the records.
Method 3: Connect MySQL to FTP Using MySQL Workbench
If you’re more into visual tools than command-line gymnastics, MySQL Workbench is a solid middle ground. It gives users fine-tuned control over their export settings and is great for one-off or occasional data transfers. But there’s no built-in FTP support, so you’ll need to manually move the files with an FTP client afterward.
Best For
- Analysts and data teams that prefer a GUI.
- Small batch exports and controlled exports.
- One-time migrations or test environment syncing.
- Users who want more export options without writing scripts.
Pros
- Friendly graphical interface.
- Detailed control over what to export and how.
- Supports multiple formats like SQL, CSV.
- Easy to install and widely supported.
Cons
- Manual workflow, less suited for frequent automation.
- No built-in FTP transfer; you’ll need a separate tool.
- Still slower than scripts for repetitive tasks.
- Potential human error during a multi-step process.
Step-by-step guide
Step 1: Export and Transfer Data
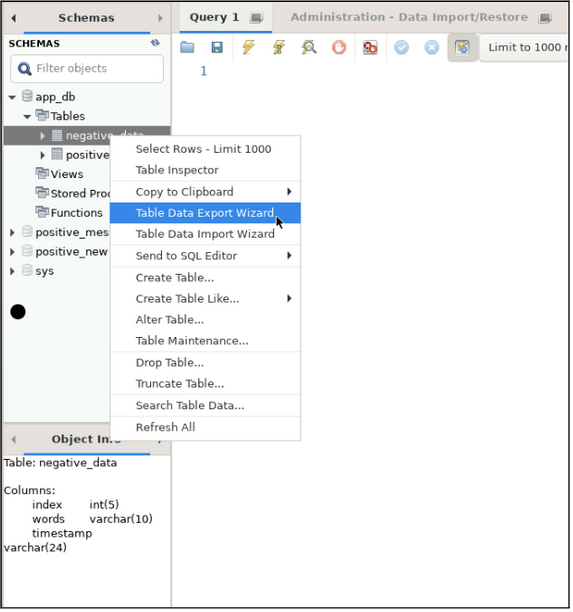
1. Right-click on the table name that needs to be exported. It will show the option to open the export wizard. Click the export wizard to initiate the process.
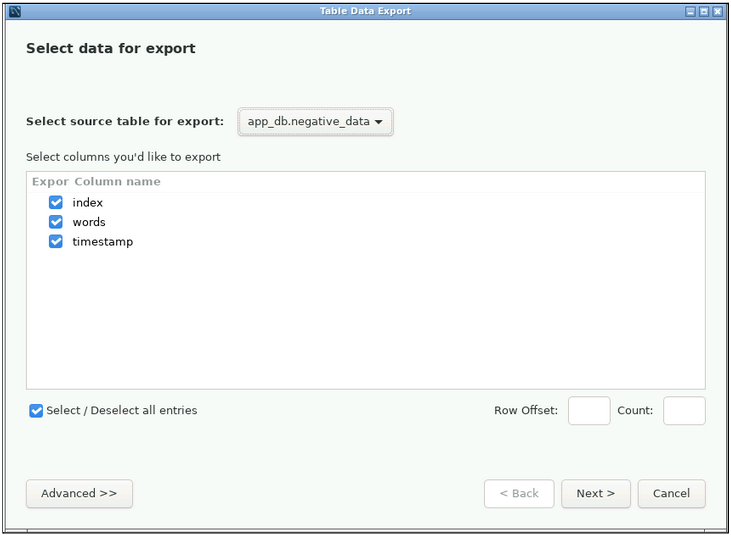
- Select the columns that need to be exported from the table and click Next.
- Click the browse button to specify where the table data needs to be exported. It will provide other options like exporting the data as a CSV or a JSON file. If you want to export the data on your local machine, then check the appropriate box.
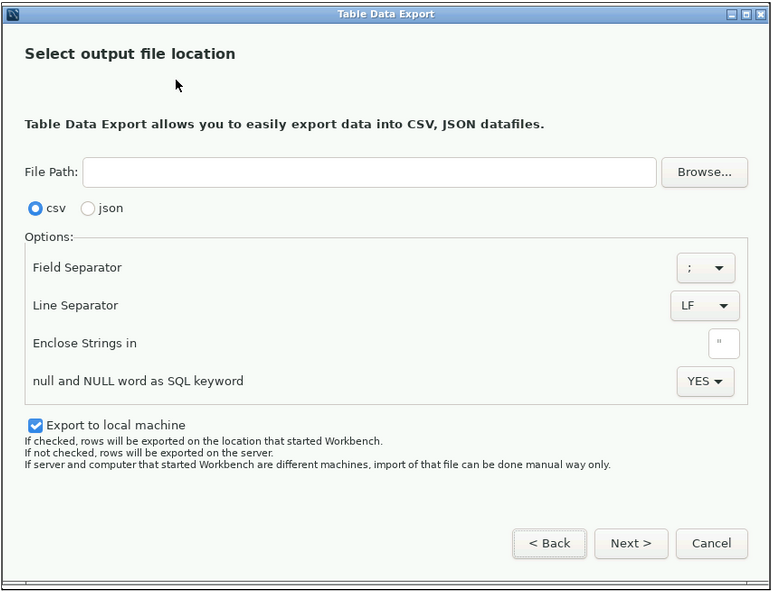
- Click Next to start the export process.
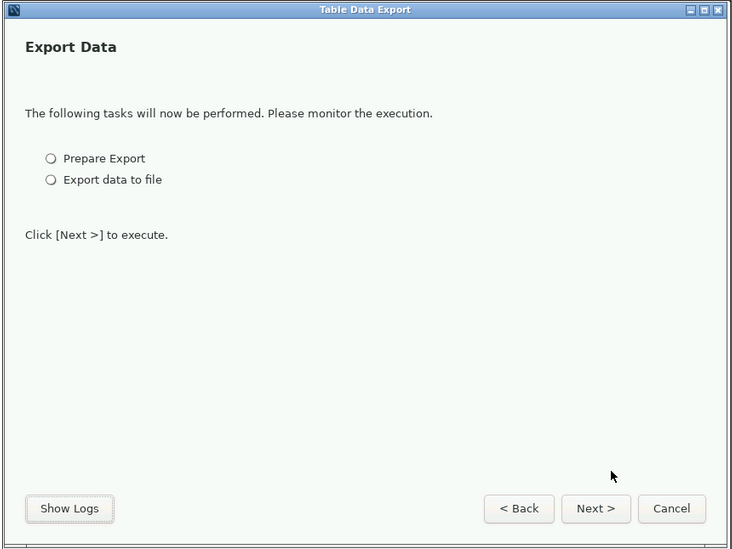
- When the export is successfully completed, the next wizard will show the confirmation.

Step 2: Import Data via Workbench
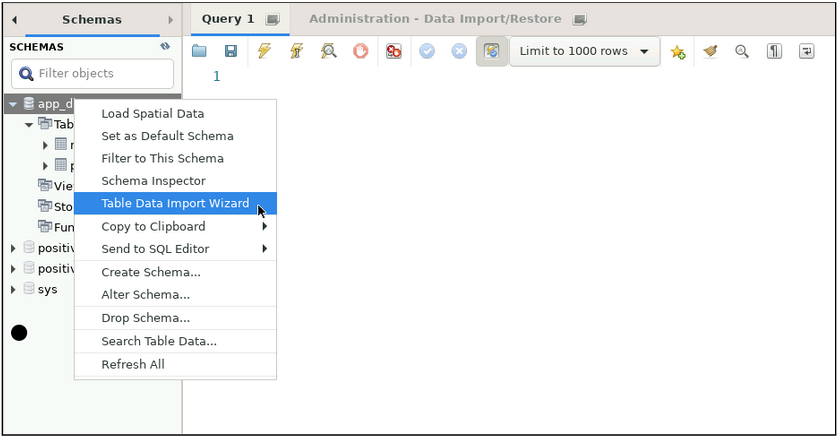
1. Right-click the database where you need to import the table. Select the Table Data Import Wizard option to start importing data into MySQL via FTP.
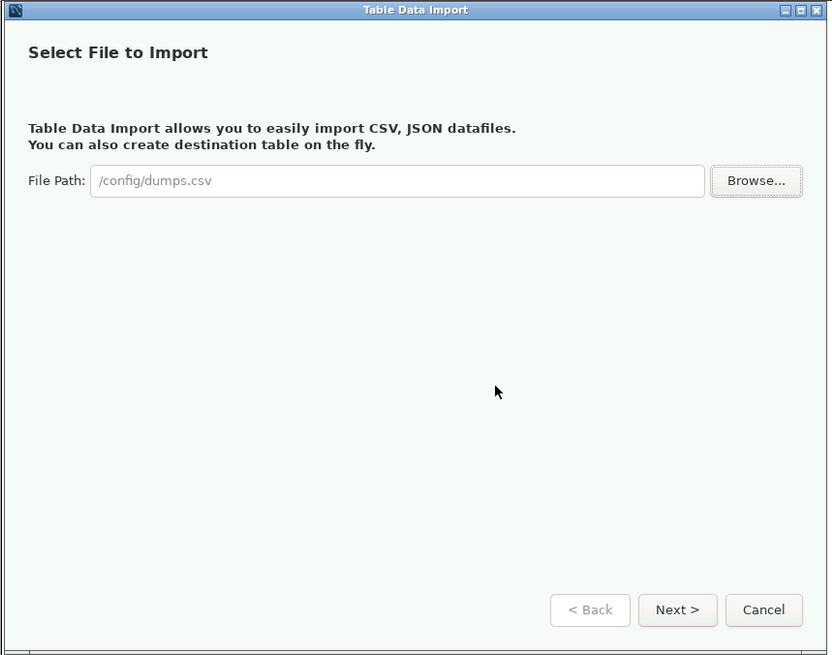
- Click on the browse option to select the file that needs to be imported.
- Click the Next button after the path of the file has been specified.
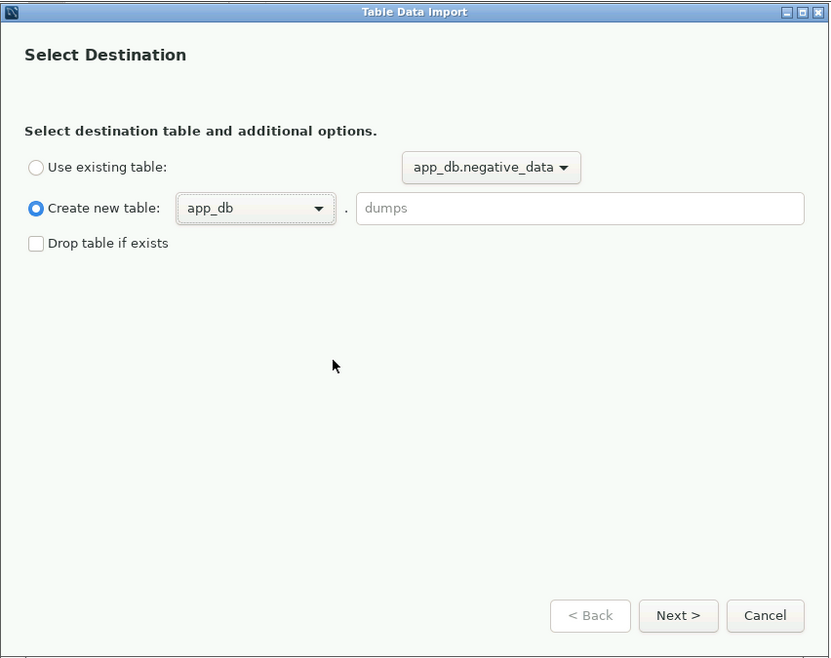
- Select the destination. Here, you may use an existing table or create a new one as shown below.
- The wizard automatically detects the type of file that needs to be exported. Specify the data type of each of the columns listed from the drop-down.
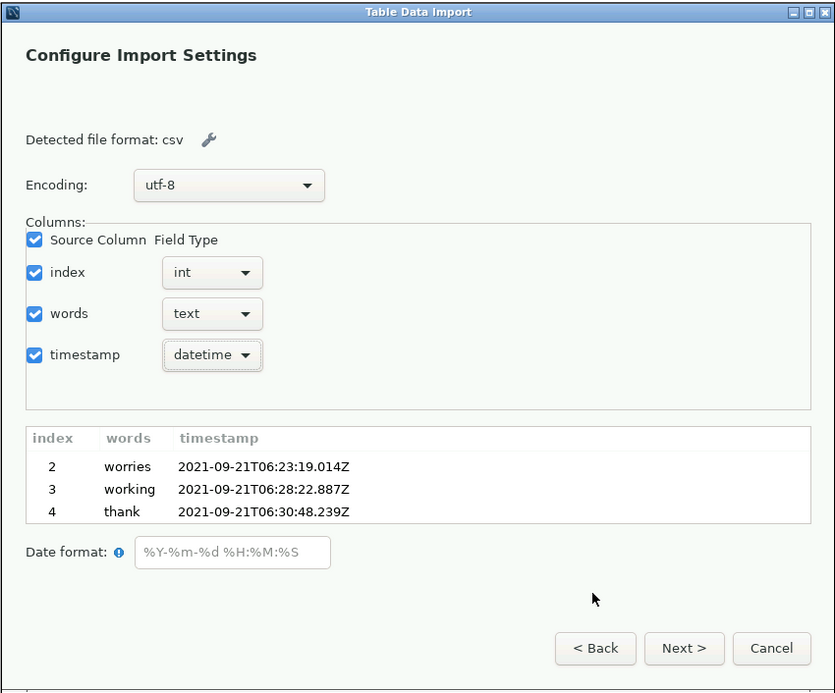
- Click Next to start the import. After the import has been completed, the wizard displays the confirmation message.

Method 4: No-Code Connect MySQL to FTP
If you’d rather skip scripts and terminals altogether, no-code tools like Skyvia make syncing MySQL data to FTP a breeze. These platforms offer a wizard-driven setup and handle the heavy lifting behind the scenes. You get reliable, scheduled transfers without needing to code. Perfect when speed and simplicity matter most.
Best For
- Non-technical users or teams without scripting expertise.
- Businesses needing reliable, recurring data syncs.
- Small to medium-sized data volumes.
- Anyone who wants set-it-and-forget-it automation.
Pros
- Faster setup with step-by-step wizards.
- No technical skills required.
- Fully automated and scalable data transfer.
- Built-in error handling and monitoring dashboards.
- Easy to adjust sync schedules and settings.
Cons
- Less control over custom export logic.
- It might be overkill for very small or one-time exports.
- Dependent on third-party platform uptime and policies.
Step-by-Step Guide
Step 1: Set Up MySQL Connection
- Log in to your Skyvia account and start a new connection by clicking +Create New > Connection.
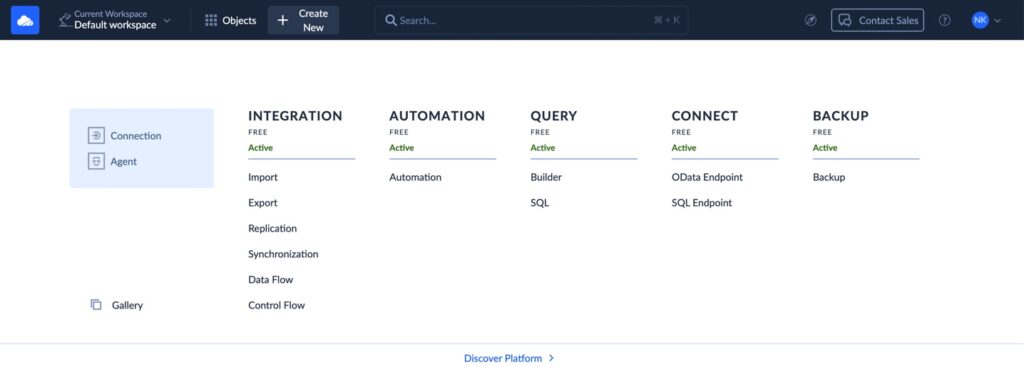
- Select MySQL as the connector and enter its credentials (host, user, password, database).
Note: Use direct connection mode for MySQL servers available through the Internet. If you are connecting to MySQL server on your local computer, configure the appropriate firewall settings or use the agent connection.

- Test the connection and save it.
Step 2: Configure FTP Connection
- Similarly to the previous case, create a new FTP connection within Skyvia (you may use the Select Connector link here).
- Enter your FTP server details and credentials.
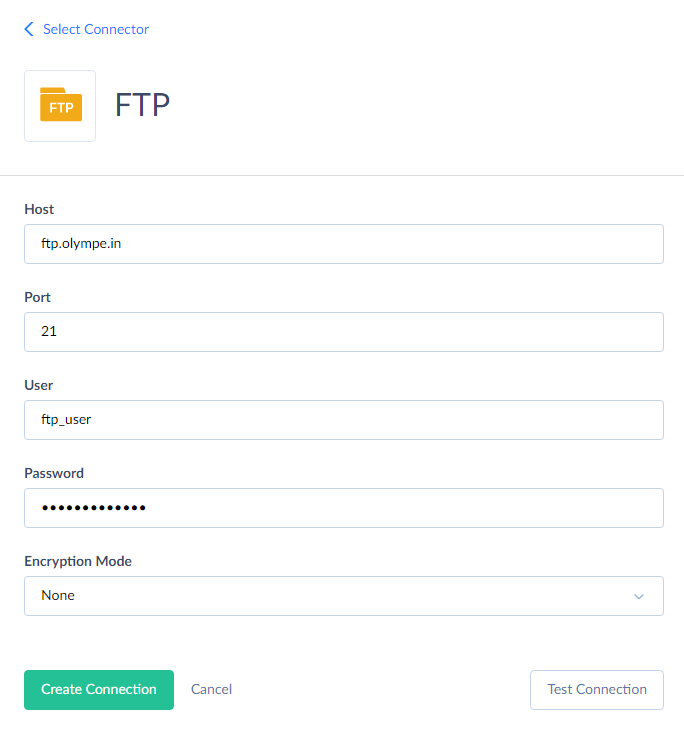
- Test and create the connection.
Step 3: Automate Data Sync with Skyvia
After creating connections, let’s configure integration. Depending on business cases, there are different scenarios. Let’s consider the most popular ones, like import and export.
Importing Data From FTP to MySQL Using Skyvia
Imagine a company’s HR department that regularly receives employee data updates in CSV files from external payroll and benefits providers. These files land on an FTP server daily or weekly.
Manually importing these files into the company’s MySQL-based HR system is tedious, error-prone, and slows down access to accurate employee records.
Skyvia automates the import of employee data files from the FTP server into MySQL, ensuring the HR database is always up-to-date without manual work. It supports incremental updates, so only changed records are processed, reducing overhead.
Let’s use the connections to MySQL and FTP we’ve already created for it and proceed to configuring import.
- Click +Create New > Integration > Import.
- Optionally, name your integration to locate it easily in the future. Click Untitled and enter a more suitable name.
- Click CSV from storage service and select FTP as the source.
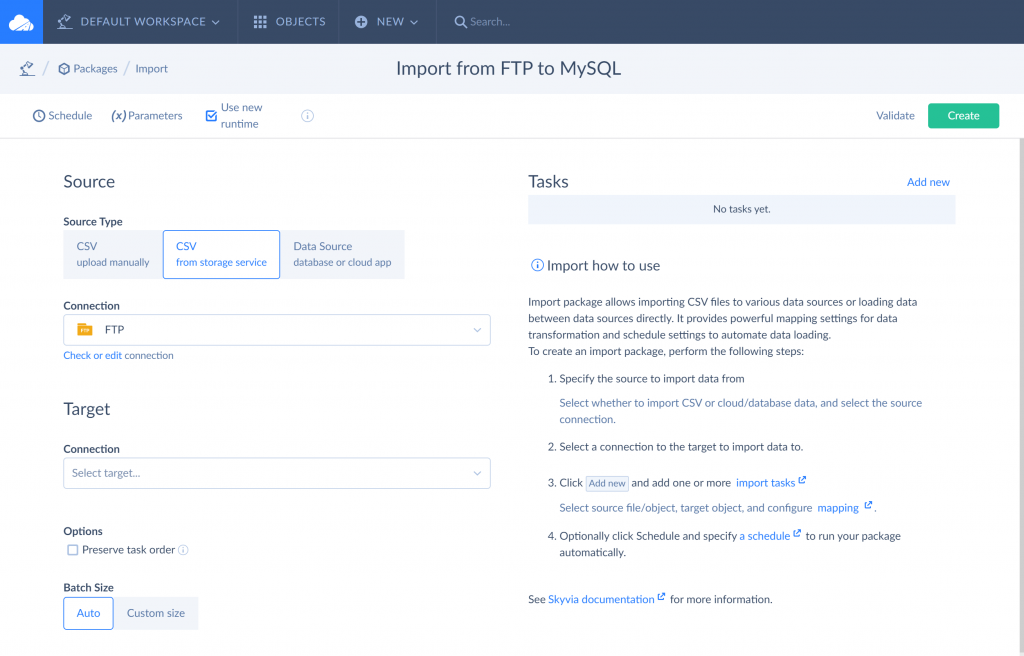
- Select MySQL as the target.
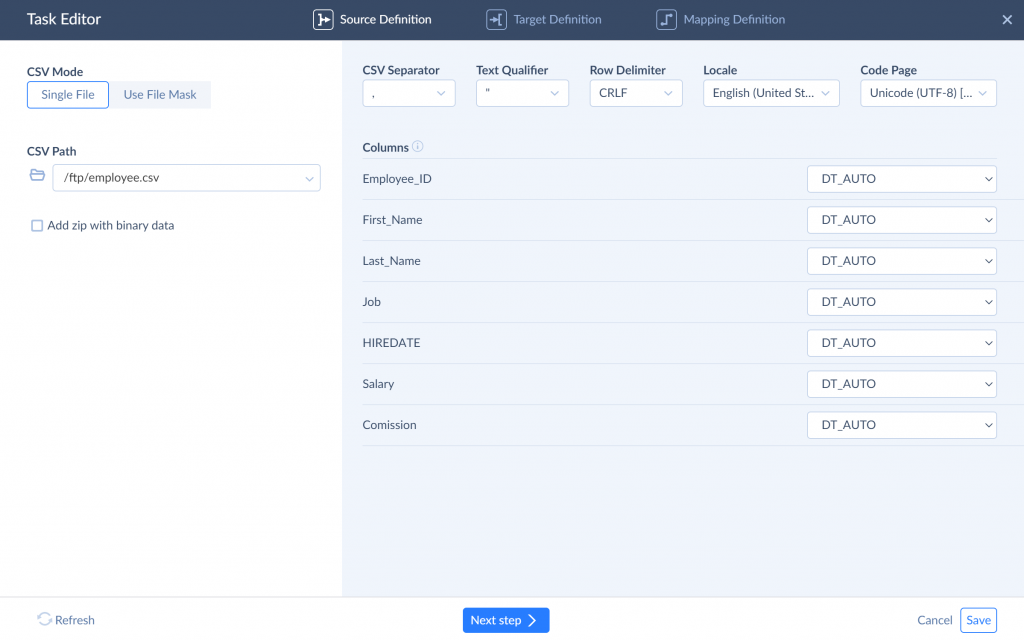
- Near Tasks, click Add new to add a new import task.
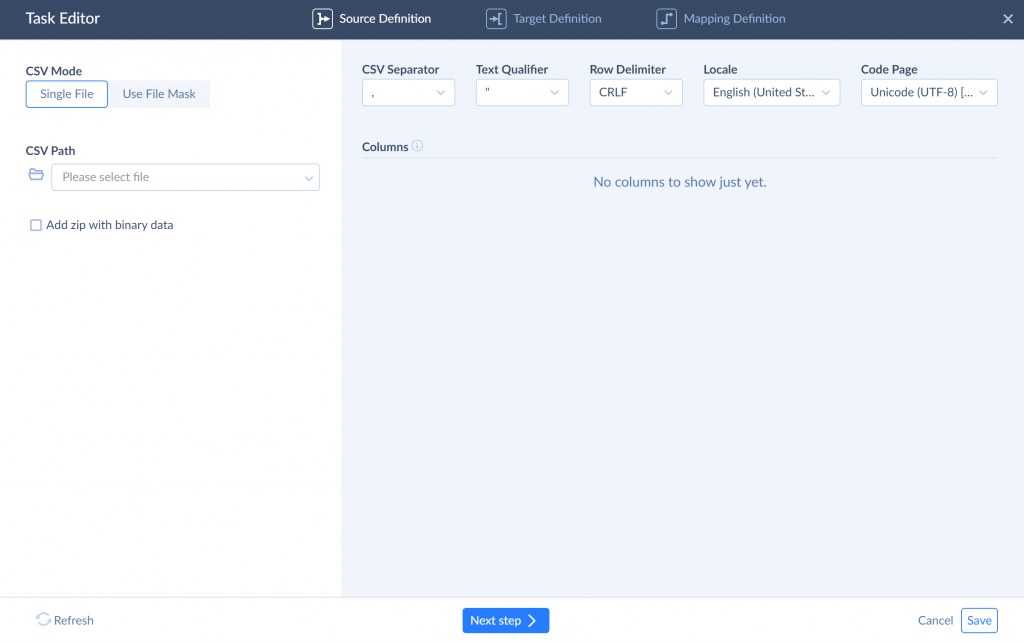
- In the CSV Path box, select the CSV file on the FTP to export. Click Next Step.
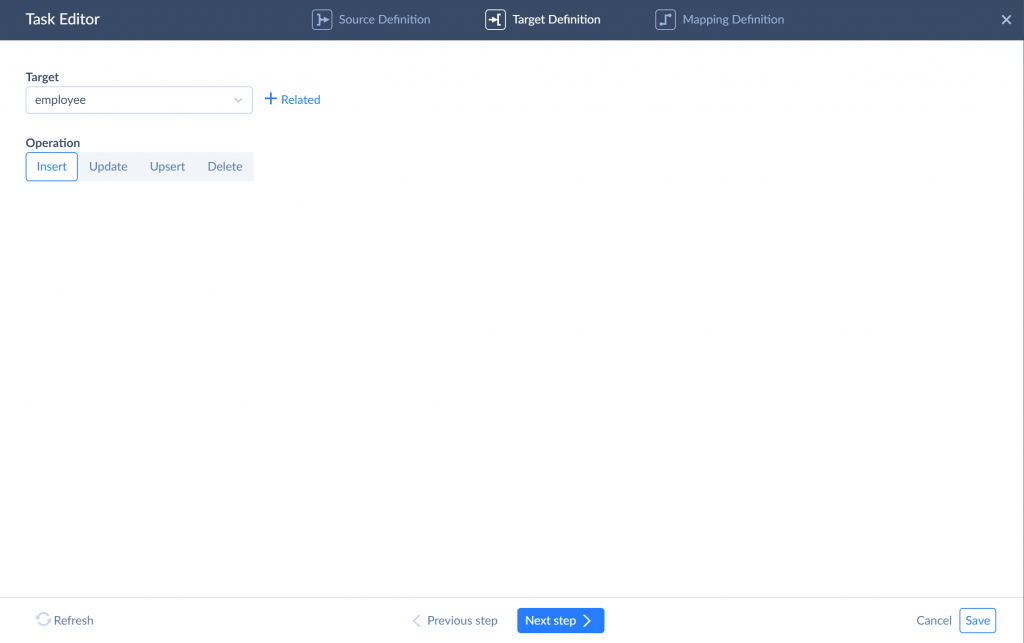
On the next step, select the target table to import data to, select the desired DML operation, and click Next Step again.
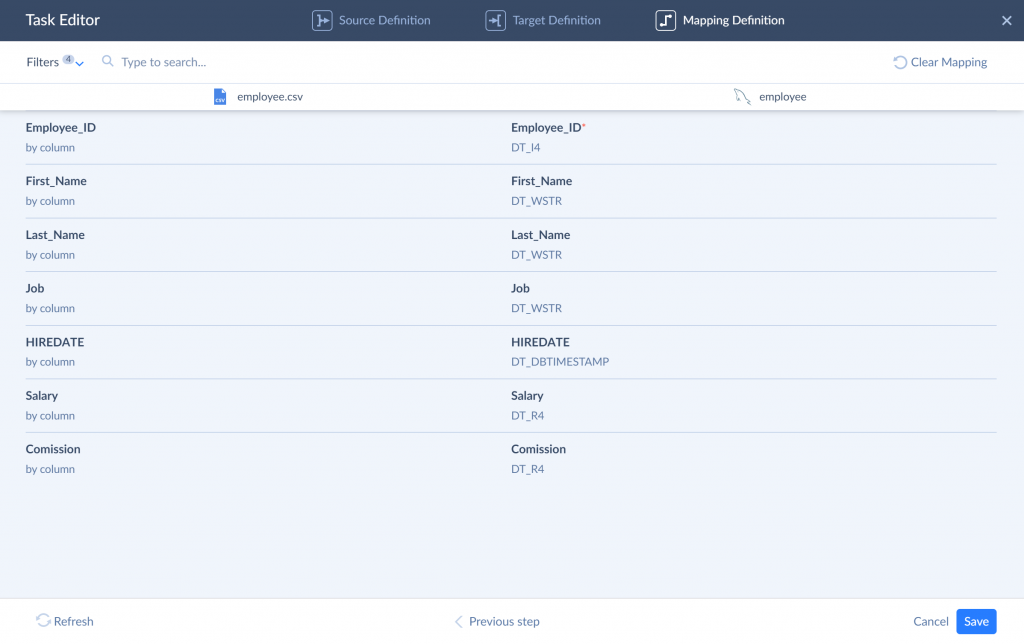
- Here, we map target and source columns. Since the source CSV and target table have columns with the same name, they are mapped automatically. Click Save.
- Click Create. The integration is ready. Now you can click Run to start the import.
Note: Skyvia automatically tracks sync status and logs errors via the Monitor and Log tabs. You can set email alerts or notifications for failures so you never miss a hiccup.
The dashboard shows detailed reports so you can monitor performance and troubleshoot easily.
Exporting Data with Skyvia
The same company’s HR database in MySQL stores all employee records. However, payroll providers, benefits platforms, and compliance auditors require regular access to it, usually via CSV files uploaded to their secure FTP servers.
Manually exporting this info, formatting it correctly, and uploading it to multiple FTP locations takes time and risks mistakes, especially as the company scales.
Skyvia automates the export of employee data from MySQL directly to the FTP servers of external partners. Scheduled tasks ensure the latest data is delivered on time, without manual intervention.
Let’s see how to export data from FTP to MySQL.
- Click +Create New, and under Integration, click Export.
- Optionally specify the meaningful name for the integration. Click Untitled and enter a more suitable name.
- Select MySQL as a source.
- Click CSV to storage service and then select the target FTP connection.
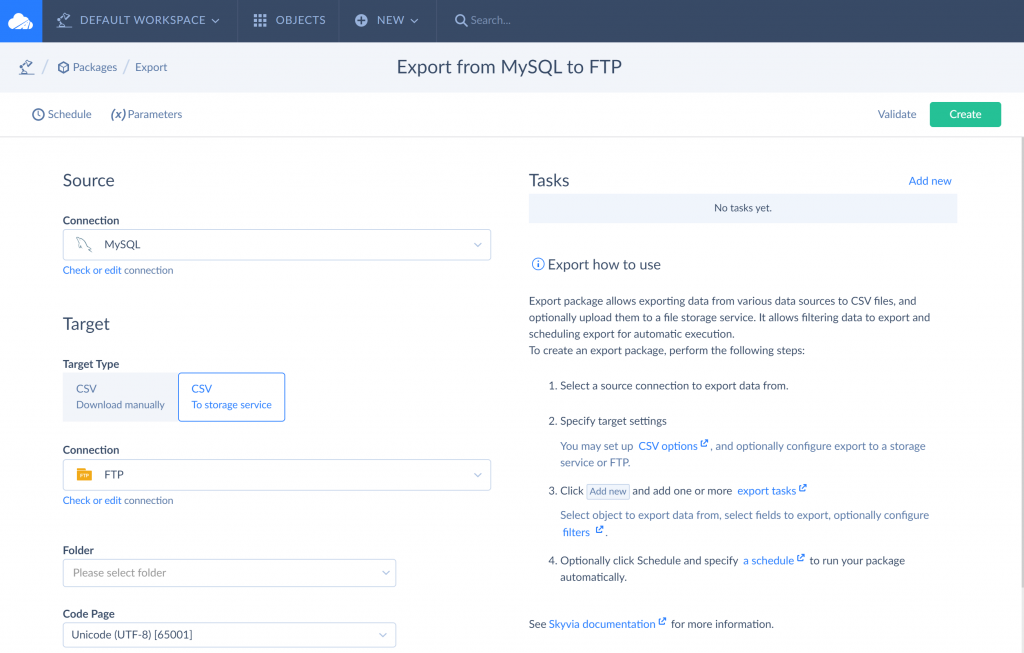
- Optionally select the folder on the FTP server to export data to, or leave it empty to export data to the root folder.
- Specify the CSV options if you need non-default ones.
- Add an export task. Near the Tasks, click Add new.
- Select an object to export data from in the object list. Then click Save. In the same way, you can add multiple export tasks, exporting data from multiple MySQL tables to FTP.

- Finally, click Create. The export is ready. Now you can click Run to start the export.
- Click Schedule and set it to automate export. Choose how often this sync runs: hourly, daily, weekly, or at custom intervals.
- Set the exact time to fit your business needs (e.g., after business hours to avoid peak load).
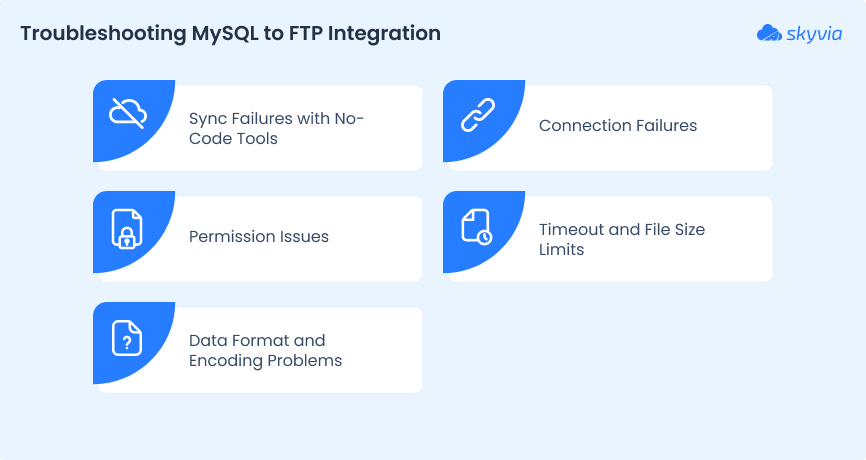
Troubleshooting MySQL to FTP Integration
Getting MySQL and FTP to play nice together isn’t always so simple. Whether you’re scripting your own solution, clicking through tools, or using a no-code platform, issues pop up. The good news? Most hiccups have straightforward fixes once you know what to look for.
Here’s a quick rundown of the usual suspects and how to handle them.
1. Connection Failures
What’s going on? Your MySQL or FTP client can’t connect to the server.
Why? Wrong hostname, port, or credentials are the top culprits. Firewalls or IP restrictions can also block access.
How to fix it:
- Double-check the server address, username, and password.
- Verify that the MySQL and FTP services are running and listening on the right ports (default MySQL: 3306, FTP: 21).
- Ensure the IP is whitelisted or firewall rules allow your connection.
- Try pinging or telnetting to test connectivity.
2. Permission Issues
What’s going on? You get errors like “Access denied” or “Permission refused.”
Why? The database user or FTP user lacks the rights to read/write files or perform certain operations.
How to fix it:
- Ensure the MySQL user has the necessary SELECT or FILE privileges for exports/imports.
- Check FTP user permissions to upload/download files in the target directory.
- If using command-line tools, confirm file system permissions on the server (read/write access to export directories).
- When working with no-code tools, confirm the connection user has full access on both ends.
3. Timeout and File Size Limits
What’s going on? Transfers fail midway, or you get errors related to max file size or execution time.
Why? Shared hosts and FTP servers often impose limits on file size, script execution time, or connection duration.
How to fix it:
- Break large exports into smaller chunks (export tables individually or by date ranges).
- Adjust timeout and file size limits in your MySQL and FTP server configs if you control them.
- Use command-line tools or no-code platforms that support chunked uploads or resumable transfers.
4. Data Format and Encoding Problems
What’s going on? Imported data looks garbled, missing characters, or CSVs don’t parse correctly.
Why? Mismatched character sets or improper export settings cause encoding issues.
How to fix it:
- Ensure MySQL export and FTP clients use the same character set (UTF-8 is usually best).
- Check field delimiters, enclosure characters, and line endings when exporting CSV files.
- Test imports on a small sample before full transfers.
5. Sync Failures with No-Code Tools
What’s going on? Scheduled syncs don’t run, or only partial data transfers happen.
Why? Connectivity glitches, expired credentials, or platform-specific limits.
How to fix it:
- Check API tokens, passwords, and connection status in your no-code platform.
- Look at logs or dashboards for error messages or alerts.
- Reauthorize or refresh connections if needed.
- Contact platform support if problems persist.
Conclusion
When it comes to connecting MySQL to FTP, your choice boils down to what you need and how comfortable you are with tech.
- Want quick manual exports? phpMyAdmin’s got your back.
- Love the command line and automation? mysqldump plus scripts will make you feel at home.
- Prefer GUI control? MySQL Workbench delivers.
- Want fast setup, zero coding, and smooth, scalable automation? No-code tools like Skyvia are the true game changers.
Ready to ditch the headaches of manual transfers and fragile scripts? Give Skyvia a spin and see how easy MySQL-to-FTP integration can really be.

F.A.Q. for MySQL to FTP

Can I Schedule Automatic Data Transfers?
Absolutely. Command-line scripts with cron jobs offer full control. No-code tools like Skyvia let you set up automatic, recurring syncs with just a few clicks. No scripting needed.
What Tools Simplify MySQL-FTP Integration?
Tools like Skyvia provide no-code visual interfaces to connect MySQL and FTP quickly. For script lovers, mysqldump combined with FTP clients is a classic, flexible approach.
How to Automate MySQL Backups via FTP?
Use mysqldump to export your database, then script FTP or SFTP commands to upload backups. Schedule these scripts with cron for hands-free, regular backups.
Can I Connect MySQL to SFTP Instead of FTP?
Yes! SFTP is more secure and widely recommended. Most FTP clients and integration tools support SFTP, letting you safely transfer MySQL exports without exposing your data.
