Key Takeaways
- COPY is how you move large volumes of data when this data lives on your server.
- /copy is how you get a CSV imported when it sits somewhere you can’t touch.
- PgAdmin is how visual thinkers, who wince seeing a string of code, get their files to the destination.
- Skyvia is how you turn continuous imports into a process that runs itself.
CSVs don’t load themselves into PostgreSQL (we wish they would), but they can get pretty close, though. This guide shows you how.
We start with psql and pgAdmin – manual methods that work when you need control. Finally, Skyvia – a cloud platform that runs CSV imports on autopilot, so you can stop manually doing this every time your data refreshes.
Without further ado, let’s import those CSVs.
Table of Contents
- Prerequisites
- How to Import CSV to PostgreSQL Table
- Common Errors and How to Fix Them
- Performance Considerations:
COPYvs.\copy - Conclusion
Prerequisites
PostgreSQL CSV imports aren’t hard, but they are exact. Here’s what you need in place so the rest of this guide feels smooth instead of frustrating.
- A PostgreSQL instance you can access
You need a PostgreSQL database you can log into. Local install, Docker, cloud provider – all fine. What matters is that you know the host, database name, user, and password, and that a connection actually works.
Quick test: open a terminal and run a simple SELECT 1; in psql, you’re ready. If it doesn’t work, get all the accesses first. Everything else depends on it.
- A target table that already exists
PostgreSQL does not create tables for you during a CSV import. The table has to exist and match the file.
That means:
- The columns should add up on both sides.
- The order should make sense (or be explicitly mapped).
- Data types should reflect what’s actually in the CSV.
In this article, we’ll work with a simple employee table, precisely this one.

It’s realistic enough to surface common issues, but small enough to stay readable.
We have it prepared so you can focus on how PostgreSQL imports CSV data, not on debugging commas, quotes, or encoding issues before you’ve even run your first command. Download the sample employees.csv file and use it exactly as-is while following the examples.
Once the import works end-to-end, you can always swap in your own files or messier real-world data later.
- The psql command-line tool
If you plan to import via the terminal, you need psql (PostgreSQL’s interactive terminal-based front-end for executing SQL queries, meta-commands, and scripts). It’s bundled with PostgreSQL and gives you access to the \copy import method.
Run a quick check to ask the system whether the psql command is available in your terminal, and if yes, which version is it:
psql --version
If that works, you’re good. If it doesn’t, install the PostgreSQL client before going further.
- pgAdmin (optional, but practical)
If command lines aren’t your thing, pgAdmin is a perfectly reasonable alternative. It provides a guided import flow, lets you confirm delimiters and headers visually, and avoids file-permission quirks on managed databases.
It’s especially useful if you import CSVs to PostgreSQL occasionally or want an extra layer of confirmation before loading data.
How to Import CSV to PostgreSQL Table
Getting a CSV into PostgreSQL is one of those tasks that looks trivial on paper and quickly turns opinionated in real life. Where the file lives, how big it is, who has access to what, and whether this is a one-time fix or a recurring job all change the “best” approach.
This chapter walks through the main ways people actually import CSV files into a PostgreSQL table. No theory, no ceremony – just practical methods, when they make sense, and what tradeoffs you’re signing up for with each one.
Method 1: The COPY Command (The Server-Side Powerhouse)
The COPY command in PostgreSQL is the go-to way to import bulk CSV data directly on the database server. It’s extremely fast because the server reads the file itself, not through a client proxy. That speed comes with a few requirements, but with the right setup, it’s hard to beat.
Important distinction between PostgreSQL’s COPY and \copy:
- PostgreSQL’s
COPYis executed by the server and reads files from the server’s filesystem. \copyis a psql meta-command that reads files from the client and sends the data to the server.
Also, here are a few reliable strategies to help you get through this easier:
- Start with a small sample before loading large files (we already have that one).
- Use a staging table for initial loads when types might mismatch.
- Include explicit column lists for clarity.
- Run a quick
ANALYZEafterward for fresh stats. - Always back up before loading mission-critical data.
When to use this method
- When you import big, clean CSVs, you trust.
- One-off or scheduled loads where you control the server or can fall back to \copy from your laptop.
- Staging-first workflows: land the file fast, then transform inside Postgres.
Step-by-step instructions
Step 0: Prerequisites
Make sure the table exists and matches your CSV because PostgreSQL won’t create the table for you. Before copying, confirm:
- The table exists with the right columns and data types.
- The CSV column order matches the table (unless you explicitly list columns).
Example:
CREATE TABLE employees (

  emp_id INT,

  first_name TEXT,

  last_name TEXT,

  date_of_joining DATE,

  email TEXT

);
Step 1: Place the CSV file where the server can read it
Because this is server-side, the file must live on the database server (not on your laptop):
- Absolute path like
/var/lib/postgresql/data/employees.csv. - Relative paths won’t work here.
- The PostgreSQL server user (often
postgres) must be able to read the file.
Note: If you can’t put files on the server (e.g., managed cloud DBs), use \copy instead.
Step 2: Connect with the right privileges
To run COPY ... FROM file, your database role needs permission to read server files – usually a superuser or a role granted pg_read_server_files. If you don’t have this, the command will fail with a permission error.
Step 3: Run the basic COPY command
Here’s the most typical form:
COPY employees

FROM '/absolute/path/to/employees.csv'

DELIMITER ','

QUOTE '"'

ESCAPE '"'

ENCODING 'UTF8'
Note: If you see encoding errors, explicitly set ENCODING ‘UTF8’ to avoid surprises.
Key flags explained:
FORMAT csv: treats the file as CSV.HEADER true: skips the first row (column names).DELIMITER ',': uses comma-separated values (default for CSV).
Step 4: Check the results
After it completes, PostgreSQL tells you how many rows were imported:
COPY 5 Then verify:
SELECT COUNT(*) FROM employees;

SELECT * FROM employees LIMIT 5;
If everything looks right, you’ve successfully loaded the data.
Pros
- Fast bulk loading straight into a table. Great throughput without fancy tooling.
- Transaction-aware when wrapped in
BEGIN/COMMIT, but partial loads can occur if errors aren’t handled explicitly. - Lots of knobs: delimiter, header,
NULLhandling, quoting, escaping, encoding, and even column-by-column mapping. - Easy to script in
psqlfor repeatable jobs and CI runs.
Cons
COPY FROMneeds server file access and the right privileges, which many managed Postgres services lock down.- Paths and permissions can be finicky, and small quoting or encoding hiccups will halt the load.
- Not much room for on-the-fly transforms. Users typically load into a staging table, then fix with SQL.
- Schema must line up with the CSV, or you’ll wrestle with type errors.
Method 2: The \copy Meta-Command (The Client-Side Convenience)
It runs inside psql, reads the file from your local machine, then streams it to PostgreSQL using COPY ... FROM STDIN.
When to use this method
- You’re working with a managed PostgreSQL service where server-side COPY is blocked or restricted.
- The CSV file lives on your laptop or CI machine, not on the database server.
- You want to import data without superuser privileges, using only normal INSERT rights.
- You’re doing speedy migrations, sketch projects, or isolated imports where putting files on the server first is just extra steps.
- You want portability across dev, staging, and prod without the bureaucratic dance of requesting filesystem privileges.
Step-by-step instructions
Step 0: Prerequisites
- Make sure you are in
psql(not a shell prompt). - The target table already exists.
- Your database user has
INSERTprivileges on that table. - The CSV columns match what you’re loading (same order, or you explicitly name columns).
- If your table name contains spaces and capital letters, it must always be quoted; e.g.:
"Sample Table for PostgreSQL CSV Import" Step 1: Connect with psql
From your terminal:
psql -h <host> -p 5432 -U <user> -d <database> If you’re already connected, great – don’t touch anything.
Step 2: Use \copy with a plain, safe baseline
Inside psql, run:
\copy your_table FROM '/absolute/path/to/file.csv ' WITH (FORMAT csv, HEADER true) Notes you’ll care about:
- The path is resolved on your computer, not on the server.
HEADER trueskips the first row (your column names).- On success, you’ll see
COPY <count>.
Windows example (either works, depending on your setup):
\copy your_table FROM ' C:\data\employees.csv ' WITH (FORMAT csv, HEADER true) Step 3: If your CSV has “extra stuff”, be explicit
Delimiter, quote rules, and what counts as NULL:
\copy your_table FROM '/path/file.csv'
WITH (
 FORMAT csv,
 HEADER true,
 DELIMITER ', ',
 QUOTE '"  ',
 ESCAPE '"  ',
 NULL "
)
Why do these matter:
DELIMITERdefaults to comma in CSV, but calling it out prevents surprises.- In CSV mode, the default NULL is an unquoted empty string, and setting
NULL"makes that behavior explicit.
Step 4: Load only certain columns (when your CSV doesn’t match 1:1)
If the table contains additional columns or the sequence diverges, declare your target columns:
\copy your_table (col1, col2, col3)
FROM '/path/file.csv'
WITH (FORMAT csv, HEADER true)
Table columns you don’t list will get defaults.
Step 5: Handle encoding on purpose (when you see weird characters)
If you know the file encoding, set it:
\copy your_table FROM '/path/file.csv'
WITH (FORMAT csv, HEADER true, ENCODING ‘UTF8’)
Note: PostgreSQL uses the current client encoding if you don’t specify it.
Step 6: Verify the import without overthinking it
Run one of these:
SELECT COUNT(*) FROM your_table; Or sanity-check a few rows:
SELECT * FROM your_table ORDER BY 1 DESC LIMIT 10; Step 7: Make it scriptable (same command, no interactive session)
From your terminal:
psql -h <host> -U <user> -d <db> -c "\copy your_table FROM '/path/file.csv' WITH (FORMAT csv, HEADER true)"
psql will execute it and exit.
Pros
- Reads files directly from your machine, so no server file access confusion.
- Works on cloud databases where server-side
COPYis off-limits. - Uses the same CSV options as
COPY, so nothing new to learn. - Easy to script with
psql, which makes it great for repeatable imports. - No elevated roles required, which keeps security teams calm.
Cons
- Tied to
psql, so it’s not available inside GUI-only workflows. - Large files move over the network, which can slow things down on remote databases.
- Fails on the first bad row unless you use staging tables or pre-clean the file. Unlike
INSERT, it doesn’t skip errors silently. - Not parallel by default, so very large imports may need extra scripting.
Method 3: Using pgAdmin (The GUI-Friendly Approach)
Not every CSV import needs to start in a terminal. pgAdmin gives you a visual way to import data, so you can see exactly what’s happening before anything touches your table.
pgAdmin wraps PostgreSQL’s import logic in a visual flow: you pick the table, point to the file, confirm delimiters and headers, and let it run. It’s slower than COPY and less flexible than scripted \copy, but it’s approachable, transparent, and hard to mess up.
When to use this method
- Small to medium CSVs and quick one-off imports.
- Analysts who prefer a GUI or are still getting comfy with Postgres.
- Ad-hoc loads where you want to tweak settings interactively before committing.
Step-by-step instructions
Step 0: Prerequisites
Before pgAdmin can help you import anything, it needs to exist on your machine. If you already have PostgreSQL installed locally, pgAdmin is often bundled. If not, installing it separately is perfectly fine.
- Go to pgadmin.org.
- Download pgAdmin 4 for your OS (Windows, macOS, or Linux).
- Install it using the default options – no special flags, no tuning needed.
Step 1: Launch pgAdmin and add your database
When you open pgAdmin for the first time, you’ll see an empty Browser panel on the left.
- Right-click Servers.
- Choose Register – Server.
- Give it a name you’ll recognize (for example: Local Postgres or Production Reporting).
In the Connection tab:
- Host name/address –
localhostor your remote host. - Port –
5432(unless you changed it). - Maintenance database – usually
postgresor your target database. - Username and password – the same ones you use with
psql.
Click Save. If the server appears without errors, you’re connected.
Step 2: Sanity check the connection
Before touching CSV files, make sure pgAdmin can actually talk to your database.
- Expand the server and database in the Browser tree.
- Open Tools – Query Tool.
- Run:
SELECT 1;
If you get a result, pgAdmin is ready. If not, fix the connection now – CSV imports won’t magically work later.
Step 3: Make sure pgAdmin can see your CSV file
pgAdmin reads CSV files from your local machine, not from the database server.
That means:
- The file must exist on your computer.
- You must have permission to read it.
- Antivirus or corporate security tools shouldn’t block temporary file access.
If pgAdmin can open the file picker and preview the CSV, you’re good.
Once pgAdmin is installed, connected, and able to see your file, the actual import is just a sequence of deliberate clicks – which is where the step-by-step import section you saw earlier comes in.
Step 4: Open the Import wizard
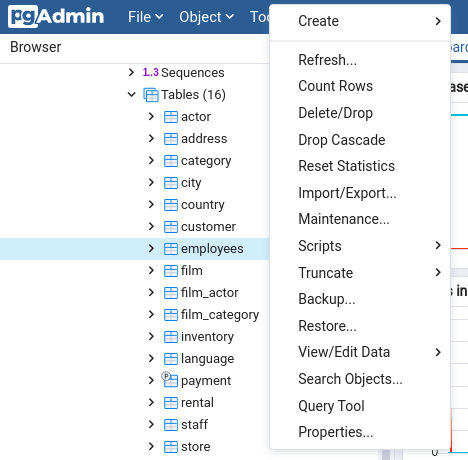
- In the Browser tree, find your table.
- Right-click the table and select Import/Export from the shortcut menu to open the wizard.
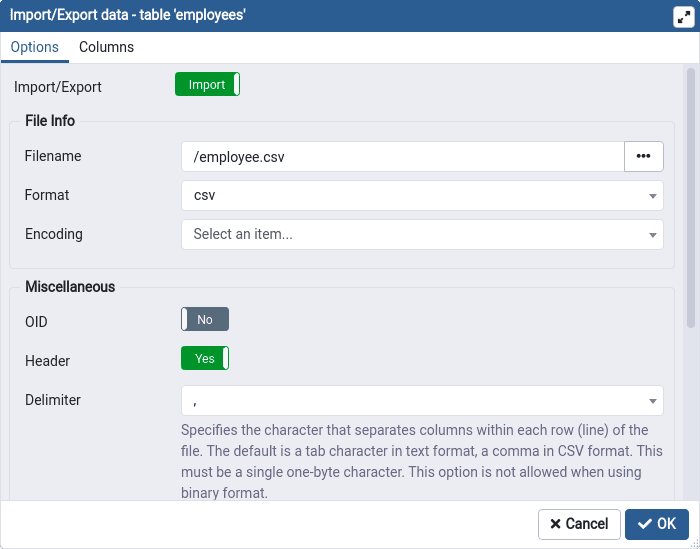
- Click the flag button. Point to your file, enter whatever’s splitting your columns, and switch on headers if your file starts with labels. Click OK and let it process.
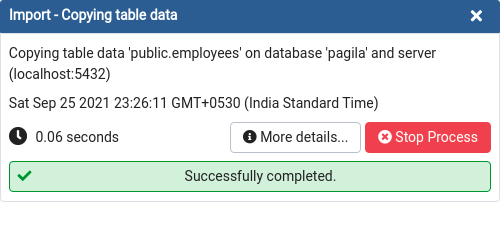
- After clicking OK, a window appears indicating that the process has been completed.
Pros
- Point-and-click simple. No terminal gymnastics.
- Handy options in one place: delimiter, header, quote, NULL string, encoding, and target columns.
- Good for sanity checks. Users can eyeball the table and try again fast if something’s off.
- Works fine on managed Postgres since you’re uploading from your machine, not the server’s filesystem.
Cons
- Manual and a bit clicky. Not great for automation or repeatable pipelines.
- Can choke or time out on very large files, especially over slow networks.
- Error messages aren’t always crystal clear, so debugging bad rows can take a few passes.
- Slower than COPY for bulk loads, and you’ll still want a staging table if the file needs cleanup.
Method 4: Importing Data to PostgreSQL Using Skyvia
Skyvia is a cloud data integration platform that comes with 200+ ready-made connectors, including PostgreSQL, cloud storage, SaaS tools, and databases, so you’re not forcibly matching things together by hand every time a file shows up.
We will discuss in detail how to import CSVs to PostgreSQL using Skyvia, but here’s a spoiler on how easy it is:
You connect Postgres → point Skyvia at the file → match columns visually → decide how often the data should land.
After that, it just happens.
“We’re thrilled to be recognized as Top Data Integration and Data Pipeline Tool by TrustRadius and our customers. Our mission is to make data integration accessible to businesses of all sizes and to all clients, regardless of their coding expertise. Receiving this award confirms that we are moving in the right direction by creating an easy-to-use yet feature-rich solution capable of handling complex scenarios.” Oleksandr Khirnyi, Chief Product Officer at Skyvia, stated.
When to use this method
- Teams that want repeatable, scheduled imports without working with scripts.
- Pulling CSVs from cloud storage or partner feeds into Postgres with light transforms on the fly.
- Data engineering lite: land to a staging table, validate, then promote – all in one place.
Step-by-step instructions
Step 0: Prerequisites
Before you start:
- Sign in to Skyvia or create an account if you don’t have one (takes seconds).
- Pick your workspace name and wrap the brief onboarding.
You’ll start Free with 14 days of advanced feature access. Zero installation – everything happens in your browser.
Step 1: Create an Import Integration on Skyvia
- Click +Create New and select Import under Integration.

- Under Source, select CSV from storage service, and then select the source Dropbox connection.
- Move on to Target and choose your PostgreSQL connection.
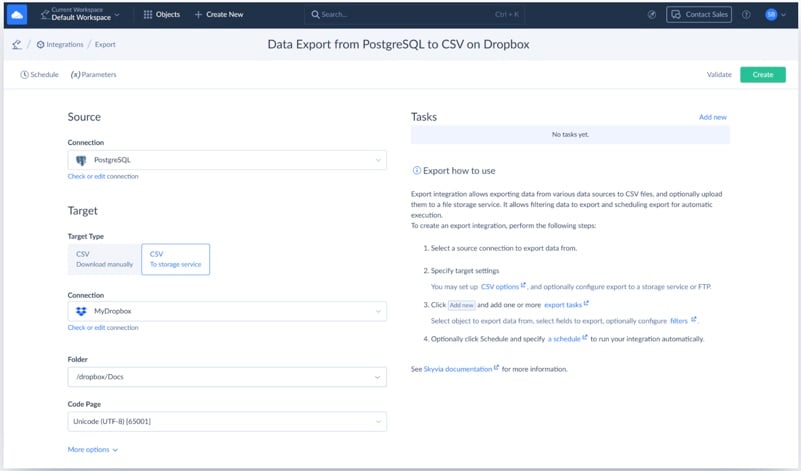
- Click Add new on the top right of the page to add an Import task.
Step 2: Map the Integration
- In the task, you specify the file and where and how to load it.
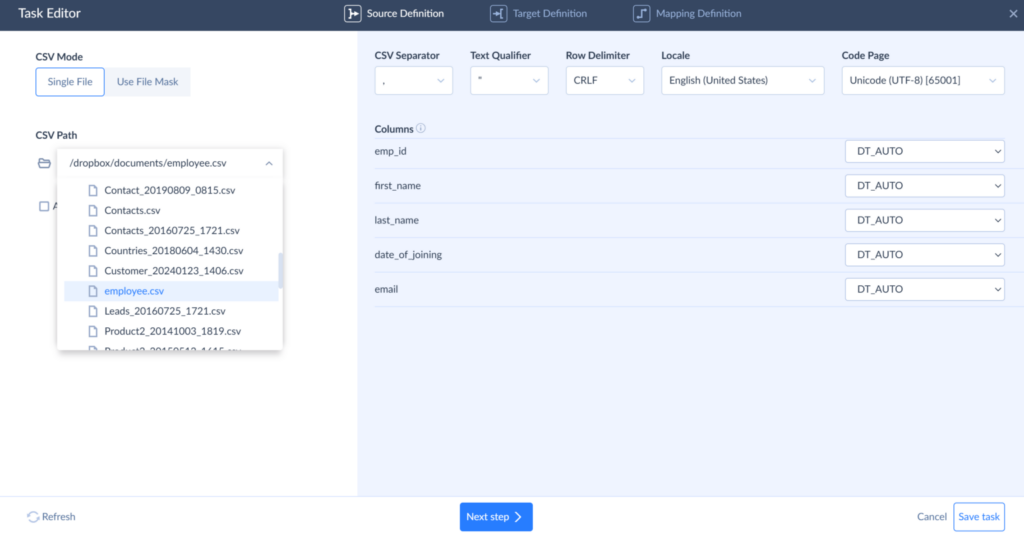
- Select the file to load data from and click Next.
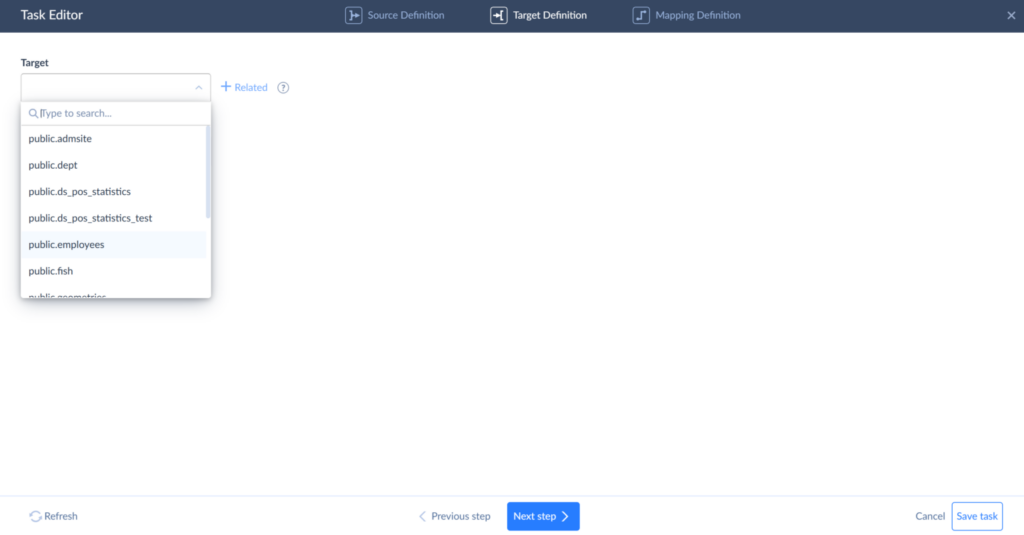
- Select the employees table to load data to and click Next.
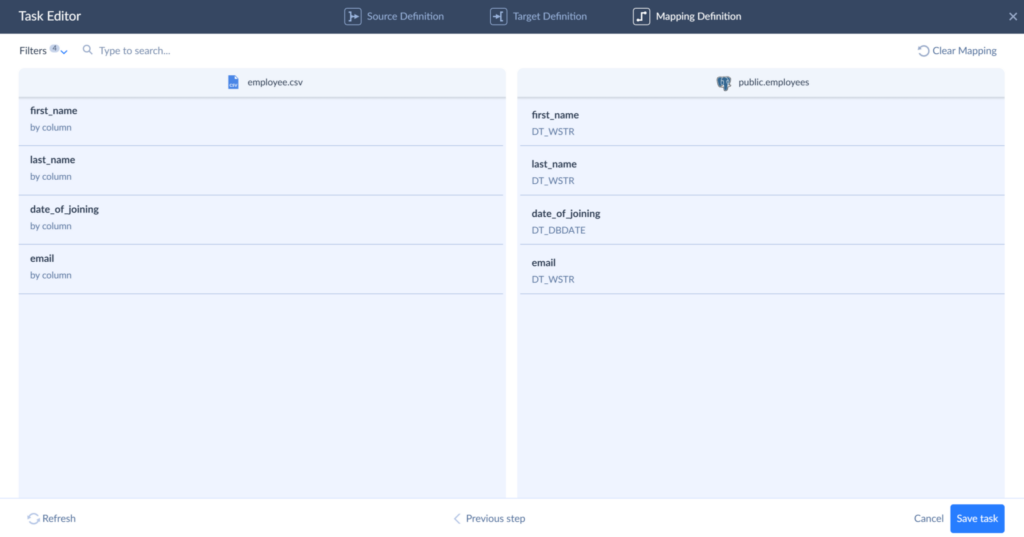
- Map source and target columns to each other and click Finish.
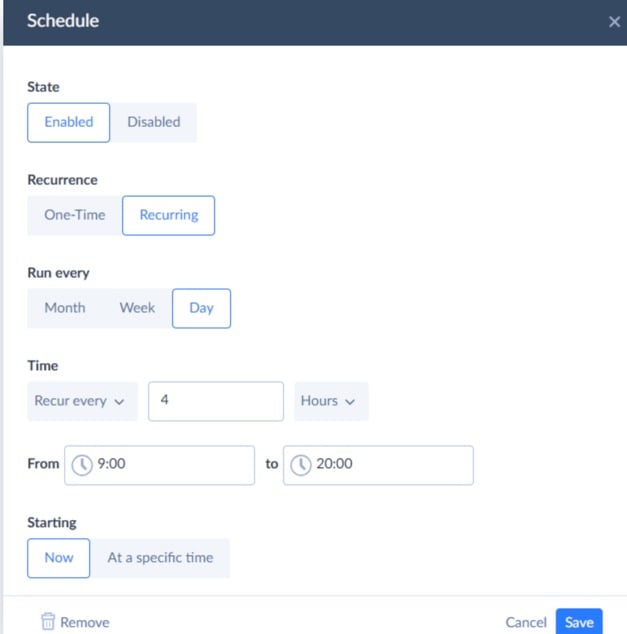
Step 3: Schedule Integration
Note: You can run the integration manually or schedule it for automatic runs.
- On the Integration main page, click on Schedule in the upper corner.
- Choose how often you want it to run and click Save.
Pros
- No-code and cloud-based, so you skip scripts and VPNs.
- Flexible mapping and transformations on the way in – trims, type casts, lookups, even splits/merges before data lands.
- Scheduler built in.
- Plays nice with storage sources like Google Drive, Amazon S3, Dropbox, and FTP. Great for marketing exports or partner drops.
- Helpful guardrails: pre/post-SQL, error logging, retries, notifications, and run history you can actually read.
- Grows with you from simple Import to multi-step Data Flow/Control Flow when things get more complex.
Cons
- Not ideal for a tiny one-off where \copy or pgAdmin gets it done in 60 seconds.
- Advanced features are available only with paid plans, and you’ll spend a bit of time on initial connector setup.
- Throughput depends on network and file size, so ultra-huge loads may still benefit from staged COPY on the server.
Common Errors and How to Fix Them
| Problem area | What usually goes wrong | How to fix it |
|---|---|---|
| Schema mismatch | invalid input syntax for type… when text lands in numeric or date columns | Check column data types and normalize values. Dates should be YYYY-MM-DD, and numbers should not contain symbols or text. |
| Column count or order | extra data after last expected column or missing data for column | Ensure the CSV column order matches the table, or explicitly list columns in COPY / \copy. |
| Header row imported | Column names appear as actual data rows | Use CSV HEADER when the first row contains column names. |
| Server-side file access | could not open file … Permission denied with COPY | Use absolute server paths and correct permissions, or switch to \copy if server access is restricted. |
| Managed database limits | COPY fails on RDS, Cloud SQL, or Heroku | Use \copy, which reads files from your local machine instead of the server filesystem. |
| Local file unreadable | \copy fails to find or read the CSV | Verify the local path and ensure your OS user has read permissions. |
| Broken CSV formatting | Imports fail due to commas or quotes inside fields | Explicitly define DELIMITER, QUOTE, and ESCAPE options. |
| Encoding issues | invalid byte sequence for encoding 'UTF8' | Convert the file to UTF-8 or specify ENCODING 'UTF8' during import. |
| NULL confusion | Empty values imported as empty strings instead of NULL | Use NULL" and FORCE_NULL if needed. |
| Vague GUI errors | pgAdmin shows “process failed” with no details | Re-run the import in psql to see the exact error message. |
| Partial imports | Failed loads leave dead rows behind | Wrap imports in transactions and run VACUUM after failures. |
| Large file failures | One bad row stops the entire import | Load into a staging table, validate, then insert into the final table. |
When you’re done with the import, hop to our export data from Postgres into CSV files guide to finish the cycle.
Performance Considerations: COPY vs. \copy
At a glance, COPY and \copy look almost identical. They use the same engine, the same CSV parser, and the same internal logic. The difference is where the file lives and how it reaches PostgreSQL – and that difference shows up once data volume grows.
COPY works on the server side. PostgreSQL reads the CSV file directly from its own filesystem and loads it internally. There’s no network hop, no client involved, and no extra buffering. That direct access is why COPY is consistently the fastest option when it’s available.
\copy, on the other hand, runs on the client side. Your machine reads the CSV file and streams it over the database connection into PostgreSQL. It’s still efficient, still miles ahead of row-by-row INSERTs, but it has one extra step: the data has to travel.
That extra hop doesn’t matter much for small files. As datasets grow, network speed, latency, and client resources start to play a role. Nothing is broken here – it’s simply the cost of moving data across systems.
The table below illustrates how the difference typically plays out as file size increases. Numbers bounce around depending on your setup, config choices, and how cooperative your network feels, but the underlying trend doesn’t lie.
| CSV size | COPY (server-side) | \copy (client-side) |
|---|---|---|
| 10,000 rows | ~0.1-0.2 seconds | ~0.2-0.3 seconds |
| 1 million rows | ~2-4 seconds | ~3-5 seconds |
| 10 million rows | ~25-40 seconds | ~30-50 seconds |
Both options scale without complaining and stream data like they’re supposed to. The split becomes obvious when distance enters the chat, or when your network’s bandwidth moves like a tired snail.
Forget abstractions for a second: what does this mean when data needs importing?
- If PostgreSQL’s on your turf and you can access the filesystem, COPY is the no-nonsense answer. It stays out of the way and does exactly one job, very well.
- If you’re working with a managed database, a remote server, or just a CSV sitting on your laptop, \copy is the sane choice. It trades a bit of raw speed for convenience and access, and in most real-world cases, that tradeoff is more than fair.
The important part isn’t chasing the fastest possible import. It’s picking the method that fits your setup so you can load data confidently and move on.
Conclusion
PostgreSQL doesn’t just give you one CSV import option. It gives you several, which are either helpful or annoying depending on whether you chose correctly. Each tool works beautifully for its intended purpose and becomes frustrating the second you’re using it wrong.
- If you’re loading a big file on a server you control and want it done as fast as possible,
COPYis the clear winner. - When the database lives somewhere you can’t touch the filesystem,
\copyis the practical alternative –same idea, fewer permissions, slightly longer path. - pgAdmin is the calm, visual option when you want to see what’s happening and don’t feel like typing commands or explaining them to someone else.
And then there’s the moment when CSV imports stop being “just this once.” When they turn into a weekly job, a nightly sync, or something that breaks every time a column shifts. That’s the point where manual tools stop being clever and start being noise.
Skyvia exists exactly for that phase. It takes the same CSV-in, table-out logic and turns it into a repeatable, scheduled process you don’t have to think about. No scripts to maintain, no commands to re-run, no reminders on your calendar to “import the file again.” You set the rules once, and the data shows up where it should, on time.
If you’re tired of CSV being a recurring task instead of a solved problem, give Skyvia a try. You can start for free and see how different PostgreSQL imports feel when they stop demanding attention 24/7.
F.A.Q. for Import a CSV file into PostgreSQL
How do I import a CSV that doesn’t have a header row?
Just skip the HEADER option. PostgreSQL won’t complain—it’ll treat the first row as data. The only real rule is that the CSV column order must line up with the table.
Which method is best for importing a very large CSV file (e.g., over 1GB)?
If the file lives on the server, COPY wins on raw speed. On cloud databases where that’s blocked, copy is the practical choice. For recurring large imports, automation beats re-running commands by hand.
Can I import only specific columns from my CSV file?
Yes. List the target columns in the command, and PostgreSQL will map values by position. Extra CSV columns are ignored; missing ones must allow NULLs.
How can I automate the process of importing CSV files on a schedule?
You can script COPY or copy with cron, but it gets brittle fast. Tools like Skyvia let you set the mapping once and run imports automatically.


