

A few teams, two platforms, and one massive headache. Welcome to a world where Intercom and Salesforce data are not synchronized. This chaos, with every missed connection, pushes customers toward competitors.
The solution? The integration that guarantees personalized support, increases conversions, and makes decisions grounded in analytics. Your customers get better experiences; your team gets easier workflows – everyone wins.
In this guide, we explore the benefits of Intercom and Salesforce integration. Whether you’re looking for manual or automated solutions, this article will walk you through the best ways to streamline and enhance your data management processes.
Table of Contents
- What is Intercom?
- What is Salesforce?
- Why Integrate Intercom with Salesforce?
- Key Challenges in Integrating Intercom and Salesforce
- How to Set Up Intercom and Salesforce Integration
- Method 1: Intercom and Salesforce Manual Integration
- Method 2: Integrating Intercom and Salesforce Automatically
- Alternative Methods to Intercom and Salesforce Integration
- Conclusion
What is Intercom?

Intercom is a frontrunner in communication and customer engagement technology. More than 25K companies globally use it to power their customer interactions, whether through email, SMS, social platforms, or direct in-app communications.
Key features
- Live chat and messaging to communicate with customers in real time on websites or apps.
- Automated messaging and chatbots personalize responses and streamline routine tasks using AI-powered bots, such as Fin AI.
- Helpdesk and ticketing system to efficiently manage and resolve customer issues.
- Analytics and reporting on customer behavior and team performance, promoting decisions based on solid data insights.
- Integrations to extend your team’s capabilities and fine-tune workflows through various connected apps.
What is Salesforce?
Salesforce is one of the most widely used CRM systems globally. More than 150K+ companies trust it. Businesses can manage customer data, services, sales processes, and marketing automation, all delivered via cloud technology.
Key features
- Contact and account management for data segmentation and structured campaigns.
- Activity and workflow automation for repetitive tasks, events, and approval processes to improve operational efficiency.
- Integration capabilities to easily connect with third-party apps, improving the versatility of Salesforce for various business needs.
- AI and advanced analytics support automation, personalization, and predictive analytics with Salesforce Einstein.

Why Integrate Intercom with Salesforce?
Manual input is tedious, prone to errors, and requires a substantial amount of time. Integration is a much shorter and less error-prone path, where the risk of misplaced orders, inconsistencies in revenue reports, and periods of stagnation don’t hang over your team’s heads.
Companies that link Intercom and Salesforce can create a comprehensive customer picture that brings sales, support, and marketing teams on the same page. As a result, having data from multiple sources makes automated processes, such as creating leads or cases based on Intercom conversations, easier.
Intercom to Salesforce integration is no longer an option for modern firms that rely significantly on client relationships; it is a must. Companies just starting out on their growth journey have a unique chance to strengthen business communication using Salesforce from the start, avoiding big integration issues later on.
Key Challenges in Integrating Intercom and Salesforce
Data integration is often like carefully navigating near an iceberg. Some issues are apparent on the surface, but real complexities often are hidden, patiently waiting to be uncovered when you start your adventure.
Each of them can slow down your entire operation. Let’s explore some of the most common problems when integrating Intercom with Salesforce and walk through practical solutions to get things back on track.
- Data Mapping and Field Compatibility
Proper data mapping between the two platforms is a guarantee of a smooth process in all of your departments. Both systems use different data structures and field types (e.g., accounts in Salesforce and companies in Intercom), but what is worse, not all fields in one system have counterparts in the other.
When a match doesn’t happen, data is likely to get lost, and a list of errors quickly grows. So, what can be done?
Map only compatible fields. Regular reviews of data flow between systems are welcomed when your business needs to grow.
- Security Risk
With any data manipulation, especially customer data, it’s easy for security gaps to open up. Poorly managed authentication or unchecked permissions are among the primary reasons why data in SaaS can be compromised, leading to lost customers, potential fines, and significant reputational damage. It’s like leaving your front door open just a bit – small gaps can lead to substantial losses.
Grant only minimal and role-based permissions to avoid any risks. Regularly review all integration activities and error logs. Also, encryption methods for data in transit and at rest to safeguard customer information won’t hurt, either.
- Third-Party Integration Conflicts
When other third-party apps or integrations are already connected to Salesforce or Intercom, a conflict is possible. Then, you will need to deal with data synchronization issues or application crashes.
Before connecting anything, test it in a sandbox environment.

How to Set Up Intercom and Salesforce Integration
Businesses have two options: manual integration and automated integration. In the end, you will witness seamless data flow between the platforms. Yet, the experience will differ in terms of complexity and functionality.
Let’s stop for a minute to take a look at the functionality of each approach:
| Aspect | Manual Integration | Automated Integration |
|---|---|---|
| Sync Frequency | Ad hoc, user-initiated | Real-time or periodic automated sync |
| Data Accuracy | Prone to errors, duplicates, outdated data | High accuracy, consistent, and up-to-date |
| Setup Complexity | Low technical setup but high manual effort | Requires initial setup, but has low ongoing effort |
| Use Cases | Small teams, low volume, simple workflows | Mid-large teams, complex workflows, high volume |
| Support for Advanced Workflows | Limited. Enables selective syncing and one-time data transfers with attribute mapping | Supports real-time syncing, trigger-based actions, lead nurturing, case creation, and advanced syncing of company/account data |
Ready to set up your integration?
Method 1: Intercom and Salesforce Manual Integration
Manual Integration involves using a native Intercom to Salesforce integration app to synchronize data between the platforms, with minimal setup requirements.
While it’s simple and doesn’t require coding skills, it has limitations in terms of automation and customization.
Best for
- Teams with relatively simple workflows and lower data volumes.
- Since no coding skills are required, manual integration is ideal for teams without dedicated developers or technical resources.
- Also, it will be useful for businesses that are still evaluating whether full-scale automation is necessary for their operations. Manual sync allows you to test data flows and assess the integration benefits before committing to more advanced automation.
Pros
- Simple setup with no coding required.
- Automatic assignment of conversations to lead owners in Intercom.
- Automatically logs conversations, notes, and messages as Salesforce tasks.
- Creates Salesforce cases from Intercom conversations.
Cons
- Limited automation and customization capabilities.
- No advanced workflows.
- Requires regular manual updates.
- The relationship Lead/User and Company in Intercom and the relationship Leads/Contact and Accounts in Salesforce have to be managed on each platform separately.
- Intercom’s native integration provides two approaches for updating Salesforce tasks with chat data: automatic and manual. The automated option syncs tasks as discussions begin and end, collecting all interaction details. When done manually, Intercom only sends a snippet of the conversation in the task, along with links to complete the context.
Step-by-step guide
Let’s start with the pre-flight checklist. You can’t attempt integration without the following accounts and permissions:
- Admin permissions for both services.
- API access for the Salesforce account (this requires either the Enterprise or Unlimited edition).
Intercom also requires access to the next Salesforce objects and their fields:
- Lead (Email, LastName, FirstName, Company, Phone, Status (aka Lead Status), LeadSource, OwnerId).
- Contact (Email).
- Account (OwnerId).
- Task (Description (aka Comments), CreatedById (aka Created By), ActivityDate (aka Due Date), Subject, Type, Status, Priority, OwnerId (aka Assigned to).
- Integration process
Now, we can install the Intercom Salesforce app.
- Go to the Intercom App Store, and on the list on the left, find For sales teams, and choose the one you need.
Note! This app cannot be installed from the Salesforce AppExchange.
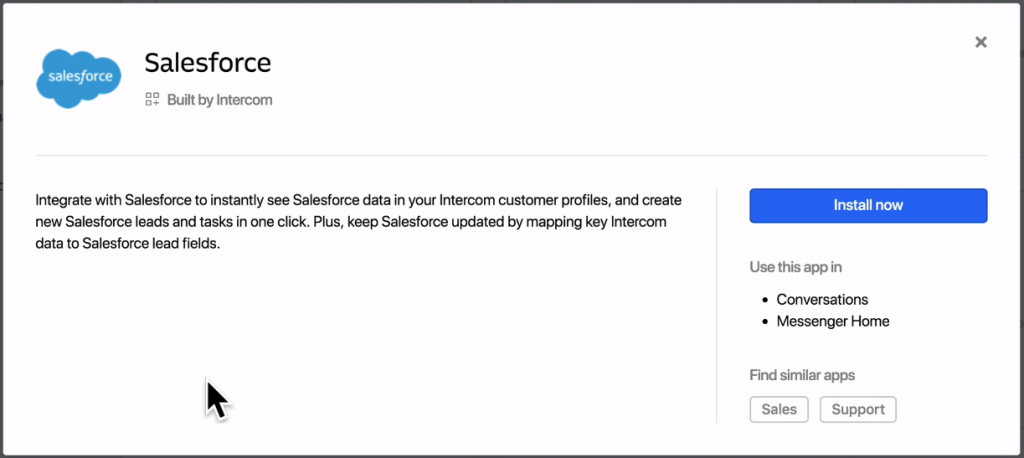
- Sign in and install it.
Note! You can take the integration for a test drive by installing the app in the test workspace and the Salesforce Sandbox environment. However, you’ll need to check if your Intercom plan supports this feature.
- Confirm in Salesforce that you’re granting access to your Salesforce account.
- The installation comes with default data mapping ready to roll, but customizing these preferences is like proofreading before you hit send. It saves you from errors and keeps your data flowing smoothly.
You can also specify the sync direction (from Intercom to Salesforce or Salesforce to Intercom).

Note! Data between Intercom and Salesforce syncs in real time, with updates triggered whenever changes are made. Salesforce, in turn, checks for changes every 5 minutes and updates Intercom accordingly. For example, if a contact’s details are updated in Intercom, Salesforce is immediately updated. If a new lead is created in Intercom, a new identity mapping is established in Salesforce, and all relevant data is synced.
Note! Historical data won’t sync unless there’s a change. As a result, data in the Salesforce inbox app may not always be up to date if no recent changes have been made.
Important! In the case of duplicated objects, the sync follows priority rules: Intercom Users over Intercom Leads. In Salesforce, Contacts over Leads. When there are two identical users or leads, the one that was last updated will be matched.
- Mapping completion initiates the sync process, but you’ll need to be patient as it may take up to 5 minutes to begin churning.
This native integration wins points for simplicity because it is built right into Intercom, but it is not without its limitations.
Method 2: Integrating Intercom and Salesforce Automatically
If the manual route doesn’t correspond with your desired workflow, you can break free with automation. This is possible through third-party tools, such as Skyvia. Here’s what that looks like in action.
This method requires more technical expertise, but don’t worry. You won’t have to pay for these advantages by having coding skills. Also, a free trial period gives you an opportunity to test even advanced features and how well they can satisfy your data integration needs before you commit.
You can choose between two scenarios depending on your needs:
- Import Integration works best for companies that do not require frequent data updates and may use filters to select the appropriate quantity of data for migration. Note that in this case, updating data is impossible because it is a simple downloading operation, and each consecutive download overwrites the previous data.
- Data Flow is excellent for companies that require constant and regular data updates. When used in tandem with Control Flow, it allows complex automation of business operations across several tools/platforms. This scenario allows you to customize the loading of Lead/User/Contact/Account data based on various parameters and use multiple final destinations for data, including CRM/marketing tools and others, simultaneously.
Best for
- Companies in need of complex integration scenarios that can be implemented through no-code visual tools.
- Teams that need regular, automated data syncs.
- Businesses that require data from various platforms to be merged, transformed, and synchronized.
Pros
- The platform provides rich functionality and vast opportunities to implement complex integrations. The service implements complex logic, applying parallel processing, error interception, and other advanced features.
- No deployment or installation is needed, as the service is cloud-based and browser-based.
- The interface is user-friendly and convenient. Business users can configure data flows visually using a no-code wizard.
- Skyvia’s approach has an advantage when it comes to debugging workflows. With its Data Flow and Control Flow features, users can observe the task’s execution in real-time, monitor the data count, and receive detailed information about errors.
Cons
- While Skyvia is a no-code platform, proper mapping may require familiarity with data integration concepts.
- Not enough video tutorials.
Step-by-step guide for Import Integration
Let’s start with the Import scenario, which is an easier one for data integration between two data sources.
- Create a Skyvia account if you don’t have one.
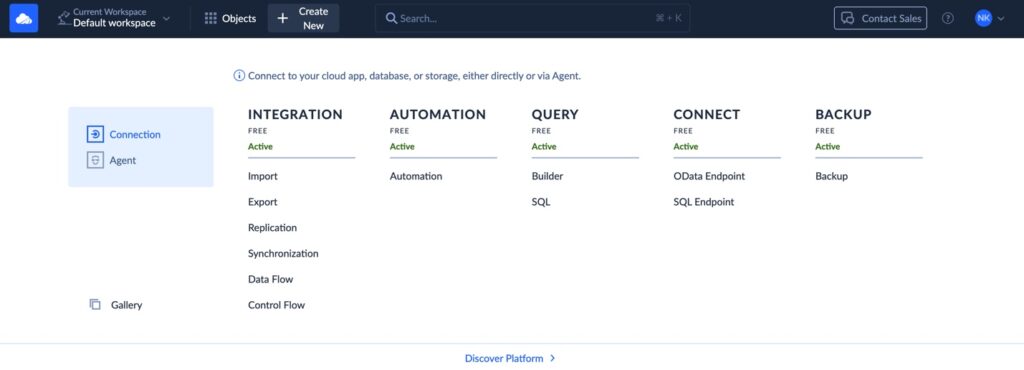
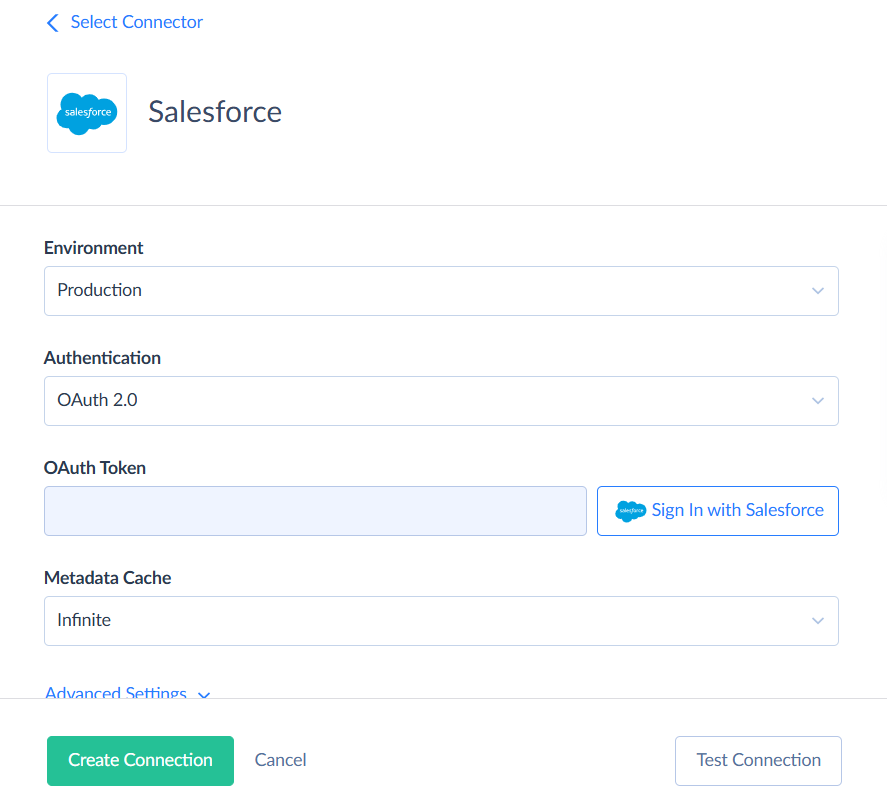
- Connect both Intercom and Salesforce to Skyvia before implementing integration scenarios. In Skyvia, click + Create New in the top menu, then click the Connection button on the left menu.
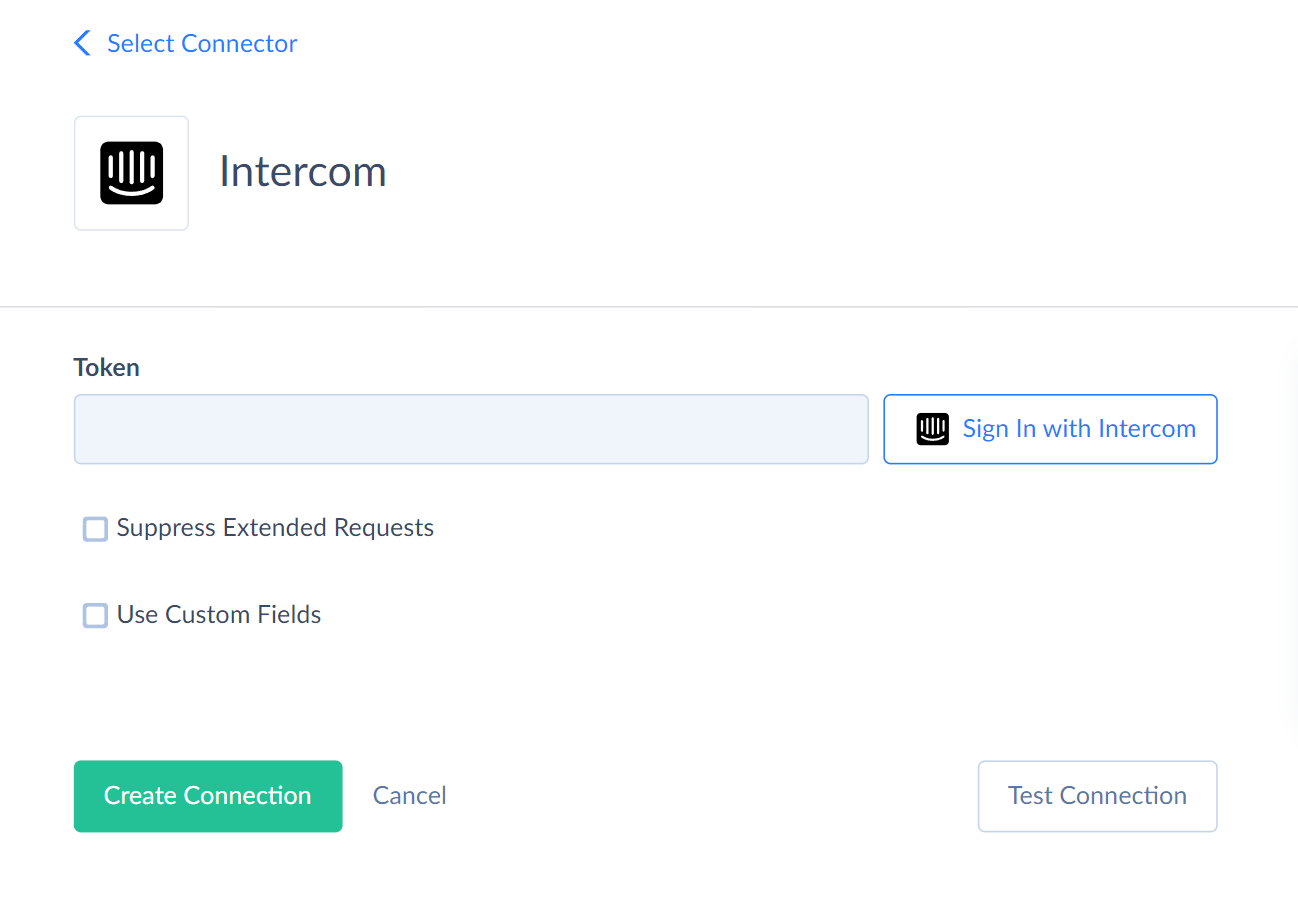
- In the opened window, select the service you want to connect to. In this case, it’s either Salesforce or Intercom. Sign in with the chosen service, enter your account credentials, and create a connection.
Note! Give your connections descriptive names, as the default one always states “Untitled.” That is especially important if you’re managing multiple connections.
- Similarly, create a Salesforce connection by selecting Salesforce and providing your login details.
Note! More details on setting up Salesforce and Intercom connections can be found within the Skyvia documentation.
Now, we can set up the integration process. In this case, we import Leads and Contacts from Salesforce to Intercom and back.
- Click + Create New in the top menu and select Import scenario from the Integration category. In the opened window, you can find detailed instructions on the right and the workspace with Source and Target data flows on the left.
- Select the data connections (those created in the step above).
- Define the Source Type and apply additional options if needed.
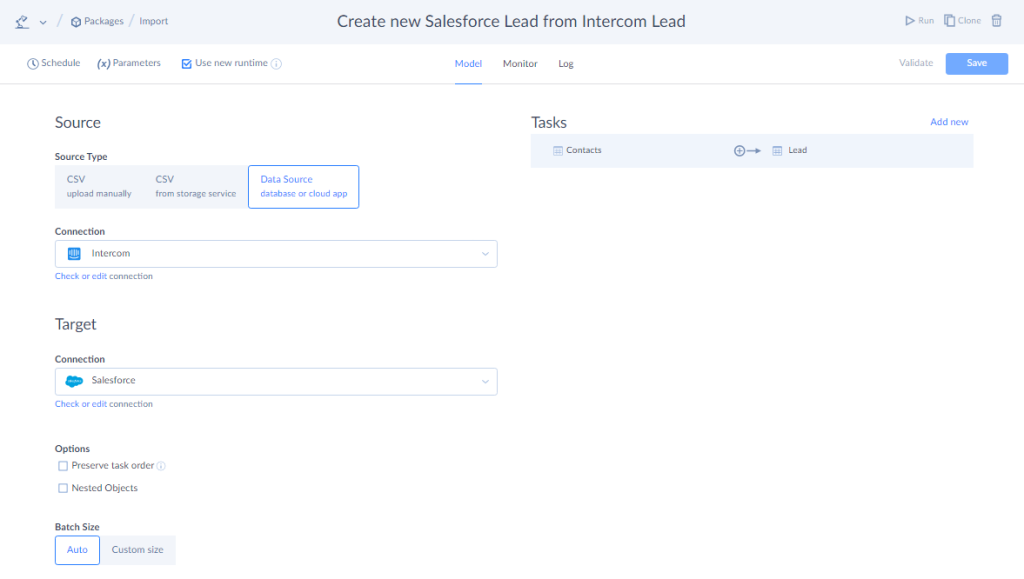
- Use the Add new button on the right to create a new data import task.
- Specify Source settings. Select a source file, cloud app object, or database table/view to import data from, and, if necessary, configure data filtering. Alternatively, you can select the Execute Command or Execute Query action to query data (in advanced mode).
- Specify Target settings. Select the target object (table) or multiple objects (tables) to import data to and the operation to apply when loading data.
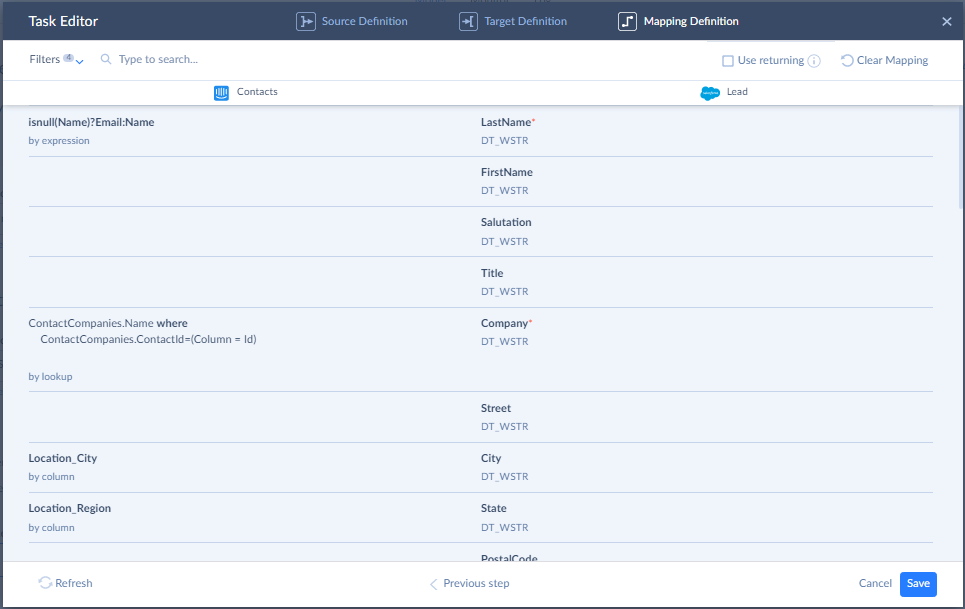
- Configure the mapping of target columns to source columns, expressions, constants, lookups, and other elements.
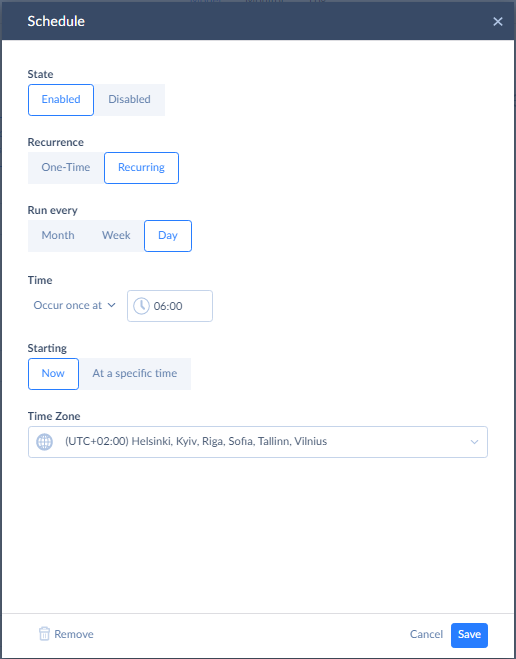
- Schedule the Import automatically by clicking Schedule on the top left menu.
- Once you’ve finished setting up, click Create to continue. Now, you can run this integration and move your data.
Important! In the mapping table, there is a required field, LastName, that does not have a corresponding field in the Intercom object Lead. The solution is to use Skyvia’s mapping by expression.
Step-by-step guide for Data Flow Integration
If you need more advanced integrations, try Skyvia’s Data Flow and Control Flow scenarios. It’s a powerful, easy-to-use solution for businesses of any size to integrate with multiple data sources. You can manage all data transformations in a single, unified location without needing a snippet of code.
It can synchronize information about Leads, Users/Contacts, Companies/Accounts, and the creation of Salesforce Tasks/Cases from Intercom Conversations, as well as other scenarios with more complex logic.

Without further introductions, let’s proceed to integration. In this case, we demonstrate how to update Salesforce data (specifically, the Lead table) by enriching it with data from Intercom (also in the Lead table).
- Click + Create New in the top menu and select Data Flow from the Integration category. An empty diagram canvas will appear. Name it for easier management later.
Note! Data Flow welcomes new users with the Fast Guide, which provides a clear overview of the main features, making the experience much smoother.
- On the left side menu, you have a list of components. Start by adding the Source; just drag it to the diagram canvas.
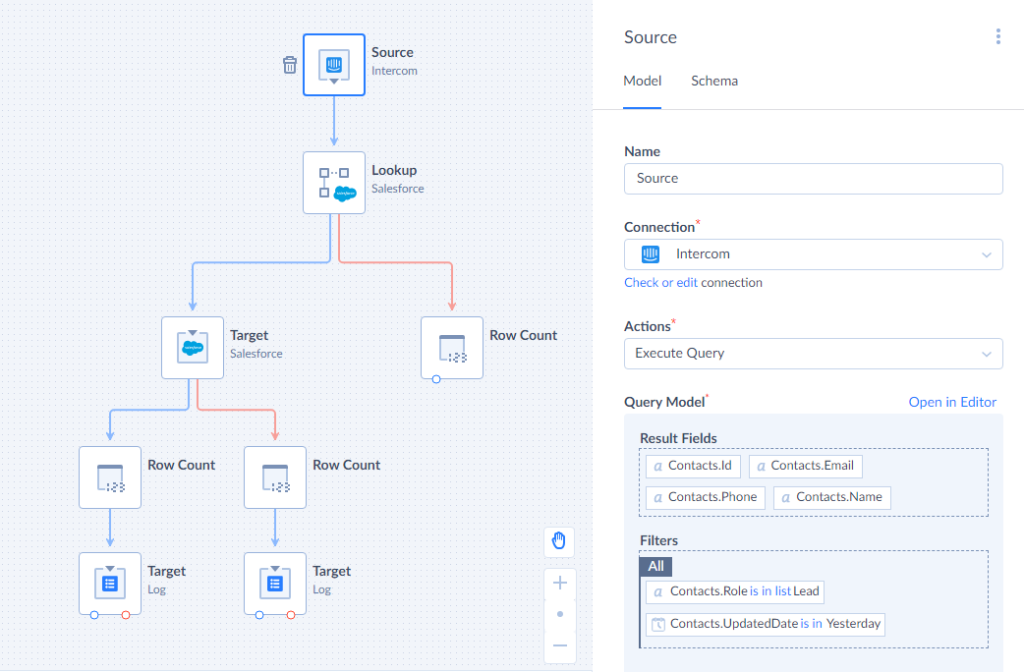
- Click on the source to configure its details. Select an Intercom connection to retrieve data from (you can also create a new one at this stage).
- Choose the action for data extraction and adjust its settings (in this example, we use the Execute Query action to perform the defined query on the target data source, but Data Flow also allows you to use the Execute Command action to run SQL commands against your data source, supporting both data retrieval and modification tasks), and map its parameters if needed.
Note! Skyvia keeps an eye on things as you go. If anything’s missing or set up incorrectly, you’ll spot the errors in Flow Inspectors at the bottom left.
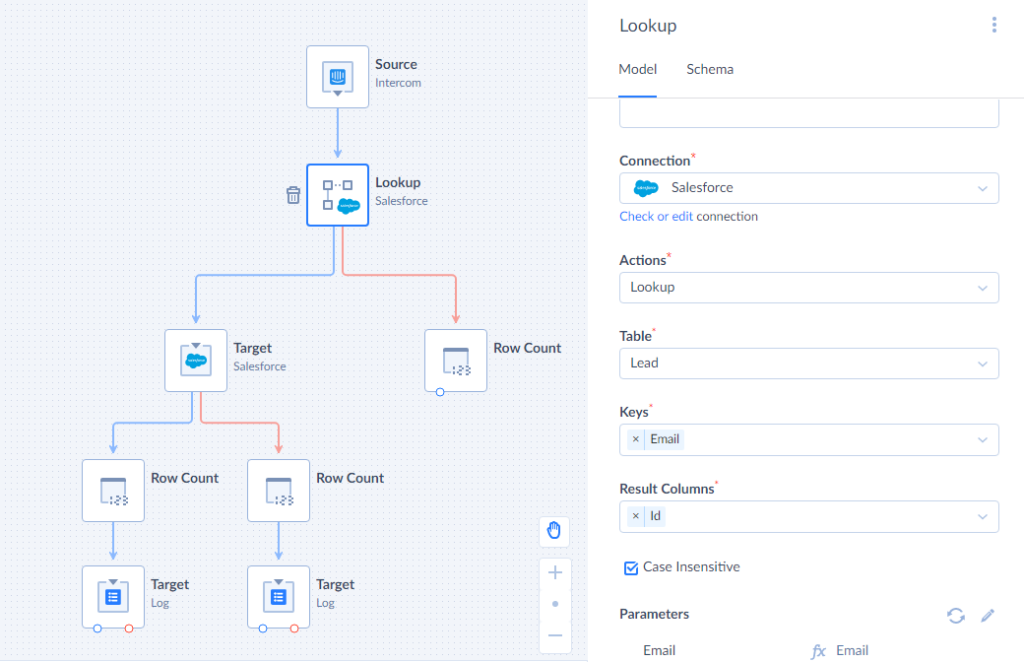
- Add the Lookup block to match input records with records from another data source, and add columns of the matched records to the scope. Specify the Behavior, Scope, and Property fields, and then select a Salesforce connection to retrieve data from.
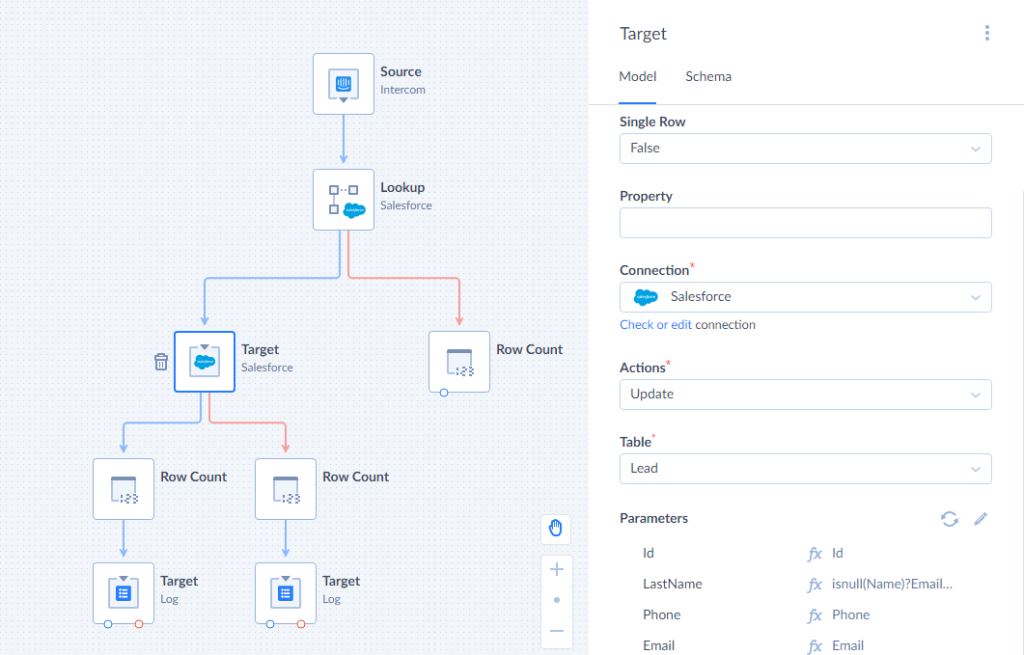
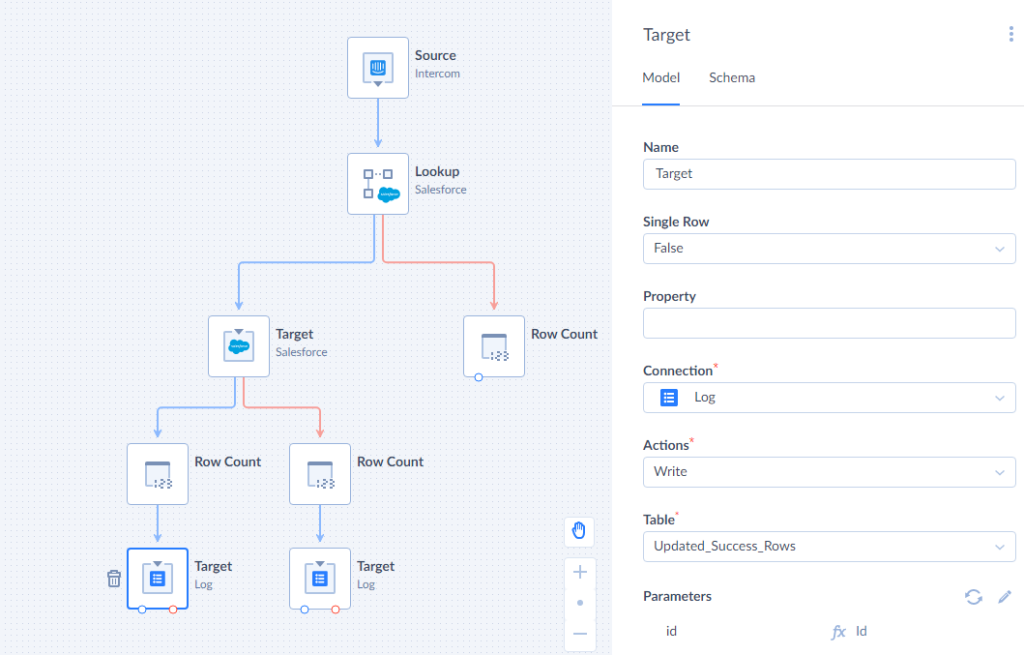
- Add a destination point for your updated data: Target block. It stores input records in a data source and writes data to logs. It should be configured the same way as the Source component (connection to load data, actions to perform, parameters if needed).
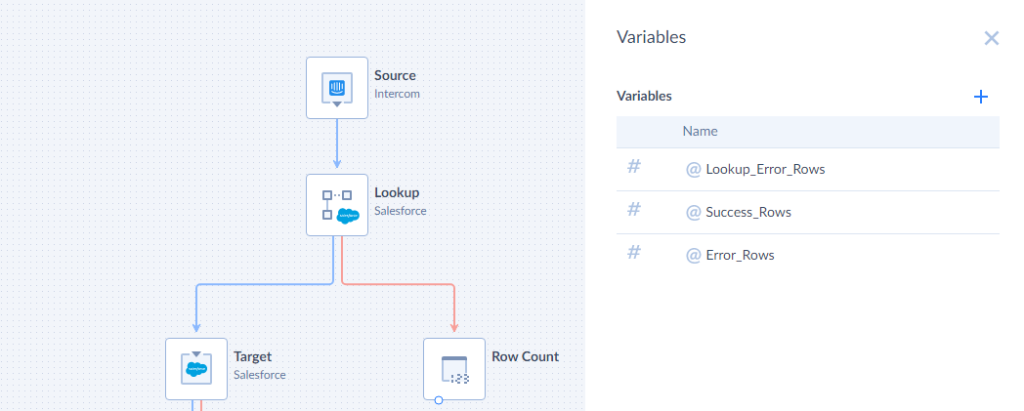
- Add the Row Count components to the data flow to count the input rows and write the result to a data flow variable.
- Click on the top menu and add Variables to put the number of the rows, and select the relevant variable in each Row Count block.
- Add the Target block again to write data to a log. Connect the necessary component output to it and select Log as its Connection. The only action available for the Log connection is “Write,” so select it from the Action list.
- Select the log Table to write data and map its columns to the input columns using the Mapping Editor.
Note! You can download the logs by opening the Run Details on the Data Flow Monitor or Log tab, selecting the necessary run, and using the Download link near the corresponding log name in History Details.
- To automate your integration, click the Schedule button in the top left corner.
- Once you’ve finished setting up your Data Flow, click Save to continue. Now, you can run it and integrate data.
Alternative Methods to Intercom and Salesforce Integration
Sometimes, businesses must go beyond. Managing B2B account hierarchies, automating case creation, or ensuring real-time data syncing requires deeper customization and flexibility.
We’ve walked through native integration and the no-code route with Skyvia, but there’s one more path where things get serious – API integration. Still, it’s pretty complex in comparison to the first two options. You’re switching from a comfortable car with AC (Flow Inspector, no-code wizard) to a Formula 1 race car, where the slightest move becomes significant. Though when you need to push boundaries, bi-directional real-time sync, custom objects, and AI-driven triggers will do the trick.
Best for
- Enterprises that need fully customized, bi-directional integrations with advanced use cases.
Pros
- Extensive customization options allow businesses to customize the integration to their specific needs, whether it’s syncing data, automating workflows, or creating custom triggers.
- Data is synced in real time or on a scheduled basis, keeping information up-to-date across both systems. This is particularly useful for B2B businesses or those with high-volume transactions.
- As businesses grow, more complex integration solutions can handle large datasets, multiple data sources, and evolving requirements.
Cons
- Implementation and maintenance demand technical expertise and additional resources.
- May be costly, particularly for small to medium-sized businesses.
- Setting up a comprehensive integration still requires time, especially when mapping fields, defining workflows, or configuring triggers.
- Requires ongoing monitoring to ensure everything works as expected. Regular audits, troubleshooting, and workflow adjustments may be necessary to maintain data integrity and smooth operations.
Conclusion
When Intercom and Salesforce finally shake hands, your customer data stops living in isolation and transforms how your teams collaborate and how your customers experience your brand.
Sure, you’ll hit some speed bumps along the way:
- Data mapping can get messy.
- Security questions will pop up.
- Third-party tools might occasionally throw tantrums.
But here’s the thing: these obstacles shrink when you have the right integration partner in your corner. Platforms like Skyvia turn what used to be developer territory into a user-friendly space for everyone.
Your customers won’t see the integration, but they’ll just notice that every interaction feels more personal, timely, and relevant. And that’s exactly the point. Try Skyvia’s no-code integration platform and see how quickly you can transform disconnected tools into a unified powerhouse that drives real results.

F.A.Q. for Intercom and Salesforce Integration

Is coding required for the Intercom and Salesforce integration?
It all depends on the tool you use. For example, Skyvia offers a no-code visual connection between Salesforce and Intercom.
How long does it take to integrate Intercom with Salesforce?
It varies depending on the approach you take. Using a no-code tool, such as Skyvia, can take as little as 30 minutes, whereas manual integration or bespoke configurations may take hours or even days.
Can I sync real-time conversations from Intercom to Salesforce?
Yes, with the proper integration tools, that is easily possible. For example, with Skyvia, you can provide your sales and support teams with up-to-date data, facilitating improved decision-making.
Can I customize the data that gets synced between Intercom and Salesforce?
Yes, both manual and no-code connectors support customization features. Skyvia allows you to handpick which Intercom fields sync with Salesforce, ensuring that only the data relevant to your workflow is transferred.
. Is my data secure when syncing between Intercom and Salesforce?
Yes, your data is protected both in transit and at rest when you use a trusted integration platform like Skyvia. Use OAuth for authentication and restrict sensitive information to authorized personnel only.
How do I troubleshoot issues with the integration?
Start by checking the sync logs, reviewing any error messages, and verifying that your integration settings are correct. Both manual and no-code approaches offer reporting tools to help you swiftly pinpoint and fix problems.
