Sales and support teams exist in nearly every company, from small local businesses to large international organizations. Salesforce and Zendesk are tools that help those teams keep track of their daily operations.
Very often, the work of sales and support managers intersects. So, how do they share information if each has its own data management system? They might create meetings or share the information of interest via chat, but when another support agent’s turn comes, the same details need to be requested again, don’t they?
Zendesk Salesforce integration adds clarity to the interaction between sales and support teams to streamline their workflows. If you feel that such processes need to be optimized, explore the two ways to connect Zendesk and Salesforce provided in this article. The first one is the native method available in the Zendesk Admin Center, and the second one relies on a no-code integration platform, Skyvia.
Table of contents
- About Zendesk
- About Salesforce
- Benefits of Zendesk and Salesforce Integration
- Use Cases for Zendesk and Salesforce Integration
- Method 1: Salesforce Zendesk Integration via Zendesk Admin Center
- Method 2: Integration via Skyvia
- Comparison of Integration Methods
- Common Integration Issues
- Conclusion
About Zendesk
Zendesk is a world-renowned CRM system for customer support, sales, and other customer communication services. With Zendesk, businesses can build a comprehensive customer support solution using features such as Tickets, Chats, Knowledge base, Community Portal, and others.
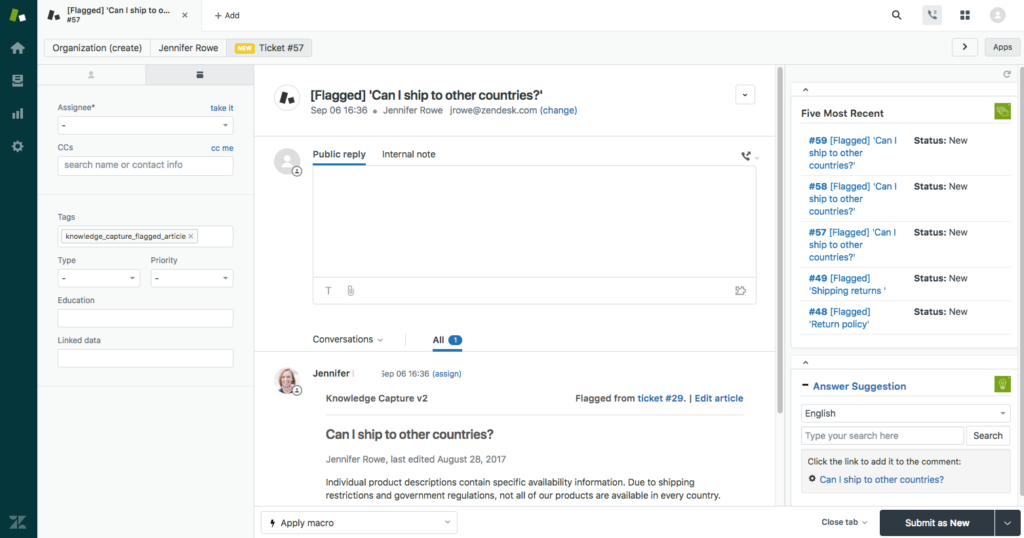
Recent Zendesk updates have equipped this platform with AI that offers smart suggestions to agents and even fully automates some processes. The companies employing those innovations report faster resolution rates and higher customer satisfaction rates.
Main Features of Zendesk
Zendesk provides all the necessary functionality for effective customer support management. This includes the following options:
- Ticketing system. It allows support teams to receive, track, organize, and solve tickets within a single workspace.
- Live chat. It enables support agents to provide assistance in real time.
- Help center. Companies can create knowledge bases for customer self-service.
- AI agents. Virtual assistants automate interactions with customers and thus facilitate the daily workflows of support agents.
- Analytics and reporting. Zendesk provides a complete overview of the customer management systems in a single window. Thus, you can track the average time to close a ticket, discover the most popular articles on the knowledge base, or apply AI analysis on calls.
- Tool integrations. This feature enables companies to connect their favorite tools with Zendesk.
About Salesforce
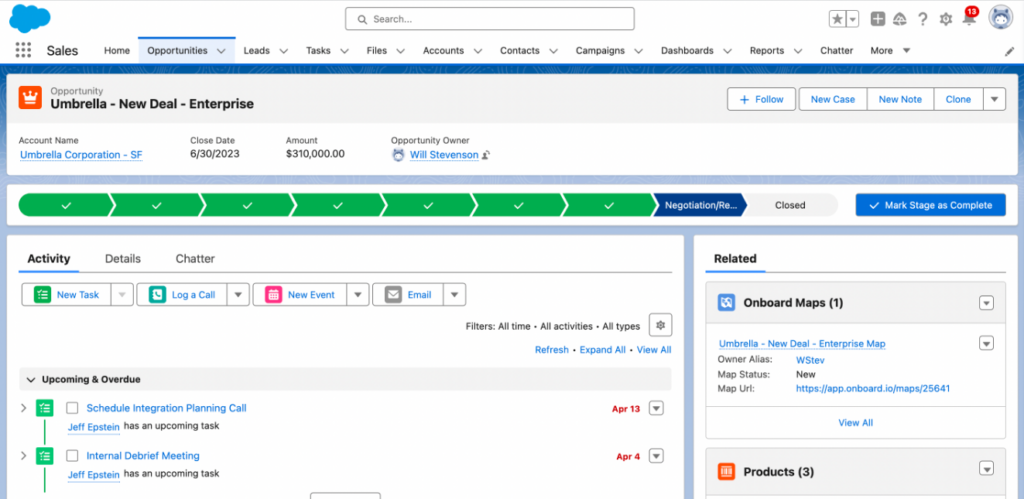
Salesforce has become one of the world’s famous CRM systems over the last decade. It fully covers the needs of sales, commerce, marketing, and service business functions. Salesforce also offers built-in opportunities for reporting, data visualization, and analytics.
Some time ago, Salesforce implemented Einstein AI, a built-in intelligence layer across the platform, that helps businesses automate their tasks and personalize customer experiences.
Main Features of Salesforce
Salesforce is a multifaceted CRM system with dozens of features for comprehensive customer management. The most popular ones are:
- Account & contact management. This is the core functionality of any CRM that allows business users to access complete information about their existing or potential customers.
- Reporting and analysis. Salesforce has robust reporting capabilities that can shed light on individual customer preferences and purchasing behavior.
- Mobile version. Even if you are on a business trip or attending a conference, you will always be able to view data, create tasks, and communicate with colleagues using the mobile version of this CRM.
- Sales forecast. Due to in-built capabilities, Salesforce can generate predictions on future sales that could greatly assist managers in building future strategies.
- File sharing. This CRM allows you to attach files to customer profiles and share them with colleagues. Those could be agreements, contracts, and other official documents.
Benefits of Zendesk and Salesforce Integration
Even though each system is powerful enough on its own, Zendesk for customer support and Salesforce for sales, their integration can further benefit businesses in their initiatives. Connecting Zendesk and Salesforce brings a number of advantages for both startups and large enterprises.
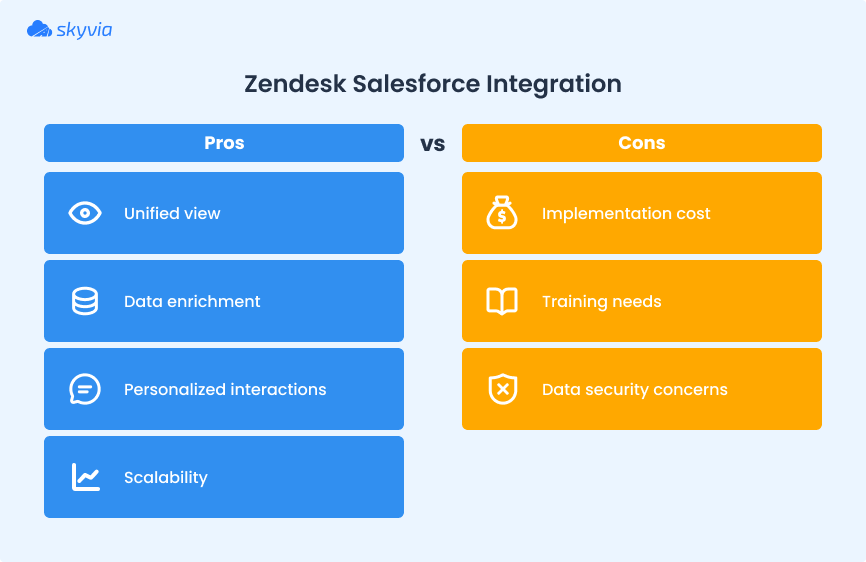
Productive Collaboration between Support and Sales Teams
Support and sales departments work closely together to ensure effective business operations. Thanks to the integration, support agents and sales representatives will be on the same page.
A unified view of the information about prospective customers ensures efficient assistance from the support side.
Data Enrichment
Zendesk Salesforce integration complements customer profiles in both systems. Such data enrichment enhances business processes and customer management as a result.
Personalized Interactions
Sales managers obtain past conversations with prospective customers with the support team. This helps the sales team analyze the preferences and interests of each client and elaborate on a personalized approach.
Scalability & Flexibility
With business expansion, the integrated systems can scale up to meet the growing demands. Despite the increasing volume of support and sales interactions, teams can ensure a high level of service to customers.
Use Cases for Zendesk and Salesforce Integration
Connecting Zendesk and Salesforce introduces a new approach to customer management across departments.
The real magic of such integration is how it optimizes daily tasks. Here are some use cases that evidence an increase in productivity and operational efficiency due to bringing together Zendesk and Salesforce.
| Ticket Auto-creation | When a lead freezes or results in negative feedback in Salesforce, an automated ticket can be generated in Zendesk to trigger follow-up from support. |
| Targeted Outreach | When syncing specific Zendesk tags (e.g., “pricing confusion” or “feature request”) into Salesforce to promote a personalized approach in marketing or sales actions. |
| Fresh Information | When a support case is resolved in Zendesk, the corresponding Salesforce opportunity or case can be automatically updated through the integration. The same thing can be done in the opposite integration direction. |
| Holistic Customer Profile | Upon integration, it’s possible to track all active Zendesk conversations, open opportunities, and support tickets in a single Salesforce dashboard. This information is essential to prevent churns and send timely updates on subscription renewals. |
Method 1: Salesforce Zendesk Integration via Zendesk Admin Center
Let’s explore how to use Zendesk Admin Center to integrate the customer support system with Salesforce.
This method requires performing some preparation activities:
- Check your Salesforce security settings.
To do this, go to Salesforce Setup -> Security (the SETTINGS block in the left menu). Make sure the Lock sessions to the IP address from which they originated checkbox is NOT selected. - Create a separate record type in Salesforce for your Zendesk tickets.
It’s not required, but it can still be helpful to distinguish Zendesk ticket records if you have several record types in Salesforce. - Connect Zendesk to Salesforce.
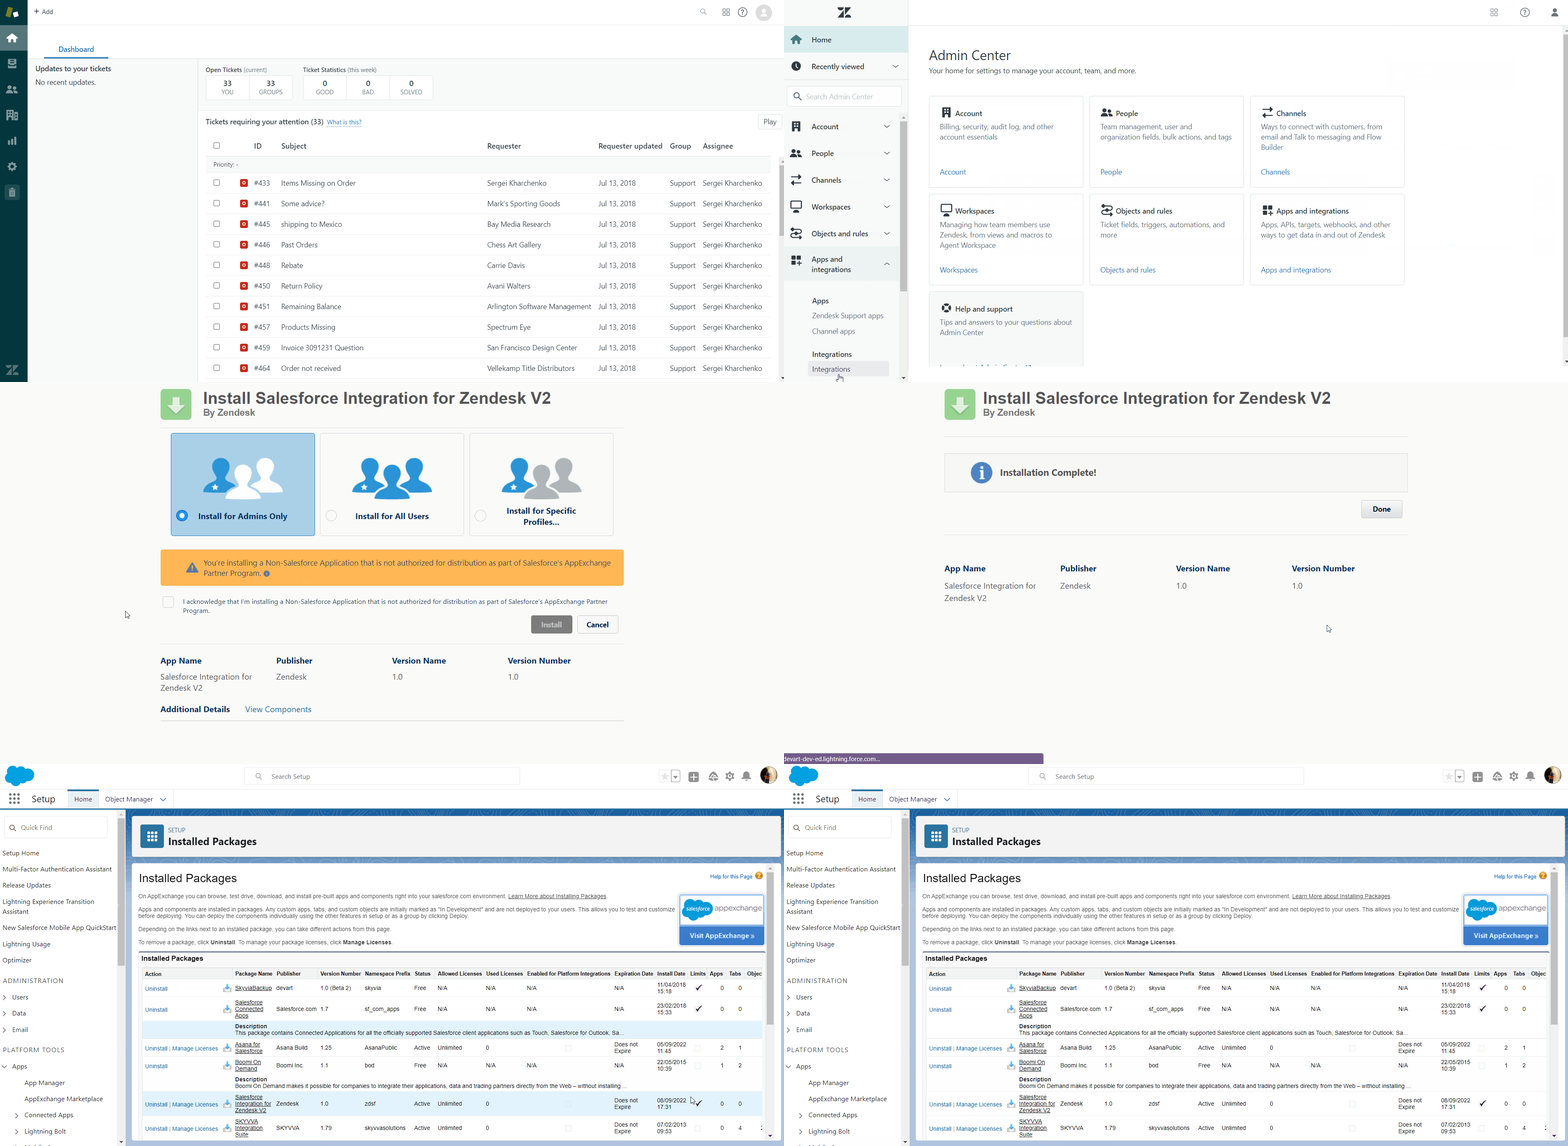
Zendesk offers three types of integration:
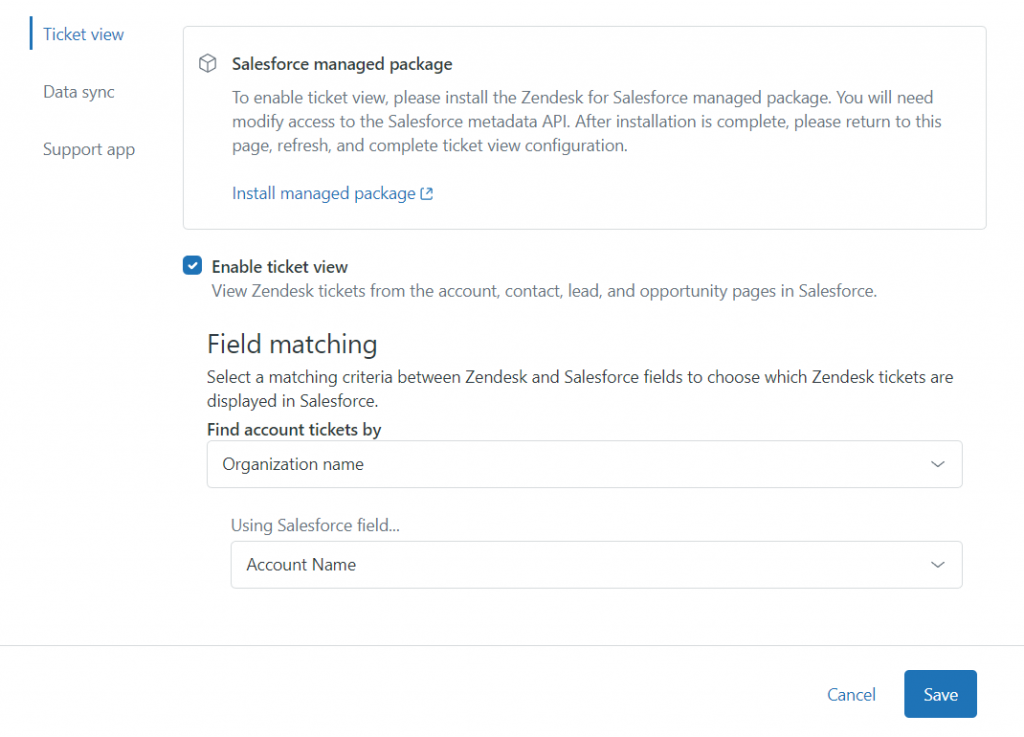
Ticket View
Ticket view lets users view Zendesk tickets directly from Salesforce’s Account, Contact, Lead, and Opportunity pages. This method implies field mapping, sorting, filtering, and viewing of ticket information in Salesforce tables.
Data Sync
Data Sync offers several scenarios for Zendesk and Salesforce integration:
- Synchronizing Salesforce Accounts to Zendesk Organization
- Syncing Salesforce Contacts or Leads to Zendesk Users
- Syncing Zendesk Tickets to Salesforce
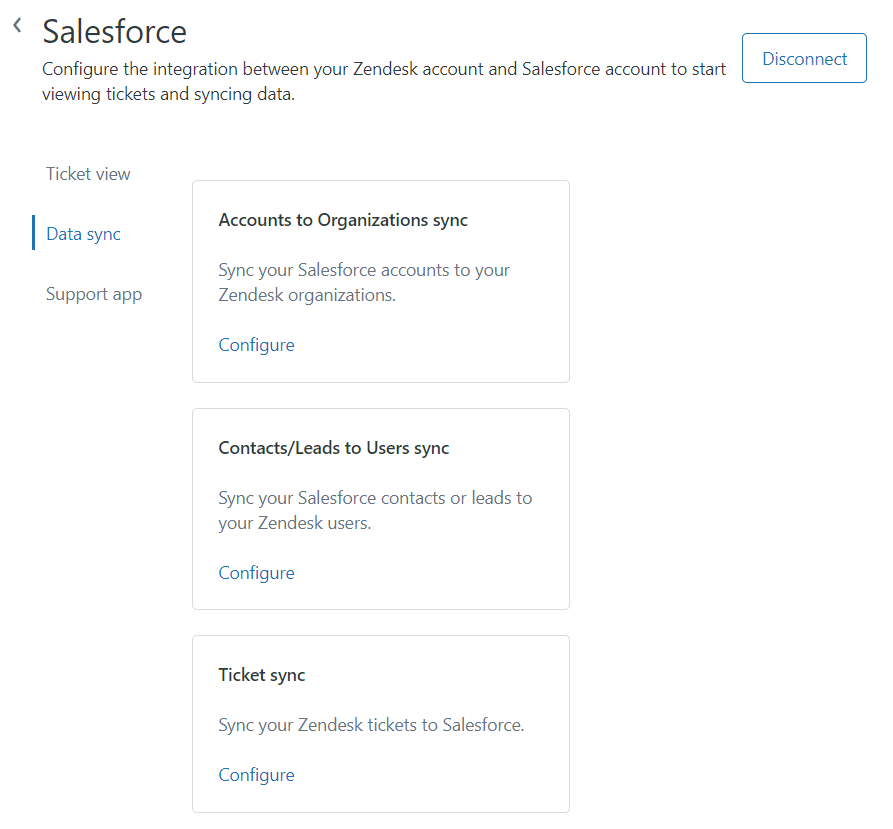
The data transfer from Salesforce to Zendesk is quite simple in this case. You just need to select the scenario from the list, set filters, map the fields, specify other integration options, and save your integration.
Ticket Sync
The Ticket sync scenario is more complicated than the previous two described above. To use this integration flow, process with the following steps:
- Create a new Record Type in Salesforce if needed.
- Install the ticket sync package in Zendesk Admin Center.
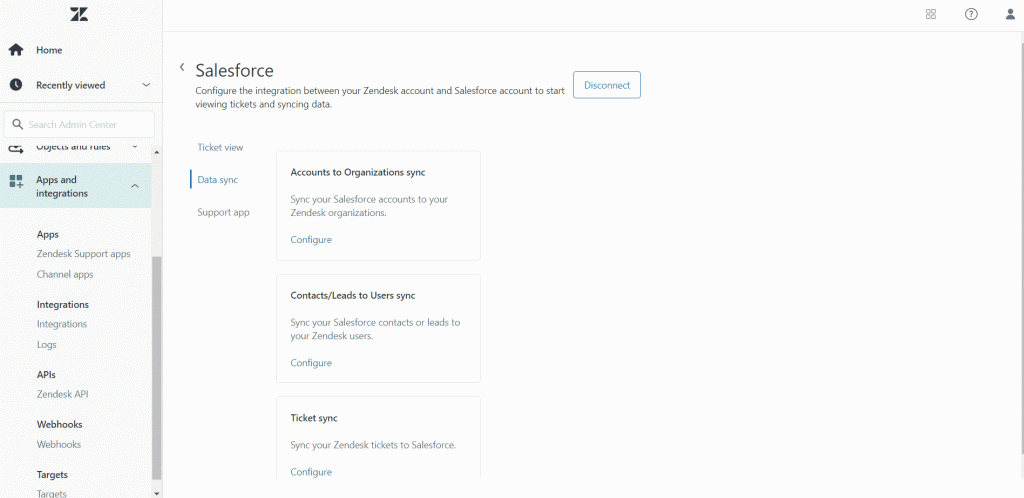
- Configure the Zendesk tickets to Salesforce cases synchronization. Make sure to map the fields correctly, set filters, etc. Configure and activate Salesforce triggers if needed.
For more detailed information, refer to the Zendesk documentation portal.
Zendesk Marketplace Apps
Applications and extensions on Zendesk Marketplace introduce other methods to connect to Salesforce. Those are mainly third-party solutions that offer various feature sets related to the Zendesk Salesforce integration. Review the number of options available on the marketplace and select the one that best meets your requirements.
Zendesk Salesforce Native Integration Pros
- Offers a quick and easy way to integrate both systems.
- The Ticket View scenario allows viewing data on the account, contact, lead, and opportunity pages in Salesforce without performing actions.
- This method supports triggers for workflow automation.
Zendesk Salesforce Native Integration Cons
- Limited by Salesforce edition: available only in certain editions: Performance, Unlimited, Enterprise, Developer Edition (or other editions with Salesforce API rights).
- Administrator permissions of both the Zendesk Support area and Salesforce are required to set up the integration.
- Native integration offers only a few scenarios.
- Currently, only Zendesk-to-Salesforce integration is available.
- Ticket view does not support the execution of data-related tasks.
Method 2: Integration via Skyvia
Another Zendesk Salesforce integration method is powered by Skyvia – a no-code cloud platform that provides solutions for various data-related tasks:
- Data integration
- Сloud data backup
- Data management with SQL
- CSV import/export
- OData service creation
Skyvia offers a range of data integration scenarios – find more details here.
As an example, we describe the simple way of integrating Zendesk Tickets data into the Salesforce Case table. Zendesk Tickets and Salesforce Cases are the functional equivalents of each other, making them the most logical pair for syncing support-related data across platforms.
Zendesk Tickets: represents a customer support request or issue; Salesforce Case: tracks customer problems, inquiries, or service needs.
Prerequisites
You need to have an account on the Skyvia platform to implement the integration. If you don’t have it yet, feel free to create a Skyvia account.
Another step is to create connections to both tools. For that, see the instructions on how to create a Zendesk connection and how to establish a connection to Salesforce in Skyvia.
You can also create a record type in Salesforce to keep the records created by Skyvia separately.
Creating the Import Integration
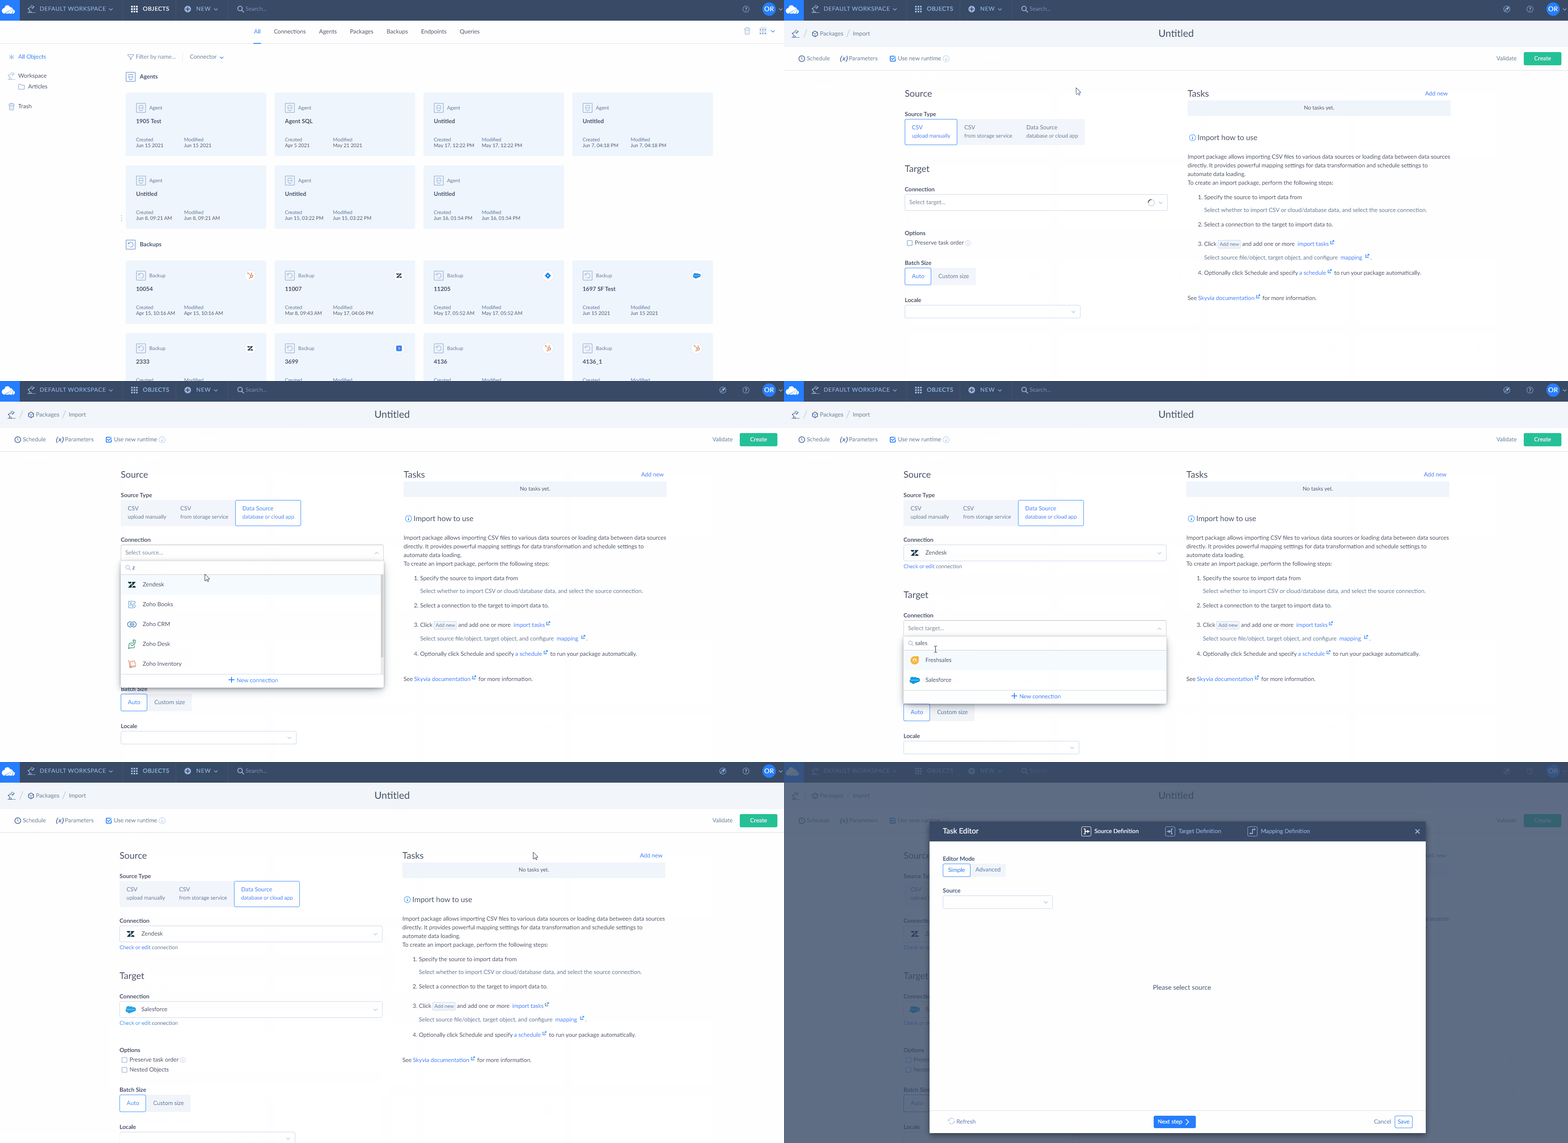
- Sign in with Skyvia, click +Create New, and select the Import option under the Integration section.
- Click Data Source database or cloud app.
- Select your Zendesk connection as a Source and your Salesforce connection as a Target.
- Don’t forget to rename the scenario.
Creating the Task
- After having selected the source and target connections, click Add new on the right to open the Task Editor.
- Select the Simple Task Editor mode. More details about available task editor modes are available here.
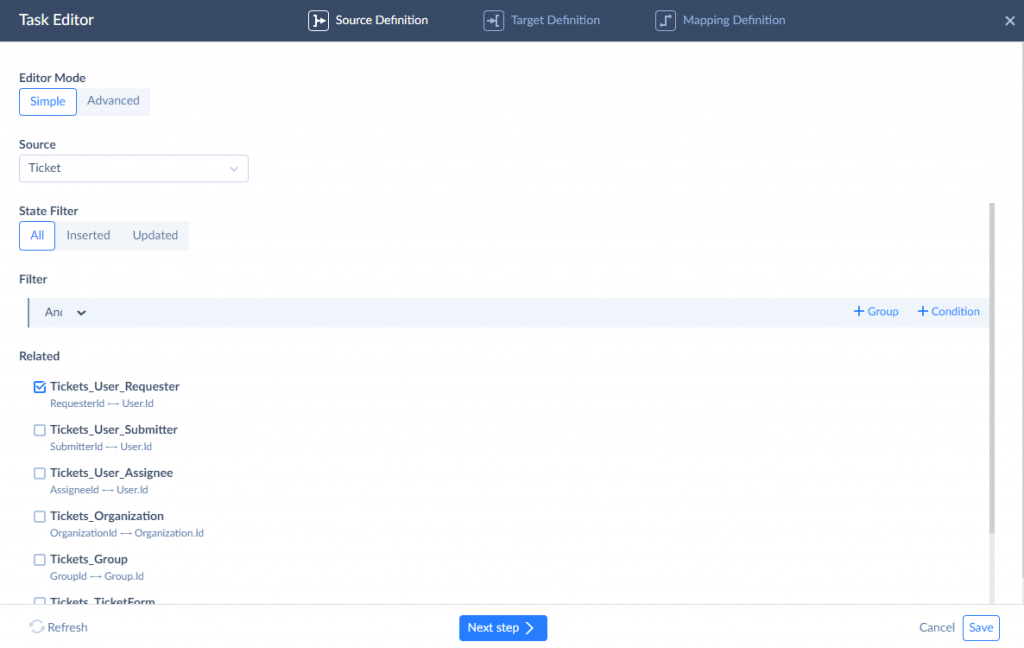
- On the Source definition tab, select the Zendesk Ticket table. You can also add filters or select the related objects for import.
- On the Target definition tab, select the Salesforce Case Table.
- Select the action you are about to perform. In our case, we select the Insert action.

- Proceed to the Mapping definition tab to map the source and target fields.
The fields with the same names will be mapped automatically.
You can map the remaining fields manually using available mapping types.
In our case, we import the tickets, associating them with existing contacts in Salesforce. To do this, we use mapping by lookup and retrieve the contacts from the Contacts table in Salesforce.

In the same way, it’s possible to associate the records with Salesforce’s existing account, another case, or others, depending on your scenario.
It’s not mandatory to create a separate record type in Salesforce, but if you did it for your Zendesk tickets in Salesforce, you have to map the RecordTypeId value by constant. If you don’t know how to obtain the RecordTypeId value, refer to Salesforce documentation.
Complete the mapping and save the package task.
Running the Package and Observing the Results
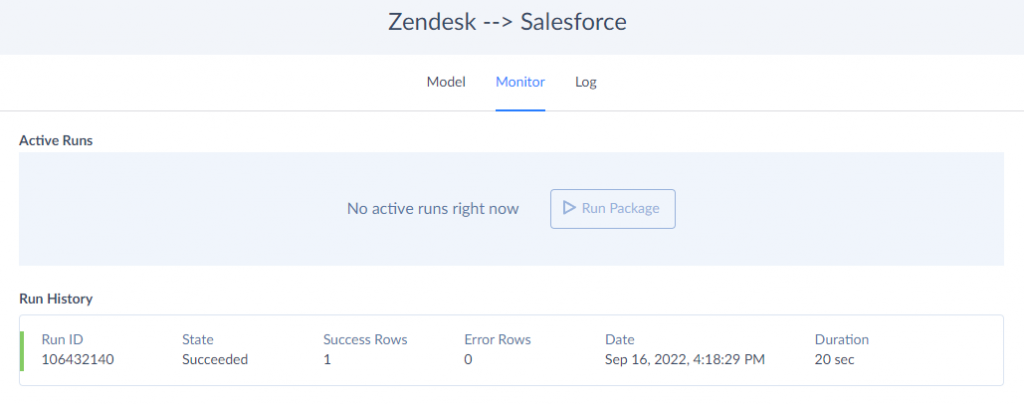
After the integration task is saved, click Create the package and proceed to its execution by clicking Run.
The integration results are available in the Monitor and Log tabs on the Skyvia dashboard.
Zendesk Salesforce Integration with Skyvia Pros
- Integration variety. This method supports many more integration scenarios than the native one does.
- Customizability. You can choose what exact objects to integrate and what operation to perform.
- Bi-directional sync. It’s possible to carry out the integration in both directions.
- Accessible to anyone. No deep technical knowledge or coding skills are required.
Zendesk Salesforce Integration with Skyvia Cons
- No real-time data streams. Skyvia does not support real-time integration, though you can set the scheduled data updates for each minute.
- Advanced feature use. SQL skills are needed when switching to the advanced mode on the integration task setup.
- No error notifications by default. If the integration isn’t successful, there will be no notification. You either need to tune this in the account settings or keep an eye on the Monitor tab.
Comparison of Integration Methods
We have explored the two main ways to integrate Salesforce and Zendesk — using the built-in Zendesk Admin Center and a no-code solution, Skyvia.
Here’s a side-by-side comparison of these two approaches and their characteristics. We hope it will help you evaluate each option and understand which one could be a better choice for you.
| Feature | Zendesk | Skyvia |
|---|---|---|
| Technical Skills Required | Basic admin knowledge | No coding needed |
| Integration direction | One-way integration | Bidirectional sync |
| Field mapping | Basic | Advanced |
| Filtering | Basic | Advanced |
| Real-time updates | Partial | No, but a 1-minute interval for data refresh is possible |
| Software installation | Salesforce package required | 100% cloud-based |
| Objects available for import | Limited | All standard and custom objects |
Common Integration Issues
Even with the newest advancements in the data integration field, you need to put some effort into setting everything up. This might take some time at the very beginning, but it will pay off in the long run. What’s more, some issues might take place after the initial runs, so you might consider starting the test integration first, and then switching to the production implementation.
To help you overcome all those obstacles, we present some common issues that take place during the Zendesk Salesforce integration and explain how you can minimize their impact or avoid them altogether.
| Issue | Description | Remedy |
|---|---|---|
| Data Conflicts | Updates in one system overwrite more recent data in another system. | – Create conflict resolution rules with conditional logic or time-based filters.- Configure synchronization direction properly (In Skyvia, define sync direction per field and not just per object).- Educate teams on source-of-truth ownership. |
| Duplicate Records | Identical tickets, user profiles, or other instances appear in the system. | – Make sure that unique identifiers are present.- Define clear data mapping rules.- Choose the right DML operations (in Skyvia, INSERT adds a new record to the system if there is no ID that matches it, and UPDATE updates the existing record with new information when the ID is found).- Make regular audits to check for duplicates. |
| Partial Data Sync | Not all new fields or updates appear in the target system upon the integration run. | – Double-check the access levels and permissions for each field in both systems.- When using Skyvia, check the Monitor tab to verify the integration result.- Verify that the mapping is set correctly and apply format conversion if needed.- Avoid syncing formula fields or calculated values that may not have static output. |
| Integration doesn’t run on a schedule | At the expected time, no new or updated information appears in the target system. | – Check the time zone indicated in the scheduling settings window.- Review the integration logs to see whether any errors have occurred during the data transfer.- Split large datasets into smaller chunks for batch integration. |
Conclusion
The integration of Salesforce and Zendesk supports the optimization of company-wide processes. In particular, it enriches datasets in both systems and adds transparency to sales-finance interconnected processes.
It’s possible to connect the two services through different integration approaches, but we’ve focused on these two:
- Using Zendesk Admin Center as a native method
- Using Skyvia as a third-party data-integration tool
The first approach is pretty straightforward, but it performs data transfer only in one direction (from Zendesk to Salesforce) and supports a limited number of fields. While Skyiva offers a wide variety of integration methods, supports all standard and custom fields, and enables bidirectional connection on Zendesk Salesforce integration.
Feel free to try Skyvia!
F.A.Q. for Zendesk to Salesforce
How to set up a reliable Salesforce Zendesk sync without coding?
To sync data between these two systems without programming, feel free to use Skyvia. It offers a range of integration scenarios for sending data from Salesforce to Zendesk and vice versa.
Is Salesforce better than Zendesk?
Salesforce and Zendesk share similar features, but each of them has its own purpose. While Salesforce is focused on sales lead management, Zendesk is primarily designed for support teams.
Is Zendesk a CRM or ERP?
Zendesk is considered to be a CRM system with the primary focus on customer service and support.
