

Picture this: your sales team is high-fiving each other after closing a big deal in Pipedrive… meanwhile, your finance team is in the corner, hunched over spreadsheets, manually typing up invoices in Stripe, muttering curses under their breath.
Sound familiar?
This disconnect between sales and finance is more common than pigeons in Central Park.
- Manual data entry.
- Delayed invoicing.
- Mismatched numbers.
It’s like playing a game of telephone with your revenue. By the time the info gets to the next team, it’s half-wrong, totally delayed, and no one knows what actually happened.
Enter the hero moment: integrating Pipedrive and Stripe
Imagine a world where deals move smoothly from Closed to Paid without extra clicks. Your sales team focuses on closing more deals, finance gets real-time payment data, and leadership finally sees the full customer picture without playing detective.
In this ultimate 2026 guide, we’re going to stroll through:
- Why connecting Pipedrive and Stripe is a game changer.
- Different ways to integrate them (from no-code to custom builds).
- How to choose the best approach for your team’s vibe and needs.
Grab your favorite coffee, lace up your sneakers, and let’s walk through this together. No more manual madness. Just smooth, automated sales-to-cash flow.
Table of Contents
- Top 5 Benefits of a Pipedrive Stripe Integration
- Methods to Integrate Pipedrive and Stripe
- Method 1: Native Integrations
- Method 2: Third-Party Connectors
- Method 3: Custom Integration via API
- Method 4: Third-Party Integration Platforms
- Popular Pipedrive-Stripe Integration Workflow
- Conclusion
Top 5 Benefits of a Pipedrive Stripe Integration
Imagine if the business ran like a smooth jazz band: every section in sync, no off-beat sax squeaks. That’s what a good integration between Pipedrive and Stripe can feel like. Let’s break down why it’s a total game-changer.
1. Automate Your Invoicing Process
Say goodbye to those late-night “Did I remember to send that invoice?” moments. Once a deal closes in Pipedrive, Stripe can automatically generate and send invoices. You get your evenings back, and invoices go out faster than a New York minute.
2. Gain a 360-Degree View of Your Customers
No more hopping between tabs trying to piece together a customer’s payment history, sales status, and favorite pizza topping. With Pipedrive and Stripe talking to each other, you see every detail from first pitch to final payment. All in one place.
3. Eliminate Manual Data Entry and Reduce Errors
We all know someone (maybe you?) who’s accidentally mistyped a payment amount. Manual entry is an error magnet. Automating the handoff between Pipedrive and Stripe means fewer typos. No double entries and less hair-pulling frustration.
4. Improve Your Sales and Finance Team Collaboration
When sales and finance aren’t in sync, it’s like a three-legged race gone wrong. Integration keeps both players on the same page:
- Sales sees payment statuses.
- Finance knows which deals are done.
5. Get Paid Faster and Improve Cash Flow
Invoices out quicker means cash in quicker. And when you’re not stuck waiting on manual processes, your cash flow starts looking a lot healthier. More stability is about more freedom to reinvest (or finally upgrade that coffee machine everyone hates).
Methods to Integrate Pipedrive and Stripe
There isn’t just one way to connect Pipedrive and Stripe. It’s more like picking the best bagel spot in NYC, and it depends on:
- Your taste.
- Your schedule.
- How techy you are.
So, let’s review the big picture.
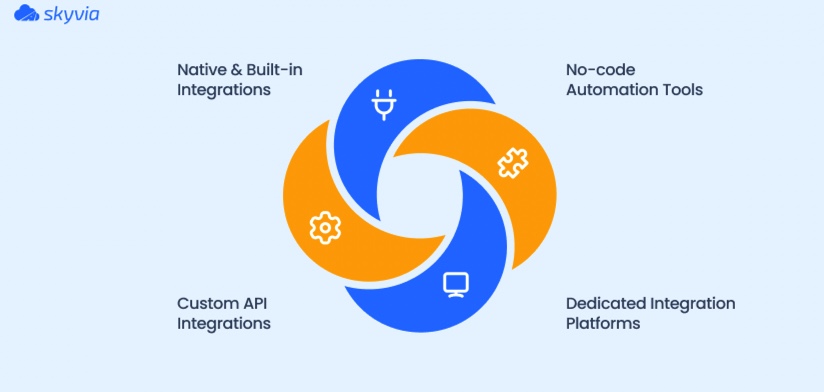
- Native & Built-in Integrations. A few simple integrations or third-party plugins you can set up in minutes. Think of these like a pre-made picnic sandwich: fast, but limited.
- No-code Automation Tools (e.g., Zapier, Make). They’re great for quick wins:
- Move data with drag-and-drop logic.
- No coding required.
- Super handy for small tasks or when you want to experiment.
- Custom API Integrations. That’s a good idea for the ones who don’t mind rolling up their sleeves. Maximum control, but it takes time and technical skills, like cooking a fancy brunch from scratch.
- Dedicated Integration Platforms (e.g., Skyvia). The all-in-one brunch buffet. It lets you connect Pipedrive and Stripe without code, but with:
- Deeper features.
- Robust automation.
- Better scalability for growing businesses.
Quick Comparison Table
| Method | Features | Pros | Cons |
|---|---|---|---|
| Native Plugins | Basic triggers & sync. | Easy setup, low cost. | Limited functionality, no deep logic. |
| No-code Tools (Zapier, Make) | Flexible automations, drag & drop. | No coding, quick to launch. | Harder to scale, can get pricey fast. |
| Custom API | Full control, unlimited options. | Tailored to your exact needs. | Expensive, dev-heavy, high upkeep. |
| Skyvia | Advanced mapping, automation, and data flow control. | No-code, intuitive, scalable. | Paid plans (but fair for value). |
Method 1: Native Integrations
Pipedrive makes it easy to link Stripe with two slick marketplace apps:
- Stripe Connector by No‑Code Venture.
- Stripe Integration for Pipedrive by Ulgebra.
These are plug-and-play solutions that require no code. Clearly, the quickest way to bring payment data into your CRM.
Best for
- Teams that want a fast, plug-and-play solution without coding.
- Sales and ops folks who need to quickly sync Stripe payment data (like invoices and statuses) into Pipedrive.
- Businesses that don’t have complex or custom logic and just want to keep it simple and reliable.
- Anyone who values vendor support and regular updates instead of maintaining scripts themselves.
Step-by-Step Guide
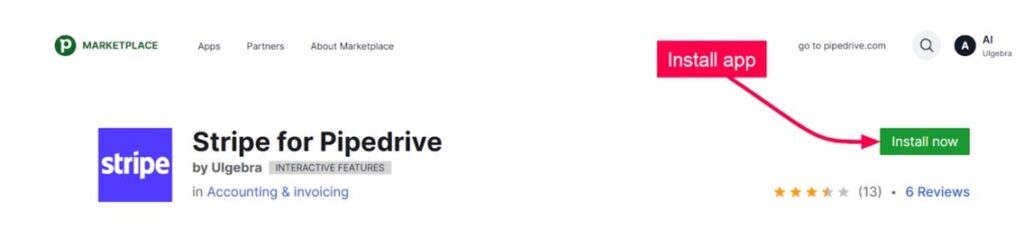
- Marketplace Search & Install
- Go to Pipedrive → Marketplace and search for it.
- Click Install now to add the app.
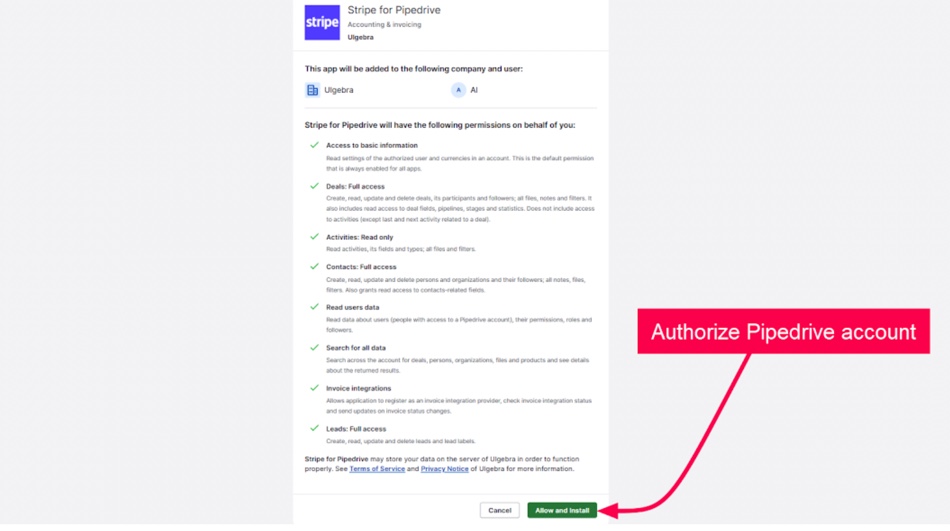
2. Grant Pipedrive Permissions
- Once you hit Install, Pipedrive will request access permissions.
- Click Allow and Install to authorize app functions within your Pipedrive account.
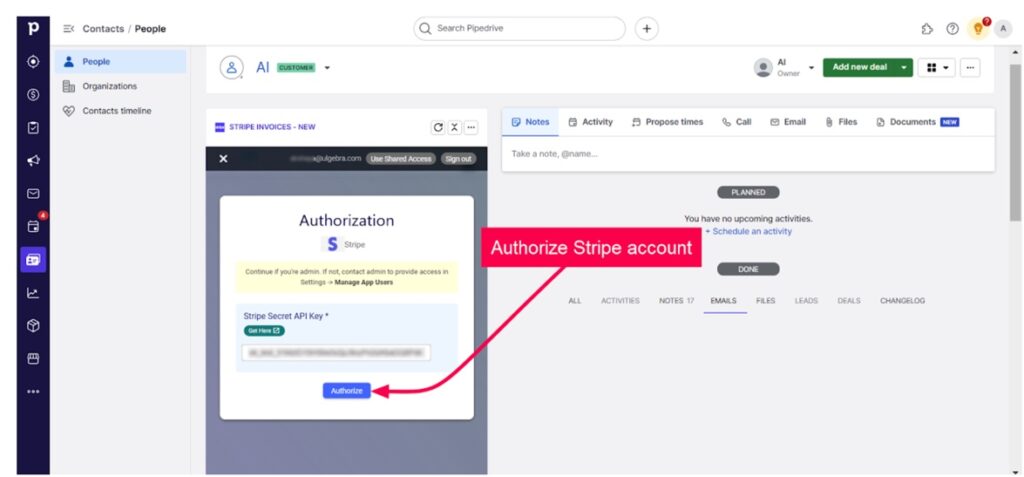
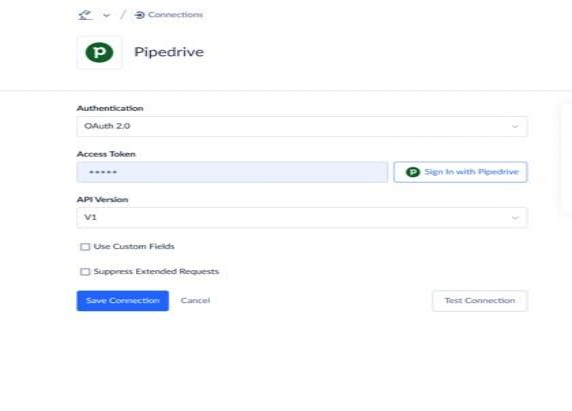
3. Connect to Stripe
- Redirected to Stripe’s auth flow.
- Paste your Stripe Secret API Key into the prompt box.
- Click Authorize to let the app sync with your Stripe account.
4. Review Integration Settings
- After authorization, go to the app’s Settings tab.
- Here, you can:
- Choose sync options (invoices, payments, contacts).
- Control duplicate contact creation.
- Adjust user permissions.
- Tick, untick, and tailor fields to match your workflow.
5. Validate with a Test Payment
- Head into Stripe and create a test payment or invoice.
- Back in Pipedrive, open a contact/deal record.
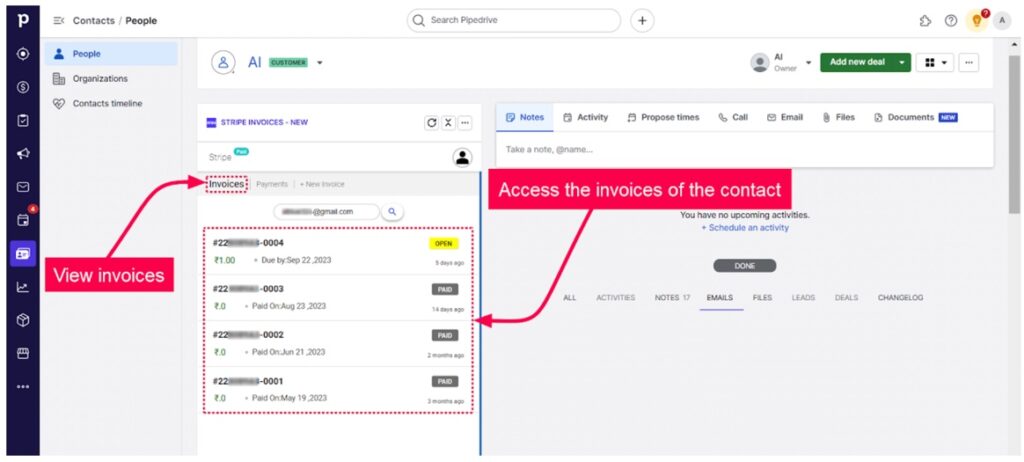
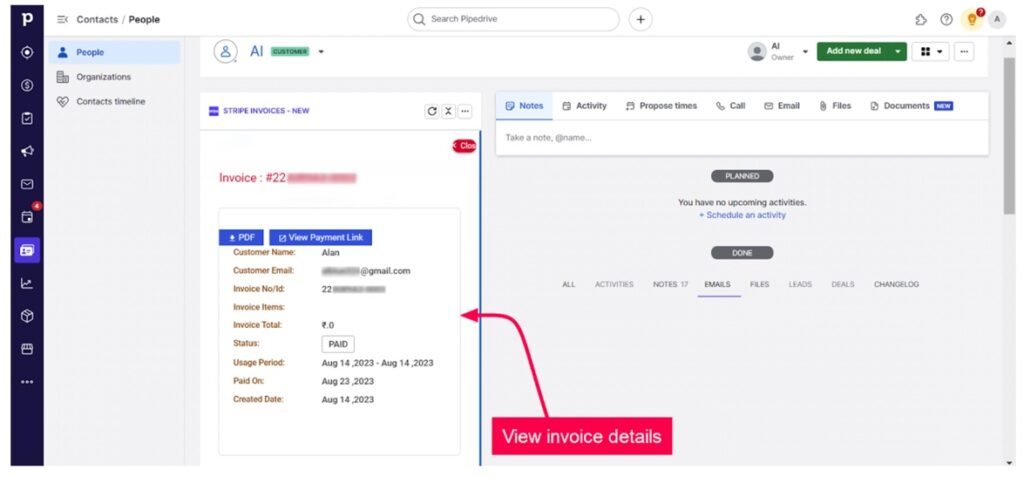
- You’ll see the Stripe invoice or payment details embedded (via pipelines or notes).
- Customize & Optimize
- Depending on your connector:
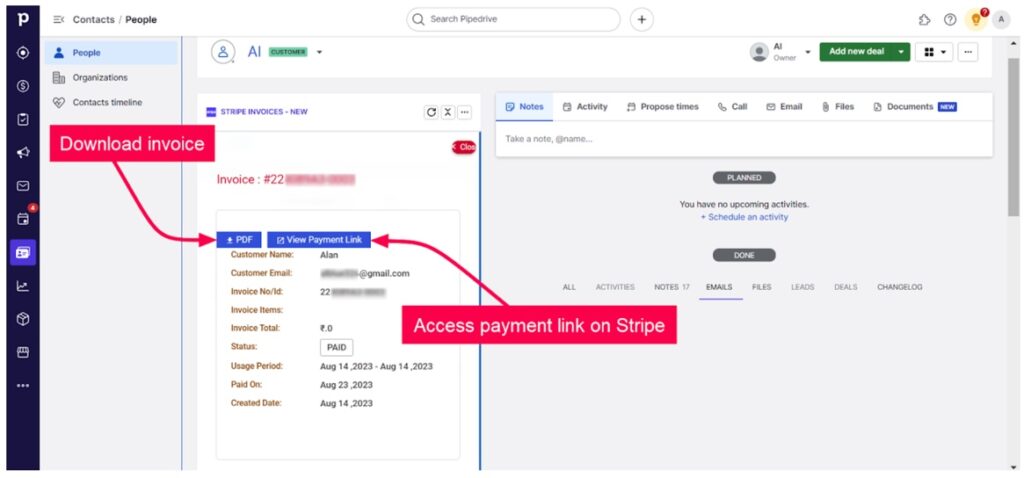
- Ulgebra lets you download invoice PDFs or open payment links.
- No‑Code Venture offers duplicate control and subscription settings.
- Fine-tune mappings, event triggers, notification setup, and subscription plans (starting ~$5 month).
Pros
- Speedy installation. Setup takes minutes.
- No coding required. Ideal for non-dev teams.
- Support included. Updates & help from the app vendor.
- Intuitive UI tools. Customize without learning code.
Cons
- Limited flexibility. Stuck with what the app offers.
- Extra cost. These connector apps usually have monthly fees.
- Feature constraints. Edge cases may not be covered.
- Vendor dependency. Reliant on third-party upkeep and support.
Method 2: Third-Party Connectors
Third-party connectors like Zapier and Make (formerly Integromat) are the master chefs of the integration kitchen. Imagine having a sous-chef who knows exactly:
- Which ingredients to grab.
- How to chop them.
- When to toss them into the pan.
All it takes is you not lifting a finger. That’s what these tools do for the apps.
They let you whip up “recipes” (aka Zaps or Scenarios) that connect Pipedrive and Stripe (and pretty much every other app in the ecosystem).
No complicated prep work, no line cooks. Just smooth, no-code automation that serves up the data exactly how you like it.
Best for
- Teams that are craving a quick, no-code recipe to get apps talking.
- Busy operators who want to automate simple workflows, like adding a new deal in Pipedrive when a Stripe payment hits the oven.
- Anyone who loves experimenting in the integration kitchen, mixing and matching different apps and triggers to taste.
- People who want to go from idea to served on the table in minutes.
Step-by-Step Guide
Note: In this example we’ll see how it works with Zapier.
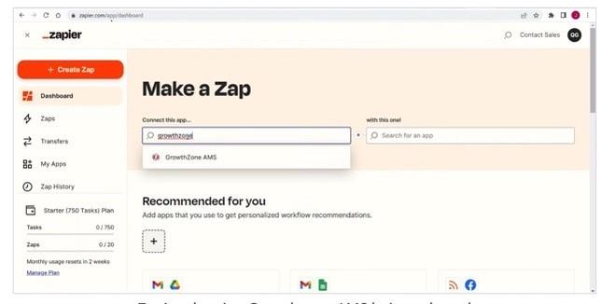
- Sign up and log in to Zapier
- Head to Zapier and create an account or log in
2. Create a new Zap
- Click Create Zap. This step opens up the new Zap setup interface.
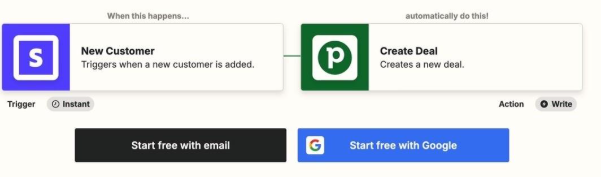
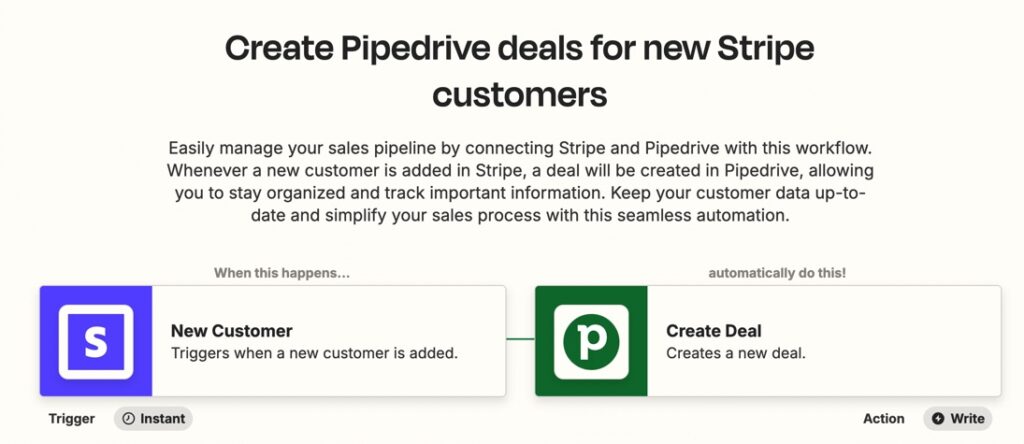
3. Select Stripe as the trigger app
- Search for Stripe, then choose your trigger event. For example, New Payment or New Custom.
4. Connect your Stripe account
- Zapier will ask you to sign in and authorize access to your Stripe account.
5. Set up trigger details
- Configure any filters or options. For example, only capture payments above a certain amount. Test the trigger to make sure Zapier pulls in sample data correctly.
Pros
- Speedy setup. You can build and launch automations in minutes.
- No coding required. Perfect for non-technical teams.
- Plenty of templates. Jumpstart with pre-made workflows for common use cases.
- Flexible combos. Connect hundreds of different apps beyond just Pipedrive and Stripe
Cons
- Extra cost. Plans can get pricey as your volume grows.
- Limited logic control. Less customizable than coding or advanced native integrations.
- Performance lag. Can be slower than direct integrations at high volume.
- Vendor dependency. Your automation relies on a third-party platform staying online.
Method 3: Custom Integration via API
Now, let’s imagine that you’re in the kitchen, but instead of using pre-made meal kits or store-bought sauces, you’re making everything from scratch.
You pick the spices, choose the veggies, and even decide how long to marinate the steak. That’s what building your own API integration feels like. Total freedom, but also total responsibility.
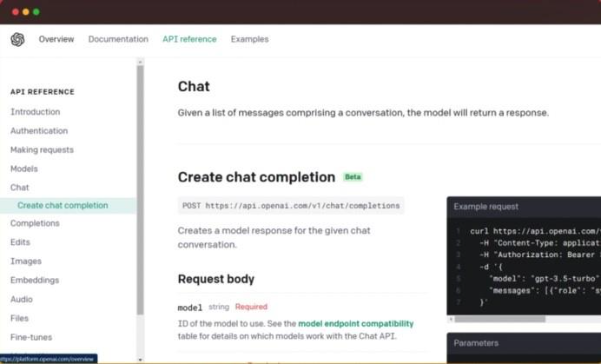
When you go this route, you’re not stuck with anyone else’s recipe. You get to decide exactly how the integration works, what it can do, and how it fits into your overall ‘menu.’ The best part? Both services offer robust REST APIs, which means you can push and pull data however you like.
It’s the ultimate “chef’s choice” option.
Best for
- Tech-savvy teams who love cooking from scratch.
- Companies that want a totally unique flavor (custom workflows, specialized features).
- Brands that want every detail of their end result to match the style.
Pros
- Full creative control. You can season and tweak everything to perfection.
- Total brand consistency. No one will mistake your product for anyone else’s.
- Super versatile. You can add as many features as you like, from AI search to smart recommendations.
Cons
- It takes skill and time. You’ll need a team that knows how to handle sharp knives (or in this case, code).
- More expensive up front. All that customization isn’t cheap, and maintenance is on you.
- Extra rules to follow. Like food safety in the kitchen, you have to keep an eye on data privacy and compliance.
Method 4: Third-Party Integration Platforms
Picture that you’re throwing a big BBQ in the park. You don’t feel like prepping every single dish from scratch, but you also don’t want boring takeout. So, you call up one of those fancy catering services. They bring the grill, the sauces, the salads, and all you have to do.
That’s exactly what using a third-party integration platform feels like. Instead of coding everything yourself, you let a specialized service handle the heavy lifting.
One of the good known in this space is Skyvia, which helps connect your systems and data sources without you sweating over every line of code.

Best for
- Folks who don’t want to code but still want to serve up something impressive.
- Teams that need to connect different data sources fast (like CRM, e-commerce platforms, or databases). Businesses that want a reliable, flexible way to automate workflows without building everything from scratch.
Step-by-Step Guide
What does this scenario look like?
- Source: Stripe . You have payment events, invoices, subscription statuses.
- Target: Pipedrive . You want to update deals, add activities, or create new leads based on Stripe payments.
Note: When a customer makes a payment or renews in Stripe, you can automatically create or update a deal in Pipedrive and even add the payment details to a custom field or as an activity note.
Let’s connect Stripe Customer and Pipedrive Person to create/update a deal per payment (tailored to a Person) based on this integration.
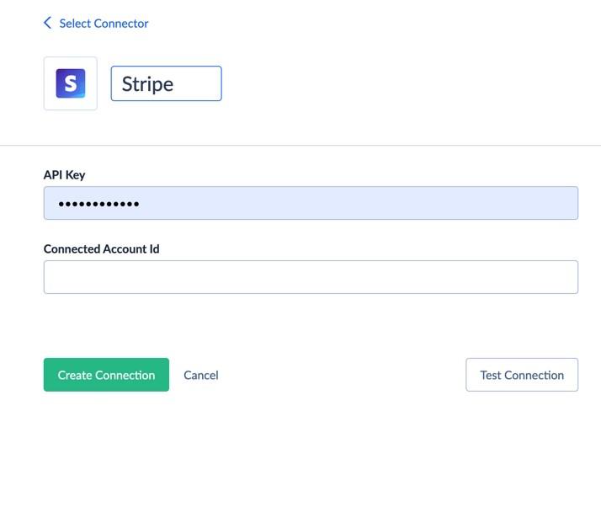
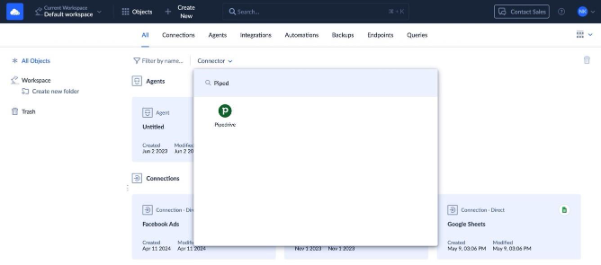
- Set Up Connections: Stripe & Pipedrive
- Create the Skyvia account or log in to the existing one.
- Go to +Create New → Connection.
- Click Connector. You may use the search keyword.

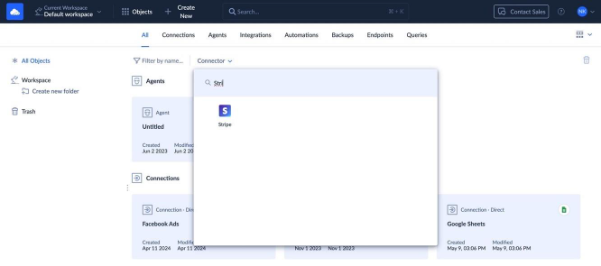
- Select Stripe as the source.
- Repeat the Connector step.
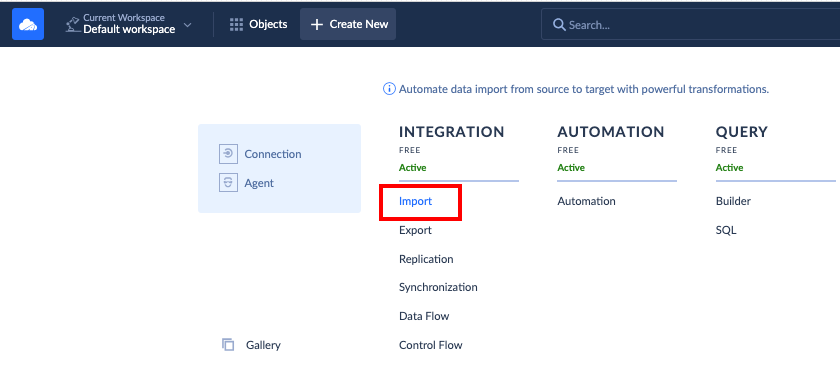
- Select Pipedrive as the target.

- Choose the integration scenario: Import or Synchronization.
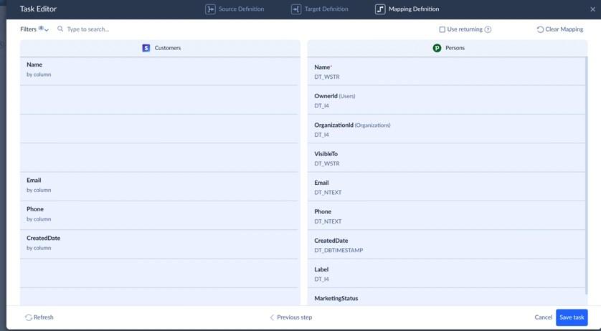
- Map Fields.
- In the mapping interface, link Stripe fields to Pipedrive fields, e.g., Stripe amount → Pipedrive deal value.
- Customer email → Pipedrive contact field.
- Set Schedule & Run Automatically
- Schedule the integration (hourly, daily, or real-time sync).
- Once activated, Skyvia automatically runs the process and logs every execution.
Pros
- No need to code. I t’s all point-and-click.
- Quick setup. You can go from raw ingredients to a finished dish in an afternoon.
- Plays well with many apps. Works with CRMs, databases, e-commerce platforms, and more.
Cons
- Limited flexibility for complex scenarios. If you need advanced technical setups, the learning curve can be steep, and you might need for more detailed tutorials.
- May require a paid plan for higher volume or advanced features. You can start free, but bigger data appetites need an upgrade.
- However, Skyvia offers a 2-week trial with full access to all features, so you can fully test if it fits your business before committing.
Popular Pipedrive-Stripe Integration Workflow
Imagine sitting in the park with an iced coffee, talking about how to stop your team from scrambling and chasing updates every time a payment comes in. That’s where these Pipedrive–Stripe workflows come in handy.
For example:
- SaaS companies. When a new customer subscribes in Stripe, automatically create a deal in Pipedrive and tag it with the subscription plan.
- Agencies & service providers. Move a deal to “Won” in Pipedrive, then automatically generate and send a Stripe invoice.
- E-commerce stores. When a high-value payment is received in Stripe, create a VIP follow-up task in Pipedrive to send a personalized thank-you or upsell offer.
- Event organizers. When someone buys a ticket in Stripe, log an activity in Pipedrive to trigger event prep workflows or follow-up emails.
- Subscription-based businesses. Sync Stripe subscription changes (upgrades, downgrades, cancellations) straight into Pipedrive so your sales team always knows customer status.
- Freelancers & consultants. Create a Stripe customer when a new person is added to Pipedrive, so you’re ready to invoice without manual setup.
Conclusion
No one wants to spend time fixing problems and prefers to focus on what really matters:
- Growing the business
- Taking care of customers.
Once everything is set up, it runs quietly in the background, giving you the freedom to think bigger and breathe easier. Whether you build it yourself or let Skyvia make it easy, choose what fits you best and make your Pipedrive–Stripe setup work exactly the way you want it in 2025.

F.A.Q. for Pipedrive and Stripe integration

Do I need coding skills to integrate Pipedrive and Stripe?
Nope. You can use no-code tools like Skyvia to connect them with just a few clicks.
What’s the difference between using Skyvia and a direct Marketplace app?
Skyvia gives you more flexible, custom workflows. Marketplace apps are simpler but usually offer fewer options.
Can I see Stripe payment information inside Pipedrive?
Yes. With the right setup, payment updates and statuses can appear as notes or custom fields in Pipedrive.
What data can be synced between Pipedrive and Stripe?
You can sync customer details, deals, invoices, payments, and subscription updates between both platforms.
